How to Upgrade Your Apple TV Hard Drive Using ATVCloner
Instructions on how to upgrade your Apple TV Hard Drive using ATVCloner for Mac.
Blancer.com Tutorials and projects
Freelance Projects, Design and Programming Tutorials
Tutorials,freelance,projects,joomla,php,mysql,wordpress,blancer.com
Instructions on how to upgrade your Apple TV Hard Drive using ATVCloner for Mac.
Where to find the direct links to the iPad Firmware Files for every released firmware version.
Instructions on how to jailbreak your iPod touch 1G using RedSn0w for Mac. Updated for the 3.1.3 firmware.
Instructions on how to set a more secure alpha-numeric passcode for your iPhone using iPhone Configuration Utility.
Combining Modern CSS3 and HTML5 Techniques
Just because some techniques don’t work in decade old browsers doesn’t mean that you shouldn’t be learning everything you can! Stay on the cutting edge, as we use everything from CSS shadows and animations, to HTML 5 mark-up and local storage, to utilizing jQuery to work with the Picasa API. We’ll also take advantage of the excellent jQuery library, and review some best practices when coding.
Give back to Nettuts and sign up for a Premium membership!


For those unfamiliar, the family of TUTS sites runs a premium membership service. For $9 per month, you gain access to exclusive premium tutorials, screencasts, and freebies from Nettuts+, Psdtuts+, Aetuts+, Audiotuts+, and Vectortuts+! For the price of a pizza, you’ll learn from some of the best minds in the business. Give back to Nettuts and sign up for a Premium membership!
Quick Tip: Understanding CSS Specificity
The “C” in CSS stands for cascading. This means that that style rules that show up later in the stylesheet will override rules which appear earlier. But this isn’t always the case. There’s something else you have to take into consideration, as well: specificity. In this quick tip, I’ll show you how to do just that.
CSS Specificity is basically this: the more specific your selector is, the more precedence it will have. To figure out which selectors are worth more, use this system:
#test { background: red; } /* specificity : 100 */

.item p { background: green; } /* specificity : 10 + 1 = 11 */

p { background: orange; } /* specificity : 1  */

body #wrap p { background: yellow; } /* specificity : 1 + 100 + 1 = 102 */
Visual Database Creation with MySQL Workbench
In today’s tutorial, you’ll learn how to use a visual database modeling utility to draw a database diagram and automatically generate SQL. Specifically, we’ll review how to use MySQL Workbench, a cross-platform, visual database design tool.
MySQL Workbench is a powerful tool developed by MySQL with three primary areas of functionality:
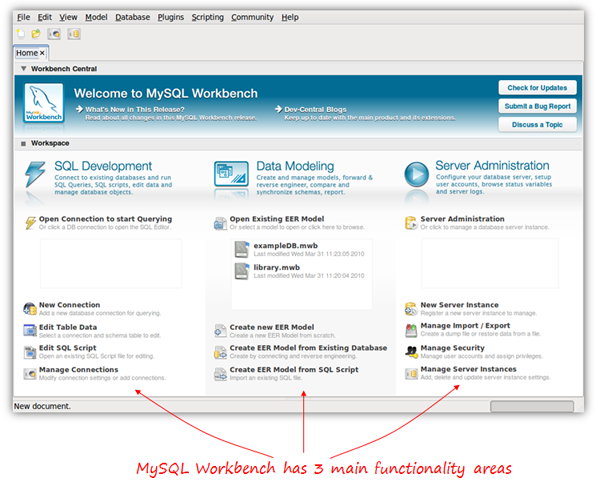
In this tutorial, we’ll focus on the Data Modeling aspect to create a database from scratch, and then have just a quick look at the SQL editor to execute our generated SQL script and create the database within MySQL.
MySQL Workbench is available for Windows, Linux and Mac OSX. There are two different editions: the Community OSS Edition and the commercial Standard Edition. The community edition is Open Source and GPL licensed, as you’d expect. It’s fully functional, and is the one we’ll be using in this article. The commercial edition adds some extra functionalities, such as schema and model validation or documentation generation.
Note: this tutorial is based on the Community OSS Edition version 5.2 (5.2.16), currently in beta release at the time of the writing (April 2010).
To learn how to use MySQL Workbench, we’ll use a very simple database for online classes as an example. Suppose a group of teachers want to offer online classes for several subjects, using Skype or any other video conferencing software. For our little project, we have decided that we need to store the following information:
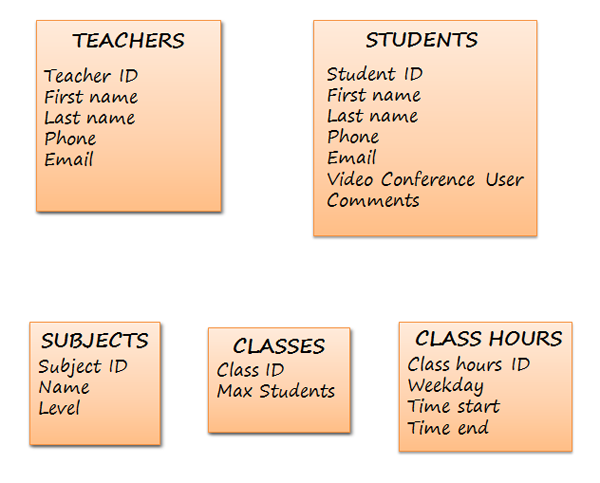
When drawing our diagram, we will need to know the relationships between these groups of data as well; so we better think about that now!
At this point, we have all the information we need to meet the star of this show…
It’s time to launch Workbench. In the data modeling part of the home screen, we click ‘Create new EER Model’, and the following screen appears:
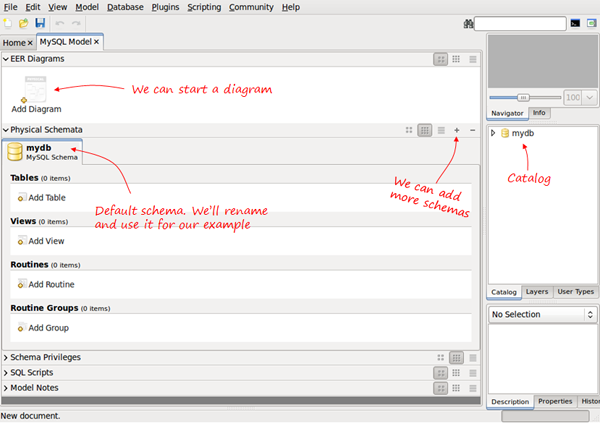
When we create a new database model, it contains the default mydb schema. We can rename it and use it as our DB schema. A database model can have several different schemas.
The catalog on the right will show every element in our schema, and allow us to drag and drop elements to diagrams if needed.
Having the separate sections for Physical Schemata and EER Diagrams, and the possibility to include several Schemas in one database model may be confusing. The next section explains these concepts and how they are related.
The physical schema contains all the necessary pieces to define the database: tables, columns, types, indexes, constraints, etc. This is what we are really defining. Every object added in the graphical model also shows up in the physical schema. It is, in fact, a visual way to define our schema.
We can have several schemas for the same database model in the same way we can have several databases in a MySQL server. Each schema will be a MySQL database. For example, in the next screen, we have two schema tabs:
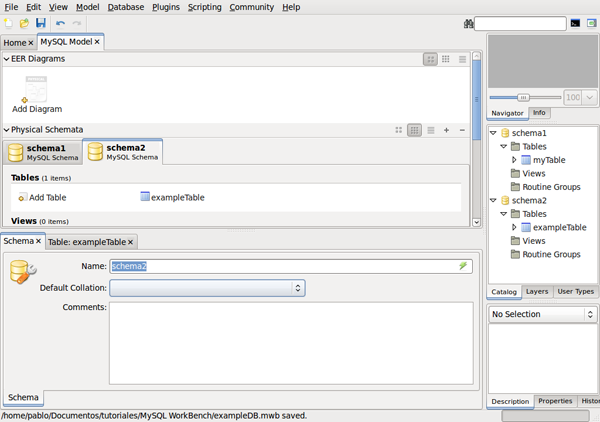
If we generate the SQL script, we will have two separate CREATE DATABASE statements – actually we will have CREATE SCHEMA which is just a synonym.
CREATE SCHEMA IF NOT EXISTS `schema1`;
CREATE SCHEMA IF NOT EXISTS `schema2`;
“EER stands for Extended (or Enhanced) Entity-Relationship. EER diagrams are just a way to model the data and the relationships between data using standard symbols”
They will be listed as databases within the MySQL server host when using SHOW DATABASES.
Now, what is an EER Diagram?. EER stands for Extended (or Enhanced) Entity-Relationship>. EER diagrams are just a way to model the data and the relationships between data using standard symbols. EER models can be complex, but MySQL Workbench uses only a subset of all possible graphical elements, because the purpose of this diagram (in this tool) is to have every element mapped to the physical schema.
We can use an EER diagram to define the whole database, or just small parts. For example, we can have a schema with five tables defined, and then create a new diagram to define two more tables using the visual editor. The diagram will contain only two tables, but those two tables will also be included in the schema, together with the previous five.
Back to our initial example; we have to rename the default schema by double clicking the name. At this point, we have two possibilities: we can start adding tables to our physical schema using the add table icon, or we can start an EER Diagram and add all the tables there.
I prefer to add a new diagram from the beginning and create my schema visually; however, in order to show how to do it with both methods, we are going to create the first two tables in the schema tab, and then continue with the EER Diagram.
When you click the Add Table icon, the table editor opens as a tab below:
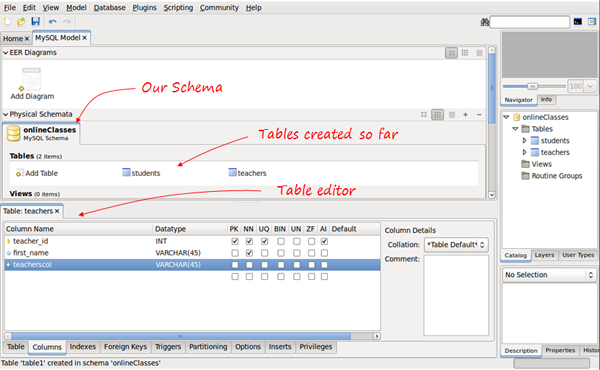
Using the table editor, we change the table name and switch to the columns tab (in the tabs below the editor) to enter our columns. We can choose the data type (there is a drop-down list with all the MySQL data types), assign default value, if needed, and we have seven checkboxes to mark any of the following properties:
This is one way to add our tables, though we can also create them using the diagrams. If we click the Add Diagram icon now, we will begin a new, empty diagram, and that’s not what we want. We want the two tables that we just created to be in the diagram.
If we go to the menu, select Model/Create Diagram from Catalog Objects, now we have our diagram, and are ready to continue.
Select the table icon on the left; the pointer changes to a hand with a little table. Next, click anywhere in the canvas to create a new table.
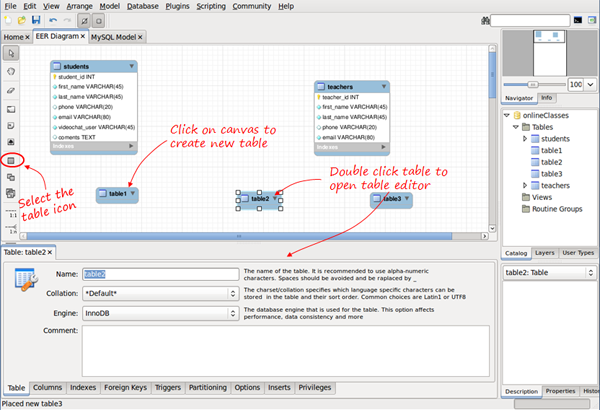
Now you just have to double click the table, and the editor tab appears to edit the name, columns, types, etc.- the same way as we did before.
After entering the column details for the new tables, we’ll be ready to start drawing the relationships.
In the vertical tool bar on the left, we have six tools available to create relationships.
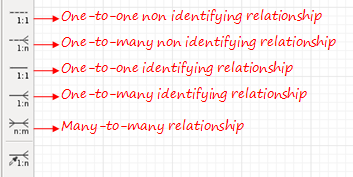
Don’t worry about the last one, we’ll explain it later. For the 1:1 and 1:n relationships, we have two different types of symbols: identifying and non identifying. What does that mean?
A relationship is considered identifying when one table is entirely dependent on the other to exist.
A relationship is considered identifying when one table is entirely dependent on the other to exist. A row in that table depends on a row in the other table. A common example is to have a separate table to store phones for users. It may be necessary to have it in another table, because there can be several phones for one user, but each row in that table is entirely dependent on the user – it belongs to the user.
You should be aware that relationships have some implications. If we want to create the physical tables in MySQL, relationships must be mapped in some way. There are a few rules to map relationships into tables:
Identifying relationships are typically used for the join tables created from a many-to-many relationship. These new tables are entirely dependent on the two original tables.
Also, in the case of 1:1 and 1:n identifying relationships, the foreign key introduced will be part of the primary key for that table, forming a composite primary key.
The good news is that MySQL Workbench knows these rules better than most of us. We just draw our lines, and the foreign keys or join tables will be automatically be created. We can also choose to do it manually, as we’ll see shortly.
To draw a relationship, click the icon, and then click the two tables to relate. For one-to-many relationships, click on the “many” side table first, and then on the “one” side table. Let’s see how to do it for the n:m teachers-subjects relationship, and for the 1:n teachers-classes.
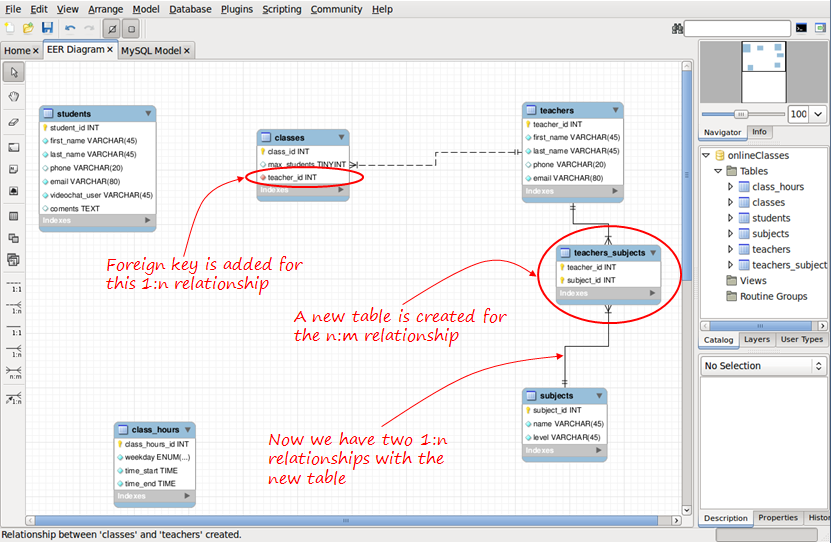
The default name assigned for the foreign keys, and for the join tables can be changed globally in Edit/Preferences/Model Tab, or only for the present project in Model/Model Options.
If we don’t want tables and foreign keys to be generated in this way, we can use the mysterious “sixth symbol.”

The “sixth symbol” creates a relationship using existing columns, meaning that you have already included the necessary foreign keys in your tables and created the necessary join tables (n:m mapping tables). Since we’ve already created these Join tables, we don’t need n:m relationships; only 1:n is available.
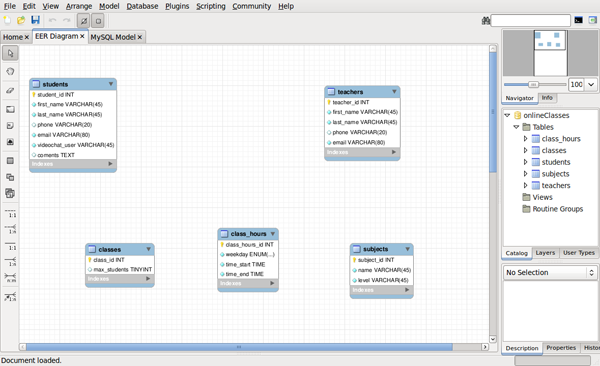
When we have all our relationships defined, our diagram should looks like so:
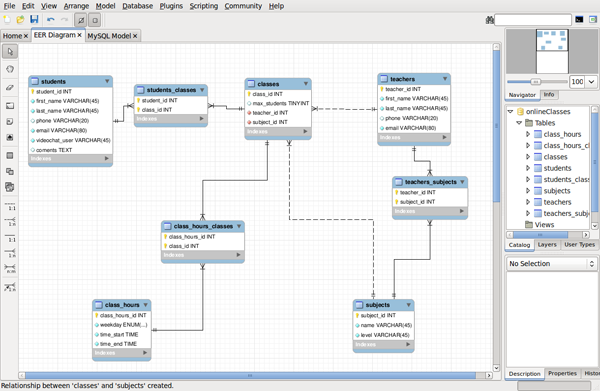
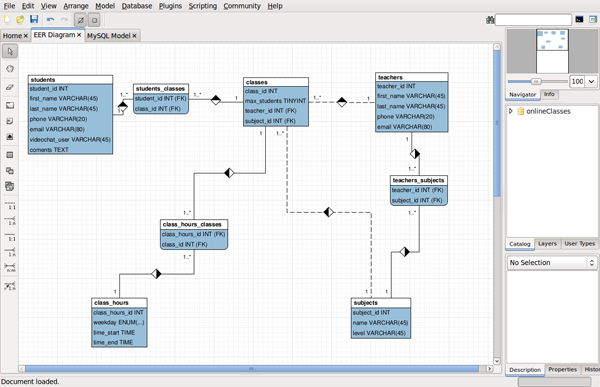
Be aware that we have been using the default MySQL Workbench notation for the diagrams, but you can change that in Model/Object Notation and Model/Relationship Notation. This is an example of our model in Classic notation:
At this point, our model is ready, and we can generate the SQL to create the MySQL database.
Select File/Export/Forward Engineer SQL CREATE Script. We are only three wizard screens away from generating our file!


We even have the option to review and edit the generated SQL before saving it:
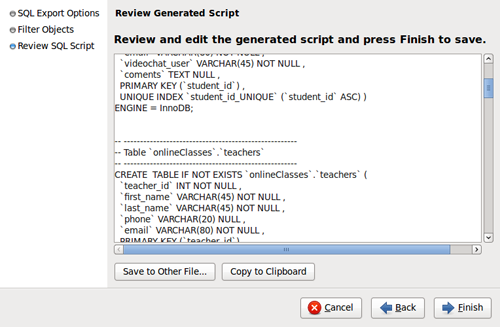
And that’s it. Clicking finish, the SQL script will be generated and saved. Now, we can use it in any way we wish. We can load it using the command-line mysql client:
mysql> SOURCE scriptName.sql
Or, we can use MySQL Workbench to finish the work, connecting to our MySQL server and running the script.
Select Database/Manage Connections from the menu, and click NEW.
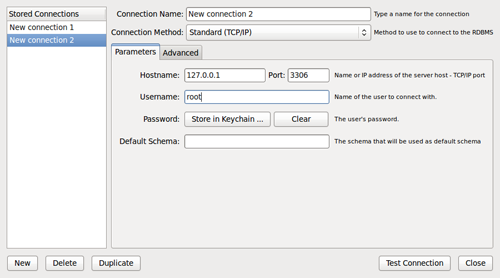
If you don’t want to set the password here, you’ll be prompted for it when needed. Click “Test Connection” to check if your parameters are correct, and then click close.
Now, to load the script, we’ll use the SQL editor. In the main menu select Database/Query Database; a window prompts you to select a connection, and then the SQL editor tab opens.
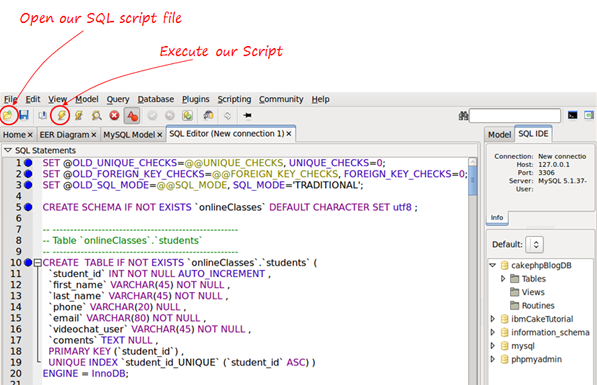
Now click the lightning icon to execute the SQL script, and your database will be generated!
We could also have generated the MySQL database directly from the model, without referencing the actual file, using Database/Forward Engineer from the menu; however, I find it useful to generate the script and then use it how I wish.
MySQL Workbench is an impressive tool. We have only seen a few basic possibilities in the data modeling part, and only peeked at the SQL editor in the second half of this tutorial. We learned how to create a database visually and draw diagrams that can be kept as documentation. You can export the diagrams as a PNG, SVg, PDF or PostScript file. Thanks for reading, and let me know what you think!
Crockford on JavaScript: The Complete Series
Douglas Crockford has been well described as the world’s foremost authority on JavaScript. His “JavaScript: the Good Parts” talks have been around for a while, but recently he concluded giving a five-part updated series, entitled Crockford on JavaScript. For any JavaScript developer, these videos are a must read; check them out below!
Magento for Designers: Part 2
Magento is a stunningly powerful e-commerce platform. In this miniseries, we’ll learn how to get started with the platform, getting to know the terminologies, setting up a store and all related aspects of it, and finally how to customize it to make it our very own.
In this second part, we’ll focus on short, simple steps to get your Magento store from installed to ready for deployment, which will cover setting up your products, product categories, taxes, shipping, payment gateways and much more! Excited? Let’s get started!
In the last part, we saw what Magento is, what features it brings to the table, how to install it and finally how to import details regarding your existing data.
Today, we’ll fast track through the set up process by eliminating all the fat and instead focusing on only the very important elements. In these short, simple steps, your fresh installation of Magento will turn into a fully functional e-commerce web site.
In the previous part, we looked at how to bulk import products but that method may not be suitable for all scenarios. Hence we’ll build up our catalog and store from scratch.
Creating categories for products and then using them for organizing them will definitely help you in the long run. Creating a category is very simple. Under the catalog menu, click on Manage Categories


The resulting form lets you manage the various properties of the category.
The Name field lets you set a name for your category. You can always refer to it by ID but a name is always easier to use. You are allowed to use any character here.
The Is Active toggle lets you decide whether to make it active straight away or wait for later. This is especially useful when you are making advance preparations for a special sale and do not need to make it live right away.
The Description and Image fields are self explanatory.
The Page Title, Meta Keywords and Meta Description fields are for SEO purposes and let you set and manage these attributes on a per-category basis.
For a quick setup, these are all the fields you need to complete. The rest of the options in the other tabs are rather advanced and are beyond the scope of this article.
Products form the base of your store and so we’ll spend a little extra time here. To add a product, click on the catalog menu, click on Manage Products.

There are a number of types of products you can create in your store:
In the interest of getting our store up and running as quickly as possible, I’ll cover simple products and downloadable products here. In all honesty though, these are all you’ll need in most cases. We’ll take a look at how to create a simple product first.

You get a total of eleven tabs chock full of fields to enter data about your product. For now, you can safely ignore most of them and focus instead on the fields that matter.

The General tab covers the bulk of the necessary information you need to input to get started. Key in values for the name, description, short description, SKU and weight fields.
The status option lets you decide whether the product is enabled or disabled from the onset. For example, you can set the products status to disabled if it’s a special product that is meant to be sold only in a certain period.
The visibility options lets you fine tune where the product appears. For instance, you may want a product to appear in the catalog but not in a search or vice versa. You can set that option here.

In the Prices tab, you only need to fill out two fields. The price field is self explanatory. Tax class lets you define to which tax class the product belongs to. I’ll talk about taxes a little bit later below.

Setting up images for each product is not necessary but is highly recommended. The Images tab lets you pick out images for the product.
Each product needs 3 images. A big image, a smaller version and finally a thumbnail for displaying in search listings and so on.
Each image can have either or neither of these three. You are also allowed to have more than one image for a product. Magento provides a simple Flash based uploaded for you to directly upload the images you need.

In the Inventory tab, you can fill out the quantity you currently have stocked so the core engine can let the customer know when an item is sold out.

Finally, you’ll need to define which category the product belongs to. I only have a solitary category in my local server but you can nest it as needed.
Feel free to explore the others options present in each tab but these are the bare minimum you need to create a simple product.
For a downloadable product, you’ll need to look into one more tab: the Downloadable Information tab.

This tab let you do a number of things including letting you upload or point to a file you want as the demo or the main product, decide whether purchasers are allowed to share the link, how many times the purchaser is allowed to download it and so on. Once you’ve filled this out, you can sell digital, downloadable products like, say, music, lesson plans, photographs and so on.
Using Magento, you can account for a myriad combinations of different locations and their resulting differing tax percentages. Setting up tax rates is easy. Under the Sales tab, click on Tax -> Manage Tax Zones and Rates and then click on the Add New Tax Rate button.

Now we’ll configure the core engine so that it adds a sales tax of 6% whenever a customer from Florida purchases an item.

The Tax Identifier field lets you name the rate to your choice. Next, choose your country and if necessary, drill down to state and finally to the zip code if taxes differ by zip codes.
You can then specify the tax rates for the location you’ve selected. If instead, the differing taxes only apply to a range of post codes, you can specify them in the range field.
For basic use, setting up a tax rate alone is sufficient. But if instead you want to drill down further; say, change the tax for different items or offer differ rates for wholesales purchasers, Magento still lets you do that. You need to make use of Customer/Product classes and then define rules for them. This feature, while simple, requires a bit more explanation to get started. We’ll look at this feature in another part of this series.
Magento can automatically calculate the shipping rate based from where your warehouse is and the customer’s address. First, you need to tell Magento where you’ll be shipping it from. On the System menu, click on configuration. The shipping settings can be found under the sales section on the left.

First, you’ll need to let the system know where you are located from or where your warehouse is so Magento can use it as a starting point in calculating the shipping rate.

Next, click on the shipping methods option. You can find it right under shipping settings.
Now, you can choose to charge a flat rate or to let Magento query a number of shipping services to find out their rates.

Here, you can modify a number of options including naming it, choosing whether the rate is calculated per item or per order, how much is to be taken for handling, the price itself and so on.
And here is where Magento shines. You can specify this is as an option for all allowed countries or just choose the countries you want to allow individually.


If instead, you’ve decided to let Magento decide the rate based on what each shipping company charges, you can select the service you like. Each of them, however, share the same options.
Most of the fields are rather self explanatory so I’ll go over the more pertinent ones here. First up, notice the gateway URL field. This is where the Magento polls for shipping rate data. If by chance, it gets outdated, feel free to update this field. You can also specify which types of shipping methods are allowed. As before, you can allow/disallow each method of each supported shipping company individually.
Please note that the User ID field is specific to each shipping company and may require registering with them. Depending on the company, DHL for instance, you may also be required to provide an access ID and password.
Magento supports a number of payment methods right off the bat to simplify your life. Only the check/MO method and saved CC method are enabled by default so you’ll have to pop-in and enable the payment methods you need on the settings page.
You can find this on the sales portion of the configuration page. In case you forgot, you can reach this page through System->Configuration.

For example, to enable Express Checkout for Paypal account holders, you’d just need to click on the appropriate method and change the enabled field to yes.

If you’ve chosen a Paypal payment method, you’ll also need to provide your Paypal email address and other credentials depending on which method you chose.

Google Checkout and Moneybookers both get their own section, in case you’re wondering. Just like with Paypal, enabling them can be done in two simple steps.
Magento provides a robust inventory management system you can use of to avoid problems in the future. You can access it by clicking on the the inventory menu in the catalog section of the configurations page.


Here, you can specify a number of options including when to mark an item has sold out, maximum numbers of items allowed in the cart, whether back orders are allowed and so on.
You can also denote whether you want your inventory to be adjusted when an order has been placed. If instead you want to manually modify your stock when a product has been shipped out, disable this. You can also specify whether sold out items are displayed and the threshold number of items before an item is marked as out of stock.
Now that we’ve got the brunt of the work done, we can focus on the smaller, often forgotten things. Analytics, for instance.
First, you’ll need to enable Google Analytics. You can do so by going to the Google API link of the sales section of the configuration page. Here choose to enable GA and keyin your account number.

Now, Magento automatically inserts the required Google Analytics code into each page of your web site.
The final step now is to make our store as SEO friendly as possible. While most of the onsite parts of SEO are dependant on the theme you use, user friendly, SEO friendly, semantic URLs are something you can do yourself through tools provided by Magento.
First, you’ll need to enable rewrites. You can do so by clicking on the web link under the general section of the configuration page.

The relevant option can be found under the SEO link.
Now, we can create our own custom URLs. Point to catalog->URL Rewrite Management.

The resulting form lets us manage our rewrite.

The type, ID path and target path are read-only fields. The request path however lets you keyin our own request path. Essentially, when a URL pointing to request path is requested by the browser, internal rewrites reroute it to the target path.
You can also denote whether the rewrite is permanent or temporary.
And we are done! We looked at how to convert your fresh installation of Magento into a fully working e-commerce powerhouse. We review how to set up your categories, products, taxes, shipping and much more. Hopefully, this has been useful to you. I’ll be closely watching the comments section so chime in if you’re having any concerns or questions.
Questions? Nice things to say? Criticisms? Hit the comments section and leave me a comment. Happy coding!
Quick Tip: Notable New Features in Dreamweaver CS5
If you’re a Twitter user, it was difficult not to be aware of Adobe’s CS5 global launch presentation. While they did an excellent job of promoting Photoshop and Flash, other applications, such as Dreamweaver, only received limited coverage. Nonetheless, take a look at some of the awesome new features in Dreamweaver CS5, slated to be released in mid-May.

Adobe, for some time now, has offered a helpful, and free, service called Browserlab. For those unfamiliar, Browserlab is a Live service that allows you to view snapshots of your website in a variety of browsers, not too dissimilar from Browsershots.org. Luckily, with CS5, this service is fully integrated into Dreamweaver, even allowing us the ability to stack multiple snapshots of our designs, from various browsers, on top of one another. This is especially helpful for those of us with pedantic attentions to detail.
“Preview dynamic web pages and local content with multiple viewing, diagnostic, and comparison tools.”

Perhaps the most welcomed and exciting new addition to Dreamweaver, there is now a “live view” option, when working on, for instance, templates for a variety of CMSs, including WordPress! This means that you can browse pages, populated with postings from your database, directly within Dreamweaver. How cool is that?
“Enjoy authoring and testing support for content management system frameworks like WordPress, Joomla!, and Drupal.”

This is something to be excited about. WIth this latest release, we now can utilize intellisense on site specific coding. For example, imagine being able to access the various WordPress functions directly from the intellisense pop-up? Pretty cool!
“Benefit from code hinting on nonstandard files and directories in Dreamweaver..”
This new feature is being promoted heavily, and, while it might definitely prove to be appealing to some designers and non-programmers, I doubt our particular community will utilize this new addition. Essentially, it allows you to design and build websites with minimal coding experience.
“Leverage integration between Dreamweaver and the Adobe Business Catalyst® service (available separately) to deliver powerful online businesses without programming.”

The Dreamweaver team has added a new feature which allows us to, after clicking the “Inspect” button, click on various elements on our page, and immediately view the applicable styling associated with that particular element. If you’re familiar with the Web Developer Toolbar, and Firebug, you’ll be quite familiar with this. Nonetheless, it’s a nice addition to have available from directly within the IDE.
“Visually display the CSS box model in detail, and easily toggle CSS properties without reading code or needing to use a separate utility.”
If you didn’t catch the live unveiling, you can watch it here. So what’s the consensus? Has Dreamweaver finally come through for us? Will it take the place of your IDE of choice?
Creative Sessions: A New Set of Educational Posts Every Month
We’re very passionate about teaching creative skills here at Tuts+, so over the last year we’ve been planning a new stream of educational content focused on the "Why?" instead of the "How". Today we’re unveiling the newest addition to the Tuts+ family: Creative Sessions.
 Every month we’ll be running a two week ‘Session’ on a creative topic. Our first Session, beginning today, is on Character Illustration, and future Sessions will be on varied topics like interface design, illustrative typography and creative freelancing. Unlike regular Tuts+ content, Sessions content is more theoretical, opinion based and will often cross many disciplines.
Depending on the Session, each specific article will fit into one of our ten educational sites (including FreelanceSwitch and WorkAwesome). So they will be published on the appropriate site, while our central site Sessions.tutsplus.com/Creative will provide the hub for each Session. There you will be able to track each Session, grab the monthly wallpaper, participate in a community project, subscribe to the RSS feed, follow CS on Twitter and give feedback (or praise!) for the Session.

Sessions is a bit of a new take on teaching online and is one we hope will be really successful. It’s going to really take advantage of the increasing diversity of our Tuts+ network, meaning that for example we could have a session on web design that might have a ‘freelance web design’ post on FreelanceSwitch, a ‘build a web design’ post on Nettuts+, a ‘optimize a web design for the iphone’ on the upcoming Mobiletuts+ and much more!
Because it’s so new, you can expect to see us tweak and improve the model over the next year or so. The content is all free, and like the rest of Tuts+ will remain so. At some point we’ll investigate adding either a bit of premium content to each Session or possibly extended courses for subscribers to help pay for it all!
Finally each Session will feature cover artwork by a talented designer or illustrator. The artwork will be downloadable as a wallpaper and will help give each of our Sessions a bit of personality!
Sessions is already bubbling with activity. You can download a gorgeous desktop wallpaper by Ryan Putnam (Rype), take part in our ‘Create an Antihero’ community project, or dive straight into the fully-illustrated Principles of Cute Character Design by Sascha Preuss, exclusive to Creative Sessions.
 Our Creative Sessions hub-site displays only one ad on every page – an excellent opportunity for your product to cut through the noise and reach its target market. Create a campaign with FusionAds to be seen on Creative Sessions and many other high quality creative sites.
If you’d like to advertise elsewhere on the Tuts+ network, we are big fans of BuySellAds and you can purchase ad spots by heading over and searching for your favourite site!
 Typography is a very important element to design, and it’s quite a shame that for the past decade we’ve resorted to using images to display this element, without having the flexibility to define different fonts outside of the 13 or so web safe fonts. In the past few years, however, we’ve seen a growing trend towards forcing new typefaces on the web. CSS defines a property for browsers to support a property called @font-face which lets the developer define new typefaces and include the original font file for the browser to download and render the site with. Support for this feature has been implemented in Safari already and is due to release with the next versions of Firefox and Opera. Though this is definitely good news and progress in the right direction, a few issues stand in the way:
Until font-face is fully adopted, web developers must resort to complimentary or supplementary solutions to make non-traditional typefaces work. There are few major flash and javascript solutions in existence that offer solutions with different approaches to displaying these typefaces. The three major typeface scripts that I am going to discuss are SIFR, FLIR, and Cufón. Before diving into details about each I’d like to point out that all of these solutions that I discuss are 100% SEO friendly, and all require JavaScript (and flash in the case of SIFR) but degrade to standard markup if JS is not enabled, also note that each of these play well with jQuery.
First I must address the acronym, thought not the most relevant seeming, “Inman” is referring to Shaun Inman who originally conceived the idea of using the DOM and Flash together to support non-traditional typefaces. SIFR uses a flash object to render to the font face, and then Javascript to identify the DOM and replace the text as specified.
Some people complain that SIFR is harder to implement, but if you’re a front-end web developer it’s vital to learn and master new technologies including really basic flash. All you have to do is open the flash file included in the zip, change the font of the text to the font you want to use, and then publish it. Instructions are included on how to do this and if it is “too challenging” than you’re in the wrong field!
Many have also commented and argued that SIFR is no more secure to stealing a font file and using it on your website. While I do agree with that statement, the issue is a legal matter. Like it or not, and argue it as you may, Adobe Flash is legally allowed to embed and use fonts that the developer has purchased. This is not true for any of the others.
Using PHP (and the GD library) FLIR renders text into a font of your choice by reading the text in a DOM and sending a request to the server with that string and returning an image of that text rendered in the new font. It’s a very clever idea, and works behind the scenes, but it’s not without it’s quirks.
While FLIR is fast and efficient with few flaws, one restriction I cannot overlook is the requirement for PHP and GD on the server. Many corporate websites (addressing the big guys, not the freelancers with this one) work exclusively with .NET on Windows/IIS servers without PHP installed at all. This eliminates FLIR from the mix for many websites unfortunately. In addition, FLIR disables the user to be able to select text. This is not a huge draw back if used on headings, but if used on a even body of text then you’re killing usability.
Cufon is basically a new and improved version of Typeface.js, with a focus on faster and easier implementation. Cufon uses the browser to draw vector objects using VML (Vector Markup Language) for Internet Explorer and the HTML 5 Canvas element for the more advanced browsers.
For many, Cufon is the best solution to work with. It allows for rendering on the fly, and works well for a developer to match a design without having to replace each heading with an image. Cufon even works quickly with large bodies of text! One thing I remain disappointed about is text selection; if this library aims to provide a solution for larger bodies of text, then it seems that text selection is a must.
As I have tested and worked with Cufon, I recommend it for the developer looking for a quick solution but only for personal or non-profit website. I’ve talked with a few professionals including a lawyer and confirmed that Cufon is not a legal solution for font-embedding on ANY website, but that unless you’re developing a large profile commercial site, you should be safe to use it freely.
Magento for Designers: Part I
Magento is a stunningly powerful e-commerce platform. In celebration of ThemeForest’s new Magento category, this mini-series will you teach how to get started with the platform, getting to know the terminologies, setting up a store and all related aspects of it, and finally how to customize it to make it our very own.
In this first part, we’ll get to know what Magento is, installing it, and importing some products. This is aimed expressly at the beginner; so you need not worry about lacking the requisite skills. We’ll walk you right through! Excited? Let’s get started!
Running an e-commerce site is a daunting task what with almost all of the current platforms being lumbering beasts ill-suited to current standards. Magento promises to fix this and a lot more.
Magento is an extremely powerful and feature filled e-commerce platform. And it’s open source to boot! It comes filled to the brim with all the features and tools you’d need to get your e-commerce web site up and running as quickly as possible.

Magento is replete with a number of features which are hard to find or maybe even unheard of in most of its competitors. Salient ones include:
Often used payment processors including Paypal, Google Checkout, USAePay and Authorize.net are supported along with support for traditional methods such as credit cards, money orders and checks. Plenty of modules are also available to make it works with a myriad other payment processors.
All the features you’d expect out of a mature product including 1-click checkout and full SSL support are present.
Magento provides complete analytics and reports for your stores. No need to use a third party solution anymore!
Out of the box, you can setup the store so that a customer can rate an item up or down and leave a review.
Magento is 100% Google friendly and supports Google Site maps to boot.
A number of different promotional options including coupons and discounts can be made use of right off the bat.
There are truly too many features to cover in a single article. To be frank, you’d need an entire book to cover what Magento can do. Magento almost has every facet covered.

Now that you’re excited about Magento, you probably can’t wait to get started. But before that, we need to choose which version to pick.
The Enterprise edition is for organizations running mission critical stores. It comes with 24/7 support and numerous features you’d expect out of an en enterprise level platform including a more robust CMS system, support for gift certificates and more. But on the flip side it weighs in at $11,125 per year.
The Community version meanwhile is completely free to download and use and you’re at complete liberty to modify it to suit your needs. The only thing you’d be giving up will be the robust support but the active community more than makes up for it.
We’ll be taking a look at the community edition today.
Magento has modest server requirements but it doesn’t hurt to make sure we have everything in order. Here are the official requirements:
There are ways to make it work with PHP 4 but honestly, it’ll be easier in the long run to just upgrade your PHP installation.
First, you need to obtain a copy of Magento. If you’re a SVN person, checkout a copy from http://svn.magentocommerce.com/source/branches/1.4. Else, you can just it get it from here.

We also need a database for Magento so we’ll set it up as it downloads. I’m assuming you already have a LAMP setup in place.

On successful database creation:
 I’m making a note here. Huge success!
We’ll need to import some sample data to our newly created database before we install Magento.

First up, download the SQL for the data.

Import it through phpMyAdmin and let it do all the rest.

Now we can move on to the actual installation. Magento, being a mature platform, has a relatively simple installation process. All you need to do is input a few values, click on the continue button and you’ll be on your way to a working Magento installation.

First, up we need to accept the license agreement. It’s mostly boilerplate but give it a quick read. Finally accept the terms and click on the continue button.

Set up your location, preferred currency and time zone in the next screen. You can, of course, change all these later through the administration screens.

Like me, if you’re daft, you might have forgotten to enable some of the PHP extensions Magento needs. In that case, enable the extension Magento needs and then retry.

You can now input the database credentials Magento needs to set it all up. You can also adjust the base URL of the store and the path to the administrative panel.
You can also set up clean SEO URLs right off the bat here.

Finally, you need to setup your admin account so you can manage everything. Magento needs an encryption key for encrypting sensitive data. If you have one at hand, type it in. Else let Magento generate one for you.

And we’re done. Magento has been successfully been installed.
If you’ve tried logging on to your fresh installation, you’ll get errors asking you to enable your cookies. This is because browsers generally tend to not store cookies for URIs without a period in it. localhost thus fails to store a cookie which leads to problems logging in.
Solutions to this problem range from using 127.0.0.1/magento instead of localhost to modifying Windows’ host file to manually redirect it. Nonetheless, since this is only going to be the test setup, we can just bypass said cookie-check.
Open up Varien.php at magento\app\code\core\Mage\Core\Model\Session\Abstract and find the following snippet starting at line 77:
// session cookie params
        $cookieParams = array(
            'lifetime' => $cookie->getLifetime(),
            'path'     => $cookie->getPath(),
            'domain'   => $cookie->getConfigDomain(),
            'secure'   => $cookie->isSecure(),
            'httponly' => $cookie->getHttponly()
        );

        if (!$cookieParams['httponly']) {
            unset($cookieParams['httponly']);
            if (!$cookieParams['secure']) {
                unset($cookieParams['secure']);
                if (!$cookieParams['domain']) {
                    unset($cookieParams['domain']);
                }
            }
        }

        if (isset($cookieParams['domain'])) {
            $cookieParams['domain'] = $cookie->getDomain();
        }
Now comment out the relevant parts like so:
// session cookie params
        $cookieParams = array(
            'lifetime' => $cookie->getLifetime(),
            'path'     => $cookie->getPath(),
            'domain'   => $cookie->getConfigDomain(),
            'secure'   => $cookie->isSecure(),
            'httponly' => $cookie->getHttponly()
        );

       /* if (!$cookieParams['httponly']) {
            unset($cookieParams['httponly']);
            if (!$cookieParams['secure']) {
                unset($cookieParams['secure']);
                if (!$cookieParams['domain']) {
                    unset($cookieParams['domain']);
                }
            }
        }

        if (isset($cookieParams['domain'])) {
            $cookieParams['domain'] = $cookie->getDomain();
        }*/
We’re all but done here. We’ve installed Magento and added some sample data to get a taste of the platform. But it’d be more useful if we could import some of our own products before leaving. For a few, manually importing them shouldn’t be a problem. But when they move into the tens, this should be a problem.
To that end, this simple technique should come in handy. There are, of course, more sophisticated ways to import data but they require a tad more Magento expertise so we’ll be tackling it later on in the series.


Study the structure of the CSV. Once you’re understood it, you can easily just add products directly to the CSV file. Feed it into a spreadsheet program to make this part even more easier.

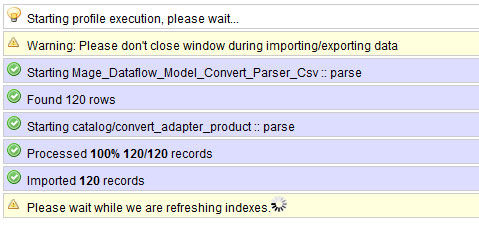
And we are done! We looked at what Magento is, the features it offers, how to install it, how to get some sample data in and finally how to get our own product data in. If you think it was a little too beginner level, fret not. This first entry is aimed primarily at the designer who wants to get his/her feet wet with Magento. We’ll be ramping up the difficulty as the series moves forward.
Questions? Nice things to say? Criticisms? Hit the comments section and leave me a comment. Happy coding!
Did you know that your friendly neighborhood ThemeForest sells premium quality Magento themes? Whether you’re a skilled Magento developer looking to start profiting from your efforts, or a buyer, hoping to build your first eCommerce store, we’ve got you covered!
How to display Twitter-like “time ago” on your WordPress blog
The first thing to do is to create the function. To do so, paste the following into your functions.php file:
function time_ago( $type = 'post' ) {
	$d = 'comment' == $type ? 'get_comment_time' : 'get_post_time';
	return human_time_diff($d('U'), current_time('timestamp')) . " " . __('ago');
}
Once done, you can use the function in your theme files:
<?php echo time_ago(); ?>
Thanks to UpThemes for this trick!
Looking for WordPress hosting? Try WP Web Host. Prices starts at $5/month and you can try it for free!
How to display Twitter-like “time ago” on your WordPress blog
8 useful code snippets to get started with WordPress 3.0
Custom post type are an incredible step forward for WordPress, because it will allow developers to create post types according to their needs.
For now, we have posts, and pages. With WordPress 3.0, we’ll be able to create a new post type called products, where a client can sell his products only, while regular post for his blog.
Creating a custom post type is easy: All you have to do is to open your theme functions.php file and paste the following:
$args = array(
        'label' => __('Products'),
        'singular_label' => __('Product'),
        'public' => true,
        'show_ui' => true,
        'capability_type' => 'page',
        'hierarchical' => false,
        'rewrite' => true,
        'query_var' => 'products',
        'supports' => array('title', 'thumbnail')
);
register_post_type( 'album' , $args );
Once you saved the file, login to your WordPress dashboard and have a look at the navigation on the left: A new post type, named Products, has been added.
Source: http://codex.wordpress.org/Function_Reference/register_post_type
In the previous example, I’ve shown you how to create a custom post type, which is pretty useful to use WordPress as a real CMS and not a simple blog publishing platform.
Now, let’s see something a little bit more complex, but extremely interesting: Creating a custom post type associated with custom taxonomies. For those who don’t know, a taxonomy is a term (such as category, tag or anything else) related to posts. For more information about taxonomies, you should have a look at WordPress Codex.
In this example, we’ll create a custom post type named Albums, which belong to “Genres” (the custom categories) and have “Performer” as tags. This snippet has to be pasted in your functions.php file. With those 27 lines of codes, you can create a fully functional music albums archive. Ain’t that powerful?
function post_type_albums() {
	register_post_type(
                     'albums',
                     array('label' => __('Albums'),
                             'public' => true,
                             'show_ui' => true,
                             'supports' => array(
                                        'post-thumbnails',
                                        'excerpts',
                                        'trackbacks',
                                        'comments')
                                )
                      );
// Adding the Custom Taxonomy for Genres. Here we can create categories specific for this post type.
	register_taxonomy( 'genres', 'albums', array( 'hierarchical' => true, 'label' => __('Genres') ) );

// Adding the Custom Taxonomy for Performer. Here we can add tags specific for this post type.
        register_taxonomy( 'performer', 'albums',
		array(
                         'hierarchical' => false,
			 'label' => __('Performer'),
			 'query_var' => 'performer',
			 'rewrite' => array('slug' => 'performer' )
		)
	);
}
add_action('init', 'post_type_albums');
Source: http://wpspecial.net/2010/03/how-to-add-custom-post-types-in-wordpress/
Now that you’ve learned how to create custom post types, the next step is to learn how to retrieve them from the WordPress database and display it on your blog.
Good news for developers, there’s nothing hard or new in the process. Custom post types can be retrieved easily, using the WP_Query object.
The following example will create a custom loop which will get only the albums custom post type.
<ul>

<?php global $wp_query;
$wp_query = new WP_Query("post_type=albums&post_status=publish");

while ($wp_query->have_posts()) : $wp_query->the_post(); ?>
    <li><a href="<?php the_permalink() ?>" rel="bookmark"><?php the_title(); ?></a></li>
<?php endwhile; ?>
</ul>
One of the most exiting new feature of WordPress 3.0 is definitely multisite management. In brief, with a single installation of WordPress you’ll be able to run a network of WordPress blog. How cool is that?
To take advantage of this feature, simply paste the following line of code in your wp-config.php file. This file is located at the root of your WordPress install.
define('WP_ALLOW_MULTISITE', true);
Source: http://wptheming.com/2010/03/wordpress-3-0-enable-network/
Most of the top blogs of the industry do not have a single author but a team of different contributors. WordPress allows you to create author pages, but WordPress 3.0 is introducing a new function which will allow you to use different templates for different authors, like we can currently do with categories.
All you have to do is to create an author page named author-XX.php where XX is either the author ID or nicename. For example, if your user nicename is “john”, you’ll have to call the file author-john.php.
Source: http://codex.wordpress.org/Function_Reference/get_author_template
WordPress 3.0 is introducing a new feature that will for sure be loved by non tech-friendly users: Custom background. The feature allows the user to upload a background in his WordPress dashboard, specify its position, and automatically have it added to his blog.
Of course, the theme used by the blogger has to support this feature, otherwise the uploaded background will not be visible. To do so, simply open your functions.php file and paste the following line:
add_custom_background();
WordPress features a WYSIWYG editor, which allow you to see text in bold, italic, and so on. But some people want more, such as being able to visualize their blog post in the blog font and colors.
This new feature allows you to create a css file (named editor-style.css in the example below) and link it to the editor for a better WYSIWYG rendering. Simply paste this code snippet to your functions.php file.
add_filter('mce_css', 'my_editor_style');
function my_editor_style($url) {
  if ( !empty($url) )
    $url .= ',';
  // Change the path here if using sub-directory
  $url .= trailingslashit( get_stylesheet_directory_uri() ) . 'editor-style.css';

  return $url;
}
Source: http://azaozz.wordpress.com/2010/01/02/can-themes-style-the-visual-editor/
WordPress 3.0 is going to feature a totally new menu system, which will allow users to add only the desired pages, add categories, and more. Good news for theme developers; adding WP 3.0 menu support to your themes is extremely easy.
To do so, open functions.php and add the following line:
add_theme_support( 'nav-menus' );
Once added, you can use the brand new wp_nav_menu() function in your theme files:
wp_nav_menu('sort_column=menu_order&container_class=navigation');
As you can see, it accepts the same kind of parameters than the good ol’ wp_list_categories() function.
Source: http://wpspecial.net/2010/04/menu-support-for-wordpress-3-0-themes/
Like CatsWhoCode? If yes, don’t hesitate to check my other blog CatsWhoBlog: It’s all about blogging!
8 useful code snippets to get started with WordPress 3.0