Facebook Hopes to Revolutionize PHP with “Hip Hop”

Facebook Hopes to Revolutionize PHP with “Hip Hop”

Little did we know that, for the last six months, Facebook has made use of a custom compiler for PHP that they refer to as “Hip Hop.” Essentially, it takes your PHP source code, and converts it into C++, and is then compiled with G++. As a result, they’ve managed to reduce their CPU usage by 50%. This project has apparently been in development for the last two years, but has only today been released to the community.

“HipHop for PHP isn’t technically a compiler itself. Rather it is a source code transformer. HipHop programmatically transforms your PHP source code into highly optimized C++ and then uses g++ to compile it. HipHop executes the source code in a semantically equivalent manner and sacrifices some rarely used features — such as eval() — in exchange for improved performance. HipHop includes a code transformer, a reimplementation of PHP’s runtime system, and a rewrite of many common PHP Extensions to take advantage of these performance optimizations.”

The Announcement

“Scaling Facebook is particularly challenging because almost every page view is a logged-in user with a customized experience. When you view your home page we need to look up all of your friends, query their most relevant updates (from a custom service we’ve built called Multifeed), filter the results based on your privacy settings, then fill out the stories with comments, photos, likes, and all the rich data that people love about Facebook. All of this in just under a second. HipHop allows us to write the logic that does the final page assembly in PHP and iterate it quickly while relying on custom back-end services in C++, Erlang, Java, or Python to service the News Feed, search, Chat, and other core parts of the site.”

The Problems Facebook Faced with PHP

  • Can’t reuse PHP logic in other systems
  • Extensions are harder to write for PHP developers
  • High CPU usage; can’t be as efficient as something like C++
  • Fully impractical to completely rewrite Facebook with a new language

How They Improved It

  • It’s a source code transformer
  • Transforms PHP into optimized C++, then compiled with G++
  • Has been in development for over two years.
  • If you’ve used Facebook within the last six months, you’ve experience Hip Hop
  • Facebook team have recorded a 50% decrease in CPU usage.
  • They’ll have dedicated evangelists to help train/familiarize the community with Hip Hop
  • If you’re on a shared host, using Apache, you’ll most likely want to continue using standard PHP
  • Where Can We Start Playing with It?

    Hip Hop is available now, and is hosted on Github. You can download it here.

    Hip Hop Process Graph


The Quickest (and Best) Way to Create Forms: Wufoo

The Quickest (and Best) Way to Create Forms: Wufoo

Wufoo is a web application which intends to simplify forms. Forms can generally be tedious to work with. You’d have to write the XHTML/CSS for the form elements, set up the back end code to capture all the data and then work on generating usable reports for it. Wufoo simplifies this entire process right from form creation to integrating it within your site through extensive theme support to producing pretty, usable reports for you to parse your data.

It even does a lot of advanced stuff, including web hooks and a proper API to access the collected data. Today, we’ll look at how to create a simple form with Wufoo, and then use the API to programmatically access and modify the data collected.

Creating Your First Form

First up, we’ll need to set up a form so we can play around with it. Register for a new account with Wufoo and you are taken to one of the most humorous blank application states of all time:

Tutorial Image

Click on the button to start building a new form and you are taken to the form builder application. The interface is very intuitive with a context sensitive panel on the left and the main form section on the right. Adding elements is as simple as clicking on it or dragging it into the main section.

Tutorial Image

Clicking on the created element lets you edit all the relevant details.

Tutorial Image

Since we’d like to keep it as simple as possible, just a single text field which takes an email address will do. Click save form and we’re done. We’ve created our first form with zero code and it took all of 60 seconds.

Integrating it With Your Site

Integrating the created form with in our site is incredibly easy. Go to the forms page and click on the code link of the newly created form.

Tutorial Image

Wufoo provides a number of ways for you to get the form to your visitors including a JavaScript version which works inside an iframe, XHTML code for a complete page containing the forms or just a link you can share with your friends.

Tutorial Image

The Wufoo API

The Wufoo API lets you programmatically retrieve, submit and modify data pertinent to your account with very little fuss. The API set essentially consists of two stable, fixed APIs and one more under beta testing. We’ll look at the stable parts today.

Do note that you’ll only be able to retrieve and submit data to already existing forms. If you are looking to create forms on-the-fly and then submit data to it or just creating new fields through the API, you are out of the luck. The current version of the API doesn’t allow this functionality but look for it in the near future along with a bunch of other functionality.

But first, you’ll be needing an API key. You can get it from the API information link in the page where you get your code snippets.

Tutorial Image

Make a note of your API key and the ID of the field you want to access and/or modify. We’ll be using it shortly.

Tutorial Image

Getting to Your Data – The Query API

The Query API lets you retrieve information you’ve collected through your forms bypassing the Wufoo web site. In case you are looking to get all the raw data and then create a custom report out of it, this is the way to go.

The first thing you need to note is the URL you’ll need to request to get to the right data. The URL looks like so:


http://username.wufoo.com/api/query/

Replace username with your username and you’re good to go. The query parts let them Wufoo servers know that you are looking to retrieve information from the servers.

Sending a Request to the Server

cURL is the easiest way for us to send data to the server. If you are a little new to cURL and feel lost, I highly recommend you go through this cURL article right here at Nettuts+.


<?php

$apikey = '1234-1234-1234-1234';
$form = 'net-tuts';
$req = 'w_api_key='.$apikey.'&w_version=2.0&w_form='.$form;

$ch = curl_init("http://username.wufoo.com/api/query/");
curl_setopt($ch, CURLOPT_HEADER, 0);
curl_setopt($ch, CURLOPT_RETURNTRANSFER, 1);
curl_setopt($ch, CURLOPT_POSTFIELDS, $req);
$resp = curl_exec($ch);
curl_close ($ch);

echo $resp;

?>

Let’s go over the code part by part. We first need the API key we made a note of before. We also need the name of the form you want to retrieve the data from. These two along with the version of the API we are using, two in our case, are the minimum parameters we need to make a successful request.

We concatenate all the required elements as key/value pairs and store it for later use.

Next up, we pass in the correct URL as noted above along with the request string we created above. We also store the response to a variable so we can use it.

$resp holds the response to our request. By default, the Wufoo API returns data in a JSON format. In case XML happens to be your payload of choice, you’ll need to add an additional parameter to the request string. The additional parameter takes the format of w_format=format where format can either be XML or JSON.

The JSON Response

The returned JSON payload is actually pretty large containing numerous pieces of information. The relevant parts are shown below:

The main part is the result of the request along with information about the requested form including the name of the form, its title, URL, description and a lot of other information.

Tutorial Image

The second point of interest is the fields, the form contains. Since our form was very simple with just a single field, our returned data is pretty short. Either way, it carries information about the ID of the field, its title and various other information including whether its required or not, a description for the field and so on.

Tutorial Image

The final point of interest is the portion containing tthe entries themselves. Each entry for the selected form is returned to the caller containing a myriad of information including the id of the entry, the value of the fields, the IP of the user, date it was created and so on.

Tutorial Image

From this point, what you do with the data is completely up to you. You can parse the data to create a nice custom report, search through the information for specific data or just enter them all into a spreadsheet or database. Your imagination is the limit.

Submit with Style – The Submit API

The submit API lets you submit data directly to the Wufoo servers. This API is specially useful if you absolutely need to use your own XHTML/CSS whilst still leveraging all the back end capabilities Wufoo provides. This way you get the best of both worlds: you get to use your own customized look but retain all the power of Wufoo.

The front end requires no significant difference. As an example, here is the markup, I used for testing out the submit API.

<form action="handler.php" method="post">
<input id="input1" name="input1" type="text" maxlength="255" value="" />
<input id="saveForm" class="btTxt" type="submit" value="Submit" />
</form>

handler.php looks like so.


<?php
$apikey = '1234-1234-1234-1234';
$formid = 'net-tuts';
$data = $_POST['input1'];
$fieldid = '205';
$req = 'w_api_key='.$apikey.'&w_form='.$formid.'&'.$fieldid.'='.$data;

$ch = curl_init("http://ssiddharth.wufoo.com/api/insert/");
curl_setopt($ch, CURLOPT_HEADER, 0);
curl_setopt($ch, CURLOPT_RETURNTRANSFER, 1);
curl_setopt($ch, CURLOPT_POSTFIELDS, $req);
$resp = curl_exec($ch);
curl_close ($ch);

echo $resp;

?>

There are a couple of things to note here. As with the query API, we save the apikey and formid so we can use it later. We also capture the value of the POSTed text box so we can send it to Wufoo ourselves.

Notice that we’ve also created a variable called fieldid. This corresponds directly to the API ID present in the API key page.

Tutorial Image

After this, everything is just as before. We concatenate the string and then use cURL to pass the data to the server. The server returns a JSON response which looks like below:

Tutorial Image

That’s it. No hassles, no non-sense. Posting to Wufoo through our custom code is as simple as that.

Bonus: Integration With Third Party Services

As an added bonus feature, Wufoo now lets you post to other services when a new entry is logged into the system. You can do a lot of nifty things with this awesome new feature but I’ll just stick to how to use this feature.

To get to the notifications page, click on the notifications link on the forms page.

Tutorial Image

This page lets you choose to get notified via a number of options including email and SMS or post to services like Highrise, Twitter and many more when a new entry is posted. But those aren’t the ones we are going to look at today. The one we are going to look at is web hooks – a nifty technology which lets developers receive HTTP callbacks when an entry is submitted to Wufoo. Think of it like a callback on steroids.

On Wufoo’s side all you need to do is enter a URL to which Wufoo will POST data to every time. All you need to on your side it to set up a page which captures the POSTed data. For testing purposes, you can setup an account at PostBin which saves you the hassle. Enter this URL into Wufoo and you are all set. An example of the data posted by Wufoo to our target URL.

Tutorial Image

Very nifty, if I may say so myself.

Conclusion

And we are done! We looked at creating a simple form with Wufoo and then how to programmatically manipulate and retrieve the data we’ve collected through Wufoo’s easy to use API. Hopefully, this has been useful to you and you found it interesting. I’ll be closely watching the comments section; so chime in there if you have any queries.

Questions? Nice things to say? Criticisms? Hit the comments section and leave me a comment. Happy coding!

Write a Plus Tutorial

Did you know that you can earn up to $600 for writing a PLUS tutorial and/or screencast for us? We’re looking for in depth and well-written tutorials on HTML, CSS, PHP, and JavaScript. If you’re of the ability, please contact Jeffrey at [email protected].

Please note that actual compensation will be dependent upon the quality of the final tutorial and screencast.

Write a PLUS tutorial


The “Introducing CodeCanyon” Scripting Competition: $6200 Worth of Prizes!

The “Introducing CodeCanyon” Scripting Competition: $6200 Worth of Prizes!

I’m extremely excited to announce our first ever CodeCanyon competition. For those unfamiliar, Envato recently launched its newest marketplace, focused specifically on selling high-quality scripts and components for PHP, JavaScript, ASP.NET, and Java. As we’ve only recently launched, we’re hoping to build up our repository with a host of fantastic scripts and components, across all of the categories.

We’re launching this new marketplace with a bang; we have over $6000 worth of prizes to giveaway to three talented developers.

How Do I Enter?

Quite simply! To enter, prepare an item (PHP, JS, ASP.NET, or Java) of your choice for CodeCanyon, and once it has been submitted and accepted on the site, leave a comment here with a link to your item. That way, we can track it! That’s all! Then, on March 1st, 2010 (CST), my review staff and I will filter through all of the submissions and choose the best three of the bunch!

Grand Prize Winner

  1. 1 Dedicated Virtual Box (Rage) from Media Temple ($1200 value)
  2. 1 32 gigabyte iPod Touch ($299 value) (Ultimate TechSmith Package)
  3. 1 copy of Camtasia Studio for Mac or PC ($299 value) (Ultimate TechSmith Package)
  4. 1 copy of Camtasia Studio 6: The Definitive Guide ($39.95 value) (Ultimate TechSmith Package)
  5. 1 Logitech QuickCam Communicate Deluxe PC Webcam ($99 value) (Ultimate TechSmith Package)
  6. 1 Audio Technica USB Studio Condenser Microphone ($149 value) (Ultimate TechSmith Package)
  7. $100 Envato credit (Can be used across all of the marketplaces)
  8. $200 cash
  9. 1 MediaTemple Gift Card – 1 year of hosting, 1 domain name, Up to 5 websites. ($95 value)
  10. $25 Amazon Gift Card
  11. 1 year Tuts Plus membership – ($78 value)
  12. 1 Wufoo Subscription – 1 year ($288 value)
  13. 1 Formspring Pro Subscription – 1 year ($348 value)
  14. 1 Surreal CMS Subscription – 1 year ($275 value)
  15. 1 Personal TypeKit subscription – 1 year ($300 value)
  16. 1 Myows Paid AccountFREE for life
  17. 1 Rockable Press Book of your Choice ($29 value)
  18. 1 copy of Snippet (mac app) ($13 value)
  19. 1 copy of jQuery UI 1.7 from Packt Publishing ($40.49 value)
  20. 1 copy of Magento Beginner’s Guide from Packt Publishing ($35.99 value)
  21. 1 copy of Object-Oriented JavaScript from Packt Publishing ($35.99 value)
  22. 1 copy of jQuery Cookbook from O’Reilly Publishing ($34.99 value)
  23. 1 Threadsy Invite
  24. You will be featured on the front page of CodeCanyon as both the featured author and the featured item of the week!
  25. Your item will be included in a collection of the three winning submissions, and will be promoted on the front page of CodeCanyon
  26. As an Envato marketplace author, you’ll earn 40-70% of every sale!

2 Runners-Up

  1. 1 year Tuts Plus membership – ($78 value)
  2. $50 Envato credit
  3. 1 Personal TypeKit subscription – 1 year ($300 value)
  4. 1 Surreal CMS Subscription – 1 year ($275 value)
  5. 1 Wufoo Subscription – 1 year ($288 value)
  6. 1 Myows Paid AccountFREE for life
  7. 1 Rockable Press Book of your Choice ($29 value)
  8. 1 copy of Snippet (mac app) ($13 value)
  9. 1 Threadsy Invite
  10. Your item will be included in a collection of the three winning submissions, and will be promoted on the front page of CodeCanyon
  11. As an Envato marketplace author, you’ll earn 40-70% of every sale!

What Kind of Item Should I Submit?

We’ll that’s entirely up to you! That’s where you get to be creative. With that said, you’ll want to think of an item that will appeal to a wide variety of buyers. Ask yourself, “what sort of script or component – that’s not widely available around the web for free – have I often found myself in need of? Remember that, at this time, we’re only accepting PHP, JavaScript, ASP.NET, and Java related items.

Refer here to view the best selling items on CodeCanyon.

FAQs

When is the deadline to enter?

The competition will officially end on February 28th, 2010 at 11:59 PM, Central Standard Time. However, we do hope that you’ll submit before that date.

Are all items accepted on CodeCanyon?

No. You’ll first go through a review process, similar to all of our other marketplaces. It’s possible that your item will be rejected, in which case, it won’t be considered.

How Will you Judge?

We’ll consider many factors when determining the winners: overall sales, innovation, how much it appeals to a wide variety of buyers, etc.

Who Will be Judging?

The CodeCanyon review staff will collaborate to determine the winners.

Terms and Conditions

  • Envato staff and reviewers are not eligible to compete
  • Only items uploaded between 12:01 AM 02/01/2010 and 11:59PM 2/28/2010 CST and subsequently approved for sale on CodeCanyon are eligible to count.
  • The same author cannot win more than once. In other words there will be three winners, no less.
  • Our decision is final.
  • Files that are taken down for any reason are not eligible to be counted.
  • Files must stay up on CodeCanyon for at least 6 months.
  • Items may not be substituted for their cash equivalent.
  • Prizes will be awarded during the first week of March, to give time to ensure no copyright infringement has occurred.

So get coding! There are five-thousand reasons to do so! We can’t wait to see what you come up with.


Inspiration: 35 Wonderful Website Headers

Inspiration: 35 Wonderful Website Headers

Website headers are a very important aspect of any web design, whether the website is a blog, a portfolio, an informational site or even an online store. It is, along with the logo, one of the first things a new user will see when visiting your website. Your website, just like a human-being, should have a personality; the best way to “present” your website’s personality is via the header design. This allows the visitor to quickly determine not only the quality of the site, but if the content is something they think they will enjoy.

This post showcases 35 awesome header designs to help inspire you for your next web design project. All of the showcased headers capture the attention of their target audience incredibly well, therefore keeping them on the website for a longer period of time. And let us know what your favorite header is in the comments!

Section 1. Illustrated Headers

Praline En Schachtel

As soon as this wonderful header has loaded we’re welcomed to a happy and cheerful environment with a great personal touch. The friendly feel of the header counteracts the fact that the navigation doesn’t seem to exist at all.

BAD Health

Meomi

Once again we are presented with a cheerful environment with the ‘Meomi’ header design. The illustration is, in fact, animated using Flash, so be sure to take a quick look at the live website. Although the design is quite busy, it is easy to adjust to, making it easy to find our way around the site without any problems. The use of a tag line below the navigation menu makes it clear to new visitors what the website is and who it is aimed at – just incase you hadn’t already gathered from the beautiful Flash illustrations.

Blog What? Design

Et Toque!

Et Toque! also uses a Flash animated illustrated header. They incorporate cute character design with bright, eye-catching colors and a superb composition. The navigation is located at the bottom of the page which, in a way, is quite unusual; Et Toque! however have managed to pull it off very well.

Bienenstich Band

Matt Hamm

Matt Hamm’s portfolio website has followed a reasonably recent and modern trend by letting his new visitors know what he does in big, bold lettering. To emphasize the word ‘Hello.’ a dark blue color has been used – this makes the personality of the website friendly and very personal. The use of a shadow directed onto the navigation menu at the top of the page makes it stand out more than it already does – it’s almost impossible not to click on the links. To top it all off, a comical illustration of Matt himself holding a Twitter bird icon has been used, telling the public he has a Twitter profile.

Tropikalny Ogrod

Section 2. Hand-Drawn Elements & Textured Headers

XHTML CSS Expert

Cochemer Stadtsoldaten

This header makes great use of stock images, textures, and shadows, all to produce a memorable compilation. The use of a large website logo only makes the website even more memorable, and the tag line beneath it makes it easy for new visitors to find what the website is about. The navigation is incredibly simple to use, with contact links, etc. being shown at the top of the header, and content navigation links being used beneath.

Sprocket House

Studio Racket

The use of grungy texture and hand-drawn elements in this header design makes the site feel very personal and inviting. The navigation is also hand-drawn, and is rather unusual using a layout similar to that of a spider diagram; although not a common technique, it is very easy to navigate around the website without too much thought and effort.

Belzebu de Saia

Odosketch

All For Design

After first loading this highly textured web design we are almost immediately hit with a burst of bright (and attractive) green. A slightly lighter and subtle green is used behind the parrot to take our eyes into the navigation menu, which has been placed above the majority of the textured background, for easier viewing. A large logo with an embedded tag line is used, which has also been placed above the majority of the textured background, making it easier to remember as an independent logo rather than part of the web design.

Brunosouza

JOBY

The Joby header uses a combination of large (and bold) small letters, small caps, and Sans Serif fonts to attract the visitors attention and let them know what the site is all about in a very memorable and exciting way. The use of a hand-drawn/painted illustration adds a great personal touch to the design.

Jay Hafling

Barclay Farms Estate

Section 3. Typography Headers

Projeto Trinta

This is quite possibly one of the most beautiful and energetic header designs in this compilation. The use of subtle gray colors and a strong, lime green with a combination of torn holes and light grunge textures make this an absolute pleasure to look at. As well as looking great, the navigation is super easy to use with a stylish white highlight effect when hovering over the links. The sponsor icons are also linked, making use of the empty space in a superb way for some advertising campaigns.

Diamond HTML

David Jonsson

North Temple

This minimalistic but great typography-based header design has it all. The large, colorful and photo-based typography header is eye-catching and is very easy to remember. After you’ve stopped staring at the lovely color scheme in the logo, you’ll probably read the tag line, explaining what the site is about, and whether or not it is something you want to carry on reading. If it is, you’re presented with some very simple but appealing text links to find your way around the site.

Trent Walton

The Urban Landscape Lab

Teleios Man

TUT Candy

TUT Candy was very close to being put in the next category, ‘Atmospheric and Bokeh Headers’, due to its starry and spacey background. It is, however, based around three-dimensional typography, securing it a place in this category. After admiring the gorgeous text effects and reading the attention-grabbing tag line, the links and search bar are very easy to locate and use at the very top of the header.

Section 4. Atmospheric and Bokeh Headers

Rareview

Rareview use subtle (but incredible) animated Flash in their header, so make sure you head on over to check out the live version – you will not be disappointed. The atmosphere the animation creates, especially if viewed on a large glossy monitor, makes you feel like you’re in a different world; it really is that powerful. The minimalistic black and white logo and navigation links make them very easy to locate and use, and make use of some great hover effects (again, see the live version).

Lisa Maya

72 Thinking:Outlets

Mycreativework

Section 5. Minimalistic & Simple Headers

CTL – The Business of Learning

The Croquis

This is easily the most elegant header in this showcase. The use of watercolor textures and the minimal use of color adds a very personal touch to the design. The thin black line at the top of the header helps release the potential of the fine logo and navigation typography.

Cloud King

XEDA Design

After looking over these fantastic examples of well designed headers, you should feel refreshed and ready to take on your next web design project, or even redesign your existing header – after all, sometimes only small tweaks are needed to release your design to its absolute full potential.


Scheduling Tasks with Cron Jobs

Scheduling Tasks with Cron Jobs

Cron Jobs are used for scheduling tasks to run on the server. They’re most commonly used for automating system maintenance or administration. However, they are also relevant to web application development. There are many situations when a web application may need certain tasks to run periodically. Today we are going to explore the fundamentals of Cron Jobs.

Definitions

First let’s familiarize ourselves with the terms related to this subject.

“Cron” is a time-based job scheduler in Unix-like operating systems (Linux, FreeBSD, Mac OS etc…). And these jobs or tasks are referred to as “Cron Jobs”.

There is a cron “daemon” that runs on these systems. A daemon is a program that runs in the background all the time, usually initiated by the system. This cron daemon is responsible for launching these cron jobs on schedule.

The schedule resides in a configuration file named “crontab”. That’s where all the tasks and their timers are listed.

Why Use Cron Jobs?

Server admins have been using cron jobs for a long time. But since the target audience of this article is web developers, let’s look at a few use cases of cron jobs that are relevant in this area:

  • If you have a membership site, where accounts have expiration dates, you can schedule cron jobs to regularly deactivate or delete accounts that are past their expiration dates.
  • You can send out daily newsletter e-mails.
  • If you have summary tables (or materialized views) in your database, they can be regularly updated with a cron job. For example you may store every web page hit in a table, but another summary table may contain daily traffic summaries.
  • You can expire and erase cached data files in a certain interval.
  • You can auto-check your website content for broken links and have a report e-mailed to yourself regularly.
  • You can schedule long-running tasks to run from a command line script, rather than running it from a web script. Like encoding videos, or sending out mass e-mails.
  • You can even perform something as simple as fetching your most recent Tweets, to be cached in a text file.

Syntax

Here is a simple cron job:

10 * * * * /usr/bin/php /www/virtual/username/cron.php > /dev/null 2>&1

There are two main parts:

  1. The first part is “10 * * * *”. This is where we schedule the timer.
  2. The rest of the line is the command as it would run from the command line.

The command itself in this example has three parts:

  1. “/usr/bin/php”. PHP scripts usually are not executable by themselves. Therefore we need to run it through the PHP parser.
  2. “/www/virtual/username/cron.php”. This is just the path to the script.
  3. “> /dev/null 2>&1?. This part is handling the output of the script. More on this later.

Timing Syntax

This is the first part of the cron job string, as mentioned above. It determines how often and when the cron job is going to run.

It consists of five parts:

  1. minute
  2. hour
  3. day of month
  4. month
  5. day of week

Here is an illustration:

Asterisk

Quite often, you will see an asterisk (*) instead of a number. This represents all possible numbers for that position. For example, asterisk in the minute position would make it run every minute.

We need to look at a few examples to fully understand this Syntax.

Examples:

This cron job will run every minute, all the time:

* * * * * [command]

This cron job will run at minute zero, every hour (i.e. an hourly cron job):

0 * * * * [command]

This is also an hourly cron job but run at minute 15 instead (i.e. 00:15, 01:15, 02:15 etc.):

15 * * * * [command]

This will run once a day, at 2:30am:

30 2 * * * [command]

This will run once a month, on the second day of the month at midnight (i.e. January 2nd 12:00am, February 2nd 12:00am etc.):

0 0 2 * * [command]

This will run on Mondays, every hour (i.e. 24 times in one day, but only on Mondays):

0 * * * 1 [command]

You can use multiple numbers separated by commas. This will run three times every hour, at minutes 0, 10 and 20:

0,10,20 * * * * [command]

Division operator is also used. This will run 12 times per hour, i.e. every 5 minutes:

*/5 * * * * [command]

Dash can be used to specify a range. This will run once every hour between 5:00am and 10:00am:

0 5-10 * * * [command]

Also there is a special keyword that will let you run a cron job every time the server is rebooted:

@reboot [command]

Setting Up and Managing Cron Jobs

There are a few different ways to create and manage your cron jobs.

Control Panels

Many web hosting companies provide control panels for their customers. If you are one of them, you might be able to find a section in your control panel to manage your cron jobs.

Editing the Crontab

Running this command will launch vi (text editor) and will let you edit the contents of the crontab:

crontab -e

So it would help to be familiar with the basic vi commands as it is quite different than any other text editor you might have worked with.

If you would just like to see the existing crontab without editing it, you can run this command:

crontab -l

To delete the contents of the crontab:

crontab -r

Loading a File

You can write all of your cron jobs into a file and then push it into the crontab:

crontab cron.txt

Be careful, because this will overwrite all existing cron jobs with this files contents, without warning.

Comments

You can add comments followed by the # character.

# This cron job does something very important
10 * * * * /usr/bin/php /www/virtual/username/cron.php > /dev/null 2>&1

Setting the E-mail

As I mentioned earlier, by default the output from the crons get sent via e-mail, unless you discard them or redirect them to a file. The MAILTO setting let’s you set or change which e-mail address to send them to:

MAILTO="[email protected]"
# This cron job does something very important
10 * * * * /usr/bin/php /www/virtual/username/cron.php > /dev/null 2>&1

Using the PHP Parser

CGI scripts are executable by default, but PHP scripts are not. They need to run through the PHP parser. That’s why we need to put the path to the parser before the path of the script.

* * * * * /usr/bin/php [path to php script]

Sometimes it might be under another location like: “/usr/local/bin/php”. To find out, you can try running this in the command line:

which php

Handling the Output

If you do not handle the output of the cron script, it will send them as e-mails to your user account on the server.

Discarding Output

If you put “> /dev/null 2>&1? at the end of the cron job command (or any command), the output will be discarded.

The closing bracket (>) is used for redirecting output. “/dev/null” is like a black hole for output. Anything that goes there is ignored by the system.

This part “2>&1? causes the STDERR (error) output to be redirected to the STDOUT (normal) output. So that also ends up in the “/dev/null”.

Outputting to a File

To store the cron output in a file, use the closing bracket (>) again:

10 * * * * /usr/bin/php /www/virtual/username/cron.php > /var/log/cron.log

That will rewrite the output file every time. If you would like to append the output at the end of the file instead of a complete rewrite, use double closing bracket (>>) instead:

10 * * * * /usr/bin/php /www/virtual/username/cron.php >> /var/log/cron.log

Executable Scripts

Normally you need to specify the parser at the beginning of the command as we have been doing. But there is actually a way to make your PHP scripts executable from the command line like a CGI script.

You need is to add the path to the parser as the first line of the script:

#!/usr/local/bin/php

Also make sure to set proper chmod (like 755) to make the file executable.

When you have an executable script, the cron job can be shorter like this:

10 * * * * /www/virtual/username/hello.php

Preventing Cron Job Collision

In some cases you may have frequent running cron jobs, and you may not want them to collide if they take longer to run than the frequency itself.

For example, you may have a cron job running every minute. Yet, every once in a while it may take longer than one minute to run. This can cause another instance of the same cron script to start running before the previous one finishes. You can create too many busy processes this way and possibly crash the server if they keep slowing down each other, and cause even more processes to be created over time..

This problem can be addressed via file locking, and more specifically the non-blocking (LOCK_NB) type of file locks. (If you are not familiar with file locking, I suggest you read about it first.)

You can add this code to the cron job script:

$fp = fopen('/tmp/lock.txt', 'r+');

if(!flock($fp, LOCK_EX | LOCK_NB)) {
    echo 'Unable to obtain lock';
    exit(-1);
}

/* ... */

fclose($fp);

With regular file locks the flock() function call would block the script if there is an existing lock. And it would release once that lock is gone. However, with a non-blocking lock, such as in the code above, the function call does not stop the script, but it immediately returns FALSE if there is an existing lock. So in this case, we can immediately exit the script when we see there is an existing lock, which indicates that another cron job is currently running.

Blocking Web Access to Cron Jobs

When you write a cron job in a web scripting language like PHP, you may want to make sure that nobody can execute it by just loading it from their browser. One easy option would be to store these script outside of your web folder. However this may not be practical or preferable for some developers, if they want to keep their cron job scripts right within their web application folders.

If you put all of the cron job scripts in a folder, you block access by putting this line in an .htaccess file:

deny from all

Or you can also deny access to scripts on an individual basis by putting this line at the beginning:

if (isset($_SERVER['REMOTE_ADDR'])) die('Permission denied.');

This will ensure that, when the script is accessed from the web, it will abort immediately.

Conclusion

Thank you for reading. Even though cron jobs just seem like a tool just for system admins, they are actually relevant to many kinds of web applications.

Please leave your comments and questions, and have a great day!


Quick Tip: How to Create a Theme-Switcher in 200 Seconds

Quick Tip: How to Create a Theme-Switcher in 200 Seconds

Have you ever seen sites that offer some kind of “color-switcher” within the header section? Want to know how easy it is to replicate? I’ll show you in 200 seconds, using jQuery.


The Screencast

Granted, this is a very simple example. What more do you expect in 200 seconds! :) But, this can easily be extended to import new stylesheets, if you wish.

The Final jQuery

var colorOptions = 'black, blue, orange, red, green'.split(', '),
	colorDivs = [],
	colorsContainer = $('#colorsContainer');

for ( var i = 0, len = colorOptions.length; i < len; i++ ) {
	var div = $('
').css('background', colorOptions[i])[0]; colorDivs.push(div); } colorsContainer.append(colorDivs); $('#header').hover(function() { colorsContainer .fadeIn(200) .children('div') .hover(function() { $('h2').css('color', $(this).css('backgroundColor')); }); }, function() { colorsContainer.fadeOut(200); });

Conclusion

I had to zoom through this screencast, so feel free to discuss/ask questions in the comments! I hope you enjoyed it! Are you liking the “two-a-week” quick tips that all of the Tuts sites are now doing?


Developing Usable (.NET) Components

Developing Usable (.NET) Components

When building an application, developers often face the decision of either writing functionality themselves or look to a third party component to get the job done in a timely manner. In the case of the latter, a well-designed component can greatly enhance a developer’s productivity. If you write components, you have an obligation to ensure your components are well-designed, easy to deploy, and above all, easy to use.

Tutorial Details

  • Technology: .NET (C#)
  • Difficulty: Advanced
  • Estimated Completion Time: 1 hour

The term “component” used throughout this article refers to a single reusable program
building block. While it is entirely possible to group multiple components together
to form one complex component, this article discusses the design of simple, single-purpose
components. This article focuses on, and uses, C# and .NET for examples, but you
can apply the same principles to any language and platform.

There are three aspects that component authors must address in order to write usable
components.

  • Identifying the type of component
  • Designing the API
  • Documentation and Packaging

Identifying the Component’s Type

Identifying your component’s type is the crucial stepping off point of a writing
a usable component. It is impossible to write a clean and simple API, much less
package it for distribution, without adequately identifying its type. Thankfully,
this first step is easy.

The two primary component types are utility components to perform a specific, non-visual
task, and UI components (visual) to either enhance the user’s experience or make
development simpler for the developer. Consider the following component as an example:

public class HtmlRetriever
{
    public static string GetPageSource(string url)
    {
    // code to get HTML from the specified URL

    // code to return the HTML
    }
}

This is a simple component that only contains this HtmlRetriever class. This class
has a static method called GetPageSource() which accepts a string parameter containing
the URL of a page. This component contains no visual elements ñ it is simply a component
that performs some sort of function. As such, you can easily identify this component
as a utility component.

Now consider the next component, called LabelTextBox, that inherits UserControl
and contains markup in an ASCX file:

<asp:Label ID="lblLabel" runat="server"
    AssociatedControlID="txtTextBox" />
<asp:TextBox ID="txtTextBox" runat="server" />

The fact that this component inherits UserControl, directly incorporates ASP.NET
controls, and outputs HTML are obvious clues that this component is a visual component.
Therefore, it should be used and thought of as a control, the UI component of ASP.NET
WebForms.

As stated earlier, identification is the easiest step in writing a usable component,
but it has to be done before you can adequately start writing code. Follow these
rules of thumb when identifying a component’s type:

  • If your component incorporates the use of, or is tied to, a UI element, your component
    should itself be designed as a UI element for the platform you are developing for.
    If your platform is ASP.NET WebForms, the component should be a control. If ASP.NET
    MVC, it should be an HTML helper. If your platform is the browser (JavaScript),
    the component should be designed to behave as an HTMLElement.
  • If your component simply works with data and is independent from the UI, it is better
    served as a utility class or reference type.

Properly identifying the type of component you need to write determines how you
approach its API and packaging.

The API and Why it is Important

A well-designed API naturally leads to productivity due to its simplicity ñ developers
spend less time acquainting themselves with the API and more time writing code.
From this simplicity also comes maintainability, as designing your API with simplicity
in mind helps keep the developer’s code simple.

Several key factors play into a simple API, and you can achieve one by adhering
to the following guidelines:

  1. Follow naming conventions and general practices for your language and platform.
  2. Emulate an API from a similar component.
  3. Design for yourself.
  4. Design for flexibility and cleanliness.

Naming Conventions and General Practices

No matter what language you write in or platform you target, the most important
rule to follow when designing your API is to follow the naming conventions and general
practices specific to your language and platform. Doing so promotes uniformity and
thus simplicity.

In the realm of .NET, these conventions are centered on two types of casing:

  1. Pascal case ñ The first letter of an identifier is capitalized. If the identifier
    consists of multiple words, then each word should start with a capital letter. Example:
    MyClass is a proper name for a class.
  2. Camel case ñ The first letter is lower-case, and any subsequent word in the
    identifier begins with a capital letter. Example: myVariable.

Pascal case should be used for all class names, enumerations and their values, events,
interfaces, methods, namespaces, and properties.

Camel case should be used for all parameters and local variables.

Emulate Another API

When starting from scratch, it may be a good idea to look for components with a
similar utility and emulate their API if it makes since to do so. Consider text-based
ASP.NET controls as an example. The Label and TextBox controls’ primary function
is to present text to the user. As such, their default property is the Text property.
If you build another text-based control, it too should implement a Text property
to get and set the text-based content of the control.

The API for UI components are typically much easier to design and implement than
that of non-visual components. Your target platform’s UI components will more than
likely have a common set of properties and methods. For .NET components, this is
easily achieved by simply inheriting the System.Web.UI.Control , System.Web.UI.WebControls.WebControl,
or System.Web.UI.UserControl classes.

It is absolutely crucial that your UI component’s API matches that of other UI components
in your target platform. It promotes uniformity and familiarity for the developer
ñ cutting the amount of time needed to learn a new API.

Build an API for Yourself

Chances are you are building a component for your own needs, and you later decided
to release it to the world. After emulating the API of another utility or control,
the next step is to add the properties and methods you want to add. After all, you
build it for a specific purpose. Not only are you the first consumer of your own
component, you are also the best resource to supply it with an API. Remember to
keep it as simple and logical as possible. Also remember to provide your properties
and methods with descriptive and clear names.

Make it Flexible

When designing the API, be sure to make it flexible to handle multiple scenarios.
Use the API you built for yourself as a basis, and start planning for different
scenarios that other developers may want your component to handle.

Making HtmlRetriever Flexible

Consider the HtmlRetriever class from the previous section. Its GetPageSource()
method may work for your original intended purpose, but also assume consumers of
your class might want a page’s source code without element tags. Make it flexible
by refactoring the method into two overloads, like in the following code:

public class HtmlRetriever
{
    // the first "default" overload
    public static string GetPageSource(string url)
    {
    	return GetPageSource(url, false);
    }

    // the second overload
    public static string GetPageSource(string url, bool stripTags)
    {
    // code to get HTML source here

    if (stripTags)
    {
       // code to strip tags
    }

    // return data
    }
}

You will notice quite a few changes from this iteration of the HtmlRetriever class
from what was presented in the previous section. As you read this code, notice how
the method names, and the names of their parameters, are descriptive. There is no
guesswork here; consumers of this class know exactly what the method does and how
the parameters change its behavior simply by how they are named.

The first overload serves as the default behavior of GetPageSource() ñ it returns
the HTML source code of a page with the tags intact. The second overload of GetPageSource()
is the workhorse of the GetPageSource() overloads. It accepts a URL and a Boolean
value as its parameters. It gets the HTML source and returns it with or without
the element tags depending on what value was passed to the stripTags parameter.

Overloading is a fantastic means of adding flexibility to your API. It also has
the added benefit of keeping your API clean and free of clutter.

Adding an API to LabelTextBox

Now refer back to the LabelTextBox. It inherits the System.Web.UI.UserControl class,
so the basis of the control’s API in place from the base class. LabelTextBox is
essentially a wrapper around a Label and TextBox, so some properties should be written
to wrap the underlying controls’ properties. The first is the Text property, which
wraps around the TextBox’s Text property:

public string Text
{
    get { return txtTextBox.Text; }
    set { txtTextBox.Text = value; }
}

The decision to make LabelTextBox’s Text property wrap that of the TextBox is a
design choice. The TextBox receives the most amount of attention from the user;
it therefore makes sense to make the Text property wrap around the TextBox’s Text
property. To set the Label control’s Text property, create a property called LabelText:

public string LabelText
{
    get { return lblLabel.Text; }
    set { lblLabel.Text = value; }
}

These two properties fit the primary need of this component ñ to get and set values.
However, a developer consuming this component may have use for a TextChanged event.
This can easily be done with the following code that wraps the TextBox’s TextChanged
event:

public event EventHandler TextChanged;

protected void Page_Load(object sender, EventArgs e)
{
    txtTextBox.TextChanged += new EventHandler(txtTextBox_TextChanged);
}

private void txtTextBox_TextChanged(object sender, EventArgs e)
{
    if (TextChanged != null)
    {
  	  TextChanged(this, e);
    }
}

The first line of this code specifies an EventHandler delegate called TextChanged,
allowing developers to add event handlers to handle the TextChanged event. Next,
in Page_Load(), the TextBox’s TextChanged event is handled by the txtTextBox_TextChanged()
method. This allows you to check if TextChanged has any subscribers, and if so,
execute those event handlers.

You could continue emulating the TextBox properties and methods for this control.
For the sake of brevity, this is as far as the API emulation will go in this article.

So now this component’s API consists of familiar members, such as the Text property
and the TextChanged event, as well as custom properties (LabelText) to fit your
needs. You could add more customizability, such as providing functionality to dynamically
add a validation control to validate the text within the TextBox. The possibilities,
and thus API, are limited only by your imagination. Just ensure that yourself, as
well as anyone else, has the appropriate tools to get the most out of your component.

Final Touches: Documentation and Packaging

How you document and package your component is just as crucial to its usability
as its API. All the hard work you put into your component is for naught if its documentation
is poor and it is difficult to add to a project. Follow the guidelines in this section,
and your component can easily be added to a project.

Use XML Comments

Chances are good that you rely on Intellisense when experimenting with pieces of
the .NET Framework you have never worked with before. The majority of developers
do the same thing. Intellisense is a fantastic tool, and your component can support
Intellisense if you use XML comments and generate an XML documentation file. The
following code adds an XML comment to the Text property of LabelTextBox:

/// <summary>
/// Gets or sets the text contained within the text box.
/// </summary>
public string Text
{
    get { return txtTextBox.Text; }
    set { txtTextBox.Text = value; }
}

The triple-slash is not a typo. Simply typing the slash three times above a class,
property, or method automatically inserts the XML comments for that identifier.
The only information you need to provide is what that identifier does.

Follow these steps to enable XML documentation file generation:

  1. Open your project’s property pages.
  2. Click on the Build tab.
  3. Scroll down and check the box next to XML documentation file.

Non-Visual Component Distribution

Utility components are best distributed as class libraries. Doing so gives the developer
a quick and easy means to add your component to their project. All they have to
do is add a reference to the DLL to their project and they can begin using it.

It is also a feasible solution to release your component as code files, as long as
the code in the files pertains only to your component. Embedding the code within
a code-behind, or some other source file type, is unprofessional and causes consumers
of your component to copy and paste the code into separate code files.

The best of both worlds: release the DLL and the code files together. If you want
to sell your component, some marketplaces may require you to include the source
code. Providing a precompiled DLL is a bonus for developers since they can just
drop it into their project.

UI Component Distribution

Distributing UI components can follow one of two scenarios. The LabelTextBox component
discussed in this article is a UserControl (ASCX). Distributing this component as
an ASCX is fine. It gives developers the ability to easily augment the control to
fit their needs thanks to the markup portion of ASCX files.

The alternative is to derive from Control or WebControl, in which case you have
to manually code the control without using markup. For simple controls, like LabelTextBox,
this is not much of an issue. However, more complex controls require more code to
write the output HTML with Render() and RenderControl(). This approach makes distribution
much easier, as the only addition to a project is a DLL file (or a code file) as
opposed to the ASCX and its code-behind file.

Never, ever, ever release your code without packaging it.

Few things are more frustrating to a developer than having to copy and paste several
lines of code from an ASPX code-behind, or worse, an ASPX markup file. As a component
author, it is your responsibility to ensure consumers of your code can use your component
as quickly as possible. Anything more than adding a file or reference to a project
quickly detracts the developer from your component. Keep it simple!

Closing

Writing components is a noble undertaking. You spend (countless) hours writing code
to make another developer’s work easier. Take pride in writing usable components.
The more professional and usable you make them, the more developers will want to
use them.

Sell ASP.NET Scripts on CodeCanyon

Did you know that you can sell your ASP.NET scripts and components on CodeCanyon? Simply sign-up for a free author account, and start selling!


How to Code a Gorgeous Watercolor Website: New Plus Tutorial

How to Code a Gorgeous Watercolor Website: New Plus Tutorial

This tutorial is a useful guide for both expert and noob designers/developers who wants to learn more about how to convert complex designs to standards-compliant websites. We’ll learn the basics of slicing a PSD design, how to convert it into a 100% functional HTML+CSS+JavaScript mockup, and more. Help give back to Nettuts+, and join Plus!

Final Preview

Join Tuts Plus

NETTUTS+ Screencasts and Bonus Tutorials

For those unfamiliar, the family of TUTS sites runs a premium membership service called “TUTSPLUS”. For $9 per month, you gain access to exclusive premium tutorials, screencasts, and freebies from Nettuts+, Psdtuts+, Aetuts+, Audiotuts+, and Vectortuts+! For the price of a pizza, you’ll learn from some of the best minds in the business. Join today!

  • Subscribe to the Nettuts+ RSS Feed for more daily web development tuts and articles.


5 Examples of Beautiful Resume/CV Web Templates

5 Examples of Beautiful Resume/CV Web Templates

Did you know that we recently launched a new sub-category on ThemeForest, specifically for resumes/CVs optimized for the web? It’s becoming more and more common for potential employers to simply request a link to your website, rather than a sheet of paper. Though the category only launched a few weeks ago, we’ve already received a handful of beautiful designs.

1. Clean CV / Resume Html Template + 4 Bonuses

2. Awesome Online Resume/CV

3. Smart CV – Resume Theme

4. Resume (CV) Perfecto

5. Major – Resume Template

Think you can do Better?

If so, why not head over to ThemeForest and submit your own design? There’s a lot of money to be made, but you have to submit something first!!


The Easiest Way to Build your First iPhone App

The Easiest Way to Build your First iPhone App

Mobile websites have come a long way, but if you want to take full advantage of a smartphone’s hardware, or get listed in the iTunes App Store, you need to compile your code. In this tutorial, we’ll show you how to create a mobile web app with an iPhone look and feel using jQTouch, then turn it into a native iPhone app using Phonegap. No Objective-C necessary.

Tutorial Details

  • Program: Phonegap
  • Version: 0.80
  • Difficulty: Intermediate
  • Estimated Completion Time: 1 hour

Requirements

To complete this tutorial, you’ll need the following:

Introduction to PhoneGap

PhoneGap is an open-source framework that can turn any web app into a native app for iPhone, BlackBerry and Android. It pulls off
this trick by running your web code in a UIWebView, an embedded instance of Safari without the
toolbars and buttons of the standalone Safari app. PhoneGap then extends this basic functionality by mapping features of the
iPhone SDK to JavaScript objects you can call in your web code, so you can easily add features like GPS, camera, contacts, vibration,
SQLLite and accelerometer support. And when you’re ready to distribute your app, PhoneGap 0.80 is Apple-approved!

Included in the PhoneGap distribution is everything you need to build and run an iPhone app. The included XCode project is bundled
with a sample code showing how to use many of the native features, and all the supporting files necessary to compile the app and
run it in the iPhone Simulator or on your phone.

Building and Running an iPhone App

To test whether you’ve got your Mac ready to run your code, let’s try out the sample project included with PhoneGap.

First, open up the iPhone folder, and double-click on PhoneGap.xcodeproj:

This should open XCode with your project loaded. Although there’s a lot going on here, we as web developers only need
to concern ourselves with the www folder. This contains the web code that will become the interface and logic of
our app.

Now that we’ve got our project loaded, it’s time to take it for a spin. Bundled with the iPhone SDK is an iPhone Simulator that
hooks right in to XCode. All we have to do is click “Build and Run.”

Building Your Web App

For the sake of this tutorial, I’ve put together a simple, native-feeling app that displays my Tumblr feed with a slide-up “About”
screen. This app is based on the excellent jQTouch framework, a jQuery-based library of UI
elements, animations, and extensions that let you rapidly develop mobile web apps with native look and feel. Let’s take a quick look
at putting together a web app using jQTouch before we import this app into our Phonegap project.

First, we load jQuery, jQTouch, and some bundled theme files in the <head> tag; these will style our elements to look like
native iPhone UI widgets:

	<head>
		<script src="jqtouch/jquery.1.3.2.min.js" type="application/javascript" charset="utf-8"></script>
		<script src="jqtouch/jqtouch.min.js" type="application/x-javascript" charset="utf-8"></script>
	    <style type="text/css" media="screen">@import "jqtouch/jqtouch.min.css";</style>
	    <style type="text/css" media="screen">@import "jqtouch/themes/apple/theme.min.css";</style>
	    <style type="text/css" media="screen">@import "master.css";</style>

		<script type="text/javascript">
	        $.jQTouch();
	    </script>
	</head>

Then we build out the skeleton of our app:

	<body id="stage" class="theme">
        <div id="home" class="current">

        </div>
        <div id="about">

        </div>
    </body>

jQTouch takes any direct descendent of the <body> tag and converts it into a full-screen “view”. This means every
<div> in the code above will take over the entire screen, and changing screens means swapping between <div>s by linking
to them by their id:

	<a href="#about">About</a>

JQTouch includes a variety of cool ways to transition between these screens, and they and can be enabled simply by adding CSS classes.
For example, to turn that link to the About page into a slide-up transition, we add the following:

	<a class="slideup" href="#about">About</a>

Then, in the About page itself, we add a button to “close” the panel by sliding it back:

	<a href="#" class="grayButton goback">Close</a>

On the default screen, we’ll add a toolbar with the aforementioned “About” button, and a spot to embed a Tumblr feed:

    <div class="toolbar">
        <h1>Home</h1>
        <a class="button slideup" href="#about">About</a>
    </div>
    <h2>Live Stream</h2>
    <div id="timeline">
        <script type="text/javascript" src="http://YOUR_TUMBLR_USERNAME.tumblr.com/js">
        </script>
    </div>

Lastly, a few CSS classes that will style the output of the Tumblr feed to match our “Apple” theme:

	ol {
	    color: black;
	    background: #fff;
	    border: 1px solid #B4B4B4;
	    font: bold 17px Helvetica;
	    padding: 0;
	    margin: 15px 10px 17px 10px;
	    -webkit-border-radius: 8px;
	}

	ol > li {
	    color: #666;
	    border-top: 1px solid #B4B4B4;
	    list-style-type: none;
	    padding: 10px 25px 10px 25px;
	}

That’s it! After adding some content to our About page, we replace the files in our Phonegap project’s www folder
with our new web app, and run it again:

Conclusion

Our web app is now compiled, and from here can be packaged up for distribution in the iTunes Store. It’s a simple start, but
in very little time we’ve got a native app that looks like Apple’s own, runs on any iPhone, and can be extended to a variety of uses.

I’ll be covering how to extend your app with support for cameras and geo-location in future tutorials. In the meantime, you can
read more about Phonegap at the Phonegap Wiki. Documentation is not fully fleshed out,
so you may find yourself digging through git repositories after the end of a long hunt.

To submit your app to the iTunes App Store, register for the iPhone Developer Program.
Once you’re registered, you’ll be given the tools to digitally sign and submit your app to the iTunes Store.

Write a Plus Tutorial

Did you know that you can earn up to $600 for writing a PLUS tutorial and/or screencast for us? We’re looking for in depth and well-written tutorials on HTML, CSS, PHP, and JavaScript. If you’re of the ability, please contact Jeffrey at [email protected].

Please note that actual compensation will be dependent upon the quality of the final tutorial and screencast.

Write a PLUS tutorial


Quick Tip: JavaScript Event Delegation in 4 Minutes

Quick Tip: JavaScript Event Delegation in 4 Minutes

Event delegation can be a confusing topic for those who are unfamiliar with the concept. But, luckily, it’s really simple. In this quick tip video tutorial, I’ll demonstrate the concept in just under four minutes.

Imagine that you have five hundred anchor tags on your page. As you might imagine, adding a click event to every one of those would be time consuming, and unnecessary. On top of that, what happens if, once you click on those anchor tags, we add additional anchor elements to the page? Would those new anchors be bound to the click event as well? The answer is no. You would then have to reattach a listener to those newly created elements.

Enter Event Delegation

Instead, with event delegation, we simply add a single event listener to an ancestor element, maybe something like a “ul.” Then, when the user clicks on one of its child elements, like an anchor tag, we only check to see if the target of the click was, in fact, an anchor tag. If it was, we proceed per usual.

$('ul').click(function(e) {

	if ( $(e.target).is('a') ) {
		alert('clicked');
	}
});

Advantages

  • Only attach one event listener to the page, rather than five hundred (in our example)
  • Dynamically created elements will still be bound to the event handler.

Why Does this Work?

It works because of the way elements are captured (not IE) and bubble up. For instance, consider the following simple structure.


When you click on the anchor tag, you’re also clicking on the ‘li’ and the ‘ul’ and even the ‘body’ element. This is referred to as bubbling up.

Notes About this Screencast

Please keep in mind that this is just a simple example to explain the functionality. We used jQuery, only because I had four minutes to record! In that particular example (watch the screencast first), we could have used two alternative options:

  1. Pass true as a parameter of the clone() method. This would then clone the element, as well as any event handlers.
  2. Use the live() method instead. However, be careful when using this method: it reattaches the event handler X times. This may not necessarily be needed.

Mostly, this was meant to demonstrate the idea. With regular JavaScript, you could do something like:

// Get some unordered list, which contains anchor tags
var ul = document.getElementById('items');

// Quick and simple cross-browser event handler - to compensate for IE's attachEvent handler
function addEvent(obj, evt, fn, capture) {
	if ( window.attachEvent ) {
		obj.attachEvent("on" + evt, fn);
	}
	else {
		if ( !capture ) capture = false; // capture
		obj.addEventListener(evt, fn, capture)
	}
}

// Check to see if the node that was clicked is an anchor tag. If so, proceed per usual.
addEvent(ul, "click", function(e) {
  // Firefox and IE access the target element different. e.target, and event.srcElement, respectively.
  var target = e ? e.target : window.event.srcElement;
  if ( target.nodeName.toLowerCase() === 'a' ) {
     alert("clicked");
     return false;
  }
});


JavaScript from Null: Chapter 5 – Events

JavaScript from Null: Chapter 5 – Events

As we move forward with JavaScript University, today, we’ll learn how to add event handlers to elements on the page. Unfortunately, this can be more cumbersome than we’d hope, due to the fact that Internet Explorer must always be the black sheep. Nevertheless, we’ll learn how to abstract these inconsistencies away to our custom utility function.

As with every JavaScript from Null screencast, it’s not essential that you view the previous entries in the series before watching.

Catch Up

In this Screencast, you’ll Learn About:

  • Working with .addEventListener
  • Working with IE’s .attachEvent
  • Differences in the way browsers handle events.
  • Capturing phase vs. event bubbling
  • Building a utility function to abstract our cross-browser event handling.

Chapter 5: Events

Other Viewing Options

Ready to take your skills to the next level, and start profiting from your scripts and components? Check out our sister marketplace, CodeCanyon.

CodeCanyon


Winner Announced – Freebie: $50 Amazon Gift Card

Winner Announced – Freebie: $50 Amazon Gift Card

Nettuts+ is a success solely because of the fantastic community. Today, we have a $50 Amazon gift card to give away to say thank you for sticking with us as long as you have!

Winner Announced!

Winner

Congratulations to “jamelb” for being randomly selected, via Random.org, as the winning commenter. Thanks so much to everyone who entered. Your feedback will be used to further improve the video tutorials on Nettuts+.

Jamelb, please contact us at [email protected] to claim your prize.

How to Enter

This one is exclusive to iTunes users. Simply visit the Nettuts+ Vodcast page on iTunes, leave a comment, and write what you think – whether negative or positive. Just be truthful, and as constructive in your criticism as you wish! Even just a few words will do. That’s it!

I’ll then, on Monday morning, randomly select one of the new comments from that list, and announce the winner on this page!

We also won’t squawk should you use choose to subscribe to that feed while you’re there. :)


An API for the Web: Learning YQL

An API for the Web: Learning YQL

The Yahoo Query Language is a great tool that’s guaranteed to speed up your web development time. The more complex your project, the more time YQL will save you. So, is it a framework, an application, a beverage? Today, you’ll find out what it is and how to use it!

Prefer a Video Tutorial? Join Plus!

If you’re more of a visual learner, you can watch a video version of this article instead. Simply help give back to Nettuts+ by signing up for a Plus membership, which grants you access to the Plus content for ALL of our sites – all for $9 per month.

Already a Member?

Watch the video version of this tutorial.

What is YQL?

Web apps and web services multiply like rabbits. They’re all fun to play with (like rabbits) and fun to integrate into other projects (unlike rabbits). But learning a new API every other day isn’t feasible or fun. And that’s the problem the Yahoo Query Language (YQL) is out to solve.

Think of YQL as the API for the web, the one API to rule them all. It’s not a hard one to learn, so let’s get you up to speed right now!

How do I use it?

Yahoo has put together a pretty nice console for us to flex our muscles with YQL. Load up that console, and let’s explore it.

In the right sidebar, you can choose a “table” in the “database”; a sample query will show up in the statement box at the top. To the right of the statement box, you can see what the corresponsing REST query would. Below, you have the data returned from the query; you can receive data in either XML or JSON.

So, let’s try a query!

select * from flickr.photos.interestingness(20)

Here’s one of the sample queries; This will return twenty images from the Flickr’s interestingness group. The results of the query look like this:

Let’s try another one.

select * from feed where url='http://rss.news.yahoo.com/rss/topstories'

This query returns each of the recent items in a feed, in this case, the Yahoo News Top Stories. Of course, we could handle it ourselves, but this will be quicker and easier.

You’ll notice that both these queries are for Yahoo sites; out of the box YQL only offers table for Yahoo properties. But they have made it extendable, and many people have written other tables. To get those, click the “Show Community Tables” in the sidebar. Now we can leverage everything from Netflix to the New York Times, from GitHub to Instapaper.

So how can we use YQL in our own projects? Most often, you’ll implement it using cURL, but we could do it in JavaScript as well. Let’s look at the cURL now, and what we get from it.

Let’s take that flickr interestingness query we just looked at; here’s what we do:

$query = 'select * from flickr.photos.interestingness(20)';

// insert the query into the full URL
$url = 'http://query.yahooapis.com/v1/public/yql?format=json&q=' . urlencode($query);

// set up the cURL
$c = curl_init();
curl_setopt($c, CURLOPT_URL, $url);
curl_setopt($c, CURLOPT_RETURNTRANSFER, 1);
curl_setopt($c, CURLOPT_SSL_VERIFYPEER, false);
curl_setopt($c, CURLOPT_SSL_VERIFYHOST, false);

// execute the cURL
$rawdata = curl_exec($c);
curl_close($c);

// Convert the returned JSON to a PHP object
$data = json_decode($rawdata);

// Show us the data
echo '<pre>';
print_r($data);
echo '</pre>';

It’s not too complicated; if you’ve not familiar with cURL, check out Burak Guzel’s great tut here on Nettuts earlier this month. We assign the cURL return value to $rawdata and then convert it to PHP. Calling the print_r function gives us these results.

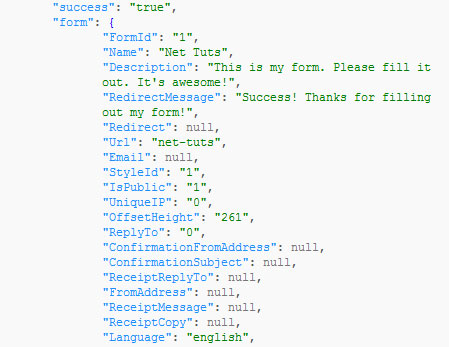
As you can see, our $data object has one property: query. That property parents all the tasty bits. You can see from the $data->query->count that we received 20 objects, matching our query. But it’s $data->query->results that we’re really interested in; that’s where our data is. The results object has one array in it, called photos.

Armed with this information, we could display the twenty latest interesting photos from flickr (we would use the url http://www.flickr.com/photos/$owner/$id, taking those variable from each photo object.)

I should note here that not all queries will display their results in the same way; some aren’t quite as developer friendly as this one. It’s a good idea to use the YQL console (or just print_r) to check out the results format before proceeding.

So you’ve got an idea of what YQL is and how you can use it. Now, let’s use YQL in a small project!

Tuts+ Tweets

Let’s build a Twitter panel that will show the latest tweets from each of the Tuts+ sites’ Twitter accounts. We’ll start by going to the YQL console and looking at our options. Make sure you’re viewing the community tables. Under the Twitter section, choose twitter.user.profile (which will include the latest tweet), or type this query into the statement box:

select * from twitter.user.profile where id="nettuts"

As we can see from the results in the tree view, the object we’ll get back isn’t formatted quite as nicely as the Flickr ones; however, we’ll make it!

Let’s begin by replacing the Flickr query in the above example with this one. Here’s what we get:

What’s wrong? Since the twitter datatable isn’t one of Yahoo’s built-in tables, we need to tell YQL to use the community tables as well. How do we do that? We’ll add a the key/value env=store://datatables.org/alltableswithkeys to our base URL; now the $url variable should look like this:

$url = 'http://query.yahooapis.com/v1/public/yql?format=json&env=store%3A%2F%2Fdatatables.org%2Falltableswithkeys&q=' . urlencode($query);

Now if we try it …

We’ve got the twitter data!

Now that we’re successfully getting Nettuts’ twitter profile, let’s consider the others. We need to get the profiles of the following accounts:

  • Psdtuts
  • Vectortuts
  • Audiotuts
  • Aetuts
  • Activetuts
  • Cgtuts
  • Phototuts
  • Tutsplus

So do we need to do eight more cURLs to YQL to get all the data we need? Thankfully, YQL has our back here; we can use this:

SELECT * FROM query.multi where queries="QUERIES GO HERE"

Armed with this knowledge, we’re ready to build our widget. We’ll begin with an array of the twitter queries:

$twitter = array (
'tutsplus'   => 'SELECT * FROM twitter.user.profile WHERE id=\'tutsplus\'',
'nettuts'    => 'SELECT * FROM twitter.user.profile WHERE id=\'nettuts\'',
'phototuts'  => 'SELECT * FROM twitter.user.profile WHERE id=\'phototuts\'',
'audiotuts'  => 'SELECT * FROM twitter.user.profile WHERE id=\'audiotuts\'',
'psdtuts'    => 'SELECT * FROM twitter.user.profile WHERE id=\'psdtuts\'',
'aetuts'     => 'SELECT * FROM twitter.user.profile WHERE id=\'aetuts\'',
'cgtuts'     => 'SELECT * FROM twitter.user.profile WHERE id=\'cgtutsplus\'',
'vectortuts' => 'SELECT * FROM twitter.user.profile WHERE id=\'vectortuts\'',
'activetuts' => 'SELECT * FROM twitter.user.profile WHERE id=\'activetuts\''
);

Let’s create our full query now:

$query ='SELECT * FROM query.multi where queries="' . implode(';', $twitter) . '"';

Since it’s getting a bit complicated, we’ll put the root URL in its own variable, and then put everything together. Note that I added diagnostics=false to the root URL; this prevents YQL from returning a bit of extra data with our results. Why? It will just make it easier when we inspect the results in a moment.

$root = 'http://query.yahooapis.com/v1/public/yql?format=json&env=store%3A%2F%2Fdatatables.org%2Falltableswithkeys&diagnostics=false';
$url = $root . '&q=' . urlencode($query);

Now that we’ve got our complete URL, let’s create our cURL, just as we already did:

$c = curl_init();

curl_setopt($c, CURLOPT_URL, $url);
curl_setopt($c, CURLOPT_RETURNTRANSFER, 1);
curl_setopt($c, CURLOPT_SSL_VERIFYPEER, false);
curl_setopt($c, CURLOPT_SSL_VERIFYHOST, false);

And like last time, we’ll catch the results, convery the JSON to a PHP object, and output them for inspection.

$data = json_decode(curl_exec($c));

curl_close($c);

echo '<pre>';
print_r($data);
echo '</pre>';

I won’t show them to you here, but you should be able to stroll through them and see the pieces of data we want to pull out. Notice that the results object has a results array inside it; that’s a bit unexpected, but I believe it has something to do with the fact that we’re executing multiple queries. When you’re done, head back to the PHP and create a $results variable (and don’t forget to remove the printr code):

$results = $data->query->results->results;

The HTML

Now that we’ve got our data, its time for some HTML. Let’s throw in a basic template under the PHP:

<!DOCTYPE html>
<html>
<head>
    <meta charset='utf-8' />
    <title>Yahoo Query Language Introduction</title>
<link rel="stylesheet" href="default.css" />
</head>
<body>
<h1>The Tuts+ Network: Latest Tweet</h1>
<ul>

</ul>
</body>
</html>

Now, inside the list, we’ll use some PHP to iterate over each of the items in the $results array we extracted and build an entry for it. First, set up the loop:

<?php for ($i = 0; i$i < count($twitter); $i++) : ?>
	<li>

	</li>
<?php endfor; ?>

Inside that list item, open a PHP codeblock; we should begin by setting up a few variables.

	$meta = $results[$i]->item->meta;
	$item = $results[$i]->item->item;
	$link = $results[$i]->item->resource;

Unfortunately, the author of the twitter table didn’t make the return object too easy to work with; instead of using key/value pairs, each key and value are entries in their own array. So it won’t be incredible obvious what we’re each object reference is when we’re done. However, remember that this is all subject to the author. The flickr table we looked at earlier—or the RSS table that you should check out—is a much more usable API.

So what do we want in our twitter widget? Let’s show the user avatar on the left and their name, username, latest tweet, and time of latest tweet on the right. To do so, let’s add this below those variables:

<?php echo "<a class='img' href='$link'><img src='" .$item[0]->resource ."' alt='" . $meta[0]->content ."' /></a>"; ?>
	<div>
		<?php echo "<a href='$link'>" .$meta[0]->content . "</a> "; ?>
		<small>(<?php echo $meta[1]->content ?>)</small>
		<small> <?php echo $item[1]->meta[2]->content; ?> </small>
		<?php echo '<a href="' . $item[1]->resource . '">' . $item[1]->meta[1]->content . '</a>'; ?>
	</div>

I know it’s a bit cryptic, but if you look at this and then look at the object we printed out to the browser, you’ll see that it works out nicely. We start with an anchor, and put the avatar image in it. After that, inside a div, we make another link for the name, which links to their twitter page. Then we put their username and time of last tweet in small tags (and if we wanted to, we could convert the time to something a little more viewer-friendly). Finally, we put their latest tweet in an anchor; cliking it will take you to the tweet’s page.

Here’s what this looks like:

Not pretty yet, but we’ve got some good hooks for our CSS.

The CSS

Nothing complicated here; we start by evening out the landscape:

body {
	font: 13px/1.5 'Helvetica Neue', Arial, 'Liberation Sans', FreeSans, sans-serif;
	background:#ececec;
	padding:10px;
}
img {
	border:0;
}

Then we’ll give out list its look and feel:

ul {
	margin:0;
	padding:0;
	border:1px solid #474747;
	border-radius:5px;
	-moz-border-radius:5px;
	-webkit-border-radius:5px;
	background:#ccc;
	width:50%;
}
li {
	min-height:50px;
	padding:10px 5px;
	list-style-type:none;
	border-bottom:1px solid #474747;
	border-top:1px solid #ececec;
}
li div {
	padding-left:58px;
}
li a.img {
	float:left;
	padding-right:5px;
}
li a {
	display:block;
}
li:first-child {
	border-radius:5px 5px 0 0;
	-moz-border-radius:5px 5px 0 0;
	-webkit-border-radius:5px 5px 0 0;
}
li:last-child {
	border-bottom:0;
}

As a final touch, we’ll give each list item a shadow on hover:

li:hover {
	box-shadow: 0px 0px 15px #000;
	-moz-box-shadow: 0px 0px 15px #000;
	-webkit-box-shadow: 0px 0px 15px #000;
}

There you have it! Behold our completed twitter widget:

Doing it with JavaScript

If you’d prefer, you can use jQuery to execute a YQL statement. You can get the plugin—called jquery.queryYQL—on GitHub. It’s pretty simple to use; here’s a modification of the example query:

$.queryYQL("select * from feed where url='http://feeds.feedburner.com/nettuts?format=xml'", function (data) {

	var ul = $("<ul/>");

	$.each(data.query.results.item, function () {
		$("<li/>").append(this.title).appendTo(ul);
	});

	ul.appendTo($("#content"));
});

Will you use it?

YQL is a pretty powerful tool; it should save you a lot of time by giving you a single, common API to access content all over the web. You really should browse through the list of available tables; you’ll probably find something that will same you a lot of time. Some tables even provide authentication and writing.

Is YQL a tool you’ll use in the future? Let me know in the comments!

Write a Plus Tutorial

Did you know that you can earn up to $600 for writing a PLUS tutorial and/or screencast for us? We’re looking for in depth and well-written tutorials on HTML, CSS, PHP, and JavaScript. If you’re of the ability, please contact Jeffrey at [email protected].

Please note that actual compensation will be dependent upon the quality of the final tutorial and screencast.

Write a PLUS tutorial