Open Mic: Tell Us About Your Best Bargain Buying Gear

My brother loves a bargain. Whenever we get together he tells me about his latest conquest. What about you? Do you have an amazing bargain you’d like to boast about when buying gear or an instrument?

Each Tuesday we open our mic to readers and lurkers alike to come out of the woodwork and tell us your thoughts and opinion, your experiences and mistakes, what you love and what you hate. We want to hear from you, and here’s your chance.


Details can make a story juicier. What did you get, how did you get it, and what makes your story so amazing?


Running Like Clockwork: Steampunk Art to Inspire You


The Steampunk style has been a part of fantasy and science fiction artwork and literature for a few years now. Some proponents insist on keeping it entirely science-based, while others like to throw in healthy doses of fantasy. The question they all seem to be asking, though, is "what if X ran on steam?" X can be anything from computers to cars to personal jetpacks. Working prototypes of steampunk-esque machines have even been made (and used). It’s an entire subculture, defined by a propensity toward Victorian aesthetics, practicality, and steam-powered anything. Below are 80 fantastic steampunk artworks to get your gears turning and start you on your way to designing your own steampunk creations.


Steampunk by PReilly


Steampunk by Sumerky


Steampunk Dragon by Kerembeyit


SteamPunk Octopus by Raybender


Steampunk Concept by Lebbeus


Steampunk Thumbelina by Hakubaikou


Steampunk Airship Pilot by Homarusrex


Oriental Steampunk by Superspacemonkey


Steampunk Mech I by likaspapaya


A Steampunk Fairytale Detail by Frankhong


Steampunk Fairytale by AkaiSoul


Escape This Steampunk City by Ftourini


Steampunk Santa by CyborgNecromancer


Steampunk Fairytale by Daniel-Velez


Steampunk Odysseus N’ Cyclops by Chrislazzer


Steampunk Lincoln by Herrenmedia


Steampunk Concept by Justaman78


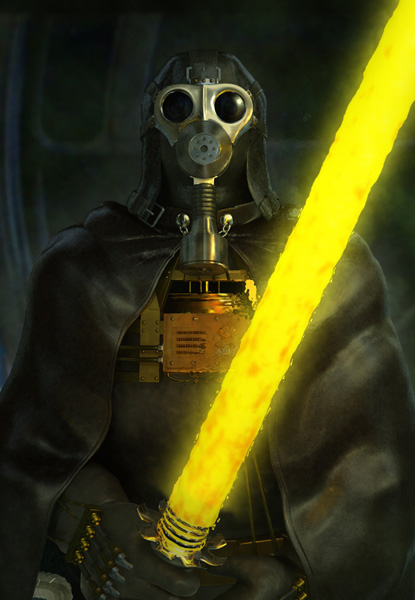
Steampunk Darth Vader by Simjoy


Steampunk Penguin Professor by Einen


2091, Rome: Steampunk Day by Leox92


Steampunk Mad Hatter by Crashingwave


Steampunk Ship: Brassheart by Industrial-Fores


Steampunk Airship by KMiklas


Steampunk Paddle Duck by Ivy00


Steampunk Bot Design by Ahbiasaaja


Steampunk Fairytale Goldylocks by Lavah


The Kid’s Last Heist by imaginism


Steampunk Robot Concept 2 by Emze


Steampunk Mandalorian by Vinom11


Little Red Steampunk Hood by Leevitron


Steampunk City by Activateru


Steampunk Nicolai and Viktor by YoshiyukiKatana


IDotW089 – Steampunk Explorer by Legato895


Big Sir – Steampunk Robot by Herrenmedia


Steampunk Japan Hi Rez by Phishy


HiddenYume Steampunk by Rickbw1


Steampunk Oil Rig by ZackF


Steampunk Challenge: Sirens by Arenyth


Bounty Hunter by Nibilondiel


Steampunk Bike by VOLT-reborn


Steampunk Professor Penguin by Mirana


Steampunk Professor Penguin by Bendragonx


Steampunk Private Investigator by DevBurmak


Steampunk Guitarist by Dreamstone


Steampunk Character WIP 3 by Craig-bruyn


Steampunk Monster by Glaaarg


Steampunk Diner-Fin by Krad-Eelav


Gunslinger by Nibilondiel


Steampunk Melissa by TehTortle


Noah’s Ark by Loboto


Steampunk Chef Wilgam by Lycorisu


Steampunk Motorcycle by Klortho


Steampunk Airship by TheOneWithout-a-Gun


Hammer Time by Yigitkoroglu


Steamy Robot Love by Ekuneshiel


P.N.Caster – Airship Provisioner by Ghostfire


Gunner by Hunterkiller


Storm Slayer – Steam Golem by Zeo-x


Control Room WIP by Malaveldt


Locomotive by Likaspapaya


LuftFlotte by Remton


Mechanoid de Nuevo by Dian3


Alice in Steampunkland by Strayedclimaca


The Smugglers by Ultra0kelvin


Steampunk Teatime by CyborgNecromancer


Harbour by JohnMalcolm1970


Vol Hivernal by Remton


SteamPunk Dalek Coloring by Mulddyr


Armada by Remton


30th by Voxmortem


Strange Island by Raybender


And You Are? by Xpsam


Hero Canal, London by Fitzhywel


Burn it to the Ground by BlueRogueVyse


Airship Pilot by Hakubaikou


Steampunk City by 0800


Sybera by Remton


City in the Clouds by ApneicMonkey


Steampunk City by Kekel


A Novel Not Yet Written by Vermin-Star


Steampunk Tutorials

Here are a handful of tutorials for creating your own steampunk-esque artworks.

Make A Steampunk Gear Using Photoshop Patterns and Effects – A tutorial that covers how to create realistic-looking gears in Photoshop by combining patterns with effects like Bevel and Emboss and Drop Shadows.

How to Create a Steampunk Style Illustration in Photoshop – A tutorial for creating a steampunk-esque photomanipulation.

Create a Dark Steampunk Digital Painting – A fantastic digital painting tutorial from ForCG.

20 Steps to Create a Steampunk Cyborg in Photoshop – Another photomanipulation tutorial.

Create a Steam Powered Typography Treatment – A Psdtuts+ tutorial for creating steampunk-inspired type.

Quick Tip: Stretch Your SWF with Stage.ScaleMode

What happens when a website crams your SWF into an area where it doesn’t fit? In this Quick Tip, you’ll find out how to take control of how your SWF scales.


Step 1: Set up Your SWF

Start a new Flash project, and set your stage to be 350px wide, 250px high.

Create a basic document class (see this Quick Tip for more info):

package
{
	import flash.display.Sprite;
	public class Main extends Sprite
	{
		public function Main()
		{

		}
	}
}

The FLA (and the SWC, for those of you not using Flash Pro) in the zip file contains two assets:

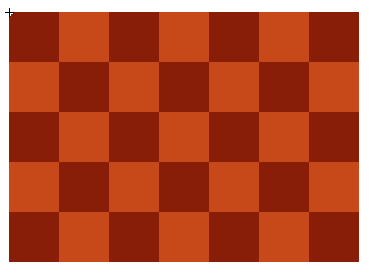
CheckedBackground, which is the same size as the stage, with its registration point in the top-left corner.

Face, which is about half as wide as the stage, with its registration point in the center.

Position them on the stage like so:

public class Main extends Sprite
{
	private var checkedBackground:CheckedBackground;
	private var face:Face;
	public function Main()
	{
		checkedBackground = new CheckedBackground();
		checkedBackground.x = 0;
		checkedBackground.y = 0;
		this.addChild( checkedBackground );

		face = new Face();
		face.x = stage.stageWidth / 2;		//center the face horizontally
		face.y = stage.stageHeight / 2;		//center the face vertically
		this.addChild( face );
	}
}

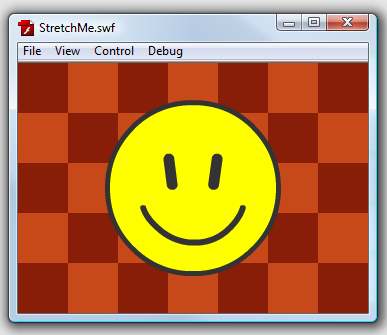
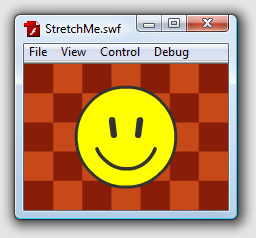
Run your SWF:


Step 2: Stretch the Player Window

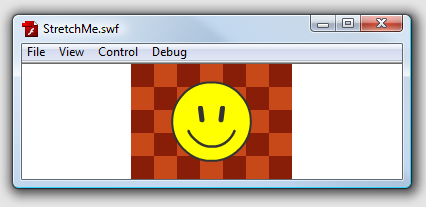
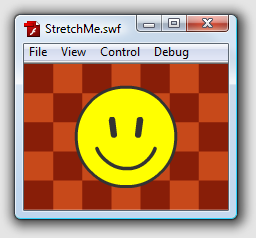
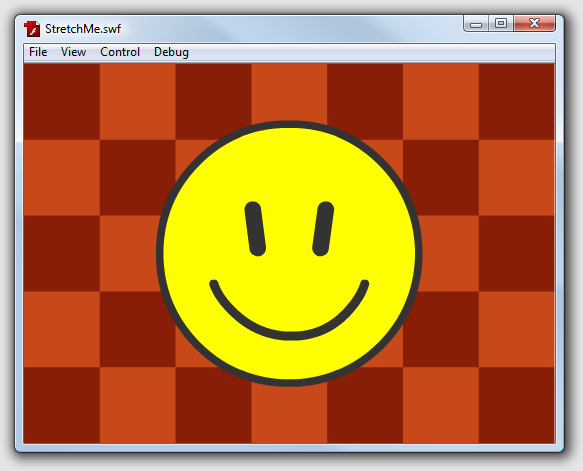
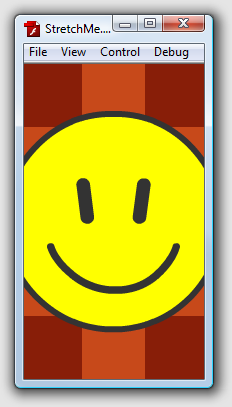
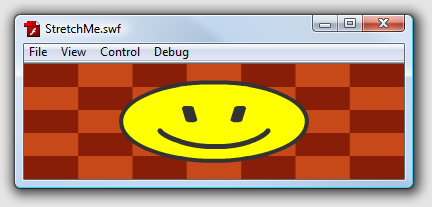
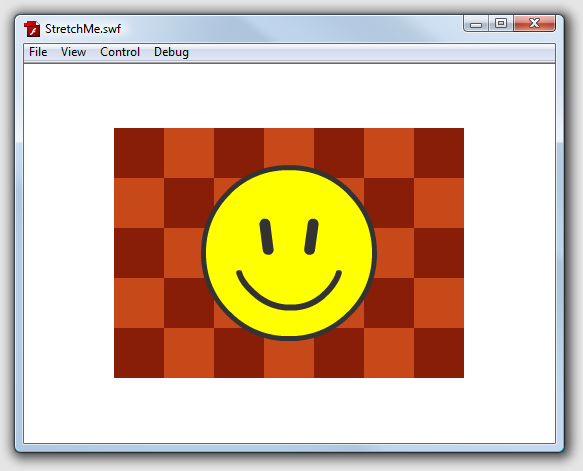
Make the window bigger, make it smaller, stretch it both in and out of proportion, and see how the contents change:

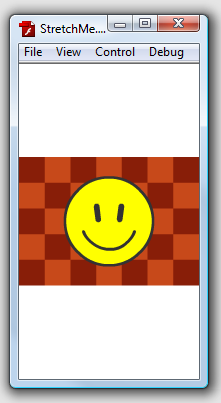
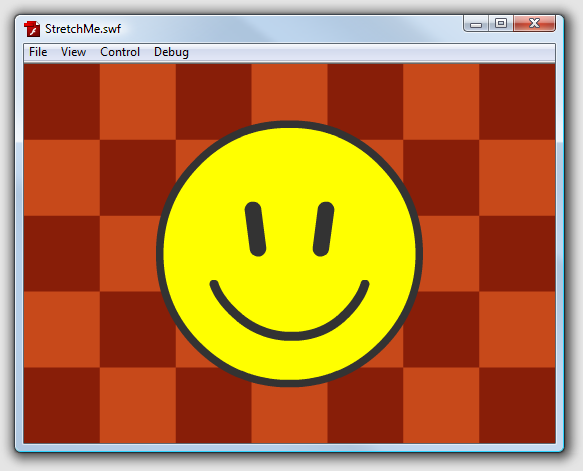
This is Flash’s default scale mode, SHOW_ALL. The contents are never distorted, and you can always see the whole stage. This means you get a “letterbox” effect if stretching out of proportion.


Step 3: Try the NO_BORDER Scale Mode

SHOW_ALL is the default scale mode, but there are three others we can use.

Import the StageScaleMode class:

import flash.display.StageScaleMode;

This contains static consts that can be used to set the scale mode. Let’s try NO_BORDER; add this line to your constructor function:

stage.scaleMode = StageScaleMode.NO_BORDER;

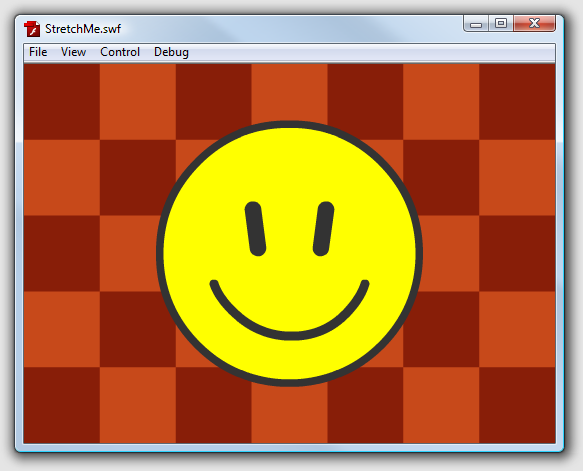
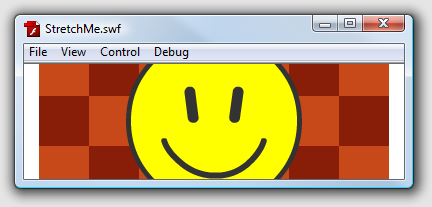
Run your SWF and stretch it again:

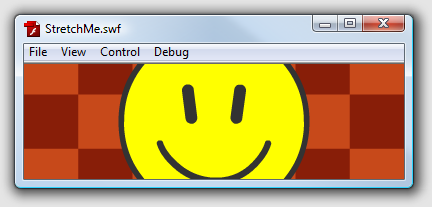
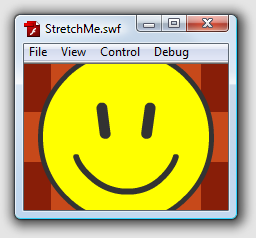
As the name suggests, NO_BORDER avoids the letterbox effect. The contents stay in proportion but always fill the available area, even if that means cropping the edges.


Step 4: Try the EXACT_FIT Scale Mode

Change the line that sets the scale mode like so:

stage.scaleMode = StageScaleMode.EXACT_FIT;

Try it out:

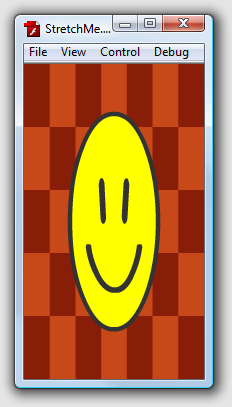
EXACT_FIT makes the edges of the stage stick to the edges of the available area, leading to distortion if the player is stretched out of proportion.


Step 5: Try the NO_SCALE Scale Mode

To check out the final scale mode, change the line like so:

stage.scaleMode = StageScaleMode.NO_SCALE;

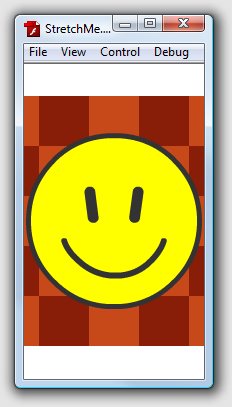
Check it out:

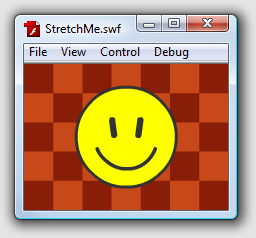
With NO_SCALE, the contents don’t change size at all; they stay centered in the player window, even if that means cropping huge amounts of the edges, or leaving massive borders on all sides.


Conclusion

Stage.scaleMode lets you control how your SWF will appear if a website changes the size of the available area. It’s also useful for creating AIR apps and full screen Web sites; NO_SCALE is a particularly good choice there, as (when combined with a RESIZE event listener) it allows you to fit the entire content to the window, while maintaining the size and proportions of the individual assets.

For more on that, check out Franci Zidar’s series on full screen scalable Web sites :)

100 Toddler Shots to Improve Your Family Photography

In honor of the most photogenic beings on the planet, we’ve compiled 100 amazing and fun shots of toddlers doing what they do best: completely capturing our attention. I challenge you to browse this post and not smile at least once.

Kids make the best photography subjects. They’re completely unpredictable, incredibly prone to humorous acts and quite often love to have their picture taken. Whenever you’re around a child, keep your camera ready and you’ll almost never be disappointed.


In the tube

Peek-a-boo

“i’m a toddler!” yoga

Best Toddler Imitation of a Mexican Wrestler Ever

Shot Tower Toddler

Toddler without a Cause

Toddler with Dandelion

5282 Toddler Legs

Toddler and the Shell

Toddler in the hole

Toddler

Toddler

Untitled

Toddlers on a bench

Lyuba

Bathroom reading

Pretty Miss E

Portal

Tickle Tickle

Nadia eres un sol

Who dressed YOU?

3 year old + Nikon D80 = Nervous Dad!

Reflections

Light, God’s eldest daughter

super cute

Alvó szempillák – Sleeping Eyelashes

Untitled

flickr colors

Leona at play

Free!

surprise!

surprise!

Waiting… to fly

Pig Pen EXPLORED!

Dylan Big Laugh

Forever blowing bubbles

Engaged

yummy in my tummy (and on my face… and hands… and stomach)

Pile-up on the Interstate

Cousins

Hey Ernie!

hugging his dog

Dordogne, Foodfest, France 2009

Beary Scary

Laughing

Anjo

Lost in thought

Almost flying

found a toddler photo of myself

alwaysbecurious EXPLORED!

Untitled

DSC09890

Eva: Tiny Thoughts

Playful toddler on hardwood floor

I have to explain

Ten-10 and Tyler

Lilah, Close

Toddler starting “the Wave”

WritingOnTheWall

Summertime

Toddler { Wedged }

Jump

Cohorts

dressed and ready for winter

P’tite-Pomme

Testing the Flow of the Fountain

Hello Kitty!

phagwah baby

Mine. All mine.

Cassette

Playing in the Sand in Late Evening Light

MY Dad Says It Makes Me Look Clever — Does IT?

Swing!

look up

So happy!

After the Fall

claire 4

Alex celebrates his birthday

Alex makes a friend at the park

HaiQal | Adik Fitri

Toddler Senior Picture Pose

Alexis looking in the snow

almost summer

oh to be a kid again

Timothée, thinking

Toddler Tank

Erina-25

Little Creations-6

claire 3

Stella & Jolene swingset 18

Jeans-and-Pink-Boots

0158bw_4×6

Little Creations – Monkey Class

Toddler in mirror

Someone Is Finally Comfortable with the Camera

Untitled

An African Christmas 2009

Ahh!

Little Sailor in Paris

Erina-35


Share Your Toddler Shots

Everyone loves to share pictures of their kids. Today we’re officially giving you permission! Leave a link in the comments below to your favorite toddler shots and also tell us which of the photos above is your favorite.

It’s Okay to Stare

Imagine stopping in the middle of a busy work day, kicking up your feet on your desk, sitting back, arms cradling the back of the head in daydream mode. Now imagine that this is one of the best things you could do in the course of a busy work day.

It’s okay, let them stare. Because the truth is that your blank stare at the wall is just what the mind needs to slow down, clear out some of the clutter and give the creative brain the opportunity to open up to better thinking, greater creativity and maybe even the next big idea.

The Ire of Idle Hands

Corporate America isn’t built to accommodate dreamers. Traditionally, it’s been all about the volume of work. In this world quantity rules. Idle hands are tools of the devil, remember? Yes, but they’re also a sign of creativity at work. A Wired article about the productivity enhancing merits of Twitter and Facebook argued that, “regularly stepping back from the project at hand can be essential to success. And social networks are particularly well suited to stoking the creative mind.”

Great news, but little consolation when the boss chews you out for screwing around. If he knew what leading theorists in the field of creative intelligence knew he might just give you a nice daydream disrupting pat on the back.

It’s all about The Incubation Time

The creative process is kind of like applied mysticism. Ideas often come in a flash, out of nowhere and without warning even at the most unusual times – often times beyond the boundaries of 9 to 5 thinking.

Maybe this is because it’s only when we have traditionally been able to leave the office that our mind can relax and enter what is known as the incubation phase of the creative process. The incubation phase is where the aforementioned magic happens. During this time, “the preliminary ideas of the preparation stage are allowed to gestate for an unspecified period of time while the problem is not pursued consciously. The culmination of the incubation process is the explosive stage of illumination.” (Source: The Encyclopedia of Creativity, VOL II, pg. 676, Academic Press, 1999)

Sounds like “down time” to me. Here, too, is the origins of the coveted Aha! moment. Just one and you could be on your way to bigger and better things in your career. And all it takes is a little inactivity. Just a few cautious moments to let the mind do what it does best: create.

Go ahead…stare

Now that we’ve all seen the merits of stepping back, staring at a wall or computer screen and letting the creative wheels turn a bit, let’s talk about how to do this at work without getting talked about or tossed out before that Aha! moment happens.

For starters, remember that we have more opportunities to engage the idea generating part of the brain than we realize. And, the most important part is to get the idea in there and let it grow. The subconscious mind will take care of the rest. The problem is that we allow for very few gaps in our thinking. We’re conditioned to keep it filled with worries, concerns, fantasies and the latest water cooler gossip. Why not give it a rest?

Getting back to the Wired story on social networks and productivity, this is why there is a counterintuitive workplace benefit to measured social networking. That next tweet or Facebook can provide that gap and may just fan the creative flames to solve the next big problem at work (mind you, you can go wrong when using social networks at work as well).

Don’t Try This at Home, Use it at Work

As you can see, screwing around a bit at work has the potential to make you the most productive, creative and dynamic mind in your office. Here are a few simple ways – among others – to get started staring blankly into the vast depths of possibility:

  1. Make Your Next Break Just That – When we get breaks during the day, even if it’s for just a few minutes, we have this tendency to fill it with random busyness. Instead, take a few breaths, close your eyes and let the mind just go. You might be surprised where it ends up.
  2. The Extended Water Break – Take a few extra moments during the next water break and go for a quick walk. Try to walk mindfully and use the stroll to empty the head. If there’s a problem to solve, let it rest there during this time. This is one way to begin the incubation process.
  3. Find White Space – Turn away form the computer screen for a few minutes and just stare at the wall. Before you do, take a few deep mindful breaths. Relax your shoulders a bit. Now, just let the mind rest. Repeat as needed.
  4. Be A Lunch Loner – Lunch is a great time gossip with coworkers, an opportunity to run a few errands and if you’re determined to have the next big idea, it’s also great time to open the mind. Why not bring a lunch, get out of the office, find a quiet place and just disengage a bit?

You are now fully prepared to step back just enough that those great ideas and insights of yours have a fighting chance at work. Because the truth is that the next great idea can come from anywhere. You’re just as capable as anyone. Make it happen.

Composite a 3D object into video footage with Boujou, Maya and After Effects

Matchmoving is a visual effects technique that allows the insertion of computer graphics into video footage. In this tutorial we’ll start by taking a look at how we can track our footage using Boujou. We’ll then jump into Maya and use that tracking information, along with a custom HDR image, to create and render a 3D object which we can insert into the scene. We’ll then use After Effects to composite the 3D object into the original video. The techniques used in this tutorial can be applied to almost almost all of your 3D integration shots.

Step 1

First we need to convert our video into sequence of images so that it can be read by Maya and Boujou. Open After Effects and go to “File > Import > File…”.


Step 2

Navigate to your footage, select it and click “Open” to load the video into After Effects.


Step 3

To create a composition with the same characteristics as our source footage, just drag the video to the new composition button.


Step 4

You should now be able to see the video along with it’s timeline.


Step 5

We now need to change our composition’s frame rate to match the frame rate in Maya. Go to “Composition > Composition Settings…”


Step 6

As the frame rate for this footage is 30fps, I’m going to set the frame rate to 30 frames per second and click “Ok”.


Step 7

To render the video, go to “Composition > Add to Render Queue”.


Step 8

Once the render queue has opened, click on the word “Lossless” in the output module section.


Step 9

In the output module settings, select “JPEG Sequence” from the dropdown and then press “OK”.


Step 10

Click here to change the name of your rendered image sequence.


Step 11

Select the folder where you want your sequence to be rendered to (remember that we’re going to be creating a lot of images!) Now change the name of your video to match this format : “Name of your video.[####].jpg”. The “.[####]” is extremely important as it ensures that our images are named sequentially. Also, make sure that you use a dot and not a under score in the filename, as Maya won’t recognize the sequence if it is not in the above format.


Step 12

We’re now ready to render the sequence, so click “Render”.


Step 13

Open Boujou and click on “Import Sequence”.


Step 14

Find the sequence that you rendered with After Effects, select the first file and click “Open”.


Step 15

Click on “OK”.


Step 16

Click on the “Edit Camera” button.


Step 17

We need to make sure that Boujou is working with the same frame rate as our sequence, so change the frame rate to 30 and click “OK”.


Step 18

Click on the “Track Features” button.


Step 19

I usually leave the settings as default, so just make sure “All frames” is active and click on “Start”.


Step 20

Boujou will now start the initial tracking process.


Step 21

Now that Boujou has finished, we have 2-dimensional tracking data for our shot. However, in order to integrate a 3D object into the footage we need to calculate the position and rotation of the camera. To begin this process, click on the “Camera Solve” button.


Step 22

Make sure that “All frames” is active and click on “Start”.


Step 23

Boujou will now start calculating the scene camera’s position and rotation.


Step 24

Once Boujou has finished tracking, we now need to align our scene to match the footage. Scroll through the video and select 2 or more points that lie in a straight line, in this case on the tabletop. These points will form our X-axis.


Step 25

Click on the “Scene Geometry” button.


Step 26

Click on “Add Coord Frm Hint”.


Step 27

Select the X-axis from the “Type” dropdown and click on “Connect to Selected”.


Step 28

With our X-axis in place, we now need to define at least one other axis so that Boujou can correctly orient our scene. Close the previous window and now select 2 or more points that lie in a straight line, but at 90 degrees to our X-axis. This will be our Z-axis and in this case travels away from camera across the tabletop.


Step 29

Click on the “Scene Geometry” button.


Step 30

Click on “Add Coord Frm Hint”, select the Z-axis from the “Type” dropdown and click on “Connect to Selected”.


Step 31

If you can confidently select points in order to calculate the Y-axis, do so and repeat the process as before, making sure to select the Y-axis from the “Type” dropdown before clicking “Connect to Selected”. In this scene, we’re unable to select Y-axis points so we’ll move straight on to the next step.


Step 32

Click on the “Scene Geometry” button, then click “Update Coord. Frame” and close the window.


Step 33

Activate the “Ground Plane” checkbox in the overlay tab on the bottom-right of the Boujou window.


Step 34

We can now see the floor plane that has been calculated for our scene. It should stay in place throughout the video (try scrolling through the footage to make sure that this is the case.) If it does not however, repeat steps 24-31 above, choosing different points to orient your scene.


Step 35

To make sure that our track is correct, we’re going to create some test objects. Click on the “Add Test Objects” button.


Step 36

Select the object of your preference and close the window, I usually choose “Ladybird”.


Step 37

Play the video to see if the object stays in place throughout. As with the ground plane overlay, if your object does not sit correctly within your footage, your scene might not be oriented correctly. If this is the case you should repeat steps 24-31 above choosing different points for each axis.


Step 38

We now need to export our tracking information to Maya. To do this, go to “Export > Export Camera Solve”.


Step 39

Browse to your project folder and choose a filename, change the export type to “Maya 4+” and then make sure the move type corresponds to your footage. As this footage was shot using a handheld camera, I’ve chosen “Moving Camera, Static Scene”. With this done, click “Save”.


Step 40

After opening Maya, go to “File > Open” and open the file that we just exported from Boujou. Your viewport should look similar to this image.


Step 41

In the menu at the top of the active viewport, go to “Panels > Perspective > Camera_1_1”.


Step 42

We will now be looking through the matchmoved camera created for us by Boujou.


Step 43

Go to “Create > Text” and click the option box.


Step 44

Enter your text and use the available options to add bevels to the text object. Click “Create” when done.


Step 45

As we aligned our scene within Boujou, our new text object should automatically sit on top of the table in our original footage.


Step 46

Rotate, scale and position the text as desired, making sure that it remains sitting right on top of the grid.


Step 47

Go to “Window > Rendering Editors > Hypershade”.


Step 48

Select “Create Mental Ray Nodes” from the dropdown on the left, and click “mia_material_x” in the “Materials” group to create a new material.


Step 49

With the new material still selected, press “Ctrl-A” to open the attribute editor and change the diffuse color of your material to your desired color, in this case a red/orange. We also want to change the following options : Reflection Color to grey, Reflectivity to 1.000, Glossiness to 0.350 and Glossy samples to 0.


Step 50

Close the Hypershade. Right click our text object in the viewport and go to “Assign Existing Material > mia_material_x1″ to apply our new material to the text.


Step 51

Open the “Render Settings” window.


Step 52

Select “mental ray” from the “Render Using” dropdown. Now change the following options in the Common tab : Choose a file name prefix (in this case I have added a folder structure before the name itself to ensure that the files are saved to the correct location,) change the image format to TIFF, change the “Frame/Animation ext” to name.#ext, set the “Start frame” and “End frame” values to match that of your animation, select “Camera_1_1” from the “Renderable Camera” dropdown, and make sure that the rendered image size matches that of your footage (in this case I have selected the HD 1080 preset.) With that done we can now close the render settings window.


Step 53

We now need to make sure that Maya’s frame rate matches that of our footage. Go to “Window > Settings/Preferences > Preferences”.


Step 54

In the “Settings” category change the time to match that of your footage. Here I’ve selected “NTSC (30 fps)”. Click “Save” When done.


Step 55

Re-open the Render settings window.


Step 56

In the Quality tab we need to change the following options: set the “Max Sample Level” to 2, “Multi-pixel Filtering” to “Gauss”, activate “Jitter”, “Raytracing Reflections” and “Refractions” to 3, “Raytacing Max Trace Depth” to 6, set “Motion Blur” to “Full” and set the “Motion Blur By” value to 2.000.


Step 57

Go to the “Indirect Lighting” tab and create an Image Based Lighting Environment. Then activate “Final Gathering” and change “Accuracy” to 200, “Point Density” to 0.100 and “Secondary Diffuse Bounces” to 2.


Step 58

If the attributes editor isn’t visible, click “Ctrl-A” to activate it. Click the folder icon next to “Image Name” and browse to your HDRI file.


Step 59

Go to “Create > Lights > Area Light”.


Step 60

Making sure that the light is selected, go to “Panels > Look Through Selected” in the menu at the top of the active viewport.


Step 61

Position the light so that the shadows cast will match direction of the shadows in the original footage.


Step 62

Go to the Attributes Editor with the light selected and activate “Use Ray Trace Shadows”. With this done, change the “Shadows Rays” to 15.


Step 63

With the light still selected go to “Edit > Duplicate”.


Step 64

Select the duplicated light and go to “Panels > Look Through Selected” in the menu at the top of the active viewport.


Step 65

Position the new light at the same height but on the opposite side of our text. This helps to produce softer shadows in the final render.


Step 66

Go to the attributes editor of the new light and turn off “Use Ray Trace Shadows”.


Step 67

In the active view menu go to “Panels > Perspective > Camera_1_1”.


Step 68

Now we need to create a surface to act as a shadow-catcher. Go to “Create > Polygon Primitives > Plane”.


Step 69

Move and scale the plane so that the shadows of the text will fall within it’s boundaries.


Step 70

Go to “Window > Rendering Editors > Hypershade”.


Step 71

Select “Create Maya Nodes” from the dropdown on the left, and click the “Use Background” material in the “Surface” group. This material allows our plane to receive shadows and reflections, but ensures that we can still successfully composite the final render on top of our original footage.


Step 72

With our new “Use Background” material selected, go to the attributes Editor and reduce “Reflectivity” to 0.


Step 73

Apply this material to the plane, by right clicking the plane object and selecting “Assign Existing Material > UseBackground1″.


Step 74

We’re now going to double-check that our objects sit exactly on top of the groundplane. In the menu at the top of the active viewport, go to “Panels > Orthographic > Side”.


Step 75

Move the objects into position if required.


Step 76

Go back to the “Camera_1_1” camera.


Step 77

Create a test-render of the scene by clicking the “Render” icon in the main toolbar.


Step 78

You can see in our render how the object integrates perfectly within the scene. If the shadows are cut off at this point, close the render view and scale up your shadow-catcher object. Make sure to do another test-render to ensure the problem has been fixed.


Step 79

Select the “Rendering” menu from the main toolbar dropdown and go to “Render > Batch Render” to begin rendering the sequence.


Step 80

When Maya finishes the rendering process jump over to After Effects and go to “File > Import > File…” .


Step 81

Navigate to find your newly rendered sequence, select the first frame and, making sure that the “TIFF Sequence” option is active, click on “Open”.


Step 82

A window asking for the alpha channel will pop up. Select “Straight – Unmatted” and click “OK” to import the footage along with it’s alpha channel.


Step 83

We now need to import the original video sequence. Go to “File > Import > File…”.


Step 84

Browse for the sequence of images we initially rendered out from After Effects, select the first frame and, making sure that the “JPEG Sequence” option is active, click “Open”.


Step 85

You should now see both sequences in the project bin.


Step 86

Drag the .tif sequence we rendered from Maya to the new composition button.


Step 87

Now drag our original .jpg sequence into the composition we just created, making sure to position it below the .tif sequence.


Step 88

Our two layers are now composited together in the viewport.


Step 89

If you zoom in, however, you’ll notice that there’s currently a glitch. This is because whilst the foreground sequence begins on frame 1, the background sequence begins on frame 0.


Step 90

To correct this error, zoom into the time line using the small slider at the bottom of the screen, and drag the green bar representing our background sequence 1 frame to the left.


Step 91

With this done, you can now see that the glitch has now disappeared.


Step 92

All we need to do now is render the video. Go to “Composition > Add to Render Queue” and set your desired output options.

Don’t miss more CG tutorials and guides, published daily – subscribe to Cgtuts+ by RSS.

How Do You Handle Distractions?

Some people use headphones or a closed door to tell office mates when they’d rather not be disturbed. Some resort to web plugins to block certain websites that are just too good to resist (I’m looking at you, Facebook and ApartmentTherapy!). Others could work just fine with the TV blaring, phone ringing, and small children screaming incoherently.
How do you deal with distractions?

Do you put up a “Do Not Disturb” sign? Lock yourself in a secluded room without TV or phone service? Or are you one of those lucky few who don’t get fazed by noise or other disruptions?

As a work-at-home freelance writer without kids or pets, I don’t have many of the same distractions that office workers or even work-at-home parents have. Still, there are plenty of cyber-distractions threatening to hijack my productivity. I give myself a few minutes of Facebook and Twitter time each day (after all, social media is like my virtual water cooler and without it out I might go stir crazy all day by myself). Then it’s “back to work, missy.” Occasionally, when deadlines loom and household chores beckon, I might escape to the library or coffee shop.

What about you?  While there are some suggestions here, we want to hear from our WorkAwesome readership…let us know in the comments.

5 Ways to Stay Lean While Working From Home

So, you’ve managed to convince your boss and/or your spouse that you can be more successful by working from home.  Nicely done. However, as discussed here, there can be some concerns if you aren’t careful.

Here are a few tips to help prevent you from putting on extra weight whilst working from home:

1. Have set mealtimes

A regular meal schedule can help you avoid the need for snacking.  There’s a lot to be said about eating smaller portions, less often.  If you have the flexibility to do this while you work from home, you might find that you aren’t having crazy sugar cravings as often.  Of course, one of the keys to this is reducing your portion size – moderation is essential.

2. Create appropriate snacks

If you have to have snacks, make it easy to make the right choice.  Fresh fruit, fresh vegetables, or small appy plates (cheese and crackers, or pickles and sliced meats) are all great choices.  If you plan ahead, you can even reward yourself when you achieve some of your daily goals.

3. Get rid of the junk food

It might hurt at first, but get rid of the chips, chocolates, candies, and ice cream.  When you are avoiding work, or suffering writers block, or just trying to take a break, the temptation to eat junk is eliminated if you don’t have any in the cupboards.

4. Cut out the cream

If you’re like me, and working at home means more (and usually much better) coffee, be aware of how much cream and sugar you’re putting into your drink.  It all adds up, and over time you might notice it adding to your weight.  This includes Irish Cream in your coffee – now that you don’t have to drive to work, you can reward yourself with a tasty adult beverage – just be careful how much and how often.

5. Get up and exercise

Now that you don’t have that extra flight of stairs, or that walk from the parking lot to your office, try to add in some new exercise to keep your body in good shape.  Go for a walk around the block, have a bike ride with the kids, or just spend some time on the treadmill.  Make it a habit, and you might even start enjoying it.  I’m not quite there yet – but apparently it will happen.

Congratulations on joining the work-at-home team – and don’t stress about your weight.  Try to make healthy decisions now that you’ve got the flexibility, and enjoy the freedom working from home provides.

10 PHP code snippets for working with strings

Automatically remove html tags from a string

On user-submitted forms, you may want to remove all unnecessary html tags. Doing so is easy using the strip_tags() function:

$text = strip_tags($input, "");

Source: http://phpbuilder.com/columns/Jason_Gilmore060210.php3?page=2

Get the text between $start and $end

This is the kind of function every web developer should have in their toolbox for future use: give it a string, a start, and an end, and it will return the text contained with $start and $end.

function GetBetween($content,$start,$end){
    $r = explode($start, $content);
    if (isset($r[1])){
        $r = explode($end, $r[1]);
        return $r[0];
    }
    return '';
}

Source: http://www.jonasjohn.de/snippets/php/get-between.htm

Transform URL to hyperlinks

If you leave a URL in the comment form of a WordPress blog, it will be automatically transformed into a hyperlink. If you want to implement the same functionality in your own website or web app, you can use the following code:

$url = "Jean-Baptiste Jung (http://www.webdevcat.com)";
$url = preg_replace("#http://([A-z0-9./-]+)#", '$0', $url);

Source: http://phpbuilder.com/columns/Jason_Gilmore060210.php3?page=2

Split text up into 140 char array for Twitter

As you probably know, Twitter only accepts messages of 140 characters or less. If you want to interact with the popular social messaging site, you’ll enjoy this function for sure, which will allow you to truncate your message to 140 characters.

function split_to_chunks($to,$text){
	$total_length = (140 - strlen($to));
	$text_arr = explode(" ",$text);
	$i=0;
	$message[0]="";
	foreach ($text_arr as $word){
		if ( strlen($message[$i] . $word . ' ') <= $total_length ){
			if ($text_arr[count($text_arr)-1] == $word){
				$message[$i] .= $word;
			} else {
				$message[$i] .= $word . ' ';
			}
		} else {
			$i++;
			if ($text_arr[count($text_arr)-1] == $word){
				$message[$i] = $word;
			} else {
				$message[$i] = $word . ' ';
			}
		}
	}
	return $message;
}

Source: http://snipplr.com/view.php?codeview&id=31648

Remove URLs from string

When I see the amount of URLs people try to leave in my blog comments to get traffic and/or backlinks, I think I should definitely give a go to this snippet!

$string = preg_replace('/\b(https?|ftp|file):\/\/[-A-Z0-9+&@#\/%?=~_|$!:,.;]*[A-Z0-9+&@#\/%=~_|$]/i', '', $string);

Source: http://snipplr.com/view.php?codeview&id=15236

Convert strings to slugs

Need to generate slugs (permalinks) that are SEO friendly? The following function takes a string as a parameter and will return a SEO friendly slug. Simple and efficient!

function slug($str){
	$str = strtolower(trim($str));
	$str = preg_replace('/[^a-z0-9-]/', '-', $str);
	$str = preg_replace('/-+/', "-", $str);
	return $str;
}

Source: http://snipplr.com/view.php?codeview&id=2809

Parse CSV files

CSV (Coma separated values) files are an easy way to store data, and parsing them using PHP is dead simple. Don’t believe me? Just use the following snippet and see for yourself.

$fh = fopen("contacts.csv", "r");
while($line = fgetcsv($fh, 1000, ",")) {
    echo "Contact: {$line[1]}";
}

Source: http://phpbuilder.com/columns/Jason_Gilmore060210.php3?page=1

Search for a string in another string

If a string is contained in another string and you need to search for it, this is a very clever way to do it:

function contains($str, $content, $ignorecase=true){
    if ($ignorecase){
        $str = strtolower($str);
        $content = strtolower($content);
    }
    return strpos($content,$str) ? true : false;
}

Source: http://www.jonasjohn.de/snippets/php/contains.htm

Check if a string starts with a specific pattern

Some languages such as Java have a startWith method/function which allows you to check if a string starts with a specific pattern. Unfortunately, PHP does not have a similar built-in function.
Whatever- we just have to build our own, which is very simple:

function String_Begins_With($needle, $haystack {
    return (substr($haystack, 0, strlen($needle))==$needle);
}

Source: http://snipplr.com/view.php?codeview&id=2143

Extract emails from a string

Ever wondered how spammers can get your email address? That’s simple, they get web pages (such as forums) and simply parse the html to extract emails. This code takes a string as a parameter, and will print all emails contained within. Please don’t use this code for spam ;)

function extract_emails($str){
    // This regular expression extracts all emails from a string:
    $regexp = '/([a-z0-9_\.\-])+\@(([a-z0-9\-])+\.)+([a-z0-9]{2,4})+/i';
    preg_match_all($regexp, $str, $m);

    return isset($m[0]) ? $m[0] : array();
}

$test_string = 'This is a test string...

        [email protected]

        Test different formats:
        [email protected];
        <a href="[email protected]">foobar</a>
        <[email protected]>

        strange formats:
        [email protected]
        test6[at]example.org
        [email protected]
        test8@ example.org
        test9@!foo!.org

        foobar
';

print_r(extract_emails($test_string));

Source: http://www.jonasjohn.de/snippets/php/extract-emails.htm

Like CatsWhoCode? If yes, don’t hesitate to check my other blog CatsWhoBlog: It’s all about blogging!

10 PHP code snippets for working with strings

Just Announced: Safari 5 Released


Despite the fact that Steve Jobs made no reference to it during his keynote speech, Safari 5 is currently available for download! If it’s not showing up for you, keep checking over the course of the next few hours. You can expect extensions, improved HTML5 and CSS3 support, faster JavaScript performance, and a plethora of other new features.


The Press Release

SAN FRANCISCO, June 7 /PRNewswire-FirstCall/ — Apple® today released Safari® 5, the latest version of the world’s fastest and most innovative web browser, featuring the new Safari Reader for reading articles on the web without distraction, a 30 percent performance increase over Safari 4,* and the ability to choose Google, Yahoo! or Bing as the search service powering Safari’s search field. Available for both Mac® and Windows, Safari 5 includes improved developer tools and supports more than a dozen new HTML5 technologies that allow web developers to create rich, dynamic websites. With Safari 5, developers can now create secure Safari Extensions to customize and enhance the browsing experience.

“Safari continues to lead the pack in performance, innovation and standards support,” said Philip Schiller, Apple’s senior vice president of Worldwide Product Marketing. “Safari now runs on over 200 million devices worldwide and its open source WebKit engine runs on over 500 million devices.”

Safari Reader makes it easy to read single and multipage articles on the web by presenting them in a new, scrollable view without any additional content or clutter. When Safari 5 detects an article, users can click on the Reader icon in the Smart Address Field to display the entire article for clear, uninterrupted reading with options to enlarge, print or send via email.

Powered by the Nitro JavaScript engine, Safari 5 on the Mac runs JavaScript 30 percent faster than Safari 4, three percent faster than Chrome 5.0, and over twice as fast as Firefox 3.6.* Safari 5 loads new webpages faster using Domain Name System (DNS) prefetching, and improves the caching of previously viewed pages to return to them more quickly.

Safari 5 adds more than a dozen powerful HTML5 features that allow web developers to create media-rich experiences, including full screen playback and closed captions for HTML5 video. Other new HTML5 features in Safari 5 include HTML5 Geolocation, HTML5 sectioning elements, HTML5 draggable attribute, HTML5 forms validation, HTML5 Ruby, HTML5 AJAX History, EventSource and WebSocket.
The new, free Safari Developer Program allows developers to customize and enhance Safari 5 with extensions based on standard web technologies like HTML5, CSS3 and JavaScript. The Extension Builder, new in Safari 5, simplifies the development, installation and packaging of extensions. For enhanced security and stability, Safari Extensions are sandboxed, signed with a digital certificate from Apple and run solely in the browser.

Pricing & Availability

Safari 5 is available for both Mac OS® X and Windows as a free download at www.apple.com/safari. Safari 5 for Mac OS X requires Mac OS X Leopard 10.5.8 or Mac OS X Snow Leopard® 10.6.2 or later. Safari 5 for Windows requires Windows XP SP2, Windows Vista or Windows 7, a minimum 256MB of memory and a system with at least a 500 MHz Intel Pentium processor. Full system requirements and more information on Safari 5 can be found at www.apple.com/safari. The Safari Developer Program is free to join at developer.apple.com/programs/safari.

*Performance will vary based on system configuration, network connection and other factors. All testing conducted by Apple in May 2010 on an iMac® 3.06 GHz Intel Core 2 Duo system running Mac OS X 10.6.3, with 4GB of RAM. JavaScript benchmark based on the SunSpider 0.9.1 JavaScript Performance test.

Apple ignited the personal computer revolution with the Apple II, then reinvented the personal computer with the Macintosh. Apple continues to lead the industry with its award-winning computers, OS X operating system, and iLife, iWork and professional applications. Apple leads the digital music revolution with its iPods and iTunes online store, has reinvented the mobile phone with its revolutionary iPhone and App Store, and has recently introduced its magical iPad which is defining the future of mobile media and computing devices.


What this specifically means for web developers has yet to be determined. Extensions? Improved developer tools? Faster JavaScript? Better CSS3 support? Absolutely! Be sure to check back with Nettuts+ over the next twenty-four hours for updated impressions and details.

Safari 5 Released


Despite the fact that Steve Jobs made no reference to it during his keynote speech, Safari 5 is currently available for update! If it’s not showing up for you, keep checking over the course of the next few hours.


The Press Release


SAN FRANCISCO, June 7 /PRNewswire-FirstCall/ — Apple® today released Safari® 5, the latest version of the world’s fastest and most innovative web browser, featuring the new Safari Reader for reading articles on the web without distraction, a 30 percent performance increase over Safari 4,* and the ability to choose Google, Yahoo! or Bing as the search service powering Safari’s search field. Available for both Mac® and Windows, Safari 5 includes improved developer tools and supports more than a dozen new HTML5 technologies that allow web developers to create rich, dynamic websites. With Safari 5, developers can now create secure Safari Extensions to customize and enhance the browsing experience.

“Safari continues to lead the pack in performance, innovation and standards support,” said Philip Schiller, Apple’s senior vice president of Worldwide Product Marketing. “Safari now runs on over 200 million devices worldwide and its open source WebKit engine runs on over 500 million devices.”

Safari Reader makes it easy to read single and multipage articles on the web by presenting them in a new, scrollable view without any additional content or clutter. When Safari 5 detects an article, users can click on the Reader icon in the Smart Address Field to display the entire article for clear, uninterrupted reading with options to enlarge, print or send via email.

Powered by the Nitro JavaScript engine, Safari 5 on the Mac runs JavaScript 30 percent faster than Safari 4, three percent faster than Chrome 5.0, and over twice as fast as Firefox 3.6.* Safari 5 loads new webpages faster using Domain Name System (DNS) prefetching, and improves the caching of previously viewed pages to return to them more quickly.

Safari 5 adds more than a dozen powerful HTML5 features that allow web developers to create media-rich experiences, including full screen playback and closed captions for HTML5 video. Other new HTML5 features in Safari 5 include HTML5 Geolocation, HTML5 sectioning elements, HTML5 draggable attribute, HTML5 forms validation, HTML5 Ruby, HTML5 AJAX History, EventSource and WebSocket.
The new, free Safari Developer Program allows developers to customize and enhance Safari 5 with extensions based on standard web technologies like HTML5, CSS3 and JavaScript. The Extension Builder, new in Safari 5, simplifies the development, installation and packaging of extensions. For enhanced security and stability, Safari Extensions are sandboxed, signed with a digital certificate from Apple and run solely in the browser.

Pricing & Availability

Safari 5 is available for both Mac OS® X and Windows as a free download at www.apple.com/safari. Safari 5 for Mac OS X requires Mac OS X Leopard 10.5.8 or Mac OS X Snow Leopard® 10.6.2 or later. Safari 5 for Windows requires Windows XP SP2, Windows Vista or Windows 7, a minimum 256MB of memory and a system with at least a 500 MHz Intel Pentium processor. Full system requirements and more information on Safari 5 can be found at www.apple.com/safari. The Safari Developer Program is free to join at developer.apple.com/programs/safari.

*Performance will vary based on system configuration, network connection and other factors. All testing conducted by Apple in May 2010 on an iMac® 3.06 GHz Intel Core 2 Duo system running Mac OS X 10.6.3, with 4GB of RAM. JavaScript benchmark based on the SunSpider 0.9.1 JavaScript Performance test.

Apple ignited the personal computer revolution with the Apple II, then reinvented the personal computer with the Macintosh. Apple continues to lead the industry with its award-winning computers, OS X operating system, and iLife, iWork and professional applications. Apple leads the digital music revolution with its iPods and iTunes online store, has reinvented the mobile phone with its revolutionary iPhone and App Store, and has recently introduced its magical iPad which is defining the future of mobile media and computing devices.


What this specifically means for web developers is still being determined. Be sure to check back to Nettuts+ over the next twenty-four hours for updated impressions and details.

How to Draw a Glossy Yo-Yo Icon using Adobe Illustrator


Entertain yourself with this tutorial on creating a glossy yo-yo icon. You will learn how to combine different gradient and object effects to make a hyper realistic and shiny plastic surface. The result is a perfectly rendered and appealing icon that can be made in just one hour!
Continue reading “How to Draw a Glossy Yo-Yo Icon using Adobe Illustrator”

Convert Your Modulation Wheel To Any Controller Number In Logic Pro

In this tutorial I’ll show you a handy way to quickly convert your Modulation Wheel into any controller number in Logic Pro.

Introduction

Before we start I should mention that if you have a default template that you use all the time for a new project you should add the following to that template so it’s always in every new project you start.

Step 1

Open a new project and open the Environment (Command+8). Select the layer ‘Clicks and Ports’ from the drop down menu in the top right hand corner.

step1


Step 2

Select the cable between the ‘Input View’ monitor and the Sequencer Input object and delete it.

step2


Step 3

From the New menu select Transformer to create a new Transformer object.

step3


Step 4

Connect the Input View object to the new Transformer object by dragging a cable to it. Then connect the Transformer to the Sequencer Input. Rename the Transformer to ‘Convert’ by selecting it and double clicking on the name in the Inspector. Also make sure the ‘Icon’ button is ticked for the Transformer.

step4


Step 5

Next up is to create a new Environment layer. Go to the drop down in the top right corner of the Environment and choose ‘Create Layer’. It will make a layer called ‘(unnamed)’, select the new layer in the drop down and double click it to rename it. Call it ‘Convert Fader’.

step5


Step 6

In the new layer create a ‘Fader’ object by going to New -> Vertical 5.

step6


Step 7

Rename the fader ‘CC Convert’. In the Inspector change the faders ‘Output’ to ‘Meta’ and where you see ‘-1-:’ below it change the value to 127.

step7

Let me explain what we’ve done. Faders in the Environment can transmit all kinds of information, from Continuous Controller messages, Pitchbend, Fader, Aftertouch etc. They can also output Meta data. These are internal Logic commands and can be used to change all sorts of cool stuff in Logic like Tempo, Screensets, jumping to Markers etc.

One of the things Meta events can also control are Transformer object parameter values. A Meta event with a value of 127 talks to the first row of ‘Operations’ parameters in the Transformer object, and this is what we want.


Step 8

First to actually get this fader to speak to our Transformer object we need to connect it. So how do we connect one object to another one on a different layer?

Simply ‘Option’ click on the faders top port to bring up the ‘Environment Objects’ menu. Navigate to ‘Clicks & Ports’ and choose the ‘Convert’ Transformer we made earlier. On a side note, if we hadn’t have checked the ‘Icon’ box on the Transformer we wouldn’t be able to see it in this menu.

step8

You should now see a curly wire sticking out of the fader which means it successfully connected to our Transformer.


Step 9

Hop on over to the ‘Clicks & Ports’ layer and double click on the ‘Convert’ Transformer to open it. In the top Conditions box set the ‘Status’ to ‘=’ ‘Control’. In the ‘Data Byte 1′ column set the values to ‘=’ ‘1′. This says we want to convert anything that comes in that is ‘Controller 1′ data or in English ‘Modulation’.

step9

In the bottom box or the ‘Operations’ parameters set the ‘Data Byte 1′ column to ‘Fix’ ‘0′. We don’t actually need any specific value here as it’s going to be controlled by our fader. Remember the Meta event from the fader, well this is the value it targets.

meta

How Meta commands target transformer parameters

A word of warning here, the Meta values change Channel, Data Byte 1 and 2 if they are set to anything other than ‘Thru’. If you want independent control over each one you’ll have to use more transformers. As we only need to target one value (Data Byte 1) we’re safe. The Status is untouched by Meta event values.


Step 10

Now switch over to the ‘Convert Fader’ layer and make sure the fader is up in the top right hand corner. ‘Control’ click on an empty space in the Environment and choose ‘Frameless Floating Window’.

step10


Step 11

Resize the now floating window so it holds the fader and place it somewhere out the way.

step11


Step 12 – Title

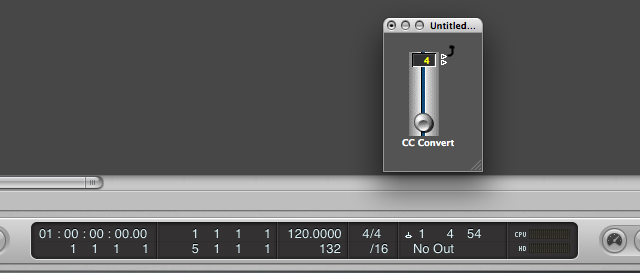
Change the value on the fader and you’ll see that the incoming modulation wheel data is converted to your chosen value before it enters Logics sequencer. You can see below the correct value in the Transport when I move the Mod Wheel.

step12a

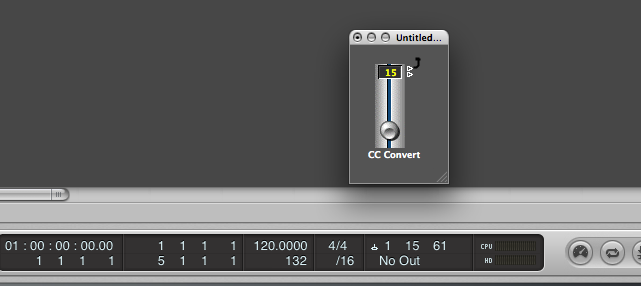
Here’s another example this time set to number 15.

step12b

Conclusion

What we’ve essentially done here is create a UI for a Transformer object, one that also handily floats over any window.

This has a ton of applications and if you have a limited amount of hardware controllers it means your Mod Wheel can essentially control any MIDI parameter in seconds without having to remap anything. All you need to know is the controller number of the parameter you want. For instance Hi Hat pedal control is CC4. Just change the fader value and in Superior Drummer, BFD etc you can open and close the Hi Hats with the Mod Wheel in real time. Even better is if you have an expression pedal you can just change the 1 to 11 (Expression is CC11) in the ‘Conditions’ box and 4 on the fader and now the foot pedal controls the Hi Hat!

Since everything in Logic is controlled by MIDI this can really be a handy utility to have on screen. You can even mod it to control plugin parameters like a Phasers LFO rate. The options are endless!

Familiarizing yourself with CC numbers is probably a good idea if your a bit confused as to what they do. And if your baffled by the Transformer we’ve got a couple of screencasts here at Audiotuts+ about that too.

Hope you’ve enjoyed this and maybe learned something too. Till next time!


How to Create a Photo Realistic Camera


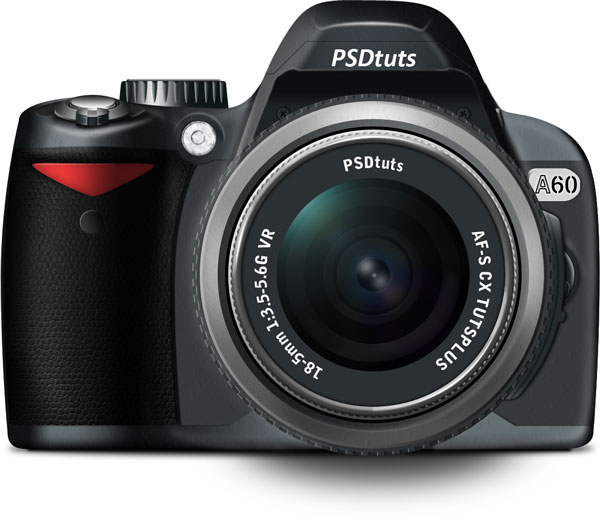
Photoshop is a great tool to work with both vector and pixel shapes. In this tutorial we will demonstrate a powerful combination of vector shapes, layer styles, and manual drawing to create a photorealistic camera. So realistic you’ll think it’s just an ordinary photo.


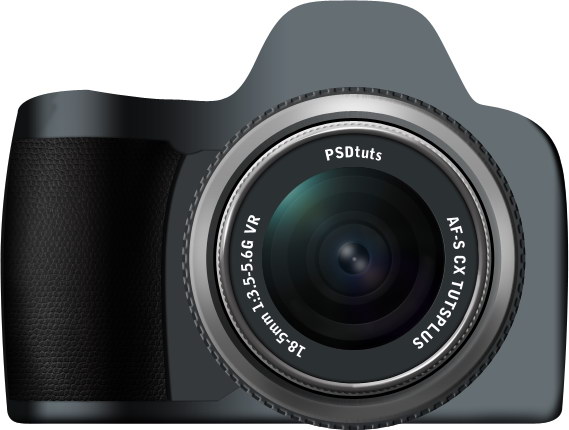
Final Image Preview

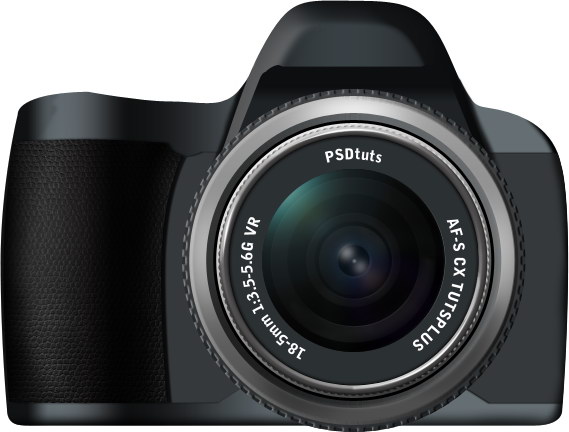
Let’s take a look at the image we’ll be creating. Want access to the full PSD files and downloadable copies of every tutorial, including this one? Join PSDTUTS PLUS for just $9/month. You can view the final image preview below. Click here to see it in full size.


Step 1

Our first step is do some research. This camera is based on a Nikon D-60 so go ahead try to search for any reference material you can find. If you have this camera, put it beside you. If you don’t, try Google image, eBay, or Nikon’s official page to search for an image.

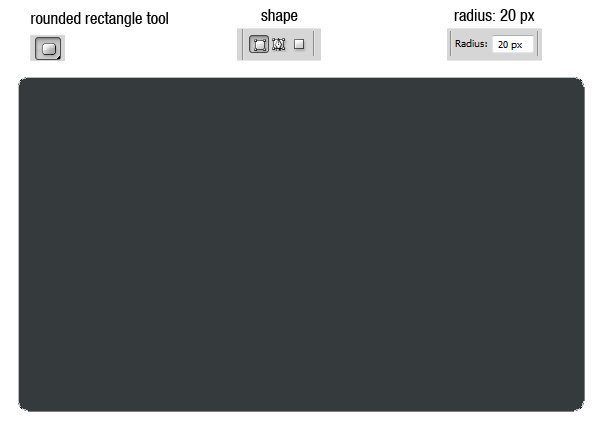
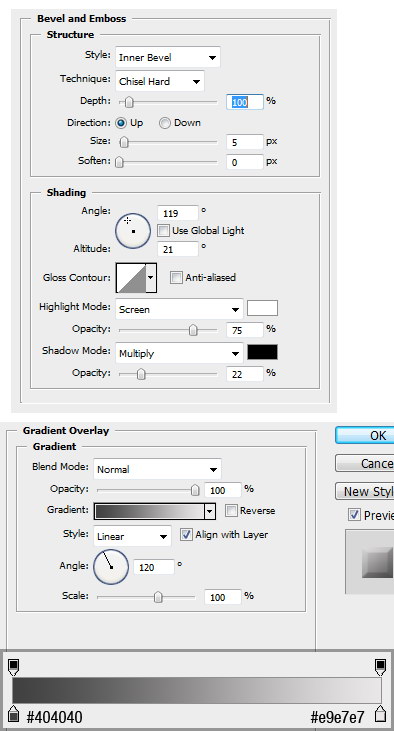
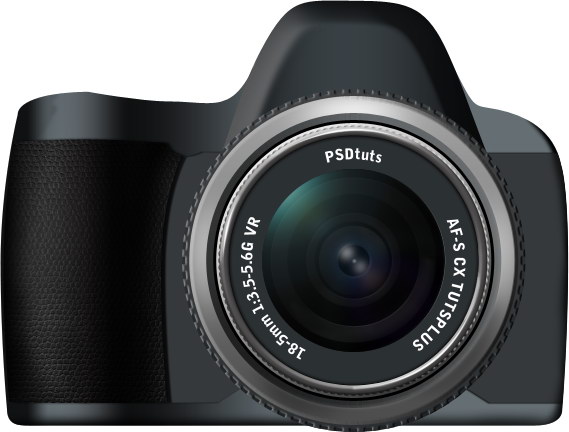
In Photoshop, we’ll start by creating the camera’s main body. Usually, it’s easier to start by creating a basic shape and then edit it from there. Use the rounded rectangle tool with a radius of 20 px, select the shape in the option bar. Create a rectangle with color #353a3d.


Step 2

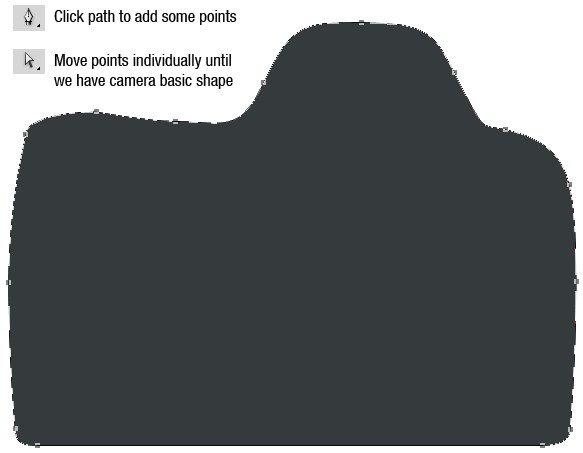
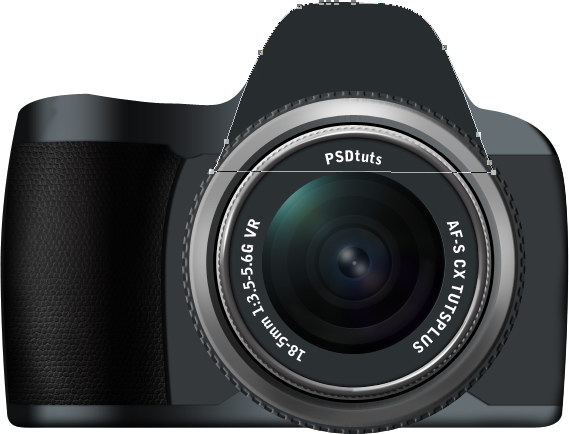
Choose the Pen Tool and click on the path to add more points. Move each point individually using the Direct Selection tool until you have the basic camera shape.


Step 3

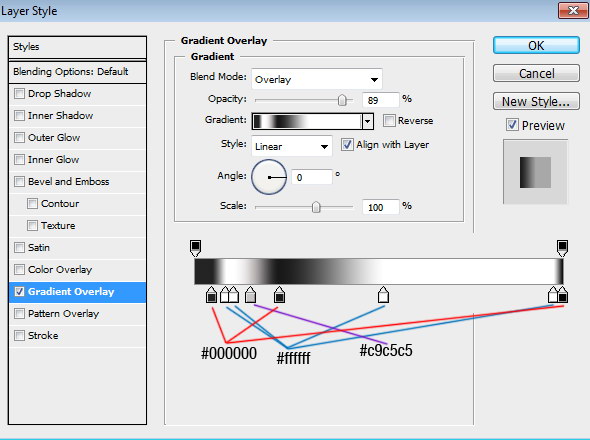
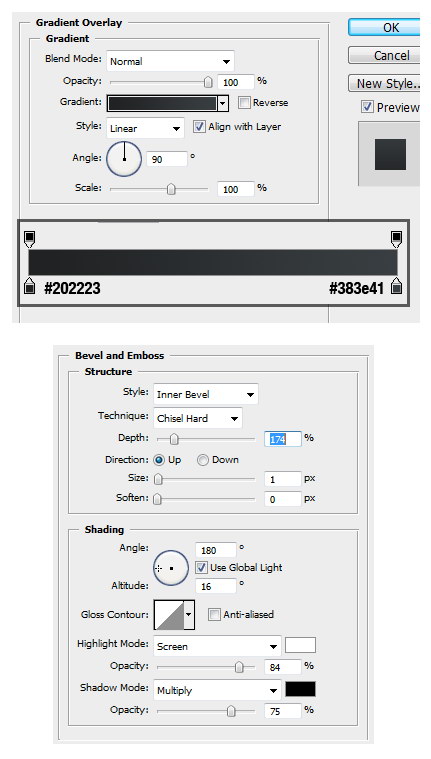
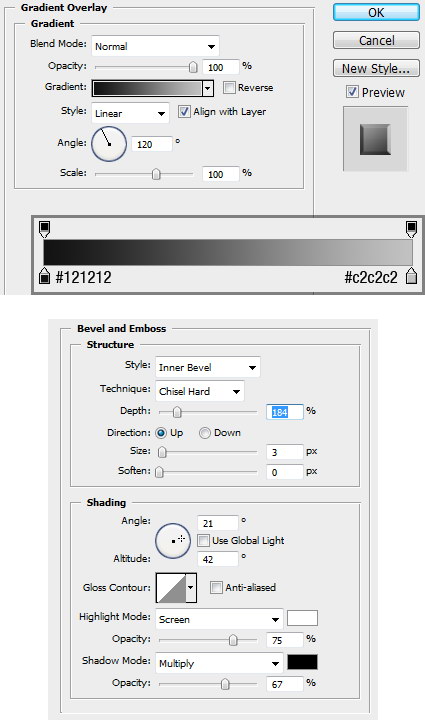
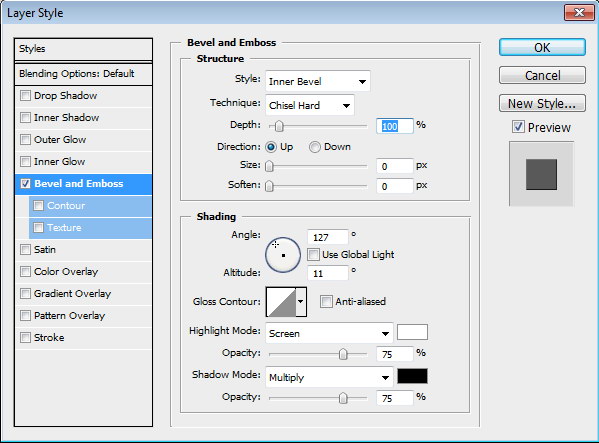
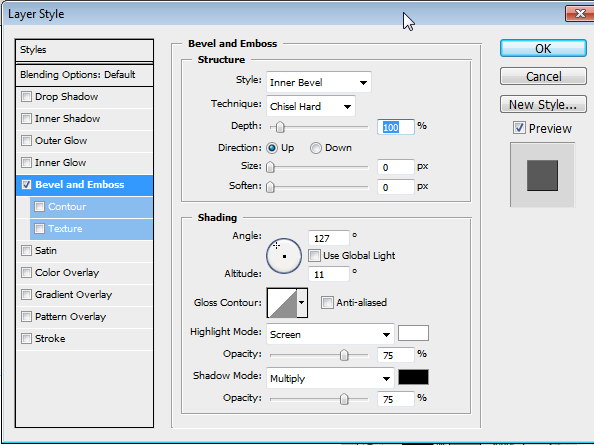
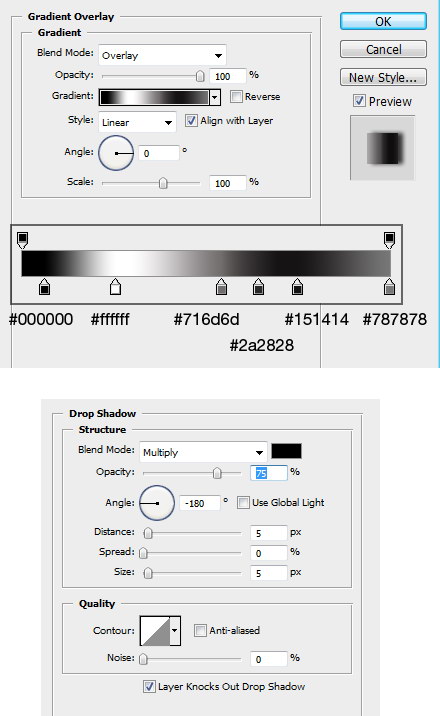
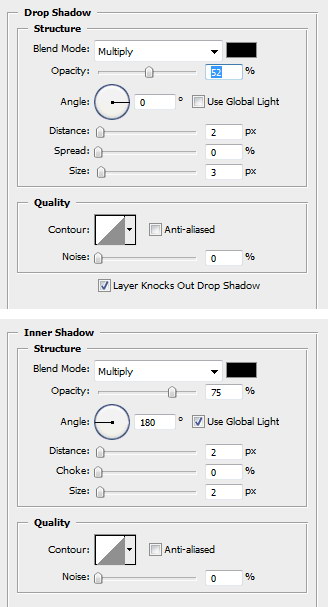
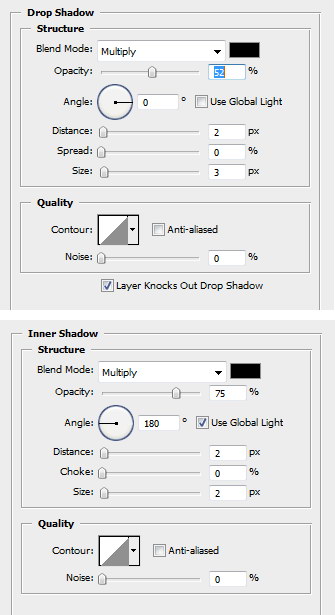
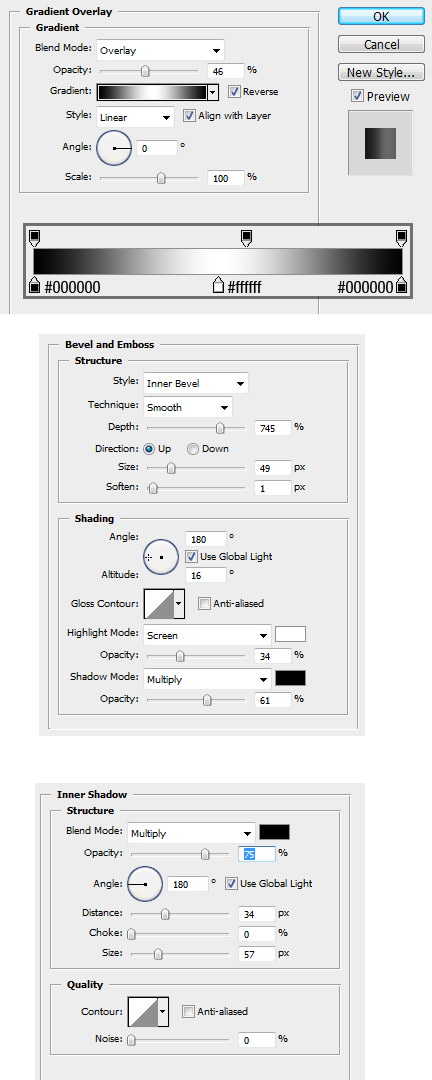
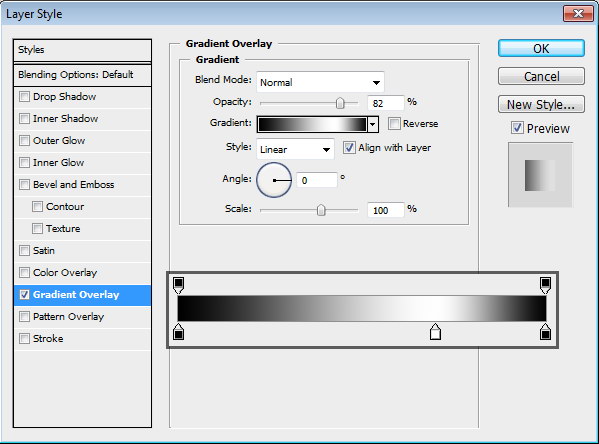
Double click the shape layer and add this layer style.


Step 4

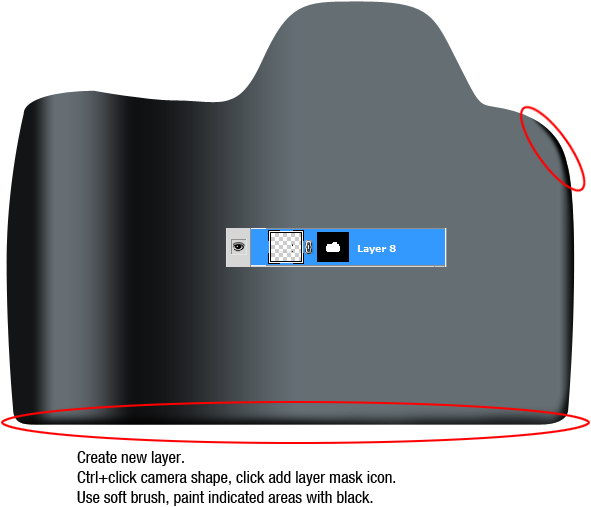
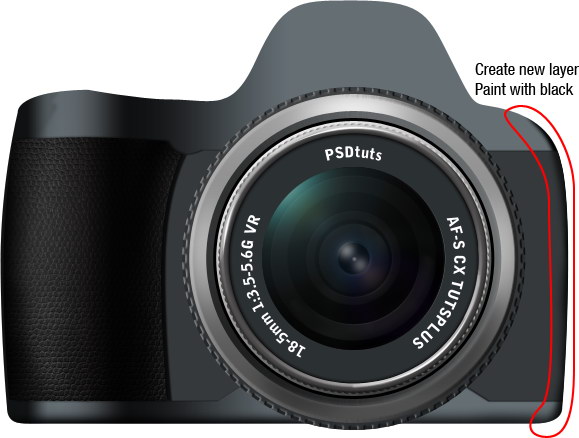
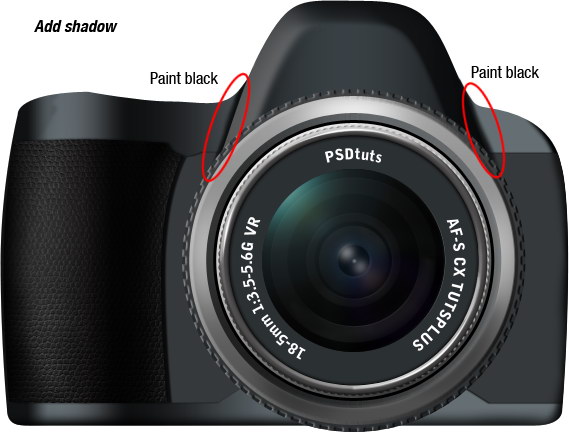
Sometimes layer styles are just not enough to create the effect. To fix it, we need to manually draw with brush tool. Create new layer, Cmd-click camera shape and click Add Layer Mask icon. Use a soft brush and paint black in the indicated areas.


Step 5

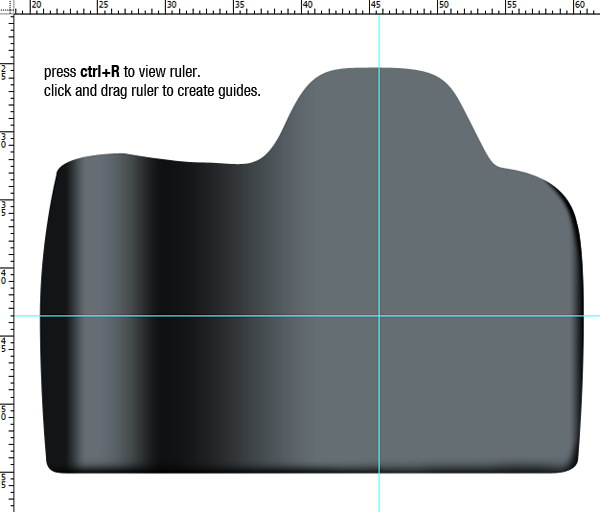
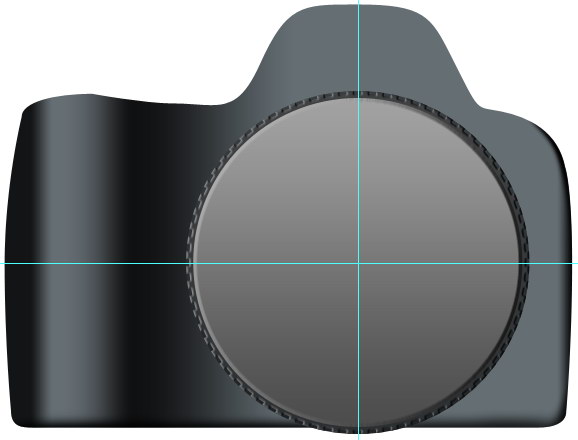
Now let’s create the lens. Open your Ruler by pressing Cmd + R. Click and drag to create center of the lens.


Step 6

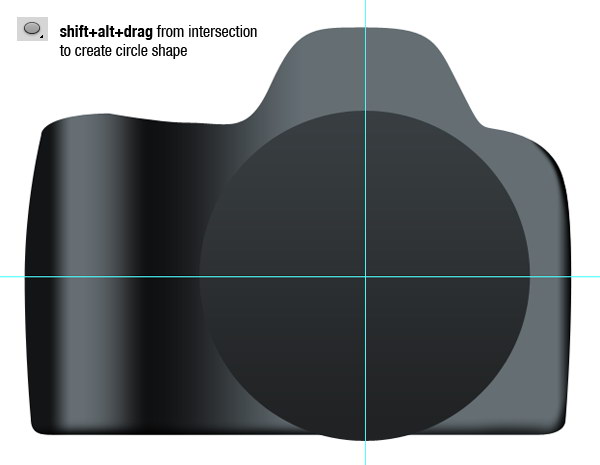
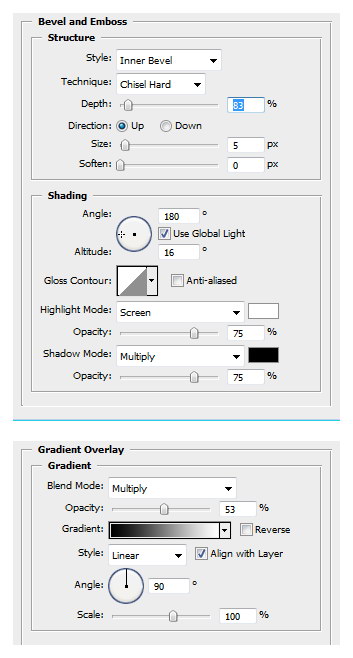
Activate the ellipse tool. While holding Shift and Alt drag from guide’s intersection to create a perfect circle shape. Add these layer styles.


Step 7

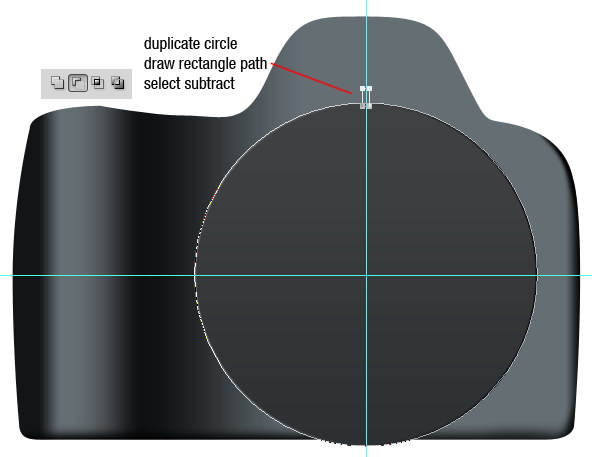
Duplicate the circle shape by pressing Cmd + J. Draw a rectangle path touching the top edge of circle and select subtract.


Step 10

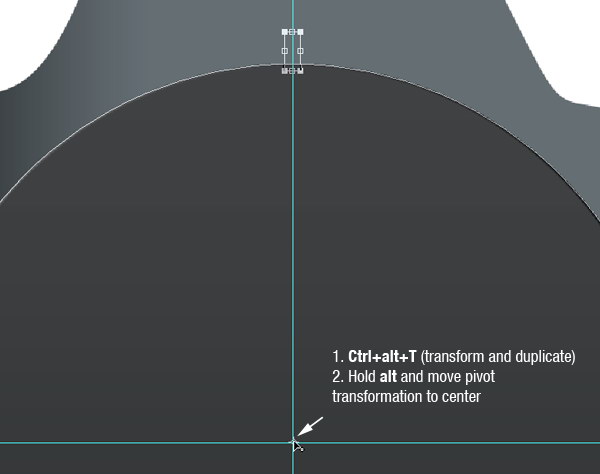
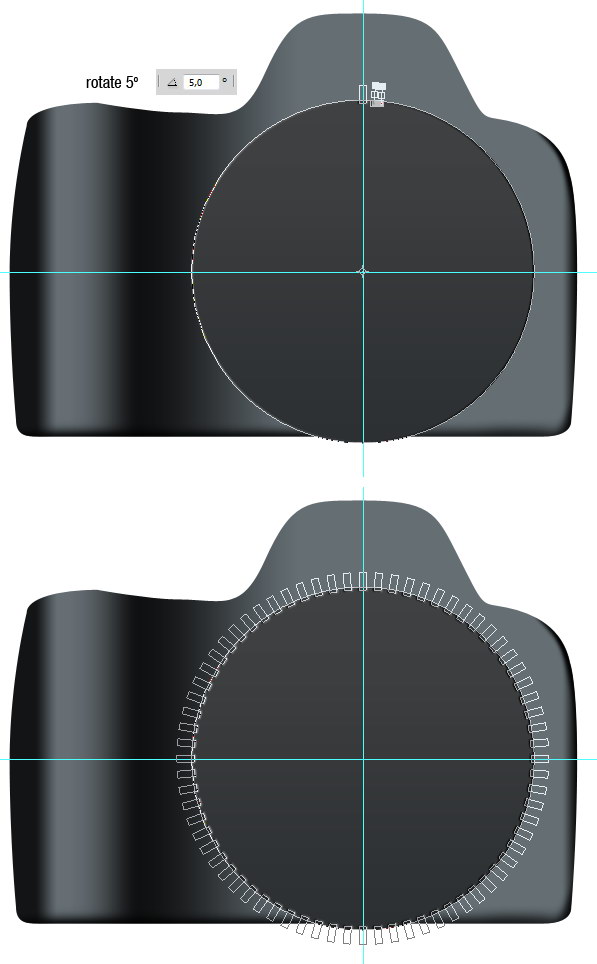
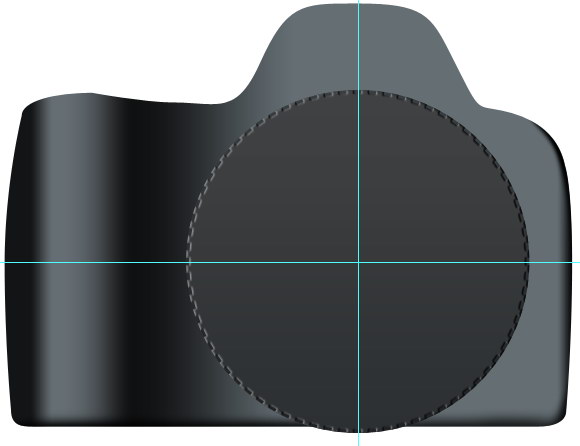
Press Cmd + Alt + T to duplicate and transform the selected rectangle path. Hold Alt and move pivot point (small dot in the center of the transformation box) to the guide center. Set rotation to 5 degree. Press Enter to start the transformation. Press Cmd + Alt + T few times until to repeat this transformation. Do this until the rectangles create a full circle.


Step 11

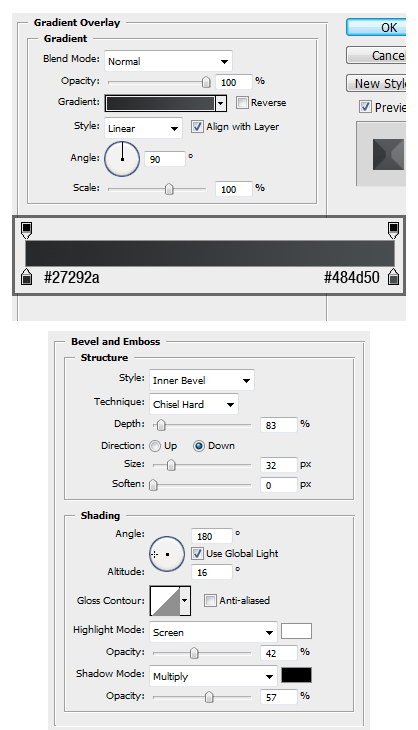
Draw a smaller circle shape with the color #a2a2a1 and add these layer styles.


Step 12

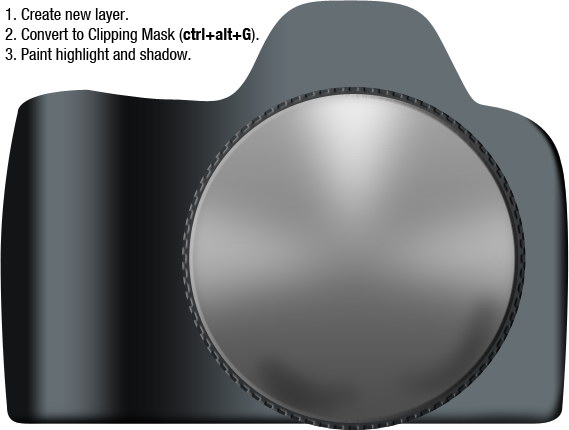
Create a new layer. Press Cmd + Alt + G to convert it to a clipping mask. Paint black and white for shadow and highlight using a soft brush. Note: I hid the guide in my example to help you see better.


Step 13

Draw smaller circle shape and add these layer styles.


Step 14

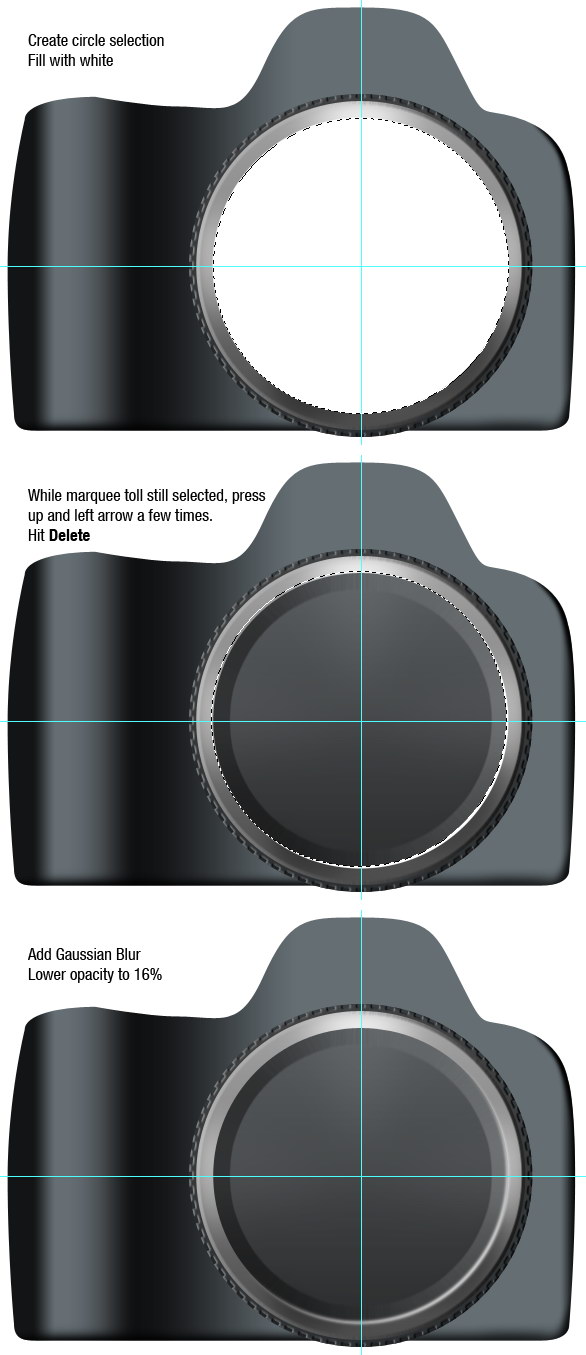
Now, we’ll add subtle highlights. Create a new layer and create a circle selection then fill it with white. Press Up and Left Arrow keys to move the selection a few pixels. Hit Delete. Click Filter > Blur > Gaussian Blur. Change layer opacity to 16%.


Step 15

Create a smaller black circle shape.


Step 16

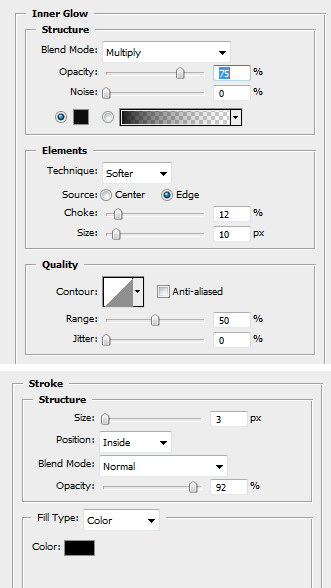
Again, create a smaller circle shape. Add these layer styles.


Step 17

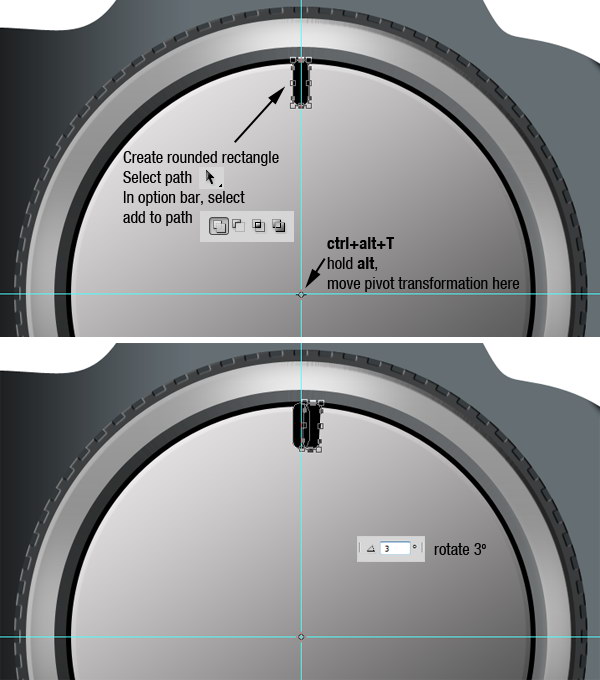
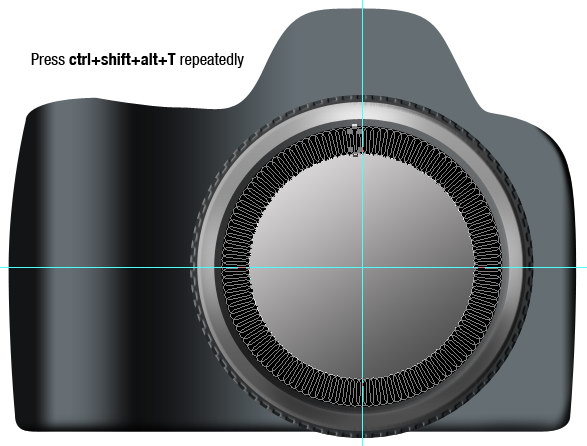
Create a rounded rectangle, place it in the middle of the vertical guide. Select path with path selection tool and choose Add to Path in option bar. Press Cmd + Alt + T, hold Alt and move pivot point to the lens center. In option bar, use rotate size 3 degree.

Press Cmd + Alt + Shift + T repeatedly until the rectangle create full circle.


Step 18

Add these layer styles.


Step 19

Create a circle covering the inner part of previous rectangle. Use #2b3033 for its color. Add these layer styles.


Step 20

Create a black circle covering the inner part of previous circle. Add these layer styles.


Step 21

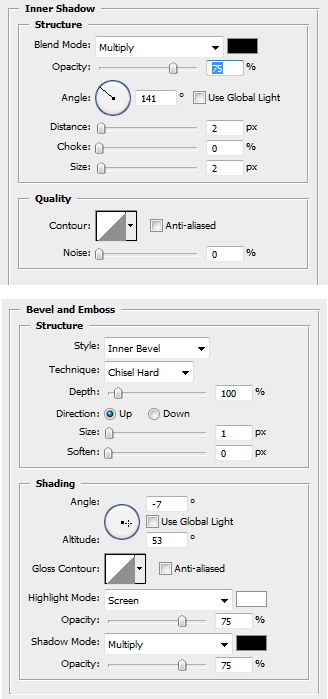
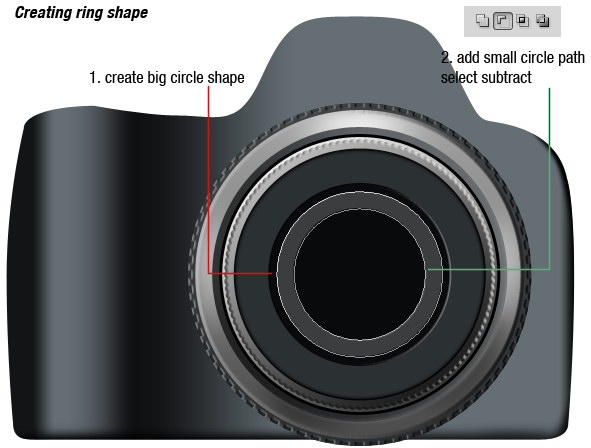
Inside the black circle create a ring shape. To do this, start by creating a circle shape then add another circle inside it. From the option bar select subtract. For its color use #3b3d3e. Add layer styles shown below.


Step 22

Create a smaller ring shape and add the same layer style.


Step 23

Add another ring shape, this time wider and add this layer style.


Step 24

Again, create ring shape, bigger than our last ring shape. Make sure you can see a small part of the previous ring shape. Add this layer style.


Step 25

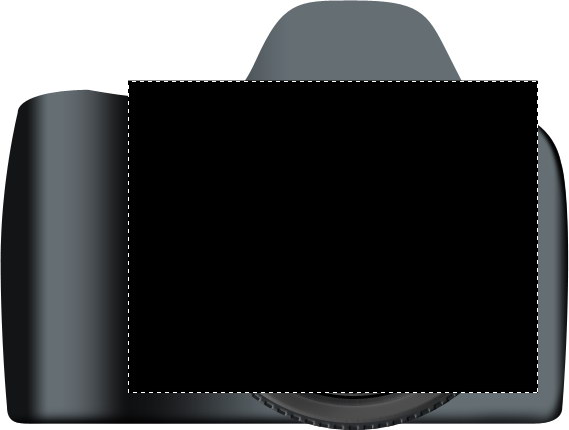
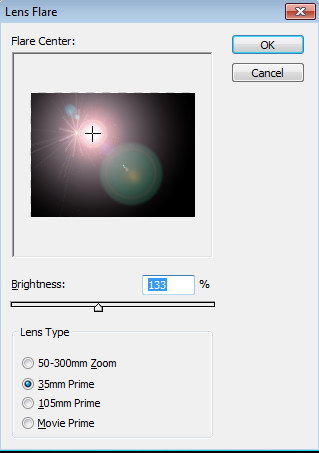
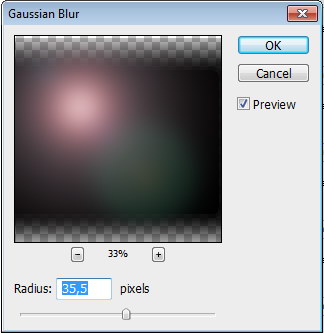
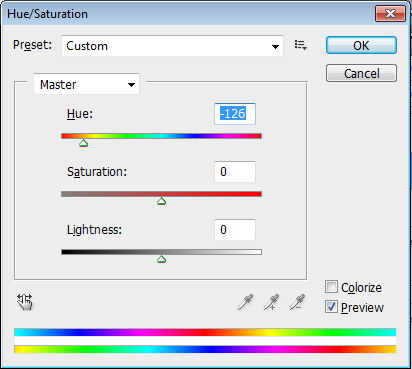
Create a new layer. Create a selection covering the lens and fill it with black. Click Filter > Render > Lens Flare. Click Filter > Blur > Gaussian Blur. Click Image > Adjustments > Hue/Saturation, move Hue slider to change the color.

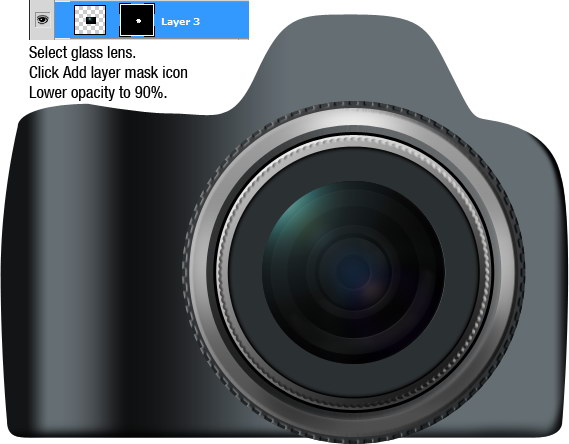
Create circular selection and click the Add Layer Mask icon. Lower the layer’s opacity to 90%. As you can see, this becomes a glass lens.


Step 26

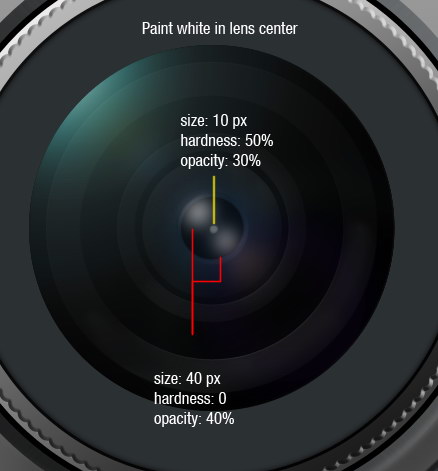
Create a small black circle shape in the middle of the glass lens.


Step 27

Paint white on the lens center. Use a soft brush with low opacity.


Step 28

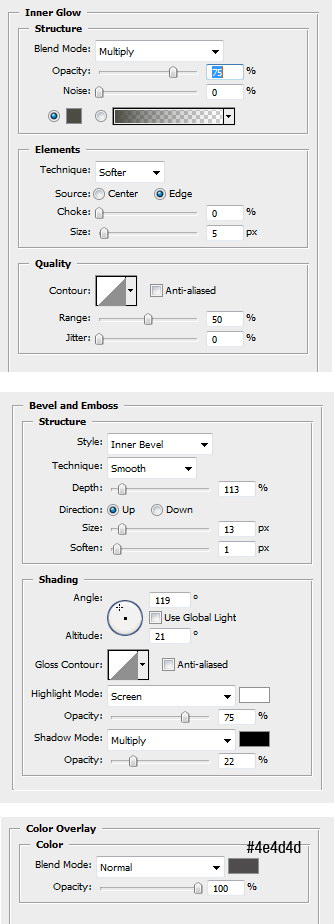
Create a small ring shape. Add these layer styles.


Step 27

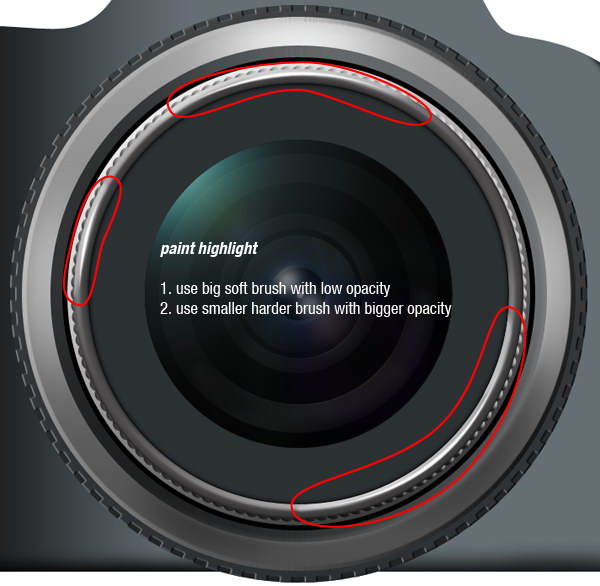
Create a new layer and manually paint highlights on the ring. First, paint with a big soft brush and then paint it again with a smaller hard brush.


Step 28

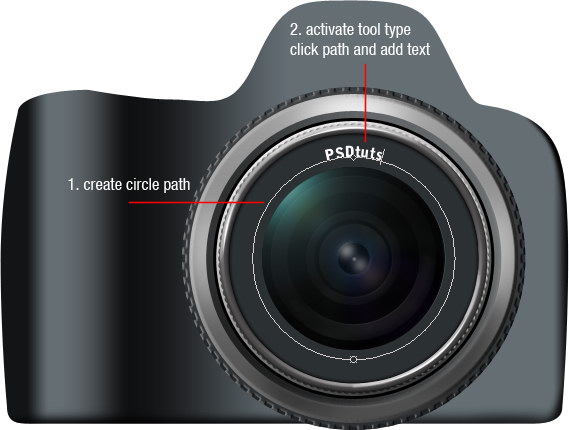
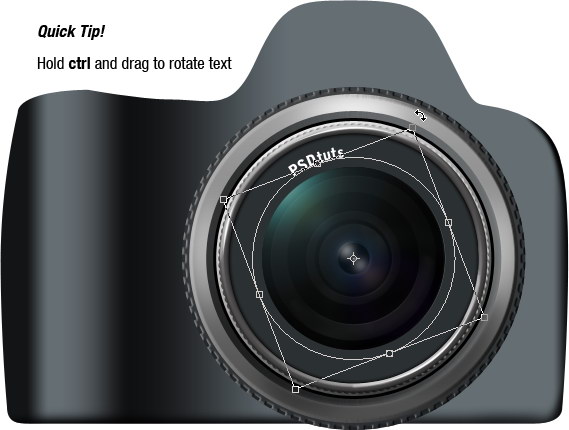
Let’s add the camera’s brand to the lens. Create a circle path. Activate the type tool and click on the path. Remember, you must click on the path not inside the path, otherwise you’ll end up with text inside the path.

Tip: To adjust the text position, hold Cmd then drag.


Step 29

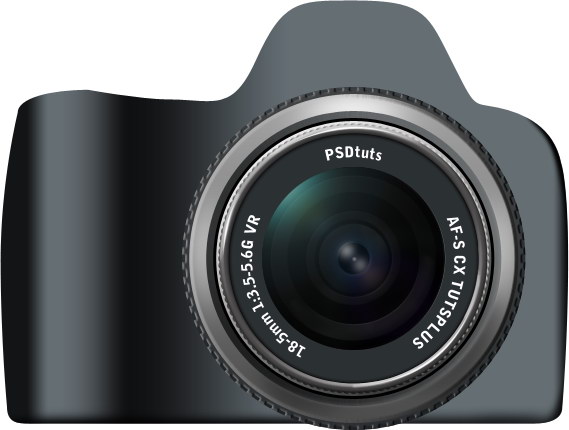
Add other details like lens brand and size.


Step 30

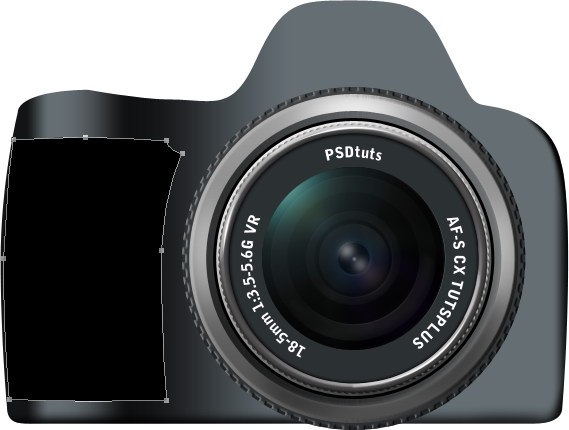
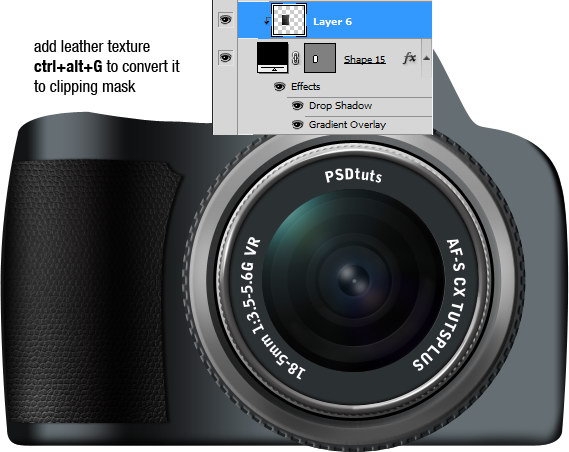
Next, we’ll create the camera’s leather handle. Create this shape. Add layer styles.


Step 31

Add a leather texture using this techniques explained in this quick tip tutorial Create Your Own Leather Texture Using Filters. Hit Cmd + Alt + G to convert it to clipping mask.


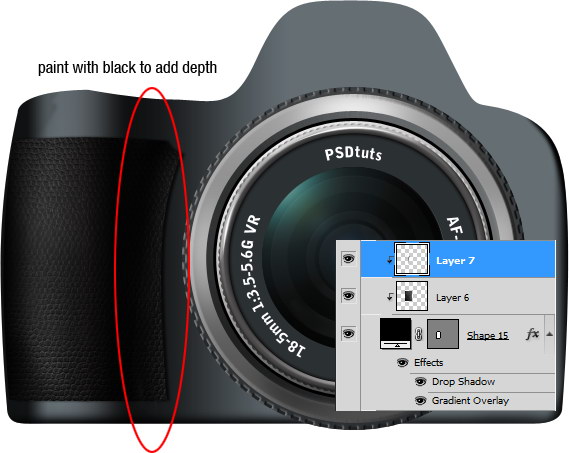
Step 32

Create a new layer and convert it to a clipping mask again (Cmd + Alt + G). Manually, paint in some black to add depth to leather texture.


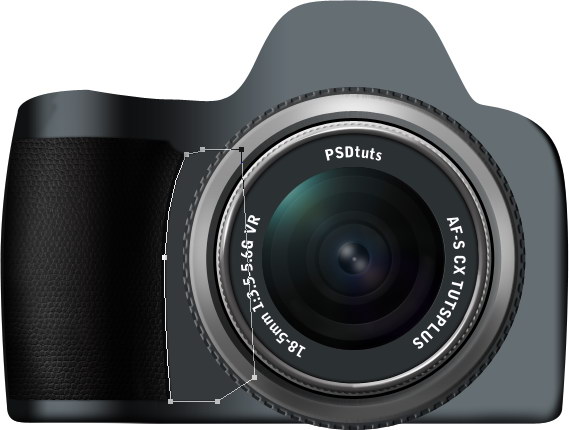
Step 33

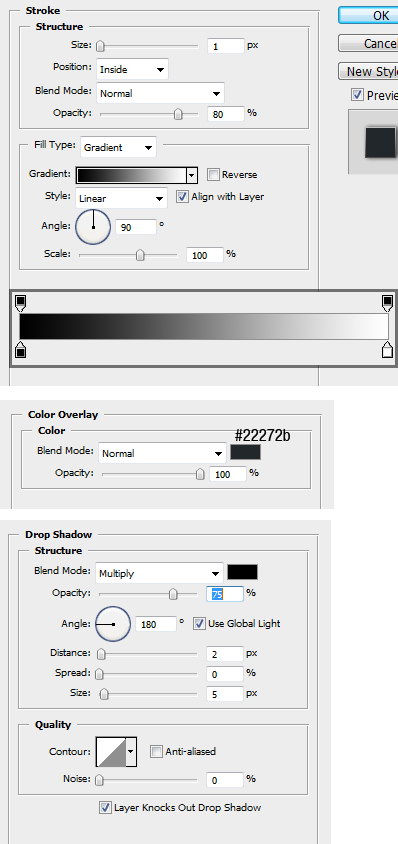
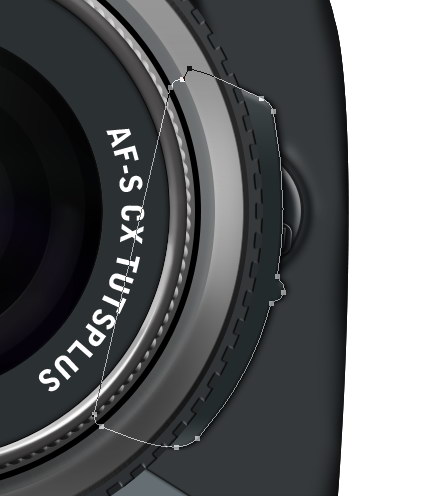
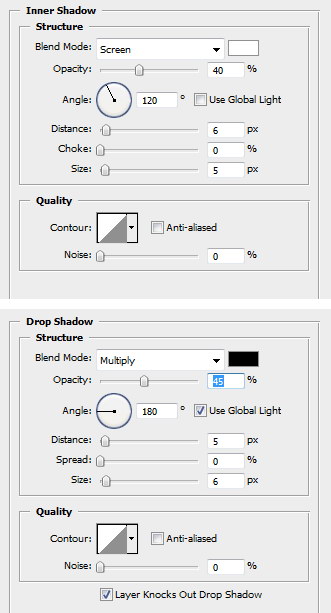
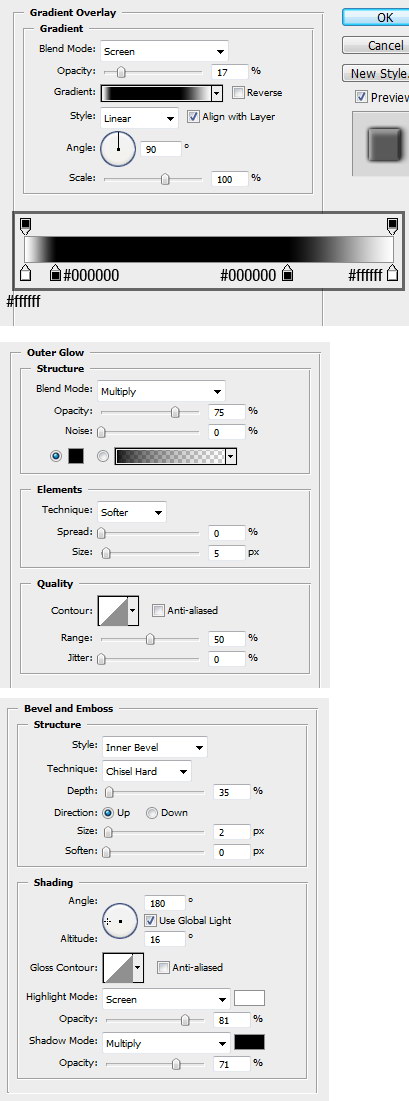
Create this shape, #35393c. Make sure it’s under the lens. Add layer styles.


Step 34

Create a similar shape for the opposite side. Use color #35393c with these layer styles.


Step 35

Create a new layer and manually paint some black to add depth to that side.


Step 36

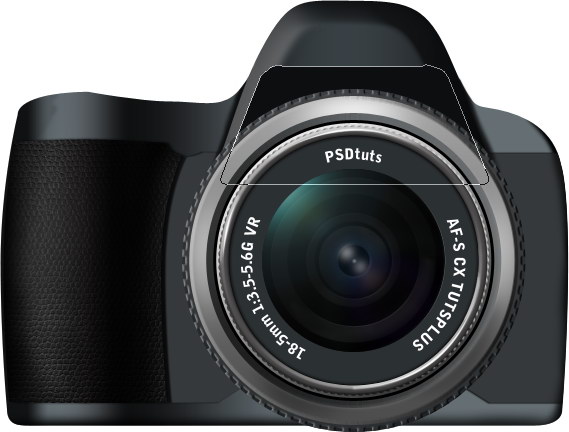
Next, we will be working on the flash. Create this shape, use color #272c2f. Add these layer styles.


Step 37

Create a new layer under the flash and paint some shadow.


Step 38

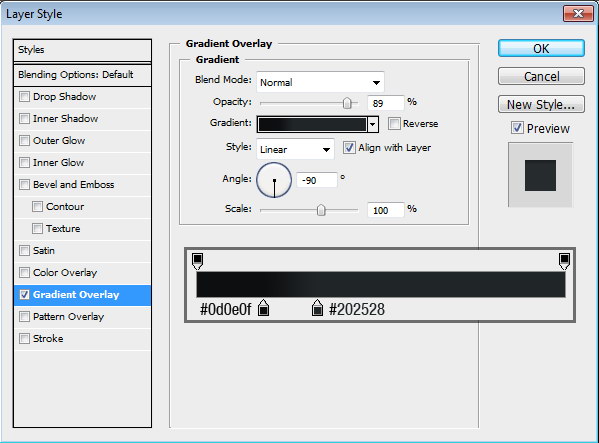
Create this shape, color #0d0e10. Add these layer styles.


Step 39

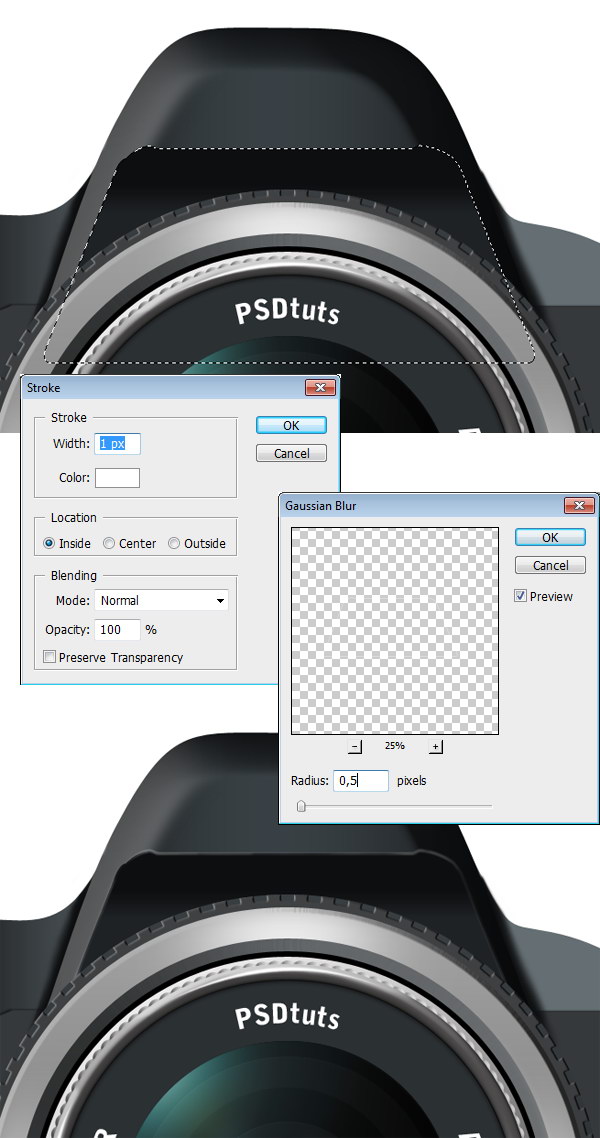
Select the path and hit Cmd + Enter to convert it to selection. Create a new layer. Click Edit > Stroke, choose white with 1 px width. Click Filter > Bur > Gaussian Blur to soften the line.


Step 40

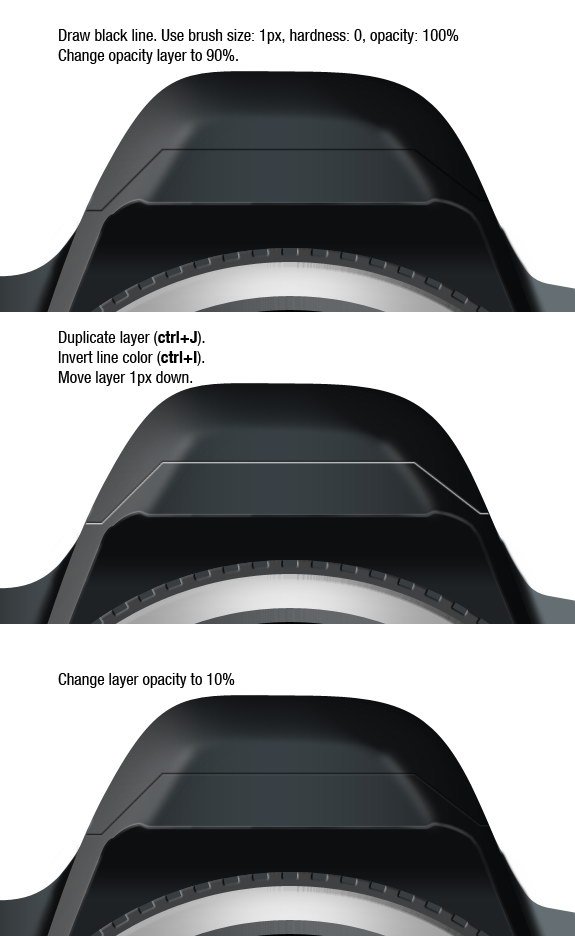
Now, we’ll create an inset line. Create a new layer and paint this line using 1 px brush. Use hardness: 0%, opacity: 100% then change layers opacity to 90%. Duplicate layer (Cmd + J), invert line color (Cmd + I). Move it 1 px down by activating the move tool and press Down Arrow key once. Change its layer opacity to 10%.


Step 41

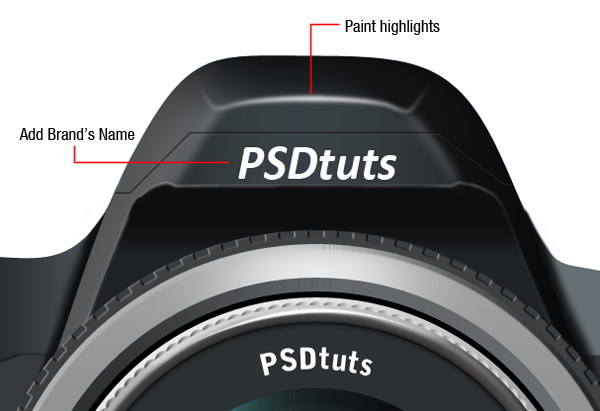
Create a new layer and paint highlights on top of the flash. Also, add brand’s name.


Step 42

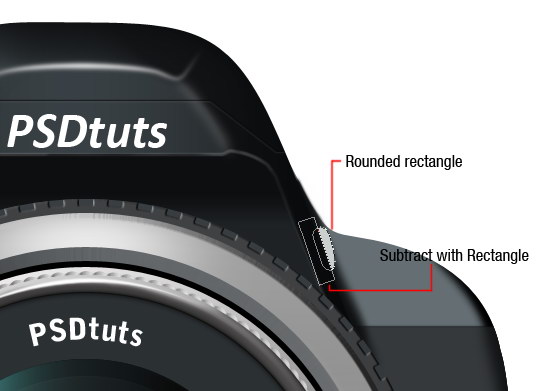
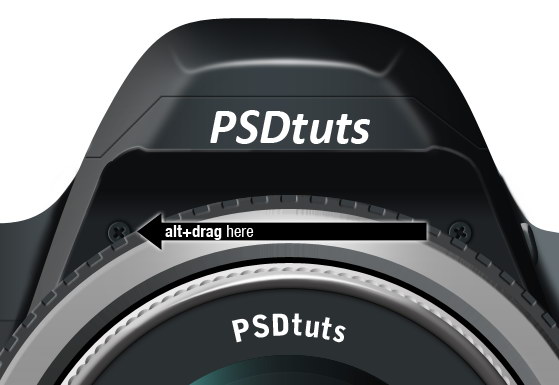
Next to the flash, create a rounded rectangle and subtract it with a rectangle path. Rotate this shape. Add these layer styles.


Step 43

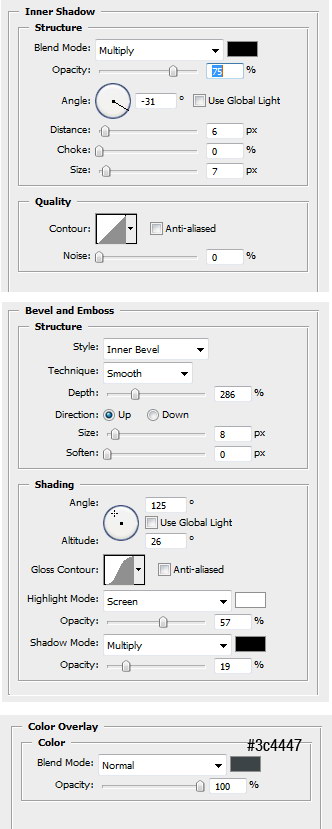
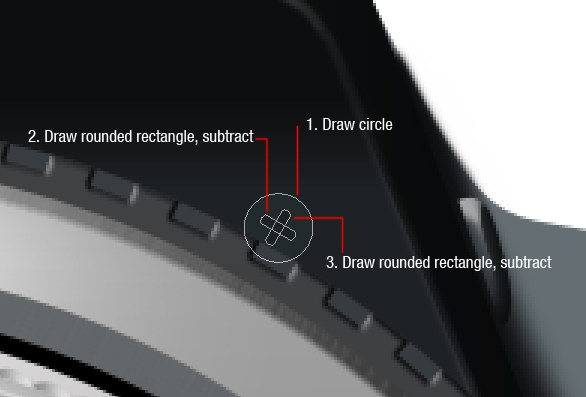
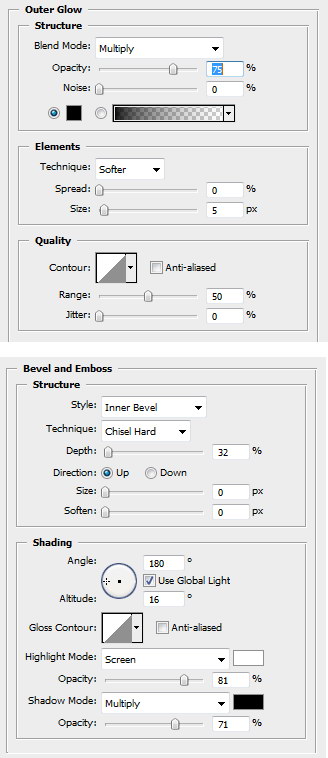
Under the lens, draw a small circle, #222a2c. Subtract it with two crossing rounded rectangles.


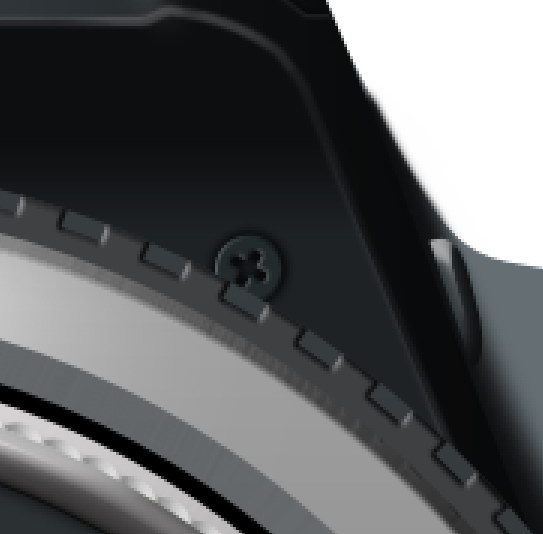
Step 44

Activate the move tool. Hold Alt and drag the screw to duplicate it. Rotate the new screw a bit to add more realism.


Step 45

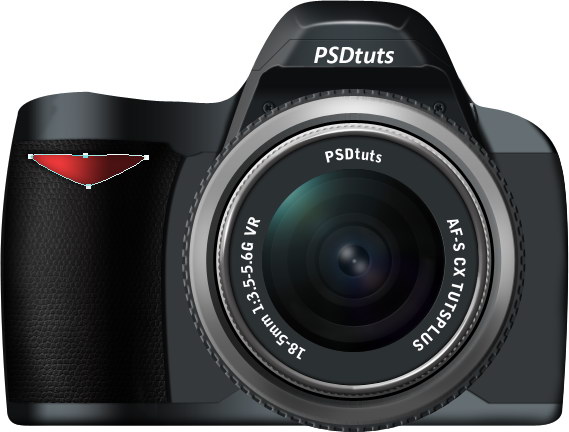
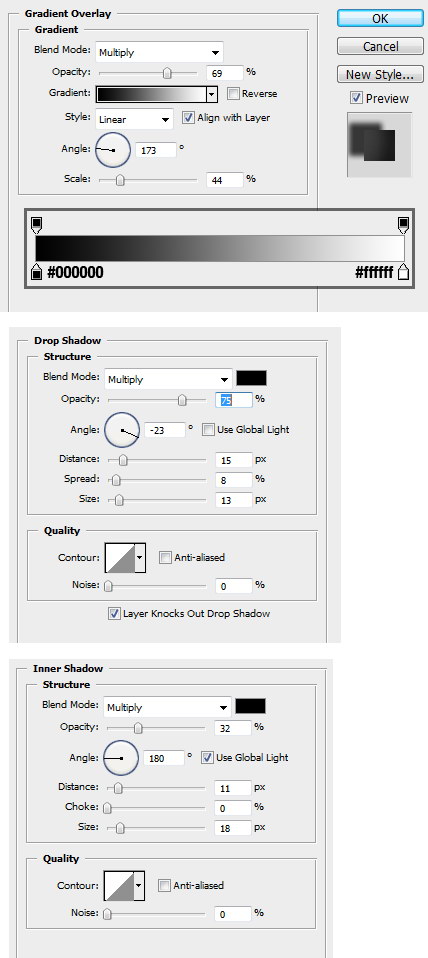
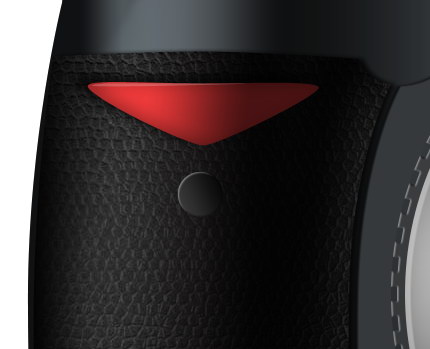
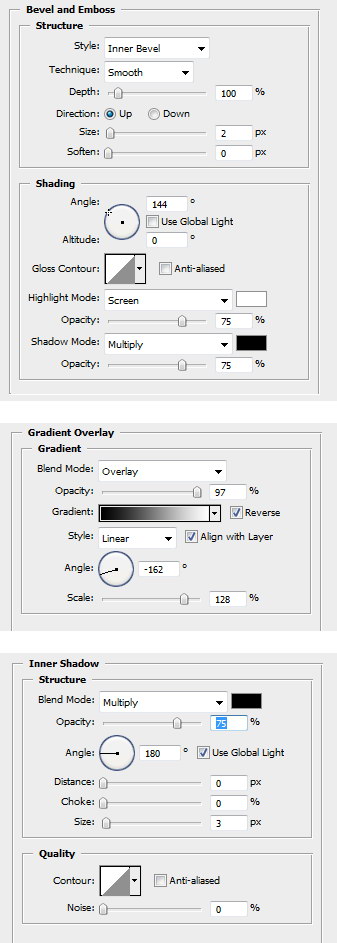
Draw a triangle shape on top of the leather texture, use color #ee3a3a. Add these layer styles.


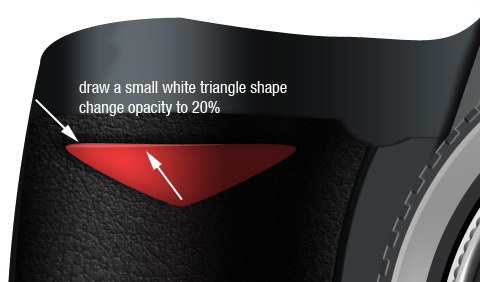
Step 46

Draw a very small white triangle for its highlight. Change opacity to 20%.


Step 47

Create a small circle under the red triangle, use #202020. Add these layer styles.


Step 48

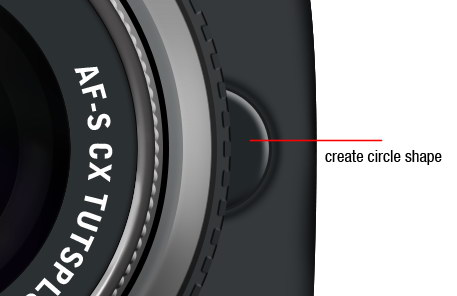
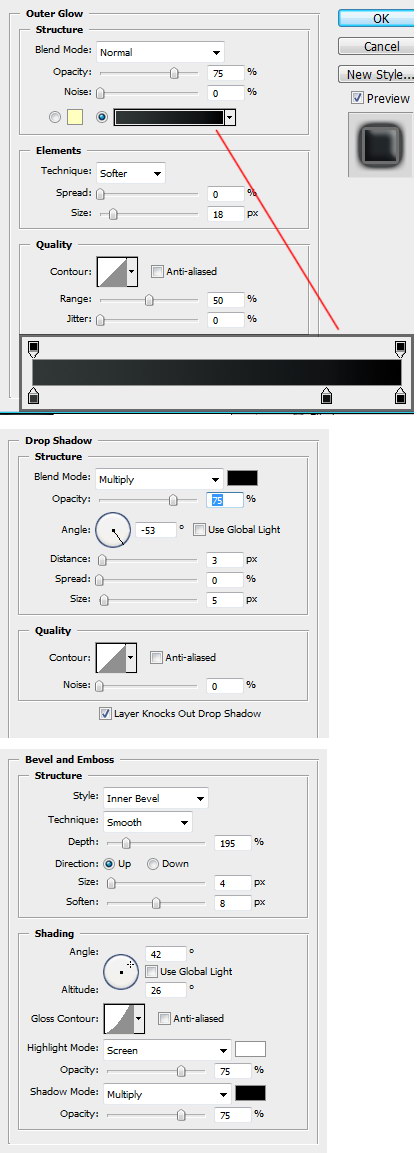
Behind the lens, draw a circle shape and add these layer styles.


Step 49

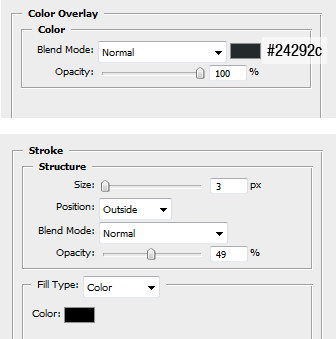
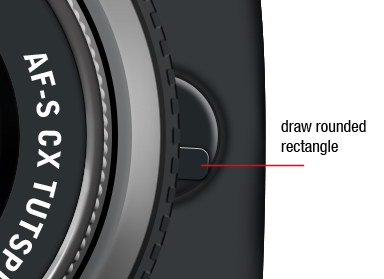
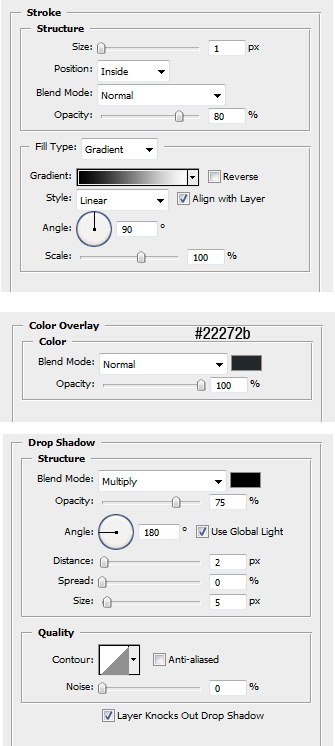
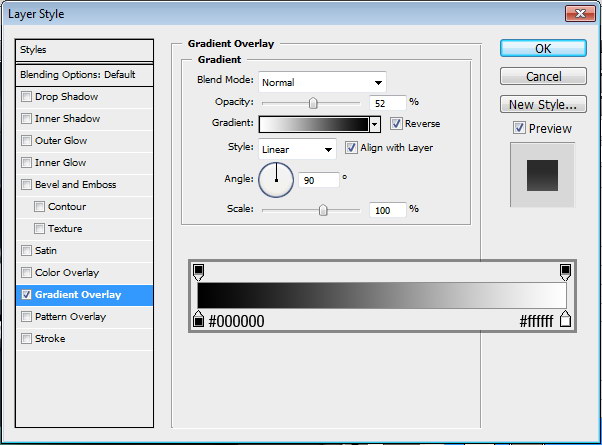
Draw a rounded rectangle on top of the circle. Add these layer styles.


Step 50

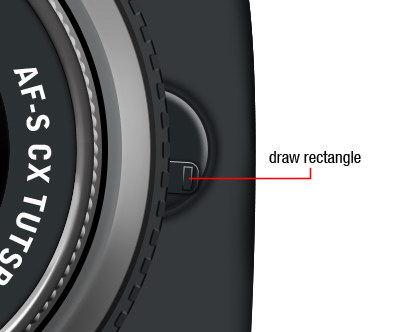
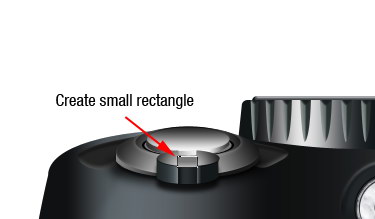
Draw a small rectangle on top of the rounded rectangle. Use the same layer style as in the rounded rectangle.


Step 51

Create this shape, #222a2c. Add these layer styles.


Step 52

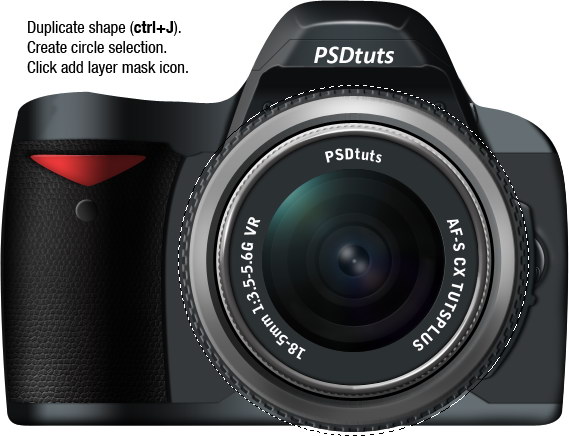
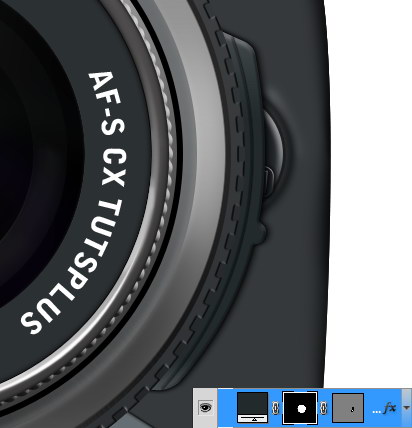
Duplicate shape (Cmd + J). Create circle selection bigger than the lens size then click Add Layer Mask icon in layer palette.


Step 53

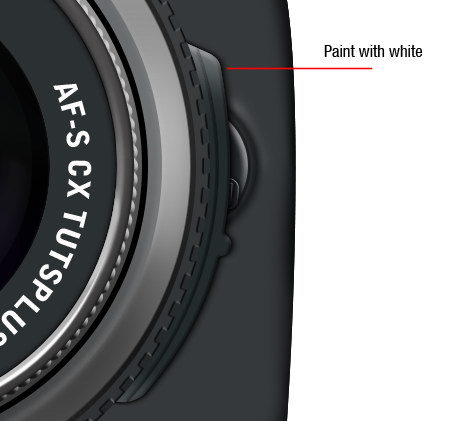
Create a new layer. Paint white on the top part of the shape to add a subtle light cast. Make sure you don’t overdo this by lowering the opacity to 20%.


Step 54

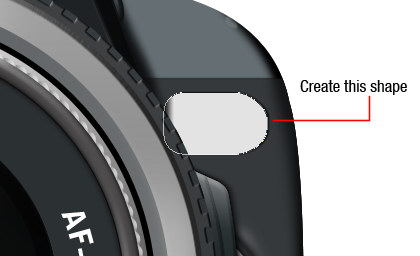
Create this shape. Add these layer styles.


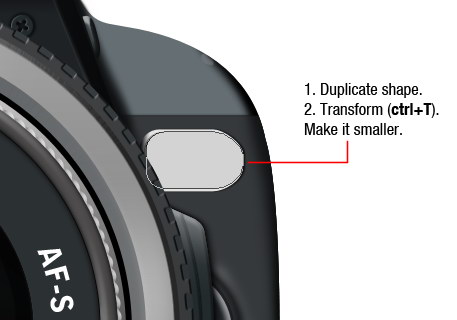
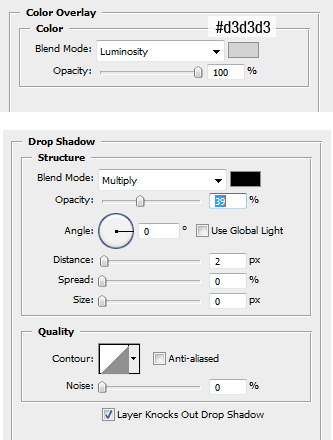
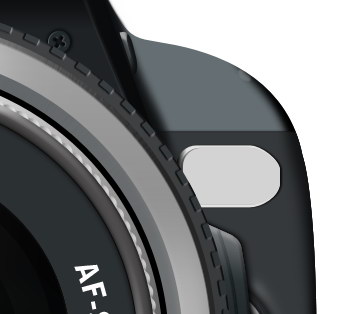
Step 55

Duplicate shape. Transform (Cmd + T) and make it smaller. Add these layer styles.


Step 56

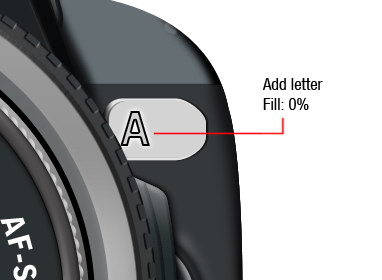
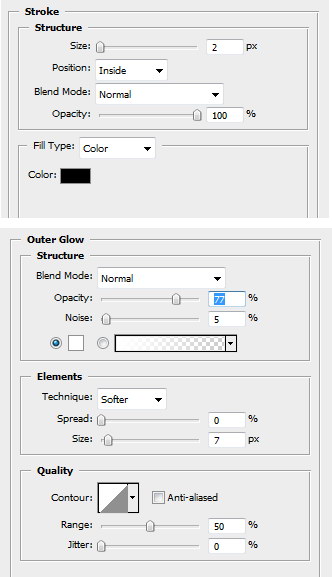
Add a letter. Set fill layer to 0% and add layer styles stroke and outer glow.


Step 57

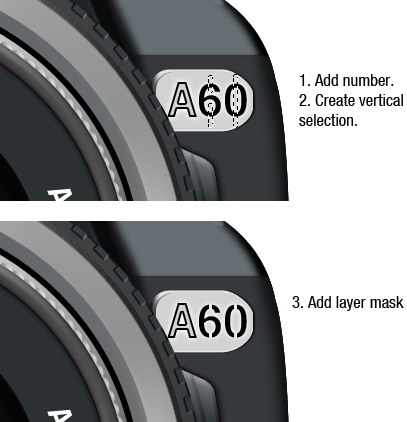
Add model number. Select middle part of each number then invert selection (Cmd + Shift + I). Click Add Layer Mask icon.


Step 58

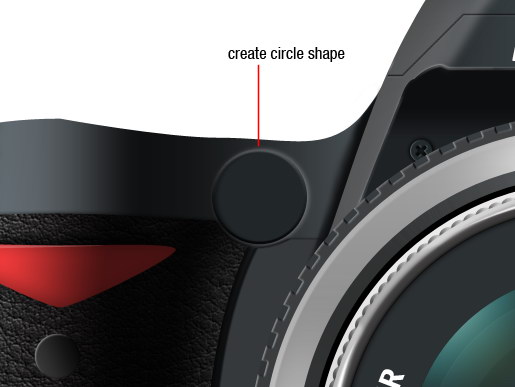
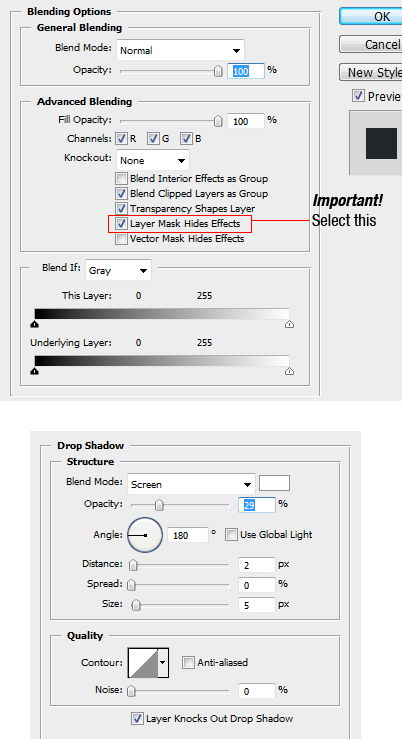
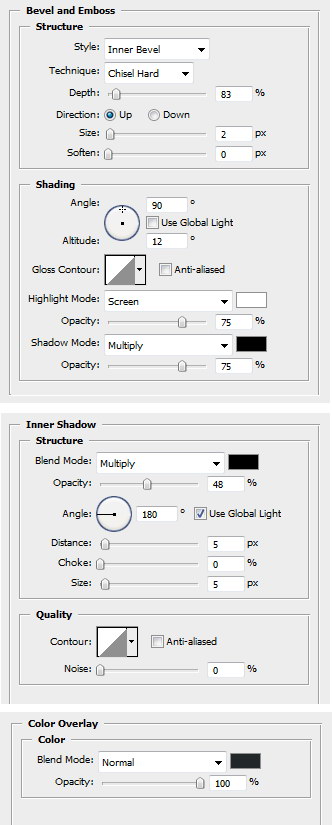
Now let’s work on the AF Assist lamp. Create a circle shape. Double click layer shape to open layer style dialog and make sure you select Layer Mask Hides Effects. For other layer styles use setting below.


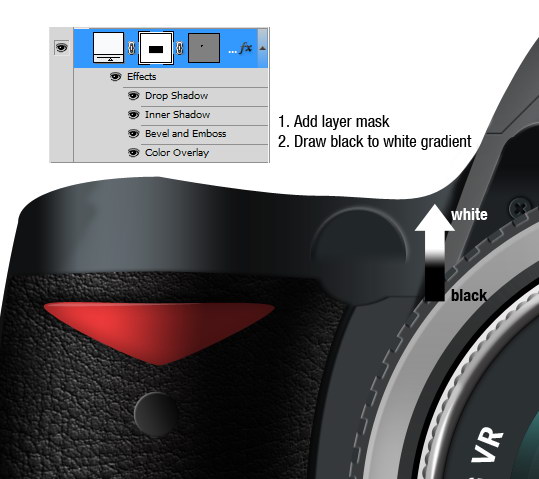
Step 59

Add layer mask. Activate gradient tool and draw black to white gradient.


Step 60

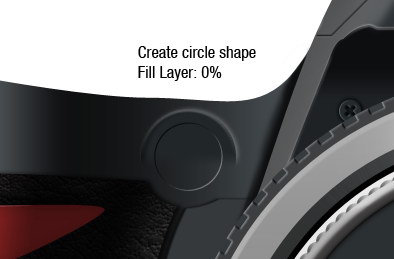
Create a smaller white circle. Set fill layer to 0% and add this layer style.


Step 61

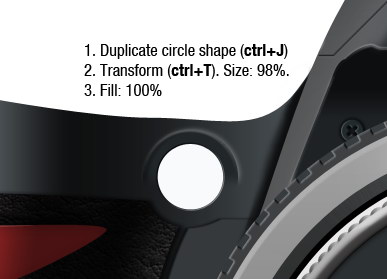
Duplicate circle. Make it smaller by transformation (Cmd + T). Use size: 98%. Change fill layer back to 100%.

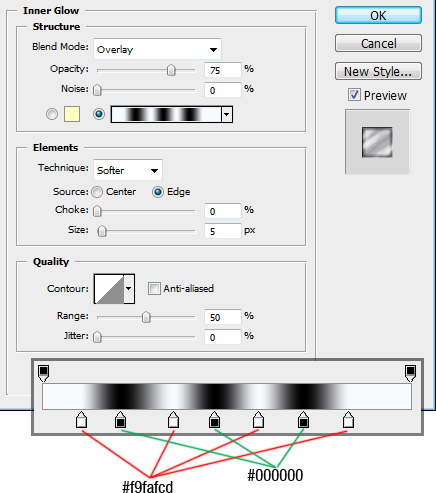
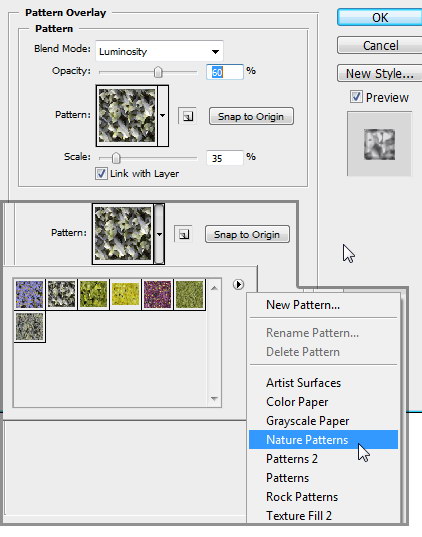
Add these layer styles. In Pattern Overlay setting, load Nature Patterns and choose one of the leaves patterns available. Set blend mode to Luminosity to remove its color.


Step 62

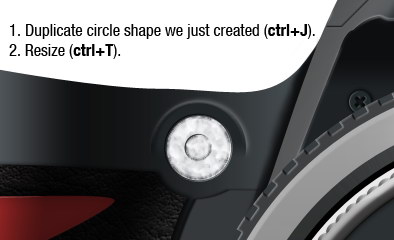
Duplicate the circle shape we just created and make it smaller.


Step 63

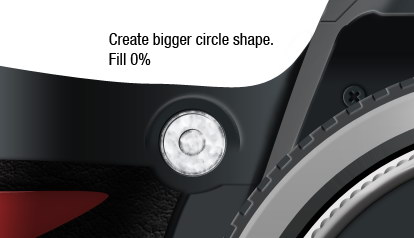
Create a bigger circle shape. Add this layer style. Set Fill to 0%.


Step 64

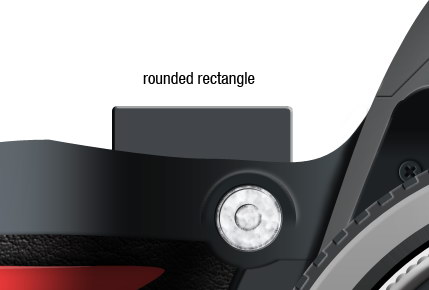
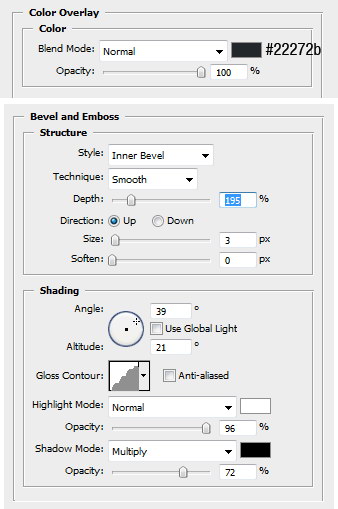
Let’s move on to create the camera’s mode selector. Create a rounded rectangle shape and put it under the camera’s main body. Add these layer styles.


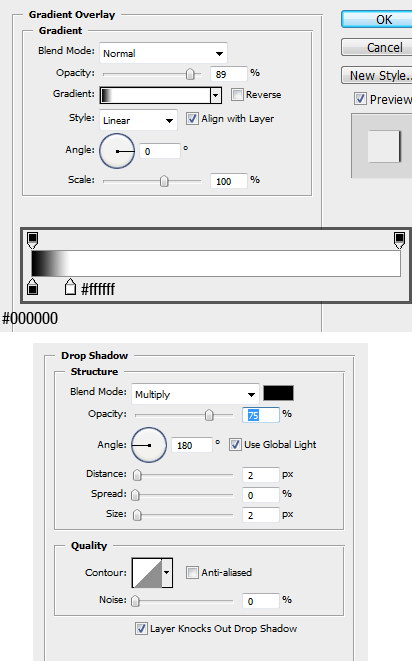
Step 65

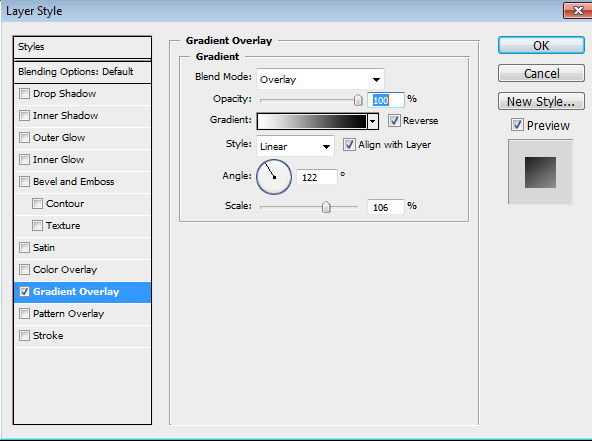
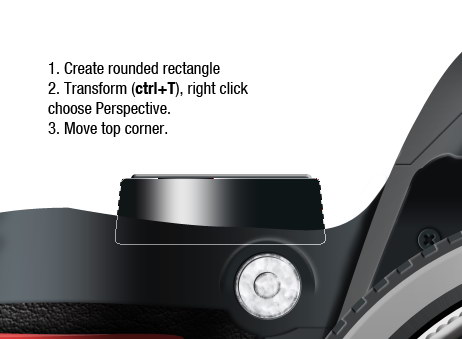
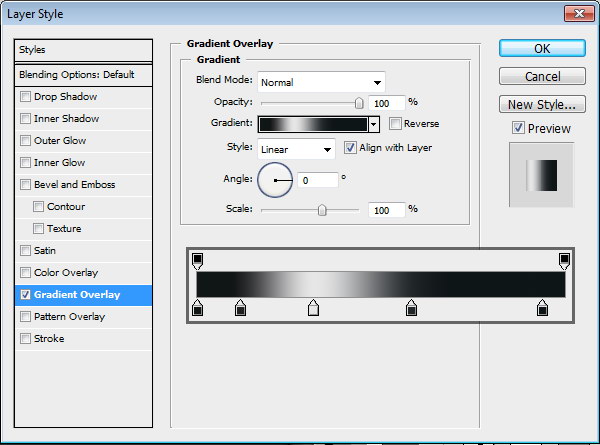
Create another rounded rectangle. Transform (Cmd + T), right click and choose Perspective. Move top corner closer. Add Gradient Overlay.


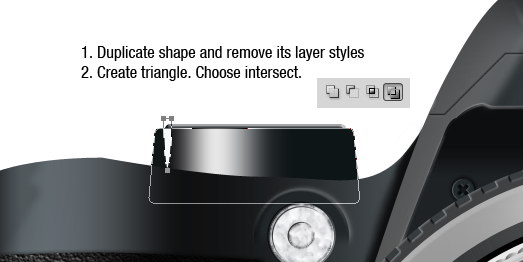
Step 66

Duplicate the shape we have created, remove its layer style. Create a triangle on top and choose intersect in the option bar.


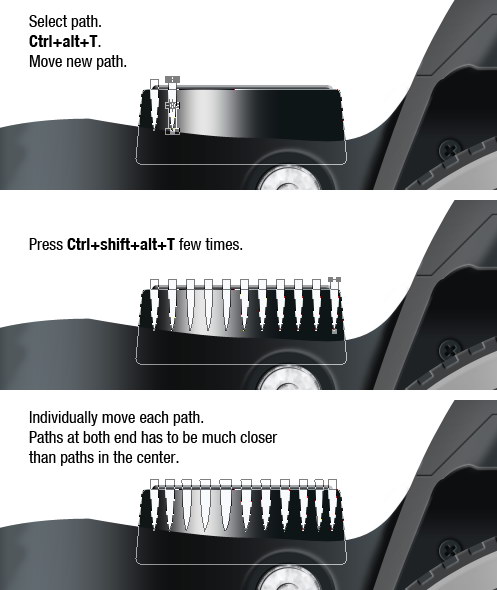
Step 67

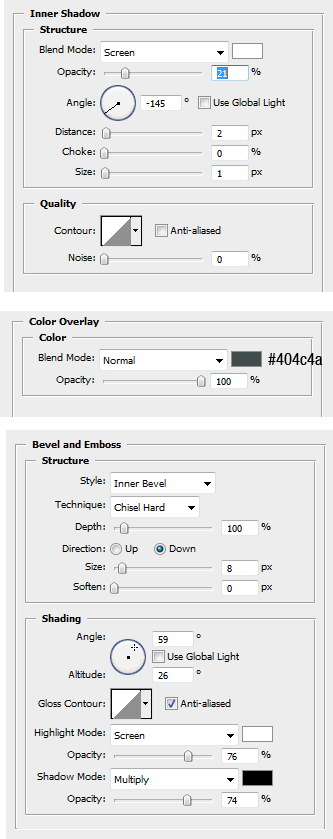
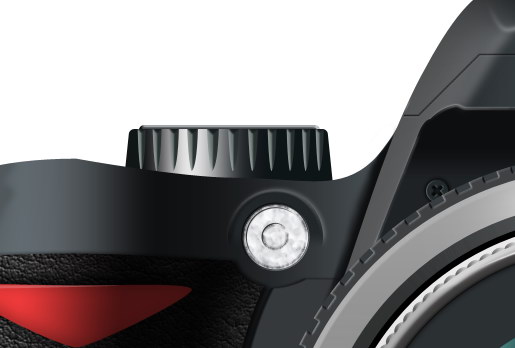
Select the triangle’s path. Press Cmd + Alt + T and move it by pressing Right Arrow a few times. Repeat transformation and duplication by pressing Cmd + Shift + Alt + T repeatedly. Use path selection tool and move each path individually. Arrange the distance of each path to give it a nice perspective.

Add layer styles as shown below.


Step 68

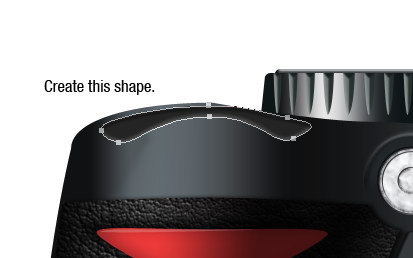
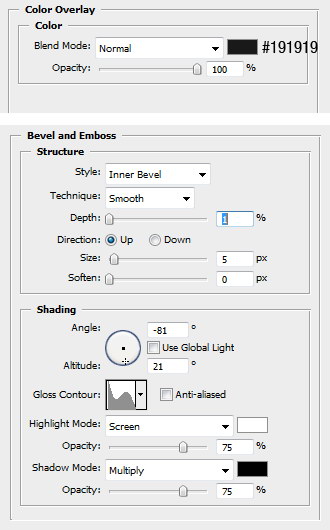
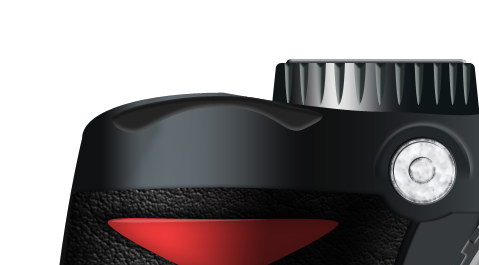
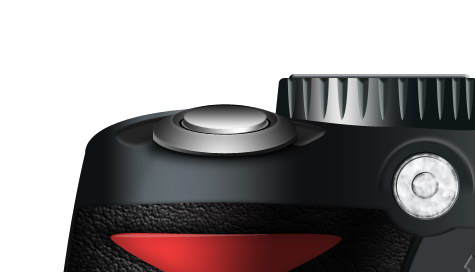
Create a shape as shown below. Place it above the camera. Add these layer styles.


Step 69

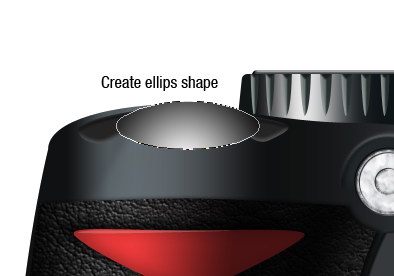
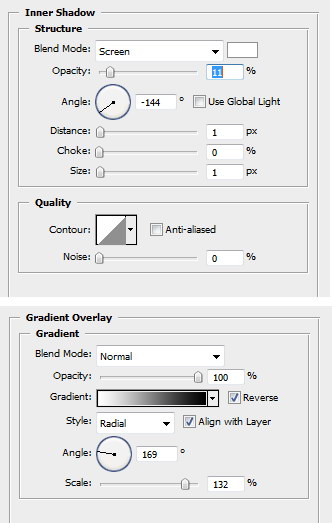
Above the shape create a white ellipse shape. Add these layer styles.


Step 70

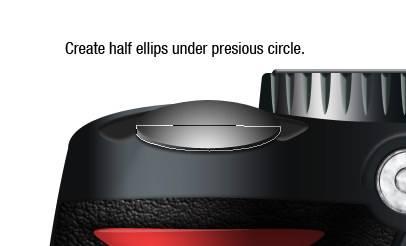
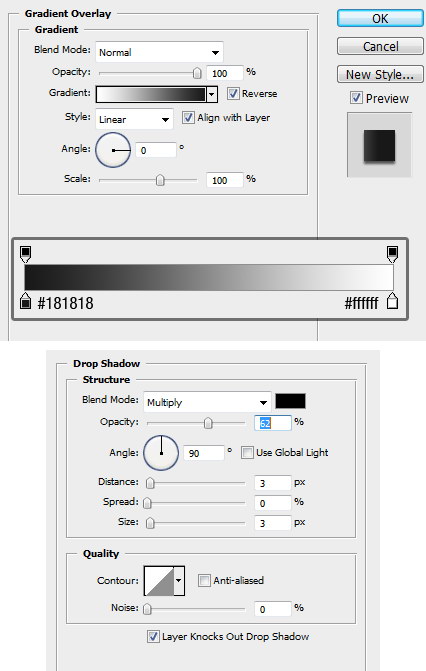
Create half ellipse under previous ellipse. For its color use white. Add these layer styles.


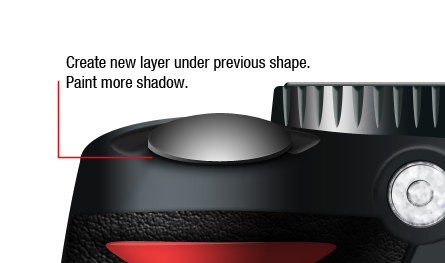
Step 71

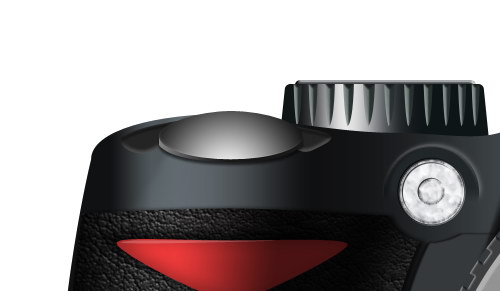
Create a new layer under the shape and paint more shadow.


Step 72

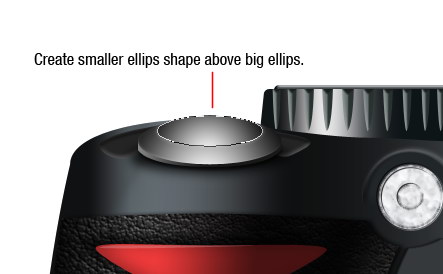
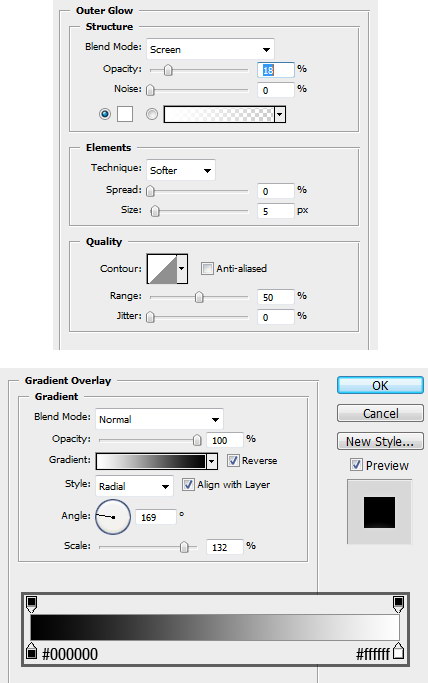
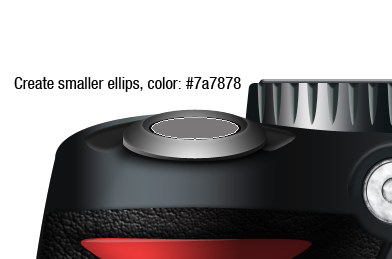
Above the big ellipse, create a smaller ellipse. Use white for its color and add these layer styles.


Step 73

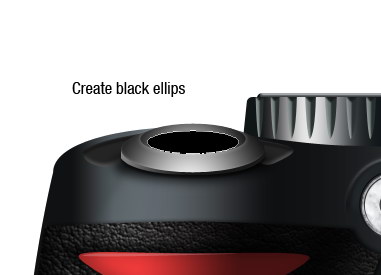
Create black ellipse.


Step 74

Create smaller ellipse.


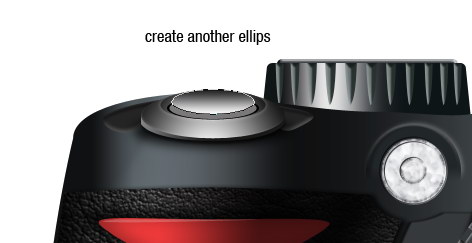
Step 75

Create another ellipse on top.


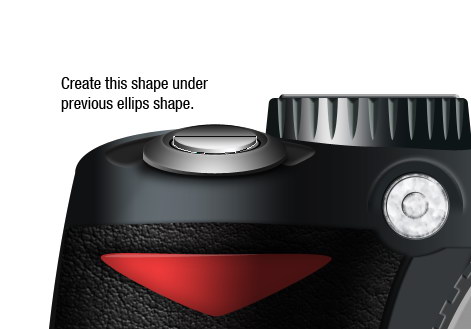
Step 76

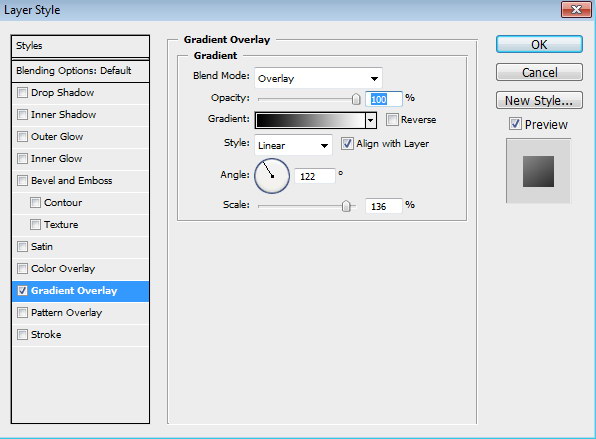
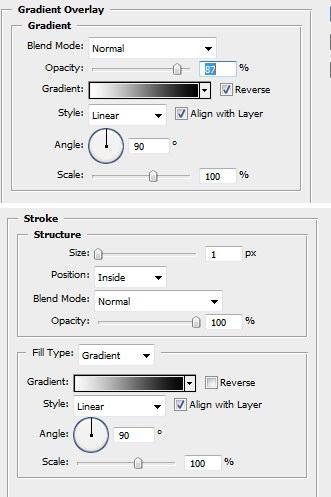
Create a half ellipse underneath the previous shape. Add a gradient overlay.


Step 77

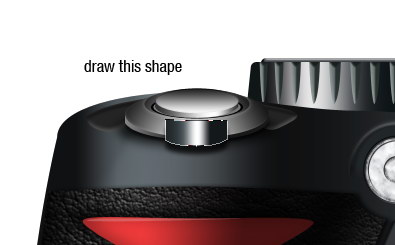
Draw a shape as shown below. Add these layer styles.


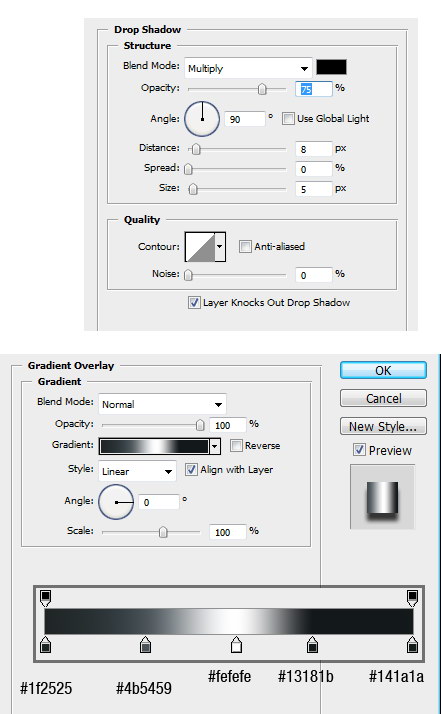
Step 78

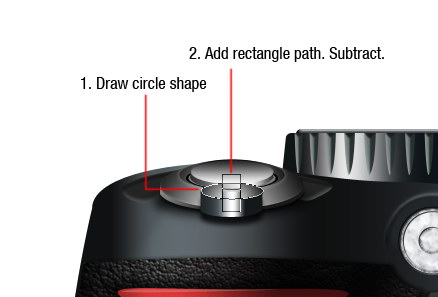
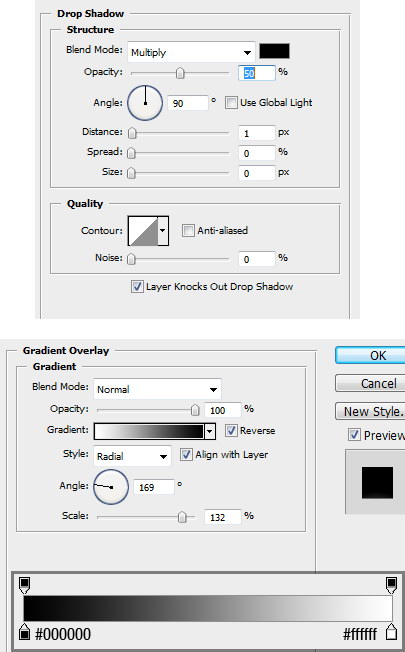
Draw an ellipse shape. Add a rectangle path in the middle and select subtract to cut it. Add these layer styles.


Step 79

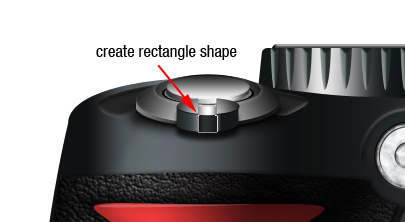
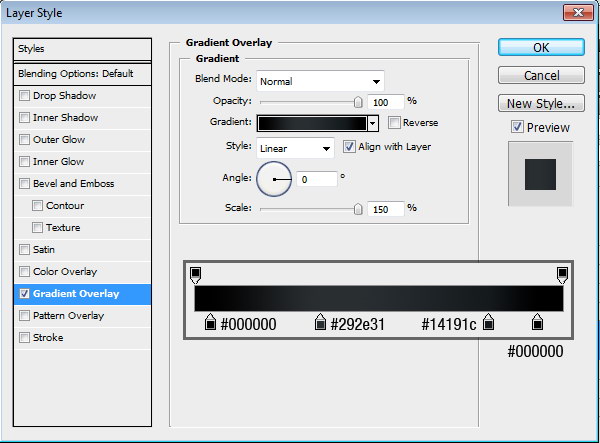
Draw a rectangle. See picture below for its position. Add Gradient Overlay.


Step 80

Draw a small rectangle. See picture below for its position. Add Gradient Overlay.


Step 81

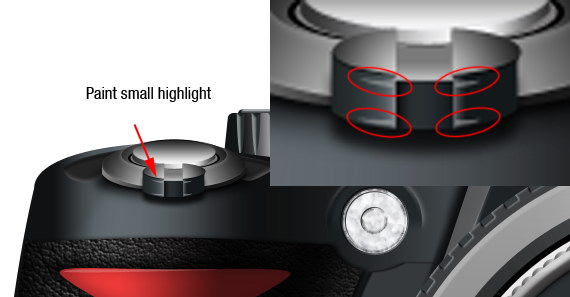
Create a new layer and paint a small highlight.


Step 82

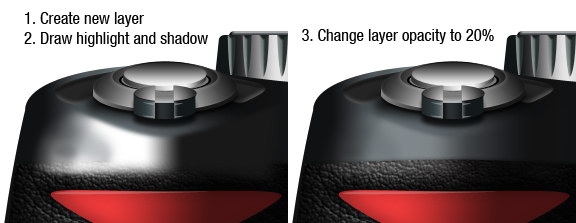
Create a new layer. Draw white and black for highlights and shadows. Make sure the color is fading gradually. Change layer opacity to 20%.


Step 83

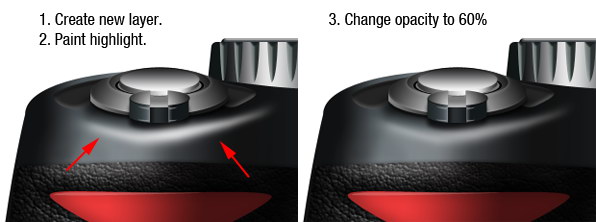
Create a new layer. Paint another highlight. Change the layer’s opacity to 60%.


Step 84

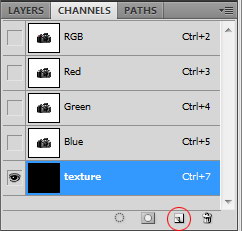
We’re almost done with the camera. The problem is that the camera is too prefect. To give it a more realistic look we need to add some texture. Open channels panel and create new channel.


Step 85

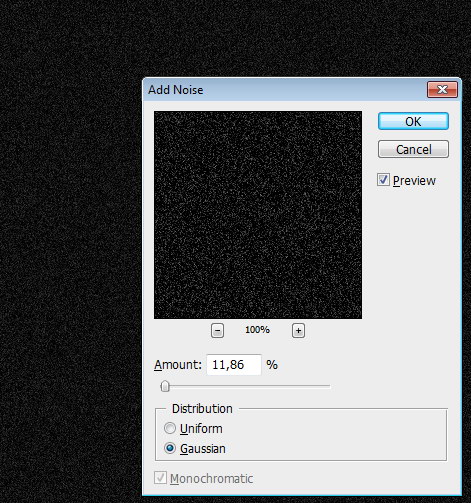
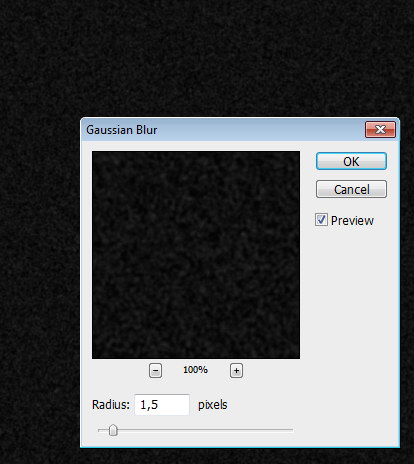
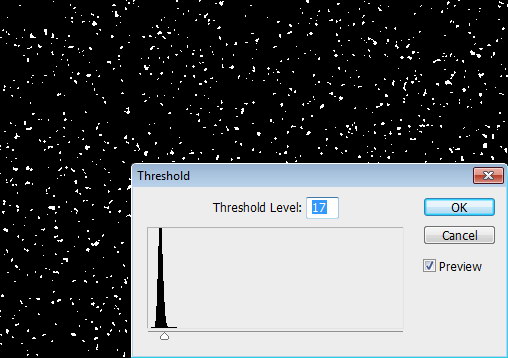
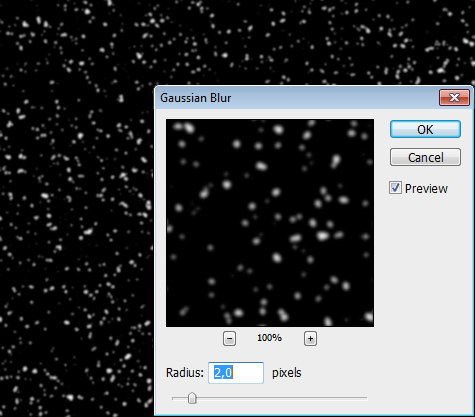
Click Filter > Noise > Add Noise. Click Filter > Blur > Gaussian Blur. Click Image > Adjustments > Threshold, move slider until we have a few random shapes. Click Filter > Blur > Gaussian Blur.


Step 86

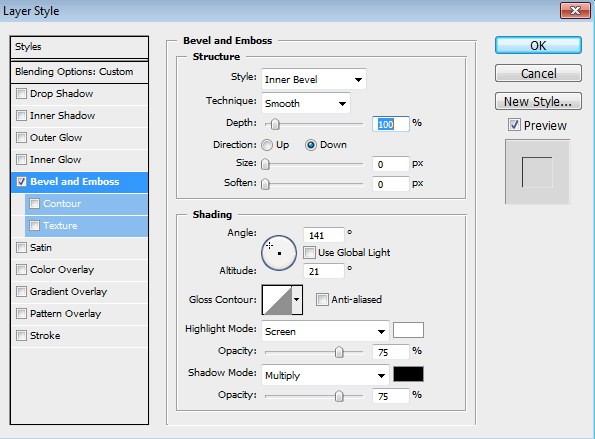
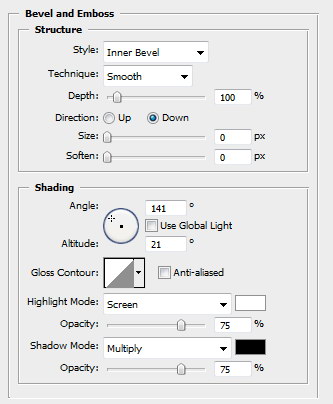
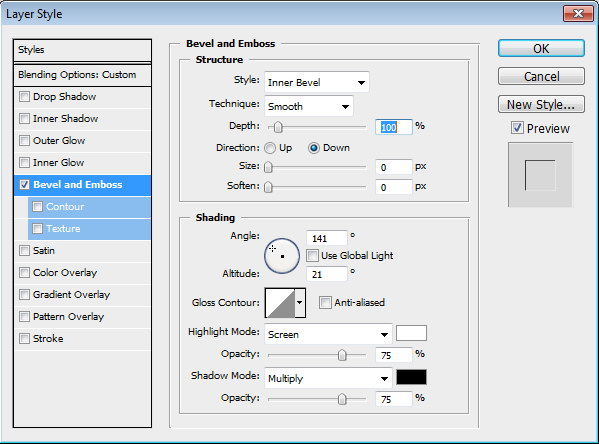
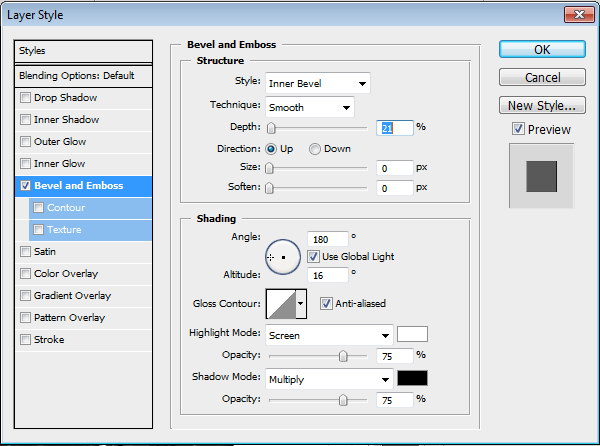
Cmd-click channel to load it as a selection. Create a new layer for our texture. Make sure it is placed above all other layers. Fill selection with white. Add this Bevel and Emboss layer style.


Step 87

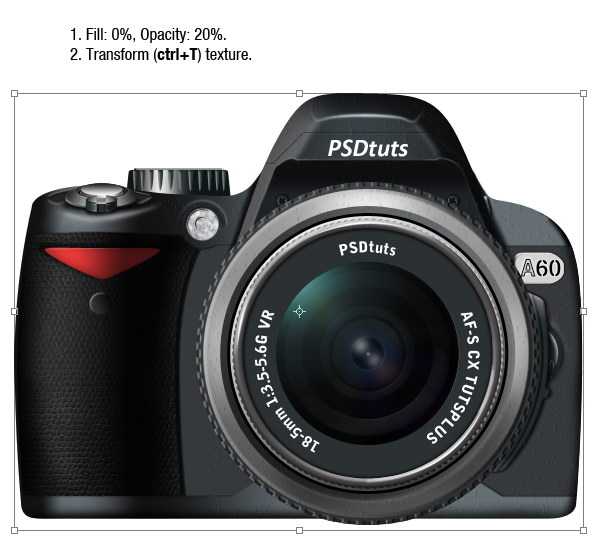
Set fill layer: 0%, opacity: 20%. Transform (Cmd + T) and change its size until you have suitable texture size.


Step 88

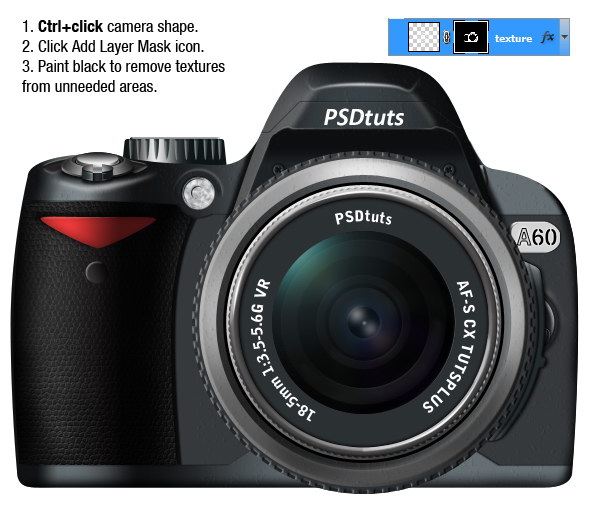
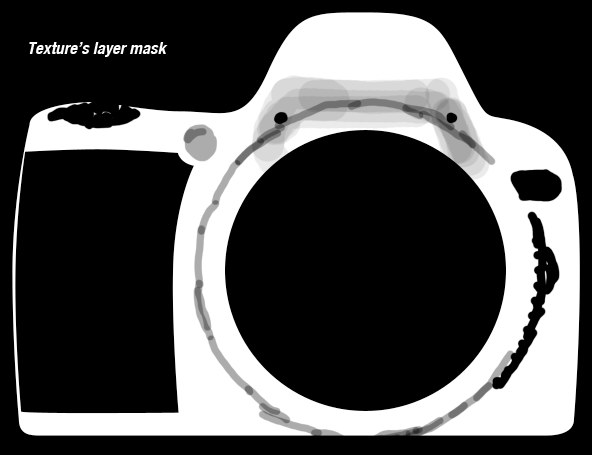
Cmd-click the camera shape and click Add Layer Mask icon. Paint black to remove texture from unneeded areas such as lens and shutter button. You can see layer mask used in this image below.


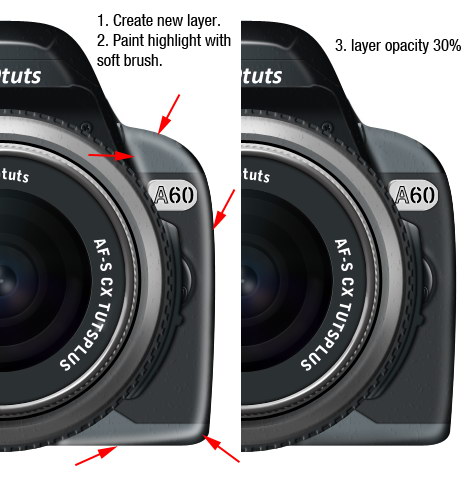
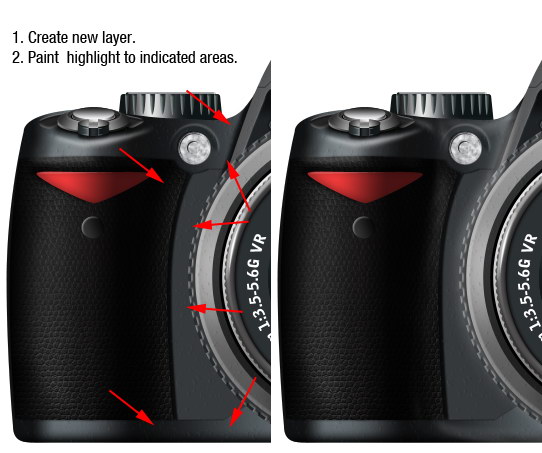
Step 89

This camera still need more highlights to give it realistic 3D look. So, create new layer and paint some highlights. Lower the layer’s opacity to keep the highlights subtle. Do this for both sides.


Step 90

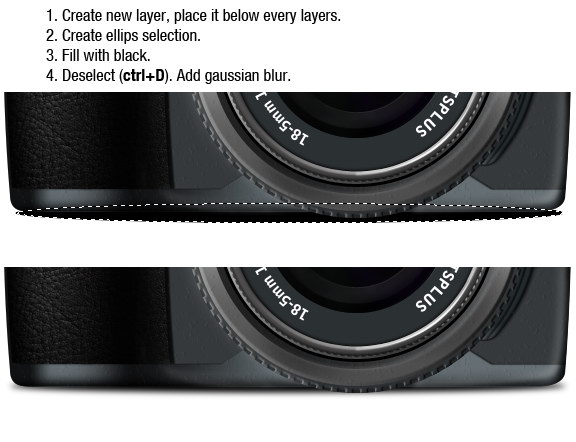
Almost done! Create a new layer and put it deep down under all layers. Create an elliptical selection under the camera and fill it with black. Deselect (Cmd + D) then make it softer with Gaussian Blur filter.


Step 91

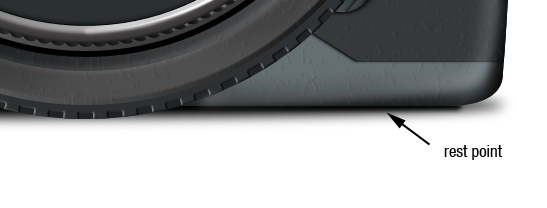
Create a new layer and paint black on the rest point, which is the place where the camera touches the floor. This shadow has to be much darker than the previous shadow.


Step 92

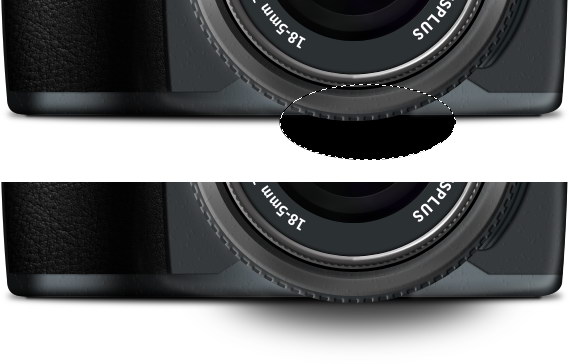
Do the same for the lens shadow. Create a new layer and add an elliptical selection. Fill the selection with black, deselect, and add Gaussian Blur.


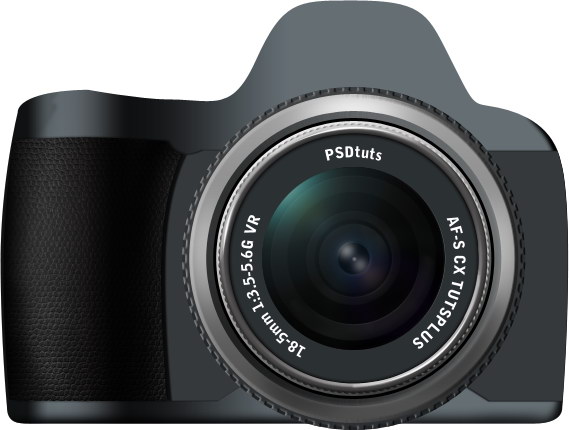
Final Image

That’s it! We’re done. What do you think? Is it real enough? I hope you enjoyed this long tutorial and have learned something new. If you have any questions feel free to ask them in the comments below.