In this tutorial I’ll show you a handy way to quickly convert your Modulation Wheel into any controller number in Logic Pro.
Introduction
Before we start I should mention that if you have a default template that you use all the time for a new project you should add the following to that template so it’s always in every new project you start.
Step 1
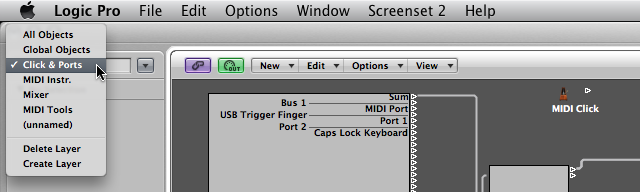
Open a new project and open the Environment (Command+8). Select the layer ‘Clicks and Ports’ from the drop down menu in the top right hand corner.
Step 2
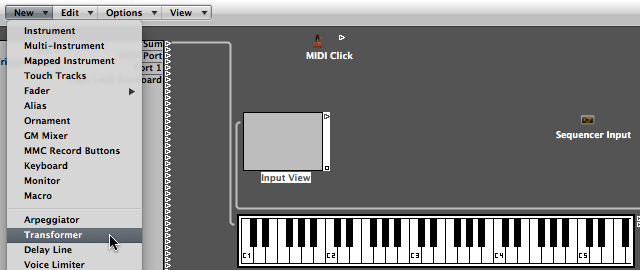
Select the cable between the ‘Input View’ monitor and the Sequencer Input object and delete it.

Step 3
From the New menu select Transformer to create a new Transformer object.
Step 4
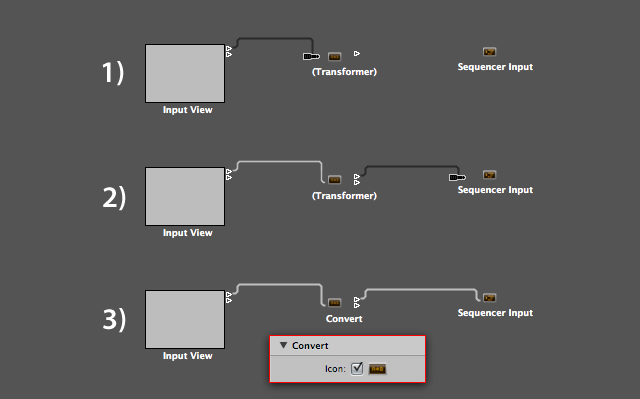
Connect the Input View object to the new Transformer object by dragging a cable to it. Then connect the Transformer to the Sequencer Input. Rename the Transformer to ‘Convert’ by selecting it and double clicking on the name in the Inspector. Also make sure the ‘Icon’ button is ticked for the Transformer.
Step 5
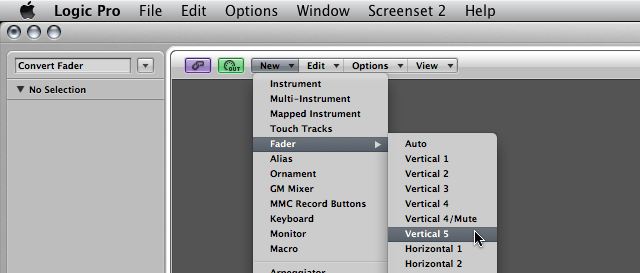
Next up is to create a new Environment layer. Go to the drop down in the top right corner of the Environment and choose ‘Create Layer’. It will make a layer called ‘(unnamed)’, select the new layer in the drop down and double click it to rename it. Call it ‘Convert Fader’.

Step 6
In the new layer create a ‘Fader’ object by going to New -> Vertical 5.
Step 7
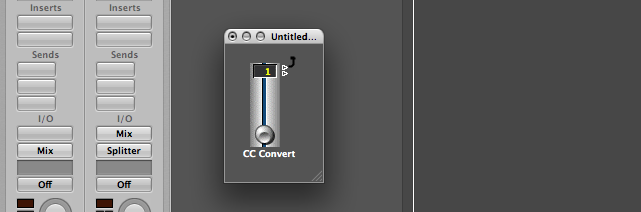
Rename the fader ‘CC Convert’. In the Inspector change the faders ‘Output’ to ‘Meta’ and where you see ‘-1-:’ below it change the value to 127.
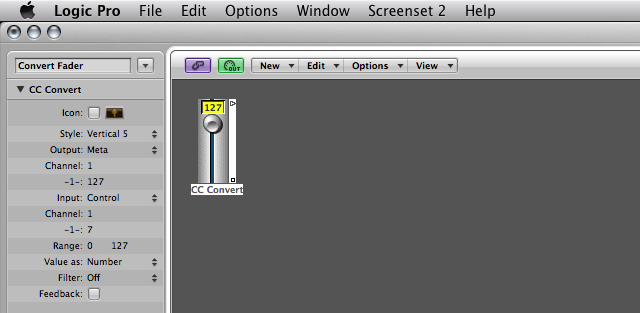
Let me explain what we’ve done. Faders in the Environment can transmit all kinds of information, from Continuous Controller messages, Pitchbend, Fader, Aftertouch etc. They can also output Meta data. These are internal Logic commands and can be used to change all sorts of cool stuff in Logic like Tempo, Screensets, jumping to Markers etc.
One of the things Meta events can also control are Transformer object parameter values. A Meta event with a value of 127 talks to the first row of ‘Operations’ parameters in the Transformer object, and this is what we want.
Step 8
First to actually get this fader to speak to our Transformer object we need to connect it. So how do we connect one object to another one on a different layer?
Simply ‘Option’ click on the faders top port to bring up the ‘Environment Objects’ menu. Navigate to ‘Clicks & Ports’ and choose the ‘Convert’ Transformer we made earlier. On a side note, if we hadn’t have checked the ‘Icon’ box on the Transformer we wouldn’t be able to see it in this menu.
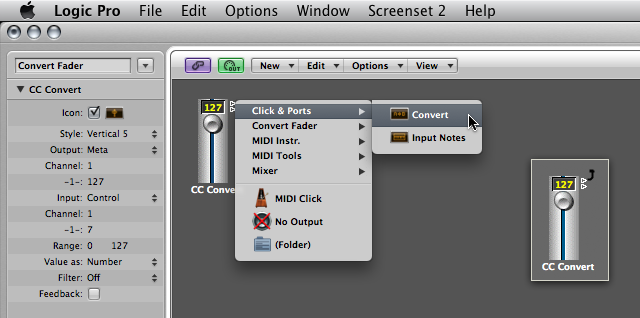
You should now see a curly wire sticking out of the fader which means it successfully connected to our Transformer.
Step 9
Hop on over to the ‘Clicks & Ports’ layer and double click on the ‘Convert’ Transformer to open it. In the top Conditions box set the ‘Status’ to ‘=’ ‘Control’. In the ‘Data Byte 1′ column set the values to ‘=’ ‘1′. This says we want to convert anything that comes in that is ‘Controller 1′ data or in English ‘Modulation’.

In the bottom box or the ‘Operations’ parameters set the ‘Data Byte 1′ column to ‘Fix’ ‘0′. We don’t actually need any specific value here as it’s going to be controlled by our fader. Remember the Meta event from the fader, well this is the value it targets.
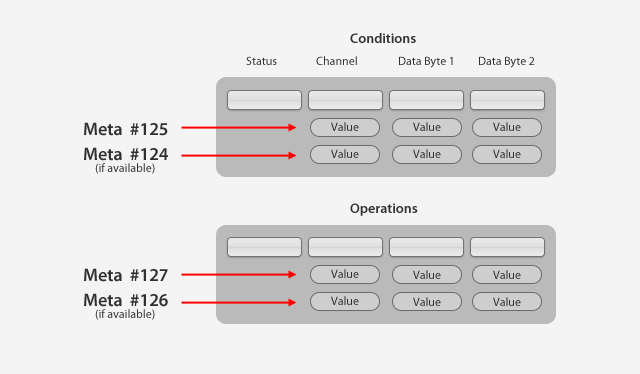
How Meta commands target transformer parameters
A word of warning here, the Meta values change Channel, Data Byte 1 and 2 if they are set to anything other than ‘Thru’. If you want independent control over each one you’ll have to use more transformers. As we only need to target one value (Data Byte 1) we’re safe. The Status is untouched by Meta event values.
Step 10
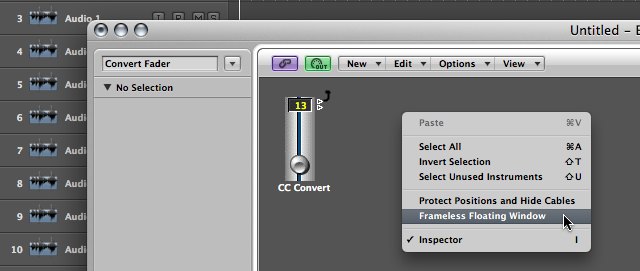
Now switch over to the ‘Convert Fader’ layer and make sure the fader is up in the top right hand corner. ‘Control’ click on an empty space in the Environment and choose ‘Frameless Floating Window’.
Step 11
Resize the now floating window so it holds the fader and place it somewhere out the way.
Step 12 – Title
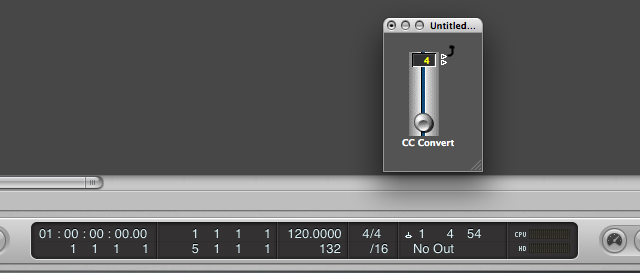
Change the value on the fader and you’ll see that the incoming modulation wheel data is converted to your chosen value before it enters Logics sequencer. You can see below the correct value in the Transport when I move the Mod Wheel.
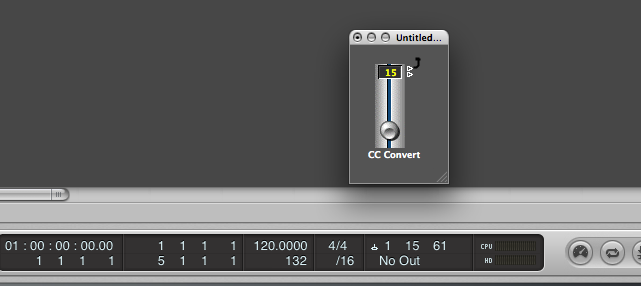
Here’s another example this time set to number 15.
Conclusion
What we’ve essentially done here is create a UI for a Transformer object, one that also handily floats over any window.
This has a ton of applications and if you have a limited amount of hardware controllers it means your Mod Wheel can essentially control any MIDI parameter in seconds without having to remap anything. All you need to know is the controller number of the parameter you want. For instance Hi Hat pedal control is CC4. Just change the fader value and in Superior Drummer, BFD etc you can open and close the Hi Hats with the Mod Wheel in real time. Even better is if you have an expression pedal you can just change the 1 to 11 (Expression is CC11) in the ‘Conditions’ box and 4 on the fader and now the foot pedal controls the Hi Hat!
Since everything in Logic is controlled by MIDI this can really be a handy utility to have on screen. You can even mod it to control plugin parameters like a Phasers LFO rate. The options are endless!
Familiarizing yourself with CC numbers is probably a good idea if your a bit confused as to what they do. And if your baffled by the Transformer we’ve got a couple of screencasts here at Audiotuts+ about that too.
Hope you’ve enjoyed this and maybe learned something too. Till next time!