Quick Tip: Create a Barcode Sticker in Photoshop – Screencast


In today’s screencast we will revisit a quick tip tutorial by Alex Painsi that demonstrates how to create your own barcode sticker in Adobe Photoshop. This tutorial shows how to create custom brushes and apply custom settings to your brushes.

Here is a link to the written version of this tutorial Quick Tip: Create a Barcode Sticker in Photoshop

Stay Lean While Working From Home

So, you’ve managed to convince your boss and/or your spouse that you can be more successful by working from home.  Nicely done. However, as discussed here, there can be some concerns if you aren’t careful.

Here are a few tips to help prevent you from putting on extra weight whilst working from home:

Have set mealtimes

A regular meal schedule can help you avoid the need for snacking.  There’s a lot to be said about eating smaller portions, less often.  If you have the flexibility to do this while you work from home, you might find that you aren’t having crazy sugar cravings as often.  Of course, one of the keys to this is reducing your portion size – moderation is essential.

Create appropriate snacks

If you have to have snacks, make it easy to make the right choice.  Fresh fruit, fresh vegetables, or small appy plates (cheese and crackers, or pickles and sliced meats) are all great choices.  If you plan ahead, you can even reward yourself when you achieve some of your daily goals.

Get rid of the junk food

It might hurt at first, but get rid of the chips, chocolates, candies, and ice cream.  When you are avoiding work, or suffering writers block, or just trying to take a break, the temptation to eat junk is eliminated if you don’t have any in the cupboards.

Cut out the cream

If you’re like me, and working at home means more (and usually much better) coffee, be aware of how much cream and sugar you’re putting into your drink.  It all adds up, and over time you might notice it adding to your weight.  This includes Irish Cream in your coffee – now that you don’t have to drive to work, you can reward yourself with a tasty adult beverage – just be careful how much and how often.

Get up and exercise

Now that you don’t have that extra flight of stairs, or that walk from the parking lot to your office, try to add in some new exercise to keep your body in good shape.  Go for a walk around the block, have a bike ride with the kids, or just spend some time on the treadmill.  Make it a habit, and you might even start enjoying it.  I’m not quite there yet – but apparently it will happen.

Congratulations on joining the work-at-home team – and don’t stress about your weight.  Try to make healthy decisions now that you’ve got the flexibility, and enjoy the freedom working from home provides.

Quick Tip: Pure CSS Reflections


Many might not be aware that, with CSS, we can achieve reflections quite easily in all webkit-based browsers, which represent roughly 20% of all browser usage. The key is in the vendor-specific, -webkit-box-reflect property. I’ll show you how to use it in today’s video quick tip!


img {
  -webkit-box-reflect: below 4px -webkit-gradient(linear, left top, left bottom, from(transparent), color-stop(.7, transparent), to(white));
  -webkit-border-radius: 3px;
   border-radius: 3px;
   border: 3px solid #666;
}
Sample

Ask Forgiveness, Not Permission

“Ask forgiveness, not permission.”

Have you heard this around your workplace? It’s basically a pithy way of saying “I’d rather you go too far than do too little.” Instead of getting bogged down in the bureaucracy, they’re telling you to move forward with your work – even if you have to bend a few rules.

Whoever says this to you clearly trusts your judgment and approves of your past work. The phrase may sound a little strange, but consider it a compliment and a testament to your reliability. You’re getting permission to bulldoze through the roadblocks instead of stopping the whole operation – you get to keep the “flow” going for both you and your organization.

Just don’t take it too far.

Have you ever worked for an organization that endorses this philosophy?  Punishes those who follow it? Let us know in the comments.

Introduction to MySQL Triggers


Chances are, you know what a database trigger is, at least in conceptual terms. Chances are even greater that you know that MySQL supports triggers and has supported them for quite some time. I would guess, even armed with this knowledge, that a good many of you are not taking advantage of triggers with MySQL. They’re one of those things which should absolutely be in your development toolbox, as they can really change the way that you look at your data.


Introduction: What is a Trigger

“However, as applications grow more and more complicated, the further we can abstract the layers of an application to handle what they should, the greater our internal development usability becomes.”

For the uninitiated, a trigger is a rule that you put on a table which basically says whenever you DELETE, UPDATE or INSERT something in this table, also do something else. For instance, we might want to log a change, but instead of writing two separate queries, one for the change, and one for the log, we can instead write a trigger that says, “Whenever this row is updated, create a new row in a different table to tell me that the update was made”. It adds a little overhead to the initial query, but since there are not two packets traveling to your database to do two separate things, there is an overall performance gain (in theory anyway).

Triggers were introduced into MySQL in version 5.0.2. The syntax for a trigger is a bit foreign on first blush. MySQL uses the ANSI SQL:2003 standard for procedures and other functions. If you are comfortable with a programming language in general, it is not that difficult to understand. The specification is not freely available, so I will do my best to use simple structures and explain what is happening within the trigger. You will be dealing with the same logic structures that any programming language provides.

As I mentioned above, triggers will be executed procedurally on UPDATE, DELETE and INSERT events. What I didn’t mention is there is they can be executed either before or after the event defined. Therefore, you could have a trigger that would fire before a DELETE or after a DELETE, so on and so on. This means that you could have one trigger that fires before an INSERT and a separate one that fires AFTER an INSERT, which can be very powerful.

I am going to look at three uses that you could consider adding to your toolbox. There are several uses that I will not be delving into, as I feel there are better methods to get the same results, or they deserve their own tutorial. Each of these uses that I am exploring have a counterpart in your server side logic layer, and are not new concepts. However, as applications grow more and more complicated, the further we can abstract the layers of an application to handle what they should, the greater our internal development usability becomes.


Beginnings: My Table Structure, Tools and Notes

I am working with a mythical cart system, with items that have prices. I have tried to keep the data structure as simple as possible just for illustration purposes. I am naming columns and tables for the purpose of understanding, and not for production use. I am also using TIMESTAMPS rather than other alternatives for ease. For those playing the at-home version of today’s game, I am using the table names of carts, cart_items, cart_log, items, items_cost.

Please note throughout this tutorial I will be using very simple queries to express my points. I am not binding any variable, as I am not using any user input. I want to make the queries as easy to read as possible, but don’t use this tutorial for anything other than practical trigger applications. I know there might be a comment or two about this, so consider this my disclaimer.

I am using the Particle Tree PHP Quick Profiler to see execution times. I am also using the database abstraction layer provided in the tool just for my own benefit. It’s a nice tool, and does much more than just providing SQL execution times.

I am also using Chive to illustrate the DB effects and create my triggers. Chive is MySQL 5+ only, and is very similar to PHPMyAdmin. It’s prettier, but also much buggier at the moment. I am using Chive, simply because it gives good screen shots as to what is happening with the queries.

One other quick note. You may need to change the delimiter for MySQL while creating a trigger. The natural delimiter for MySQL is ; but since we will be using that delimiter for our added queries, you may need to explicitly rename the delimiter if creating these via command line. I have chosen not to show this, because using Chive, there is no need to change the delimiter.

To change a delimiter, you would simply do this before your trigger command:

DELIMITER $$

And this after your trigger command:

DELIMITER ;

The Easy Trigger: Data Integrity

If you do even the slightest normalization to your database structure you have probably run into a time where you have deleted the main data source, but still have fragments running around in your data stream. For instance, you might have an cart_id which is referenced in two or three tables without foreign keys, particularly since foreign keys are not supported with the MyISAM engine.

What you have probably done in the past is something like this (simplified for illustration):

    $sql = 'DELETE FROM no_trigger_cart_items WHERE cart_id = 1';
    $rs = $this->db->query($sql);

    $sql = 'DELETE FROM no_trigger_carts WHERE cart_id = 1';
    $rs = $this->db->query($sql);

Now, depending on how well you organize yourself, you might have a single API or method which you would clear your carts. If that is the case, you have isolated your logic to run these two queries. If that is not the case, then you always need to remember to clear your cart items when you delete a specific cart. Not difficult, but when you forget, you are losing your data integrity.

Enter our trigger. I am going to create a very simple trigger so that whenever I delete a cart, my trigger will fire to delete any cart items that have the same cart_id:

CREATE TRIGGER `tutorial`.`before_delete_carts`
    BEFORE DELETE ON `trigger_carts` FOR EACH ROW
    BEGIN
        DELETE FROM trigger_cart_items WHERE OLD.cart_id = cart_id;
    END

Very simple syntax as I said above. Let’s go through each line.

My first line states “CREATE TRIGGER `tutorial`.`before_delete_carts`”. I am telling MySQL to create a trigger on the database “tutorial” to have a name of “before_delete_carts”. I tend to name my triggers with the formula of “When_How_Table”. That works for me, but there are plenty of other ways to do this.

My second line tells MySQL the definition of this trigger, “BEFORE DELETE ON `trigger_carts` FOR EACH ROW”. I am telling MySQL that before you delete on this table, for each row do something. That something is explained next, within our BEGIN and END. “DELETE FROM trigger_cart_items WHERE OLD.cart_id = cart_id;” I am telling MySQL before you delete from trigger_carts, take the OLD.cart_id and also delete from trigger_cart_items. The OLD Syntax is the defined variable. We will discuss this in the next section where we will combine OLD and NEW.

There is really nothing to creating this trigger. The advantage is moving your data integrity logic to your data layer, which I could make the case, is where it belongs. There is also one other slight advantage and that is the slight performance gain, seen below.

Two Queries:

Delete with No Trigger

One Query with a Trigger:

Delete with a Trigger

As you can see there is a slight performance gain, which should be expected. My database that I am using is on localhost with my server, but had I been using a separate DB server, my performance gain would be a bit greater due to round trip time between the two servers. My trigger delete has a slightly higher time to delete, but there is only one query, so the overall time decreases. Multiply this over all the code that you use to keep your data integrity, and the performance gain becomes at least modest.

One note on the performance, the first time the trigger runs, it may be much slower than subsequent times. I don’t use triggers necessarily for the performance gain, but rather to move my data logic to my data layer, just like you want to move your presentation from your markup to your presentation layer, otherwise known as CSS.


The Pretty Easy Trigger: Logging and Auditing

The next example that we will look at will deal with logging. Say I want to keep track of every item placed into a cart. Perhaps, I want to monitor my cart items purchase rate. Perhaps, I just want to have a copy of every item placed into a cart, not necessarily sold, just for some insight into the mind of my customers. Perhaps, you created your cart items as a MEMORY table, and you want to log all items in an InnoDB table. Whatever the reason, let’s look at an INSERT trigger, which will open up some good possibilities for logging or auditing of our data.

Before triggers, we probably did something like this (again, simplified for illustration):

Create with No Trigger

Now, we can create a very simple trigger for this logging process:

CREATE TRIGGER `after_insert_cart_items`
    AFTER INSERT ON `trigger_cart_items` FOR EACH ROW
    BEGIN
        INSERT INTO trigger_cart_log (cart_id, item_id)
        VALUES (NEW.cart_id, NEW.item_id);
    END

Let’s run through this again, just so there is clarity of what this trigger is doing. First we start with the line, “CREATE TRIGGER `after_insert_cart_items`”. I am again telling MySQL to create a trigger with the name of “after_insert_cart_items”. The name could be “Foo”, or “BullWinkle” or whatever you want to call it, but again, I prefer to illustrate my trigger names. Next we see, “AFTER INSERT ON `trigger_cart_items` FOR EACH ROW”. Again, this is saying after we insert something on trigger_cart_items, for each row inserted execute what is between my BEGIN and END.

Finally, we just have, “INSERT INTO trigger_cart_log (cart_id, item_id) VALUES (NEW.cart_id, NEW.item_id);” which is a standard query with the exception of my two values. I am using the NEW value that is inserted into the cart_items table.

And we have cut our queries in half with the subtle performance gain:

Create with a Trigger

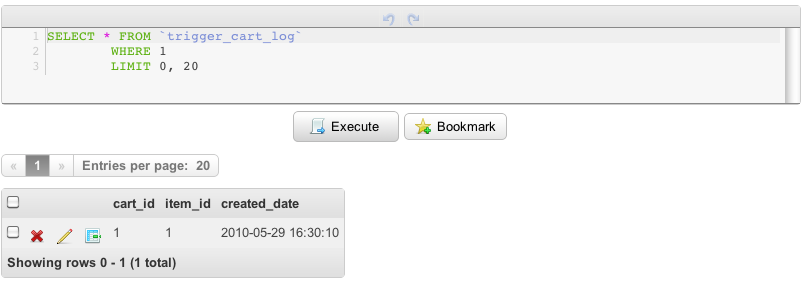
And just to check that our trigger is working, I see the values in my table:

Proof of my Trigger

This is again, relatively easy, but we are working with a couple of values, which can add to the complexity just a bit. Let’s look at something a little harder.


The Harder Trigger: Business Logic

At this point we can skip the old way of multiple queries with a single query. I imagine that will get just a whee bit tedious to continue to measure performance of queries. Instead, let’s get into a few more advance examples of triggers.

Business logic is where the bugs always creep up. Regardless, of how careful or organized we are, something always slips through the cracks. Triggers on UPDATE mitigate that just a bit. We have some power in a trigger to evaluate what the OLD value was, and set the NEW value based on the evaluation. Say for instance we want to always have our price of items to be a 30% markup of the cost of the items. It makes natural sense then, that when we UPDATE our cost, we also need to UPDATE our price. Let’s handle that with a trigger.

CREATE TRIGGER `after_update_cost`
    AFTER UPDATE ON `trigger_items_cost` FOR EACH ROW
    BEGIN
       UPDATE trigger_items
       SET price = (NEW.cost * 1.3)
       WHERE item_id = NEW.item_id;
    END

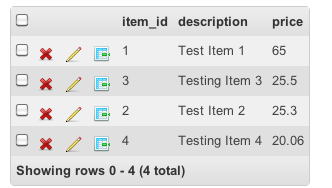
What we are doing is updating the items table with a price based on the NEW.cost times 1.3. I entered a cost of $50, so my new price should be $65.

Update Trigger Price Change

Sure enough, this trigger worked as well.

We need to take a look at a bit more advanced example. We already have the rule to change the price of an item based on it’s cost. Let’s say that we want to tier our cost a bit. If the cost is less than $50 our cost is actually $50. If it the cost is over $50 but less than $100 then our cost becomes $100 dollars. While my example probably doesn’t match a true business rule, we do adjust cost based on factors everyday. I am merely trying to keep the example easy to understand.

In order to do this, we are again going to work with an UPDATE but this time we will fire it before we execute our query. We are also going to be working with an IF statement, which is available to us.

Here’s the new trigger:

CREATE TRIGGER `before_update_cost`
    BEFORE UPDATE ON `trigger_items_cost` FOR EACH ROW
    BEGIN
        IF NEW.cost  50 AND NEW.cost < 100 THEN
            SET NEW.cost = 100;
        END IF;
    END

What we are doing now is not calling a query, but rather just overriding the value. I am saying if the cost is less than $50, then just make it $50. If the cost is between $50 and $100, then make it $100. If it is above that, then I just let it stay the same. My syntax here is not that foreign from any other server side language. We do need to close our IF clause with an END IF; but other than that, it really isn’t tricky.

Just to check to see if our trigger works, I have entered a value of $30 for the cost, and it should be $50:

Cost Is 50

When I enter a cost of $85, here is the value:

Cost Is 100

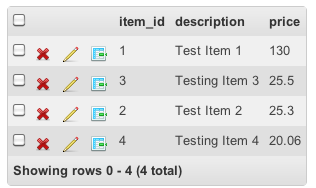
And, just to check if my AFTER UPDATE trigger is still working, my price should now be $130:

Price is 130

Life is good.


Conclusion

I have only touched the tip of the iceberg with triggers and MySQL. While there are countless uses for triggers, I have gotten along just fine in the past without them by dealing with my data in my logic layer. That said, the ability to add rules to my data in the data layer just makes sense. When you add in the modest performance improvements, the advantage is even greater.

We have to deal with complicated high traffic web applications now. While using a trigger on a single page vanity site might not be the best use of time and energy; a trigger on a complex web application might make the world of difference. I hope you enjoyed the examples, and please let me know what needs further explanation.

DIY: How To Make a Professional Softbox for Under $20

Nowadays a softbox needn’t be all that expensive – you can get nice results for $100 or even less. But what if there’s a way of making it much cheaper, with the same results? That’s what we’ll be explaining in this DIY tutorial; how to make a softbox with professional results for less than $20.


Step 1: What is a Softbox?

A Softbox is a type of light modifier, used specially in studio or outdoor portraits. It creates a soft diffused light by directing light through some diffusing material. The light is reflected in its inner walls, covered with a bright surface, usually aluminum foil, bouncing against a white diffusion sheet.

It can be used with either strobe light or continuous light sources. The main purpose of a softbox is to create a soft and uniform light, often used as key light. Also, it’s perfect for lighting a studio, where every inch of bright area is important.


Step 2: Materials required

In order to build the softbox, this is all you need:

  • Large cardboard
  • Tape
  • Aluminium foil
  • Glue
  • Velcro straps
  • Screws and nuts
  • Paper roll (at least 40 inch wide, and 50 inch large)
  • Black spray

Step 3: Drawing and Measuring

In this tutorial, we’ll explain how to create a 30×25 inch softbox, but this method will work for any size. Just remember to keep in mind proportions in order to make it correctly.

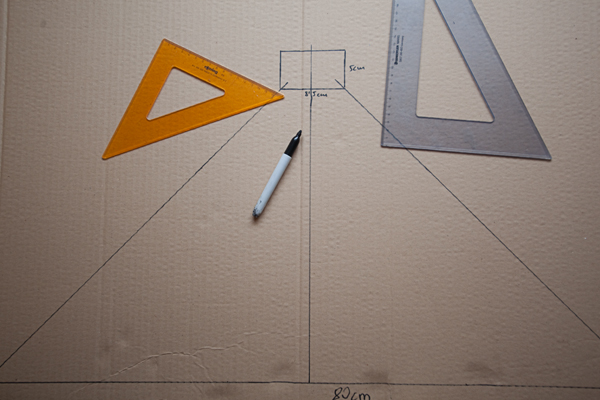
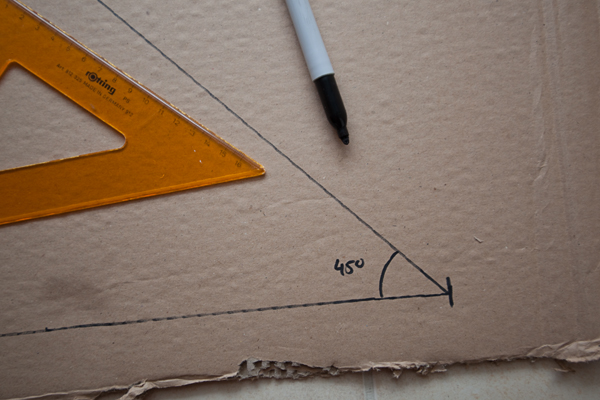
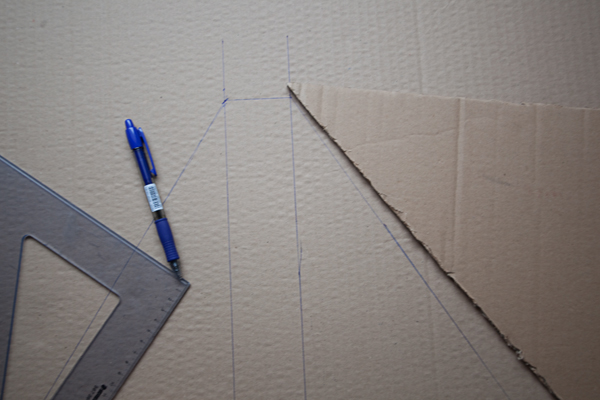
First of all, you need to draw the four sides of the softbox in trapezoid shape. The first two sides will be the large ones, and then the other two the short ones.

The lower part of the trapezoid will be 30 inches long. The side walls have a 45º angle. The upper part of the shape will be the length of your flash head, in my case, it’s 3 inches. Next, repeat the process again to have the two large sides of the softbox.

Afterwards, it’s time for the short sides. The lower part is 25 inches long, and the upper one, the height of your flash head. At this point, the angle of the sides is not so important, it’s a little more than 60º, but to make it easier, simply use the length of the sides of the walls you made before.


Step 4: Cutting the Four Walls

Now that you have the four sides of the softbox – two large and two small ones- , it’s time to cut the cardboard carefully. Remember to leave a small amount of cardboard in the upper part, about 2-3 inches long, because that’s where the flash goes. Cut every piece using a cutter, and place the finished ones aside.


Step 5: Making the Inner Part

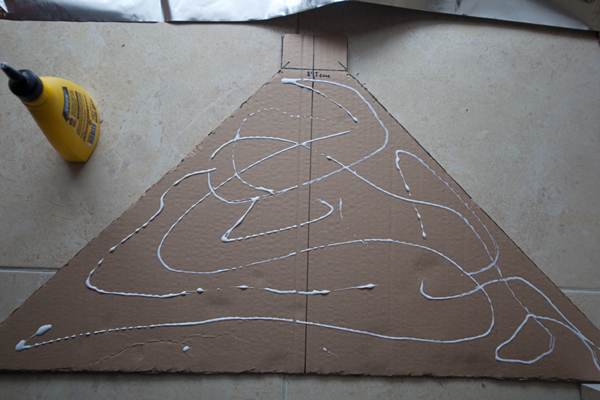
Once you have everything cut, use some glue and cover every piece of cardboard with aluminum foil (but only one side). You can use aluminum tape along the borders to fix it more securely. This part will reflect the light of the flash, making it stronger and more powerful. Just in case, use two layers of aluminum foil, to ensure everything will stay intact for a long time.


Step 6: Adding the Velcro Straps

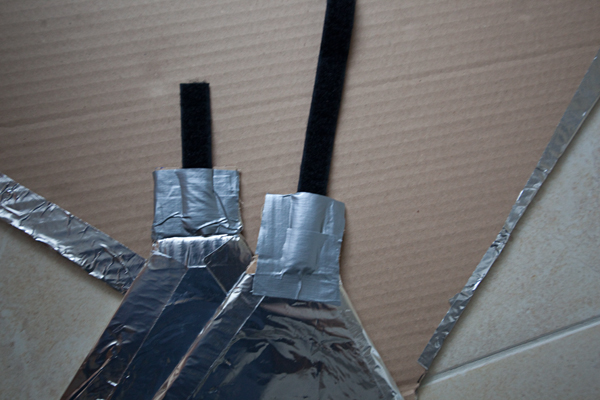
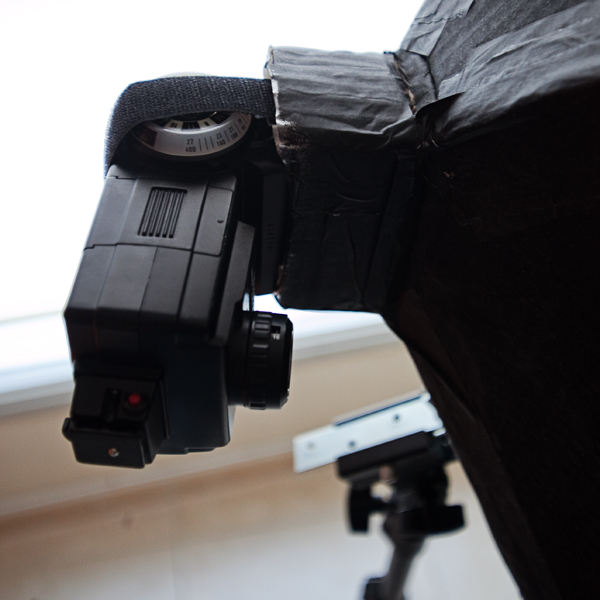
Next, take the two short walls – those with the short part at the top – and tape two velcro straps on it. A large one, about 6 inches, and a short one, 2 inches. Also, staple it carefully and double tape it, to make it more resistant. These two straps will keep the flash from falling, and will hold it still.


Step 7: Gluing and Mounting

Once you have everything in order, it’s time to assemble the softbox. The order is very simple. First, take a large side, then a short one, then the other large one, and finally the remaining side. Tape it well and glue it, with large amount of glue and tape, just to secure every part, so that it won’t tear apart.

Remember to tape the upper part, where the flash goes, too. A good way to check that it’s properly built is to lift the softbox holding the upper part. If it doesn’t move, then it’s ok. If it’s moving and unstable, add more tape until everything is secure.


Step 8: Painting

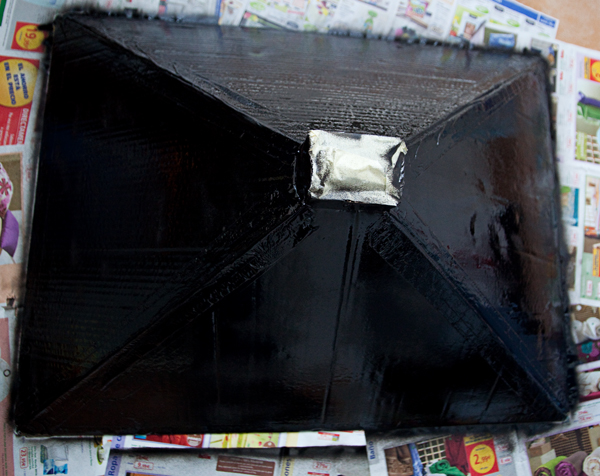
After waiting a few minutes, you can paint your softbox to make it look a lot considerably more professional. Use old newspapers and some tape to protect the parts you don’t want to paint, like the upper hole. I used black spray to make the process a little simpler. After it dries, add another layer of color, and then leave it drying overnight.


Step 9: Building and Adjusting the Tripod Adaptor

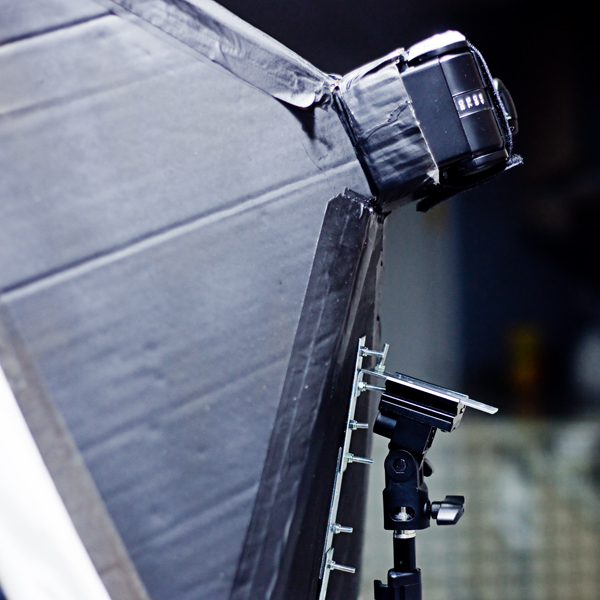
Once you have the softbox almost finished, it’s time to make the tripod adaptor. Use an L shaped aluminum bracket, and place the large side of it on the softbox. Make some holes in the softbox, just in the middle of the short side. Then, using some screws and nuts, place the bracket and screw it on, making sure that it’s stable and not moving.

To use this bracket, you’ll also need a light stand and a light stand mount swivel, easy to find on eBay, for example, for just only $10. To mount it, the easiest way is to insert the L bracket in the flash mount gently.


Step 10: Making the Diffusion Panel

Now it’s time to mount the diffusion panel, made of paper. Extend the paper roll on the floor, place the softbox face down on it, and carefully glue the paper to every side. You can also add more layers if you’d like to make the light much softer, and also more uniform and equal. Remember that the more layers you add, the lower the power of the light.

Of course, if the paper tears, you can always repeat this process at a later date.


Step 11: Mounting the Flash

Finally, it’s time to mount the softbox on the light stand, and then place the flash in the hole. In order to do this, hold the flash gently and insert it in the hole, pressing carefully until it fits snugly. Proceed to secure it using the velcro straps.

The reason to use the flash horizontally is to have more flexibility moving the softbox. You can use it pointing down, up, or in a 45º angle, for example.


Step 12: Final result

All you need to do now is to experiment taking a few photos with your brand new softbox! It produces wonderful, soft light, lighting an entire person, for example. I always use it in the studio as main light, without needing anything else.

It’s great for making dramatic portraits, by pointing it at a side of a model, or producing soft beauty images. Here are some examples. The first one is using only the softbox, at camera right at full power. It produces a high-contrast look. The other two were made using the softbox as main source, along with another two bare strobes – one on each side as rim light.


Give it a Try!

What are you waiting for? Dig out that old cardboard box sat in your garage, and give the process a try! If you do decide to go ahead with putting your own softbox together, be sure to share a few photos of it in the comments below.

Tackling Rich Media for Tablets with Adobe CS5: Part 1

Tablets are today’s Big Thing. Sure, the iPad can’t do Flash, but it’s just the first of a wave. Adobe InDesign CS5 can do a ton of interactive stuff that’s perfect for the large screen space of a tablet, then kick it over to Flash for tweaking and improvement. In this tutorial, we’ll see how to work with the InDesign side of things.


Introduction

When Adobe floated its iPhone Compiler for Flash at Max last year I have to admit I was, briefly, blown away. Then I turned to the guy next to me in the audience and said: “This is going to be great until Apple finds a way to shut it down.” Which sort of explains why Apple’s “April Shock” really didn’t surprise me. How they did it was a surprise but shutting it down was not unexpected.

A couple of weeks later Richard Galvan the Flash Product Manager was on the stage at FlashintheCan showing off some rather “whizzy” stuff that Flash CS5 can do. During the course of his presentation he demoed how InDesign CS5 can now do a ton of Interactive stuff which can then be easily swung over to Flash CS5 as a .fla or simply shot out of InDesign as a fully interactive swf. I am going to admit I had the same reaction as many of you are having: “Gimme a break. There is no way a Flash developer/designer worthy of the title is going to create one big, honking swf from InDesign.”

After Richard’s presentation I cornered him and asked why he was demoing something that was tantamount to giving a crazy man a gun. His one-word answer rocked me back.

Tablets.

he said.

If there is one fundamental rule I try to beat into my students’ heads it is that when it comes to grappling with issues “start with the obvious and work back to the obscure.” Richard’s response was so darn obvious that I felt a little sheepish.

Even though the iPad is one seriously cool device we tend to forget that tablets are an emerging technology. Google, HP and others are going to be coming out with a regular cornucopia of these things and they will all be Flash enabled. Tack onto this the Flash Player 10.1 release which is going to start popping up on every mobile device except Apple’s offerings and it isn’t much of a stretch to assume it is only a matter of time before our clients climb on to the mobile bandwagon.

Just because Apple was first out of the block with its “toy for cool kids”, does not mean it is the benchmark. If these things take off it just might be Apple that has produced a “niche” product.

Which brings me to this tutorial. Tablets have a lot of screen space, which is pretty darn close to the size of a regular sheet of paper kicked out of your laser printer. It makes sense, (and Wired is already showing this off,) to regard print publications as nothing more than pages of “content” and to use the Flash Player to turn a rather passive medium into a rich media experience.

Over the next several months, there will be a number of new Android mobiles and tablets hitting the market this summer. The line up includes Notion Ink’s ADAM, but there are others as well, including the Marvell Moby, WePad and the Dell Mini 5, to mention a few.

Over the course of this two-part series you are going to discover why Flash CS5 had its molecules turned inside out and rearranged with the new XFL format; how InDesign CS5 has suddenly changed from a static layout app to one with a plethora of interactive features and how the new TextLayout Framework in Flash is a lot more than a rather curious addition to the line up. Naturally, we’re going to start assembling the assets in InDesign. By the end of this piece I hope many of you will discover just how "cool" the Interactive features of InDesign really are and, more importantly, why they are there in the first place. Let’s get started:


Step 1: Come Up With a Concept

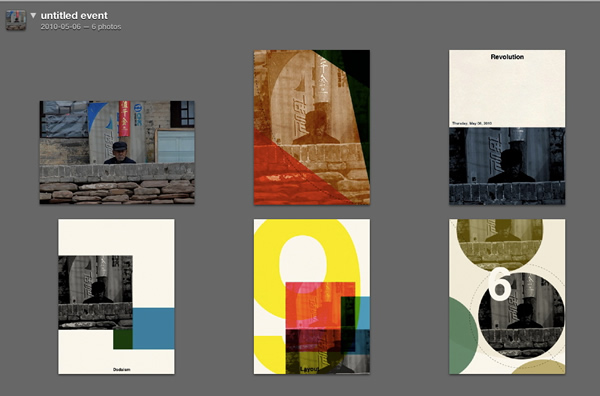
OK. I’m lazy. I let my iPhone handle that one. Brendan Dawes out of MagneticNorth in the U.K. turned me on to a rather interesting iPhone app – addLib – that takes an image you feed it and kicks out some rather interesting variations of how it can be used. Seeing as how I wanted to demo some of the features of InDesign CS5 I thought a trip I made to a small village in China – Huo Guo – would fit the bill and the photo of the old guy peering over the wall at me is one of my favorites from that trip. I fed the image into addLib and I really liked the last treatment.

Based on that design I just knew the tool for the job was Illustrator CS5 and that the imaging was best done in … get set for it … Fireworks CS5.


Step 2: Resize the Image

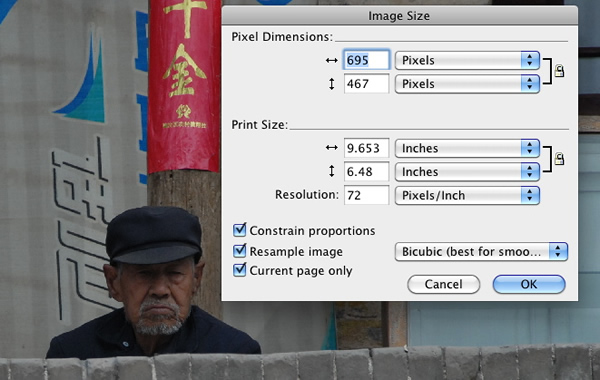
When the image opened the first thing to be done was to get it to a more manageable size. The original image from my Nikon D200 was 2896 by 1944 pixels which wasn’t going to work either in Illustrator CS5 or Fireworks CS5. I selected the image on the Fireworks canvas, selected Modify>Canvas>Image Size and changed the pixel dimensions to those shown in the Figure. With the image resized I clicked the Fit Canvas button in the Properties panel to ensure there was no extra canvas in the final image.


Step 3: Color Correction

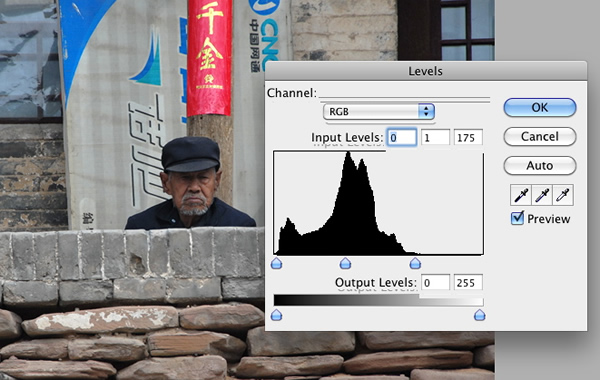
The image is rather dark and could use a bit of color correction. I selected the image on the Canvas and, in the Properties panel selected Filters >Adjust Colors> Levels. The histogram told me I needed to clip some of the white on the right side of the graph. Moving the White Point, as shown in the figure, brightened up the image. The image was saved as CoverColor.jpg.

Creating a grey scale version was also a snap. With the image selected on the Canvas I selected Filters >Adjust Colors> Hue /Saturation and set the saturation value to -100 which removed the color from the image. This image was then saved as CoverGrey.jpg.


Step 4: Resize Images for Slideshow

I thought heaving a photo gallery into InDesign was a no brainer and would demo this feature of the application. Of course 12 images, the same size as the cover image wasn’t going to fly and scaling them, by hand, is not fun.

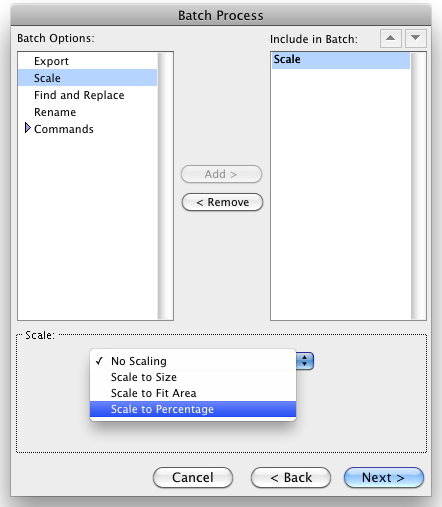
One of my favorite features of Fireworks CS5 is Batch Processing: File > Batch Process… It’s a very simple workflow. Identify the photos, determine the scaling amount and let Fireworks stick the scaled down versions into a separate folder. This took less than 30 seconds to accomplish.


Step 5: Create Cover in Illustrator CS5

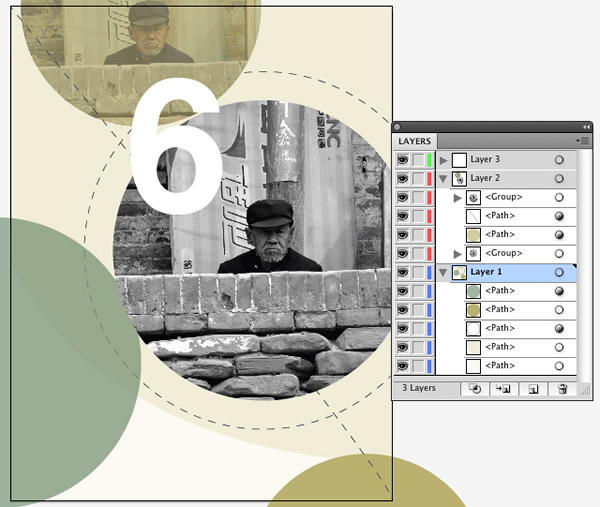
The addLib design was remarkably easy to replicate in Illustrator CS5. Using a combination of simple shapes, masks and type I was able to pull this together in under 30 minutes. The major decision involved output format. I went with the ai format because both Flash and InDesign allow me to round trip back to Illustrator to make changes. If this was destined for a web app with a stop in Catalyst or Flex, I would have gone with FXG across the board in Fireworks, Flash and Illustrator.

5.jpg

With the assets assembled it was time to get to work in InDesign.


Step 6: Why InDesign CS5?

I though I would take a minute or two to get a bit deeper into this subject before I roll into the project because, quite frankly, like many of you, I saw it as a print layout tool that sat on the tool bench rather than one in my interactive tool box. Still, being a bit of a type junkie, nothing frustrated me more than being able to use fine typography techniques on the print side of the fence while we sort of had to “fake it” on the interactive side. Not to mention that attempting to get a multicolumn layout or grid system to work in Flash was something my graphics colleagues on the print side of the street never failed to mention to me.

InDesign CS5 sort of stops this friendly needling. Among the features of InDesign CS5 that I just dig are:

  • The ability to add audio and video to the document.
  • The ability to incorporate animation into the document.
  • The ability to add interactivity – buttons, navigation elements and so on – to the document.
  • Typography is now available thanks to the fact both InDesign and Flash share the new TextLayoutFramework. This is huge.

Make no mistake about it folks. These things are not whizz bang, gratuitous eye candy features added to the app to garner choruses of “Cool” from the Fan Boyz at demos and conferences. These are, as you are about to discover, industrial-grade features that move seamlessly into a SWF or to Flash. In fact, for you codies, you don’t even have to touch Flash or Catalyst. InDesign docs can be output as good old XML.

Having said that, this is an emerging workflow that will, especially for the Flash crew, require extra work on your part. I regard this as a “good thing” because, as you are about to see, kicking out a Flash document from InDesign does not make one a Flash artist. You get the bare bones and if your Flash skills are minimal you are, essentially, dead in the water.

Finally, this is not an InDesign tutorial. It’s purpose is to show you how the Interactive features of InDesign are added to a page and how a doc is output to the SWF and Fla formats.

Let’s get on with it…


Step 7: Interactivity

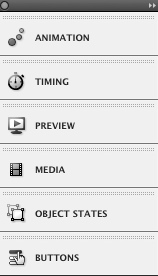
Open InDesign CS5 and select Window > Workspace > Interactive to open the Interactivity panel.

Here, in broad terms, is what each item in the panel does:

  • Animation: use this panel to put things in motion. If you are a Flash user, the default settings are the ones used in the Flash Motion Presets panel.
  • Timing: This panel is used to determine “when” stuff happens, in what order and for how long.
  • Preview: This is a really interesting panel. It builds a SWF inside the panel and allows you to take the project for a test run.
  • Media: This panel not only allows you to preview video and audio but to also add it and assign it such properties as poster frames and controllers.
  • Object States: Typical buttons have three, maybe four, states. Think of these things as button states on steroids. This panel is ideal for things like the slide show.
  • Buttons: This panel allows you to turn anything into a button (think clickable) and then add what happens when the object is clicked.

Step 8: Fly in From Top

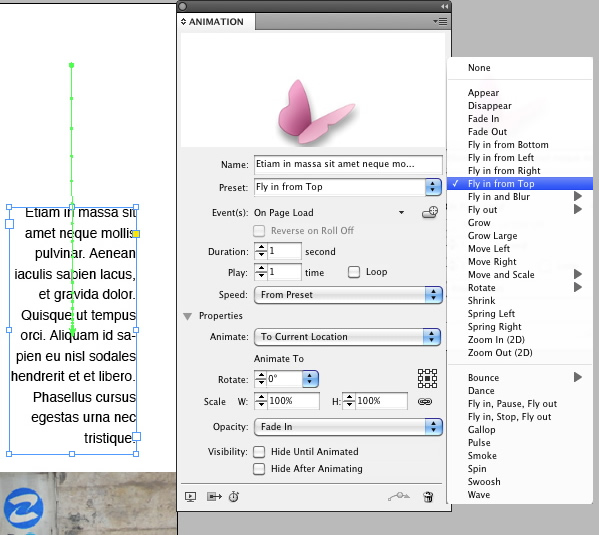
Now we’re going to apply an animation effect to the caption. Select the object that will animate, open the Animation panel and select the animation from the Preset pop down. When you do that a few things happen:

The motion path, in green, is shown on the page and a preview of the animation is applied to the butterfly in the panel’s Preview window. These Motion Paths can be edited with the Pen Tool and one really neat aspect of this is any Custom Paths you may create in Flash can be used here and vice versa. Use the name area to give the animation a name and select when the event – On Page Load, On Page Click, On Click (Self), On Roll Over (Self) – will occur from the Event(s) pop down.

You also get to choose the duration and how often it occurs and even if the animation is to loop. The Speed pop down is where you get to apply Easing.

The Properties, if you are a Flash designer, look quite familiar. The Animate pop down allows you to determine how the animation works – from or To Current Appearance or To Current Location. And the Animate To area allows you to apply rotation and scaling to the final state of the object in motion.


Step 9: Test the Animation

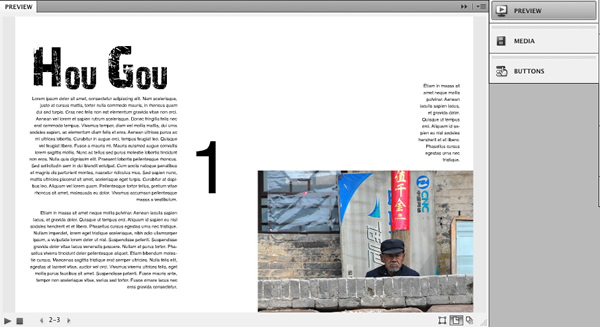
Testing animations or interactivity in previous versions of InDesign was painful. You would create the animation, compile the SWF and leave InDesign to preview your work in the Flash Player. The Preview panel puts all of those steps in one spot.

When you finish with your Animation, simply click the Preview panel button and the panel will appear. It will, at first be blank. This is because InDesign is creating a swf that will play in the panel. When the page appears, click the Play button in the bottom left corner and the caption slides in.

If the panel seems too small, simply drag out a corner to enlarge it the view.


Step 10: Create a Slideshow

The 12 images we prepared earlier using Batch processing in Fireworks CS5 can now be brought into the document and used in a slide show. This is a two-step process: Bring in the images and align them on the page and then convert them to a Multi State object. Here’s how:

Select Edit>Place, locate the folder containing the scaled images and, with the Shift key held down, select them all and click OK. You will see a small “gun” containing a thumbnail of an image. Click it and the image in the thumbnail is dropped on to the page and the “gun” shows you the next image in the stack. Roughly move all of the images into where the slides will appear and, with all of the images selected, open the Align panel by pressing the F7 key. Align the images by their top and left edges.


Step 11: Convert to Object

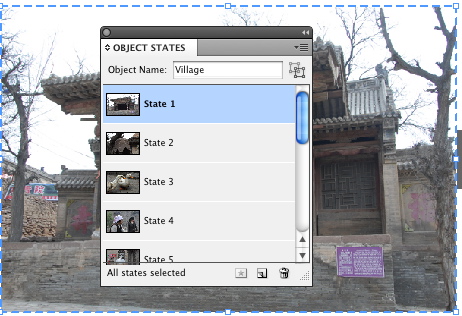
Having created the “stack”, open the Object States panel and click the “Convert selection to multi-state object” button – the page with the turned up corner at the bottom of the panel – and all of the images will appear in the panel. Give the object a name and, if you wish, rearrange the images by dragging them, in the panel, to different “layers” in the stack.

10.jpg

Step 12: Navigation Buttons

A stack is useless if you don’t put it to work. In this case Forward and Back buttons created in Fireworks CS5 are imported for the task at hand. InDesign, like many of the CS5 apps contains a Library of “pre-rolled” buttons – Window > Sample Buttons – but none fit the design. They were brought in using File>Place and moved into their final positions on the page.


Step 13: Adding Button Functionality

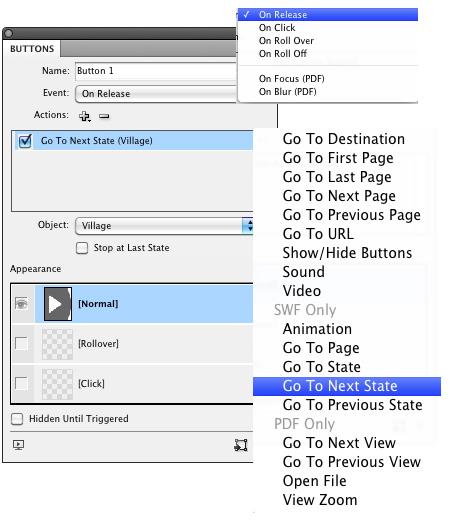
To create a button you open the Buttons panel and, with the object selected, click the “Convert Object to a Button” button – it’s right beside the Trash Can on the Buttons panel. When this happens the panel lights up and you can assign the button some properties.

The first thing to be done is to give the button a name. Next, attach an Event to the button. There are six events, two of which are strictly for PDF projects, to choose from. “On Release” is a safe bet. The next step is to assign an Action to an Event. Click the + sign in the actions area and a pop down list will appear. This is a slide show so it makes sense to assign a “Go To Next State” action. The important thing to note here is that Actions are grouped according to final use. In this case we are going to SWF and Flash so the choice will work.

When the Action is selected the Buttons panel will change to ask you which Object is to be controlled by the button. In this case, it will be the Village stack. You can also click the “Stop at Last State” radio button to ensure the user actually stops at the last image in the stack.

Repeat this process for the Back button and test the slide show in the Preview panel.


Step 14: Add an Audio Track

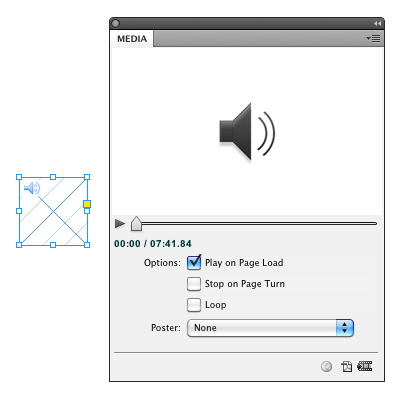
Adding an audio track to a page is dead simple. You can either use the File>Place menu or click once on the Media panel and use the Place an audio or video file button – the one in the bottom right corner of the panel – which will open the Place media dialog box. Just keep in mind the only audio format you can use is mp3.

Once the file is imported a small audio container appears on the stage. In many respects this container is similar to how Flash manages audio on the stage. The container can be placed anywhere because it is more of a placeholder than anything else.

The Audio panel lets you test the sound by clicking the Play button and the Options are somewhat self-explanatory. Your best bet, if you are going the interactive route, is to select the first two options. If you don’t your audio file will continue to play even when you leave the page.


Step 15: Audio Control Buttons

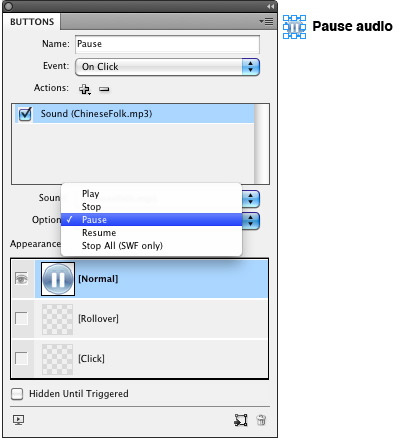
Simple UX design principles state that if you are playing an audio file, you should give the user the opportunity to kill it. In this case a Pause and a Play button were created in Fireworks CS5 and converted to buttons in InDesign CS5. As soon as you link the button to a source, it recognizes an audio file and you are presented with the audio control options shown in the Figure. One really neat feature of the Buttons panel is the icon in the bottom left corner. Click it and the Preview panel opens to let you determine if the button does what you want it to do.


Step 16: Adding Video to the Document

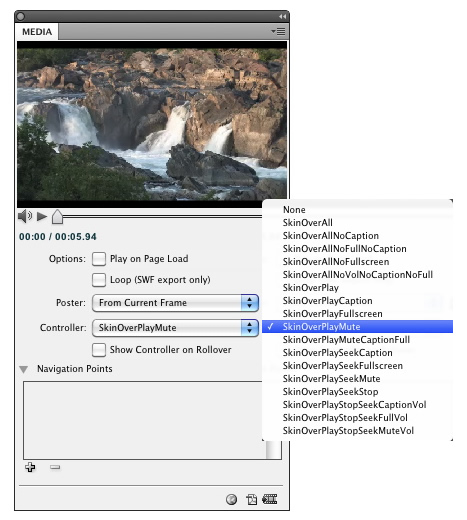
Video – FLV, F4V, MP4 – can be added to InDesign as easily as an audio file and the video properties are set in the media panel. Still there are some aspects of this that you need to know.

Though you are given two playback options, if you are going to give the user a controller, leave them deselected. The Poster option lets you choose a frame from the video or even another image to appear in the document. In this example, I used the scrubber in the panel to identify the frame that will appear in the layout. You can also choose a controller – the SkinOver skins from Flash are your only choices – and whether or not the controller will appear when the cursor rolls over the video on the page. You can also add cue points – InDesign calls them Navigation Points – to the video or they can be added using Adobe Media Encoder CS5.

The other thing you need to know about this video feature, especially if you use video in Flash, is the video needs to be clicked on the stage for it to start playing or to reveal the skin. It might not be a bad idea, if you are going to be outputting only a swf, to add a small caption or icon telling the user to click the image to start video playback.

Finally, use the Preview panel to test the video.


Conclusion

In this article I showed you how to use all of the features in InDesign CS5’s Interactive panel. I showed you how to create buttons, add audio and video and how to turn a stack of imported images into a slide show. You were also shown how to use buttons to control audio and how to add a skin to a video.

I also included how many of the assets were created in Fireworks CS5 and Illustrator CS5 and prepared for placement in the InDesign CS5 project.

In the next installment of this series I will walk you through the steps necessary to output an interactive InDesign document for playback in a browser or for further “tweaking” in Flash. Thanks for reading!

Procrastination Hack: Aim for Nonzero

Whenever his clients had trouble understanding the meaning of their dreams, Sigmund Freud would ask them, “What does this dream definitely not mean?” Once they started discussing invalid interpretations of their dreams, the inertia was broken, and they would transition without effort into examining the actual meaning of those dreams.

A little reverse psychology goes a long way. Too often we become so preoccupied with a project’s final outcome that we become blind to the incremental nature of completion. We think about what we haven’t done. But we can choose to either see the glass as 10% full or 90% empty. You can focus on, “I finally got started”, or, “Man, I’ve got so much to do”. I would suggest that one frame of mind leads to greater engagement than the other.

Forget Finishing. Forget Starting.

I don’t know about you, but advice like, “Just get started” has never been particularly helpful to me when trying to break a spell of procrastination. “Getting started” always seemed fairly abstract. So one day I asked myself, “What would getting started look like?” In my case, as a writer, it would look like some text on the screen as opposed to no text on the screen.

So I made my first course of action to not have a blank screen. That turned out to be way more actionable than asking myself, “What’s a good opening?”, or, “How do I get started?” Putting down a serviceable title filled that requirement. Then I would repeat the process, since the rest of the page was blank. I would fill in the page one unit at a time, sometimes with a paragraph, sometimes with a subheading. Instead of struggling with the creative process of “writing”, I turned it into the mechanical process of “whitespace reduction”.

The moment I have an idea for an article, instead of just jotting it down as a phrase, I open a blank document and create the title, any subheadings that come to mind, and at least one paragraph, forming the “stub” of a full article. I find it much easier to continue later with some copy on the page than none. With the stub in place, the article on some level already exists; the rest is just detail. I’m never starting cold.

If you have a quota of sales calls to make, put the quota aside. Make your only goal to not have no sales calls. As soon as you sit down at your desk in the morning, pick of the phone and eliminate “settling in” time. But what about the other calls you’re required to make? The time to ask that is after you’re past zero calls. Once you’re beyond zero, you’ve “lost your virginity”, so to speak. You’ve experienced doing, and now’s the time to repeat the process, just once. You only have to commit to one more call, not 29. You can’t make 29 calls at once anyway, so why think about them all at once?

The 10-Minute Dash

Since productivity is a ratio of output over time, we can either choose to focus on output or focus on time. A popular variation on the nonzero goal is the 10-Minute Dash. This is where you set a timer for 10 minutes and commit to working on your task for — you guessed it — 10 minutes. In both cases, you’re shifting the focus from intellectual process to mechanical process. There are only two inviolable rules: (1) You must either do nothing else but the task you’ve set, or nothing at all; (2) You must use a timer, not your head, to enforce the interval.

It’s perfectly fine to sit and do nothing for those 10 minutes. You can even daydream, as long as you don’t physically do anything that’s off-task. But naturally, your goal is to have something productive to show for your time, so within a couple of minutes, you’ll probably get started just to avoid the boredom of waiting for the timer to go off.

Allowing idleness might seem to contradict the principle of eliminating zero work done, but it breaks the scatterbrain procrastination mindset of not having enough time. Procrastinators typically (almost necessarily) presume to need larger blocks of time than they have, so they consequently put in no time. Putting in 10 minutes disrupts the self-induced loop of perceived time famine. The 10-minute length is somewhat arbitrary, but just long enough to induce more than idle contemplation.

Small quantities of work might not seem valuable, but they’re infinitely more valuable than no work. They break inertia, establish your direction, let you experience doing, demonstrate solid time management skills and give you material for reflection and revision. All you have to do is more than zero.
Model and Texture an Accurate Looking Pool Table in 3ds Max – Day 2

In this tutorial you will learn a work flow on how to create a pool table using real scale values to give a realistic impression.
You will see how to use the Symmetry modifier to speed up your work, as well as the Bend modifier coupled with some basic commands like Insetting and Bridging to create a very unique design in matter of minutes. You will also learn how to save rendering time by choosing Standard materials over the Arch&Design ones, while still achieving the same impressive results by ‘reverse-engineering’ the Pro Materials in matter of minutes.

This tutorial is Day 2 in a series – Go to Day 1.


Video 1

Download

Note: click the ‘Monitor’ icon to view tutorial in full-screen HD.

Video 2

Download

Note: click the ‘Monitor’ icon to view tutorial in full-screen HD.

Video 3

Download

Note: click the ‘Monitor’ icon to view tutorial in full-screen HD.


This tutorial is Day 2 in a series – Go to Day 1.


Don’t miss more CG tutorials and guides, published daily – subscribe to Cgtuts+ by RSS.

Quick Tip: Turn Your Guitar Into a Bass with Logic 8

Writing and recording your own music is an addictive hobby and, as your skills and ambitions grow, it’s not uncommon to find that there’s always yet one more piece of equipment you need to create the sounds you need. Like most people, until that lottery win comes in, I have to make-do with what I have but, rather than being a limitation, this can be a great impetus to learn new tricks.

For most of my compositions, I really only need simple, root note bass to add some low end thump, so Logic’s built in synth bass tones are usually good enough. But for those occasions when I need some more realistic phrasing in my bass lines, the synth starts to fall short. So if, like me, you need some realistic bass sounds in your recordings without having to buy, borrow or steal, here’s a quick tip for getting a great bass sound out of a regular 6 string guitar.

Here is a short track demonstrating what you will achieve with this tutorial:

Download audio file (GuitBass.mp3)

Continue reading “Quick Tip: Turn Your Guitar Into a Bass with Logic 8”

The Best of Business in May: 10 Posts from FreelanceSwitch & WorkAwesome

At the start of every month, we’ll be rounding up the best posts from the business network of blogs and directing you to them. Here’s the best of business in May, including articles from WorkAwesome and FreelanceSwitch. We look forward to adding the Netsetter to our round-ups after its upcoming relaunch!

FreelanceSwitch

WorkAwesome

  • Handling Interruptions Realistically by André Kibbe. This article outlines how to deal with situations that keep you from finishing your tasks in a realistic way.
  • Habits That Annoy Your Cubicle Mates by Ana da Silva. Keep in your co-workers good graces by learning what not to do if you share workspace with them.
  • 9 Ways To Improve Your Writing by Carl Natale. Brush up on your writing skills and learn 9 ways you can take them to the next level.
  • How to Ask Your Boss to Work from Home by Mike Vardy. While you know you can get more done at home, you may have a challenge ahead of you convincing your boss that’s the case. Gearing up the courage to ask is the first step, but read this if you want to have some tips on how to ask.
  • The Benefits of Working from Home by Ana da Silva. If you’re on the fence about whether you want to move from the office to home, consider this piece on The Benefits of Working from Home, which details some of what you’d have to look forward to.

What Do You Do To Relax?

Wow.  Another week is upon us…already.

The weekends seem to fly by without so much as a pause (unless you take the time to make the pauses happen) – and before you know it you’re back at the grind again.  Hopefully you’ve gone back to work with a fresh set of batteries, ready to take on everything that comes your way and have set yourself up for a very productive week.  The best way to do that would, of course, have handled all of the weekend stuff you have to deal with and then have taken the time to just…relax.  Whether its curling up with a good book, going camping or spending quality time with friends and family, relaxation is the key to gearing up for the busy times in your life.
So, what do you do to relax – weekend or otherwise?  Let us know in the comments.

Resume Design Inspiration from WorkAwesome


In today’s job market, it sometimes takes a little extra ingenuity to get noticed. From people printing their resume on florescent paper, to sending baked goods along with a cover letter, even buying online ads or renting billboards to promote themselves. While a creative resume isn’t guaranteed to get you a job, just ask Aleksey Vayner, you have to admire the creativity of these 25 resume designs:

( Continue Reading at WorkAwesome )

5 Incredibly Useful Gmail Features

Most Gmail users are aware of its superior search capabilities, but there’s a whole lot more to love about this email program beyond that. Did you know it can save you from forgotten attachments or emailer’s remorse?

Read on to discover some of Gmail’s little known, but incredibly useful features. Most of these can be enabled under Gmail Labs (look for that little green beaker in the upper right corner of your browser window or go to Settings > Labs).

Forgotten Attachment Detector

We’ve all experienced the embarrassment of sending someone an email, only to get a curt response saying something to the effect of, “Great. Now, where’s that attachment?” Enabling Gmail’s “forgotten attachment detector” under labs can spare you this indignity and save you from having to send another email with the attachment (talk about a productivity killer!). It automatically scans your outgoing emails for phrases that might indicate you meant to attach a document and forgot. It will then prompt you by asking if you’d like to send as is or attach something.

Mail Goggles

Not that any of you dear readers need this feature, but just in case … Gmail labs has a feature that could prevent you from firing off a late-night email to your entire company–or to an ex. It’s called Mail Goggles. Once enabled, Mail Goggles will ask you to complete a few simple math problems to prove your sobriety before you send each message. The math equations are timed, and Mail Goggles’ default is set to turn on late at night (the assumption being that users are more likely to EUI or email under the influence then). You can change the time window to anything you want.

Undo Send

Similar to Mail Goggles, but perhaps more suited for emails composed in anger, is the Undo Send feature. This feature can’t actually unsend emails after they’ve gone out. Instead, once you enable this option it will hold each email for five seconds and give you the opportunity to rescind the message if you experience emailer’s remorse.  So while it won’t help you make things better once you’ve made a mistake, it can buy you a few more seconds to make sure that you haven’t made one. I’ve sent a few email messages that I later regretted, so I’m sure I’m not the only person who will find this feature useful.

Wrong Recipient Detector

This handy little feature is appropriately called “Got the wrong Bob?” Based on the groups of people you email most often, it can detect when you might have inadvertently included the wrong person. For instance, if you usually email Sandy Smith and Bob Jensen together, but this time you’re emailing Sandy Smith and Bob Levy, it will point that out and given you the chance to correct it. I’ve gotten lots of email messages intended for a different Susan (and I’ve probably made this mistake myself on occasion), so I know that a lot of people could benefit from this feature. There’s a similar feature, Don’t forget Bob!, that can suggest more recipients based on the groups of people you email most often. Just don’t misuse this feature while planning a surprise for the “Bob” in your life or you might blow your cover.

Offline Gmail

For people who have spotty internet connections or carry around a laptop even when they can’t get online, Offline Gmail is a useful feature. It allows you to download a local cache of your Gmail account so you can open a browser window and access your old emails even when you can’t get online. You can also compose emails and include attachments while you’re offline. Anything you “send” while offline will be automatically sent the next time your computer connects to the internet. Google Reader has a similar mode available for reading your RSS feeds while you’re offline. In order to use Offline Gmail or  Google Reader, you’ll need to download Gears, which unfortunately isn’t supported on Safari or Chrome at this time.

Do you use any of these features? Or are there other cool, useful features we missed? If you could come up with any new option in Gmail Labs, what would would it be? Leave a comment and let us know!

5 Ways to Add Value to Your Weekend

Hopefully you’re reading this post over a coffee on Monday morning after a perfect weekend.  Your batteries are fully charged and you’re feeling ready to conquer the world this week.  You’re well rested, invigorated, and able to tackle whatever the week brings you.

No?  Doesn’t sound quite like you?  Maybe you’re like the rest of us, stuffing the weekend so full of activities that you need to go back to work just to get a rest.  Here are a few quick tips that you can use to help get you ready to go back to work on Monday.

1. Spend quality time with your family

If you have a family, this might seem like a given, especially if you’re racing one kid to soccer and another to swimming lessons, but driving and talking isn’t quite quality time.  Whether it’s with your kids or your spouse, schedule some time to spend with them, one-on-one.  And remember, they determine what quality is – so make it count.

2. Volunteer

Find a way to give back to your community or your cause.  The difference this can make in your life is amazing; physically, spiritually, and psychologically.

3. Reward yourself

If you’ve read the first part of this post and thought “sure – when am I going to find the time to do that!?” – create a plan of what you want to accomplish, schedule it, and reward yourself when you reach your target with a treat of your choice.  From chocolate to Guiness – it’s much tastier when you meet your goal.

4. Invest in some “me” time

Find time in the weekend to do something just for you.   It doesn’t need to be a lot of time, but it should be time that you are the only one involved.

5. Turn off your computer

Easy to say, hard to do.  As great as it is, the internet can be a bit of a time suck.  You’re probably on the computer already for most of the work week – leave it alone on the weekend and you’ll probably find you gain a few hours to do the other things you enjoy.

Remember that you only have 168 hours to make your week awesome.