Model, UV, and Texture a Mac-10 Submachine Gun, Day 2- CG Premium Tutorial

In the second part of this monstrous, 10 hour CG Premium tutorial series, available exclusively to Premium members, freelance CG artist, Ben Tate, will cover the UV mapping of his detailed Mac-10 submachine gun, using the innovative Headus UV layout and 3ds Max. This series is a must see for any artist that wants to level up their skills in high quality CG weapon creation! Can’t wait to get started, Become a Premium member, or learn more at the jump!

Learn the Secret to High-End CG Weapon Creation

Follow freelance CG artist, Ben Tate, as he demonstrates how to use a combination of 3ds Max traditional UVW Unwrap modifier, and Headus UV Layout’s innovative and intuitive UV tools, to quickly slice up his model, and lay each piece down with minimal distortion and in record time! Don’t have UV Layout or 3ds Max, not a problem. Throughout the entire process, the emphasis will be kept firmly on universally transferable UV mapping approaches and techniques, that can be easily be achieved using any 3d application that is capable of UV mapping.

CG Tuts textured machine gun

Want to Join Plus?

The Tuts+ network runs a membership service called Premium. For $9 per month, you gain access to exclusive high quality screencast tutorials, downloadable content packs, and freebies at CGtuts+, Psdtuts+, Vectortuts+, Audiotuts+, Nettuts+ and Aetuts+! For less than the price of a movie, you’ll learn from some of the best minds in the business all month long!!. Become a Premium member today!

Don’t miss more CG Premium tutorials and content packs, published weekly – subscribe to Cgtuts+ by RSS.

5 Ways You Can Go Wrong with Social Media at Work

Social media is the greatest thing for the working class since the water cooler.

In a 10-minute break we can update our Facebook status, comment on our cousin’s photos and share links to new Muppet videos. But there are professional uses too. You can research solutions to problems, make new connections in your field and keep up with industry developments. There is a case to be made for using social media at work.

Hopefully you won’t have to make such a case at work. It’s tempting for management to restrict and prohibit you from accessing social networking sites. They don’t want you wasting time. But Brad Lawwill, general counsel of Pierce Promotions in Portland, Maine, advocates reasonable social media policies that don’t interfere with employees’ lives.

For example, don’t dictate that you can’t ever talk about your job or check your networks from the office. Lawwill says management is going to create more work for itself than it’s worth. Instead, managers should apply existing policies to social media use.

You probably already have a policy covering breaks and using company resources such as e-mail and the phone for personal use. Those can be applied nicely to your time spent on Facebook or Twitter.

If your boss says social media is fine as long as it doesn’t interfere with work, you’re in luck. Enjoy the freedom and the Mafia Wars. But that doesn’t mean you can’t get in trouble. This is a minefield you can navigate safely but be aware of a few mines you don’t want to trigger.

NSFW – Not Safe For Work

Do I really need to explain why you can’t use the work computers to collect porn? It’s a hostile workplace lawsuit waiting to happen. So you’re not going to watch porn at work.

But what about dirty jokes and sexy pictures? It’s not exactly porn. And it’s shared between consenting adults. But you don’t know who in the office is going to object. Just like telling off-color jokes in a meeting, something a little spicy could be enough reason for someone to file a complaint.

This is where your friends can get you into trouble. Even if you swear off surfing for bikini-model photo collections, you may be connected to someone who wants to share the art form with you. Make sure you avoid those kinds of updates at work.

Your Real Boss is Not a Foreman in Farmville

Even if your updates are totally safe for work, you can’t spend too much time on Twitter or Facebook. This probably is your manager’s biggest concern. Every supervisor looks for the time sucks that can waste productivity. And Facebook is built to distract you from getting any work done.

This is easy for management to track and see how you spend your time. Track your time before your boss does, and cut yourself off.

Discretion is Appreciated

Not everything you do at work is safe to share with your networks. There may be confidentiality expectations – especially when clients are involved. They may not appreciate your updates about what they’re doing when they expect discretion. And your employer may expect the same.

Be careful when talking about your job. Don’t share client’s names unless it already is acknowledged by your company publicly. Make sure you’re not about to share trade secrets. And it’s not a bad idea to become familiar with the contracts with clients. They often are specific about publicity.

Don’t Out Your Boss as a Jerk

In addition to being perfect for providing distractions, social media is built for distributing snarkiness. Your feeds and lists are full of friends rushing to prove how clever they are one snarky and sarcastic phrase at a time. So you’re forgiven if you fire off a zinger or two.

Just don’t make it about work. You don’t want to keep apologizing and explaining yourself to your coworkers and your boss. I know making fun of your boss is a national past time. So do it at happy hour or in a break room when you know he is out of earshot. Don’t write it on a wall that everyone and their human resource department can read.

Not only does it fail to impress current management, but it won’t look good to hiring managers when you re-enter the job market. Clients won’t be impressed either when they see employees trashing the company they’re expected to pay.

Speaking of clients, you don’t want to say anything negative about them either. I don’t care if you do it at home on your personal account. They can’t restrict your freedom of speech but they don’t have to pay someone who is going to criticize them publicly. Would you?

Don’t Make Yourself Look Like a Jerk Either

Did you read Mark Garrison’s column on getting promoted? It’s good advice that can get you far. But all that effort can be erased by the pictures of you from reggae night at your favorite bar. What you do in your personal time should be kept personal. Hard to argue that when unprofessional photos are published on social networks.

And it doesn’t take a photo to make you look like a knucklehead. Off-color remarks or stories about the weekend partying can create negative impressions also.

Some of this really isn’t new. The standards of decorum and manners still apply. Don’t write something on a wall that you wouldn’t say to your boss or a local reporter. It’s easy these days to become an unofficial spokesperson for your employer. Maybe it’s not fair but it’s what is happening.

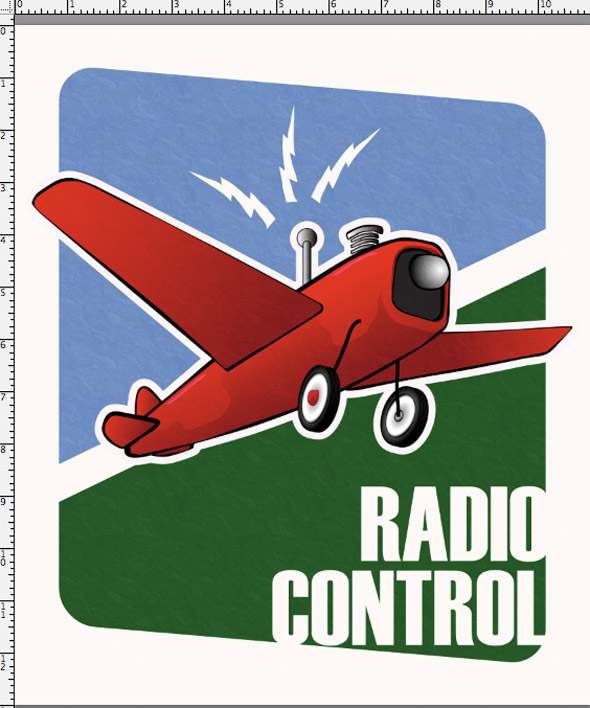
How to Make a Retro RC Airplane Poster

This is an exercise in digital drawing using Adobe Illustrator. In this tutorial, we’ll predominantly be using the Pen, Pencil and Gradient tools to create a fun retro remote-control airplane illustration. It takes quite a bit of work with the Pen, so make sure you’re familiar with the Pen Tool before beginning. Don’t worry if you’re a beginner, this tut is not too difficult, so let’s get on with it!


Step 1

OK, let’s begin by creating a new Illustrator document with an artboard size of 800×950 pixels, or 11×13 inches. In the centre of the canvas, draw a rectangle that is about 450×300 pixels. This is our guide for the airplane’s fuselage, or body. Grab your pen tool and begin drawing the fuselage (body) of the airplane, using the rectangle we just drew as a guide for the size and angle of the shape. It should be pretty thick at the nose. When it’s finished, fill it black with no stroke. Here’s what mine looks like, before it’s black, so you can see the path more easily:


Step 2

Now we draw another shape for the fuselage that’s very similar to the first one. This one is slightly smaller than the first shape and fits inside it. The other shape serves as a thick outline to the body, but doing them as separate shapes gives it a much more natural look than simply adding a stroke to a single shape because there is some variation in the thickness of the black layer. We’ll continue to use this technique for the major shapes in this illustration. You can go ahead and delete the guide rectangle.


Step 3

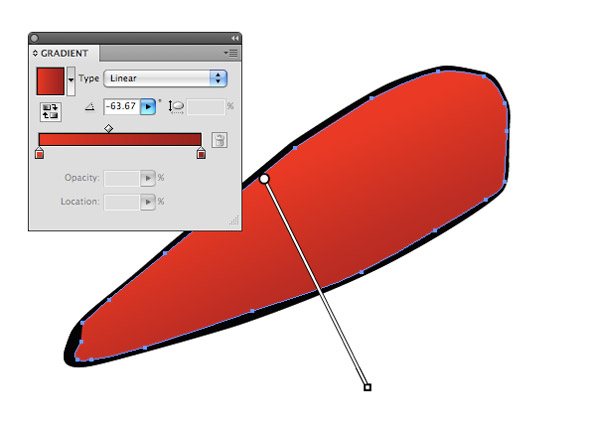
This shape needs a gradient. So, open up your gradients panel. Pick a gradient with two color stops, and proceed to modify it. Put the stops at opposite ends of the track and put the midpoint slider to about 40%. Double-click the first stop, on the left, choose the Swatches option, and choose the Red swatch. Set the second color stop to Mars Red. In the gradients menu in the upper left of the panel, hit the Save button. We’ll be using this gradient throughout the airplane’s body. Now, apply the gradient as shown to the shape you drew in Step 2.


Step 4

Now, we can begin the wings. Draw a wing shape on the near side of the airplane. Make the tip squareish, like the one shown.


Step 5

As we did for the fuselage, the wing will be composed of an outer shape and an inner shape. Draw the inner shape, leaving a very thin line of the outer shape showing along the front edge. Then, grab the red gradient that we saved in Step 3 and apply it to the wing as demonstrated.


Step 6

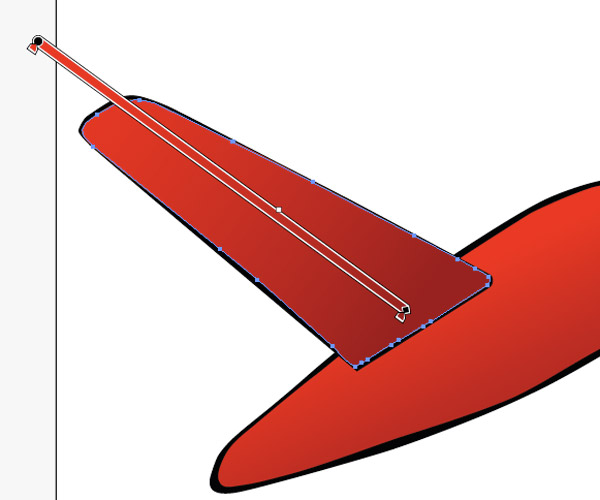
For the second wing, we go through the same process. Draw a black outer wing shape with the pen tool and then an inner wing. Apply the Red/Mars Red gradient to the wing so that it gets darker near the body of the airplane. Begin the gradient off the end of the wing and drag left, ending the gradient about two-thirds down the wing. Move these two objects behind the fuselage.


Step 7

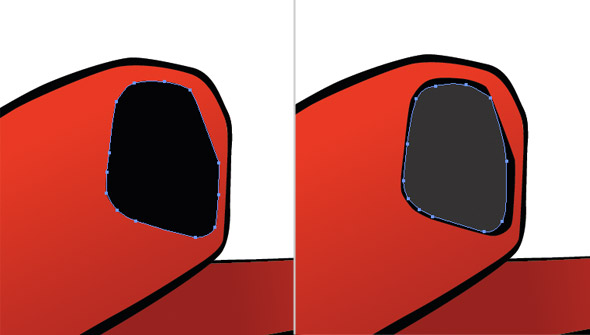
The mouth of the plane comes next. This part is quite simple, but it has three parts to it. The first two are easy, we’ve been doing them for every part of the plane so far: an outer shape and an inner shape. Draw the outer shape and fill it black. Next, the inner shape. This time, fill it #333, or another very dark gray. This is how they should look. You can see that I left a part flat, because this is where the propeller is going to go. You can make it curved or leave it flat as you choose.


Step 8

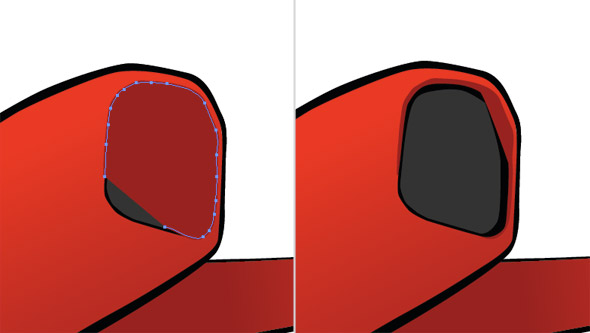
We get to add a fun detail to the mouth now, another style of shadow. Draw a shape that is just a little larger than the black outer shape, so that it overlays the shape on the top and right, and just slightly on the left. Fill it Mars Red and move it backward twice to put it behind the other mouth layers.


Step 9

Let’s begin the tail now. Pan over to the tail by holding the spacebar and dragging. Grab the pen tool once again and draw the shape for the part of the tail nearest you. Then, draw the inner shape as well. Leave a thick outline on this one. Apply the Red/Mars Red gradient to the tail.


Step 10

Repeat the process for the upright tail fin and the little that you can see of the second tail fin. Since the second horizontal fin is barely peeking out from behind the plane, make it very stubby. Apply the gradient to the upright fin and fill the stubby fin with Mars Red. Move these four objects behind the fuselage.


Step 11

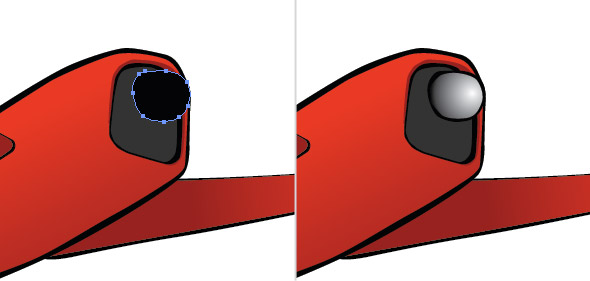
Pan over to the nose again. With the Pen Tool, draw a sort of blob here for the propeller. Make it blunt and rounded on the end. Fill it black, then make an inner shape. Open the gradients panel once again, and this time we get to use a different gradient! Select the White to Black gradient and set it to radial rather than linear. Apply it to the propeller head as shown.


Step 12

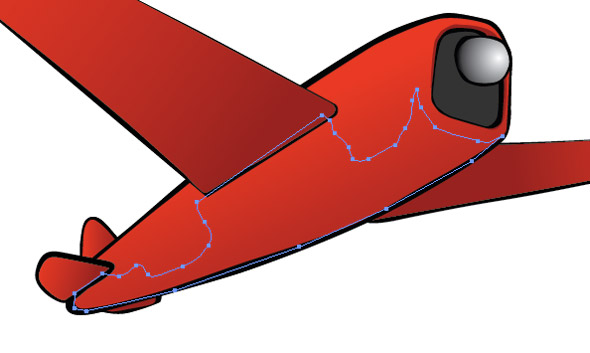
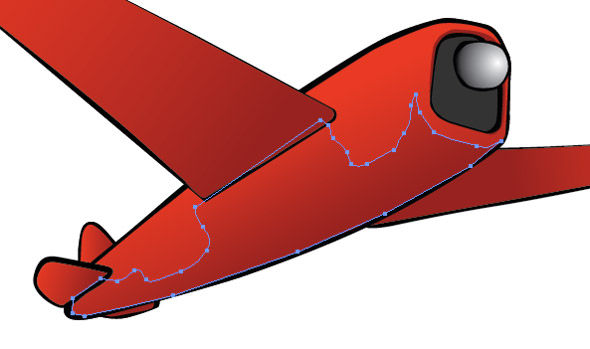
Now we get to add some interest to the body of the airplane with a shadow. Select the inner layer of the fuselage, copy it and go to Edit > Paste In Front to put it directly on top of the first one. Grab your Pencil Tool and start reshaping the top of it so it follows the contour of the plane the way a shadow would. It can take a while to get it just right. Use mine as a reference. When you’re done shaping the shadow, apply the Red to Mars Red gradient so the bottom is significantly darker.


Step 13

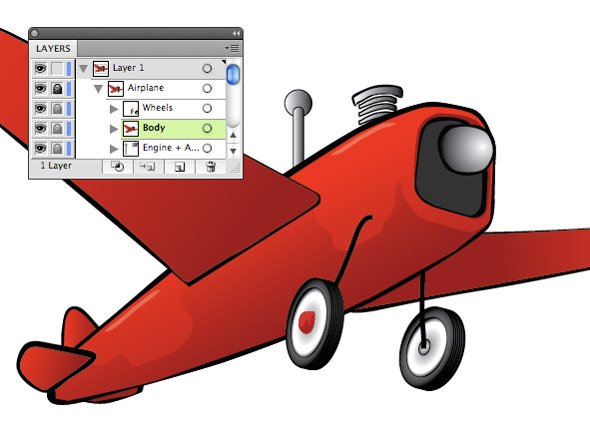
Select everything on your Artboard and group it. Then open up your layers panel and lock this group. Now, zoom out and take a look at your airplane. We’ve made some progress, and it’s looking good! Save your file before continuing. Unfortunately, we have quite a few details yet to go, and the details take quite some time! So, let’s get started with the accessories.


Step 14

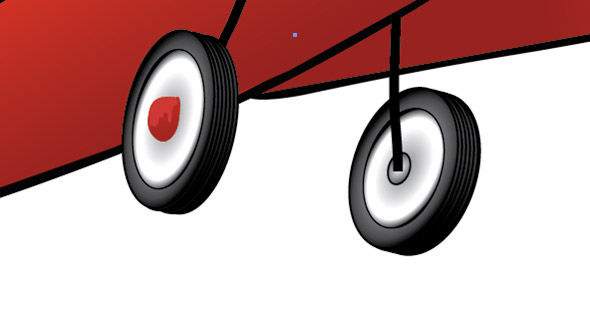
One of the most necessary accoutrements to an airplane is its landing gear. We wouldn’t want anything to happen to this plane of ours, so let’s give it wheels. Start by taking the pencil tool and setting it to a 5pt, black basic stroke. Make two strokes just in front of the wings for our wheels to hang onto. Since there’s a thick outline on the fuselage we can start the stroke for the further wheel in the outline so it looks as though it’s behind the airplane. Also, note that the stroke on the left is very short.


Step 15

Now we get to start the wheels. This is a bit of a process, but it’s actually quite easy. Grab your EllipseTool. Make an Ellipse that is 45×90px and give it a 1 point black stroke. Grab the gradient tool and apply the White to Black radial gradient that we used for the propeller head. Using the gradient tool, squish the gradient into an ellipse so it fits the shape. Rotate the ellipse about -3 degrees.


Step 16

Holding down the Option key, hit the left arrow key to copy the shape and move it 1 point left. Then release the Option key and hit the left arrow key again so the second ellipse is 2 points away from the first one. Repeat this process with the second ellipse, copying it and moving it so the next shape is 2 points from the previous one. As you go, move every third ellipse up 1 point. Keep going until you have about 8 to 10 total ellipses. Select these ellipses and group them.


Step 17

The second wheel is similar, but it has a few differences. First of all, we start with an ellipse that is 50px wide and 83px tall. Then, rotate it about -18 degrees. Apply the White to Black radial gradient so it fits the shape and add a 1 point black stroke.


Step 18

Repeat step 16, but apply it to this wheel instead. Select this set of ellipses, group them, and move them so the centre of the top ellipse is at the point of the leg. You have now created your airplane’s tires!


Step 19

Go back to the first set of ellipses that you made. Copy the ellipse on the top of the stack using the method that we used for making the stack: hold down Option and hit the left arrow key. Keeping the proportions steady, resize this ellipse to about 80% of its original size. This is going to be the wheel, so centre it inside the next ellipse in the stack of tires. Do the same for the second wheel. This is what it should look like:


Step 20

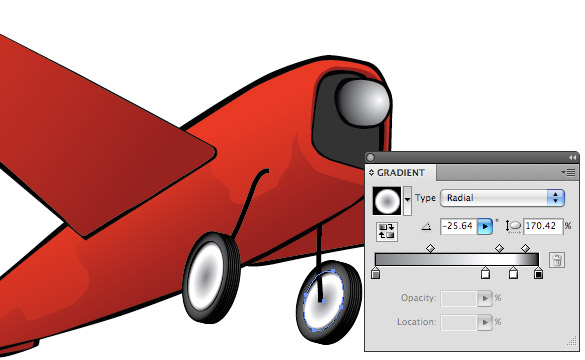
Now we get to have some more fun with gradients. Open up your gradient panel and select the White to Black radial gradient. Put a white color stop at 55% and 85%. Leave the color stop on the far right black, and make the color stop on the far left Graphite. Hit the Save button in the gradient menu in the upper left corner of the panel. Select both of the ellipses you made in the previous step and select your new gradient from the gradient menu to apply it at the correct angles to these ellipses. Now your wheels are made, and we just need the hubs.


Step 21

With the pencil or pen tool, draw a blob-like shape to be the hub of the wheel. Fill it with Red. Hold down Option and hit the left arrow key to make a copy of this shape, release the Option key and hit the right arrow key to move it back on top of the first shape. With the Pencil Tool, reshape this hub to be a shadow for the first hub shape, similar to what we did with the airplane body. Make this shape Mars Red.


Step 22

For the other hub, simply make a small ellipse with a 1 point black stroke and rotate it about -18 degrees. Apply the White to Black radial gradient and put it behind the airplane’s leg. In your layers panel, select all the parts having to do with the wheels, hubs, tires and legs. Group the items.


Step 23

Now we need to make the antenna. Pan up to the top of the airplane. Grab your rounded rectangle tool and make a rectangle that is about 10 pixels wide and 80 pixels tall. Find a good corner radius by hitting the up and down arrow keys while holding the shape. Make the ends round like the one in the picture below. Apply the White to Black linear gradient to it.

Make a circle to sit on top of the antenna. It should be about 25 pixels in diameter. Give it a 1 point stroke and apply the same gradient to the circle.


Step 24

Make the engine comes next. With the pencil tool, draw a shape like the edge of a thick disk. Give it a 1.5 point black stroke and apply the White to Black linear gradient. Copy this shape twice by holding down the Option key and hitting the up arrow key. Align the shapes vertically, leaving a pixel or two of space in between the shapes. Select the three shapes and move them behind the fuselage so they look natural, as shown.


Step 25

To complete the engine, we need to cap it off with a larger shape. For this one, we’ll do an outer and inner shape, as we’ve done with all the major shapes. Start by making the outer shape with the pen tool and filling it black. Then, make the inner shape, also with the pen tool, and apply the White to Black linear gradient to it. As you can see, mine looks a little wobbly. That’s OK, because it fits in with the uneven style of the illustration. Select all the parts of the engine and antenna and group them.


Step 26

Zoom out and grab your brush tool. We’re going to put a couple highlights on the fuselage. Set the stroke color to white, the stroke opacity to 30%, and the stroke size to 0.5 pt. In the Artistic Ink brush library, choose the Tapered Stroke that’s tapered on both ends. Put a quick stroke near the nose and the tail as shown. Add these strokes to the wheels group in your Layers panel.


Step 27

In your Layers panel, unlock the airplane group. Select everything that’s on the canvas, group it, and lock the group. Name the groups as you like. Save your illustration before going on to the final section. We’re getting close to the finish!


Step 28

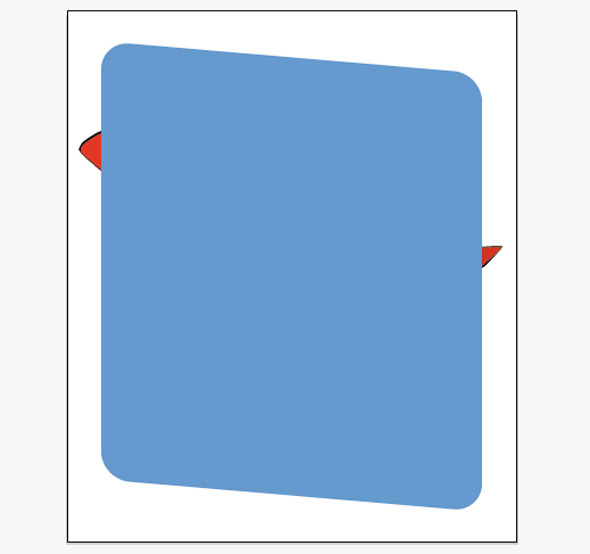
Now we can finally start the background! Grab your Rounded Rectangle tool and make a rectangle that’s 670px wide, 770 px tall and with a corner radius of 50px. Fill it with #6699CC and no stroke. Then, take the Shear tool and shear it to -170 degrees. Be sure to hold down the Shift key as you shear it so it only shears vertically.


Step 29

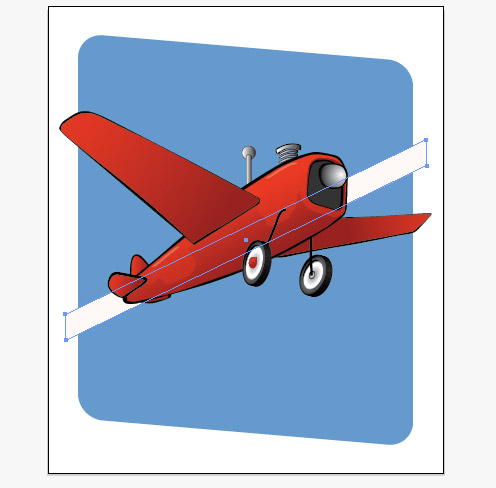
Select the large blue shape and move it to the back. Now, make a normal rectangle (no rounded corners) that’s about 750px wide and 50px tall and fill it #FDF6F2. Shear this one -25 degrees. Again, hold the Shift key while shearing. Move it behind the airplane but in front of the blue background shape.


Step 30

Make a large rectangle of the same color (#FDF6F2) that fills the canvas and move it to the back. Select the three shapes. In the Pathfinder panel, select Divide. Go into the group that this creates and fill the lower of the two blue shapes #336633. Exit the group.


Step 31

Open up the layers panel and unlock the airplane group. Copy the group, and lock the original, leaving the copy unlocked.

With the copy of the group selected, open the Pathfinder panel again. Hit Unite to make it a single shape. Set it to default color (black basic outline, white fill). Set the stroke to the same color as the background (#FDF2F6) and set it to 20 points. Move it behind the first airplane group.


Step 32

Now we get to have some fun. With the Pencil Tool, draw a little bolt of lightning like this. Copy the bolt of electricity twice and arrange them around the antenna like so.


Step 33

Make a text box in the lower right corner. Type Radio Control in all caps and set the font to Haettenschweiler. Make the font size 145 point and set the line height in the Type panel to 115. Make the text color #FDF2F6 and align it as shown.


Step 34

OK, you’re almost done. For the final effect, we have to take this over to Photoshop. Save your project. Now, save it as an Adobe PDF file and open it in Photoshop.

Once you’re in Photoshop, go to your Layers panel > Adjustments Menu and create a new pattern fill. In the pattern fill dialog box, open the Rock Patterns pattern library and choose the Rock Wall pattern. Set the Scale to 400% and hit OK. Looks great, right? Now you notice that this doesn’t look like an airplane; it just looks like an ugly texture. Let’s fix that. In your Layers panel, set the Blend Mode (Layer Mode) of the pattern to Overlay. This has a pretty shocking result, so fix that in turn by putting the layer opacity down to 10%. Now it looks much better.


Step 35

It still looks like something is missing. However, we can add a lot of impact with just a small step. In the Layers panel, right-click the pattern layer and duplicate it to this document. Then set the Blend Mode (Layer Mode) for this pattern layer copy back to Normal. This adds the texture in the light-colored parts and enhances the texture in the darker colors.


Conclusion

Save your file as a PDF. Believe it or not, we’re finally done! Congratulations! You have here a quality vector Retro RC Airplane poster with raster textures. Now that you’ve completed the tut using the set colors, why not try and make the poster sepia tone or black and white. Have fun!


Loading Data with Commands

It’s very common to load external data (such as SWF files) during runtime, but only when the data is completely loaded can we read or manipulate its content. Usually we have to listen to the complete event dispatched by a Loader or URLLoader object that loads the data for completion handling. Oftentimes, we write code that loads the data in one function, and write code that handles the completion of the loading in another function, but this can be improved by grouping the whole loading process together..

This tutorial demonstrates how to create a loading extension to the command framework in my previous tutorial, Thinking in Commands part 1 of 2, to pack the loading the completion handling into one place. This loading extension can also be combined with the scene management framework covered in Thinking in Commands part 2 of 2. Many classes used in this tutorial are covered in the previous tutorial, so I highly recommend that you read the previous tutorials before going on.

Additionally, this tutorial introduces the concept of data manager, a central “bank” that stores references to data objects. You can register data to the data manger with a unique key string, and later access the data by providing the corresponding key string. This spares you the trouble of keeping references of data objects and some variable scope issues.

By the way, you’ll need the GreenSock Tweening Platform in order to complete these examples.


Why Load Data with Commands?

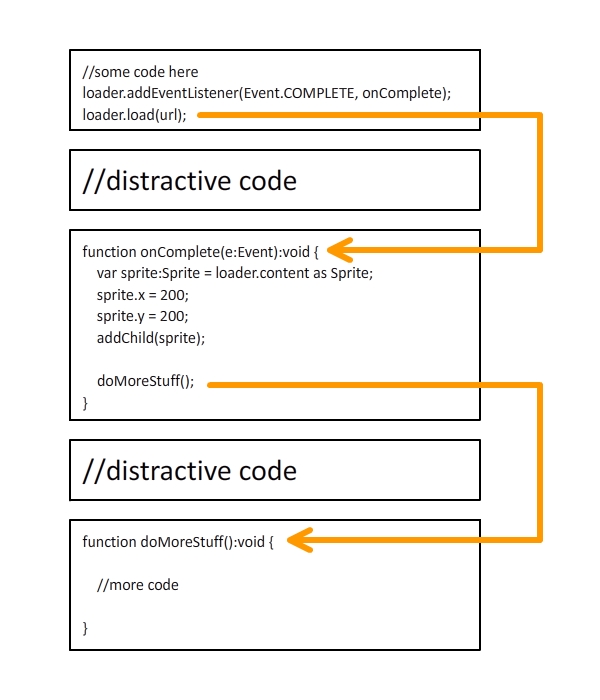
Normally, we handle the loaded data inside the complete event listener function. This breaks apart two chunks of code that are logically connected. And by looking at the code, your flow of thought might be interrupted as your sight jumps from the loading function to the complete event listener.

Let’s look at the logic flow of a naive SWF loading approach.

The loader loads a SWF from a URL, and the onComplete() function is invoked by the dispatchEvent() method that dispatches a complete event, where the dispatchEvent() method is invoked internally by the loader. Well, actually, it’s invoked by the LoaderInfo object that belongs to the Loader object, but for simplicity, let’s just say the dispatchEvent() method is invoked by the Loader.

Next, within the onComplete() function, the doMoreStuff() function is invoked after the loading completion handling is done and, as the function’s name suggests, does more stuff.

The high-level logic flow is very linear: invoke the Loader.load() method first, onComplete() second, and doMoreStuff() third. However, as you’ll notice from the diagram, each function’s invocation is embedded within the function body of the previous one, resulting in a “nested” code. In my own opinion, if the logic flow of a certain functionality is linear, the associated code should be written in a linear manner, not nested. Otherwise, the code could sometimes become confusing if the invocation nest level is too high.

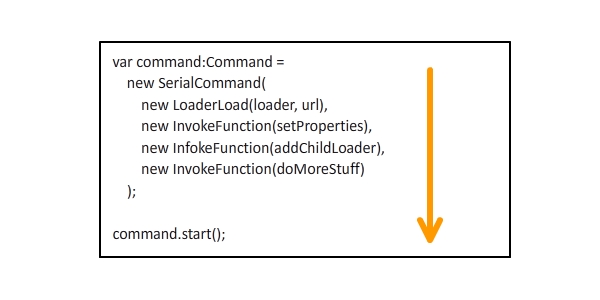
This is when the Command approach comes into play. From the diagram below, we can see that the code is pretty linear using commands, in that all the commands are linearly chained together by a serial command. Although the program “diverts” into the setProperties(), addChildLoader(), and doMoreStuff() functions; their invocation is linear.


Data Manager

Alright, before we get down to anything further about loading, let’s first take a look at the DataManager class. A data manager lets you associate a key string with a data object, and you can obtain a reference to this data object everywhere in your code. With the data manager, you don’t have to worry about keeping data references and variable scopes. All you have to do is register a piece of data to the manager with a key string.

The coding is pretty straightforward, as shown below:

package data {
	import flash.utils.Dictionary;

	public class DataManager {

		//a dictionary that maintains the string-data relations
		private static var _data:Dictionary = new Dictionary();

		//returns the data object associated with a key string
		public static function getData(key:String):* {
			return _data[key];
		}

		//registers a data object with a key string
		public static function registerData(key:String, data:*):void {
			_data[key] = data;
		}

		//unregisters a key string
		public static function unregisterData(key:String):void {
			delete _data[key];
		}

		//unregisters all key strings
		public static function clearData():void {
			for (var key:String in _data) {
				delete _data[key];
			}
		}
	}
}

So when we want to register a key string “myData” with a data object – say, a sprite – we could write the code as follows:

var sprite:Sprite = new Sprite();
DataManager.registerData("myData", sprite);

Later, anywhere in the code, we could write the following code to obtain a reference of the sprite and add it to a display list. It’s that simple, no more issues about maintaining object references and variable scopes.

var sprite:Sprite = DataManager.registerData("myData") as Sprite;
container.addChild(sprite);

Naive Loading Approach

Now let’s take a look at how the naive loading approach loads an external image. The loading code lies in one function and the completion handling code lies in another. We are going to load three images and add them to the stage when the loading is complete. Also, we’ll monitor the loading progress by listening to the progress events.


Step 1: Create a Flash Document

Open Flash and create a new Flash Document.

Step 2: Create a Progress Bar

Draw a progress bar on the stage; this is for representing the loading progress. Convert the entire progress bar into a symbol and give it an instance name of “progressBar_mc”. Within the progress bar symbol, convert the inner progress bar into another symbol, and give it an instance name of “innerBar_mc”.


Step 3: Prepare the Images

Place three images in the same folder as the FLA file, named “image1.jpg”, “image2.jpg”, and “image3.jpg”. Here’s what the three images look like.


Step 4: Create the Document Class

Create a new AS file for the document class for the FLA file. The code is pretty straightforward, and all the details are explained in the comments. First, three loaders are created and the loading begins. On each progress event, the progress bar is updated. When the loading is complete, the progress bar fades out and the three images fade in one-by-one.

package {
	import com.greensock.TweenMax;
	import flash.display.DisplayObject;
	import flash.display.Loader;
	import flash.display.MovieClip;
	import flash.events.Event;
	import flash.events.ProgressEvent;
	import flash.net.URLRequest;

	public class NaiveLoading extends MovieClip {

		private var loader1:Loader;
		private var loader2:Loader;
		private var loader3:Loader;

		public function NaiveLoading() {

			//shrink progress bar to zero scale
			progressBar_mc.innerBar_mc.scaleX = 0;

			//create loaders
			loader1 = new Loader();
			loader2 = new Loader();
			loader3 = new Loader();

			//add progress listeners
			loader1.contentLoaderInfo.addEventListener(ProgressEvent.PROGRESS, onProgress);
			loader2.contentLoaderInfo.addEventListener(ProgressEvent.PROGRESS, onProgress);
			loader3.contentLoaderInfo.addEventListener(ProgressEvent.PROGRESS, onProgress);

			//add completion listeners
			loader1.contentLoaderInfo.addEventListener(Event.COMPLETE, onComplete);
			loader2.contentLoaderInfo.addEventListener(Event.COMPLETE, onComplete);
			loader3.contentLoaderInfo.addEventListener(Event.COMPLETE, onComplete);

			//start loading
			loader1.load(new URLRequest("image1.jpg"));
			loader2.load(new URLRequest("image2.jpg"));
			loader3.load(new URLRequest("image3.jpg"));
		}

		private function onProgress(e:ProgressEvent):void {

			//calculate total bits to load
			var bytesTotal:uint = 0;
			bytesTotal += loader1.contentLoaderInfo.bytesTotal;
			bytesTotal += loader2.contentLoaderInfo.bytesTotal;
			bytesTotal += loader3.contentLoaderInfo.bytesTotal;

			//calculate total bits loaded
			var bytesLoaded:uint = 0;
			bytesLoaded += loader1.contentLoaderInfo.bytesLoaded;
			bytesLoaded += loader2.contentLoaderInfo.bytesLoaded;
			bytesLoaded += loader3.contentLoaderInfo.bytesLoaded;

			//update progress bar scale
			progressBar_mc.innerBar_mc.scaleX = bytesLoaded / bytesTotal;
		}

		private var _completeCount:int = 0;
		private function onComplete(e:Event):void {
			_completeCount++;
			if (_completeCount < 3) return;

			//remove progress listeners
			loader1.contentLoaderInfo.removeEventListener(ProgressEvent.PROGRESS, onProgress);
			loader2.contentLoaderInfo.removeEventListener(ProgressEvent.PROGRESS, onProgress);
			loader3.contentLoaderInfo.removeEventListener(ProgressEvent.PROGRESS, onProgress);

			//remove completion listeners
			loader1.contentLoaderInfo.removeEventListener(Event.COMPLETE, onComplete);
			loader2.contentLoaderInfo.removeEventListener(Event.COMPLETE, onComplete);
			loader3.contentLoaderInfo.removeEventListener(Event.COMPLETE, onComplete);

			var image1:DisplayObject = loader1.content;
			var image2:DisplayObject = loader2.content;
			var image3:DisplayObject = loader3.content;

			//adjust loaded image positions
			image1.x = 30, image1.y = 30;
			image2.x = 230, image2.y = 30;
			image3.x = 430, image3.y = 30;

			//add loaded images to display list
			addChild(image1);
			addChild(image2);
			addChild(image3);

			//fade out progress bar
			TweenMax.to(progressBar_mc, 0.5, {autoAlpha:0, blurFilter:{blurX:20, blurY:20}});

			//fade in loaded images
			TweenMax.from(image1, 0.5, {delay:0.5, alpha:0, blurFilter:{blurX:20, blurY:20}});
			TweenMax.from(image2, 0.5, {delay:0.7, alpha:0, blurFilter:{blurX:20, blurY:20}});
			TweenMax.from(image3, 0.5, {delay:0.9, alpha:0, blurFilter:{blurX:20, blurY:20}});
		}
	}
}

Step 5: Test the Movie

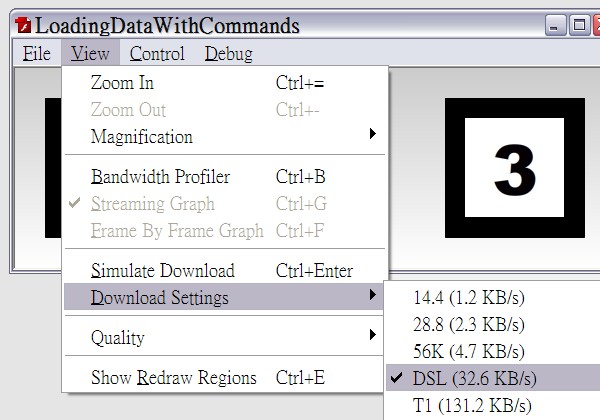
Press CTRL+ENTER to test the movie. You’ll see that the progress bar immediately fades out and the three images fade in. That is because the images are local files, meaning they can be loaded almost immediately. To simulate online download speed, first select the View > Download Settings > DSL as the simulated download speed, and then press CTRL+ENTER again without closing the test window to start simulating online downloading. This time you shall see the progress grow progressively wider before it fades out.

Okay, it’s time to load the images with the command framework.


Utility Commands

Before we proceed, let’s create some utility commands that will be used later in the example. Again, these command classes are based on the command framework presented in my previous tutorial (Part 1), and I highly recommend that you go through them before going on. If you’ve read the tutorial before, you can always head back if you need your memory refreshed.

Data Managers Commands

Here we are going to create two commands for registering and unregistering data for the data manager class. The RegisterData command registers data to the manager, while the UnregisterData command unregisters data.

package commands.data {
	import commands.Command;
	import data.DataManager;

	//this command registers data to the data manager
	public class RegisterData extends Command {

		public var key:String;
		public var data:*;

		public function RegisterData(key:String, data:*) {
			this.key = key;
			this.data = data;
		}

		override protected function execute():void {
			DataManager.registerData(key, data);
			complete();
		}
	}
}
package commands.data {
	import commands.Command;
	import data.DataManager;

	//this command unregisters data from the data manager
	public class UnregisterData extends Command {

		public var key:String;

		public function UnregisterData(key:String) {
			this.key = key;
		}

		override protected function execute():void {
			DataManager.unregisterData(key);
			complete();
		}
	}
}

The LoaderLoad Command

This command encapsulates a Loader instance’s load() method. You may provide an onProgress command that is executed upon each progress event and an onComplete executed when the loading is complete. Note that the complete() method is invoked when the loading is complete. This line of code is extremely crucial. If you do not invoke the method, the command will never be regarded as complete, jamming your entire application in the worst case scenario.

package commands.loading {
	import commands.Command;
	import flash.display.Loader;
	import flash.events.Event;
	import flash.events.ProgressEvent;
	import flash.net.URLRequest;
	import flash.system.LoaderContext;

	public class LoaderLoad extends Command {

		public var loader:Loader;
		public var url:URLRequest;
		public var context:LoaderContext;

		public var onProgress:Command;
		public var onComplete:Command;

		public function LoaderLoad(loader:Loader, url:URLRequest, context:LoaderContext = null, onProgress:Command = null, onComplete:Command = null) {
			this.loader = loader;
			this.url = url;
			this.context = context;
			this.onProgress = onProgress;
			this.onComplete = onComplete;
		}

		override protected function execute():void {

			//add listeners
			loader.contentLoaderInfo.addEventListener(ProgressEvent.PROGRESS, progressListener);
			loader.contentLoaderInfo.addEventListener(Event.COMPLETE, completeListener);
			loader.contentLoaderInfo.addEventListener(Event.COMPLETE, loadingComplete);

			//start loading
			loader.load(url, context);
		}

		private function loadingComplete(e:Event):void {

			//remove listeners
			loader.contentLoaderInfo.removeEventListener(ProgressEvent.PROGRESS, progressListener);
			loader.contentLoaderInfo.removeEventListener(Event.COMPLETE, completeListener);
			loader.contentLoaderInfo.removeEventListener(Event.COMPLETE, loadingComplete);

			complete();
		}

		private function progressListener(e:ProgressEvent):void {

			//execute the onProgress command
			if (onProgress) onProgress.start();
		}

		private function completeListener(e:Event):void {

			//execute the onComplete command
			if (onComplete) onComplete.start();
		}
	}
}

The InvokeFunction Command

This command encapsulates the invocation of another function. It is designed to allow you to provide an extra parameter array for the function to be invoked.

package commands.utils {
	import commands.Command;

	//this command invokes a function
	public class InvokeFunction extends Command{

		public var func:Function;
		public var args:Array;

		public function InvokeFunction(func:Function, args:Array = null) {
			this.func = func;
			this.args = args;
		}

		override protected function execute():void {
			func.apply(null, args);
			complete();
		}
	}
}

That’s it. Time for the example.


Step 1: Copy the Flash Document File

Copy the FLA file from the previous example to a new folder and copy the image files along with it.


Step 2: Create the Document Class

Create a new AS file for the document class of the copied FLA file, named “LoadingDataWithCommands”. Remember to change the document class name in the FLA file to this new one.

The code for the document class is pretty clean. It simply sets the current scene to a LoadingScene with a scene manager. We are using the scene framework presented in my previous tutorial (Part 2). You can check it out if you’ve forgotten how to use it.

package  {
	import flash.display.MovieClip;
	import scenes.SceneManager;

	public class LoadingDataWithCommands extends MovieClip {

		public function LoadingDataWithCommands() {

			var sceneManager:SceneManager = new SceneManager();
			sceneManager.setScene(new LoadingScene(this));
		}
	}
}

There are two scenes in total. The LoadingScene loads the images and updates the progress bar. After the loading is complete, the scene transits to the MainScene, which fades in the loaded images.


Step 3: The Loading Scene

Extend the Scene class to create a new class named LoadingScene. The container property holds a reference to the main sprite. This allows us to access the progress bar later.

package {
	import scenes.Scene;

	public class LoadingScene extends Scene {

		private var container:LoadingDataWithCommands;

		public function LoadingScene(container:LoadingDataWithCommands) {
			this.container = container;
		}
	}
}

Now, create the intro command for the loading scene. The intro will create three loaders and begin the loading process. This is done by overriding the createIntroCommand() method. The following code goes into the class body, same as the constructor.

//the intro command begins the loading of the three images
override public function createIntroCommand():Command {
	var loader1:Loader = new Loader();
	var loader2:Loader = new Loader();
	var loader3:Loader = new Loader();

	var command:Command =
		new ParallelCommand(0,

			//shrink the progress bar to zero scale
			new SetProperties(container.progressBar_mc.innerBar_mc, {scaleX:0}),

			//loading-related commands executed in series
			new SerialCommand(0,

				//registers the three loaders to the data manager
				new ParallelCommand(0,
					new RegisterData("loader1", loader1),
					new RegisterData("loader2", loader2),
					new RegisterData("loader3", loader3)
				),

				//start three loading commands in parallel
				new ParallelCommand(0,
					new LoaderLoad(
						loader1, new URLRequest("image1.jpg"), null,
						new InvokeFunction(onProgress) //onProgress command
					),
					new LoaderLoad(
						loader2, new URLRequest("image2.jpg"), null,
						new InvokeFunction(onProgress) //onProgress command
					),
					new LoaderLoad(
						loader3, new URLRequest("image3.jpg"), null,
						new InvokeFunction(onProgress) //onProgress command
					)
				)
			)
		);

	return command;
}

Next, override the onSceneSet() method. This method is invoked when the intro command is complete, indicating that the loading is complete. Within this method, we tell the scene manager to transit to the main scene. Before the scene transition, the outro command is executed first.

override public function onSceneSet():void {
	sceneManager.setScene(new MainScene(container));
}

And then override the createOutroCommand. This command shall fade out the progress bar.

//the outro command fades out the progress bar
override public function createOutroCommand():Command {
	var command:Command =
		new SerialCommand(0,

			//fade out progress bar
			new TweenMaxTo(container.progressBar_mc, 0.5, {autoAlpha:0, blurFilter:{blurX:20, blurY:20}}),

			//remove progress bar from display list
			new RemoveChild(container, container.progressBar_mc)
		);

	return command;
}

Finally, create the onProgress method invoked by the InvokeFunction commands.

private function onProgress():void {

	//retrieve loader references from the data manager
	var loader1:Loader = DataManager.getData("loader1") as Loader;
	var loader2:Loader = DataManager.getData("loader2") as Loader;
	var loader3:Loader = DataManager.getData("loader3") as Loader;

	//calculate total bits to load
	var bytesTotal:uint = 0;
	bytesTotal += loader1.contentLoaderInfo.bytesTotal;
	bytesTotal += loader2.contentLoaderInfo.bytesTotal;
	bytesTotal += loader3.contentLoaderInfo.bytesTotal;

	//calculate total bits loaded
	var bytesLoaded:uint = 0;
	bytesLoaded += loader1.contentLoaderInfo.bytesLoaded;
	bytesLoaded += loader2.contentLoaderInfo.bytesLoaded;
	bytesLoaded += loader3.contentLoaderInfo.bytesLoaded;

	//update progress bar scale
	container.progressBar_mc.innerBar_mc.scaleX = bytesLoaded / bytesTotal;
}

Step 4: The Main Scene

Now create a new class for the main scene, extending the Scene class.

package {
	import scenes.Scene;

	public class MainScene extends Scene {

		private var container:LoadingDataWithCommands;

		public function MainScene(container:LoadingDataWithCommands) {
			this.container = container;
		}
	}
}

Override the createIntroCommand() method. This method will add the loaders to the display list, and fade them in one-by-one. In addition, the data key strings are unregistered from the data manager.

override public function createIntroCommand():Command {

	//retrieve loader references from the data manager
	var loader1:Loader = DataManager.getData("loader1") as Loader;
	var loader2:Loader = DataManager.getData("loader2") as Loader;
	var loader3:Loader = DataManager.getData("loader3") as Loader;

	var command:Command =
		new ParallelCommand(0,

			//loaded-image-handling commands
			new SerialCommand(0,

				//adjust loaded image positions
				new ParallelCommand(0,
					new SetProperties(loader1, {x:30, y:30}),
					new SetProperties(loader2, {x:230, y:30}),
					new SetProperties(loader3, {x:430, y:30})
				),

				//add loaded images to display list
				new ParallelCommand(0,
					new AddChild(container, loader1),
					new AddChild(container, loader2),
					new AddChild(container, loader3)
				),

				//fade in loaded images
				new ParallelCommand(0,
					new TweenMaxFrom(loader1, 0.5, {alpha:0, blurFilter:{blurX:20, blurY:20}}),
					new TweenMaxFrom(loader2, 0.5, {delay:0.2, alpha:0, blurFilter:{blurX:20, blurY:20}}),
					new TweenMaxFrom(loader3, 0.5, {delay:0.4, alpha:0, blurFilter:{blurX:20, blurY:20}})
				)
			),

			//unregsiter data from the data manager
			new ParallelCommand(0,
				new UnregisterData("loader1"),
				new UnregisterData("loader2"),
				new UnregisterData("loader3")
			)
		);

	return command;
}

Step 5: Test the Movie

Alright. We’re done! Test the movie and simulate online downloading. You will see the exact same result as in the previous example, but this time it’s all done with the command framework and the scene framework.


Summary

In this tutorial, I’ve shown you how to load external images with the command framework. The LoaderLoad command can be used to load external SWF files, too. Moreover, you can create your own commands to load external data other than images and SWF files, by encapsulating the URLLoader class into your commands.

We’ve written more code in the second example than the first one. Remember, the purpose of using the command framework and the scene framework is not to achieve the same result with less code, but to manage the code in a systematic and modular approach, making your life easier when it comes to future maintenance and modification.

The first example squeezes all the code into one single class, making it difficult for future maintenance if the code amount should grow extremely large. The second example, on the other hand, separates logically independent code into different scenes, making it easier for future modification. Also, by integrating with the command framework and the scene framework, we’ve made room for future extension, where we can add more scenes and intro/outro commands without disrupting irrelevant code.

This is the end of this tutorial. I hope you enjoyed it. Thanks for reading!

How to Create a Morphing Multi FX With the Audio Effect Rack in Ableton Live

The racks introduced in Live 6 give you unique tools for creating effects, synths, and drum machines. This very simple interface offers very complex processing for any kind of data. We will learn to use it to create complex morphing multi-effects using racks concepts like Chain, Macro Control, Zone and Fade.


Step 1

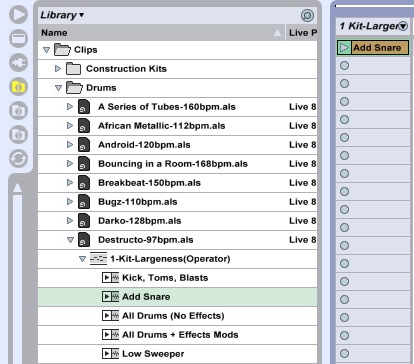
For this tutorial take a clip from Ableton. I chose addSnare located in library/clips/drums/destructo97/1-Kit-largeness. Remove few notes to get a simple loop and you can also delete or switch off the Beat Repeat and the PingPong Delay which we don’t use here.

Download audio file (MP3a step 1 original sample.mp3)


Step 2

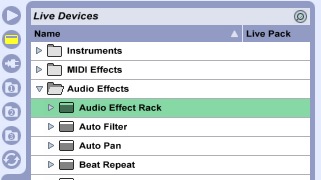
Insert an Audio Effect Rack on the track.

You can find it in Live Device / Audio Effect / Audio Effect Rack.


Step 3

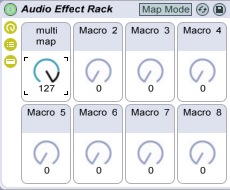
Highlight the three shortcuts on the left to see the Macro Control and the Chain List.


Step 4

In most DAWs the insert channel effects works in serial – the effects output goes to the input of the next effect. The Audio Effect Rack introduces another concept: it works in parallel. Each band is called a Chain . All chains receive the same input signal at the same time. You can insert into a chain as many FX as you want. You can insert into a rack as many chains as you want. You can also insert a rack into a chain. For this tut we’re going to need five chains.

Create a chain by right clicking on the chain list and selecting Create Chain.


Step 5

Now it’s time to add the effects. For this tut I’m only using Live’s effects, though many plugins are available.

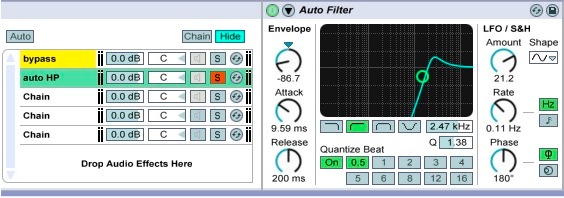
The first chain will be used to keep the signal dry, or in other words to bypass the FX. So just rename it (cmd/ctr R) to Bypass. You can also change the color.

Select the second chain and drag an Auto filter on it. Solo the chain to edit the filter, rename, color.

On the third chain drag another Auto Filter. Tweak it and rename…

On the fourth chain drag a Beat Repeat

On the last chain drag a PingPong Delay

Now we have four FX and one bypass chain. You can switch them with the solos buttons.

Download audio file (MP3b step 5 switch with solo button.mp3)


Step 6

It will be better to have another way to listen the chains individually. You can do that by creating a Zone.

First: show the chain select editor. Click the green chain button.

Select all chains (cmd/ctr A). Drag the zone edges to 96, right-click and choose Distribute Ranges Equally.

Now you can select your FX with the little blue sky bar: The Chain Select Ruler. Don’t forget to unsolo the chains.


Step 7

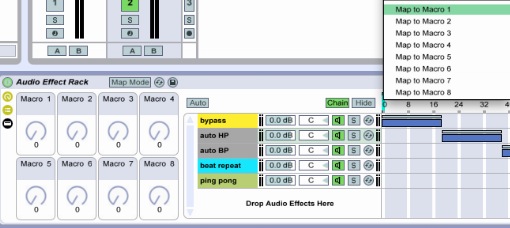
To make things easy we are going to map The Chain Ruler to macro 1. To do that, right-click the Chain Ruler and choose Map to macro 1.

You can rename and color macro 1.

If you have a MIDI controller it’s a good idea to assign it to one knob. Press cmd/ctr M, select the macro, move your knob, and press cmd/ctr M again.

Download audio file (MP3c step 7 chain play.mp3)


Step 8

As you can hear, the transition between the FX is a little bit brutal. So let’s add some fades and morphing.

Each zone is split in two sections: The Zone Range (the big dark blue part used for resizing and moving the zone), and The Fade Range (the little blue sky upper section). To edit them just drag the left or the right edges.

First, expand the Zones Ranges. Then drag the right and left Fade Range edges to create fades.

Start playback and play with the Chain Ruler. You can hear a smoother transition between the FX.

Download audio file (MP3d step 8 smooth.mp3)


Step 9

Tweak your Rack with the Macro Control.

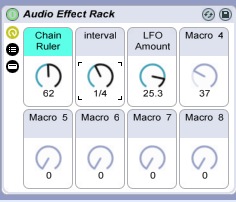
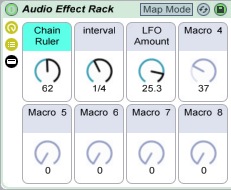
Assign the Interval knob of the Beat Repeat FX and the LFO amount of the second Auto Filter to the macro controls 2 and 3 by right-clicking like we mapped The Chain Ruler in Step 7.

Download audio file (MP3e step 9 macro play.mp3)


Step 10

Save your work. You can save your rack setting as a Preset to use anywhere you want, as an insert, in a return track, on the master bus, or like a chain in a rack. We will save it as an insert.

Click the little green floppy disk icon on the right.

Rename it to My FX Rack in the Live Devices browser.


Step 11

As you can see in Step 8, the PingPong Delay zone range stops at 112. This allows you to hear the tails of the delay without the dry signal when you go over 112 with the Chain Selector.

Let s try this effect in detail with another simple rack composed with one bypass and two different delays and some blank zone.

Download audio file (MP3f step 11 delay fx.mp3)


Step 12

We’re going to build another rack for create a morphing FX. As we did in the earlier steps, create a rack with four chains, the first as the Bypass, the next three as Auto Filters with three different presets. I’ve used Cut o Move H, Follow Me and Swirl, which you can find in Live Devices / Audio Effect / Auto Filter. Draw some fades and play with the Chain Ruler to listen the morph.

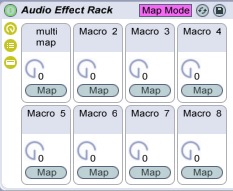
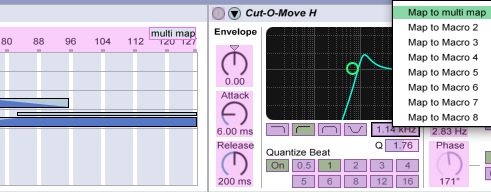
Now we will map different parameters to the same macro control to create a complex assignation controlled with only one knob. Rename Macro 1 to Multi Map, and switch on the Map Mode

Right-click the Chain Ruler and Cutoff of each Auto Filter, and select Multi Map.

And in the Macro Mappings pool try differently ranges values. You can also invert the range with a right click.

Download audio file (MP3g step 12 Morphing Filter.mp3)


Step 13

We’ve left the best till the end. We will Automate the control with the Clip Envelope Editor. Turn the Multi Map Macro command knob to 127 (remember the clip envelope works with relative values).

Duplicate the Add Snare clip (cmd/ctr D), color the new clip and double-click on it.

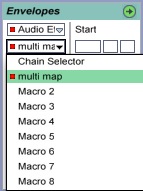
Show the Envelope Editor by clicking the little green arrow on the right. In the device chooser (the first box), select your audio FX rack, and in the second box (the control chooser) select multi map.

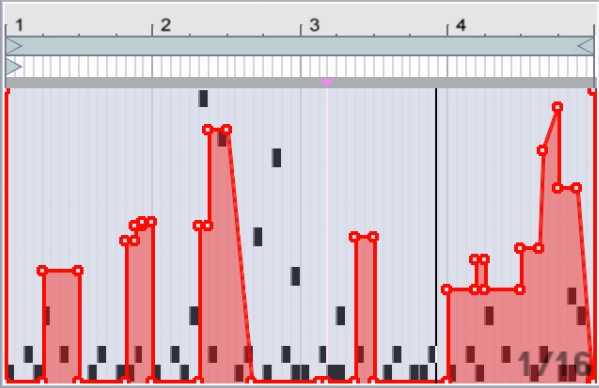
Draw an envelope in the Envelope Editor.

Download audio file (MP3h step 13 enveloped.mp3)


Step 14

Now it’s time to experiment with differents settings for the plugins, macros, and all you can imagine. Don’t forgot to have a look to the others racks like the Instrument Rack. You can do the same things, but with MIDI instruments instead.

To keep this tutorial simple, I’ve only used Live effects, but I strongly recommend you use third-party VST/AU instruments and effects inside the rack to obtain an higher quality sound.

Download the Play Pack for this tutorial (135 KB)

Contents

  • Ableton Live Source Files


Memories Photography Competition: Voting Round 2

A huge thank you to everyone who entered our recent photography competition. We’re continuing the voting in our second round today, and it’s another great chance to see some inspiring photography and help us pick a winner!


The Voting Process

We’ve gone through all the submissions received, and picked around 150 that we feel are worthy of putting to a reader vote. If yours wasn’t included, we hope you won’t be discouraged and will try again next time!

Voting will take place in three parts of around 50 images each, with the 10 highest rated photos of these three rounds going into a “final”.

This is the second round, and the third will be published early next week. If you don’t see your photo here today, don’t worry – it’s probably coming up the third round.

Spend some time looking over the following photos and, when you’ve decided which you’d like to win, scroll to the bottom of the page to cast your vote! You’ll be able to vote once for each round, and again in the final!


The Competition Finalists – Round 2 of 3


Entry Number: 1

Well, in this photo I portrait an old man called Don Lucho, a vagabond of the plaza de armas in Santiago, Chile.

He tells me his story, all about what he does and what he done and the photo really captures those memories, the time is imprinted on his face and so the memories of the past. I think old people are intrinsically linked to the memories, because it’s what has become his life, a bank of memories.


Entry Number: 2

Photographs are little pieces of time. And even this is quickly becoming a memory of photography. He could be looking at any number of memories there. Those pictures could have been taken any number of years before. Maybe he need to reprint a memory because the original print faded. Or maybe those are pictures he took that day. The stories here are endless. The man has obviously seen many things and some of those things he has seen he’s also stored in picture format there. On those negatives are some of his own precious memories, just as this picture is one of mine.


Entry Number: 3

I took this picture in West Bengal, India. My picture depicts the memories of his sister with whom he used to play, but his play mate is no more.


Entry Number: 4

I took this picture in West Bengal, India. Here the memories of the boy’s friends reflect through a mirror.


Entry Number: 5

This is my niece. She was a C-section because there were complications at her birth that could have killed both her and my sister. This photo was taken in the hospital the day she was born. I hope that every time I look at this, I’m reminded how much of a gift she is.

This was the first time I saw her open her eyes.


Entry Number: 6

Take in Kyiv, Ukraine


Entry Number: 7

My brother’s family, who I am very close to, moved quite far away from me a few months ago, but before they left I had to capture a moment of my nieces, so I could have them near me forever. When I took this picture, it captured much more than just a moment. It captured the sadness of the day and move, but also a glimmer of hope and prosperity they will have in their new home.


Entry Number: 8

The Sandakan Memorial Park is at the site of the Prisoner of War Camp where the Renau Death Marches started from. This message, along with many others were left by visitors to the Park on ANZAC Day and are on display.


Entry Number: 9

The loss of a loved one leaves a grave hole in the life of the living. Coping with it can be hard and sometimes, an extended process. What reminds us of the departed is the time we spent with them, good or bad; their memories. Even though the loved one is not among us any more, we can relive their life and remember them through the fond memories we have of them. Memories as simple and routine as sitting with your loved one on a park bench every evening, watching the sun set amongst the roses.

This photograph conveys such a feeling to me. The picture that it paints in my mind is of a loving husband dedicating this to his departed wife and perhaps sitting on this bench, now alone, but smiling with her fond memories, reminiscing the beautiful sunsets of the years gone by.


Entry Number: 10

Do you know what this is? It’s half of a MIZPAH Charm. It’s a symbol of an emotional bond shared between two people that are separated. It says, “The Lord watch between me and thee while we are absent one from another.” But it’s more than that. It’s a flood of memories. It’s like a tidal wave. The wave hits me.

It’s our first kiss. It’s sitting in the car in the dead of winter because I don’t want to say good night and leave her side. It’s sitting on the bow of the boat watching the fireworks as they explode over Lake Superior. It’s belting out “Livin’ on a Prayer” at the baseball game. It’s watching a movie while sharing one giant bowl of ice cream.

It’s all of these memories wrapped up in a tiny little charm. A tiny little charm that says, “I love you.” A tiny little charm that says, “I’m here for you, always.” A tiny little charm that says, “You have a friend in me.” It’s this tiny little charm that uses all these wonderful memories to wash over me and remind me that I am loved.


Entry Number: 11

Perhaps memories are like tags or labels that get created/posted once we get to experience something out of that certain object or being. These labels (memories) remind us of how what we felt or how we experienced a particular moment together with that object or being.

This photo represents ‘memories’ as labels or post-its that get posted on something. In these labels indicate certain emotions or reactions that can be summoned once the person remembers a certain memory based on that specific object or being.

The photo also represents a struggle to capture and immortalize the objects or being that contain the memories that can be cherished once they get immortalized in a photograph.


Entry Number: 12

Children’s are god’s angels, they are very innocent. For them there is no religion, caste, creed etc. their hearts are pure and full of divine love. The above image was clicked at cultural program in small village near Panaji city. It is a program where everybody keeps awakes till night and there are many cultural programs where every one participates. It is full with joy; happiness etc.

I was shooting the program, suddenly my eyes grabbed on the small child looking to the camera. One of the television channels taking interview of the participants, what I like is the innocent look of the boy. It really catches my attention and within a fraction of moments I release the shutter. It is a memorable image to me, whenever I look at it; it evokes a different kind of innocent, divine feeling within me.


Entry Number: 13

The lady in the picture is my girlfriend Megha who I have been stealing horses for the better part of my life. This was taken in Shimla when she came for an overnight trip to surprise me from Agra.


Entry Number: 14

I have this reoccurring memory: a vivid image of a white horse turning at speed in a vast green field.

We all have memories that pop up now and then that we just can’t place and this is one I’ve had since as long as I can recall. I’ve no idea of the context – a scene in a movie, imagery from a book or an event I might have seen when I was young and it is something that is utterly frustrating.

The white horse has come to represent anything I have forgotten: where I put my keys, date of my Mother’s birthday, if I actually ate breakfast or if it’s still on the kitchen counter; if it’s something I can’t place, the image of a white horse hits me pretty hard.

So when my girlfriend approached this window display I had to snap it.

The illuminative radiance pouring from the white horse could signify that glimmer of recognition we feel when we try pull on some obscured memory; and in this shot my girlfriend could be on the cusp of that ‘Eureka moment’, that knife edge where focus and distraction determine whether memory is either recalled, or lost to us again.


Entry Number: 15

This picture reminds me of all the good times of my past summer. This photo reminds me of the warmth, and happiness of summer. I treasure it because it has no people in the image but only a pair of sunglasses. Sometimes an object can remind you of a past experience or event, similar to when one goes through their old toys from back when they were a kid. This image is like that old toy for me.

Summer is the time in Vancouver which everyone looks forward to because we have to face with the constant downpours of rain during the fall and winter time, and the summers in Vancouver are amazing! It represents memories in the sense that I personally have a horrible memory, and the fact that I remember what I was doing on that day and where this picture was taken really proves the saying that ‘a picture is worth a thousand words’. Now all I have left to say is, summer is near, I cannot wait, and I hope to be taking lots of pictures soon!


Entry Number: 16

I have taken this picture on a parking next to a highway in Germany, we were returning from vacation in Austria, when our car brooked down so we needed to stop. We had to wait for more than 8 hours before a tow truck arrived and brought us back to Belgium. While we were waiting we needed to get some food and because it was too dangerous to walk next to the highway we needed to go through the fields that where next to the parking in order to get to a small village where there was a hostel, here we were able to get some food, I ordered a wiener schnitzel which is a typical German dish whit some fries, it was very delicious and the best wiener schnitzel I have ever got so far.

When we got back to the car the sun started to descend which is the moment I have taken this picture of the fields where we just walked trough. Whenever I see this picture it remembers me of that day and I get the taste of that delicious wiener schnitzel back in my mouth, it’s something I will remember for many years.
I actually didn’t mind that we needed to wait so long because I was able to take this picture, I like the way how the sky looks and personally I think this is one of my best pictures so far.


Entry Number: 17

It was a cold, grey, and windy day in Wellington. The kind that makes you want to stay inside and do constructive things or play a board game. But my California based girlfriend Heidi and I were all about making the most of each day come rain or shine! This day will forever remain with us for the simple things we spent doing; visiting our favorite spots, being in one others presence; talking about where we are going in our relationship, and what we wanted with our lives. This photo displays just how very different the two of us are: coming from different places in the world, with different backgrounds and upbringings, but still being able to meet somewhere, somehow and maintain it beyond that big blue ocean.


Entry Number: 18

This couple decided to go to a resort located on top of a mountain and having a great view of the lake and the metropolis. The planned everything and announced his marriage proposal. This will surely be one of the happiest moment of their lives as a couple.


Entry Number: 19

Almost every one of us have a very happy memory of us playing with our friends when was just a young kid. This what is shown in this pictures a group of kids having a great time in the river. Surely all of them would remember this day as part of their happiest moment when they still young.


Entry Number: 20

Her parents are our godparents. After 25 years of marriage, my brothers and I had become like their children since they had none of their own. That was until January 24th when Devyn Michelle was born. She’s the happiest surprise our families have ever had. After our first girls’ day with her – a full day filled with games, reading about princesses, and a enjoying a tea party – she announced that she needed to take a nap.

She grabbed her blanket and off she flounced to the couch where she promptly fell asleep. As I watched her softly breathe, I couldn’t help but think it was a beautiful day spent with mothers and grandmothers. It was a bittersweet day knowing that her grandmother, in the early stages of Alzheimer disease, won’t remember this day much longer…much less her granddaughter. It was a day filled with love. The image of Devyn sleeping, in all her princess glory, is a precious memory of her innocence, care free spirit at the age of 2, and a dream 25 years in the making.


Entry Number: 21

My 2 children walking in front of me on a holiday in Wales. It gives me one of those happy/sad feelings.

To see them so young and without a care in the world, the only thing that seems to matter is what is around the next corner to explore. And knowing this will one day change and they will have responsibilities and problems and will loose this time in their lives forever.


Entry Number: 22

To me, this photo represents trying to hold on to or recreate something they enjoyed so much in the past. As a child I loved the slippery dip at the local park. Quite often I could be found going backways, sideways and upside-downways on the slide. Now as an adult I miss being able to act like that, simply because the slides aren’t big enough. That’s why when I was looking to take this shot I composed it so it caught that slightly cheeky moment before you let go and slide away – the memory of a feeling that everyone can identify with.


Entry Number: 23

A photo of my wife being pregnant on our fourth baby and the first and my only boy on all of my children(3 girls). Everytime i look at this photo and watch my boy grow up now always reminded me of how lucky i was in having him and how he grow up so fast.


Entry Number: 24

I’m aware this HDR isn’t the perfect photograph, with a little bit of messy flair and so on. But it holds the key to my memory of my father. He passed away in January of this year after a long battle with cancer. This hill is on the family farm in Swaziland and Dad often used to say he wanted to build a house here.

We spread his ashes on top of the hill and although it had been a cloudy day, they parted allowing the sun to shine through and finally to set affording us this wonderful view. When I remember this hill and that view it brings tears to my eyes, but I know that he would have appreciated this final resting spot.


Entry Number: 25

This picture was taken at Robber’s Cave State Park. This photo represents my childhood memories of camping with my family. Whenever we had a break from school we would go camping. I have so many cherished memories of these experiences.

The first time I ever went backpacking was here at Robber’s Cave State Park. My dad, brother, and I went in, taking only what we could carry. We caught fish for dinner (although they tasted like dirt-flavored mush). My brother even speared a monster bullfrog that we ate for breakfast! After breakfast we explored the cave used as a hideout by the bandits of the Old West. It was an amazing experience that I will never forget.

This photo also represents the “memories” of the tree. Robber’s Cave often served as a hideout for Old West criminals. This tree, which grows in the entrance of the cave, must have seen them all come and go. And now this ancient pine watches as hundreds of tourists pass by each year.

As the years go by, this tree will continue to watch the people coming to visit the hideout of past criminals. I can only wonder what kind of memories this tree will have of us when we are all long gone.


Entry Number: 26

Every year Mysore celebrates the Dasara festival and part of that includes blessing everything from tools to computers, cars to buildings to rid them of evil for the coming year. This photograph was taken during Dasara when the Raleigh International field base was being blessed. A few months later Raleigh moved to a different building to run their operations.

What memories of the strange foreigners will these children grow up with?


Entry Number: 27

This was taken in the Atlanta Aquarium during Dragon*Con 2009. Three good friends of mine were dressed as Merryweather, Princess Aurora and Fauna from Disney’s Sleeping Beauty (I was Flora, in case you’re wondering why one of the fairies was missing).

Sleeping Beauty was on constant rotation at my house when I was a child and easily still ranks as one of my favorite animated movies. When my friends and I decided to make and wear these costumes the entire process brought back memories of running around my parents house waving a chopstick at various objects in order to “magic” them.

When we were at the convention in these we were constantly greeted by exclamations from people who shared the same love from this childhood classic.


Entry Number: 28

This picture reminds me of how a beautyful girlfriend I had who is now my wife.


Entry Number: 29

This photo is a photo I took of my best friend while we were taking lots of funny pictures in the forest. How it represents memories is that we unfortunately don’t take photos together anymore and i really miss that.


Entry Number: 30

The first flower of spring in eastern Ontario is always a pretty and inspiring site. After many months of cloudy and dark skies, along with the dreary brown to dark melting snow, the site of any colour that announces spring is always welcomed.

Just as the days get longer, the sun is just beaming down lighting this dormant life and bringing smiles to all that see it. When I see the first flower bloom of the season, it triggers my memories of Christmas where you are all smiles and just want to un-wrap your gifts and play with them forever.

This flower instilled that same feeling, where I run into the house to get my camera and capture this beauty forever. This not only allows me to look at this beautiful flower and think of how small a miracle can come from a frost bitten winter, but just like memories, if not captured in a photograph it will disappear forever.


Entry Number: 31

This photograph might be of no value to others, but personally it’s one of the most meaningful photos I have captured. This is my female pup, the only survivor out of 8 pups. The mother Chihuahua had delivered deformed puppies; all with the brain fully exposed and twisted bones and missing tails. It’s a tragic story behind this photo. I would love to look at this photograph in the future and remember how hope never died, for my family, my pup, and me.


Entry Number: 32

Littlest thing can make a difference and make you smile. That memory shows it all. It’s how life works. It always gives you something to make you happy. But the point is realising them. The snow upon your head, the sun shines at sky…

Everything is happening for us. We must realise it everytime we wake up. Our eyes must be wide open and we must be sensitive to earth. The memory shows simplest things can make a difference.


Entry Number: 33

I went out to photograph some steam trains from an old grassed over bridge in West Sussex when I heard some Bluetits squawking nearby. Then I nearly trod on this fledgling who had fallen out of the nest into the long grass.

He was quivering with fear so I picked him up on a piece of bark and placed him in sight of his parents and left him. When I turned back for a last look I noticed that he seemed to be on a surfboard so I took a shot. The parents then came and fed h


Entry Number: 34

Sitting and staring into the distance in Wisconsin is one of my personal favorite memories. Me and a friend took a small vacation to Devil’s Lake national park and had an excellent time there boating, rock climbing, and just having fun in general.

We spent a lot of time photographing each other doing random things such as freeclimbing and changing the angle to make it look far more impressive than it actually was, getting up at 5 in the morning to catch the sunrise over the horizon, etc. It was a much needed break from school and just served to relieve a ton of stress I had at the time.

I also got one of my best photos from it, and this is it. This is also my very first attempt at HDR, and as far as I can tell it turned out pretty well, although I hope that I don’t fall into the HDR hole that so many other people seem to succumb to.


Entry Number: 35

Reminds of when my brother and I were much more younger. I was about 10 and he was 3 years old and we went down this exact same field to play next to the old ruins hide and seek. Now were not that close to each other, we often fighting about nothing. I miss that little girl and boy who we were at that time.


Entry Number: 36

Childhood memory. A football game. The part that is about waiting, waiting, waiting. Waiting and boredom is a part of childhood. I thought that deserved a picture.


Entry Number: 37

This is my cake when I turned 24 last April 17, 2010. Believe it or not, this is my first birthday cake. I’m very thankful to my wife. This is also my first birthday as a married man, together with my wife, my son and my wife’s family. I wanted to keep this my whole life because there is too much memories in it.

A lot of good things happened to me during year 2009. I got married, my wife gave birth to our first boy and so much more. And April 2010 is the start of the year for me with my own family.And this photograph will reminds me of the starting point of my life as a married man.


Entry Number: 38

This is not a stranger. It is my friend. We climbed at the top of the mountain and we were pretty much feeling down, because the summer was ending. He was remembering on the great summer memories that we spent together. We were traveling for 1500km in my little country. That’s why I named this photo “Remains Of Summer Memories”


Entry Number: 39

She was sorry about her village, and its population there. She said to me: “Son, its beautiful here, I wish there were younger people here. Without them everything looks old. The young people left this place long time ago, they all went living in the cities. Now this village is dying. Long time ago there were so much happenings here, but now… I am very happy that I see young people like you here. Take care my son!”

She was remembering back when she was young. She was very sad. That’s why I named this photo “Reminiscent”. I was really sorry for her, and after taking the photo I said to her that I will come back and give her a print. I will do that in the next few months! She said that she would be happiest person if I do that!


Entry Number: 40

This watch calls up a strong memory, a fixed idea. A promise to ourselves. An interdiction to forget.


Entry Number: 41

This photo for me reminds the childhood days, when we used to carry the bat and stumps to play cricket in the gully. The fast changing life has made us so busy in work, that we are unable to enjoy the life as we had.


Entry Number: 42

Just a ball and a green court: I can look backwards and it’s always me playing and kicking with my friends and almost alone. That’s football. Fun, concentration, teamwork.

Football grew up inside me. It means the strongest value, the sense which I don’t imagine to live without: it’s just passion.


Entry Number: 43

Balloons. Turning any 19 year old into the child they really are. Never gets old.


Entry Number: 44

This is a picture of my girlfriend, Breanna, at the Santa Rose Plateau this past January (2010). I’m a real big fan of hiking and outdoors so she took me there for our 1-year (dating) anniversary. Also, I had just bought my first Canon L lens a couple days before that that I had been saving up for forever. A Canon EF 24-70mm f/2.8L that I hadn’t really had an opportunity to use. I was super stoked.

As we were hiking, I saw this field of grass and it looked just like the pictures of where many pros take theirs so I decided to put my new lens to its money’s worth.

It was about 4:00pm so the sun was starting to set and had this awesome glow behind the treeline that illuminated everything perfectly. I had my girlfriend pose close to the ground and I angled myself so that the grass in the foreground and the trees in the background would give a nice sense of the depth of field. Took the FIRST shot, looked at the result on my LCD and I knew right then and there that it was THE best picture I had ever taken.


Entry Number: 45

Smile of children is a rare thing and hard to catch after we are adults. The smile of children is truthful. Unlike smile of adults, inside of a child, we will find an innocense, liberated from thoughs of an adult. When we were children, we smile and laugh at loud in nature. I remember the moment when I could laugh enthusiastically with no worries and pretending. It is difficult to gain the moment back and for that, I deeply missing those moments. Smile of Children could not deceive, it is a gift from God.


Entry Number: 46

Going back home by train took a day and a half, right across the Indian subcontinent. It was monsoon season, and the coming of the rains brought back memories of previous journeys, of the years past. The smell of the rain and the darkening of the skies reminded me of the the rains before, and of previous journeys back home, always in the rain, in the slowly moving train.


Entry Number: 47

When I was a kid my friends and I had only one thing on our mind – we want to play. As a part of all the games we played we were competing all the time. Who will be better, faster, smarter.

It was the only concern, unlike today. So when I see this two boys it brings back memories.


Entry Number: 48

Back in January 2002 (I guess it was that year) I came back from school and noticed the jets of the local air force were much noisier than other days. They appeared to do combat training. An experienced pilot was showing off too much and noticed he was running out of fuel resulting in having to crash somewhere because he would never get back soon enough to the base.

He aimed at the grass field in front of our home (it’s a big field). But because of the seat that ejected, the force of it made the plane move in a slight other direction.

My dad was working outside in our fruit yard and didn’t feel so well, he went walking in that field the pilot aimed for. Suddenly he sees the F16 fly incredibly low and with no cockpit cover on it anymore, right above his head and sees it smack all the way trough the trees, through the fruit and explode +-40 meters next to our house.

I heard a loud bang and saw the windows glasses turn orange. I instantly thought it was an attack of Bin Laden since back then he was very active. Other F16 kept blasting/flying over the crashed plane, I thought it was the plane throwing a bomb. After lots of doubt my mom, sister and me went outside to see what happened. Many people were already there and appeared to know what actually happened.

A really strange moment when you’re so young and don’t really know what happened. In this picture you see a part of the plane sticking out of the ground. The ripped off part looks like a mouth/face of a monster while the plants form an X over it. The image is heavy at the right because i wanted the air to play a big role. Also the situation wasn’t balanced at all, now represented here.


Entry Number: 49

Reminds me of the pictures i took with this camera when i was a child, i wanted to give it a “vintage” feel with some post processing.


Entry Number: 50

During their holidays, boys are playing and fishing in a temple pond at Kanchipuram, India. Childhood friendship memories will not go away from anyone’s mind. Boys are enjoying their joys in fishing is a good example for childhood memories. Two boys are giving pose to the camera is giving the strength to this photograph. Others are interested in fishing. If their parent find them, they will run and hide somewhere there.


Coming up Next…

Stay tuned to the site, because we’ll be posting up the third and final round of voting next week. Best of luck to all our photographers!
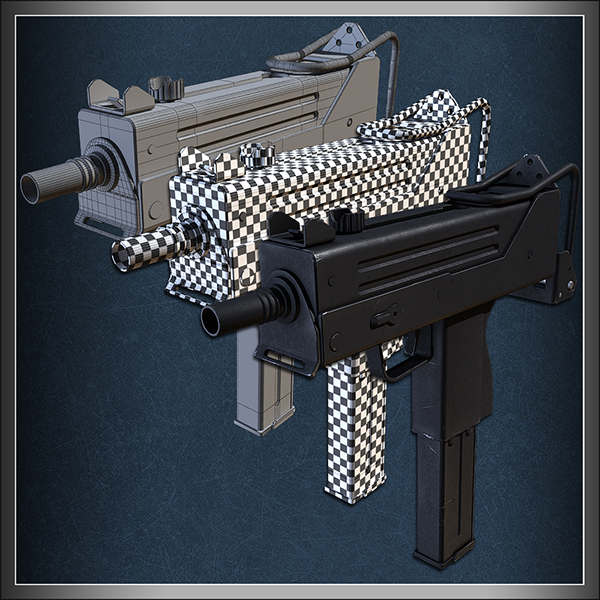
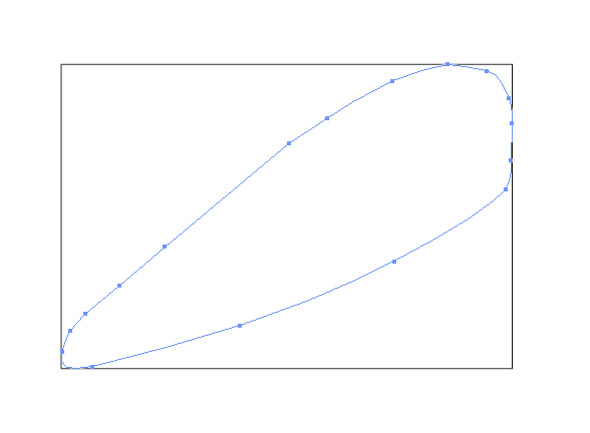
Isloo – 50 Free High Quality Icons

To celebrate IconFinder’s three-year anniversary we have a free present for all the readers of Psdtuts+. It consist of 50 icons designed by the talented Asher Abbasi.


These 50 icons are released under Creative Commons Attribution-No Derivative Works 3.0 and can be used commercially – just don’t redistribute them without written permission.


As some of you might know, TurboMilk designed the logo and mascot of Iconfinder. Their talented designers have provided at great illustration of the IconFinder mascot for this anniversary. There’s no doubt that the work by them has helped IconFinder’s growth the last year. If you’re launching a new app or service you should hire TurboMilk.


Quick Tip: Top 5 Awesome Features in Transmit 4

The ever-amazing Mac software company Panic released the fourth version of their incredible FTP client Transmit last week. What’s packed into this version? Well, according to the release notes, “Everything is new!”

5. Brand New Interface

The biggest changes in Transmit 4 are in the interface; you almost don’t recognize it as the same software!

Transmit 3

Transmit 4

4. Super User-Friendly

A lot of Transmit 4’s awesomeness is in its incredibly ease-of-use. For example, when viewing a folder (both local and remote) you’ve got a “bread-crumb” trail to make navigating between folders a breeze. Then, the sync panel now gives you a nice tooltip, making it easier to see exactly what will happen.

3. Rules

The preferences panel in Transmit 4 now includes a rules panel; this makes it really easy to skip certain files, like source control files.

2. Local to Local / Server to Server

With Transmit 4, either panel can be either a server or a local folder, making it super-simple to transfer files between folders.

1. Mounting Disks

The “one more thing” about Transmit 4 is that you mount servers as disks, just like you’d mount a local hard drive.

Do you use Transmit?

Or do you have another favourite FTP client?

Blancer!!

The State of CSS3 in Email Templates

On the heels of some of our recent findings regarding the state of CSS in email, I reckoned it was high time to shake things up a bit. So here goes – CSS3 in email lives. Ok, so I’m sorry if I made you drop your toast, there. I know you’re thinking, “But… It’s still largely experimental… In the browser, to boot!” Yes, CSS3 support is even more fickle amongst a swag of email clients that can’t even get CSS2 right. But that doesn’t mean that it’s too soon to touch any of it.

In this article, I’ll go through two properties you can use in your email templates, alongside some practical examples. So, brush off your toast and let’s get down to business.


Let’s talk CSS2 in Email.

If you’ve been designing HTML email templates for a while now, you will know that it’s often near-impossible to predict what sort of CSS-related quirks will display when testing your design across the major email clients. For example, Gmail has been notorious for stripping any CSS that isn’t inline (and for a while, not recognizing table cellpadding & cellspacing), while some clients simply choose to do away with styles altogether.

Gmail Style Tags

If you’re new to designing HTML email templates, this is probably the most foreboding thing you can possibly read. But fear not, there’s lots of info out there to bring you up to speed. Give 24ways’ ‘Rock Solid HTML Emails‘ a skim and you will see that there’s no reason to crank up the zefrank. It’s manageable.

Anyway, given that designers already have enough troubles with CSS2 support in email clients, shouldn’t CSS3 be a bit of a pipe dream? Well, read on.


Is it too Early to be Using CSS3 in Email?

Yes and no. For the yes case, there’s a couple of popular email clients that have pretty robust CSS3 support (more on that later). The great news is that a fair few of the CSS3 properties that display in these clients degrade gracefully elsewhere, meaning that there’s always a fallback option. But that said, if you want to ensure that your email templates display near-consistently across the major email clients, then CSS3 is not for you.

If you swing over to our guide to CSS in email, you will see that there’s a few email clients that have partial, or full support for a number of CSS3 properties. And for the most part, they have one thing in common – Webkit.


It’s a Webkit World

How your email template looks in Outlook isn’t anything like how it will look on your Blackberry, or when you’re viewing your webmail in Firefox.

If you have the blessing of always working on a Mac, checking your email on your iPhone and passing the time by browsing on your iPad, then you have one, fairly consistent view of the web. Unfortunately, the rest of us have to do with varying degrees of CSS support across a number of vendor platforms. How your email template looks in Outlook isn’t anything like how it will look on your Blackberry, or when you’re viewing your webmail in Firefox.

So it’s probably no surprise to you that Apple devices use the same rendering engine (the software that decides how to display HTML & CSS code) across their email apps and the Safari browser. For designers, it’s probably less of a surprise that this engine is Webkit and its CSS3 support is comparatively, very good.

That said, Webkit email clients (Apple Mail, iPhone & iPad Mail) account for roughly 20% of email clients used overall. However, what really counts are the email clients your subscribers are using. For example, a Mac software developer may have close to 100% of their customers viewing their newsletter on Apple devices.

With this in mind, let’s have a look at some of the CSS3 properties that are now creeping into your inbox.


Using Text-Shadow

Usage:

<!-- x offset, y offset, blur, and color, respectively -->
<p style="text-shadow: 2px 2px 2px #000;">
   Welcome to the latest issue of Widgets Inc monthly widget gossip.
</p>

Works in:

  • Apple, iPhone & iPad Mail
  • Yahoo! Mail, Hotmail Live! & Gmail (when viewed in browsers other than IE)
  • Android default client & Gmail

Adding drop and inner shadows with text-shadow is a non-destructive way to decorate your text. Not only can it save you from otherwise creating the same effect using an image, but it looks fine in clients where text-shadow isn’t supported.


Using Border-Radius

Usage:

<p style="border-radius: 5px; -moz-border-radius: 5px; -webkit-border-radius: 5px; border: 3px solid #000; background-color: #ccc; padding: 5px;">
   View it in a web browser.
</p>

Works in:

  • Apple, iPhone & iPad Mail
  • Thunderbird
  • Yahoo! Mail, Hotmail Live! & Gmail (when viewed in browsers other than IE)
  • Android default client

Using rounded corners on your otherwise boxy layout or square buttons is already a commonly used technique on the web. It also can give your email templates a softer, more modern look in the above email clients, plus safely reverts to square corners when not supported.

With the announcement that border-radius will be formally implemented in IE9, we can expect to see more of its use.


One Step Further: Animation and More

Some of the more extreme uses of CSS3 in email templates can be found in situations where the recipients are using a very limited set of email clients. A great example of this is the aforementioned Mac developer. Panic, the purveyors of ’shockingly good Mac software’, send amazing invoices after you purchase one of their titles, which include – gasp! – animated, glowing buttons:

Here’s the code they used to achieve this effect:

-webkit-animation-name: 'glow';
-webkit-animation-duration: .7s;
-webkit-animation-iteration-count: infinite;
-webkit-animation-direction: alternate;
-webkit-animation-timing-function: ease-in-out;

Of course, this wouldn’t look nearly as good in an email client other than Apple Mail, but it’s certainly a neat concept!


And Another Example…

How much CSS3 can you spot in this other email design from Panic? Click through for a larger version:

Take note of how the design resizes elegantly in the browser. And those airmail stripes? They’re forward slashes (/). Genius! To find out what went into this template, check out this article.

/
<b style="color: #f5290a;">/</b>
<i style="color: #006699;">/</i>
<b style="color: #f5290a;">/</b>
<i style="color: #006699;">/</i>
<b style="color: #f5290a;">/</b>
<i style="color: #006699;">/</i>
<b style="color: #f5290a;">/</b>
<i style="color: #006699;">/</i>

So, on that Note…

Take a look at CampaignMonitor’s email client usage reports, and swing over to the definitive guide to CSS in email to get an idea of which CSS3 properties are available across the major email clients. And of course, test, test, test. With a sprinkle of CSS3, a little experimentation and a dollop of caution, you can make your email template stand out from the crowd.

If you’re of the ability, and would like to sell your email designs, now is the time to check out the Email Templates category on ThemeForest!
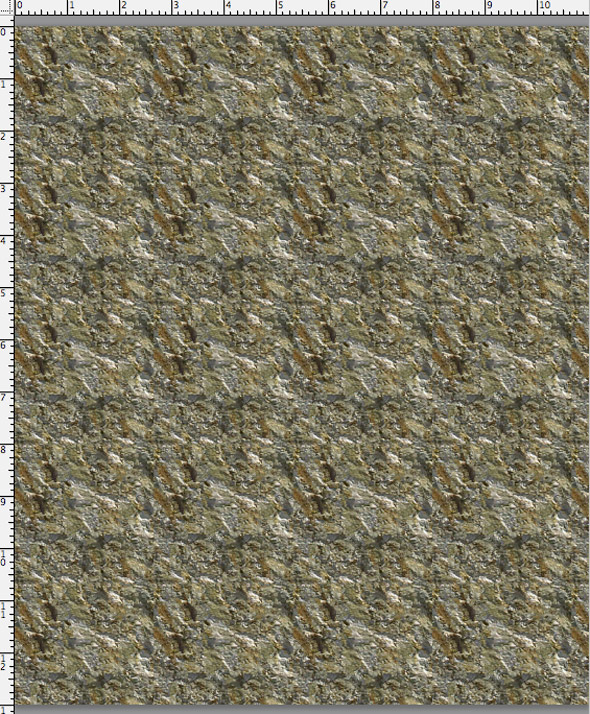

How to Create a Greek Mythology Inspired Photo Manipulation

In Greek Mythology, the Titan Atlas literally carried the weight of the world on his shoulders. This is because when the Titans were defeated Zeus condemned him to hold the Earth in place. In today’s tutorial we will demonstrate how to depict Atlas’ punishment using stock photography and Photoshop.


Resources

Today, we will be using the following stock photos.


Step 1

Open stock for atlas model, using Pen tool, extract model from its background and then duplicate it on a new layer. Change layer’s name to atlas.


Step 2

Fill background layer with black. We need a bigger canvas; go to Image > Canvas Size menu. For easier resize process, choose percent and then fill in Width: 120, Height: 140 percent and Pick middle down anchor point. This way, canvas will be resized upward. Click OK to confirm resize.


Step 3

Open earth stock, notice that the earth consists of three layers, delete background layer so now you only have two layers left. Go to Layer > Merge Visible or just press Cmd+Shift+E to merge visible layers.

step 03

Step 4

When done, insert the Earth in to atlas illustration. Make sure you place the Earth’s layer below the atlas layer, then rename its layer to ‘earth’. Resize earth to make it larger, then rotate it to the right so the dark side of earth is in the left side. Press Enter to confirm transformation.


Step 5

Click back to atlas layer then resize (Cmd+T) to make it smaller. Make sure atlas image is resized proportionally by holding Shift when you drag the corner control point. Hit Enter when done.


Step 6

Use Crop Tool to crop canvas size. To give celestial atmosphere, add stars to the background. For that purpose, select background layer then click Filter > Noise > Add Noise. Adjust Amount value around 100%, select Gaussian and check Monochromatic ON.


Step 7

Click OK, then background layer will be filled with noise. Blur it using Filter > Blur > Blur More. You can repeat this step by pressing Cmd+F in case you want the noise look even more blurry. Press Cmd+L to bring up Levels dialog. Adjust input levels by dragging its slider’s until the number of "stars" is reduced, or until you have found the desired result. Click OK to confirm levels adjustment.


Step 8

Activate Brush tool, then load the cloud brush (you can find and download the cloud brush here). See image below to learn how to load brushes.

We also need more space to draw the clouds, so resize atlas and earth to make its smaller.

step8b


Step 9

Select white as your brush color and make sure Brush Opacity is 100%. Create a new layer on top of your atlas layer, then start creating clouds using various cloud brushes. As you can see, the clouds are placed below the atlas body. To get better results, try to vary multiple cloud brushes as shown below.


Step 10

Now load some ink brushes in to Photoshop (you can find and download ink brush here). Same as before, combine multiple ink brush to get varied results.


Step 11

Add a layer mask to cloud layer. Now paint layer mask with black using cloud and fire Brush with low opacity (around 20-25% ). There is no guide to do this; just try to balance the look of the clouds, not too thick or thin.


Step 12

Select atlas layer, then press Cmd+U to bring up Hue/Saturation dialog. Drag Saturation slider to left to change pale skin color, and then drag Hue slider to right to change skin color look more yellowish.


Step 13

Open up texture stock, use Rectangular Marquee tool to create selection. Copy selected texture in to atlas illustration.


Step 14

Place texture between clouds and atlas layer’s. Change its layer name to texture and then press Alt+Cmd+G to make it a Clipping mask. This way the texture will only appear inside of atlas’ body. Change texture layer Blending Mode to Overlay, then press Cmd+T and make it smaller.


Step 15

Open fire stock, create selection using Rectangular Marquee tool. Drag selected fire in to illustration.


Step 16

Place it between texture and clouds layer, then change its layer to a clipping mask by pressing Alt+Cmd+G. Also change the blending mode to Overlay. This should give the texture below it a nice hue.


Step 17

Add layer mask to the fire layer, then use a Linear Gradient to mask it. This way only half of the fire will be visible.


Step 18

Open chain stock. You can use the Pen tool to create a selection path or you can also use quick mask selection using the Brush tool to extract the chain from its background.


Step 19

After you are done extracting the chains, copy the selected chains in to the atlas illustration. Make sure that you place it on the very top of layer and name it ‘big chains’. Using free transform command, resize and rearrange the chains to the right of illustration, see image below for more details.


Step 20

Duplicate chain layer, then flip it horizontally (Edit > Transform > Flip Horizontal). Drag the flipped chain to left, see image for more details.


Step 21

Open and select texture stock once again, then drag it in to atlas illustration. Place this texture over the first big chain layer.


Step 22

Make this texture only appear inside chain image by change its mode to clipping mask (Alt+Cmd+G). To blend texture with chains, change the Blending Mode to Overlay.

22

Repeat this process to the other big chains layer.

22b

Step 23

Open the second chain stock, select chain on the left by using Rectangular Marquee tool and then drag this selected chain in to the atlas illustration. Make sure you place this second chain stock on top of every layer, rename its layer to "small chain."

23

Step 24

Use the magic wand to select and remove the black background from the chain. See image below for more details.

24

Step 25

Rotate this small chain until it appears horizontally. Then use the Clone Stamp tool to extend the length of the chains.

25

Step 26

Press Cmd+J four times, so now you got four new small chain layers, plus one (the original chain layer). Arrange these five chain images like the image below, as you can see, it look like the chain is attached to atlas neck’s.

26

Step 27

As you can see, the small chains are covering the big ones. We will fix this later. Select one of the small chain, then go to Edit> Transform> Warp. Drag warp control point to make the chain curve down like the image below. Do this step in each small chain layer until all the small chains are curved.

27

Step 28

Use a hard round eraser tool to remove the small chains as shown below.

28

Step 29

Now we need to create shadows for the chains to add depth to the illustration. First, we need to select all the chains. Hold Cmd+Shift, then click each related thumbnail layer, see image below for more details.

29

Step 30

Create a new layer below the cloud layer, then fill the selection with black. Press Cmd+D to deselect. Now name this layer shadow. Now rotate this chain’s shadow to the left, so you can see it, it’s also because the light source is from top right corner, so normally the shadow will fall to the left. This also gives depth to the chains.


Step 31

We need to make this shadow a little blurry, so go to Filter > Blur > Gaussian Blur. Adjust Radius value around 5 to 7 px, click OK to confirm Gaussian blur. Remember, to make it even more blurry you can easily repeat this step by pressing Cmd+F.

31

Step 32

Still in the same layer, add a layer mask. Use a soft black round Brush with low opacity to mask the shadow, so it looks as if it is fading out. See image below for more details.

32

Step 33

Repeat steps 29 to 32 to create shadows for the other chains.

33

Step 34

Now select the topmost layer. Hold Alt, then click menu button, choose Merge Visible. This will merge all visible layers in to a new layer.

34

Step 35

Now go to Filter > Other > High Pass. Adjust Radius value around 1.5 to 2 px then click OK. Change this layer’s blending mode to Overlay. This step will make this illustration look sharper.

35

Step 36

Add a new layer adjustment, Color Balance, then adjust its value so the entire illustration becomes yellowish. See image below for more details.

36

Conclusion

Take a look at the final image below.


Handling Interruptions Realistically

You’ve read the usual advice on career, productivity and self-development  blogs when it comes to handling interruptions at work. Firewall your attention. Don’t check email. Stay off of Facebook and Twitter. All good suggestions, but they’re tautologies equivalent to saying that the best way to avoid distractions is to be undistractable. We’ve read that the typical office worker is interrupted every three minutes, that it takes 15 minutes to recover from each interruption, that interruptions cost the country $12 trillion in lost productivity (the number fluctuates radically). We get it: interruptions are not welcome.

The Flip Side of Interruptions

Interruptions may not be welcomed by the interrupted, but that doesn’t necessarily make them any less avoidable. Holding up your palm in response to your boss and saying, “Not now, I’m working” isn’t exactly a best practice. Sometimes you have to roll with the punches. Sometimes, what I consider an interruption is what my boss likes to call “employment”. In a perfect world, we would only have new opportunities presented to us in between finished tasks, but since that utopian synchronicity still eludes us, let’s examine how to allow interruptions the smart way.

Bookmark Your Work

Interruptions are frustrating, not just because the interrupter is inconsiderate, but because we risk losing track of what we we’re doing. Much of that anxiety is magnified by trying to track what we’re doing mentally instead of physically. When we rely on our short term memory as a placeholder, there’s a heightened need to get back to that task as soon as possible to avoid forgetting it.

The easiest way to allow the interruption is to “bookmark” the current work in one of two ways. If there’s no paperwork involved with the task (like a phone call, or something you’re doing on the computer), just write the task and throw it into your in-basket. If there is paperwork, just throw that into the in-basket. This assumes that you regularly process the contents of your in-basket.

If you don’t have an in-basket, or let it pile up, then hold the paper in your hand until you’re done with the interruption (e.g., answer the interrupter’s question, scheduled a meeting, produced a requested document, etc.), and don’t let go of it until then. Once you have a consistent, physical place to park your interrupted work, your brain will stop trying to issue yourself reminders of what you’ve put aside while the other person is talking to you. You can give the person your undivided attention.

Rescheduling

Some ways to say “not now” are more elegant than others, such as , “That’s a good idea! I’d really like to go over this in detail once I get this purchase order out of the way. When’s a good time for you to discuss this?” You’ve pushed back by telling the interrupter (a) that he or she isn’t a nuisance (“That’s a good idea!”), (b) what you have something else to do at the moment (“this purchase order”), (c) that you’re committed to following up on the topic, and (d) that the discussion will happen later — all without being a jerk about it.

When a time is proposed, imply a suggested length for the meeting time: “So at 4:30, you’ll have 10 minutes to go over this?” Whether it’s 10 minutes or 30, it’s always a good idea when proposing a meeting to think for a couple of seconds about how long the meeting actually needs to take, rather than uttering an arbitrary or open-ended length. Shorter meetings are better to staying on topic.

The Two Minute Rule Revisited

You’ve probably heard of the Two Minute Rule: if you determine that an action will take less than two minutes, just do it now, even if it’s a low-priority item, assuming it needs to be done at all. These are items that would take longer to put on a to-do list and review later than they would to finish immediately.

Retrieving a requested document, find requested contact information, faxing or photocopying something, answering quick questions instead of offering to “think about” them later — these are all example of simple tasks that become more urgent if deferred. There’s less friction in handling a short request now than being nagged into it later. It’s also worth noting that just because a question or request is unexpected doesn’t mean it’s unimportant.

The other advantage of consciously asking if something can be done in under two minutes is that prevents you from getting lured into vaguely longer actions. If someone asks you to set a meeting, you can pick a time and email the rest of your team in less than two minutes. If someone asks you to determine the agenda of the next meeting, you’re probably better off responding, “That’s a great idea! I’d really like to go over this in detail . . “, and set a time to discuss it. Or you may decide to bookmark your current work and discuss it now. The main principle to keep in mind is that how you decide to respond to interruptions is always under your control to some degree.

It’s Time To Be Heard…

Here at AEtuts+ we are trying to find tutorials that will be useful for those who check the site. Every once in a while we’ll get a tutorial from a “non-English” speaking author who will send a video with captions and even though the end result is good, it’s hard to tell how well they’ll be received and we were hoping you could help. We’ve been holding on to a few of these tuts for a while and just wanted to find out if you wanted us to post them? They have captions, but no voice. I’ll attach some of the previews… let us know what you think in the comments?


Previews

This one is a two parter and starts in C4D, then heads over to AE for the final touches.

This one is pretty self explanatory, but I thought the technique on how to get a wet looking logo was pretty creative.

I also have a Basix tut that walks you through how to create a preset using Wiggle and Expression Controls. You’d be able to download the Wiggle preset.

”Wiggle

We were thinking about maybe having a “Silent, But Deadly” week next week where we’ll post these tuts…what do you think?

How to Illustrate a Marvelous Violin Icon

We have another great Vector Premium tutorial available exclusively for Premium members today. If you want to learn how to create a marvelous violin icon, then we have an awesome tutorial for you. This tutorial covers how basic shapes and a solid understanding of perspective and volume work together to quickly build a successful icon.

This Tutorial is Filled with Creative Techniques

Flex your creative muscle with this cool tutorial on how to create a violin icon.

Premium members can Log in and Download! Otherwise, Join Now! Below are sample images, which show some of the development of this tutorial.

Vector Premium Membership

As you know, we run a Premium membership system that costs $9 a month (or $22 for 3 months!) which gives members access to the Source files for tutorials as well as periodic extra tutorials, like this one! If you’re a Premium member you can log in and download the tutorial. If you’re not a member, you can of course join today!

Subscribe to the Vectortuts+ RSS Feed to stay up to date with the latest vector tutorials and articles.


Quick Tip: Working With the FXG Format in Flash CS5

I’m here to talk to you about the new FXG format that’s being introduced with Flash CS5. This format allows you to create objects on the Flash stage, export them out to applications such as Illustrator, Photoshop, Fireworks, Catalyst etc. and work on them there.


View Screencast

Don’t like ads? Download the screencast.

Ricoh GXR: An Inspired Piece of Design or Just Plain Crazy

We’re kicking off a new series of hardware reviews on Phototuts+, starting today with an in-depth look at the Ricoh GXR, a fascinating compact camera with a unique concept – rather than just changing lenses, you change the entire camera unit!

It’s every photographer’s dream – a compact digital camera which offers the image quality and the controls of a digital SLR. Ordinary compacts are no good because the sensors are too small to deliver decent quality, they don’t accept interchangeable lenses, and they’re designed for a market where idiot-proof automation is more important than creative control. And yet SLRs are too big and bulky for casual, candid photography.

The makers are keen to exploit this big, new market. Olympus and Panasonic were the first with their Micro Four Thirds hybrids, Samsung was next with the NX10, and Sony has announced the development of its own series of interchangeable lens compacts.

But Ricoh has taken a completely different approach, disregarding conventional notions of cameras and lenses as separate to produce the GXR, a compact where you don’t just change lenses, but entire camera units consisting of a lens and a sensor combined.

Continue reading “Ricoh GXR: An Inspired Piece of Design or Just Plain Crazy”