It’s very common to load external data (such as SWF files) during runtime, but only when the data is completely loaded can we read or manipulate its content. Usually we have to listen to the complete event dispatched by a Loader or URLLoader object that loads the data for completion handling. Oftentimes, we write code that loads the data in one function, and write code that handles the completion of the loading in another function, but this can be improved by grouping the whole loading process together..
This tutorial demonstrates how to create a loading extension to the command framework in my previous tutorial, Thinking in Commands part 1 of 2, to pack the loading the completion handling into one place. This loading extension can also be combined with the scene management framework covered in Thinking in Commands part 2 of 2. Many classes used in this tutorial are covered in the previous tutorial, so I highly recommend that you read the previous tutorials before going on.
Additionally, this tutorial introduces the concept of data manager, a central “bank” that stores references to data objects. You can register data to the data manger with a unique key string, and later access the data by providing the corresponding key string. This spares you the trouble of keeping references of data objects and some variable scope issues.
By the way, you’ll need the GreenSock Tweening Platform in order to complete these examples.
Why Load Data with Commands?
Normally, we handle the loaded data inside the complete event listener function. This breaks apart two chunks of code that are logically connected. And by looking at the code, your flow of thought might be interrupted as your sight jumps from the loading function to the complete event listener.
Let’s look at the logic flow of a naive SWF loading approach.
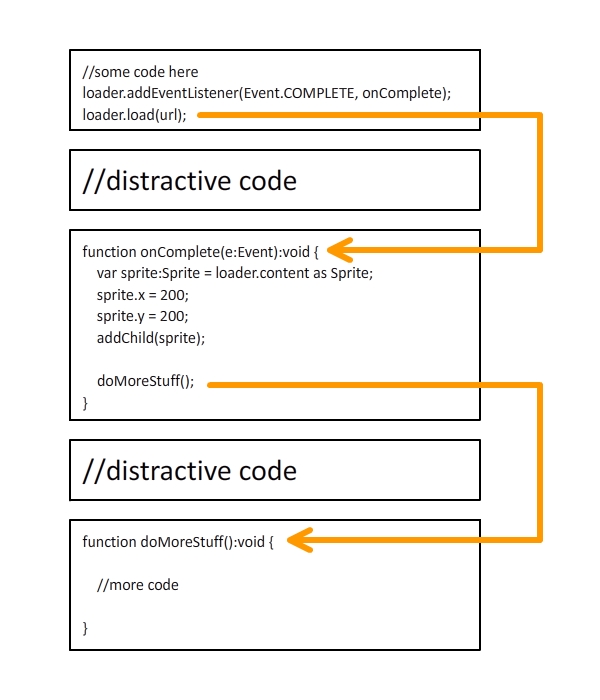
The loader loads a SWF from a URL, and the onComplete() function is invoked by the dispatchEvent() method that dispatches a complete event, where the dispatchEvent() method is invoked internally by the loader. Well, actually, it’s invoked by the LoaderInfo object that belongs to the Loader object, but for simplicity, let’s just say the dispatchEvent() method is invoked by the Loader.
Next, within the onComplete() function, the doMoreStuff() function is invoked after the loading completion handling is done and, as the function’s name suggests, does more stuff.
The high-level logic flow is very linear: invoke the Loader.load() method first, onComplete() second, and doMoreStuff() third. However, as you’ll notice from the diagram, each function’s invocation is embedded within the function body of the previous one, resulting in a “nested” code. In my own opinion, if the logic flow of a certain functionality is linear, the associated code should be written in a linear manner, not nested. Otherwise, the code could sometimes become confusing if the invocation nest level is too high.
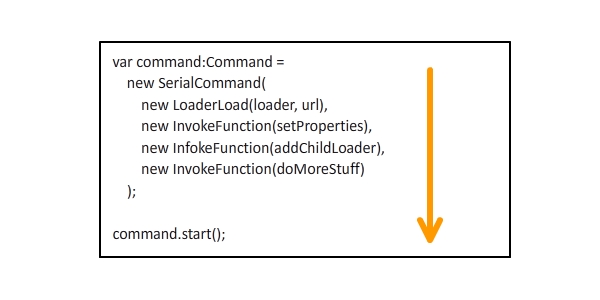
This is when the Command approach comes into play. From the diagram below, we can see that the code is pretty linear using commands, in that all the commands are linearly chained together by a serial command. Although the program “diverts” into the setProperties(), addChildLoader(), and doMoreStuff() functions; their invocation is linear.
Data Manager
Alright, before we get down to anything further about loading, let’s first take a look at the DataManager class. A data manager lets you associate a key string with a data object, and you can obtain a reference to this data object everywhere in your code. With the data manager, you don’t have to worry about keeping data references and variable scopes. All you have to do is register a piece of data to the manager with a key string.
The coding is pretty straightforward, as shown below:
package data {
	import flash.utils.Dictionary;

	public class DataManager {

		//a dictionary that maintains the string-data relations
		private static var _data:Dictionary = new Dictionary();

		//returns the data object associated with a key string
		public static function getData(key:String):* {
			return _data[key];
		}

		//registers a data object with a key string
		public static function registerData(key:String, data:*):void {
			_data[key] = data;
		}

		//unregisters a key string
		public static function unregisterData(key:String):void {
			delete _data[key];
		}

		//unregisters all key strings
		public static function clearData():void {
			for (var key:String in _data) {
				delete _data[key];
			}
		}
	}
}
So when we want to register a key string “myData” with a data object – say, a sprite – we could write the code as follows:
var sprite:Sprite = new Sprite();
DataManager.registerData("myData", sprite);
Later, anywhere in the code, we could write the following code to obtain a reference of the sprite and add it to a display list. It’s that simple, no more issues about maintaining object references and variable scopes.
var sprite:Sprite = DataManager.registerData("myData") as Sprite;
container.addChild(sprite);
Naive Loading Approach
Now let’s take a look at how the naive loading approach loads an external image. The loading code lies in one function and the completion handling code lies in another. We are going to load three images and add them to the stage when the loading is complete. Also, we’ll monitor the loading progress by listening to the progress events.
Step 1: Create a Flash Document
Open Flash and create a new Flash Document.
Step 2: Create a Progress Bar
Draw a progress bar on the stage; this is for representing the loading progress. Convert the entire progress bar into a symbol and give it an instance name of “progressBar_mc”. Within the progress bar symbol, convert the inner progress bar into another symbol, and give it an instance name of “innerBar_mc”.

Step 3: Prepare the Images
Place three images in the same folder as the FLA file, named “image1.jpg”, “image2.jpg”, and “image3.jpg”. Here’s what the three images look like.

Step 4: Create the Document Class
Create a new AS file for the document class for the FLA file. The code is pretty straightforward, and all the details are explained in the comments. First, three loaders are created and the loading begins. On each progress event, the progress bar is updated. When the loading is complete, the progress bar fades out and the three images fade in one-by-one.
package {
	import com.greensock.TweenMax;
	import flash.display.DisplayObject;
	import flash.display.Loader;
	import flash.display.MovieClip;
	import flash.events.Event;
	import flash.events.ProgressEvent;
	import flash.net.URLRequest;

	public class NaiveLoading extends MovieClip {

		private var loader1:Loader;
		private var loader2:Loader;
		private var loader3:Loader;

		public function NaiveLoading() {

			//shrink progress bar to zero scale
			progressBar_mc.innerBar_mc.scaleX = 0;

			//create loaders
			loader1 = new Loader();
			loader2 = new Loader();
			loader3 = new Loader();

			//add progress listeners
			loader1.contentLoaderInfo.addEventListener(ProgressEvent.PROGRESS, onProgress);
			loader2.contentLoaderInfo.addEventListener(ProgressEvent.PROGRESS, onProgress);
			loader3.contentLoaderInfo.addEventListener(ProgressEvent.PROGRESS, onProgress);

			//add completion listeners
			loader1.contentLoaderInfo.addEventListener(Event.COMPLETE, onComplete);
			loader2.contentLoaderInfo.addEventListener(Event.COMPLETE, onComplete);
			loader3.contentLoaderInfo.addEventListener(Event.COMPLETE, onComplete);

			//start loading
			loader1.load(new URLRequest("image1.jpg"));
			loader2.load(new URLRequest("image2.jpg"));
			loader3.load(new URLRequest("image3.jpg"));
		}

		private function onProgress(e:ProgressEvent):void {

			//calculate total bits to load
			var bytesTotal:uint = 0;
			bytesTotal += loader1.contentLoaderInfo.bytesTotal;
			bytesTotal += loader2.contentLoaderInfo.bytesTotal;
			bytesTotal += loader3.contentLoaderInfo.bytesTotal;

			//calculate total bits loaded
			var bytesLoaded:uint = 0;
			bytesLoaded += loader1.contentLoaderInfo.bytesLoaded;
			bytesLoaded += loader2.contentLoaderInfo.bytesLoaded;
			bytesLoaded += loader3.contentLoaderInfo.bytesLoaded;

			//update progress bar scale
			progressBar_mc.innerBar_mc.scaleX = bytesLoaded / bytesTotal;
		}

		private var _completeCount:int = 0;
		private function onComplete(e:Event):void {
			_completeCount++;
			if (_completeCount < 3) return;

			//remove progress listeners
			loader1.contentLoaderInfo.removeEventListener(ProgressEvent.PROGRESS, onProgress);
			loader2.contentLoaderInfo.removeEventListener(ProgressEvent.PROGRESS, onProgress);
			loader3.contentLoaderInfo.removeEventListener(ProgressEvent.PROGRESS, onProgress);

			//remove completion listeners
			loader1.contentLoaderInfo.removeEventListener(Event.COMPLETE, onComplete);
			loader2.contentLoaderInfo.removeEventListener(Event.COMPLETE, onComplete);
			loader3.contentLoaderInfo.removeEventListener(Event.COMPLETE, onComplete);

			var image1:DisplayObject = loader1.content;
			var image2:DisplayObject = loader2.content;
			var image3:DisplayObject = loader3.content;

			//adjust loaded image positions
			image1.x = 30, image1.y = 30;
			image2.x = 230, image2.y = 30;
			image3.x = 430, image3.y = 30;

			//add loaded images to display list
			addChild(image1);
			addChild(image2);
			addChild(image3);

			//fade out progress bar
			TweenMax.to(progressBar_mc, 0.5, {autoAlpha:0, blurFilter:{blurX:20, blurY:20}});

			//fade in loaded images
			TweenMax.from(image1, 0.5, {delay:0.5, alpha:0, blurFilter:{blurX:20, blurY:20}});
			TweenMax.from(image2, 0.5, {delay:0.7, alpha:0, blurFilter:{blurX:20, blurY:20}});
			TweenMax.from(image3, 0.5, {delay:0.9, alpha:0, blurFilter:{blurX:20, blurY:20}});
		}
	}
}
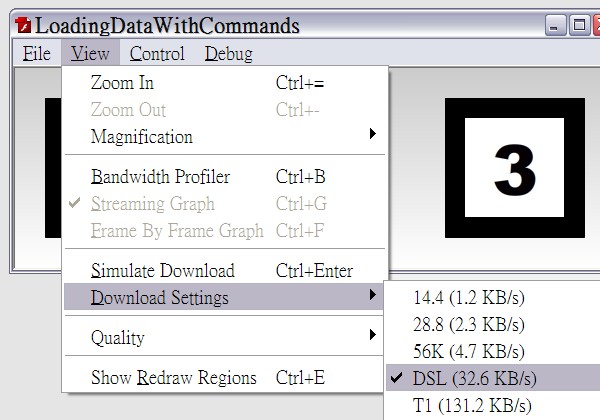
Step 5: Test the Movie
Press CTRL+ENTER to test the movie. You’ll see that the progress bar immediately fades out and the three images fade in. That is because the images are local files, meaning they can be loaded almost immediately. To simulate online download speed, first select the View > Download Settings > DSL as the simulated download speed, and then press CTRL+ENTER again without closing the test window to start simulating online downloading. This time you shall see the progress grow progressively wider before it fades out.
Okay, it’s time to load the images with the command framework.
Utility Commands
Before we proceed, let’s create some utility commands that will be used later in the example. Again, these command classes are based on the command framework presented in my previous tutorial (Part 1), and I highly recommend that you go through them before going on. If you’ve read the tutorial before, you can always head back if you need your memory refreshed.
Data Managers Commands
Here we are going to create two commands for registering and unregistering data for the data manager class. The RegisterData command registers data to the manager, while the UnregisterData command unregisters data.
package commands.data {
	import commands.Command;
	import data.DataManager;

	//this command registers data to the data manager
	public class RegisterData extends Command {

		public var key:String;
		public var data:*;

		public function RegisterData(key:String, data:*) {
			this.key = key;
			this.data = data;
		}

		override protected function execute():void {
			DataManager.registerData(key, data);
			complete();
		}
	}
}
package commands.data {
	import commands.Command;
	import data.DataManager;

	//this command unregisters data from the data manager
	public class UnregisterData extends Command {

		public var key:String;

		public function UnregisterData(key:String) {
			this.key = key;
		}

		override protected function execute():void {
			DataManager.unregisterData(key);
			complete();
		}
	}
}
The LoaderLoad Command
This command encapsulates a Loader instance’s load() method. You may provide an onProgress command that is executed upon each progress event and an onComplete executed when the loading is complete. Note that the complete() method is invoked when the loading is complete. This line of code is extremely crucial. If you do not invoke the method, the command will never be regarded as complete, jamming your entire application in the worst case scenario.
package commands.loading {
	import commands.Command;
	import flash.display.Loader;
	import flash.events.Event;
	import flash.events.ProgressEvent;
	import flash.net.URLRequest;
	import flash.system.LoaderContext;

	public class LoaderLoad extends Command {

		public var loader:Loader;
		public var url:URLRequest;
		public var context:LoaderContext;

		public var onProgress:Command;
		public var onComplete:Command;

		public function LoaderLoad(loader:Loader, url:URLRequest, context:LoaderContext = null, onProgress:Command = null, onComplete:Command = null) {
			this.loader = loader;
			this.url = url;
			this.context = context;
			this.onProgress = onProgress;
			this.onComplete = onComplete;
		}

		override protected function execute():void {

			//add listeners
			loader.contentLoaderInfo.addEventListener(ProgressEvent.PROGRESS, progressListener);
			loader.contentLoaderInfo.addEventListener(Event.COMPLETE, completeListener);
			loader.contentLoaderInfo.addEventListener(Event.COMPLETE, loadingComplete);

			//start loading
			loader.load(url, context);
		}

		private function loadingComplete(e:Event):void {

			//remove listeners
			loader.contentLoaderInfo.removeEventListener(ProgressEvent.PROGRESS, progressListener);
			loader.contentLoaderInfo.removeEventListener(Event.COMPLETE, completeListener);
			loader.contentLoaderInfo.removeEventListener(Event.COMPLETE, loadingComplete);

			complete();
		}

		private function progressListener(e:ProgressEvent):void {

			//execute the onProgress command
			if (onProgress) onProgress.start();
		}

		private function completeListener(e:Event):void {

			//execute the onComplete command
			if (onComplete) onComplete.start();
		}
	}
}
The InvokeFunction Command
This command encapsulates the invocation of another function. It is designed to allow you to provide an extra parameter array for the function to be invoked.
package commands.utils {
	import commands.Command;

	//this command invokes a function
	public class InvokeFunction extends Command{

		public var func:Function;
		public var args:Array;

		public function InvokeFunction(func:Function, args:Array = null) {
			this.func = func;
			this.args = args;
		}

		override protected function execute():void {
			func.apply(null, args);
			complete();
		}
	}
}
That’s it. Time for the example.
Step 1: Copy the Flash Document File
Copy the FLA file from the previous example to a new folder and copy the image files along with it.
Step 2: Create the Document Class
Create a new AS file for the document class of the copied FLA file, named “LoadingDataWithCommands”. Remember to change the document class name in the FLA file to this new one.
The code for the document class is pretty clean. It simply sets the current scene to a LoadingScene with a scene manager. We are using the scene framework presented in my previous tutorial (Part 2). You can check it out if you’ve forgotten how to use it.
package  {
	import flash.display.MovieClip;
	import scenes.SceneManager;

	public class LoadingDataWithCommands extends MovieClip {

		public function LoadingDataWithCommands() {

			var sceneManager:SceneManager = new SceneManager();
			sceneManager.setScene(new LoadingScene(this));
		}
	}
}
There are two scenes in total. The LoadingScene loads the images and updates the progress bar. After the loading is complete, the scene transits to the MainScene, which fades in the loaded images.
Step 3: The Loading Scene
Extend the Scene class to create a new class named LoadingScene. The container property holds a reference to the main sprite. This allows us to access the progress bar later.
package {
	import scenes.Scene;

	public class LoadingScene extends Scene {

		private var container:LoadingDataWithCommands;

		public function LoadingScene(container:LoadingDataWithCommands) {
			this.container = container;
		}
	}
}
Now, create the intro command for the loading scene. The intro will create three loaders and begin the loading process. This is done by overriding the createIntroCommand() method. The following code goes into the class body, same as the constructor.
//the intro command begins the loading of the three images
override public function createIntroCommand():Command {
	var loader1:Loader = new Loader();
	var loader2:Loader = new Loader();
	var loader3:Loader = new Loader();

	var command:Command =
		new ParallelCommand(0,

			//shrink the progress bar to zero scale
			new SetProperties(container.progressBar_mc.innerBar_mc, {scaleX:0}),

			//loading-related commands executed in series
			new SerialCommand(0,

				//registers the three loaders to the data manager
				new ParallelCommand(0,
					new RegisterData("loader1", loader1),
					new RegisterData("loader2", loader2),
					new RegisterData("loader3", loader3)
				),

				//start three loading commands in parallel
				new ParallelCommand(0,
					new LoaderLoad(
						loader1, new URLRequest("image1.jpg"), null,
						new InvokeFunction(onProgress) //onProgress command
					),
					new LoaderLoad(
						loader2, new URLRequest("image2.jpg"), null,
						new InvokeFunction(onProgress) //onProgress command
					),
					new LoaderLoad(
						loader3, new URLRequest("image3.jpg"), null,
						new InvokeFunction(onProgress) //onProgress command
					)
				)
			)
		);

	return command;
}
Next, override the onSceneSet() method. This method is invoked when the intro command is complete, indicating that the loading is complete. Within this method, we tell the scene manager to transit to the main scene. Before the scene transition, the outro command is executed first.
override public function onSceneSet():void {
	sceneManager.setScene(new MainScene(container));
}
And then override the createOutroCommand. This command shall fade out the progress bar.
//the outro command fades out the progress bar
override public function createOutroCommand():Command {
	var command:Command =
		new SerialCommand(0,

			//fade out progress bar
			new TweenMaxTo(container.progressBar_mc, 0.5, {autoAlpha:0, blurFilter:{blurX:20, blurY:20}}),

			//remove progress bar from display list
			new RemoveChild(container, container.progressBar_mc)
		);

	return command;
}
Finally, create the onProgress method invoked by the InvokeFunction commands.
private function onProgress():void {

	//retrieve loader references from the data manager
	var loader1:Loader = DataManager.getData("loader1") as Loader;
	var loader2:Loader = DataManager.getData("loader2") as Loader;
	var loader3:Loader = DataManager.getData("loader3") as Loader;

	//calculate total bits to load
	var bytesTotal:uint = 0;
	bytesTotal += loader1.contentLoaderInfo.bytesTotal;
	bytesTotal += loader2.contentLoaderInfo.bytesTotal;
	bytesTotal += loader3.contentLoaderInfo.bytesTotal;

	//calculate total bits loaded
	var bytesLoaded:uint = 0;
	bytesLoaded += loader1.contentLoaderInfo.bytesLoaded;
	bytesLoaded += loader2.contentLoaderInfo.bytesLoaded;
	bytesLoaded += loader3.contentLoaderInfo.bytesLoaded;

	//update progress bar scale
	container.progressBar_mc.innerBar_mc.scaleX = bytesLoaded / bytesTotal;
}
Step 4: The Main Scene
Now create a new class for the main scene, extending the Scene class.
package {
	import scenes.Scene;

	public class MainScene extends Scene {

		private var container:LoadingDataWithCommands;

		public function MainScene(container:LoadingDataWithCommands) {
			this.container = container;
		}
	}
}
Override the createIntroCommand() method. This method will add the loaders to the display list, and fade them in one-by-one. In addition, the data key strings are unregistered from the data manager.
override public function createIntroCommand():Command {

	//retrieve loader references from the data manager
	var loader1:Loader = DataManager.getData("loader1") as Loader;
	var loader2:Loader = DataManager.getData("loader2") as Loader;
	var loader3:Loader = DataManager.getData("loader3") as Loader;

	var command:Command =
		new ParallelCommand(0,

			//loaded-image-handling commands
			new SerialCommand(0,

				//adjust loaded image positions
				new ParallelCommand(0,
					new SetProperties(loader1, {x:30, y:30}),
					new SetProperties(loader2, {x:230, y:30}),
					new SetProperties(loader3, {x:430, y:30})
				),

				//add loaded images to display list
				new ParallelCommand(0,
					new AddChild(container, loader1),
					new AddChild(container, loader2),
					new AddChild(container, loader3)
				),

				//fade in loaded images
				new ParallelCommand(0,
					new TweenMaxFrom(loader1, 0.5, {alpha:0, blurFilter:{blurX:20, blurY:20}}),
					new TweenMaxFrom(loader2, 0.5, {delay:0.2, alpha:0, blurFilter:{blurX:20, blurY:20}}),
					new TweenMaxFrom(loader3, 0.5, {delay:0.4, alpha:0, blurFilter:{blurX:20, blurY:20}})
				)
			),

			//unregsiter data from the data manager
			new ParallelCommand(0,
				new UnregisterData("loader1"),
				new UnregisterData("loader2"),
				new UnregisterData("loader3")
			)
		);

	return command;
}
Step 5: Test the Movie
Alright. We’re done! Test the movie and simulate online downloading. You will see the exact same result as in the previous example, but this time it’s all done with the command framework and the scene framework.
Summary
In this tutorial, I’ve shown you how to load external images with the command framework. The LoaderLoad command can be used to load external SWF files, too. Moreover, you can create your own commands to load external data other than images and SWF files, by encapsulating the URLLoader class into your commands.
We’ve written more code in the second example than the first one. Remember, the purpose of using the command framework and the scene framework is not to achieve the same result with less code, but to manage the code in a systematic and modular approach, making your life easier when it comes to future maintenance and modification.
The first example squeezes all the code into one single class, making it difficult for future maintenance if the code amount should grow extremely large. The second example, on the other hand, separates logically independent code into different scenes, making it easier for future modification. Also, by integrating with the command framework and the scene framework, we’ve made room for future extension, where we can add more scenes and intro/outro commands without disrupting irrelevant code.
This is the end of this tutorial. I hope you enjoyed it. Thanks for reading!