Dear All
Need to change contact phone number details on website. Small project as the change is within a photo
Website is: www.cvthatworks.com
More work available, however I want a longer term relationship with a coder so this is just the start
Freelance Projects, Design and Programming Tutorials
Dear All
Need to change contact phone number details on website. Small project as the change is within a photo
Website is: www.cvthatworks.com
More work available, however I want a longer term relationship with a coder so this is just the start
We offer fitness vacations/retreats and we would like to be able to take reservations online via our website.
It needs to be a secure form (in order to collect cc data) where people can book a reservation for a retreat/vacation package + extras. This form also needs to be integrated into our existing website.
We want the visitor to be able to click a “Make a Reservation Now” link, and then have all of the retreat packages pop up.
They would then select their Retreat Package, their date to arrive, + any additional services or products. They they would need to put in their cc info, name, address, phone, email, etc.
Then it needs to total the amount at the end, ask them to click “confirm” and then send a confirmation to the visitor AND to us. It doesn’t have to be a full confirmation, just something that emails them to say “we got your info, a confirmation is on it’s way….blah, blah, blah.”
We can then review the reservation and send out confirmation.
We do NOT need to actually process the credit card information online. We only need to collect the credit card information and we will process it offline.
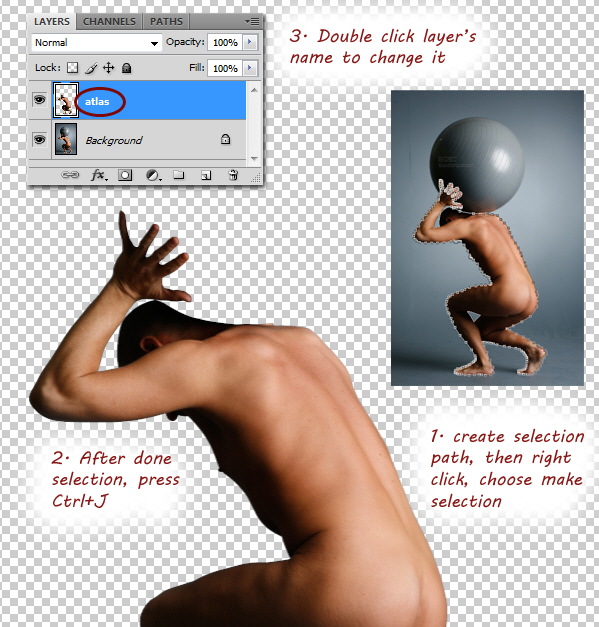
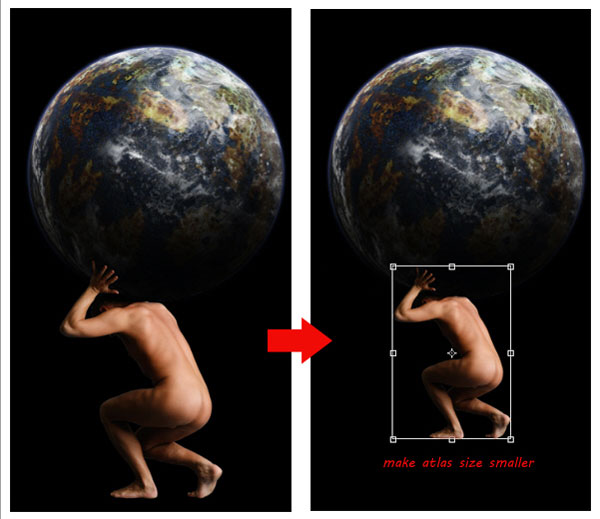
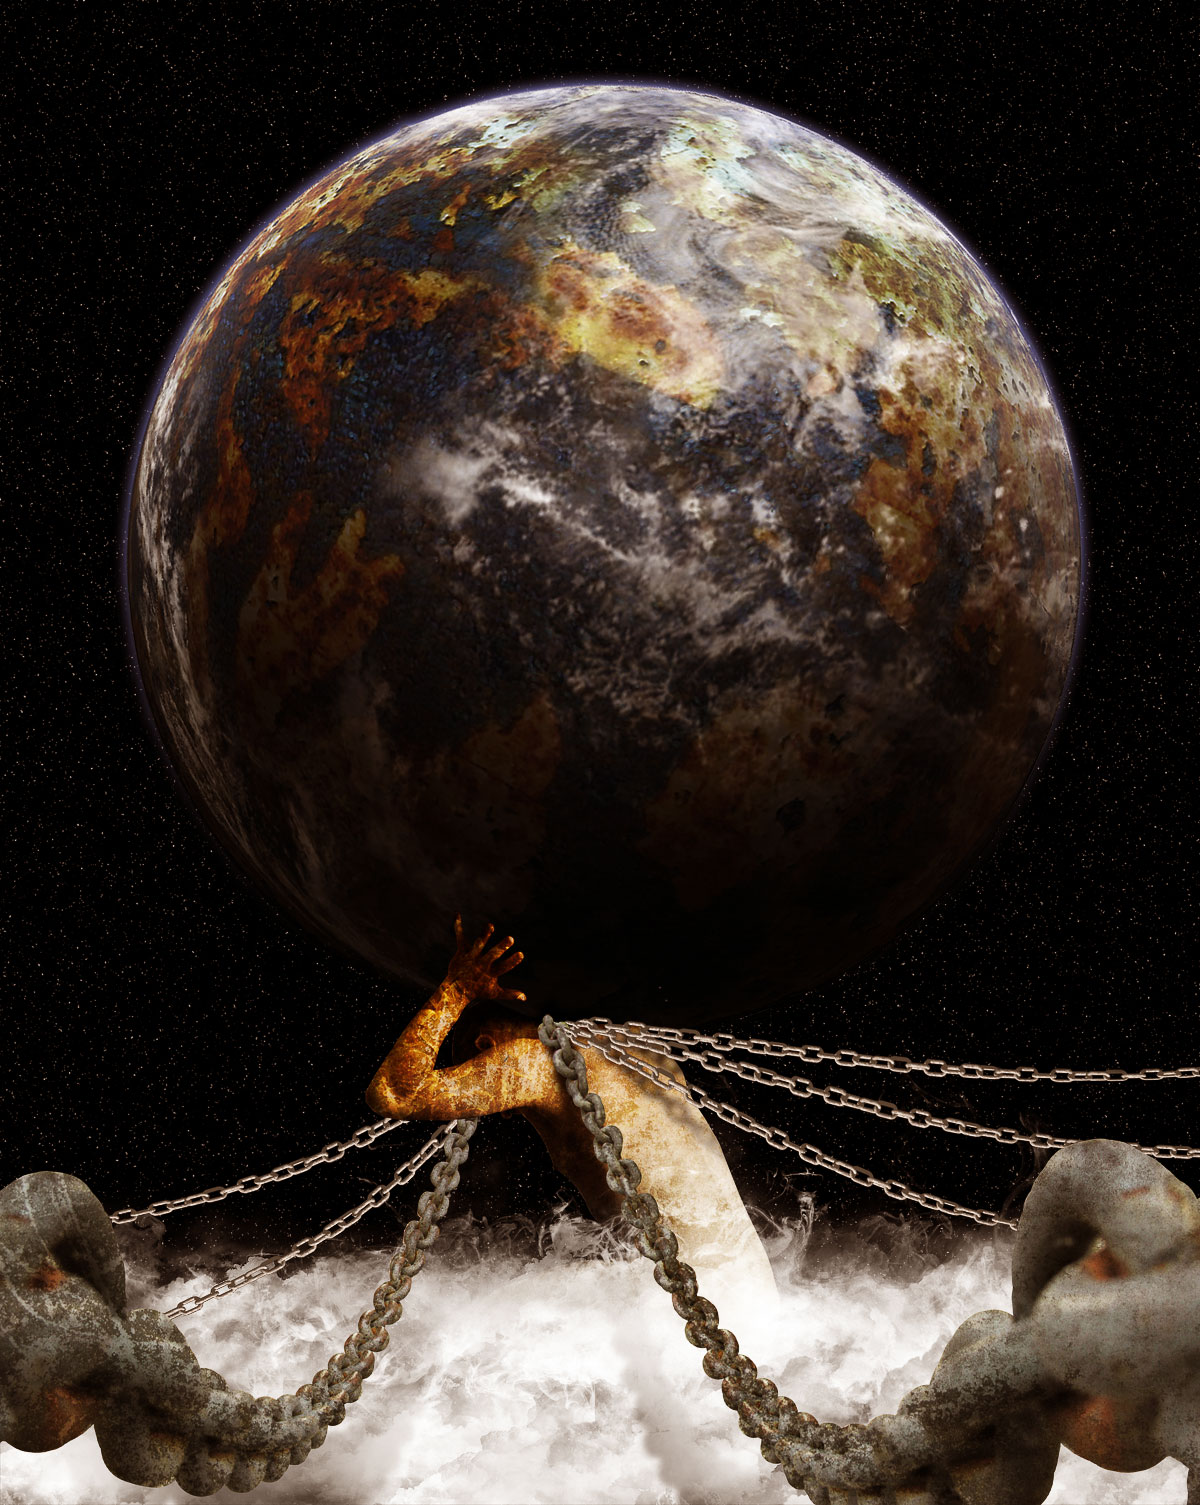
In Greek Mythology, the Titan Atlas literally carried the weight of the world on his shoulders. This is because when the Titans were defeated Zeus condemned him to hold the Earth in place. In today’s tutorial we will demonstrate how to depict Atlas’ punishment using stock photography and Photoshop.
Today, we will be using the following stock photos.
Open stock for atlas model, using Pen tool, extract model from its background and then duplicate it on a new layer. Change layer’s name to atlas.
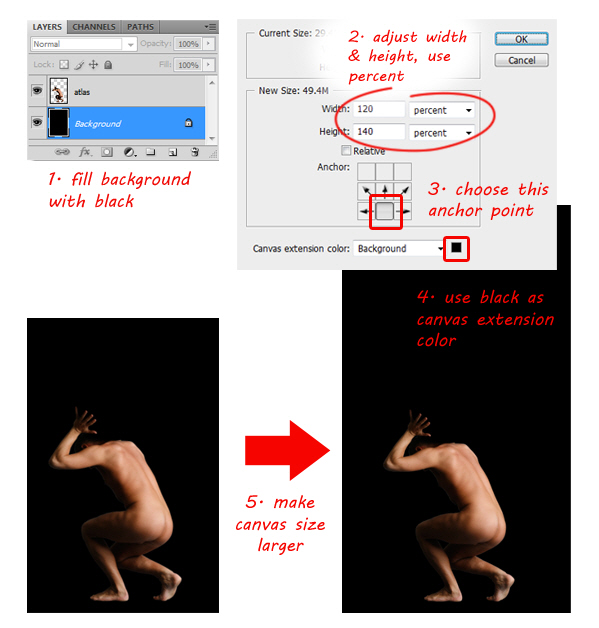
Fill background layer with black. We need a bigger canvas; go to Image > Canvas Size menu. For easier resize process, choose percent and then fill in Width: 120, Height: 140 percent and Pick middle down anchor point. This way, canvas will be resized upward. Click OK to confirm resize.
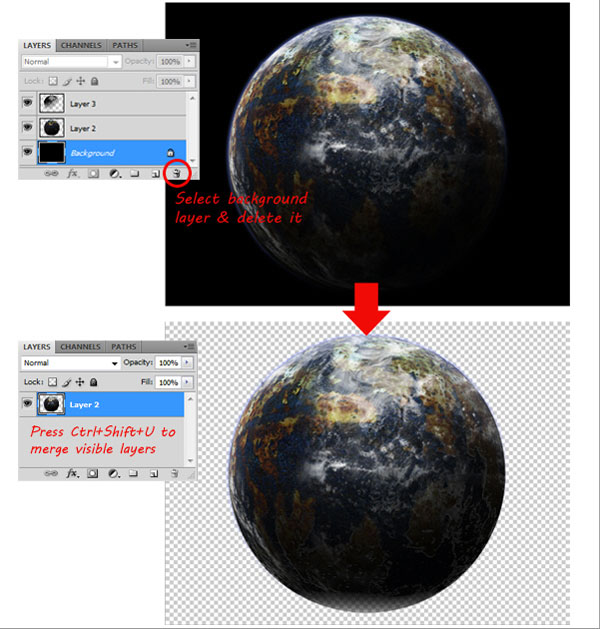
Open earth stock, notice that the earth consists of three layers, delete background layer so now you only have two layers left. Go to Layer > Merge Visible or just press Cmd+Shift+E to merge visible layers.
When done, insert the Earth in to atlas illustration. Make sure you place the Earth’s layer below the atlas layer, then rename its layer to ‘earth’. Resize earth to make it larger, then rotate it to the right so the dark side of earth is in the left side. Press Enter to confirm transformation.
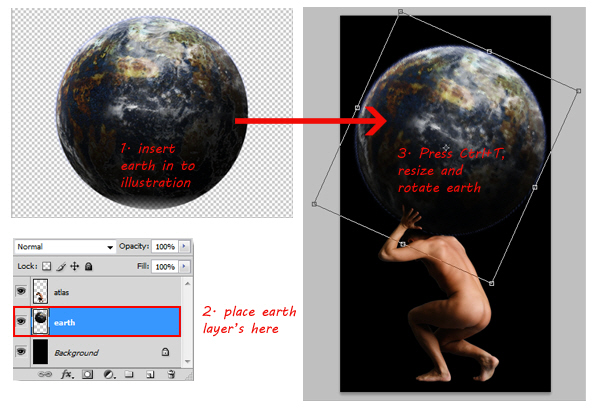
Click back to atlas layer then resize (Cmd+T) to make it smaller. Make sure atlas image is resized proportionally by holding Shift when you drag the corner control point. Hit Enter when done.
Use Crop Tool to crop canvas size. To give celestial atmosphere, add stars to the background. For that purpose, select background layer then click Filter > Noise > Add Noise. Adjust Amount value around 100%, select Gaussian and check Monochromatic ON.
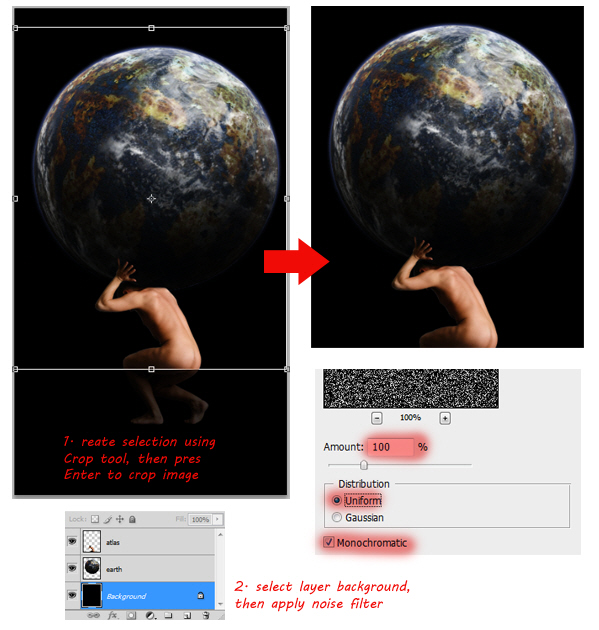
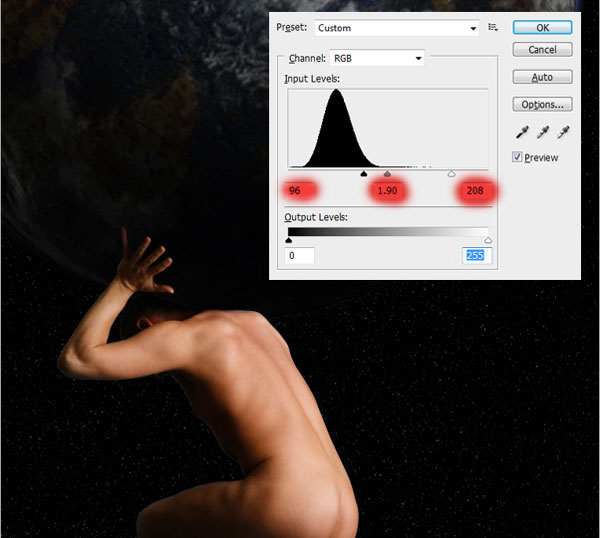
Click OK, then background layer will be filled with noise. Blur it using Filter > Blur > Blur More. You can repeat this step by pressing Cmd+F in case you want the noise look even more blurry. Press Cmd+L to bring up Levels dialog. Adjust input levels by dragging its slider’s until the number of "stars" is reduced, or until you have found the desired result. Click OK to confirm levels adjustment.
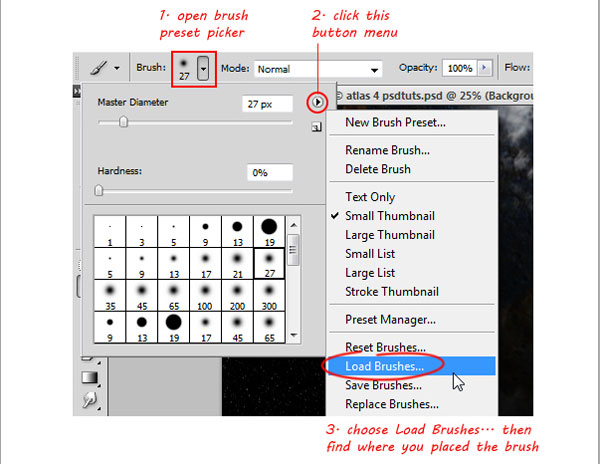
Activate Brush tool, then load the cloud brush (you can find and download the cloud brush here). See image below to learn how to load brushes.
We also need more space to draw the clouds, so resize atlas and earth to make its smaller.

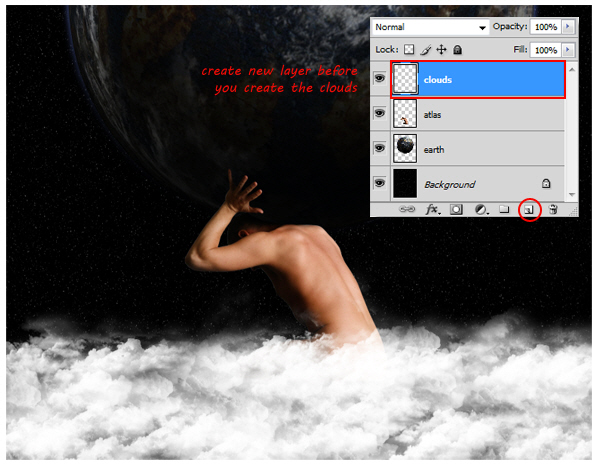
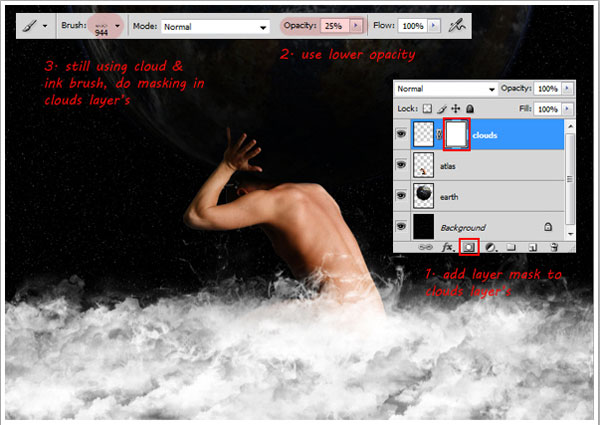
Select white as your brush color and make sure Brush Opacity is 100%. Create a new layer on top of your atlas layer, then start creating clouds using various cloud brushes. As you can see, the clouds are placed below the atlas body. To get better results, try to vary multiple cloud brushes as shown below.
Now load some ink brushes in to Photoshop (you can find and download ink brush here). Same as before, combine multiple ink brush to get varied results.

Add a layer mask to cloud layer. Now paint layer mask with black using cloud and fire Brush with low opacity (around 20-25% ). There is no guide to do this; just try to balance the look of the clouds, not too thick or thin.
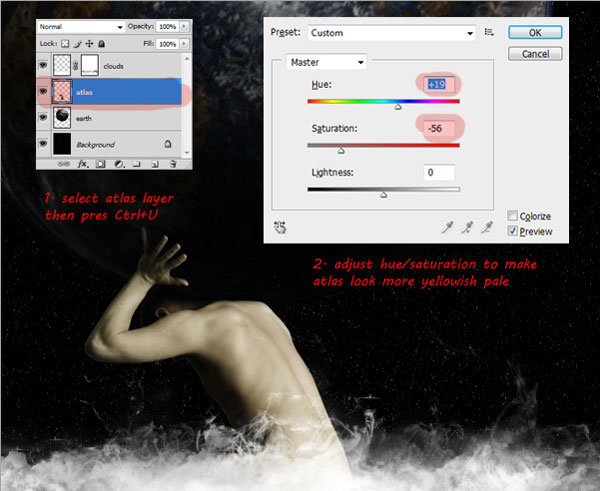
Select atlas layer, then press Cmd+U to bring up Hue/Saturation dialog. Drag Saturation slider to left to change pale skin color, and then drag Hue slider to right to change skin color look more yellowish.
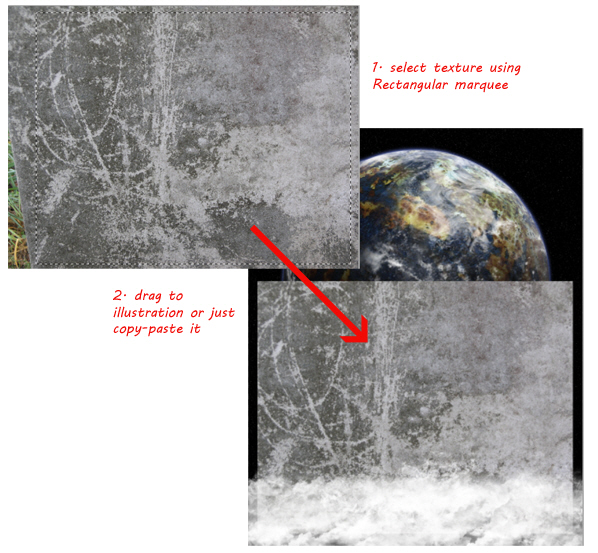
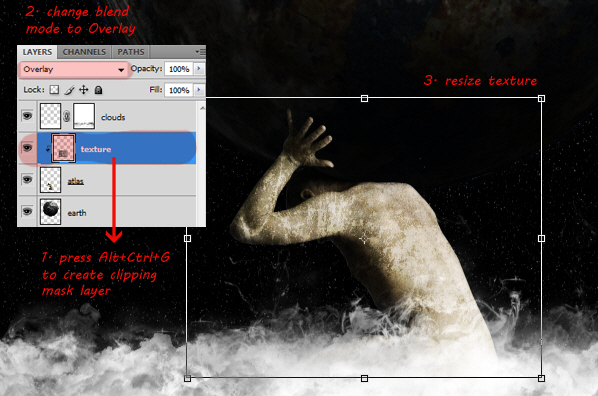
Open up texture stock, use Rectangular Marquee tool to create selection. Copy selected texture in to atlas illustration.
Place texture between clouds and atlas layer’s. Change its layer name to texture and then press Alt+Cmd+G to make it a Clipping mask. This way the texture will only appear inside of atlas’ body. Change texture layer Blending Mode to Overlay, then press Cmd+T and make it smaller.
Open fire stock, create selection using Rectangular Marquee tool. Drag selected fire in to illustration.
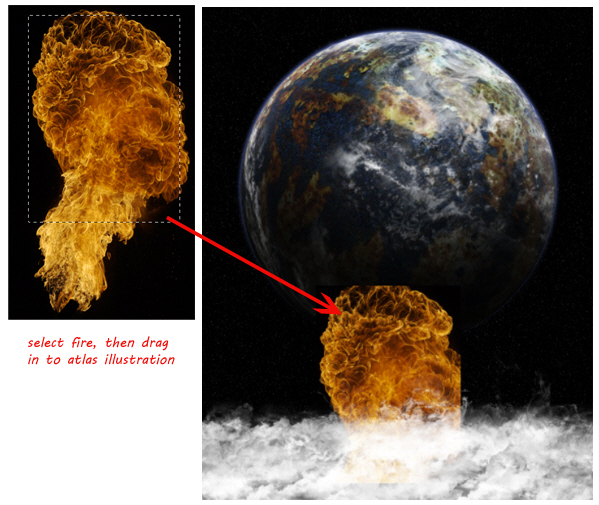
Place it between texture and clouds layer, then change its layer to a clipping mask by pressing Alt+Cmd+G. Also change the blending mode to Overlay. This should give the texture below it a nice hue.
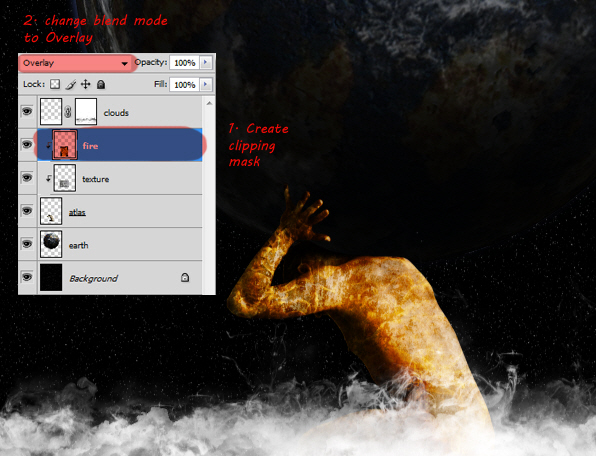
Add layer mask to the fire layer, then use a Linear Gradient to mask it. This way only half of the fire will be visible.

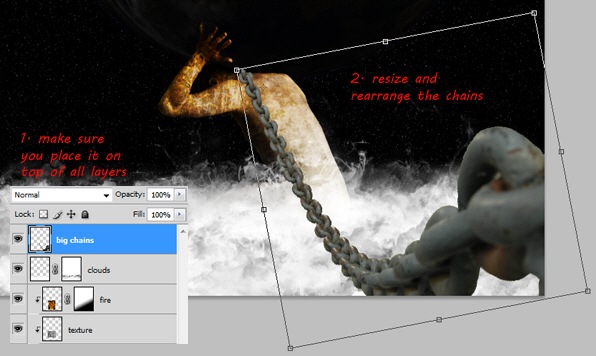
Open chain stock. You can use the Pen tool to create a selection path or you can also use quick mask selection using the Brush tool to extract the chain from its background.

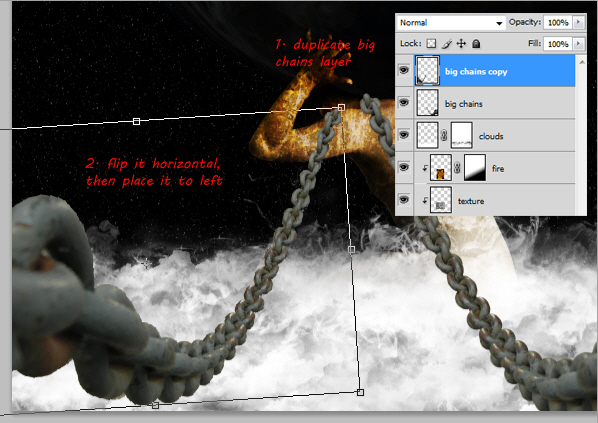
After you are done extracting the chains, copy the selected chains in to the atlas illustration. Make sure that you place it on the very top of layer and name it ‘big chains’. Using free transform command, resize and rearrange the chains to the right of illustration, see image below for more details.
Duplicate chain layer, then flip it horizontally (Edit > Transform > Flip Horizontal). Drag the flipped chain to left, see image for more details.
Open and select texture stock once again, then drag it in to atlas illustration. Place this texture over the first big chain layer.
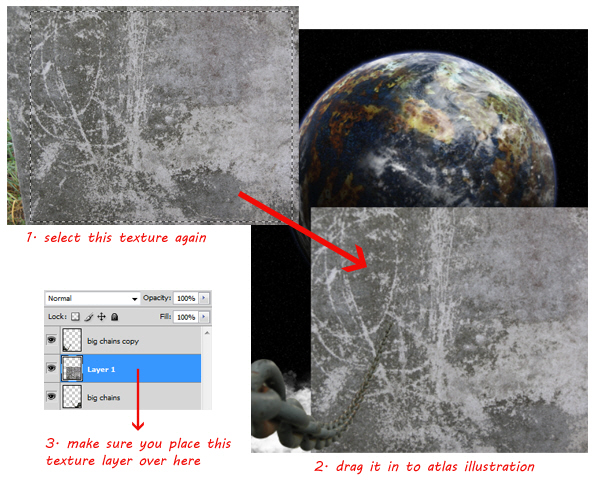
Make this texture only appear inside chain image by change its mode to clipping mask (Alt+Cmd+G). To blend texture with chains, change the Blending Mode to Overlay.
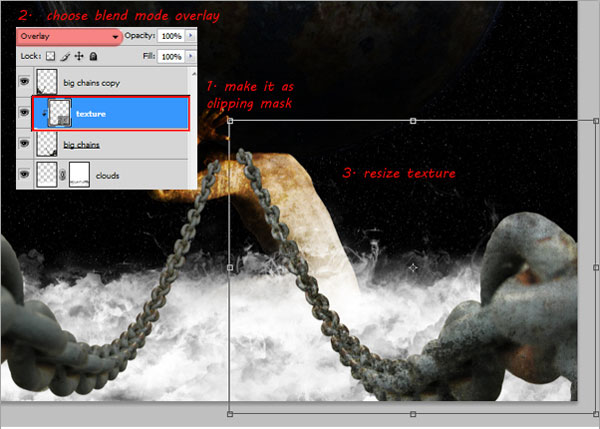
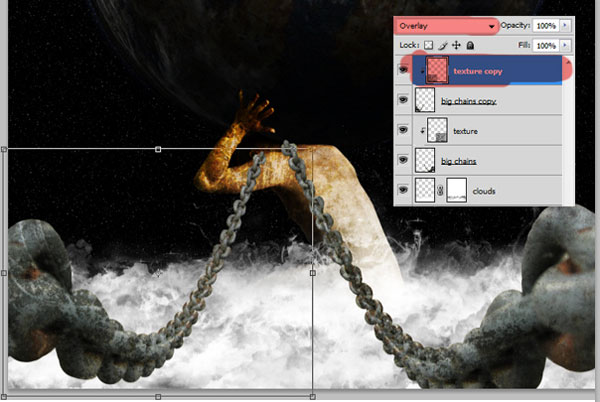
Repeat this process to the other big chains layer.
Open the second chain stock, select chain on the left by using Rectangular Marquee tool and then drag this selected chain in to the atlas illustration. Make sure you place this second chain stock on top of every layer, rename its layer to "small chain."
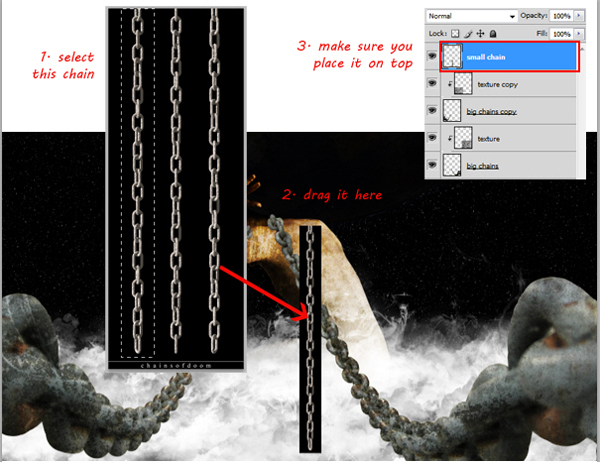
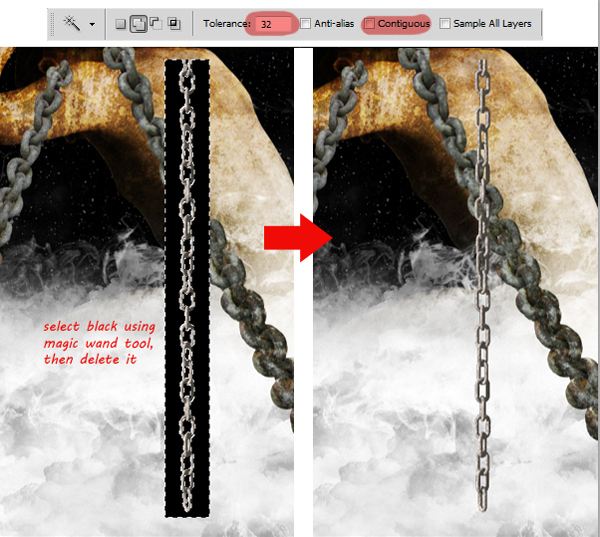
Use the magic wand to select and remove the black background from the chain. See image below for more details.
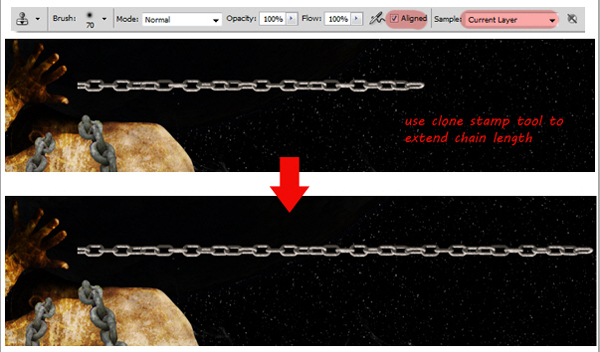
Rotate this small chain until it appears horizontally. Then use the Clone Stamp tool to extend the length of the chains.
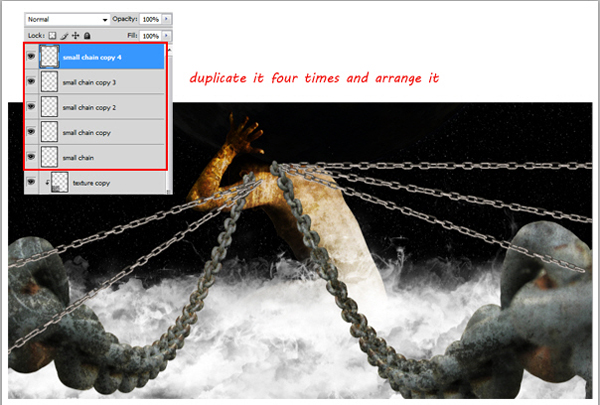
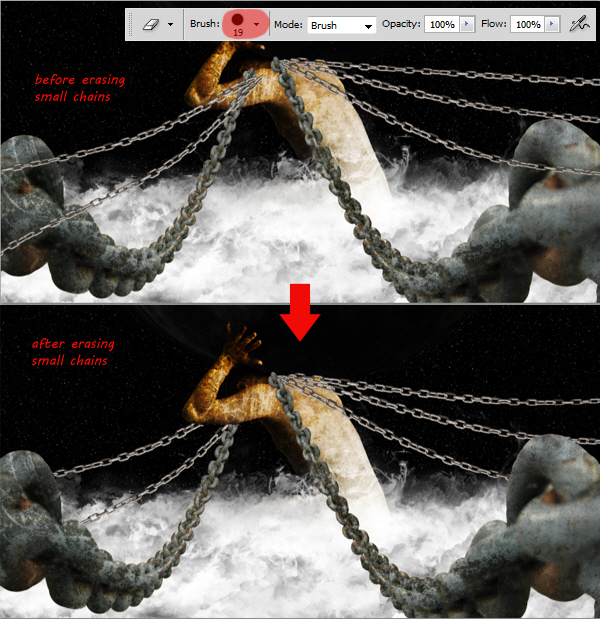
Press Cmd+J four times, so now you got four new small chain layers, plus one (the original chain layer). Arrange these five chain images like the image below, as you can see, it look like the chain is attached to atlas neck’s.
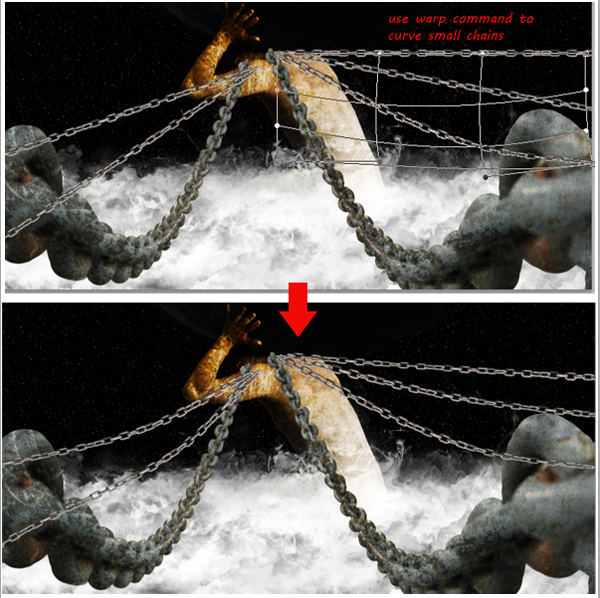
As you can see, the small chains are covering the big ones. We will fix this later. Select one of the small chain, then go to Edit> Transform> Warp. Drag warp control point to make the chain curve down like the image below. Do this step in each small chain layer until all the small chains are curved.
Use a hard round eraser tool to remove the small chains as shown below.
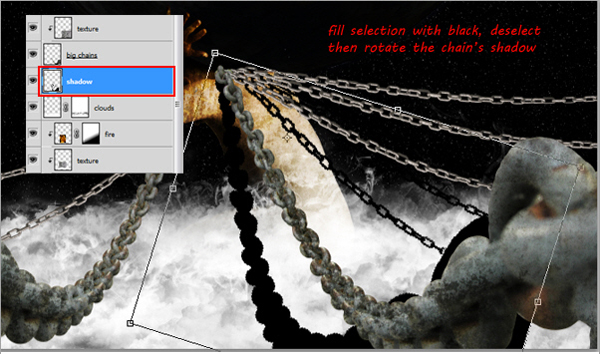
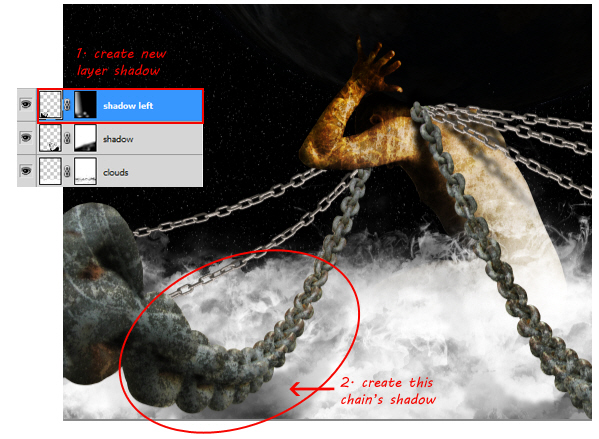
Now we need to create shadows for the chains to add depth to the illustration. First, we need to select all the chains. Hold Cmd+Shift, then click each related thumbnail layer, see image below for more details.

Create a new layer below the cloud layer, then fill the selection with black. Press Cmd+D to deselect. Now name this layer shadow. Now rotate this chain’s shadow to the left, so you can see it, it’s also because the light source is from top right corner, so normally the shadow will fall to the left. This also gives depth to the chains.
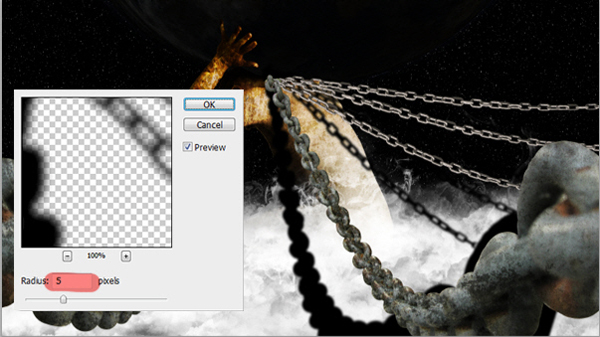
We need to make this shadow a little blurry, so go to Filter > Blur > Gaussian Blur. Adjust Radius value around 5 to 7 px, click OK to confirm Gaussian blur. Remember, to make it even more blurry you can easily repeat this step by pressing Cmd+F.
Still in the same layer, add a layer mask. Use a soft black round Brush with low opacity to mask the shadow, so it looks as if it is fading out. See image below for more details.
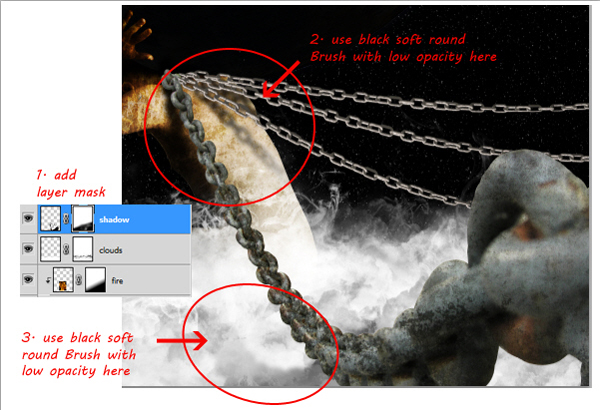
Repeat steps 29 to 32 to create shadows for the other chains.
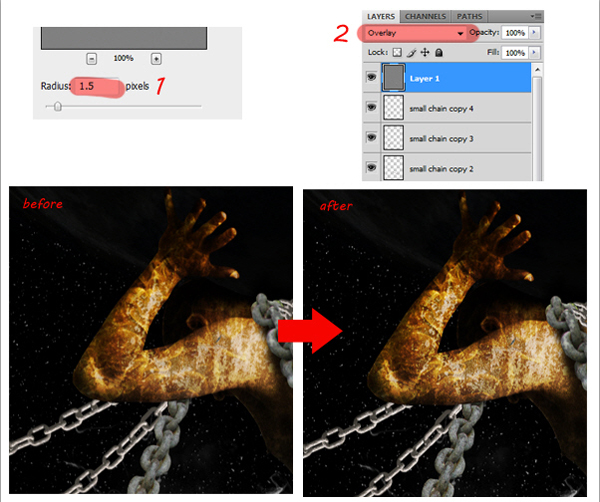
Now select the topmost layer. Hold Alt, then click menu button, choose Merge Visible. This will merge all visible layers in to a new layer.

Now go to Filter > Other > High Pass. Adjust Radius value around 1.5 to 2 px then click OK. Change this layer’s blending mode to Overlay. This step will make this illustration look sharper.
Add a new layer adjustment, Color Balance, then adjust its value so the entire illustration becomes yellowish. See image below for more details.
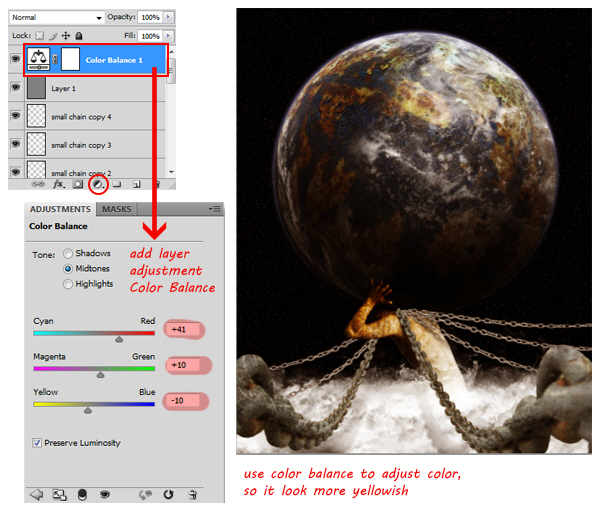
Take a look at the final image below.
Hello,
I need joomla expert for my website for my NGO.
Please send me joomla link and ngo site link.
this is urgent project.
thanks
I need of blog writer with experience in Affiliate Marketing. Must write in my tone.. which is young, hip, cool.
I will provide you with some themes to write about and you will have to do some research and write blog post’s in my tone.
You must be proficient in the english language.
You will also be re-writing my blog post’s as my english writing sucks. I am good at Marketing but not writing : )
Blog postings will be once per week on emerging trends, Facebook Advertising and anything i can think of.
Please post your experience
Thanks you.
I want a website like slimball dot ro same content, same
structure, the design be a little bit different, and the header I
want to look different but contain the same text.
Best regards!
I am going to explain this good as possible.
There has been made a survey in PHP & MySQL.
Main goal was:
– survey exists out of three rounds
– question could exist out of:
open questions (textarea),
multiple-choice (checkbox),
multiple-choice likert scale (radiobuttons, 1 to 5 from left to right)
Round 1: Open questions
Round 2: multiple-choice likert scale and 1 open question
Round 3: multiple-choice likert scale and 1 open question and possibility to review(change) all answers (except open question) of round 2 (which have to be saved seperated so they can be compared to round 2)
Programmer 1: He started to program the survey and completed round 1. Programmer 2: He programmed the code for round two. Round two is running now.
Needed NOW: programmer 3! To program round 3.
The problem:
Programmer 1 made everything with the Zend Framework.
Programmer 2 made everything with baggy code and without use of Zend Framework
The backend of programmer 2 is differtent than the backend of programmer 1.
Deliverables (what I need):
– One backend, (no differtent links anymore)
– Backend function: Possibility to send email to all people which have NOT completed the survey yet
– Backend function: Possibility to send email to all people which have NOT completed the survey yet (already integrated but perhaps buggy)
– Backend function: Nice view of participants which have completed the survey. View shows: Participant Id, average answer (1,2,3,4,5), most choosen answer (1,2,3,4,5), less chosen answer (1,2,3,4,5)
Click on participant will show his personal results for each question.
Viewable are: Participant Id, questionnumber, answer (1,2,3,4,5), average answer by other participants (1,2,3,4,5)most choosen answer by other participants (1,2,3,4,5), less chosen answer by other participants (1,2,3,4,5)
– Backend function: Nice view of participants which have NOT completed the survey. View shows: THE SAME COLUMNS AS PARTICIPANTS WHO DID COMPLETE THE SURVEY + emailadres
Click on participant will show his personal results for each question.
Viewable are: THE SAME COLUMNS AS PARTICIPANTS WHO DID COMPLETE THE SURVEY + emailadres
– Backend function: Nice view of questions and it answers. View shows: average answer (1,2,3,4,5), most choosen answer(1,2,3,4,5), less chosen answer (1,2,3,4,5)
Click on question will show all results for this question.
Viewable are: particpant ID, questionnumber, answer (1,2,3,4,5)
– Backend function:
Possibility to view round 3 before it is published. One click on a button should publish the round 3.
I will provide you all information you need as soon as possible. I will send you login-details for the databases, hostingaccounts etc when you accept the order.
Please note:
The survey is running LIVE now!! DO NOT MAKE MISTAKES WHICH CAN INFLUENT THE RESULTS IN ANY WAY!!!!
Please backup files before you start.
I am looking for someone who can work very fast and perfect without mistakes for a small price.
You’ve read the usual advice on career, productivity and self-development blogs when it comes to handling interruptions at work. Firewall your attention. Don’t check email. Stay off of Facebook and Twitter. All good suggestions, but they’re tautologies equivalent to saying that the best way to avoid distractions is to be undistractable. We’ve read that the typical office worker is interrupted every three minutes, that it takes 15 minutes to recover from each interruption, that interruptions cost the country $12 trillion in lost productivity (the number fluctuates radically). We get it: interruptions are not welcome.
Interruptions may not be welcomed by the interrupted, but that doesn’t necessarily make them any less avoidable. Holding up your palm in response to your boss and saying, “Not now, I’m working” isn’t exactly a best practice. Sometimes you have to roll with the punches. Sometimes, what I consider an interruption is what my boss likes to call “employment”. In a perfect world, we would only have new opportunities presented to us in between finished tasks, but since that utopian synchronicity still eludes us, let’s examine how to allow interruptions the smart way.
Interruptions are frustrating, not just because the interrupter is inconsiderate, but because we risk losing track of what we we’re doing. Much of that anxiety is magnified by trying to track what we’re doing mentally instead of physically. When we rely on our short term memory as a placeholder, there’s a heightened need to get back to that task as soon as possible to avoid forgetting it.
The easiest way to allow the interruption is to “bookmark” the current work in one of two ways. If there’s no paperwork involved with the task (like a phone call, or something you’re doing on the computer), just write the task and throw it into your in-basket. If there is paperwork, just throw that into the in-basket. This assumes that you regularly process the contents of your in-basket.
If you don’t have an in-basket, or let it pile up, then hold the paper in your hand until you’re done with the interruption (e.g., answer the interrupter’s question, scheduled a meeting, produced a requested document, etc.), and don’t let go of it until then. Once you have a consistent, physical place to park your interrupted work, your brain will stop trying to issue yourself reminders of what you’ve put aside while the other person is talking to you. You can give the person your undivided attention.
Some ways to say “not now” are more elegant than others, such as , “That’s a good idea! I’d really like to go over this in detail once I get this purchase order out of the way. When’s a good time for you to discuss this?” You’ve pushed back by telling the interrupter (a) that he or she isn’t a nuisance (“That’s a good idea!”), (b) what you have something else to do at the moment (“this purchase order”), (c) that you’re committed to following up on the topic, and (d) that the discussion will happen later — all without being a jerk about it.
When a time is proposed, imply a suggested length for the meeting time: “So at 4:30, you’ll have 10 minutes to go over this?” Whether it’s 10 minutes or 30, it’s always a good idea when proposing a meeting to think for a couple of seconds about how long the meeting actually needs to take, rather than uttering an arbitrary or open-ended length. Shorter meetings are better to staying on topic.
You’ve probably heard of the Two Minute Rule: if you determine that an action will take less than two minutes, just do it now, even if it’s a low-priority item, assuming it needs to be done at all. These are items that would take longer to put on a to-do list and review later than they would to finish immediately.
Retrieving a requested document, find requested contact information, faxing or photocopying something, answering quick questions instead of offering to “think about” them later — these are all example of simple tasks that become more urgent if deferred. There’s less friction in handling a short request now than being nagged into it later. It’s also worth noting that just because a question or request is unexpected doesn’t mean it’s unimportant.
The other advantage of consciously asking if something can be done in under two minutes is that prevents you from getting lured into vaguely longer actions. If someone asks you to set a meeting, you can pick a time and email the rest of your team in less than two minutes. If someone asks you to determine the agenda of the next meeting, you’re probably better off responding, “That’s a great idea! I’d really like to go over this in detail . . “, and set a time to discuss it. Or you may decide to bookmark your current work and discuss it now. The main principle to keep in mind is that how you decide to respond to interruptions is always under your control to some degree.
Hello,
This job is for an oscommerce website and Easy Populate (EP) use.
I am searching for a serious programmer that read fully this project and have real competence.
1.
My oscommerce website was modifyed to allow a product to have severals images displayed.
Easy populate (EP) allow only 1 image in csv file for a product.
I want easy populate accept severals images (then severals column in csv file) for a product.
It must runs for import or export csv file and in all cases.
2.
Bug : products created via EP are not recognized by my website as “new products”.
I want to see them in “New” menu category like other products created normally without EP
3. Bug : product number (model) of EP are displayed at some place of my website. I don’t want they are displayed on my website.
4. Bug : date of creation / add of each product via EP are not true.
I think this bug is related to point 2.
5. Bug: images displayed of products are sometimes so greater when customer click to “enlarge” image of a product.
Then, only a partial part of image is displayed and there is no possibility to use cursor of mouse to see totality of image.
I want when user click to enlarge, image is adjusted to screen of user without any deformation of image. Images must use maximum size possible. But if image doesn’t have to be enlarged more if it is a little image (i don’t want see pixel of image).
If you have any question please don’t hesitate.
Regards
I need 2 extensions for the FeedWordPress Plugin.
I only accept bids where you wrote the current release of FeedWordPress.
The Extensions should be generated as own plugins that extends FeedWordPress with the integrated hooks.
You don’t have to change any file of FeedWordPress.
The Links to the admin-panels should be integrated at the feedWordPress menu block.
1. Image Download
If a feed also sends images the plugin must download the image from the source-server and save them as attachment to the post.
2. Auto-Tags
Generate automated Tags for each fetched rss post and save them.
The tags must be checked agains yahoo.com and tagthe.net.
I must be possible to define the maximum number of tags at the admin-panel.
3. Auto-Delete
At the admin-panel it must be possible to define the number of days after a post in draft mode that has been imported by FeedWordPress should be deleted
I need help to grab info from different pages (rss feeds are availible in most cases) and add them to a mysql database. A simple admin area is also required. The data collector script needs to run automatically using cron.
You should be experienced in php/mysql/rss and administration areas. The project is a site that links to other streaming tv sites. If I’m satisfied with the outcome, there will be much more future work with the site for you.
Please let me know if you have done any similar work before and also let me know if you have any questions.
Are you a great writer looking to work from home, get paid, and build a portfolio of work all at the same time? Then we want you on our team!
We need articles written for a whole host of subject areas, from finance and travel to automotive, health and fitness, and do-it-yourself.
This is the perfect opportunity to:
– Telecommute
– Write (and earn) as much as you want!
***We require a minimum of 5 articles per day****
******* $1.00 per 400 words ***********
PAYMENT: On the 15th day of each month.. Payment to writers on all articles approved during previous calendar month.
REJECTED ARTICLES are not eligible for payment.
NO PLAGIARISM. YOUR WORK MUST BE ORIGINAL.
Immediate START!!!!!!!!!!!!!!
If interested, please send me a private message and I will provide more information on the assignments.
Here at AEtuts+ we are trying to find tutorials that will be useful for those who check the site. Every once in a while we’ll get a tutorial from a “non-English” speaking author who will send a video with captions and even though the end result is good, it’s hard to tell how well they’ll be received and we were hoping you could help. We’ve been holding on to a few of these tuts for a while and just wanted to find out if you wanted us to post them? They have captions, but no voice. I’ll attach some of the previews… let us know what you think in the comments?
This one is a two parter and starts in C4D, then heads over to AE for the final touches.
This one is pretty self explanatory, but I thought the technique on how to get a wet looking logo was pretty creative.
I also have a Basix tut that walks you through how to create a preset using Wiggle and Expression Controls. You’d be able to download the Wiggle preset.

We were thinking about maybe having a “Silent, But Deadly” week next week where we’ll post these tuts…what do you think?
We have another great Vector Premium tutorial available exclusively for Premium members today. If you want to learn how to create a marvelous violin icon, then we have an awesome tutorial for you. This tutorial covers how basic shapes and a solid understanding of perspective and volume work together to quickly build a successful icon.
Flex your creative muscle with this cool tutorial on how to create a violin icon.
Premium members can Log in and Download! Otherwise, Join Now! Below are sample images, which show some of the development of this tutorial.


As you know, we run a Premium membership system that costs $9 a month (or $22 for 3 months!) which gives members access to the Source files for tutorials as well as periodic extra tutorials, like this one! If you’re a Premium member you can log in and download the tutorial. If you’re not a member, you can of course join today!
Subscribe to the Vectortuts+ RSS Feed to stay up to date with the latest vector tutorials and articles.
Are you a great writer looking to work from home, get paid, and build a portfolio of work all at the same time? Then we want you on our team!
We need articles written for a whole host of subject areas, from finance and travel to automotive, health and fitness, and do-it-yourself.
This is the perfect opportunity to:
– Telecommute
– Write (and earn) as much as you want!
***We require a minimum of 5 articles per day****
********** $1.00 per 400 words **************
PAYMENT: On the 15th day of each month.. Payment to writers on all articles approved during previous calendar month.
REJECTED ARTICLES are not eligible for payment.
NO PLAGIARISM. YOUR WORK MUST BE ORIGINAL.
***********This is a Long Term Job (6 months – 1 year)***********
Immediate START!!!!!!!!!!!!!!