I need to “clean up” my site. This job includes minor font/alignment changes to make the site show up correctly in all three major browsers. The job will include small code additions to make fields from the database show up on the site. Really simple. In addition I would like to put a link to the Facebook when new properties are added to my site.
WordPress Mu/lite Social Site
Hello,
I want to utilize a wordpress MU and host many blogs with light social networking feature.
I want to make a site dedicated for a particular genre of sport where they can make individual profiles with blogs. Please let me know if
You had past experience with this.(MU)
What question you have for the project
Looking forward to working with you very soon.
Lee
X50 Reviewarticles 4 Cuttysark
About 400 words per article, which shall be original and written by human as well as pass copyscape.
These articles shall not be sold, reproduced or reused in any way.
It’d be great if anyone who has the articles which are never been published on the internet and can provide them to me in a short time.
Copy Articles To My Joomla
Hi all what i need is simple but i created a document with explanation just to be clear. I have another web site to get the articles (some have videos inside them that comes from youtube)from with permission they gave me. The site is in the Attachment.
What i need is to:
– Create the menus and sub menus
– Copy the articles (see the attachment)
– Change Home Page links to reflect the articles you created
– Add the Facebook i like to Joomla
Rethinking Forms in HTML5
While there are many changes for the better in the HTML5 specification, there is no better bang for the buck for the data driven website than the transformation of forms. These simple changes will transform how you enter, validate, process, and even display inputs. You will be able to create more usable web applications with less code and less confusion.
Introduction: What’s in Store?
“In the recent past, the majority of innovation in forms have come from the use of JavaScript, rather than old fashioned HTML. While there is nothing wrong with using JavaScript to enhance forms, it does bring its own usability along with many development headaches.”
HTML 5 is still undergoing changes before it is finalized. If you look at the spec, you will see that there is still a last call for comments along with statements, such as, “Implementers should be aware that this specification is not stable.” Furthermore, particularly for the purposes of this tutorial, focusing on the changes to forms, browser implementation is spotty to say the least. That said, the changes on the horizon are worth examining today. While the changes are major in scope, the implementation for developers look to be rather easy. In this tutorial, we will take a high level overview of these ground breaking changes, and think about how they will impact the nature of user input.
In the past, changes to forms have been relatively minor. If you go back to the HTML 3.2 spec, which was finalized in 1997, you will see the same basic form inputs that you use today. Select, textarea, radio, checkboxes and text were available then. A generation of web developers have grown up writing to these same standards. While later versions of the specification brought changes to forms, such as the fieldset, label, legend, and form actions such as onsubmit or onchange, the way we deal with user input has remained somewhat static. In the recent past, the majority of innovation in forms have come from the use of JavaScript, rather than old fashioned HTML. While there is nothing wrong with using JavaScript to enhance forms, it does bring its own usability along with many development headaches. For instance, there are many different ways that we can validate forms using JavaScript, but what happens when a user does not have JavaScript enabled? We further have to apply logic to our server side scripts. In the end, we have a not so consistent way of handling user input. HTML 5 doesn’t address every innovation headache for forms in the past 13 years, but it does give us plenty of tools to
make our jobs much easier, and allows us to produce much more consistent forms.
There are three basic changes that we should examine. First, we will look at the changes to the input elements, such as “autocomplete” or “autofocus”. The second is changes to the input states, and there are quite a few! Finally, we will examine the new form elements. It is important to restate that the specification is in flux; so I wouldn’t be surprised if, in the future, there are subtle changes to what we are discussing. That’s what makes this fun!
Changes to Input Elements: A Whole New Playground.
Input elements are those items that you place in inputs to explain what the input is doing. For instance:
<input name="form_text" id="form_text" type="text" value="foo" size="10" maxlength="100">
In the example above, the input attributes are value, size, and maxlength. These have been around for quite some time. HTML 5 doesn’t change the concept of having input elements, but rather adds quite a few more. There does appear to be at least one subtraction, or rather substitution, and that is the change of “disabled” now appears to become “readonly.” The spec does not go into detail to the change, but if I was a betting man, the change would allow event handlers, such as onblur, to fire – which a disabled element prevents.
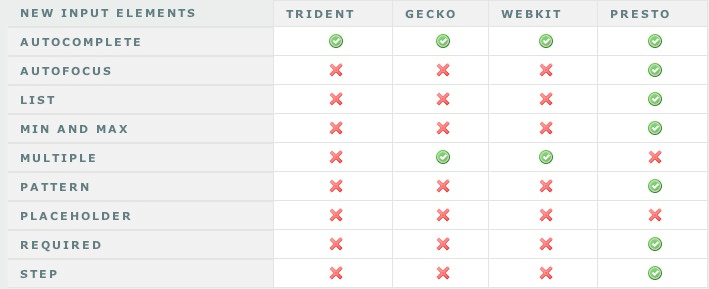
The new attributes include “autofocus”, “autocomplete”, “list”, “required”, “multiple”, “pattern”, “min and max”, “step” and “placeholder”. I think of these as two different flavors of elements. The first flavor enhances the experience for the user, while the second enhances the development experience. What I mean by this, is “autofocus”, “autocomplete”, “list”, “multiple”, and “placeholder” helps the user experience in selecting items, or perhaps by giving a description of what the form input is looking for, or by aiding in completing the form. “required”, “min and max”, “pattern” and “step” add to the development experience by saying what should be in the form itself.
Autofocus
What each of these new attributes do is relatively easy to understand. For instance:
<input name="form_text" id="form_text" type="text" value="foo" autofocus>
Above, the autofocus element focuses the text input on page load. This means that as soon as the page loads, this text input is ready to take an entry. You can start typing right away, as this element has the focus of the document. Something that we used to do in JavaScript in a line or so, can now be done with a single word.
Autocomplete
<input name="form_text" id="form_text" type="text" value="foo" autocomplete="off">
In the above example, by turning off “autocomplete”, you keep the browser from filling in the form field from a previous value. Nothing bugs me more than seeing my credit card number come up in a form as soon as I type a digit. The default for autocomplete is to be on, so the only time you need to use this element is when you want to prevent the form field from completing from previous entries. It adds to the user experience by keeping sensitive information from just “popping up”.
List
    <input name="form_url" id="form_url" type="url" list="url_list">
    <datalist id="url_list">
        <option value="http://www.google.com" label="Google">
        <option value="http://www.nettuts.com" label="NetTuts">
    </datalist>
The list attribute is very cool. Essentially, you provide a datalist, and it will create a drop down from your text input. Think of it as a natural auto complete. Take it a bit further, and instead of having to add a JavaScript library for a quick look up, based on key entries, you could easily just add an “onchange” event handler, with an AJAX post, and you end up with a drop down that gets more specific as the user types into the box. With HTML 5, this functionality an be created with just a few lines.
Multiple
    <input name="form_url" id="form_url" type="url" list="url_list">
    <datalist id="url_list">
        <option value="http://www.google.com" label="Google">
        <option value="http://net.tutsplus.com" label="NetTuts+">
    </datalist>
The multiple attribute allows you to select multiple items from your datalist. For instance, you might have a form which sends messages from your website. By using the multiple element, you can allow the user to select multiple recipients to send that message. Again, this is something we can accomplish with a bit of JavaScript now, but with HTML 5, we only have to add a single command to the form.
Placeholder
<input name="form_text" id="form_text" type="text" placeholder="Type Here">
The placeholder attribute is something we have been doing for years with a touch of JavaScript. What this does is, as soon as the input is focused, “Type Here” will vanish. If there was no change to the text on blur, then “Type Here” will reappear. Once again, we are taking some JavaScript out of the picture to enhance the user experience.
These next new attributes all enhance our development. With the exception of “step,” each aid in the validation of user inputs.
Required
<input name="form_text" id="form_text" type="text" value="foo" required>
The “required” attribute is exactly as it sounds. I, the developer of this webpage, require you to fill out this form prior to hitting submit. This is the basic form validation that we use today with JavaScript. What took a library before to add a required entry, now takes a single word in the form.
RegEx
<input name="form_text" id="form_text" type="text" value="foo" pattern="[0-9][A-Z]{3}">
Of all the new form attributes, this is the one that I am most excited about. “Mr. Form, let me introduce you to my good friend, Regex.” That’s right, we can validate form entries based on regular expressions. While this one is going to be mystifying at first, as you learn regular expression, the possibilities of validation now become limitless.
Validation
<input name="form_range" id="form_range" type="range" min="1" max="10" step=".5" value="5" >
I have lumped the final three into one example, as they all deal with number validation – or the range of numbers that we can include.
- Min is the minimal value that an input will take.
- max is the maximum input value the input will take.
Each of these are dealing with numerical values. Don’t confuse them with “maxlength,” which deals with the number of characters an input will take. The “step” element is just as it sounds. As you select a numerical value, step it up by .5 or down by .5 — meaning this input type will have the possible values of 1, 1.5, 2, 2.5, and so on.
As of right now, to the best of my knowledge, browser support is somewhat spotty on these attributes. Here’s a quick chart showing what I was able to find on the implementations.
Changes to Input Types: A Whole Lot of Love.
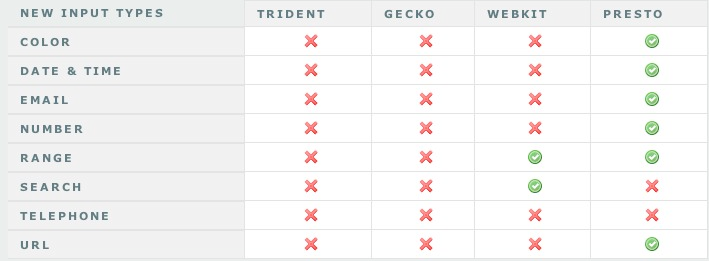
There are eight new input types, not counting all the new date and time types, which for our purposes, I am lumping into one. It’s important to note that the browsers which have not implemented the new input types will degrade to a type of text on each that I have tested. What the new input types bring is an ability to validate user input based upon the type that you are using. There is also more validation to come which I will be discussing in the next two sections. Each of the new input types allows us to separate from a text field to something more specific. For instance, to take integer or float values prior to HTML 5, we mostly used an input type of text. Just from the annotation, it is counter intuitive for beginners. By being more specific, we then have better visual control over our interface, as the more specific the element in HTML, the greater control you have from within the CSS, and the easier it is to define those visual elements. In addition, with the new specific input types, browsers are now able to fine tune what the input range should be. Finally, with the advent of mobile computing, we are able to make web application form elements which can be styled to look like natural applications, or can shape the “keyboard” that we are using.
Let’s look at number handling first:
Numbers, Integers and Floats
    <input name="form_range" id="form_range" type="range" min="1" max="10" step=".5" value="5" >

    <input name="form_number" id="form_number" type="number" min="1" max="10" >
Each of these input types allows us to play with numbers, and when we post the forms, we should be sure that we have those float values for our server side processing without the added JavaScript validation. Simply put, for each of these types, we are expecting to get numbers back within the range that we define and with the step that we want. The difference between the two types is how they are displayed. While I am waiting to see implementation on the number type, I would expect either a roll, or a text box, or possibly a type of a select with numbers. The range type is a bit different, in that it looks like a sliding value, similar to what you would expect to see for a volume control.
Dates and Times
    <input name="form_date" id="form_date" type="date">

    <input name="form_month" id="form_month" type="month">

    <input name="form_week" id="form_week" type="week">

    <input name="form_time" id="form_time" type="time">

    <input name="form_datetime_local" id="form_datetime_local" type="datetime-local">
Another big relief to standardize your backend development is the new date and time input types. From the Opera implementation that I have seen, each shows a calendar drop down, which allows your user to select a date. Again, we can validate on our webpage that the input is in the format that we are expecting. Each does exactly what you would think; you are selecting a month, week, day, or time. The one that is a little different is the datetime-local, which is showing the date and time without your timezone offset. For instance, if you are selecting a flight, the datetime-local would show the time and date in the city that you are going, which is not necessarily the timezone that you are currently in.
Urls, Emails, Telephone, and Color
    <input name="form_url" id="form_url" type="url" list="url_list">
    <datalist id="url_list">
        <option value="http://www.google.com" label="Google">
        <option value="http://net.tutsplus.com" label="NetTuts+">
    </datalist>

    <input name="form_email" id="form_email" type="email" list="email_list" multiple>
    <datalist id="url_list">
        <option value="[email protected]" label="Jane Doe">
        <option value="[email protected]" label="John Doe">
    </datalist>

    <input name="form_telephone" id="form_telephone" type="telephone">

    <input name="form_color" id="form_color" type="color">
Each of these input types are descriptive. The URL and Email types both have the validations of valid url patterns and valid email patterns. The telephone does not, however, conform to any specific pattern. It just strips line breaks. If you want to enforce a validation pattern on the telephone field, you can always use the pattern element. Each of these elements minus color will also take the list atttribute, minus color. Color is the oddball of the bunch; I can see it’s practical use, where you can select a color from a fancy pull down that shows colors, and enforce the text entry of something like #000000, but it doesn’t really fit the rest of the changes, in my opinion. It’s like playing “which one is not like the others.”
Like the attributes, the input type browser implementation is quite spotty. My iPhone seems to support more of these than Safari, which is a bit funny to me. This is the best that I could find, as to support.
Changes to Form Elements: Not Quite as Drastic
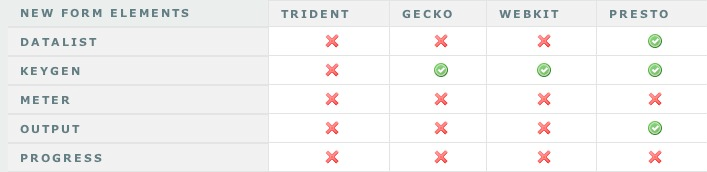
The number of changes to the form elements is not as drastic as input attributes and types. That said, there are a few new elements to be aware of. We have already covered “datalist” – it is how we define what will be selected from a list element call – but we haven’t seen “keygen”, “output”, “progress”, or “meter”. Outside of “keygen”. these aren’t quite as self explanatory as the new attributes. Let’s dig into these just a bit.
Keygen
<keygen name="key">
This one is a bit confusing. It does not generate a public key for you. Instead, it is a key pair generator control. Once the form is submitted, it packages the key pair to store the private key in the local key store, and sends the public key back to the server. It will generate the client certificate and offer it back to the user to download. Once downloaded and stored with the private key, you can then authenticate services, such as SSL or certificate authentication
Output
    <input name="number_1" type="number"> + <input name="number_2" type="number"> =
    <output onforminput="value = number_1.valueAsNumber + number_2.valueAsNumber"></output>
Think of the output element as a text area on steroids. What you can do is calculate from two number type text inputs and output that calculation without ever submitting the form back to the server. If you just return false onsubmit, in the above example, it will calculate number_1 plus number_2, and provide you the answer. Like many things discussed in this tutorial, this is something that we can accomplish today with JavaScript, but this really lessens the amount of code that we need to write in the future.
Progress and Meter
    <progress id="p" max=100>0% </progress>

    <meter min=0 max=20 value=12 optimum=10>12cm </meter>
The final two new elements are progress and meter. They are similar, but with one difference. Progress is meant to be used to measure the progress of a specific task. For instance, if you might have five more pages to complete before a survey is done, you would show the progress element in that area. The meter, on the other hand, is a measurement of something. You might want to show the remaining disk space a user has left. You would use the meter to display that measurement. There are new boundary elements, such as low, high and optimum. These supersede the min or max elements; so if they exceed them, they become the new lower and upper limits of the form.
Like the rest of the HTML 5 form changes, browser implementation is poor at the moment. Here’s what seems to work, and what doesn’t (at the time of this writing).
Conclusion
From what I can see, there is no reason to not start using HTML 5 forms. The input elements and types all degrade nicely, even in IE6, where they are either ignored as elements, or degraded to text inputs. We are going to have to wait a while for the validation attributes to become a reality, but with that said, there are still some uses today without those advantages. For instance, the iPhone modifies the keyboard if you are using the url, email, or number types. The range input type is already supported in WebKit browsers, so you could be the first kid on the block with a number slider that works without JavaScript. The spec is rapidly finalizing, and browsers are catching up rather quickly to the paradigm shifts. There is no time like the present to at least begin playing with these new toys! What do you think?
Setup Email Campaign Today
We need slight change to HTML email template(Design PSD will be provided) and the campaign set up in campaigner.com.
This job needs to be completed today.
Drupal Social Website
Description:CSS, Drupal social website
Looking for a creation of a Social Website exclusively for our members – GUI based concept utilizing Drupalto include installation and configuration. Utilizing – blog, chat, calendar/event and video plug ins. We hope to be a Christian based news and social platform. We have an idea as to the look we want but we need to take it farther.
To be awarded this project the following are must haves for the Design Team:
We need designer with CSS skills to customize an existing theme
An experienced Drupal developer.
An experienced PHP developer who can learn and code to a well defined set of APIs.
Project manager who participates in the Drupal community and has experience with social websites.
Example of a great Drupal Community site – http://couleeregiononline.com
WEBSITE related desires:
e-mail form (database driven contact form with e-mail function)
Drupal based dynamic generated menu structure
News aggragate page
Google Analytics – web statistics
Google Sitemap
Edit-preview, this means during the edit-process it is possible to see the created site (incl. background picture, text layer, etc.)
Website will be disclosed upon selected bid.
Whats needed as we proceed in this project to insure mutual satisafction:
1. a) Discussion of workflow.
b) Written concept of website and Drupal extensions including function as well as timelines.
c) Prototype with BETA testing
– We Deliver 50% of agreed fee –
2. a) All fixes related to BETA test complete.
b) Finished version tested for load and browser compliance.
c) Transfer and install on our host server with server compliance testing complete.
d) Written agreement(to include non-disclosure)ie.The Independent Contractor transfers to the Client the copyright of the work described in this Agreement for the life of the copyright as defined by law.
– We Deliver the final 50% of agreed fee –
NOTE: All disputes will be managed by the Freelancer-Portal and/or by Escrow-Service.
Penny Website
I need some to set up an penny auction for me and Mantain it for me keeping ads posted so site gets plenty visibilty as to drive traffic to site. It should be set up to ressemble the website www.bigdeal.com if you can set up and market me to drive business please summit you bid for the job looking to start within the next 30 days or less. Not sure of all the perticulars but that’s why I’m hiring you. Help me get this set up done right, please have some prior experience.
Thank You!
Php Search Engine
Looking for a very good php programmer to edit a php search engine for a dating website which already exists.
Need new scripts to optimize database and fast queries for the engine and make the website going faster and fluent.
So it’s :
– new search engine with more criterias
– Autorizing the user to register two different requests in his profil
– Create a new db for the engine and a new index
make proposal please
see attached files
website : www.maghreb-in.com
Customize WordPress Plugin
Hi,
It’s for a business directory on a wordpress blog.
I would like to customize the wordpress plugin:
http://wordpress.org/extend/plugins/connections/
I need the plugin to display 7-8 additional fields and have the ability to send people listed on the site e-mail enquiries.
Many thanks,
Dan
Magento E-commerce Site
All the deign is already done and is available on http://dl.dropbox.com/u/249791/magento_site.pdf (66 Mo)
The application must be done using Magento, with all the included
classic e-commerce facilities.
Payment will be done using Paypal API.
Description page per page
Page 1 : 2 languages, French and english.
Page 4 : This is the home page. When I mouse-over A category, the image
change with a slightly darker one.
The themes of products are fixed “Jump Line”, “Sportswear line” and
“Divine line”.
Under jumps line, you will see the categories of the products. They are
fixed and you will see the same under “devine line”.
under “sportswear line”, you will see the brands
The bottom left block “Collection 2010” will be a link to general
catalog page. POromotion will be a filter on all items with “Promotions”
tags
Bottom right block is a link on events page.
All 3 bottom blocks are editable in admin (name, image and link)
Page 20 : Account login page (after basket validation or when i click on
“My Account”)
Page 23 : Account creation page, the top block disappear, page will
start with “JE CREE MON COMPTE”
Page 25 : Account creation confirmation. User gets an email. if user
came from basket page, we go to payment page, else if user did not come
from baslet page, we go to homepage.
Page 27 : Catalog Page.
On the left, you see 9 categories. They are fixed.
Under the 9 categories, you have the themes. If user click on homepage a
theme, then we will filter all products for that theme. (see page 37 for
themes)
Under themes (thematiques in French), you have brands (CREATEURS in FR).
Same as themes, you filter product by francs (see page 43 for brands)
Under Brands (CREATEURS), you have promotion, just filter products that
has promotions
Page 51 : Product detailed page
User can sleect a size and color. These options can be activated. If
color is activated, the image change when the user change color. There
will be a color by default.
Page 52 : User can browse articles by clicking on next / prev arrows.
Page 58/59, user can zoom on the image.
Page 60 : Basket page
Page 64 : Payment page (user has to be logged for this).
3 payments : Check, Wire transfer or Paypal
Page 68/79 : My account page (see magento), they are dfault pages
Page 80 : Image gallery
There are 3 themex, fixed. Admin can add / remove pics and change text.
Page 85 : Zoom on one image
Page 86 : Agenda and events
Same as photo galery, 3 themes fixed.
Allow admin to add / remove events
Page 91 : Details of an event (allow admin to edit)
Page 92 : Links page (3 themes, fixed)
Allow admin to change links and order them
Page 95 : Contact page
Form2mail
Page 99 : Error 404
Add Icons To WordPress
Hi,
We have an existing wordpress install, and need 2 things added to the template:
1. Facebook icon and link to footer
2. HTML to join Constant Contact mailing list. We have the HTML code ready to go.
Need ASAP, should be quick and easy. Thanks.
Five Articles Needed 2
Writer required to produce articles.
Articles must be seo friendly and would target a specific keyword.
Each article must be well researched, have attention grabbing titles, be completely original, free from spelling errors. Articles must be grammatically correct, and pass Copyscape. No sentence stuffing at all
Must have PERFECT English and be able to respond to tight deadlines.
Must be flexible and able to follow instructions.
I have plenty of writing work for the right programmer.
I would be happy to pay $2.5/500 words.
Need 5 articles for now.
Please don’t apply if you are unable to reach deadlines.
Payment only through pay pal and after completing the task.
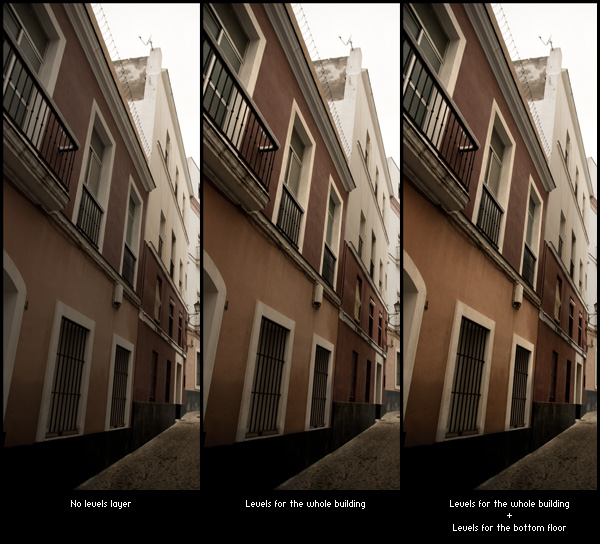
Bring a Photograph to Life Using Levels With Zones
In this tutorial you’ll learn how to use levels in Photoshop to add a spark of life to an otherwise dull photograph. We’ll divide the image into different zones in order to process them independently, achieving an interesting look. Let’s get to work!
Watch the Video
Step 1
The first step is to open the image to pre-process it with Camera Raw. If you have a raw file (like .CR2 files on Canon cameras) just open it in Photoshop. If you are using a JPEG image to start, go to File > Open As, choose “Camera Raw” as the file type and open your file. Then the Camera Raw dialog will appear.
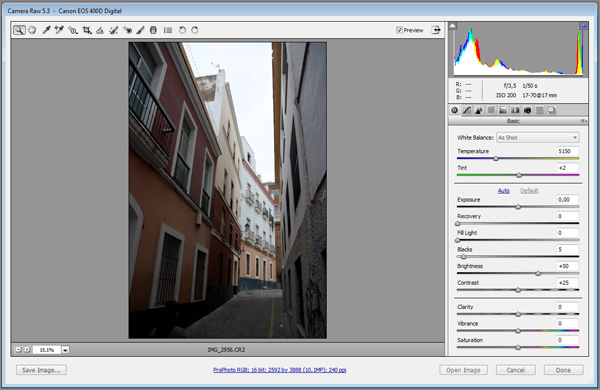
This is the original image:

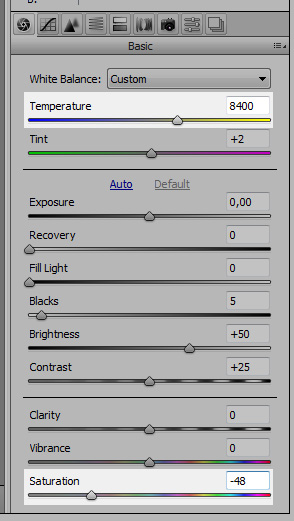
Step 2
Increase the temperature using the first slider. We’re looking for a warm look, so choose a value close to 8000k. Also, decrease the saturation to give it an older look. Do not change Contrast or Blacks as we will be changing them later using levels and curves.
Step 3
Go to Lens Correction and add some Lens Vignetting by moving the Amount slider down to -21. Then hold Shift and the “Open Image” button will change to “Open Object”. Click it.

Step 4
Before starting to tweak levels and curves, remove anything you don’t want in your final image. In the example image there was a girl in the bottom left corner that I had to remove using the Clone Stamp Tool (S). Right-Click the layer and select Duplicate Layer, click OK and then Right-Click the new layer and select Rasterize Layer.
This way you will keep a copy of the original raw file that you can edit in Camera Raw just Double-Clicking on the layer’s thumbnail. Do your cloning and healing process in the new layer.

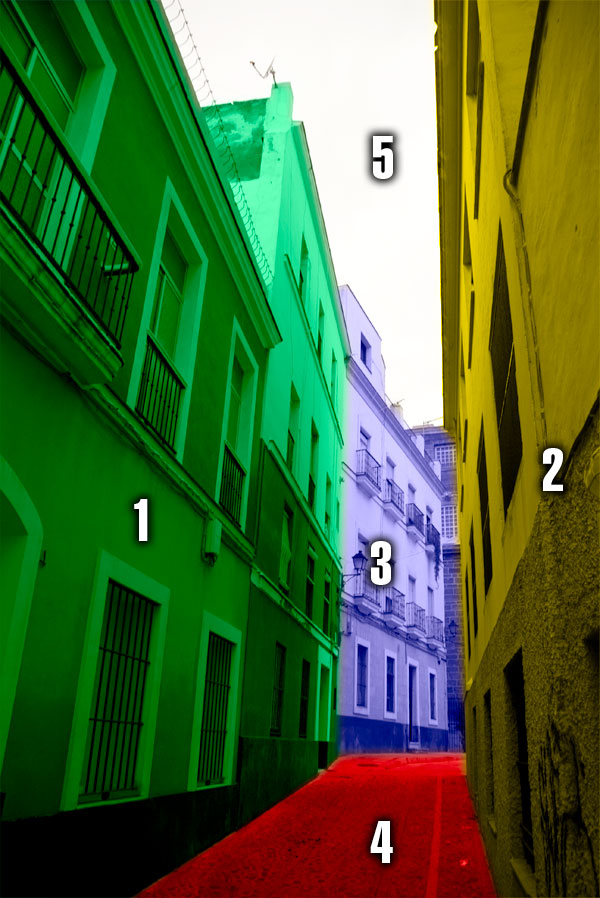
Step 5
Now we will start working with the different zones of the image. We can divide our image in 5 sections:
- The left walls in the foreground.
- The right walls in the foreground.
- The white building in the background.
- The road.
- The sky.
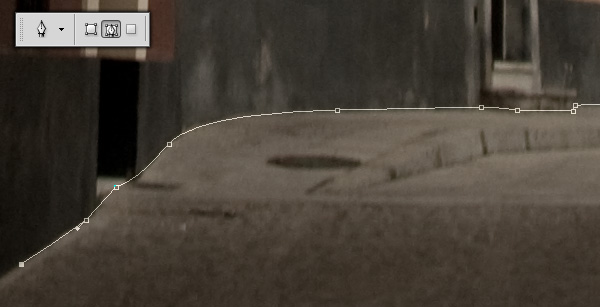
Step 6
We will start with the 4th zone: the road. Choose the Pen Tool (P) and select the Paths option (second button) in the upper toolbar. Now draw the shape of the road.
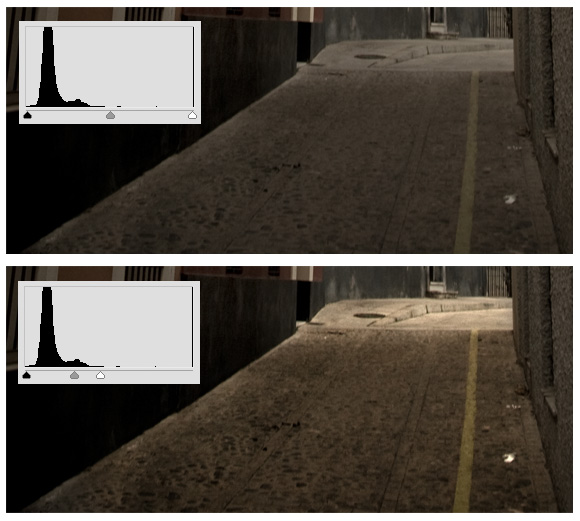
Step 7
Once you finish with the Pen Tool, Right-Click the newly created shape and select Make Selection. Make sure Anti-Aliased is ticked and Feather Radius is set to 0px, then click OK. Now go to Layers > New Adjustment Layer > Levels and create a new levels layer called “Road”.

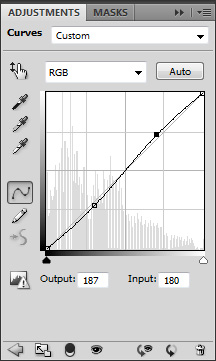
Now let’s adjust the levels. Double-Click on the Road Levels layer and the Levels Adjustment window will appear. Now move the black handle to the beginning of the histogram, and the white handle to the end of the histogram.
This increases the contrast of the area, as the white point of the histogram matches the white point of the area, and the same with the black point. However, you have to be careful because the smaller the area between the black and white handles, the less information you leave on that area. Move the middle handle to the right until it looks good.
Step 8
Now repeat the process with the first, second and third sections (refer to Step 5). Use the Pen Tool (P) (or any other selection tool you prefer) to select the area, make a new Levels Adjustment Layer and move the handles to match the histogram.
Sometimes, like with the left wall, it’s good to make more than one adjustment layer: one for the whole area, and another one for a smaller area within. For instance, for the left wall I used a layer for the whole building, and then another layer for bottom floor of the first building.
Step 9
Once the road and all the buildings have their own Levels Adjustment Layer, let’s work with the sky. Right-Click on the first layer (the original image, not the rasterized one) and select New Smart Object via Copy. Rename the layer to “Sky Layer” and move it to the foreground. Double-Click it to edit it in Camera Raw and use the following settings:
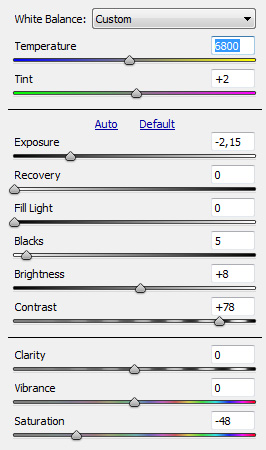
Notice that we have decreased the temperature, in order to cool the sky a little bit. Also we have decreased the exposure and increased the contrast in order to get some details in the clouds. Now use the Pen Tool (P) to select the sky, bordered by the buildings’ roofs.
Right click the new path and choose Make Selection, and use the selection as a mask for the Sky layer. It’s good to feather after having set the mask rather than before, as you can see how the different values for the feather work in real time, using the Masks panel.

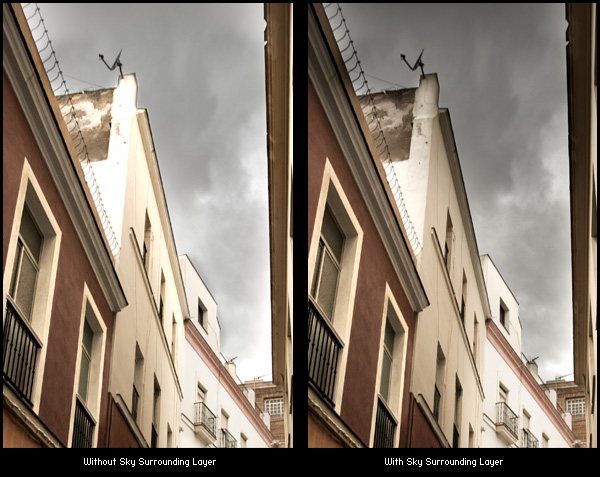
Step 10
The buildings are very bright, and the sky is quite dark, so let’s ease that difference a bit. Create a New Smart Object via copy from the original one and use these adjustments in Camera Raw:
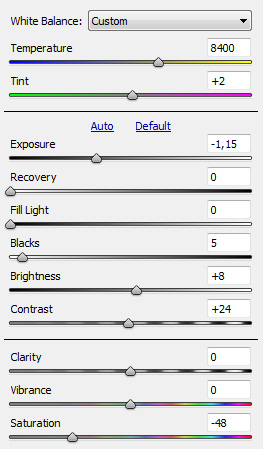
Rename the layer to “Sky surroundings” and Ctrl-Click on the mask of the Sky layer. Go to Select > Modify > Expand and use a value of 100px. Choose the Sky Surroundings layer and then click on Layer > Layer Mask > Reveal Selection. Now it’s time to feather the mask a little bit using Select > Refine Edge. A Feather value about 70px is OK, but experimenting is key.
Step 11
To end up, make a loose selection of the sky and make a new Levels Adjustment Layer to tweak it a bit. Optionally you can add a global levels layer. Now go to Layer > New Adjustment Layer > Curves, name it “General Curves”, and choose Linear Contrast from the dropdown menu on the Adjustments Panel. It will increase the general contrast a little.
Finally, let’s add a black border: Go to Image > Canvas Size, disable Relative, and use 50px as width and height. Click OK, create a new background layer and fill it with black. We’re done!
Conclusion
Although the process is pretty simple, the results are quite impressive. Here you can compare the original image and the final one.
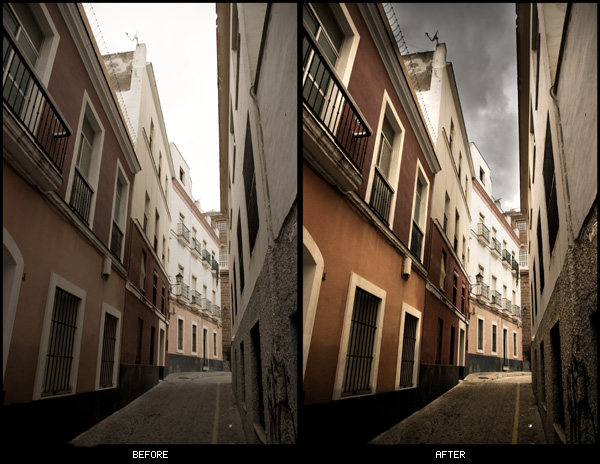
And the final result:
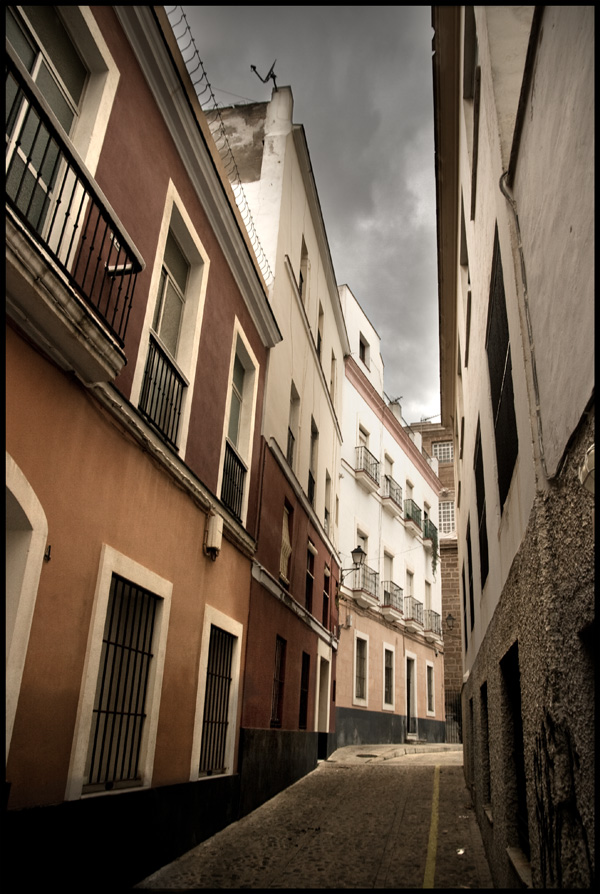
Thanks for reading, and let us know whether you feel this effect is useful for any of your own images!
A Simple Website Needed For Me
Hello Freelancers,
This is santa again with another job.
This time i am in need of a simple site for showcasing makeup products.
i like the style, colours and layout of http://www.toofaced.com/palette.asp
website deals with makeup products of around 20 to 30.
Colour theme would be bright pink, black, pale pink, to match my business cards
This is a low budget project.
So expecting realistic bids.
Thanks and regards
Santa