How to Create a 303 Synth Sound in FL Studio

In this tutorial we are going to create our very own 303 synthesizer sound using the TS404 Bassline Synthesizer plugin in FL Studio. As you might know, there are already five 303 presets that come with Sytrus and a whole lot more with the TS404, so why would I want to make my own sound? Well, I’ve never been a big fan of presets and as Image-Line put it themselves, the 303 presets are “303ish”.


Step 1: Setting up our Project

Start of by opening up a new project, right click on kick and replace it with a TS404 bassline synthesizer. As we won’t need the Clap, Hat and Snare it’s probably best if we delete these from the step sequencer to avoid any kind of confusion. I’ve also set the tempo of this project to 130 bpm.


Step 2: Piano Roll Sequence

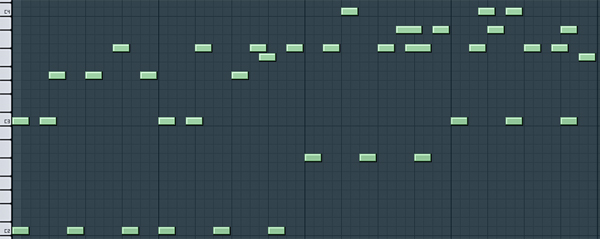
Now we’re set up we need to create a melody in the piano roll to give us something to work with. To do this, right click on TS404 in the step sequencer and select piano roll. OK, it’s now time to create our bassline. You can use the image below to copy my pattern, download the score file from below or you can create your own. If you’re creating your own pattern try to use a variety of notes, it’s good to see how our 303 will sound if we change from C4 to D#4 in the piano roll.

Score File

If you’ve used my pattern you should have something that sounds like this.

Download audio file (audioclip1.mp3)


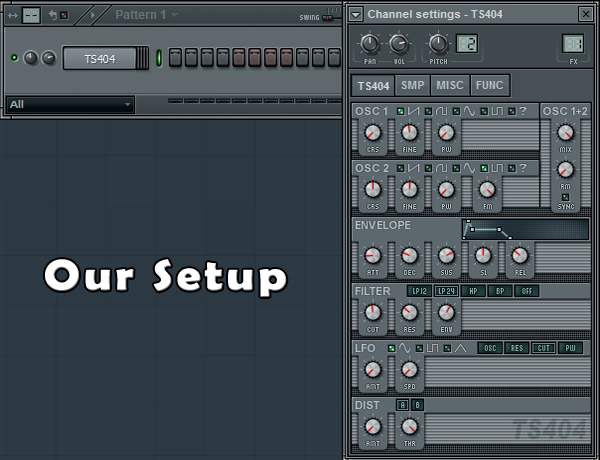
Step 3: TS404 Channel Settings

Now we are ready to start tweaking our TS404. So, let’s bring the Step Sequencer back up, click on TS404 and we’ll start. The first thing we need to do is to turn the Mix Dial all the way down. By doing this we’re now only using 1 Oscillator. Our Oscillator uses a Sawtooth shape. (The Mix Dial is the top right dial underneath OSC 1+2.)


Step 4: TS404 Envelope and Filter Setting

Under the Envelope settings we need to turn our Attack completely off. To do this, turn the ATT dial all the way down. If we had Attack on, it would take our note longer to reach its peak. If you turn the ATT dial up about half way you’ll see what I mean. Next we need to do the same for the release, turn it off by turning the REL dial all the way down. The amount of release we have on determines how long it takes our note to reach nil or finish. Once again experiment by turning the dial up and down.

For our filter settings we need to move our CUT dial to left middle and we also need to make sure we have LP24 selected.

LP12 short for Low Pass 12, LP24 short for Low Pass 24, HP short for High Pass and BP short for Band Pass are different types of filters. Once we’ve finished this tutorial, have a play around with each filter remembering to play around with the CUT dial too. It’s all about experimenting


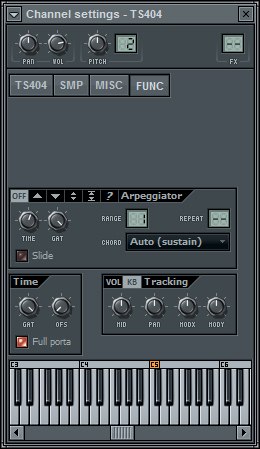
Step 5: TS404 Function Setting

We now need to click the FUNC tab inside our TS404 Channel Settings. All we need to do inside this section is adjust the Gate. So, if we look towards the bottom of the FUNC area we will see the Time section. We will now turn the GAT Dial all the way up.

Download audio file (audioclip2.mp3)


Step 6: Saving Our Progress

Now we’ve finished configuring our TS404 synthesizer settings we are going to add some effects to really get things going. But, before we do this, it might be a good idea for us to now save our TS404 settings as a new preset. To do this we click the little arrow in the top left hand corner, select save channel state as, type our desired name and then click save.


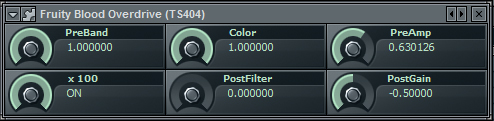
Step 7: Fruity Blood Overdrive

We will now send our TS404 to a free mixer track. To do this we click the arrow in the top left hand corner of our TS404 settings panel and then select assign free mixer track. Next we click the arrow on slot 1 and add Fruity Blood Overdrive which is used as a distortion effect. Now to configure our Overdrive, use the settings from the image below.


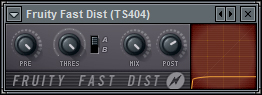
Step 8: Fruity Fast Dist

On our next effects slot we will add Fruity Fast Dist. Like Overdrive, Fast Dist is a distortion effect which I’m using to give our 303 a nice gritty feel. Again, use the following settings from the image below.

Download audio file (audioclip3.mp3)


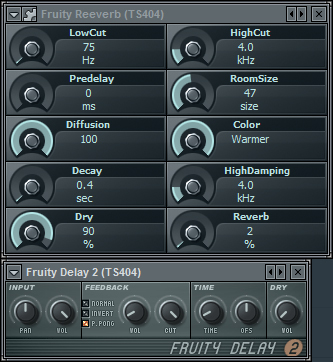
Step 9: Reverb and Delay

In my opinion, the sound is a little too dry. To get around this we can add some Reverb and Delay to effects slots 3 and 4. These will give our sound more character. The image below shows us the settings I decided on using but I’d recommend you having a little play too. I find these types of effects are best left to personal preference. Some people like dry sounds, others like echoed, ping pong delay effects. So, see if you can create your own settings. You can get some great results by messing around with these two effects.

Download audio file (audioclip4.mp3)


Step 10: Does It Work

Although the Roland TB-303 sound has been around for some some time now, it still sounds great, especially in harder types of dance music. Below I’ve created a small loop with a kick drum, snare, hats and a pad to show you how our 303 sounds within a track. There have been a few changes though. I’ve made our original melody less complicated, side-chained it to the kick drum and I’ve automated a fruity free filter to it so it slowly builds up.

I hope you enjoyed the tutorial.

Download audio file (audioclip5.mp3)


Quick Tip: Colouring Tracks – More Than Just Pretty

Colour-coding your tracks can be an extremely useful tool when it comes to mixing. It enables you to quickly acknowledge what you’re listening to and jump to it without hesitation.

This can be particularly helpful when you’re attempting to glue together 15 or more tracks. Now, you’re probably thinking that colouring tracks isn’t very ground-breaking when it comes to mixing techniques? Possibly. But Logic has deeper functionality that enables you to take track colouring further.


Step 1

Take three separate groups of tracks. For this example, I’m going to use Drums, Guitars and Vocals.


Step 2

Open up the Colour Palette <OPTION C>


Step 3

Colour the Drums BLUE
Colour the Vocals RED
Colour the Guitars GREEN


Step 4

It starts to get interesting now…

Select just ONE region of the Vocals.

The one that is selected is partially black.

Now hit <SHIFT C>

As you will notice, all of the Vocal tracks are selected in one go. You’ve just used the ‘Select Equal Colours’ command.


Step 5

This can be a very powerful tool. With groups of tracks selected at once, you can instantly take control over the arrange page and speed up your work flow.

Hit ‘S’ and everything in the group is soloed

Hit ‘M’ and (you guessed it) they’re all muted.

All of this came simply from selecting one region after colouring. It works in piano roll too.

So, as you can see, colouring tracks isn’t just to make your session look pretty – although it does that too – but it aids with your visual recognition of tracks and, more importantly, allows you to take more control.

Get colouring!


60 Spectacular Examples of Photoshop Design and Art


Today we’re launching a redesign and refresh of our popular Creattica gallery of inspirational work. The site features almost six thousand items, many of which are just mind-bogglingly amazing. Anyone can submit work for inclusion to the gallery, and we pick the best of the best for showcasing. Plus the latest work gets shown right here on the Psdtuts+ sidebar.

This post is a taste of some of the exceptional Photoshop work you can find in the Creattica Photoshop Gallery. Scroll down to check it out, and jump to the end of the article to learn about the redesign and some of the new features now available on Creattica.


Creattica Photoshop
Creattica Photoshop
Creattica Photoshop
Creattica Photoshop
Creattica Photoshop
Creattica Photoshop
Creattica Photoshop
Creattica Photoshop
Creattica Photoshop
Creattica Photoshop
Creattica Photoshop
Creattica Photoshop
Creattica Photoshop
Creattica Photoshop
Creattica Photoshop
Creattica Photoshop
Creattica Photoshop
Creattica Photoshop
Creattica Photoshop
Creattica Photoshop
Creattica Photoshop
Creattica Photoshop
Creattica Photoshop
Creattica Photoshop
Creattica Photoshop
Creattica Photoshop
Creattica Photoshop
Creattica Photoshop
Creattica Photoshop
Creattica Photoshop

Creattica Photoshop
Creattica Photoshop
Creattica Photoshop
Creattica Photoshop
Creattica Photoshop
Creattica Photoshop
Creattica Photoshop
Creattica Photoshop
Creattica Photoshop
Creattica Photoshop
Creattica Photoshop
Creattica Photoshop
Creattica Photoshop
Creattica Photoshop
Creattica Photoshop
Creattica Photoshop
Creattica Photoshop
Creattica Photoshop
Creattica Photoshop
Creattica Photoshop
Creattica Photoshop
Creattica Photoshop
Creattica Photoshop
Creattica Photoshop
Creattica Photoshop
Creattica Photoshop
Creattica Photoshop
Creattica Photoshop
Creattica Photoshop
Creattica Photoshop


Creattica Design Refresh

A year ago we migrated our small Faveup gallery to its new home at Creattica and the site has been growing quickly ever since. The new design was an improvement, but it’s been showing its age recently, and it had an awful lot of bright red for a site supposed to be aimed at showcasing work. So we’ve given the logo a refresh, toned back the design so it’s more about the work and generally cleaned up the site.

Old Creattica Design
The Old
New Creattica Design
The New!

Showcasing … Everything!

Today we showcase 3D, Advertising, Posters, as well as our old favourites: Business Cards, Logos and Websites. And with our redesign we’re adding a whole lot of new categories for Email Design, Mobile Design, Vector Graphics, Photo Retouching, Icon Design, Brochures, Book Covers, Tshirt Designs, Skate & Snowboard Art, and Desktop, iPad and iPhone Wallpapers.

If you’re interested in submitting to the new categories, be sure to check out our competition where you’ll be in the running to win $1000 in cash!

New Features

Of course a new design is not complete without lots of new features! So we’ve built in a lot of great new functionality, particularly focused around finding great creatives to work with:

  1. Search, Follow and Contact Creatives
    The biggest update to the new site is the ability to search creatives who have been featured in the gallery. Creatives can specify their country, budget and profession as well as provide a website and contact details. We hope this will give designers and artists one more avenue to get freelance work!

  2. Tagging and Colour Tagging
    The new site now provides the ability to tag items with a set of preset keywords and colours. This will mean more ways to browse the gallery – once we’ve got some stuff tagged that is!

  3. Extras – Badges + WordPress Plugin + Random Browse
    And there are lots of little extras we’ve added including badges to show that you’ve been featured, a WordPress plugin to add creative inspiration to your blog’s sidebar and a feature to browse the gallery a little more randomly!


We hope you enjoy the new Creattica and get a wealth of inspiration from the amazing work of talented creatives around the world. If you have any feedback about the new site, the new design, the new categories, or pretty much anything else then Fill in the Feedback Form or leave a comment!

Win $1000 by submitting work to Creattica!


Today we’ve launched our refreshed inspiration gallery Creattica and, along with the updated design and new features for finding and contacting creatives for hire, we’ve also added some new categories! To help get the new sections off the ground, we’re giving away $1000 in cold, hard cash to one Creattica user. Read on to learn how you can win all those moneys!

Win $1000

So we’ve got ten new categories of inspiration now up on Creattica: Email Design, Mobile Design, Vector Graphics, Photo Retouching, Icon Design, Brochures, Book Covers, Tshirt Designs, Skate & Snowboard Art, and Desktop, iPad and iPhone Wallpapers. All you have to do is submit your work to one of these twelve categories before June 1st. We’ll run our usual review process and any items showcased in the new categories will be an eligible entry! One approved item will be selected at random and the lucky winner will get US$1000 in cash, paid to a PayPal account.

How to Enter

Submitting your work is super easy:

  1. Create an account on Creattica or log in to your existing account
  2. Submit an item to one of the ten eligible categories (written above) before June 1st
  3. If your work gets approved for inclusion to Creattica, then check back on this post on July 1st when we’ll be announcing the winner! We’ll also contact the winner via the email on their Creattica account – so make sure your details are correct!

Terms & Conditions

  1. Whether an item is included in the Creattica gallery is entirely up to the discretion of the Creattica review staff. Their decision is final.
  2. You upload as many entries as you wish, and any that are approved will be counted as valid entries.
  3. Work you submit must be entirely your own work and you must be the copyright holder (don’t submit other people’s work!) If its discovered you’ve uploaded someone else’s work we’ll throw out all your entries.
  4. Your items must be submitted by June 1st 11:59pm Pacific Standard Time to be eligible, but approval into the gallery may happen after that date.
  5. There will only be one winner and they will be selected by means of a random selection algorithm between all items approved in the twelve eligible categories. Each item showcased in one of those categories will count as one entry.
  6. The selected item’s creator will be contacted via the email address given in their account to claim their prize. If the creator does not reply with their PayPal address within 14 days, a new winner will be selected randomly and contacted in the same way.

Good Luck!

Quick Tip: Create a Carbon Mesh Background in Photoshop


In this quick tip tutorial, we will demonstrate how to create a cool ‘carbon cut-out’ effect using mesh and carbon textures made from scratch. Let’s get started!


Step 1: Creating the Mesh Pattern

Create a new document, 50×50px and name it "Holes". Fill the background in with #FCFCFC.


Step 2: Alignment

Now we need to make a grid to help us layout the holes for the mesh pattern, so we need to create precise guides by going to: View > New Guide. And make the following separate guides:

  • Vertical: 12px, 25px and 38px
  • Horizontal: 9px, 17px, 25px, 33px and 41px

Step 3: Adding the Holes

Using the Elliptical Marquee tool (M), set the selection style to "Fixed Size" and enter 14px for width and height. Cmd + Click on the cross sections highlighted on the image below. This should create a perfectly centered eclipse around the cross in which we will fill in black (#000000). Repeat for the remaining points.

Should look something like this:


Step 4: Adding Detail

Add the following layer styles: (Inner Shadow: Black, with Distance set to 1 and Size set to 3.

Pattern Overlay: Pattern selected from Photoshop’s default ‘Artist Surface Pack’ called ‘Oil Pastel on Canvas’ , set opacity to 36%.


Step 5: Saving the Pattern

Using the Rectangle Marquee tool (M) select the inner rectangle (as seen in the image). With it selected go to: Edit > Define Pattern (You may need to expand the menu, by clicking on "Show All Menu Items"). Call it "Mesh" and press Ok.


Step 6: Creating the Carbon Pattern

Create a new document, 100×100px in size. Create a new layer (Cmd + Shift + N) and call it "Vertical Tile." Using the Rectangle Marquee tool (M) set the selection style to "Fixed Size" Using 25px for width and 50px for height. Make a selection in the very upper left hand corner and fill it in black (#000000) for the vertical tiles.

Add the following layer styles: Color Overlay: with the color set to: #252627.

Stroke: with the color set to: #121213, size on 1 and position set to: Center.


Step 7: Horizontal Tiles

We need to now create the template for the horizontal tiles, so create a new layer (Cmd + Shift + N) and call it "Horizontal Tile". Using the Rectangle Marquee tool (M) change the "Fixed Size" to 50px for width and 25px for height. Click right next to the vertical and make the selection flush in the upper right hand corner (as seen in the image below). Fill it in with black.

Add the following layer styles: Color Overlay: with the color set to: #1a1b1c.

Stroke: with the color set to: #121213, size on 1 and position set to: Center.


Step 8: Repeating the Pattern

We have the templates for both the horizontal and verticals tiles; by duplicating the layers (Select layer > Cmd + J to duplicate) we now have copies in which we can arrange in a pattern (Pattern template below) Making sure they are flush and not leave gaps (As this will affect the final outcome of the image). Repeat duplicating and ordering the layers to get the finish pattern (as seen below).


Step 9: Saving the Pattern

Again using the Rectangle Marquee tool (M) select the whole document (or Cmd + A). With it selected go to: Edit > Define Pattern (You may need to expand the menu, by clicking on "Show All Menu Items"). Call it "Carbon" and press Ok.


Step 10: Putting it All Together

Create a new document to what size suits you (I will use 1000×700px for demonstration purposes). Create a new layer (Cmd + Shift + N) and call it "Mesh", fill it in with black (#000000). Apply the Mesh pattern we made previously via layer styles (as seen below).

Pattern Overlay: The patterns we made are saved in the last pack you selected, so in our case the Artist Surface was our last. Select the Mesh pattern from the pack.

Create a new layer (Cmd + Shift + N) on top and call it "Carbon" and fill it in with black (#000000), apply the Carbon pattern we made previously via layer styles (as seen below).

Pattern Overlay: Select the carbon pattern in the same folder, and drop the scale down to 25%.

Gradient Overlay: Starting color #000000 to #2e3033, drop opacity down to 65%.


Step 11: “Cutting out” the carbon

Select the Carbon layer and again using the Elliptical Marquee tool (M); making sure the selection style is back to "Normal" make a rough oval selection from the middle most bottom of the document to the centre right portion. Press delete to remove that portion to reveal the mesh layer beneath, deselect the selection (Cmd + D).


Step 12: Adding Highlights and Shadows

Create a new layer (Cmd + Shift + N) between the Carbon and Mesh layer and call it "Carbon Shadow." Using a large soft brush (200-300px) with its hardness turned down to 0, opacity to 50% and color set to black (#000000), start to draw along the "cut-out". Use a technique of overlapping brush strokes to build up the shadow under the lip of the carbon, and to fade out towards the center of the uncovered mesh.

To add extra detail we can create a very slight highlight on top of the carbon to give it the effect of catching the light source. Create a new layer (Cmd + Shift + N) on top of the Carbon layer and call it "Carbon Highlight" Using the same brush but using white (#FFFFFF) instead of black, Cmd + Click the Carbon layer, to load the selection and keep our highlight in. Now start to paint across the lip very softly to create that soft highlight, turn down the opacity down to 25%.


Final Image

You’re Finished, I hope you enjoyed the tutorial!

The Benefits of Working from Home

Going to work in an office can be stressful and costly for both employee and employer.  Thanks to technology many people have the option of working from home (or off-site at that warm beach somewhere!).  For consultants and freelancers there are obvious reasons why you should work from home (you might not have another choice anyway!) but for full-time employees there are financial and personal advantages to working at least a couple days per week from home.  Not every profession allows for this flexibility but if yours is one of the many that do, here are some benefits to look into for both employer and employee.

Lower Costs for Employers

Reduced office costs
Fewer people in the office results in lower office bills: less coffee to provide, fewer paper clips to stock, fewer phone calls to pay for, less toilet paper to buy and so on.

Managers may plan to have a certain number of employees working from home at any given time and may even choose to have smaller offices where employees rotate among desks.  These days so much is done by email that an employee might not even need his or her own number at work but should he or she really need it, technology may permit call forwarding, calls over the internet and whatever else is possible.

(If you’re an employee and you’re terrified of not having your own desk with your own stacks of documents, check out this 14 minute video about Semco, a company in Brazil in which employees in fact are not allowed to use the same desk all the time.  But be warned: after learning about Semco you might never see work the same way again!)

Reduced health insurance costs
Employees who have more flexibility in their schedules tend to be happier people because they may arrange their schedule to include running errands, taking care of their children and getting enough rest and exercise.  Happier employees = healthier employees = lower health insurance costs.  You may read about the “link between psychological health and overall health” here. http://www.apa.org/monitor/dec03/awards.aspx).

Lower Costs for Workers

Less fuel and other car expenses
In 2009 Cisco released the results of their survey of nearly 2,000 of their telecommuter employees around the world.  On average each employee saved approximately US$5,000 in 2008 in fuel expenses alone by telecommuting (the total for all surveyed was US$10.3 million).  Working from home you’ll also be putting fewer miles on your car and reducing gas emissions.

Lower child care expenses
Although working from home you’ll still need to dedicate the same amount of time to work, you can still be the person who will drop off and pick up your children after school, take them to the doctor or even watch out after your toddler for half of the day.  But most importantly, the time you spend with your children is priceless, which brings us to the next section.

Personal Reasons To Work from Home

Spending time with your children
Thirty five hours per week at work (40+ for Americans) plus commuting time all adds up to time not spent with your children.  Both you and your children will be happier if you spend more time with them.  But you can always ask your children what they think.

In my own experience, I feel very lucky I had my dad around when I was a child.  Due to his working schedule, Dad spent half days at home and it was just awesome to see him around!  He could just be taking care of our dog or taking a nap before his next shift but there was a very warm feeling in knowing that Dad was around to take care of me if I needed him.

More time for oneself
You may put the time you spend commuting towards your hobby, favorite sport, studying or other experience more enriching than attacks of road rage and smelling the armpits of that guy in the metro who’s never heard of deodorant.

Increased productivity
When employees have more time to be with their families or to do things for themselves, they’re happier people.  Happier people are less stressed out and are less likely to make mistakes.  Happier people are more productive, which leads to more work done and more money saved.  This I learned from Dr. Foo, my neurologist in NYC (great guy, by the way!), but in reading an article at CNN some supervisors see the productivity value in flexibility as well.  One supervisor mentions that employees are more committed to a company that allows them to have flexible schedules.  Another manager explains that having employees with flexible schedules is an advantage to her because that way her company may expand its working hours to better cater to the 24/7 business cycle in which it works.

If you’ve never thought of working from home but your company offers this option, you might be interested in finding out how such arrangement works out for you.  If your company doesn’t have a work-from-home program, you may be in a position to ask your boss about this arrangement.

$1.50 – $2/500 GOOD English Writers Wanted by writecontent

Looking for GOOD & RELIABLE writers from Philippines/USA/Canada/Australia/UK. Must be able to write perfect English,high quality and plagiarism-free articles that are detailed with no fluff. Can write 5 or more articles per day… (Budget: $30-250, Jobs: Article Rewriting, Articles, Ghostwriting, Technical Writing)

Develop Vegas Video Plugin -Camera Shake by ConnorBerge

Hey guys! I don’t know what the budget will look like for this, so i’m leaving it open for estimates. I need a Sony Vegas Pro plugin that will mimic camera shake. It will be very similar to NewBlue’s Active Camera in their Motion Blends pack… (Budget: $250-750, Jobs: C# Programming, C++ Programming, Embedded Software, Software Testing, Visual Basic)