I need 100 short informational articles written about different US cities. For each article you need to come up with a minimum of 100 words of grammatically and idiomatically correct English on the subject matter… (Budget: $30-250, Jobs: Article Rewriting, Articles, Blog, Data Entry)
Facebook to reveal privacy plan
The social network confirms that it will roll out simpler privacy settings in response to complaints from users.
This article is from the BBC News website. © British Broadcasting Corporation, The BBC is not responsible for the content of external internet sites.
Births to older mothers ‘trebled’

The number of births to older mothers has almost trebled in 20 years and is continuing to rise, figures have shown.
Some 26,976 babies were born to women aged 40 and over in 2009, compared with 9,336 in 1989 and 14,252 in 1999, figures for England and Wales show.
Among those aged 35 to 39 there were 114,288 births in 2009, a rise of 41% on the 81,281 in 1999.
The data, published by the Office for National Statistics, showed a 0.3% drop in the overall number of births.
The data means the typical age for a first-time mother has risen to 29.4 in 2009, compared with 29.3 in 2008 and 28.4 in 1999.
Compared with 2008, the birth rate for women under 35 has fallen. There was a 2.3% drop among women under 20, from 26 births per 1,000 women in 2008 to 25.4 in 2009.
‘Good news’
Rates for women aged 20 to 24 and 25 to 29 fell by 1.6% and 1.4% respectively, while for women aged 30 to 34 there was a 0.4% decline.
But rates for women aged 35 to 39 and 40 to 44 continued to rise in 2009, by 1.2% and 2.4% respectively.
Women had an average of 1.95 children each in 2009, down from 1.97 children the previous year.
The figures also showed that the proportion of births to mothers born outside the UK continued to rise, from 24.1% in 2008 to 24.7% in 2009.
The proportion of births to overseas mothers has increased every year since 1990, when it was just under 12%. In 1999, the figure was 14.3%.
Louise Silverton, deputy general secretary of the Royal College of Midwives, said the small decline in the birth rate was "a tiny morsel of good news".
"The birth rate has gone up by 19% since 2001 yet the number of midwives has risen by only 11% over the same period.
"The figures also mask the fact that an increasing number of births are becoming more complicated, requiring more of midwives’ time.
"This very small decrease in the birth rate should not be used as an excuse to stop or reduce the promised rise in the number of midwives."
This article is from the BBC News website. © British Broadcasting Corporation, The BBC is not responsible for the content of external internet sites.
Man charged with courthouse bomb
A man appears in the same courthouse he is accused of bombing in a dissident republican attack in February.
This article is from the BBC News website. © British Broadcasting Corporation, The BBC is not responsible for the content of external internet sites.
PSD to WordPress Conversion by Agata1212
Professional web designer to code three PSD files to WordPress and integrate it on one page our WordPress website. This is our requirement for the coding: W3C Valid XHTML 1.0 Transitional Table-less CSS markup… (Budget: $30-250, Jobs: Website Design, WordPress)
Special project for Pinky by designpassionate
Hi Pinky, I need your services for a few things : 1/ A logo that I made already but needs some touchs that maybe you could help (illustrator file is done already) 2/ Another logo that is already… (Budget: $30-250, Jobs: Logo Design)
Create a Snappy Snapshot App with Flash Builder 4
There are many sites where you can choose your profile image by taking a picture with your webcam, instead of uploading one. This tutorial will teach you how to take a picture and do whatever you want with it, using Flash Builder 4 with Ruby on Rails or PHP.
Final Result Preview
Click on the demo link above, but bear in mind that you won’t be able to use the ‘Save’ function unless you run it yourself on a server which supports PHP. You can “Right click > View source” to see the application source.
Step 1: Flash Builder 4 Considerations
In order to take full advantage of this tutorial, it’s recommended that you already know some of the new features of Flash Builder 4, like the new namespaces and components. Also, you’ll need Flash Builder 4 to run the source code without having to change anything.
Flex 3 users: don’t worry, you can still follow this tutorial. You’ll need to change all the “fx” and “s” namespaces to “mx”, example: “<s:Button>” becomes “<mx:Button>”. The “Declaration” tag does not exist (write what’s inside it, outside). “Group” and “BorderContainer” will be “Canvas”. “VGroup” will be “VBox”. “HGroup” will be “HBox”. And there is no “chromeColor” (you will need to style the button differently).
Step 2: Create a New Flex Project
First of all, we need to create a new Flex Project. Open Flash Builder 4 and click “File > New > Flex Project”.
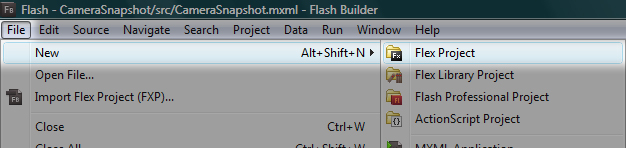
The following dialog will open:
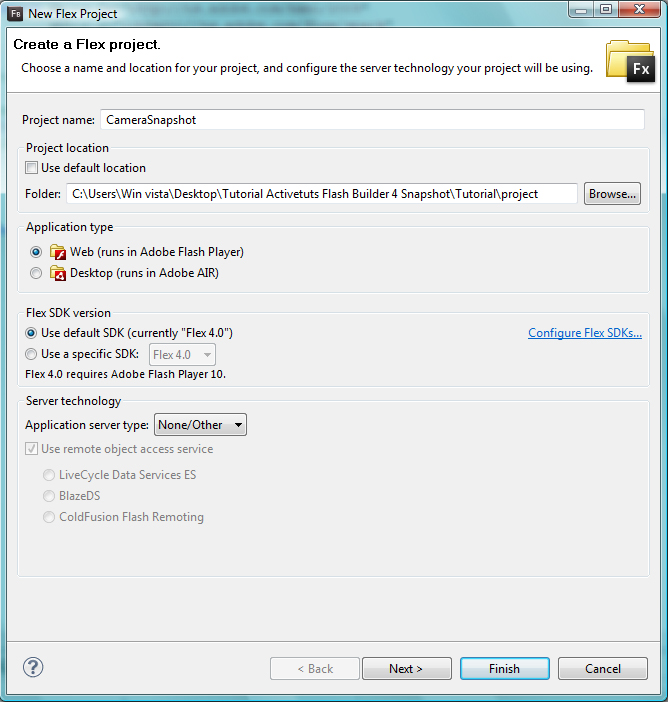
Choose a “Project Name”: in our case it will be “CameraSnapshot” but you can use whatever you want. You can also set the "Project location" to anywhere you want. As it will run in the browser, we will leave “Web” checked. We will use the default SDK version and we won’t choose any server technology.
Hit Next.

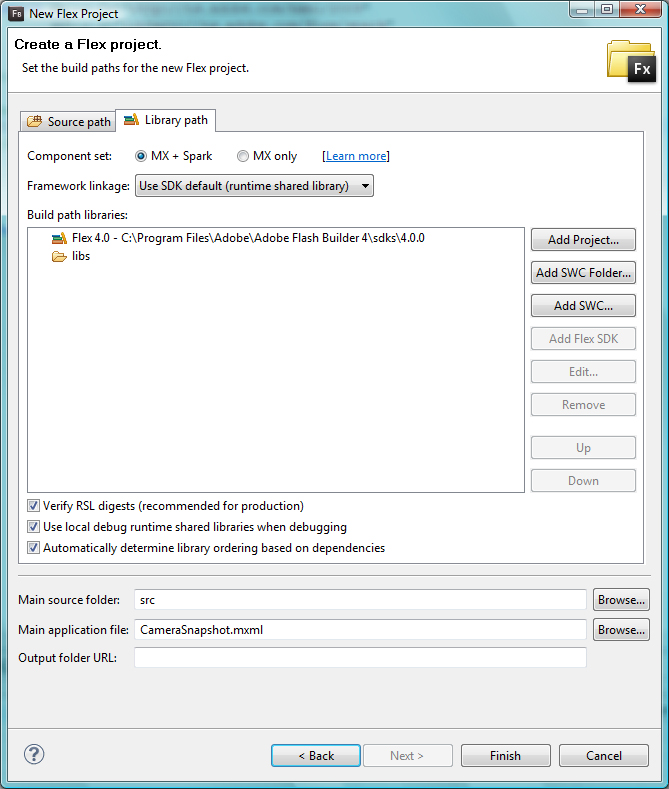
We won’t change anything here, hit Next.
In this following step we will also use the default settings, so click Finish:
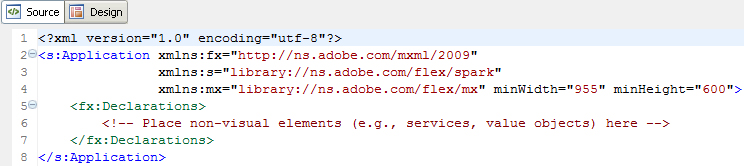
Our project has been created. This is a fresh new Flash Builder 4 app!
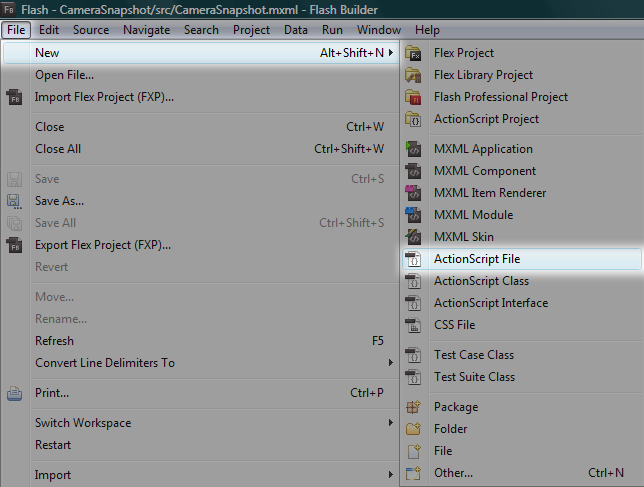
Step 3: Create an ActionScript File
We will have an external ActionScript file that will perform all the logic for us.
Create a new ActionScript file: File > New > ActionScript File
Give it a name, we’ll choose: "cam" but again, it can be whatever you want:
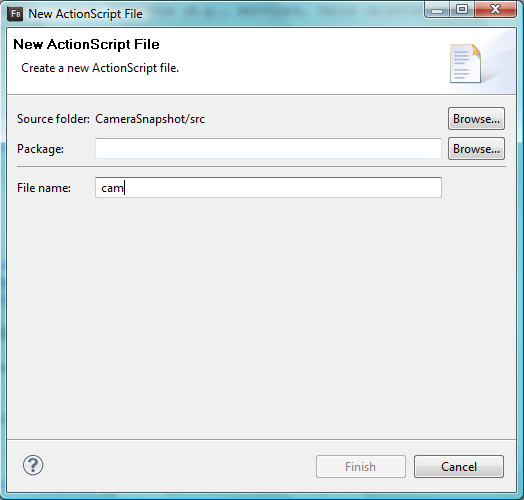
You can leave the “Package” blank. Hit Finish. Now let’s start coding!
Step 4: Camera Placeholder
Now that our project has been created, we’ll need a place to display our camera. Lets add a VideoDisplay to our CameraSnapshot.mxml file, after the "Declarations" tag:
<mx:VideoDisplay id="theCam" width="533" height="400"/>
The id is important because that’s how we refer to this specific VideoDisplay.
You may change the width and height of the VideoDisplay to anything you want, but remember to keep a 4:3 aspect ratio to avoid image distortion. Unless you are dealing with a specific case.
Also, notice that we’ve used the “mx” namespace prefix instead of “s”. If we use the “s” namespace prefix here, Flash Builder will throw an error when we try to use the method “attachCamera”. We will see this method in the next step.
Step 5: Getting the Camera
Now that we have place to display the user’s camera, let’s get it! Create a new function inside the file cam.as:
private function getCam():void
{
	if (Camera.getCamera())
	{
		// assign the user's default camera to a variable
		var camera:Camera = Camera.getCamera();

		// set the camera quality to be the highest as possible
		camera.setQuality(0, 100);

		// set the width, height, frames per second
		camera.setMode(theCam.width, theCam.height, 30);

		// attach the camera to our "theCam" VideoDisplay
		theCam.attachCamera(camera);
	}

    else
	{
		//add your own method to tell the user his problem
	}

}
Notice that we have a conditional: we will only move on if we can get at least one camera from the user. Next, we called it “camera” for convenient purposes and configured it in the next few lines.
In camera.setMode, you should understand “theCam.width” as “the width of our VideoDisplay”. In Flex, this is called Data Binding. In plain english: “the width and height of the ‘camera’ will always and automatically be the same width and height of the ‘theCam’”. So, if you decide to change the size of the VideoDisplay later, the camera’s size will change automatically.
After getting and configuring our camera, we attach it to our “theCam”. It tells our VideoDisplay what to display.
Step 6: Displaying the Camera
Lets import our cam.as to our CameraSnapshot.mxml file, otherwise we won’t have access to the function we just made:
<fx:Script source="cam.as"/>
If you saved your “cam.as” in a different folder, just add the folder name before “cam.as”, for instance: “different_folder/cam.as”
Now we need to tell our application to actually run this function. We’ll add a “creationComplete” method calling “getCam();” inside the opening “Application” tag. It means that our camera will be displayed as soon as the application is completely created:
  <s:Application xmlns:fx="http://ns.adobe.com/mxml/2009"
                    xmlns:s="library://ns.adobe.com/flex/spark"
                    xmlns:mx="library://ns.adobe.com/flex/mx" minWidth="955" minHeight="600"
               creationComplete="getCam();">
Step 7: First Run
So far, so good. Now, run the application and see yourself inside it before we move to the next step ![]()
Notice: a few users, specially on a Mac, may have to change the default camera that Flash Player is getting. Inside the running app: Right click (or cmd + click) > Configurations … > Click the “webcam icon” tab below > Change it to your “real” cam.
Step 8: Layout and Positioning
In this step we’ll wrap our “VideoDisplay” tag with a “VGroup” to layout the elements that we’ll add, vertically. You’ll see it yourself later.
<s:VGroup horizontalCenter="0" verticalCenter="0">
		<mx:VideoDisplay id="theCam" width="533" height="400"/>
	</s:VGroup>
Notice the “horizontalCenter” and “verticalCenter” properties set to “0″. This means that the “VGroup” will be 0 pixels away from the center of the parent container, in our case, the whole application.
You can run the application again: resize your browser’s window and notice that you are always in the middle.
Step 9: Capture Button
In order to add our “Take a picture” button, we’ll need to wrap our “VideoDisplay” with a “Group” tag where the layout is absolute and everything is placed on top of each other (unless you position them with X and Y or place them some pixels away from the top, right, bottom or left).
Your code should look like this:
	<s:VGroup horizontalCenter="0" verticalCenter="0">
		<s:Group id="videoArea">
			<mx:VideoDisplay id="theCam" width="533" height="400"/>
		</s:Group>
	</s:VGroup>
Notice that we’ve just added the “Group” tag. It’s inside our recently added “VGroup” and wraps our well known “VideoDisplay”
Now we add the “Take a picture” button. It will appear inside a nice semi-transparent “BorderContainer” that we’ll write below our “VideoDisplay”, take a look:
			<mx:VideoDisplay id="theCam" width="533" height="400"/>

			<s:BorderContainer
				bottom="0"
				width="100%"
				backgroundColor="black"
				backgroundAlpha="0.4"
				borderColor="black"
				height="55">

				<s:Button
					id="trigger"
					horizontalCenter="0"
					verticalCenter="0"
                    label="Take a picture!"
					height="35"/>

			</s:BorderContainer>
Notice that our button area is “0″ pixels away from the bottom and it has a black semi-transparent (backgroundAlpha) background. We also added our capture button called “trigger”. It is placed right in the middle of our “BorderContainer”.
Step 10: Button Style
Add “chromeColor” and “color” to our “trigger” button and our code should look like this:
				<s:Button
					id="trigger"
					horizontalCenter="0"
					verticalCenter="0"
					height="35"
					label="Take a picture!"
					chromeColor="#33abe9"
					color="#ffffff"/>
You can run the app again and see how we’re doing.
Step 11: Picture Preview Placeholder
Now we’ll add a placeholder where we can preview the picture that we’ll take later. Write it below our “VideoDisplay” and above our “BorderContainer”.
			<s:Group id="previewBox" visible="false">
				<mx:Image id="preview" width="100%" height="100%"/>
			</s:Group>
We’ve added a “Group” called “previewBox” that wraps an “Image” called “preview”.
Step 12: Preparing for the Snapshot
Add the following code at the top of our “cam.as” file.
// ActionScript file

import flash.display.BitmapData;

import mx.graphics.codec.JPEGEncoder;
import mx.rpc.http.HTTPService;
import mx.utils.Base64Encoder;

private var bm:BitmapData;
Here we’ve just imported everything that we’ll need in order to take and send the picture to the server.
Step 13: Take a Picture!
Now it’s time to take a picture. Let’s add a function that will do it:
public function takePicture():void {

	//if we are not previewing any picture, we'll take one
	if (!previewBox.visible) {

		//create a BitmapData variable called picture that has theCam's size
		var picture:BitmapData = new BitmapData(theCam.width, theCam.height);

		//the BitmapData draws our theCam
		picture.draw(theCam);

		//Our preview's source is a new Bitmap made of picture's BitmapData
		preview.source = new Bitmap(picture);

       //stores this BitmapData into another BitmapData (outside this function)
		bm = picture;

		//makes the previewBox visible, so we can see our picture
		previewBox.visible = true;

		//change our trigger label, so the user will be able to try again
		trigger.label = "Take another picture...";

		//changes the color of the button
		trigger.setStyle('chromeColor', '#ff0000');

	}

	//if we are previewing a picture...
	else {

		//makes the previewBox invisible
		previewBox.visible = false;

		//changes the label
		trigger.label = 'Take a picture!';

       //changes the color of the button
		trigger.setStyle('chromeColor', '#33abe9');

	}

}
if (!previewBox.visible) {
//create a BitmapData variable called picture that has theCam's size
var picture:BitmapData = new BitmapData(theCam.width, theCam.height);
//the BitmapData draws our theCam
picture.draw(theCam);
//Our preview's source is a new Bitmap made of picture's BitmapData
preview.source = new Bitmap(picture);
//stores this BitmapData into another BitmapData (outside this function)
bm = picture;
//makes the previewBox visible, so we can see our picture
previewBox.visible = true;
//change our trigger label, so the user will be able to try again
trigger.label = "Take another picture...";
//changes the color of the button
trigger.setStyle('chromeColor', '#ff0000');
}
//if we are previewing a picture...
else {
//makes the previewBox invisible
previewBox.visible = false;
//changes the label
trigger.label = 'Take a picture!';
//changes the color of the button
trigger.setStyle('chromeColor', '#33abe9');
}
}
The comments above “// (…)” will tell you what’s going on.
Now, add a “click” property inside our “trigger” button (CameraSnapshot.mxml) to call our recently created “takePicture” function:
				<s:Button
					id="trigger"
					horizontalCenter="0"
					verticalCenter="0"
					height="35"
                    label="Take a picture!"
                    chromeColor="#33abe9"
					color="#ffffff"
					click="takePicture();"/>
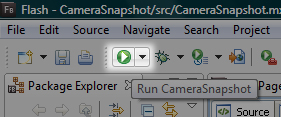
Run the app and Take a picture!
Step 14: Adding Cool Effects
Now we add some cool effects: when we take a picture, we’ll see a flash light. When we discard a picture, it will go away. Change the “Declarations” tag, by adding the following code:
	<fx:Declarations>
		<!-- Place non-visual elements (e.g., services, value objects) here -->

		<mx:Fade id="flashFX" duration="550" />

		<s:Parallel id="discardPhoto">
			<s:children>
				<mx:Zoom
					duration="350"
					zoomWidthFrom="1.0"
					zoomWidthTo="0.01"
					zoomHeightFrom="1.0"
					zoomHeightTo="0.01"
					target="{previewBox}"/>
				<mx:Fade duration="350"/>
			</s:children>
		</s:Parallel>

	</fx:Declarations>
The “Fade” tag will make the flash light disappear realistically. The “Parallel” tag will run the “Zoom” and “Fade” at the same time, discarding our photo with style.
Step 15: The Flash Effect
Let’s add our flash light below the “preview” Image:
				<mx:Image id="preview" width="100%" height="100%"/>

                <s:BorderContainer
					id="flashLight"
					width="100%"
					height="100%"
					hideEffect="{flashFX}"
					backgroundColor="white"
					backgroundAlpha="0.8"/>
Notice the “hideEffect” set to “{flashFX}”: when the “flashLight” becomes invisible, this effect will be triggered. Also, the “backgroundAlpha” is set to “0.8″ so our flash light is not that bright. Our flash light is just a white BorderContainer that shows up and then quickly goes away, creating the “flash” effect.
Now we just need to set the “flashLight” visible property to “true” and “false” (activating the flash effect) inside our “takePicture” function that will now look like this:
public function takePicture():void {

	//if we are not previewing any picture, we'll take one
	if (!previewBox.visible) {

		//create a BitmapData variable called picture that has theCam's size
		var picture:BitmapData = new BitmapData(theCam.width, theCam.height);

		//the BitmapData draws our theCam
		picture.draw(theCam);

		//Our preview's source is a new Bitmap made of picture's BitmapData
		preview.source = new Bitmap(picture);

		//stores this BitmapData into another BitmapData (outside this function)
		bm = picture;

		//makes the previewBox visible, so we can see our picture
		previewBox.visible = true;

		//displays the flashLight
		flashLight.visible = true;

		//makes the flashLight go way
		flashLight.visible = false;

		//change our trigger label, so the user will be able to try again
		trigger.label = "Take another picture...";

        //changes the color of the button
		trigger.setStyle('chromeColor', '#ff0000');

	}

		//if we are previewing a picture...
	else {

		//makes the previewBox invisible
		previewBox.visible = false;

		//changes the label
		trigger.label = 'Take a picture!';

        //changes the color of the button
		trigger.setStyle('chromeColor', '#33abe9');

	}

}
Step 16: Discard Picture Effect
Change the "Group" called “previewBox” (CameraSnapshot.mxml) so it uses the “discardPhoto” effect:
<s:Group id="previewBox" visible="false" hideEffect="{discardPhoto}">
Notice the “hideEffect” again. Run the app, take a picture, take another and see the effects!
Step 17: Save Button
Lets add a Save and Cancel button right below the closing tag of our “Group” called “videoArea” and above the “VGroup” closing tag:
		<s:HGroup verticalAlign="middle" horizontalAlign="right" width="100%">
			<mx:LinkButton label="Cancel"/>
			<s:Button
				id="savePic"
				label="Save picture"
				height="30"
				enabled="false"
				toolTip="Make it your profile image!"/>
		</s:HGroup>
We wrapped the “Cancel” and “Save a picture” buttons inside an “HGroup” tag (which will display them horizontally). We’ve set the “verticalAlign” property to “middle” so the “Cancel” button is placed in the middle of the “savePic” height. We also set the “width” to “100%” and “horizontalAlign” to “right”.
Notice that the “Save picture” button is disabled. We will enable it when the user is previewing a picture and disable when not. You can make the Cancel button go to the previous page, close the pop-in that wraps the SWF, etc… It’s your call.
Inside the “cam.as” file, after some changes, our “takePicture” function will now be looking like this:
public function takePicture():void {

	//if we are not previewing any picture, we'll take one
	if (!previewBox.visible) {

		//create a BitmapData variable called picture that has theCam's size
		var picture:BitmapData = new BitmapData(theCam.width, theCam.height);

		//the BitmapData draws our theCam
		picture.draw(theCam);

		//Our preview's source is a new Bitmap made of picture's BitmapData
		preview.source = new Bitmap(picture);

        //stores this BitmapData into another BitmapData (outside this function)
		bm = picture;

		//makes the previewBox visible, so we can see our picture
		previewBox.visible = true;

        //displays the flashLight
		flashLight.visible = true;

		//makes the flashLight go way
		flashLight.visible = false;

		//change our trigger label, so the user will be able to try again
		trigger.label = "Take another picture...";

		//enables the savePic button
		savePic.enabled = true;

        //changes the color of the button
		trigger.setStyle('chromeColor', '#ff0000');

	}

	//if we are previewing a picture...
	else {

		//makes the previewBox invisible
		previewBox.visible = false;

		//changes the label
		trigger.label = 'Take a picture!';

		//disables the savePic button
		savePic.enabled = false;

        //changes the color of the button
		trigger.setStyle('chromeColor', '#33abe9');

	}

}
Above, we’ve just added 2 lines of code to enable and disable the Save button.
Step 18: Saving the Picture
Now we’ll look at one of the many things that you can do with your picture: sending it to the server. In doing so, you can assign it as a user’s profile picture, a new album photo, etc…
Let’s create a function that sends our picture to the server when we click “Save a picture”:
public function savePicture():void {

	//change the savePic button label so the user knows as soon as possible
	//that we are saving his picture
	savePic.label = "Saving..."

	//disables the button so the user don't click it twice
	savePic.enabled = false;

	//the trigger button displays a nice message
	trigger.label = "That's a nice picture  "

	//disables the "trigger" button, now is too late to take another picture!
	trigger.enabled = false;

	//creates a new JPEGEncoder called "je"
	//sets the quality to 100 (maximum)
	var je:JPEGEncoder = new JPEGEncoder(100);

	//creates a new ByteArray called "ba"
	//JPEGEnconder encodes our "bm" Bitmap data: our "picture"
	var ba:ByteArray = je.encode(bm);
	//this ByteArray is now an encoded JPEG

	//creates a new Base64Encoder called "be"
	var be:Base64Encoder = new Base64Encoder();

	//encodes our "ba" ByteArray (wich is our JPEG encoded picture) with base64Encoder
	be.encodeBytes(ba);

	//Now we have our "encodedData" string to send to the server
	var encodedData:String = be.flush();

	//this is the HTTPService that we will use to send our data to the server
	var handleService:HTTPService = new HTTPService();

	//now we set what URL we want... Set the URL of your server-side page/action
	//this is a typical Ruby on Rails URL. Controller: users_controller, Action: handlepicture
	handleService.url = "http://localhost:3000/users/camerasnap";

	//another example of URL:
	//appUrl.url = "http://www.example.com/handlePicture.php";

	//or, a relative path:
	//appUrl.url = "/handlePicture.php"

	//we choose POST as our method
	handleService.method = "POST";

	//here we show the busy cursor for better visual feedback
	handleService.showBusyCursor = true;

	//Finally, we send our "encodedData" as a "content" variable
	handleService.send({content: encodedData});

	// 1 - in your server-side code you can handle the "param" or "post" variable called "content"
	// 2 - use a base64 decoder
	// 3 - write it to disc (now you have a real image saved in your server)
	// 4 - make this image the user's profile picture or anything you want

}
In this function we do three things: change some labels and disable some buttons, encode our picture to JPEG and, finally, send the encoded data (Base64 string) to the server.
Again, the comments above “// (…)” can tell you how we did that.
Now our “Save picture” button needs to trigger the “savePicture” function. Add a "click" method:
			<s:Button
				id="savePic"
				label="Save picture"
				height="30"
				enabled="false"
				toolTip="Make it your profile image!"
				click="savePicture();"
				/>
Step 19: Server-side Handling
In the following steps, I wrote only the necessary code so you can do anything you want with the saved picture file. You’ll have to write the code to make “example_name.jpg” the user’s profile picture (for example). Unfortunately, I cannot cover how you can accomplish that as it changes a lot depending on your current solution. Room for another tutorial I guess..
The following example shows how to save the picture into your server using Ruby on Rails or PHP, it’s pretty simple!
Step 20: Server-side Handling Ruby on Rails
  require "base64"

  def camerasnap

    #associate the param sent by Flex (content) to a variable
    file_data = params[:content]

    #Decodes our Base64 string sent from Flex
    img_data = Base64.decode64(file_data)

    #Set an image filename, with .jpg extension
    img_filename = "example_name.jpg"

    #Opens the "example_name.jpg" and populates it with "img_data" (our decoded Base64 send from Flex)
    img_file = File.open(img_filename, "wb") { |f| f.write(img_data) }

    #now we have a real JPEG image in our server, do anything you want with it!
    #Write what's necessary to make it a profile picture, an album photo, etc...

  end
Step 21: Server-side Handling PHP
<?php

	//associate the param sent by Flex (content) to a variable
	$file_data = $_POST['content'];

	//Decodes our Base64 string sent from Flex
	$img_data = base64_decode($file_data);

	//Set an image filename, with .jpg extension
	$img_filename = "example_name.jpg";

	//Opens the "example_name.jpg"
	$fp = fopen ($img_filename, "w");

	//populates it with "img_data" (our decoded Base64 send from Flex)
	fwrite ($fp, $img_data);

	//closing the file pointer
	fclose ($fp);

    //now we have a real JPEG image in our server, do anything you want with it!
    //Write what's necessary to make it a profile picture, an album photo, etc...

?>
These two examples above (Rails and PHP) are as simple and clear as possible. You can write them in just 1 line of code (Rails) and 2 lines (PHP) if you want.
Step 22: Exporting Release Build
Before uploading the SWF to your site, it’s recommended that you export it as an optimized SWF (release build):
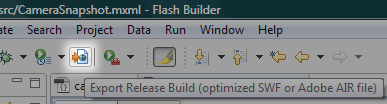
After exporting, you will have to upload everything that’s inside the “bin-release” folder (located inside your project folder).
Conclusion
I hope you’ve liked this tutorial! There are many things that you can do with this “real-time picture”, I’m already using it in production so my users can quickly change their profile picture. Tell us what you think would be a creative or innovative use of this feature in the comments below. Thanks!
Blog Commenting [urgent] by zahidrock007
I am looking for people to do blog commenting on blogs. Basically signup for an account at a website, and put down a comment after reading an short article. Preferably someone who can write a sentence or two of their opinion of the article, not “I agree” then spam the link… (Budget: $30-250, Jobs: Blog)
Place orders on retail websites – $30/order by alter12
Need people to place orders on retail websites – $30/order To achieve our affiliate targets, we are looking for people (preferably in United States and UK) who can place orders on various shopping websites (e.g… (Budget: $30-250, Jobs: Customer Support, Data Entry, Data Processing, Order Processing, Virtual Assistant)
Build online bid based website (provider selected already) by dmoreno73
This project is at an evaluation stage to determine key data for a business plan. We need a technical evaluation and cost estimation to develop a platform/website which allows customers to post projects in the area of home improvement, home maintenance and addtional services around daily needs… (Budget: $750-1500, Jobs: Website Design)
Vectorise logos by pixeldesignhouse
I have an immediate requirement for someone to vectorise the attached logos – they need to be done quickly hence loading them as attachments to this project. Need all 5 logos back inside 1 hour of being… (Budget: $30-250, Jobs: Illustrator, Photoshop)
## Ebay data entry -earn good money -100% reliable job ## by fe7re77
You MUST have at least 3 positive feedback *** You MUST have at least 3 positive feedback I need at least 10 – 20 sellers, who have eBay seller account preferably with feedbacks and know how to create one if needed to… (Budget: $250-750, Jobs: Craigslist, Data Entry, Data Processing, eBay, Sales)
Microsoft SQL Subject Matter Expert (SME) by malgorzataj
Job Title: Microsoft SQL Subject Matter Expert (SME) Languages: French, Italian, German, Spanish, Chinese Simplified, Chinese Traditional, Korean, Japanese , Russian , Brazilian Portuguese Qualification/… (Budget: $3000-5000, Jobs: Azure, Microsoft, SQL, User Interface / IA, Windows)
Css/html coder urgently needed… by NewGMR
Dear GAF, We have my old design all ready implemented in my old site which needs to replace in mine brand new site asap..? Work Details:- *Whole sites design needs to be replaced from old… (Budget: $30-250, Jobs: Banner Design, CSS, PHP, PSD to HTML, Website Design)
A Poor Man’s Guide to Budget Macro Photography
Macro photography can be an absolutely stunning way to view the world as you’ve never seen it before. However, high equipment costs represent a formidable barrier to entry in this particular field, leaving anyone without a large lens budget left out. Today we’ll discuss how to bypass these costs with some cheap and crafty tricks for getting up close and personal with your subjects.
Don’t Break Your Camera
The methods and devices discussed in this article are exactly what the introduction claims: cheap. Using these will most likely get you decent results, not amazingly professional photographs (though it’s definitely possible to get stunning results!).
Some of the methods below, if implemented poorly, could even result in damage to your lens or camera. For this reason we recommend that you proceed with caution and avoid anything that you think could harm your equipment.
Ultimately, the best way to get great results is to purchase a nice macro lens. If you want high quality professional shots, there’s simply no substitute. However, if you’re just looking to get started in macro and want to have some fun, check out the options below.
Reverse Mounting

This method is by far the most bizarre. It turns out one of the easiest ways to get a lens to shoot close-up is to flip it around backwards! There are plenty of high-level technical explanations for why and how this works, but unless you’ve got a strong grasp of the math behind focal lengths and diopters, it’s enough to make your head spin.
What you need to know is that reverse mounting can yield high magnification. It’s actually a fairly popular technique and can be accomplished in a variety of ways.
DIY Reverse Mounting
As you can see in the picture below, DIY reverse mounting can get pretty crazy.

This method actually uses an extension (which we’ll discuss below) and a reverse mount. What you’ll need to do is to take the lens hole cover that came with your camera and cut a big hole in it to give you a fitting that will attach to your camera’s body. Then insert a PVC pipe securely into that fitting and place a rubber coupling over the pipe.
Finally, flip your lens around backwards and stuff it into the rubber coupling. Make sure everything is nice and snug so that nothing falls out and smashes to pieces on the ground.
Additional optional steps include sanding everything down and painting it black so that it doesn’t look like you’ve got a giant PVC pipe sticking out of your camera.
For a more detailed set of instructions, check out this step-by-step guide: DIY Macro Lens Reverse Mount Extension Tube
Of course, if you really want to mess up your equipment, you can forgo all that complicated coupling stuff and just use a ton of tape:

Reverse Mounting Adapters
An easier and much safer way to go is to just pick up reverse mount adapter, also known as macro coupler.
These handy rings contain two male ends: one that screws into the tiny threads on the front of your lens and one that screws into your camera’s body. This makes it easy and relatively safe to reverse mount your lens without fear of it falling off.

Reverse mount adapters are actually really cheap; you can usually pick one up on Amazon for less than $15.
Rather than reverse mounting a lens directly onto the camera body, you can combine it with another lens using a similar adapter. The rig below uses a Canon EF 50mm f/1.4 lens mounted onto a Canon EF 100mm f/2.8 macro lens.

Reverse Mounting Example Shots
So you can get a true feel for the quality of results that reverse mounting can provide, here are some shots taken with various reverse mount rigs.
Reverse Lens Macro 001 – Edge of a Canadian Quarter!

My Eye: Take 2

The Cozy Eatery

Your basic US penny

Crawling Around

Wheat Husk

Water Drop

Extension Tubes
Extension tubes, which can be used alone or in conjunction with reverse mounting, essentially serve to extend the length of your lens. Normally, your SLR won’t allow you to take a picture if you’re too close to your subject due to focusing issues. By using an extension tube you can get the lens a lot closer to what you’re shooting while maintaining focus.

Extension tubes are generally sold as a set with varying tube sizes. The longer the extension tube is, the closer the lens will be able to focus. A typical set might contain a 12 mm, 20 mm, and 36 mm tube.
Extension tube sets are a lot pricier than reverse rings but still plenty cheaper than a nice macro lens. Most good tube sets will run between $100-200. Here are some links to a few sample tube sets:
- Kenko DG Auto Extension Tube Set for the Canon EOS AF Mount: $168.99
- Opteka Auto Focus DG Macro Extension Tube Set for Canon EOS Digital SLR Cameras: $79.95
- Kenko DG Auto Extension Tube Set for the Nikon AF Mount
And of course, you can just build one yourself with some PVC pipe and a few couplers. Here’s a good breakdown of the process: Diy Macro Extension Tube With Pictures And Instructions

Extension Tube Example Shots
Again, so you can get a sense of the magnification quality, here are some example shots taken with extension tubes. Remember that results will vary drastically depending on the setup and equipment.
Canon with extension tubes

Macro test shot with Extension tube

Extension Tube Experiment

Testing the hacked extension tube

Day 12 – Extension Tube

Face of a Southern Yellowjacket Queen

Bellows
Bellows are bizarre devices that look like they came from the 1950s. Bellows use the same exact principle as an extension tube: by extending the length of your lens they allow you to get closer to whatever you’re shooting while remaining focused.

However, bellows are different in that they have an accordion-like body that allows for a highly controllable range of lengths. Modern bellows allow a great amount of control and very minute adjustments for precise focusing. Further, bellows allow you to reach a longer extension without having to worry about bending your tubes or breaking your camera mounts.
It looks like you can grab a decent bellows for around $50, whether you’re shooting Canon or Nikon.
Bellows seem to have a fairly wide range of prices and quality, so be sure to shop around and decide whether your goals and budget are better suited by a basic or expensive set to really ensure you’ll be satisfied with the product.
Bellows Example Shots
Finally, here are some photos taken with bellows.
bellows-macro-experiment

Stamen, Zeiss Flektagon 35mm f2.4 + Macro Bellows

Anterior Median and Anterior Lateral Eyes of a Phidippus princeps Jumping Spider

Close Encounter

Celtic Knot Macro

RIB

Salticidae

Pros and Cons
The techniques and devices above provide photographers with some of the cheapest ways possible to take decent macro shots. Reverse mounting is a crude but effective may to increase your magnification and extension tubes and bellows allow you to overcome focusing problems when trying to get physically close to your subject. You can even mix and match these techniques to really push the limits of what you can achieve.
However, there are definitely downsides. As stated before, all of these methods represent a compromise in quality when compared to an actual macro lens. Further, the DIY procedures can and will fail you if you aren’t careful and confident in your ability to create a solid finished product. Finally, many of these devices, especially the DIY versions, will eliminate any of the automatic functions of your lens. Focusing and adjusting your lens settings can therefore be quite tricky (especially with reverse mounting). To add to focusing issues, your DOF can become very shallow at high magnifications and close ranges, making it hard to get a crisp shot. You’ll also want to be sure to invest in a good tripod as macro photography tends to require long exposures.
Beyond these global limitations, each method has it’s own pros and cons. The reverse mount is simple enough with a converter and can provide great magnification, but you’re leaving the inside of your lens exposed to all kinds of dust and foreign debris that can quickly reduce or ruin its functionality. Be sure to keep the lens cover screwed on at all times when you are not shooting to help prevent this.
Extension tubes are easy to install and don’t expose your lens to dust but provide extra length and weight that could possibly lead to damage on the mounts of your camera’s body. Bellows can be safer and lighter but are considerably more bulky and awkward.
Conclusion
The key takeaway here is that you don’t have to possess a large equipment budget to try your hand at macro photography. The solutions above might not result in the highest quality photos, but they get the job done and can be a great point of entry.
Let us know in the comments below which of these solutions you’ve tried and what you thought of the results. Also be sure to drop in any links you have to example shots you’ve taken with reverse mounts, extension tubes or bellows.