8 Practical Pro Tools Shortcuts

A crucial part of knowing Pro Tools is being able to navigate a session quickly and efficiently. When time is expensive and tempers are short, the session needs to run as smoothly and efficiently as possible. Be it tracking, editing, mixing or mastering – learning keyboard shortcuts is key to succeeding in the Pro Tools digital recording/editing/mixing world. Let’s get started.

Tips:

  • The less you use the mouse, the faster you will be able to navigate Pro Tools.

  • A list of the shortcuts covered in this tut can be found here.

1. Creating Tracks

OK. You’ve just opened a blank Pro Tools Session. You are about to record multiple tracks to Pro Tools. Let’s create our tracks. “Command + Shift + N” will bring up the New Tracks menu.

OK. Try not to use the mouse now! You can enter the amount of tracks you need using the keypad. You can cycle through mono/stereo/5.1 types using “Command + Left/Right ” (arrow keys). You can select the type of track (Audio/Aux/MIDIetc) using “Command Up/Down” and you can add/remove a row of tracks using “Command + Shift Up/Down”. As an example, let’s create 6 Mono Audio Tracks, 2 Stereo Aux Tracks and a MIDI track:

  • Enter “6″ in the number field (or simply use the Down/Up arrow keys to cycle through numbers) to allow for 6 audio tracks.
  • Then “Command + Shift + Down” to add a row.
  • “Up” to say 2 tracks, “Command + Right” to make them stereo, “Command + Down” to make it an Aux track.
  • “Command + Shift + Down” to add a row.
  • “Comand + Down” to cycle to MIDI track.
  • Then hit enter.
  • “TAB” will cycle through the track number fields.

    2. Assigning Inputs and Outputs

    Brilliant. Pro Tools has now created these tracks. The default view is the Edit Window. But we want to cycle to the Mix window. Use “Command and ‘+=’” Now, we’ll need to organize our I/O setup on the tracks. There are a few nifty shortcuts to learn here (as well as I/O settings, these shortcuts can be used on send and insert parameters).

    Change parameter on ALL: “Option” and click on, for example, output on Audio 1 Track and select outputs 1/2. All tracks now have 1/2 as their output.

    Cascade ALL: “Option + Command” and click parameter. Now for example, Audio 1 has input 1; Audio 2 has input 2, Audio 3 input 3 and so on.

    Note that Aux 1 and Aux 2 have input 1 and 2 again (and not the expected 7 and 8). This is because I only have 6 available inputs in my hardware. So Pro Tools will begin cascading again as soon as it reaches 6. You can apply the change ALL or CASCADE parameter shortcuts to SELECTED (as opposed to ALL) tracks if you add “Shift” to them.

    Change parameter on SELECTED tracks: “Option + Shift” and click.

    Cascade on SELECTED: “Option + Shift + Commnad

    To select multiple contiguous (next to each other) tracks, use “Shift” and click.

    To select multiple non-contiguous tracks, use “Command” and click.


    3. Naming Tracks

    It’s very important to name tracks as soon as possible because Pro Tools automatically names the file you record after that track. So if you have a big session, it may be difficult to remember what “Audio 1″ was in the Edit Window, Region Bin and in your Audio Files folder. So double click on the first track where it says “Audio 1″. You will get the following Naming window:

    Name the track. To cycle between next track and previous track use “Command + Left/Right”. To cycle between the comments and name fields, use “TAB”.


    4. Keyboard Focus: The Three Options

    You may have noticed a few “A-Z” icons in the Edit Window. Each of these is a “Keyboard Focus” mode and when enabled (yellow) it will allow you to use the Keyboard to control specific functions.

    Group: allows you to select/unselect edit/mix groups you create (see “Creating Groups”).

    Edit Window: probably the most important. See “Keyboard Focus: Edit Window”.

    Region Window: allows you to control various regions with the keyboard.


    5. Creating Groups

    Let’s select the first 3 tracks (remember, that’s “Shift” and click) and create a group using “Command + G”. Name it as you wish. Create a group for the next 3 Audio tracks, and then the 2 Aux Tracks.

    As you can see, next to each group’s name is a letter. With the Group Keyboard Focus enabled, you can use the letters on your keyboard to select/deselect these groups. If you wish to change the letter assignments or group attributes, use “Command + G + Up”


    6. Keyboard Focus: Edit Window

    There are too many shortcuts in the Edit Window Keyboard Focus to go through in this tutorial alone. So I am going to provide what I believe are the most useful. (Remember, for these to work, you have to have the Edit Window Keyboard Focus selected. The “A-Z” should be yellow.)

    To move your cursor within the Edit window Up/Down/Left/Right use P ; L “ respectively. This is great when editing, moving regions around, and even tracking. Let’s say our cursor is in the first track

    We can move through tracks very quickly now, this is great in large sessions. We can also select contiguous tracks by using shift together with the shortcuts. Now, if the cursor is in a track we can use:

    • “Shift + R” to record arm the track (or groups of tracks!)
    • “Shift + S” to solo it
    • “Shift + M” to mute it
    • “Shift + I” for input monitoring (Pro Tools HD only).

    Here are other important edit window short

    “Command + Ctrl” and click: makes inactive (an inactive plugin will free up the processing power it previously used. It is grayed out when inactive)

    “Command + D” duplicates the selected region. It is automatically placed at the end of itself. Great if you need to loop something without using Loop Playback, for example a drum over and over.

    “Ctrl Up/Down” in edit window resizes the track.

    I hope this helps get your work flow in tense situations smooth and fast-moving. At the very least it should help with your confidence in Pro Tools. The only way to really learn these is to use them. I’ve attached a list of all the shortcuts covered in this tutorial. Feel free to print them out, put them on your wall and use them whenever you need! With time, they will become second-nature and soon you’ll be flying through your Pro Tools sessions!


Model and Texture an Elegantly Simple Chess Set in 3ds Max – Day 2

The goal of this tutorial is to create a simple yet elegant Chess set in a clean and efficient way. Throughout the series you will learn to use many different modeling methods and techniques, and also see which ones would be the quickest for different modeling situations, so that you will be able to create the scene in as little time as possible.

This tutorial is Day 2 in a series – Go to Day 1.


Video 1

Download

Note: click the ‘Monitor’ icon to view tutorial in full-screen HD.


This tutorial is Day 2 in a series – Go to Day 1.


Don’t miss more CG tutorials and guides, published daily – subscribe to Cgtuts+ by RSS.

Workshop #66: Tao by Small Carbon Footprint

At Audiotuts+ we irregularly put up a reader track for workshopping and critique (find out how to submit a track). This is how it works: you upload your song, and every week or so we’ll publish one here and step away from the podium. The floor is yours to talk about the track and how the artist can fix problems in and improve upon the mix and the song.

This track has been submitted for your friendly, constructive criticism. They have put their track (and their heart and soul) in your hands to learn and get useful feedback.

  • Do you enjoy the song or track itself? Does it have potential?
  • Can the arrangement be improved?
  • How did you find the mix? What would you do differently?
  • What do you enjoy about the rhythm track? What can be done to improve it?
  • Is the choice of instruments relevant and effective for the style/song?
  • Are the lyrics (if any) effective? Does the style, arrangement and genre of the song suit them?
  • Can you suggest any specific techniques that might improve the track?
  • Do you have any other constructive feedback?

Tao by Small Carbon Footprint

Description of the track:

Relaxing ambient groove.

Download audio file (Tao.mp3)

Terms of Use: Users can stream the track for the purposes of giving feedback but cannot download or redistribute it.

Have a listen to the track and offer your constructive criticism for this Workshop in the comments section.


Submit Your Tracks for Workshopping

Need constructive criticism on your own tracks? Submit them using this form.


Build a WordPress Plugin to Add Author Biographies to your Posts

Many popular blogs these days are authored by multiple contributors. Today, we’ll create a simple WordPress plugin that will allow us to add the post author’s biography to the conclusion of each post, much like you see on Nettuts.

Nettuts Author Bio

1. Have a Bio Ready

If you don’t already display authors’ biographical info, then the you can add and edit biographical info by heading to the users pane from within the WordPress dashboard, selecting a user, and filling in a quick bio. We’re also going to be adding a gravatar for the author, so ensure that you also set an email address.


2. Create the Necessary Files

We’ll need to create a single file that contains the functionality of our plugin. Fire up your FTP of choice, and, within the wp-content/plugins/ folder, create a file called ntauthorbio.php. In order for WordPress to recognize our plugin, we need to create a quick header comment in our file, much like you do at the top of style.css. Paste the following code into your file, and, of course, make adjustments accordingly.

/*
Plugin Name: Nettuts Author Bio
Plugin URI: http://www.nettuts.com/
Description: This plugin adds an authors bio to his/her post
Author: nettuts
Version: 0.1
Author URI: http://www.nettuts.com/
*/

3. Functions & Actions

Next, we’ll create the base for our plugin. Paste the following after the opening comment header.

function author_bio_display($content)
{
	// this is where we'll display the bio
}

function author_bio_style()
{
	// this is where we'll style our box
}

function author_bio_settings()
{
	// this is where we'll display our admin options
}

function author_bio_admin_menu()
{
	// this is where we add our plugin to the admin menu
}

add_action('the_content', 'author_bio_display');
add_action('admin_menu', 'author_bio_admin_menu');
add_action('wp_head', 'author_bio_style');

“Hooks are provided by WordPress to allow your plugin to ‘hook into’ the rest of WordPress; that is, to call functions in your plugin at specific times, and thereby set your plugin in motion.”

Above we’ve created four functions that our plugin will require to work properly. Each function has a specific purpose (as commented above), and also, each is tied to a specific action (apart from author_bio_settings, which will be called from another function.

When developing plugins, it’s important to understand what a ‘hook’ is. A hook is a place in the running cycle where we can hook into WordPress, and call our functions. For example the hook used above, for author_bio_display, is the_content; this means that when WordPress uses the_content (used for displaying a post/page’s main content), it will first call the function we’ve given it.

  • the_content – the content of the page/post is displayed
  • admin_menu – called when the sidebar in the admin dashboard is created
  • wp_head – lets us add code to the head tags of the page. This is why you include wp_head() when designing your themes.

4. The Display Function

The most important function in our plugin is the display function, which will handle the process of actually displaying the information after the content. Before we start, it’s important to note that this function accepts a parameter, called $content. This means that the content of the page/post is passed to our function, so we can then append our author bio.

Let’s start with a simple if/else statement.

function author_bio_display($content)
{
	// this is where we will display the bio

	if ( is_single() || is_page() )
	{
		$bio_box = // placeholder;
		return $content . $bio_box;
	} else {
		return $content;
	}
}

Above, we check to see if the content is being displayed on a single post using is_single(), or a page using is_page(). If either returns true, we can post our box which will be placed in the $bio_box variable. Otherwise, if we’re on some different page, such as the archives or front page, we should simply return the content untouched.

Now we need to add our code for the box to appear, change your $bio_box to match the following code.

$bio_box =
'<div id="author-bio-box">
	'.get_avatar( get_the_author_meta('user_email'), '80' ).'
	<span class="author-name">'.get_the_author_meta('display_name').'</span>
	<p>'.get_the_author_meta('description').'</p>
	<div class="spacer"></div>
</div>';

The styling, of course, can be changed later to fit your own tastes, but for now, we’ll use a simple box, and will add some CSS to style it shortly.

We’re using a few functions above to retrieve our required data. get_avatar() is a built-in function in WordPress that will return a user’s gravatar, if they have one, according to their email. We pass the get_avatar() function two parameters; the author’s email, and a size for the image (80px*80px in our case).

The function get_the_author_metacan retrieve any piece of information about a registered WordPress user. A full list of the items you can return can be found on WordPress Codex.

If we now run our plugin, we should see something that resembles this:

It’s not the prettiest looking biography, but we now have the basic functionality we’re after. If you’re still having problems, ensure that the author of the post/page has a biography and/or gravatar, and also ensure that the plugin has been activated in the plugins section of the dashboard. Let’s next style things a bit.

5. Making it Pretty

If you’re a designer, here’s your chance to do as you please! My code below is just enough to make our box look clean and simple. To provide an example of how wp_head() can be used, we’ll insert the CSS for this box into the head tag of our document. However, you can also simply place this within your stylesheet.

This author_bio_style() function needs to return a simple block of CSS.

function author_bio_style()
{
	// this is where we'll style our box
	echo
	'<style type=\'text/css\'>
	#author-bio-box {
		border: 1px solid #bbb;
		background: #eee;
		padding: 5px;
	}

	#author-bio-box img {
		float: left;
		margin-right: 10px;
	}

	#author-bio-box .author-name {
		font-weight: bold;
		margin: 0px;
		font-size: 14px;
	}

	#author-bio-box p {
		font-size: 10px;
		line-height: 14px;
		font-style: italic;
	}

	.spacer { display: block; clear: both; }
	</style>';
}

The above code doesn’t require much explanation; CSS is beyond the scope of this tutorial. Generally, we’re just creating a box with a border, and floating the image left. Finally, we add a spacer to make sure the box is big enough to fit the image and text in. You could also use the clearfix hack, or even overflow:hidden to achieve this effect. Ultimately, that will depend on your specific layout.

Your new fangled box should look similar to mine now; see below.

6. Making a Settings Page

Before we wrap up, let’s take a look at adding a settings page in the dashboard for our plugin. Most plugins rely on some sort of settings section to provide a bit more flexibility without the user having to edit any code.

There are numerous options we could add; such as, where the box appears (top or bottom), the colors used, exclude certain users, and so on. For this tutorial, I’ve chosen to specify if the plugin can appear on only pages, only posts, or both. Hopefully this will be enough to show you the ropes. At that point, you can extend the functionality how you see fit.

Making the Page

We need to setup a page in the admin dashboard. To do so, we need to tell WordPress what to do when the admin_menu action triggers. To compensate, we’ll edit our author_bio_admin_menu() function to look like the code below:

function author_bio_admin_menu()
{
	// this is where we add our plugin to the admin menu
	add_options_page('Author Bio', 'Author Bio', 9, basename(__FILE__), 'author_bio_settings');
}

The above code creates an options page in the dashboard, and passes the following parameters:

  • Menu NameAuthor Bio
  • Page TitleAuthor Bio
  • Access Privilege9 – or, only Administrator access
  • Handle
  • The required function – author_bio_settings()
    • We next need to provide the page some content. Since we called author_bio_settings() when creating the page, that’s the function we’ll be using to display our options form and update the database.

      The Settings Function

      Simply put, this function needs to display a form with the options. It also needs to check whether the form has been submitted, and, if so, store the new values in the database. First, let’s concentrate on creating the form.

      function author_bio_settings()
      {
      	// this is where we'll display our admin options
      
      	$options['page'] = get_option('bio_on_page');
      	$options['post'] = get_option('bio_on_post');
      
      	echo '
      	<div class="wrap">
      		'.$message.'
      		<div id="icon-options-general" class="icon32"><br /></div>
      		<h2>Author Bio Settings</h2>
      
      		<form method="post" action="">
      		<input type="hidden" name="action" value="update" />
      
      		<h3>When to Display Author Bio</h3>
      		<input name="show_pages" type="checkbox" id="show_pages" '.$options['page'].' /> Pages<br />
      		<input name="show_posts" type="checkbox" id="show_posts" '.$options['post'].' /> Posts<br />
      		<br />
      		<input type="submit" class="button-primary" value="Save Changes" />
      		</form>
      
      	</div>';
      }

      We start by grabbing some options from the database. Of course, we don’t currently have a method for setting them yet, so they’ll be blank for now. Next, we display the form, which is already styled by WordPress’ dashboard CSS. You’ll notice we’re displaying a (currently unset) variable called $message; this is so we can notify the user when we update the settings if it was successful.

      We print our options at the end of the checkbox code. If the user turns an option on, we need to store it in the database as ‘checked’ in order to check the checkbox. The functions we use to get and set options are get_option() and update_option() respectively. The get function requires the name of the option (so it’s important to be unique), and the update option needs the name of the option and the new value. If the update function doesn’t find the option, it simply creates a new one.

      So far your page should look like do:

      Now, let’s add our code to take the values sent by the form, and update the options in the database. The form contains a hidden value, called action, which is set to ‘update.’ We’ll check if that value is set, and if so, we update our options. This code should be placed at the top of our autor_bio_settings() function.

      if ($_POST['action'] == 'update')
      {
      	$_POST['show_pages'] == 'on' ? update_option('bio_on_page', 'checked') : update_option('bio_on_page', '');
      	$_POST['show_posts'] == 'on' ? update_option('bio_on_post', 'checked') : update_option('bio_on_post', '');
      	$message = '<div id="message" class="updated fade"><p><strong>Options Saved</strong></p></div>';
      }

      If the form has been submitted, we use the ternary operator (if you’re unsure of how these work, look them up – they’re a simple form of if/else) to check whether the checkboxes are checked or not. If they are, then we set the option as ‘checked;’ otherwise we set it as blank. Finally, we set the message displayed to a successful dialog, already styled by WordPress.

      Changing the Output

      Now, we should be able to set options and see them change in our options page; however, the functionality of our plugin will not alter yet as we’ve not told it to do so. So the final step in our project is to make the display function react to these options. In our author_bio_display() function, prepend the following code to the top, in order to get the options previously set.

      $options['page'] = get_option('bio_on_page');
      $options['post'] = get_option('bio_on_post');

      Now that we have these values, we only need to execute the display code if the option is set. To do so, we change our if statement accordingly.

      if ( (is_single() && $options['post']) || (is_page() && $options['page']) )

      Here we have implemented two conditions that, if met, will cause our box to display. Not too hard, right? Here’s our full plugin:

      <?php
      /*
      Plugin Name: Nettuts Author Bio
      Plugin URI: http://www.nettuts.com/
      Description: This plugin adds an authors bio to his/her post
      Author: nettuts
      Version: 0.1
      Author URI: http://www.nettuts.com/
      */
      
      function author_bio_display($content)
      {
      	// this is where we will display the bio
      
      	$options["page"] = get_option("bio_on_page");
      	$options["post"] = get_option("bio_on_post");
      
      	if ( (is_single() && $options["post"]) || (is_page() && $options["page"]) )
      	{
      		$bio_box =
      		"<div id="author-bio-box">
      			".get_avatar( get_the_author_meta("user_email"), "80" )."
      			<span class="author-name">".get_the_author_meta("display_name")."</span>
      			<p>".get_the_author_meta("description")."</p>
      			<div class="spacer"></div>
      		</div>";
      
      		return $content . $bio_box;
      	} else {
      		return $content;
      	}
      }
      
      function author_bio_style()
      {
      	// this is where we will style our box
      	echo
      	"<style type=\"text/css\">
      	#author-bio-box {
      		border: 1px solid #bbb;
      		background: #eee;
      		padding: 5px;
      	}
      
      	#author-bio-box img {
      		float: left;
      		margin-right: 10px;
      	}
      
      	#author-bio-box .author-name {
      		font-weight: bold;
      		margin: 0px;
      		font-size: 14px;
      	}
      
      	#author-bio-box p {
      		font-size: 10px;
      		line-height: 14px;
      		font-style: italic;
      	}
      
      	.spacer { display: block; clear: both; }
      	</style>";
      }
      
      function author_bio_settings()
      {
      	// this is where we will display our admin options
      	if ($_POST["action"] == "update")
      	{
      		$_POST["show_pages"] == "on" ? update_option("bio_on_page", "checked") : update_option("bio_on_page", "");
      		$_POST["show_posts"] == "on" ? update_option("bio_on_post", "checked") : update_option("bio_on_post", "");
      		$message = "<div id="message" class="updated fade"><p><strong>Options Saved</strong></p></div>";
      	}
      
      	$options["page"] = get_option("bio_on_page");
      	$options["post"] = get_option("bio_on_post");
      
      	echo "
      	<div class="wrap">
      		".$message."
      		<div id="icon-options-general" class="icon32"><br /></div>
      		<h2>Author Bio Settings</h2>
      
      		<form method="post" action="">
      		<input type="hidden" name="action" value="update" />
      
      		<h3>When to Display Author Bio</h3>
      		<input name="show_pages" type="checkbox" id="show_pages" ".$options["page"]." /> Pages<br />
      		<input name="show_posts" type="checkbox" id="show_posts" ".$options["post"]." /> Posts<br />
      		<br />
      		<input type="submit" class="button-primary" value="Save Changes" />
      		</form>
      
      	</div>";
      }
      
      function author_bio_admin_menu()
      {
      	// this is where we add our plugin to the admin menu
      	add_options_page("Author Bio", "Author Bio", 9, basename(__FILE__), "author_bio_settings");
      }
      
      add_action("the_content", "author_bio_display");
      add_action("admin_menu", "author_bio_admin_menu");
      add_action("wp_head", "author_bio_style");
      
      ?>

      Voila

      Hopefully if everything went according to plan, you should now have a working authors’ biography box after your posts/pages. Further, you now have a custom settings page in your WordPress dashboard, that you’re free to extend how you see fit.

Quick Tip – Nifty Northern Lights

Have you ever been way up north and seen those amazing northern lights? If your answer is no (or even yes for that matter…) – this is a tutorial for you. We gonna learn how to create a cool looking aurora borealis effect using Trapcode Particular and Magic Bullet Looks so you have an extra chance to see this wonder of nature.


Preview

Want access to the full AE project files and assets for every tutorial on Aetuts+, including this one? Join Ae Premium for just $9/month. You can view the final effect preview video below.

QuickTip

Download Tutorial .flv

File size 61.7MB


Phototuts+ Reader Profile: Radiant Photography

Today we’ll be getting up close and personal with Scottie and Breanna Chanson, a husband and wife photography team that comprise Radiant Photography. Radiant has made a big splash in the photography scene in Phoenix, particularly in the area of wedding and engagement photos.

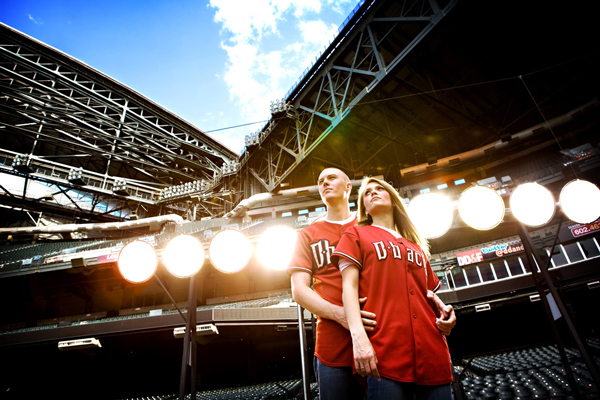
The purpose of this interview is to give our readers some insight into what it’s like to start a full-time photography business. Scottie and Breanna shared tons of great information and experience with us about trials of starting a new business, how they scraped by in the beginning stages, where they find work, how to leverage social media and how they manage to spend virtually all of their time together without killing each other. Along the way we’ll see some of their recent work.


Q 1. Let’s start by getting a little background. When and how did each of you take up photography as a hobby?

Breanna: I feel like I’ve spent most of my life in search of an artistic medium that fits me. I’ve tried everything from fingerpaints (yes, as an adult) and ceramics to dancing,singing, and acting. I always felt like I had creative visions in my head that I couldn’t quite duplicate through any medium. When I took some of my first pictures, I started to think that it’s possible I was never meant to create something entirely from scratch, but rather to capture things that already exist and just manipulate them in a way that expresses the creative explosions going off in my head.

I started taking pictures with my friends when I was 14 (we thought we were high fashion models and Scottie still likes to make fun of those photos to this day!). When I was 16 I took a photography class at school and that really opened up the world of photography to me… film photography! My parents did their own research and bought me a nice camera for Christmas so I could keep shooting after the class. I used that one for quite awhile working on naturally lit black and whites. I didn’t start working with flash photography until Scottie started getting really good at it and I was jealous of the pictures he was getting!

I capture things that already exist and manipulate them in a way that expresses the creative explosions going off in my head.

Scottie: When I was a little kid I got it in my head that I wanted to be a professional photographer when I grew up. The only problem was that I’d never actually owned a camera to work with! My grandfather had an entire room of his house filled with magazines (I mean that quite literally!) so I found myself living vicariously through all the photos in his old National Geographics. My passion took a detour when I was told that I needed to get a real job so I never pursued my childhood dream.

The first time I got my hands on my own camera was when I discovered that marrying Breanna meant inheriting her cameras! I spent a ton of time on our honeymoon experimenting with her camera and I was SO excited about working with it more (well, actually I was excited about buying a much better camera to work with more!). By this time I had gotten over all that “real job” stuff, and I was working as a graphic/web designer. As I began taking photos for client websites, I gained more and more experience and I could feel my old love for photography returning.

Breanna: Yeah, that reminds me, I didn’t get to take any pictures on our honeymoon because you were hogging my camera!! You owe me a trip where I get to take all the pictures!


Q 2. Can each of you tell us what you did before becoming full-time photographers?

Breanna: Scottie’s answer to this one is the funniest so he gets to go first!

Scottie: I don’t know if you can call it funny but I was definitely a “Jack of all trades”. I started out going to college to be a Doctor and I ended up switching over to animal science to be a veterinarian. The part that Breanna thinks is funny is how many jobs I had between then and now that are completely random and not at all related to each other.

So here’s the list (or at least all that I can remember anyways): grocery bagger, vet tech, research assistant, pizza cook, sporting goods store manager, kayak guide/sailboat salesman, machinist, landscaper, pool table mechanic, youth pastor, and graphic/web designer. I definitely get bored easy and I love learning about new things. Even though I was able to learn a lot through such a myriad of different jobs and experiences, I never really felt satisfied with any of them. Photography is different. For one it’s the longest “profession” I’ve ever had! I’d say it took me 28 years to find my calling in life!

Breanna: I on the other hand, am much more content to learn something and stick with it! Marrying Scottie has challenged me to be more open to change and growth. So while I love how good that is for me and how interesting it makes my life… it’s definitely exhausting at times! What I’m trying to say is that my story is much simpler. I got my bachelors degree from Arizona State University in Family and Human Development. As much as I tried to get out of it, I was forced to go on and work towards my masters degree in counseling since almost everything in the field I wanted to go in required a Masters degree.

I still love Family studies, psychology, sociology, child development, etc. But I am also totally LOVING what we’re doing right now so I decided to put the second half of my Masters degree on hold for now so I can focus on Radiant. Just for kicks, here’s a list of all the jobs I’ve had in my life to compare with Scottie’s: Record store employee, odd jobs in a “leadership development” program at a church, a makeup/skin care consultant, a barista at Starbucks, and a receptionist. That’s it… all 5 of them! Actually that is a lot more than I thought I’d done… I’m catching up to you, Scottie!


Q 3. Tell us about the transition from viewing photography as a hobby to something that could actually provide income.

Scottie: I’m kind of the story of what not to do! I jumped in with both feet before I was ready, I was never part time, I went right to full time (my wife was a barista at Starbucks at this time… we weren’t quite bringing in the big bucks!). I didn’t even really spend much time as a hobbyist either.

Breanna: Let me interrupt to tell you something about Scottie that he’d never say about himself. Scottie has this incredibly ability to pick up a new skill faster than anyone else I know. He’s self taught in everything he does (and he’s also amazing at everything he does) which is made possible because he’s a genius… don’t argue with me, Scottie, it’s true!

When you own a photography business you spend 90% of your time running your own business and about 10% of it actually taking/processing photos.

Scottie: Whatever, Breanna (*blush*). As I was saying, I had to learn a lot the hard way and suffered a lot because of the way I did it. The biggest wake up call is realizing that when you own a photography business you spend 90% of your time and energy on running your own business and only about 10% of that time is spent actually taking/processing photos. We got lucky because it turns out that I love running a business as much as I love photography.

Breanna: I was a little slower to just jump in like Scottie did because for one I was pretty happy with what I was doing. I was still in college and full of hopes and dreams about my future career. It wasn’t until I got a 9-5 job that I went, “uh oh” and I started realizing this wasn’t going quite the way I had hoped it would! Before the “uh oh” point, I had been helping Scottie shoot weddings on occasion, but I wasn’t even doing enough photography to be considered part time and I wasn’t involved in the actual running of the business. Hence, I did things what we call “the right way”. I began shooting slowly and learning slowly. I didn’t need my money from photography to survive so I could just take the time I needed to grow as a photographer and to learn the things I needed to before I got started (where as Scottie learned all that AFTER he got started and had to do things with a lot more frustration involved).


Q 4. How did you juggle your respective careers while taking on extra work as photographers?

Breanna: Once the “real world” hit me when I had my first full time job, I decided I wanted to back track and do what Scottie did as far as disregarding that whole “real job” idea and start doing something I loved! So I cut back at work to part time and started doing photography full time. I would work a full day at my job and come home and work on Radiant stuff until midnight and get up the next day to do the same thing (or to have a day off from my other job and spend that entire day working on our business). It was more than exhausting… I couldn’t have kept it up for longer than I did. But thankfully, all that work paid off enough that after only a few months I was able to quit my real job and focus solely on photography along with Scottie who was already doing it full time.

So to answer your question, it wasn’t as rough as it could’ve been since Scottie was already doing it full time (and he never did have to juggle another job with it) and I didn’t have to juggle my part time job for very long. When we decided it was time for both of our incomes to rely solely on photography, it was a HUGE leap, but we were more than ready for it at that point.

Scottie: Um, a huge leap is definitely an understatement! It was freaking hard. We sacrificed a lot when both of us began doing it full time. But the good thing is, I think we were very realistic about those sacrifices and we were very ready to make them. Have you ever seen that movie “P.S. I Love You”? (yes, I’ve seen it and I’m man enough to admit it).

There’s a scene in there where the couple is fighting because the woman is so exhausted and unhappy at her job and they just can’t seem to figure out what to do about it. While watching that film, Breanna and I just turned to each other opened mouthed because we felt like someone had stuck a camera in our bedroom to film that scene. We’d had that same fight more times than we could count and we were sick of it. Sick enough to decide we wanted to sacrifice our comfortable lives for awhile and live off of whatever scraps (and meals Breanna’s mom made for us) that we could!

We feel like we’re still not caught up from the time we spent pouring ourselves into our business when it first started. Pulling all nighters, having mutual crying spells (again, I’m man enough to admit it), and nights where we were so stressed that we couldn’t sleep even though we had the time. It was rough, but oh man, we wouldn’t change it for the world! And most of what I described happened after Breanna quit her job and while I was already full time! I can’t imagine how we would’ve done it if both of us had been working full time at other jobs while trying to start up Radiant!


Q 5. How do you find most of your clients? Has this changed from when you first began?

Scottie: When we first started, I was a college pastor at a large church. Putting tons of single college students in the same room together is bound to result in some love connections! So we had a very large base of people getting married when we first started out and that’s a major reason that our company grew as fast as it did. For every wedding we shot, 100-200 people saw our work and heard about us… and a lot of those people were planning weddings themselves! We also did a lot of bridal shows in the very beginning which helped get our name out there. We are still shooting weddings for the friends of clients we met at some of our first bridal shows.

Breanna: Since the hubbub about Radiant in the college world died down some (most of the people we knew then are married now), a lot of our business has been coming through Facebook. What used to be word of mouth referrals from “friends of friends” has now transitioned to being indirect referrals from “friends of friends of friends”… and so on! Facebook has worked out so well for us that we are now beginning to speak to other business owners on how to use it. “Like” us on Facebook to learn more about how we use it as a marketing tool! (Radiant Facebook Link)

Scottie: Breanna has rocked the Facebook side of Radiant. She’s my favorite… not just because she brings in business for us either!


Q 6. How and why did each of you make the decision to jump into photography as a full-time career?

Scottie: When we were dating I was working 80+ hours a week, missing every major holiday, sleeping 4-5 hours a night, falling asleep on our dates, and just generally hating life. I actually have huge memory lapses from that period of my life due to lack of sleep (it’s a miracle she decided to marry me!). When we got engaged, we decided we wanted more out of our lives than money and security… we wanted freedom and beauty. We decided we could only accomplish that if we took a huge leap of faith. That was when I started doing graphic design independently, which eventually led to the start of Radiant.

Breanna: People thought we were crazy to have him quit his “good” job right before we got married. But that’s how we roll I guess! Our main goal in life (after loving people) is to live an extraordinary life and we knew we wouldn’t get it without taking risks and without resisting many of the comforts that the norms around us provided. Even way back when we were newlyweds we chose freedom over security and we are continually pushing ourselves to make that choice on a daily basis. Yes, we were dirt poor for a long time, and yes, it was difficult.

But I wanted to have a husband to live life with, not just money to spend on trying to gain a life that made me happy. So he quit his job and eventually I quit mine so that we’d be free to discover something that made us feel alive and that gave us the opportunity to pursue deeper things in this world that are more important than the type of lifestyle we lead. If we’ve peaked your interest, I just published a blog about it called “To Live An Extraordinary Life”.


Q 7. Have either of you ever questioned the decision to go full-time?

Breanna: Yes, when it’s 2am and we’re still working, all the while thinking about how we have to get up early and do the same thing the next day. Especially since we know that our to do list is going to, once again, magically grow by itself overnight! Other than that, NO!


Q 8. Approximately how many shoots did you do last year?

Breanna: We had about 60 portrait sessions (including engagement, family, high school senior, etc. sessions). And we had about 20 weddings. We believe that the more time we spend getting to know our couples the better their wedding photos turn out, so we spend a lot of time with our clients. We actually throw in engagement sessions for free with each wedding because we so strongly believe in spending quality time with our couples as often as possible. We don’t believe in booking so many things that we have to sacrifice quality for quantity, so we limit ourselves on how many weddings and portrait sessions we book in a year.


Q 9. Scottie, how has a background in design helped you become a better photographer? Would you recommend that other designers expand their skill set to include photography?

I absolutely think designers should expand their skill set to include photography.

Scottie: There are SO many things I gained from my background in design. For one, I gained a better understanding of color and composition and those are obviously a huge deal in both design and photography. Of course my design work helped me learn Photoshop which is my entire world now. As I’ve mentioned before, I jumped into photography way too fast and I made a lot of mistakes. I am very grateful that I had all the time that I did working in graphic design for me to learn Photoshop a little bit slower than I did photography! Graphic design also helped me learn the ins and outs of computer/tech skills that I’ve needed to use a ton in the photo business (especially when things don’t work quite like you expect them to!).

Even with all of those things that helped me, I’d say the biggest thing that has carried over from my graphic design days is my ability as a creative professional to understand and deliver a client’s vision. That’s quite a feat and graphic design prepared me very well for being able to accomplish that for my photography clients. I absolutely think designers should expand their skill set to include photography. They should at least be hobbyists in photography. The reason being is that designers work with photography so often that at the very least it would help them learn how to better communicate/collaborate with photographers to make things go smoother on both ends.


Q 10. Can you briefly describe a typical day of work on a non-shoot day?

Scottie: This happens to be our big project for 2010. We are working on being much more efficient than we currently are. There are a few programs that have really helped us improve our efficiency and have significantly changed what we do on an average day. One of those programs is Showit Sites that we used to create our website. Using Showit has significantly cut down on the amount of time we spend updating our website, but allows us to still maintain a flash website that reaches our clients. I can’t even tell you how much time per week I used to spend on our site, now I spend more time focusing that energy into growing our business, rather than on just trying to maintain it. You can find our site here.

Breanna: The program we’ve adopted that I love the most is Shoot Q, which handles all of our studio management, and it’s completely changed our lives! In other words, we now have time to actually have lives! But in general, here are the activities we do during an average non-shooting day in order of the amount of time they take: Photo processing, client communication, album design, blogging, Facebooking, reading/learning, accounting, marketing, and walking our dog (that’s what gets us out of the house and into the land of the living on some of these days!).


Q 11. What’s it like to work with your spouse?

Scottie: The good part is getting to spend all day with my best friend. The bad part is spending all day with my best friend. Ha ha!

Breanna: I would protest that, but I do agree!

Scottie: Really though, the bad part is that it’s easy to forget that she’s my best friend and not my boss. It’s so easy to make our lives (even when we’re away from our computers) all about Radiant. Sometimes it’s hard to just live normal life together. We’re working on spending time away from work and actually not talking about work when we are finally away from it!

Breanna: I definitely don’t think working with your spouse is for everyone. It just happens to work well with us and our personalities. Ever since we’ve been working together I feel like we actually argue LESS than we used to! That was really surprising to me, considering we spend 95% of our lives now and we have a lot more major decisions to make then we used to. But whatever, I guess we’re just the type of couple that does better when we spend more time together, where I think other people do better when they get more time away from one another. Hopefully I’ll still agree to all I just said as we continue working together for the next however many years! Ha!

Scottie: You will, you know you need me! Seriously though, I’m constantly amazed at how well we work together, both when we’re shooting and when we’re sitting side by side for an entire day. When you think about it, the fact that we’re always together and that we’ve worked really hard on our communication with one another, really pays off when we’re shooting in the heat of the moment. I really think that having a constant teammate for life that is the same at home and at work, gives us an advantage over photographers who shoot with someone different all the time or with someone who they aren’t that connected with.

My favorite thing about working with Breanna (other than the fact that she talks a lot so I don’t have to!) is that she can take an idea that I have and communicate it well to others… so all that talking does pay off in the end! Her communication skills pick up where mine are lacking and our clients fall in love with her when they meet her where if it were just me by myself they’d probably be like “yeah, I could take him or leave him”. I also love how we have differing artistic eyes that push us forward.

Breanna: So to make a long answer even longer, I have to make sure I add what I like about the fact that Scottie in particular is the one who is my teammate! Aside from his irresistible good looks, I love working with Scottie because he’s such a great example to me. He’s an incredibly hard worker who is never finished learning and who always wants to do better. And then there’s me… sprawled on the couch watching him do all this stuff to better himself while I’m content to just lay there watching the E channel on TV! His quest for knowledge drives him and it really does mean that he will always be growing. Who can be around that without feeling the need to step up to the challenge as well?! He patiently pushes me to be a better person (very, VERY patiently!). He also takes care of some of the businessy junk that I hate so that I can be free to do the creative stuff that I adore… so I love him for that as well!

Scottie: See I told you that you need me… who would do your taxes?!


Q12. Any last advice for amateur photographers who are looking for a way to make the leap into full-time?

Scottie:Take your time, do it right, and learn from others mistakes instead of making your own. This is the biggest mistake I made! You need to have another source of income while you take the needed time to learn. If the only means you have to take care of yourself is photography and you are new to it, you’re going to make mistakes that could’ve/should’ve been avoided.

Take your time, do it right, and learn from others mistakes instead of making your own. And also find a great network of other photographers who can support you!

The biggest thing I think everyone should consider is that starting your own photography company is running an actual, legit business. Just because you like photography, doesn’t mean you like being a business person… there’s an unbelievable amount of work that goes into a business that most people don’t anticipate. If you don’t think you’d enjoy running another kind of business, you probably won’t enjoy running a photography company either. I totally respect people who decide they just want to get the opportunity to take pictures full time and that’s the extent of what they want to do. If that happens to be you, consider that there are plenty of companies out there who are doing all the business work and want to hire you just to take pictures, so start looking into one of those.

Breanna: A lot of the horror stories we hear are from people who hired a “new” photographer who ended up just being bad on the business side and it screwed up the couple’s wedding pictures. Of course more often than that, we hear of people who just ended up with wedding pictures they aren’t happy with because they hired someone who wasn’t experienced enough. We can’t stress enough how much people need to second shoot with other photographers before jumping in (we can say that because we’ve experienced it both ways)! There’s so much more to shooting a wedding than just walking around taking pictures. It’s an entire process and it involves a lot of skills and knowledge on top of just knowing how to get a good shot.

Scottie: The final thing I would say is to join the Professional Photographers of America (PPA) and listen to just about everything they have to say.

Breanna: And also find a great network of other photographers who can support you! There’s nothing better than to feel like you have a place to go when you need advice or you’re at your wits end. Just knowing there are others out there like you is a huge comfort. Other photographers are also fun because they tend to be really, really cool people…. like us!


Conclusion

A huge thanks to Scottie and Brianna for taking the time to answer all of our questions. Be sure to stop by the Radiant website, blog, and Facebook page for more information and to get a look at their full portfolio.

Feel free to use the comments below to ask Scottie and Breanna your own questions about starting a photography business. Also be sure to share your own expereinces with making the jump to full-time!

Create a Nature Inspired Surrealistic Room in Photoshop

Creating a surreal image composition in Photoshop often involves mastering the various techniques and tools that Photoshop has to offer. In today’s tutorial we will demonstrate how to create a surreal nature inspired room using many of Photoshop’s most useful and popular tools. When we are finished you will have learned how to create a room with realistic water as its floor, real clouds on the walls, and a boat floating in the water with waves crashing in its wake.


Final Image Preview

Let’s take a look at the image we’ll be creating. Want access to the full PSD files and downloadable copies of every tutorial, including this one? Join PSDTUTS PLUS for just $9/month. You can view the final image preview below or view a larger version here.


Resources


Step 1: Creating a New File

Create a new file that is 3000 x 3000 pixels, 300 dpi, 8 bit RGB Color, with a Transparent Background.


Step 2: Create the Walls

To start off, let’s open Big Blue Sky. We will be using this to create the walls of our room. So let’s transfer it to our 3000 x 3000 layer. Click our stock image, press (M) to activate our Marquee tool and select the sky; making sure to leave the trees outside the marquee box, once you’ve done that press (V) and drag the selected part of the image by holding down the left mouse button to our canvas. See example below:

Decrease the size of the Blue Sky image to fit our canvas. Activate our ruler by pressing Cmd+R. Now that the ruler is active, create a guide at 5.3 in. See image below:

Press Cmd+T to transform our image. Resize it to come up with something similar to the image below:

Now it is time to create the room’s perspective. Let’s set the navigator to 15% so the ruler would be counting in 1’s. See image below:

Activate your marquee tool and use it to select the area from axis 5.3 in of the ruler on the left to axis 3 in on the top ruler. An example is shown below:

Now use the transform tool and right click anywhere on the canvas and left click on the Distort tool. Follow instructions as seen on the image below:

Do the same thing on the axis 5.3 in below and axis 7 in to 10 in on the top ruler. See instructions on the image below:


Step 3: Adding Texture to the Walls

In this Step, we will be adding a texture to the very flat looking wall. We will be putting the texture over the clouds to give it a feel of a dirty wall. Let’s open our 18 Vintage Photoshop Brushes. (Note: After downloading this brush set, extract it to ABR file to “Adobe Photoshop > Presets > Brushes”)

We will need to apply the brush on a clean layer so create a new layer. Press Cmd+N or click on the “Menu bar’s Layer > New > Layer.” You may also create a new layer by pressing the paper button located on our Layer Window. Be sure to rename our new layer as “Wall texture: middle” Changing the layer’s name is easy, just click on the words Layer 1, double click on it and there you have a new name for it.

Press (B) to activate your brush tool and right click anywhere in the image and click on the button that resembles the play button on audio players then left click on Replace Brushes.

Replace your current brush set with our “18 Vintage Photoshop Brushes” which should appear as “vintage-paper-brush” in your Photoshop Brushes folder. Don’t worry you may revert back to your original brush set by loading your choice of brushes or if you’d like to use the original Photoshop brushes just click on the play button again and click on Reset Brushes.

Now you see the brushes have been replaced. We will be using only one of the 18 brushes. The other brushes are nice but the one that I picked fits well with our image. With the proper opacity, it would make our wall look really convincing. Click on the brush that has a size of 1650px. See image below:

Once you’ve clicked it, the brush will appear on screen ready to be stamped to our canvas. Notice that the brush is on a horizontal position? We need to flip it to a vertical position. First set your brush Opacity to 100%. Set the Brush color to this value: #494949 on the color picker. See Reference below:

After that, apply the brush anywhere on the image. Next, transform the image by pressing Cmd+T and Rotate 90 degrees CW. Once it has been rotated let us transform it again to make it fit the wall. Be sure to activate the ruler since we will need it throughout. Transform the image and align its width from the axis 3in to 7in on the top ruler and be sure its height is in the axis 5.3in on the left ruler. Reference is below:

After doing that, transform the image and click Flip Horizontal.

Now let’s lower the layer’s opacity. Go to the Layer Window and change the Opacity to 25%.

To create the texture for the wall on the left just duplicate “Wall texture: middle” press Cmd+T and click Flip Horizontal and then rename it to: “Wall Texture: Left” We will need to distort it to fit the wall, so let’s transform the image and use the Distort Tool. Distort the texture like we did with our sky image earlier to fit the wall and make sure to align it to axis 10in on the ruler on the left. Set its opacity to 50%. See reference below:

For the wall on the right just duplicate “Wall Texture: Left” rename it to “Wall Texture: Right” and drag it using your Move Tool (V) to the right. It should now look like this:

Group all the Wall textures to keep things organized. To create a group, “go to Layer > New > Group” and name it “wall textures.”

Let’s darken some parts of the wall to enhance the contrast and appearance. Activate your Burn tool by pressing (O) and clicking on that tool to bring out the menu shown on the image below for instructions:

Set the Burn tool values to the following:

  • Brush size: 900px
  • Range: Midtones
  • Exposure: 35%

The reference below shows the region to be burned or darkened.


Step 4: Creating the Floor

For our floor, we will be using the image Stormy Sea. Open the file, use the marquee tool and select the sea and drag it to our 3000 x 3000px layer and put it under all the layers that we have created. Transform it to fit the canvas and make it look like the room’s floor. See reference below:


Step 5: Creating the Waves

A sea without waves wouldn’t look or feel like a real sea right? So let’s add some waves on the walls to make it feel an authentic sea. Create a new layer, name it “wave1”. Activate your brush tool and replace it with the brush set: Waves Brush by anaRasha. When it opens, pick the wave brush which has a size of 600px. Press (D) to revert the foreground color and background color to its normal state which is black and white and then press (X) to revert back it to their original position. You should now have the color white selected. Press (B) again to activate the brush.

Use these brush values:

  • Brush Opacity: 100%
  • Set its size to 600px (default size of the brush that we’re going to use)

See image below for instructions:

Rotate the image by pressing Cmd+T and clicking Rotate. Rotate it so that is it straight and aligned with the sea; right click on that selected area and stretch the image (press free transform and stretch it) so it fits perfectly with our floor. Instructions are shown below:

Next, let’s create a new layer for our new wave and name it “wave2.” We will be putting this on the right wall. In total there will be 13 waves. Activate your brush tool, make sure that the brush setting you’re using is still the Waves brush by anaRasha and click the wave brush with the size: 526px. Do not change the brush size, just use the default size and then brush it over the right wall, just beside “wave1.” Make sure to rotate it to be aligned with the wall.

Press Cmd+T to transform it once again and this time click Scale, for we will be resizing it to be aligned until axis 8 of the left ruler. Just erase the unwanted waves that appear. I would recommend using an Eraser Hardness of 0% and a Opacity of 100%. You can do that by clicking the Eraser tool or pressing (E) and then changing the Hardness to 0%. See reference below:

Create a new layer and name it “wave3.” Open your brush tool again and click on the wave brush which has the size 461px. Use the default size and brush it over the right wall just in line with “wave2.” (You can move it using the Move tool or V) Remember to erase the excess waves. See image below:

Create a new layer for “wave4.” Use the same brush we used for “wave3.” Brush it on the right wall just beside “wave3.” Remember to rotate it to be aligned with the present waves and erase the excess waves that you see. See image below:

Now for the left wall, just duplicate “wave2” and “wave3” and align them to the left wall. Do the necessary rotations to align it with the wall. See reference below:


Step 6: Creating the Splashes on the Walls

Now we will be creating the splashes on the walls. Activate your brush tool and replace the current brushes with the Water Effects brush by fiftyfivepixels. We will be adding some authentic-looking water splashes with the help of these brushes. Create a new layer and name it “wave5.” Activate your brush tool once again (Take note that the brush opacity should still be set to 100%) and follow instructions from the image below:

Change the brush size to 1411px and brush it over “wave1.” Erase the excess waves. The result should be similar to this:

Create a new layer and name it “wave6.” Open your brush tool and select the brush indicated by the image below:

Once you’ve selected your brush, change its size to 1014px. Brush it on the left wall over the duplicated “wave2” and “wave3” layers. Then use your Distort tool via the Transform tools and distort the layer so it is aligned to the wall, making it look like it is splashed on the wall. The result should look something like this:

Create another layer and name it “wave7.” Pick the brush as shown in the image below:

Use the default size which is 2500px. Apply the brush in this manner as seen in the image below:

Remember to erase the unwanted waves.

The result should be similar to this image:

Create a layer and name it “wave8.” Pick this brush from the brush palette (waves brush by anaRasha) as seen in the image below:

Apply the brush like this:

Now we will be distorting “wave8”, this will be a bit tricky so pay close attention to the images shown below:

Erase the excess waves.

Create another layer and name it “wave9” and pick the brush as shown in the image below:

Use its default brush size which is 2500px and apply it to the image as shown below:

Hit the Cmd+T key (transform tool) and click on Distort. We will be using the same distort technique as we used in “wave8.” See reference below:

Erase the excess waves to come up with an image similar to this:

Create a layer and name it “wave10.” The brush that we will use is shown in the image below:

Apply the brush on the center of the image without changing the brush size, and then activate the Transform tool and click Rotate 90 degrees CW. Resize it and move it to the right wall – to where “wave 9” is located. After you’ve done that, transform the image by using the Distort Tool so it would be aligned to the right wall. Scale it to the size of “wave9.” See image below for instructions:

Duplicate “wave10”, activate the Transform tool and click Flip Horizontal. Move the duplicated layer using the Move Tool to the spot shown in the image below:


Step 7: Inserting the Boat and the Clock

Now that the background is complete, let’s add our subjects. Open Clock by Mind IllusionZ. We’ll be using the Polygonal Lasso Tool to separate the clock from its background. Now, activate the Polygonal Lasso Tool (L). You’ll find it in the Tools Window just below the Marquee Tool. See reference below:

Now that you’ve cut the clock, let’s move it to our canvas by using the Move Tool (V). Rename the layer to “clock.” Activate the Transform tools and scale it down to the level shown in the image below:

Create a new layer and put it under the clock’s layer and name it clock’s shadow. We will be adding some shadows to the back of the clock to give it depth and to reduce its flatness. Activate your brush tool and right click on the image to bring up the menu and click Reset brushes. Resize your brush to 150px (recommended) and then set its opacity to 25%. See reference below:

Now let’s add the boat. Open Toy Boat and cut it out from its background using the Polygonal Lasso Tool. Once you’ve done that move the boat using the Move tool to our canvas and put it on top of all the layers. We will need to change its Brightness/Contrast, so select the boat’s layer and “go to Image > Adjustments > Brightness/Contrast.” Set its values to:

  • Brightness: -25
  • Contrast: -39

Then Flip the boat horizontally via the Transform tool. Scale it down to the level shown in the image below:

Now let’s add waves to boat. Click the Stormy sea layer which is located under all the layers and activate the Clone Stamp tool (S). Use these values:

  • Brush size: 70px
  • Opacity: 100%

See the image below for instructions on where to clone:


Step 8: Retouching the Image

Technically, our image is complete but let’s spice it up a bit more.

First let’s add more shadows to the walls to give it some more contrast. Create a new layer and name it “shadows.” Just put it under the boat’s layer. Activate your brush tool and use these values:

  • Opacity: 15%

You’ll need a huge brush for this. I would recommend using a brush size of 1400px. See image below for reference as to where we would add the shadows:

Let’s create a Gradient Map to increase the image’s contrast. “Go to Image > Adjustments > Gradient Map” or you may click on the Create a New Adjustment Layer button (circle button) just beside the “Create a Group” button in the Layer window. See the reference below for the shortcut:

Once you have the gradient map on your Layer window, you will notice that the whole image turns into a high-contrast Black & White image. We don’t want that; so click on the Blending Mode which is found on the Layer window. Click on the word Normal to bring up the menu and find the setting labeled: Luminosity which is found in the bottom most part of the menu. Set the Opacity of the Gradient Map to 100%. The result should be similar to this:

Now let’s make the image a little bit darker to increase its impact. We will be using the curves tool. Click on the “Create a New Adjustment Layer” button and input these values:

  • Input: 137
  • Output: 122

The result should be similar to this:


Step 9: Creating the Vignette

Let’s create a vignette to further enhance the perspective of the image. To do that, we need to create a new image. “Go to File > New or press Cmd+N.” Use the same settings as the current image. Create a new file with the same settings as with our canvas except that the background contents should be white (Refer to Step 1)

Once it has been created, “go to Filter > Distort > Lens Correction.” Find the tab Vignette and use these settings:

  • Vignette amount: -100
  • Midpoint: +50

Drag that vignette layer to our original image and put it on top of all the layers that we’ve created, and then use these settings:

  • Blending mode: Multiply
  • Opacity: 75%.

You can adjust the opacity if you wish but I would strongly recommend 75%. Notice that the bottom part of the image seems a little dark. Use your Eraser tool to erase it. Make sure to use the following values.

  • Brush size: 1400px
  • Opacity: 50%

See image below to see where you will need to erase.


Step 10: Giving the Image Another Retouch

At this point our image is mostly complete but let’s add some finishing touches for good measure.

Increase the image’s contrast. Click on the Create a New Adjustment Layer button and pick Brightness/Contrast and enter these values:

  • Brightness: 0
  • Contrast: +7

Now let’s adjust the Color Balance. Click again on the Create a New Adjustment Layer button, and pick Color Balance and enter these values respectively:

  • -6; 0; -14

Create another Gradient Map from the Adjustment layer button and set it to Luminosity, Opacity: 25%.

Adjust the Brightness/Contrast once again but input these values:

  • Brightness: +5
  • Contrast: 0

Let’s add more Cyan and Yellow to our image. Create another Color Balance Adjustment Layer from the Adjustment Layer button and input these values respectively:

  • -6; 0; -6

You may also want to lower the Opacity down to 70% so it is not too green.
Finally, let’s bring out the whites in the image by increasing the contrast. Create another Brightness/Contrast adjustment layer and input these values:

  • Brightness: 0
  • Contrast: +6

Step 11: Sharpening and Saving as PSD

Go ahead and save your file. We can further enhance this image by sharpening it. “Go to Filter > Sharpen > Smart Sharpen” and input these values:

  • Amount: 125%
  • Radius: 1.0
  • Remove: Gaussian Blur
  • Check the More Accurate box

Conclusion

Take a look at the final image that we created.

Subscribe to the PSDTUTS RSS Feed for the best Photoshop tuts and articles on the web.


Keyword Research for Sales and Business

First, a word of warning. This isn’t a keyword research primer for hardcore internet marketers. This is for the rest of us. Most of this will be familiar to anyone seriously involved in internet marketing, but even the most basic keyword research concepts are unfamiliar to 95% of the population.

There are two main ways of making offers for your company’s products or services. You can use your experience to intuit what your customers want, or you can do actual market research. The usual tools for conducting market research are polls and focus groups. Unfortunately, these can be loaded methodologies, since polling makes it hard to avoid positing leading questions and answers, and focus groups tend to generate self-conscious feedback that’s not representative to real-world customers. Both approaches elicit reactive information.

So how can we find out what’s on customers’ minds without asking them? Welcome to the wonderful world of keyword research.

I’m going to create an example in real time without editing it later to prove a point. Suppose I’m a software developer interested in selling a product in the computer security niche. Most vendors like to create a product first, then figure out how to market it. It’s much more efficient to take the opposite approach. We want to find the best marketing angle, then create a product to fill it. That way we don’t have to spend weeks or months creating a product which, we discover in hindsight, nobody wants.

For simplicity’s sake, I’m limiting this example to two types of computer security products: firewall software and antivirus software. Instead of asking myself, “What’s the best way to market these?”, I ask myself a smarter question, “Which one is an easier sell?” The latter question breaks down into two further nuances: “Which one are more people looking for?” and “Which one is more commercial?”

Using the Google AdWords Keyword Tool

To answer these questions, we’re going to use the free Google AdWords Keyword Tool, sometimes called the “Google Keyword Tool” or, less accurately, just “AdWords”. This is the tool advertisers use to determine what search keywords to bid on to trigger their ads. I’ll explain that later, but for now, let’s finish my hypothetical software marketing example.

Go to the Keyword Tool by hitting the link above, or just do a search for “keyword tool”, which usually brings it up as the first search result. If you found it by doing a search, click the “Get keyword ideas” link in the middle of the home page. Now, in the center field captioned, “Enter one keyword or phrase per line”, put in the first keyword, “firewall software”, hit Enter, and on the next line put in the second keyword, “antivirus software”. Now enter the CAPTCHA (a word rendered as a graphic to avoid automated queries) in the box below, and click the “Get keyword ideas” button.

We first need to configure the tool to show the information that’s relevant to what we’re doing, and hide the information that isn’t. In the Match Type dropdown menu, set the type to Exact. In the menu captioned, “Choose columns to display”, select “Show Estimated Avg. CPC”, then select “Hide Advertiser Competition” and “Hide Local Search Volume”. Click the header for Global Search Volume to sort the the data in descending order by this column. Now scroll down to the end of the first keyword list (there are two lists — we’re ignoring the second one in this context), and click “.csv (for excel)” to export the list to Excel.

In the top row of letters, double-click in the separator between the A and B columns to expand the cells of the keyword list. Now click in D2 and enter the following formula: “=b2*c2*.43″, hit Enter, click on D2 again, and double-click the lower right corner of the cell to auto-fill the rest of the column with the same calculation. With the values still highlighted, right-click on the column, select Sort from the context menu, then select Sort Largest to Smallest. This will bring up a Sort Warning that you’ll leave in the default option selected, “Expand the selection”, and click Sort. Then click D1 and type “KW Value” to create a header for keyword value.

The results will vary, since AdWords bids fluctuate like stock prices, but in my spreadsheet, a broad insight stands out: the market for the keyword “antivirus software” is 10 times bigger than the market for “firewall software”: $426K vs. $42K. We’re multiplying the number of searches per month by the cost per click — the amount of money advertisers are willing to pay to capture a reader who clicks on their ad with the respective keyword. The top search result on page 1 of Google statistically gets 43 percent of all of the search traffic, and since advertisers can buy a Sponsored Link directly above this spot, they’re getting roughly the same percentage.

An internet marketer would make further adjustments for clickthrough rates — if you got 43 percent of all search visits, only a tiny percentage of those would actually click on the ad — but that’s beyond the scope of what we’re doing here. We’re only trying to compare the relative size of the markets we’re considering. Between two keywords, the one with the bigger market is either more popular (higher search volume), more commercial (higher cost per click) or both.

What about Competition?

Internet marketers will quickly point out that I’ve left out a key part of the equation: the amount of competition surrounding each keyword. An ideal keyword is one with a search search volume, a high CPC, and a low competition. In this context, “competition” is the number of pages indexed by Google for that keyword relative to the number of searches for it.

Competition is a worthwhile subject to cover in a later post, but I’m skipping it here because we’re not necessarily applying insights from keyword research to internet marketing.

Here’s an example. Suppose you had a law firm in Los Angeles that you wanted to promote with print advertising. Which wording in the Yellow Pages or in the Los Angeles Times’ classifieds would yield better results? Would a headline with “Los Angeles Lawyer” or “Los Angeles Attorney” perform better? Well, “Los Angeles Attorney” has a 20% higher keyword value. As a bonus of extracting our keyword list, we can also discern which niches of legal service are most in demand. “Los Angeles Criminal Defense Attorney” and “Personal Injury Attorney” ace out “Los Angeles DUI Attorney” and “Los Angeles Criminal Attorney” in keyword value by 25%.

Unlike online advertising, where paying for more valuable keywords costs more, there’s no cost difference whatsoever in print, and competition factors are less relevant. Keyword research has an enormous amount of leverage beyond applications to internet marketing. Spend some time experimenting with the Keyword Tool, and see if you can find new ways to create or position your products, your services, or yourself.

How to Create a Vector Baseball Bat and Ball

In this tutorial, you'll learn how to create a baseball bat and a baseball using Illustrator’s 3D tool and blends. We’ll utilize 3D art mapping for texture creation and pathfinder tools to create this classic illustration of a bat and ball.

Step 1

Open up a new document and select the Ellipse Tool (L). Create a circle and fill it with gray for now and a 1pt black stroke.

Step 2

Create a sickle like shape with the Pen Tool (P) and fill it with a darker gray.

Step 3

Reselect the Ellipse Tool (L) and create a shape like in the image below. Fill it with white.

Step 4

Select the Pencil Tool (N) and start drawing a stitch like shape (A). Make sure the path is closed. Fill it with red and set the stroke to black. Then create two small black circles (B) and place them on the tips. Last, create two small strokes with the Pencil Tool (C) as well.

Step 5

Group the stick (Command + G) and make a duplicate (Option-drag). Place them apart and select both. Create a blend (Command + Option + B). Then open the Blend Options (Object > Blend Options) and set the Specified Steps to 24, or whatever distance you want to achieve.

Step 6

Then select it with the Selection Tool (V) and rotate it 45 degrees. With the selection still active, go to Object > Envelop Distort > Warp Options and apply the settings below.

Step 7

Rotate it slightly clockwise.

Step 8

Reflect the stitches (Select object then hit O + Option-drag).

Step 9

Make a copy of the original circle for the baseball and place it above the stitches. Set the fill and stroke to none. Then select the stitches and the circle and apply a Clipping Mask (Command + 7).

Step 10

Now we have the stitches clipped.

Step 11

Place the stitches on top of the baseball objects.

Step 12

To make the baseball look a little more ragged, add some strokes with the Pencil Tool (N). You can replace the stroke with a brush of your liking.

Step 13

To make the baseball a little bit more flashy, we will had a few highlights. Create a half circle and fill it with white.

Step 14

Then with the half circle selected, go to Effect > 3D > Extrude & Revolve and apply the settings below.

Step 15

Place the 3D object on top of the baseball and set the Layer Mode to Multiply, 100%. Of course, you could create a circle with a radial gradient fill instead.

Step 16

Create a small gray ellipse and place it under the baseball. Then apply a Feather effect of 30pt (Effect > Stylize > Feather).

Step 17

The baseball is ready.

Step 18

Let’s move on to the baseball bat. Have a look at some baseball bats and pick a nice one for your reference. Then start creating it with the Pen Tool (P) in outline. You need only create half of it. Make sure the path is closed. Set the Stroke to a beige color.

Step 19

Since we want to add a small detail to the bat, select the Pen Tool (P) again and add two extra points to the outline along the handle. Then with the Scissor Tool (C), cut both points by simple clicking on them. Then select the small path with the Direct Selection Tool (A) and set the stroke to red.

Step 20

Select the outline and apply the 3D Revolve Options below (Effect > 3D > Revolve). Make sure you place the highlight so it shows a nice end of the baseball bat.

Step 21

For the wood texture we need to create a symbol so we can apply it as a texture map. Select the Pencil Tool (N) or the Pen Tool (P) and create a few lines, one thin and one thick in a beige and brown.

Step 22

Then select the Warp Tool (Shift + R) and warp the lines a bit.

Step 23

Then select all the lines and drag them into the Symbols Palette.

Step 24

Reselect the bat and open the 3D Revolve via the Appearance Palette. Click the Map Art button and add the wood symbol.

Step 25

Last but not least, add a shadow just like we did in Step 16. You can make a copy of the bat, expand the appearance and fill it with a gray color. Then apply the Feather effect again. Make sure you scale or rotate the shadow shape.

Conclusion

This is the finished artwork. A baseball bat and a baseball. I hope you enjoyed this tutorial.


Quick Tip: Using Google App Engine as a Proxy Server

Google App Engine can be used as a free and convenient way around restrictive or missing cross domain policy files. This tutorial will show you how to create a GAE proxy that provides access to restricted resources for your Flash application.


Final Result Preview

Let’s take a look at the final result we will be working towards:

That’s just sent some test data to a remote spreadsheet hosted on Google Docs. This would not work without a crossdomain.xml file on the receiving domain – yet, the cross domain policy file on Google Docs does not allow this, and I can’t change it. Read on to find out how this was done.


Why Use a Proxy?

In my last Quick Tip A Guide to Cross Domain Policy Files I showed you how cross domain policy files are used by Flash to determine what data can be accessed from remote domains. While being able to control access to resources is great for administrators, it is a pain for Flash developers trying to access data on a server that does not have a cross domain policy file, since no policy file means no access. Setting up a cross domain policy file can be easily overlooked, and I have run into more than one web service provider that didn’t think to cater for Flash developers.

I also mentioned that the issue was easily circumvented by use of a proxy. The idea behind a proxy is that it will accept connects from remote Flash applications (by supplying the appropriate crossdomain.xml file), then act as an intermediary passing data back and forth. The only real requirement of a proxy server (as it relates to Flash) is that it should be able to access public resources regardless of the permissions that may or may not be granted by a cross domain policy.

The really good news is that you can setup just such a proxy with no up front costs using Google App Engine (GAE). GAE will host a web application, and assuming your traffic requirements are below their threshold, there is no charge. What I will demonstrate here is how to create a simple GAE web application that can act as a proxy, allowing Flash applications to access resources that would otherwise be off limits.


Step 1: Google Spreadsheets and the Dreaded crossdomain.xml

There is a really neat feature in Google Docs that allows you to create a web form which can be used to populate a spreadsheet. I have set up just such a form here, with the results of this form being published as a public web page here. The form is a standard HTML form, which can be submitted programmatically using a standard HTTP POST operation.

I was recently in a position where I needed to collect some feedback from a Flash application I had distributed. These forms seemed like a great way to do that. There were no hosting costs for me, the results could be easily analyzed directly by the spreadsheet, and I could be pretty sure that a Google service like Docs would be reliable. The only problem was the cross domain policy.

<?xml version="1.0"?>
<!DOCTYPE cross-domain-policy SYSTEM "http://www.macromedia.com/xml/dtds/cross-domain-policy.dtd">
<cross-domain-policy>
<site-control permitted-cross-domain-policies="none" />
</cross-domain-policy>

This particular policy file allows no access to the http://spreadsheets.google.com/ domain for remote Flash applications. And sure enough, if you try to submit a form programmatically from Flash, it will fail.

This is a perfect example where a proxy can help.


Step 2: Create a GAE Application

Sign up for an App Engine account. You will be asked to create a new application. Here I have created an application called activetutsproxydemo. You will have to pick your own unique application name.


Step 3: Get the GAE SDK

Download and install the App Engine SDK. This will install an application called Google App Engine Launcher. Run it and click File | Create New Application…

Type in the name of the application you created in Step 1, select a location for the application’s files to be stored, and click the Create button.


Step 4: Modify the main.py File

The Google App Engine Launcher will create a default application for you in the directory you specified. You should see a file called main.py. Overwrite the contents of this file with the following Python code:

from google.appengine.ext import webapp
from google.appengine.ext.webapp.util import run_wsgi_app
import urllib
from google.appengine.api import urlfetch

class GoogleForm(webapp.RequestHandler):
	def post(self):
		destinationURL = "http://spreadsheets.google.com/formResponse?formkey=dHh4VTRVbGtSM3ZycUtpbEFKSUJ2Znc6MA&ifq"
		form_fields = {
			"entry.0.single": self.request.get('entry.0.single'),
			"entry.1.single": self.request.get('entry.1.single'),
			"entry.2.single": self.request.get('entry.2.single'),
			"entry.3.single": self.request.get('entry.3.single'),
			"pageNumber": "0",
			"backupCache": "",
			"submit": "Submit"
		}
		form_data = urllib.urlencode(form_fields)
		result = urlfetch.fetch(url=destinationURL, payload=form_data, method=urlfetch.POST, headers={'Content-Type': 'application/x-www-form-urlencoded'})
		print result

class CrossDomain(webapp.RequestHandler):
    def get(self):
		self.response.headers['Content-Type'] = 'text/xml'
		self.response.out.write("""<?xml version="1.0"?> <cross-domain-policy> <allow-access-from domain="*" /> </cross-domain-policy>""")

application = webapp.WSGIApplication([('/googleform', GoogleForm), ('/crossdomain.xml', CrossDomain)], debug=True)

def main():
    run_wsgi_app(application)

if __name__ == "__main__":
    main()

You can find more information about how this code works in the GAE documentation, but I’ll highlight the important bits here.

This line says that the GoogleForm class will be executed when the http://youapplicationname.appspot.com/googleform address is accessed, and the CrossDomain class will be executed when the http://youapplicationname.appspot.com/crossdomain.xml address is accessed.

application = webapp.WSGIApplication([('/googleform', GoogleForm), ('/crossdomain.xml', CrossDomain)], debug=True)

The CrossDomain class will output a cross domain policy file that allows full access to the domain by remote Flash applications.

class CrossDomain(webapp.RequestHandler):
    def get(self):
		self.response.headers['Content-Type'] = 'text/xml'
		self.response.out.write("""<?xml version="1.0"?> <cross-domain-policy> <allow-access-from domain="*" /> </cross-domain-policy>""")

The GoogleForm class is used to pass the incoming HTTP POST request to the Google Docs Form.

class GoogleForm(webapp.RequestHandler):
	def post(self):

The destinationURL variable defines the URL that the form will post to (no, this is not the same as the URL used to view the form, but rather the URL assigned to the form tag’s action attribute.

destinationURL = "http://spreadsheets.google.com/formResponse?formkey=dHh4VTRVbGtSM3ZycUtpbEFKSUJ2Znc6MA&ifq"

The form_fields variable maps the incoming HTTP POST variables with those that need to be supplied to the Google form.

form_fields = {
	"entry.0.single": self.request.get('entry.0.single'),
	"entry.1.single": self.request.get('entry.1.single'),
	"entry.2.single": self.request.get('entry.2.single'),
	"entry.3.single": self.request.get('entry.3.single'),
	"pageNumber": "0",
	"backupCache": "",
	"submit": "Submit"
}

The data in the fields is URL encoded. This is a little redundant, because they should already be encoded by the Flash application when they are sent, but it doesn’t hurt to make sure.

form_data = urllib.urlencode(form_fields)

The data is then re-POSTed to the Google servers, and the result is saved in the result variable.

result = urlfetch.fetch(url=destinationURL, payload=form_data, method=urlfetch.POST, headers={'Content-Type': 'application/x-www-form-urlencoded'})

The result is then printed, which has the effect of sending it back to the Flash application.

print result

Step 5: Upload the Application

Select your GAE application in the Google App Engine Launcher and click the Deploy button.

You will prompted for your Google credentials, and then the application will be uploaded.


Step 6: Test Your Application

Go to http://yourapplicationname.appspot.com/crossdomain.xml (you can see my crossdomain.xml file here). If all went well, you should see an XML file (you may need to view the page source to see the policy file).

If you see something similar to the image above, your GAE web application is up and running.


Step 7: Accessing the Form with Flex

The MXML file below is an example of how to do an HTTP POST action using the HTTPService class.

<?xml version="1.0" encoding="utf-8"?>
<mx:Application
	xmlns:mx="http://www.adobe.com/2006/mxml"
	layout="absolute"
	width="550"
	height="400"
	applicationComplete="onAppComplete()">
	<mx:Script>
		<![CDATA[
			import mx.rpc.events.FaultEvent;
			import mx.controls.Alert;
			import mx.rpc.events.ResultEvent;
			import mx.rpc.http.HTTPService;
			private function onAppComplete():void
			{
				var variables:Object = new Object();
				variables["entry.0.single"] = "test0";
				variables["entry.1.single"] = "test1";
				variables["entry.2.single"] = "test2";
				variables["entry.3.single"] = "test3";

				var service:HTTPService = new HTTPService();
				service.url = "http://spreadsheets.google.com/formResponse?formkey=dHh4VTRVbGtSM3ZycUtpbEFKSUJ2Znc6MA&amp;ifq";
				service.resultFormat = HTTPService.RESULT_FORMAT_TEXT;
				service.method = "POST";
				service.addEventListener(ResultEvent.RESULT, function(event:ResultEvent):void
					{
						Alert.show("Data was sent successfully!");
					}
				);
				service.addEventListener(FaultEvent.FAULT, function(event:FaultEvent):void
					{
						Alert.show("There was an error!");
					}
				);
				service.send(variables);
			}
		]]>
	</mx:Script>
</mx:Application>

The variables variable maps thePOST variable names to the data that will be sent.

var variables:Object = new Object();
variables["entry.0.single"] = "test0";
variables["entry.1.single"] = "test1";
variables["entry.2.single"] = "test2";
variables["entry.3.single"] = "test3";

Next we create a new instance of the HTTPService class.

var service:HTTPService = new HTTPService();

We need to specify which URL we will be POSTing to. For this first test we will try POSTing to the Google form directly. This will actually fail, but it is a good demonstration of why we need to use a proxy in the first place.

service.url = "http://spreadsheets.google.com/formResponse?formkey=dHh4VTRVbGtSM3ZycUtpbEFKSUJ2Znc6MA&amp;ifq";

We tell the HTTPService object that we are expecting plain text in response.

service.resultFormat = HTTPService.RESULT_FORMAT_TEXT;

We also need to tell the HTTPService object that we want to perform an HTTP POST operation.

service.method = "POST";

Some event handlers are set up to let us know if the operation was successful or not.

service.addEventListener(ResultEvent.RESULT, function(event:ResultEvent):void
	{
		Alert.show("Data was sent successfully!");
	}
);
service.addEventListener(FaultEvent.FAULT, function(event:FaultEvent):void
	{
		Alert.show("There was an error!");
	}
);

Finally, we send the data off.

service.send(variables);

Step 8: Compile the Application

If you compile and run the application using the button with the green arrow on it, you will find that it actually works.

So what is the big deal? Why go to all the trouble of creating a proxy? Well, the application will work on your local machine because the /bin-debug/ directory where Flex places the compiled SWF is a trusted location. This means the application will be able to access the Google server. To simulate how the application would work on a web site though you need to compile a release version.

Now, when you run the SWF from the /bin-release/ folder, you will see that the operation has failed. This is how the SWF will act when it is uploaded to a web site.


Step 9: Using the Proxy

Using the GAE proxy is a simple case of changing the URL that is assigned to the HTTPService object.

service.url = "http://activetutsproxydemo.appspot.com/googleform";

Now when you run the application, either from the bin-debug or bin-release directories, the operation will complete successfully.


Conclusion

Creating a Google App Engine proxy application will allow you to easily access resources on servers that would otherwise exclude Flash applications. As long as your application is not requesting massive resources you should find that you will not cross the thresholds for the free GAE service.

However, don’t be tempted to create a more generalized proxy. While it would be possible to create a proxy that used a special variable to determine the destination URL, making the application capable of acting as a proxy for any resource, such a server would be quickly exploited by other developers. Here we have hard coded the destination url, meaning that at worst someone could use this proxy to pass data to the Google Docs form. This makes it of little use to anyone else, and reduces the likelihood that the service will be abused.

I hope you liked this tutorial, thanks for reading!

Quick Tip: Fixing Lens Distortion in Photoshop

In this slightly expanded Quick Tip we’re going to take a look at fixing lens distortion caused by the camera lens. We’re be offering a quick, ten minute overview of the complete workflow and also understanding the process of fixing chromatic aberrations and vignetting.


Watch the Video


Topics Covered

  • Using the Lens Correction Filter to fix perspective and distortion
  • Different options for expanding the edges of your image after fixing the lens distortion
  • An overview of the problems caused by Chromatic Aberration and Vignette
  • Using a grid to line up your image correctly
  • Further adjusting your image using Photoshop’s distort tool

Sequencing Reason Using Logic Pro

In this tutorial I’m going to show you how to combine the sequencing power of Logic Pro with the killer sound set that Reason has to offer.

Introduction

When it comes to sequencing applications I’ve always found Reason to be a bit of a pain to work with. Compared to the MIDI feature set of Logic Pro there is, just no comparison.

Saying that, Reason ships with a truck load of highly usable synths/loops and more importantly – a great work horse sample library. If you love sequencing in Logic and want to use Reasons sample and synth sound set then this could be of real benefit to you.


Step 1: Set Up A Project

The first thing to do is to set up a Logic Pro project folder. This is done by simply creating a new document (from one of Logic’s templates or your own) and naming and saving it to the desired destination.

Logic creates a folder with the name you chose, inside is your ‘.logic’ file and a folder named ‘Audio Files’. Inside this folder create a new folder (Shift+Command+N) and name it ‘MIDI Files’. This will come in handy later.

newFolder

In your audio preferences make sure that ‘Rewire Behavior’ is set to Live Mode.

liveMode


Step 2: Open Reason

Next up, open Reason. As your probably well aware Reason has to be opened after Logic in order to activate the Rewire connection between the applications. Rewire allows you to route audio signals from the slave (Reason) into the master’s (Logic) mixer. It also however allows you to pass MIDI signals from master to slave, which is the point of this tutorial.

rewire

This allows you play and control every aspect of Reason’s rack modules from within Logic, completely bypassing the need for internal sequencing/automation in Reason.


Step 3: Create a New Reason Device

Create a New device in an empty rack in Reason. I’ve created a Thor. I’ve selected the patch ‘Big Sync’ from the ‘Lead Synths’ folder in the preset browser. I’ve also renamed the Thor device to the patch name.

Thor

If you press ‘Tab’ you’ll see that the outputs of the Thor synth are automatically connected to Rewire audio outputs 1-2 in Reason. These are fed into Logic’s mixer through the ‘Aux’ channel strip object. Any new devices will have to be manually connected to a new output for routing into Logic.

This will give you a lot more flexibility than creating a Mixer:14 at the start and having any new device automatically connect to it and just bringing a stereo mix into Logic, this means you have to mix in Logic and Reason! No good! I like to bypass all that and put everything straight into Logic that way everything is in one place.

audioRouting

There are 64 input channels available in Logic with every Rewire slave application such as Reason, Ableton Live etc. To access all 64 in Reason just click the More Audio button on the Rewire output device.

moreAudio


Step 4: Create The Rewire Inputs In Logic

To get the audio from Reason into Logic we need to create an input for it in the Environment (Command+8). In the Environment select New -> Channel Strip -> Auxiliary.

newAux

In the ‘Input’ slot of your new ‘Aux’ channel select Reason -> RW:Mix L/R. This relates to Outputs 1-2 in Reason. As you can see the integration of Reason in Logic is pretty well implemented. I’ve named it ‘Reason Mix L/R’

selectInput

To show the track in the Arrange page open the Mixer panel (X) and make sure ‘Aux’ is highlighted blue in the view option bar. Locate the new ‘Aux’ channel and ‘Ctrl click’ it. Select Create/Select Arrange Track.

channelArr

Your channel strip will now appear on the Arrange page as a track. This is useful if you want to automate it.

newTrack


Step 5: Create the Thor Sequencer Track

Now for the MIDI part. This couldn’t be easier. In the Arrange page go to Track -> New. Select ‘External MIDI’ make sure you have ‘Open Library’ checked.

createRewireMIDI

Pressing ‘Create’ will give you a new MIDI track and open the Library window. In this you will see a folder called Reason. Click it and low and behold is a list of all your Reason devices. You can see it even relabels them. No hassle, no mess, just easy!

library

I’ll select ‘Big Sync’ which will the be assigned to my newly created MIDI track.

bothTracks

As you can see I renamed my Reason ‘Aux’ track to something that relates to the patch better.

So now you have one track to send MIDI to the Thor device complete with note and controller data for any parameter. We also have an audio channel for mixing the device into your Logic project complete with Track Automation and plugin processing options.


Step 6: Record Something!

Now your all set up just hit record in Logic and record something. I’ve added some mod wheel as well, if I want to edit it it’s all there for me in the piano roll.

ThorMIDI


Step 7: Using the MIDI Implementation Chart

It’s possible to automate any parameter on a device via MIDI using Logic and Rewire. In the Documentation folder in the Reason application folder is the MIDI Implementation Chart. This gives you a list of all available parameters and their corresponding MIDI CC value. Here you can see the Thor devices Delay Feedback is assigned to Controller 25.

MIDIChart

Just select Controller 25 in the automation drop down on the MIDI track and away you go! OK, so you have to look it up but what the hey!

delay-auto

Maybe a cool new feature for Logic would be to dynamically list these parameters in the down list for each device assigned to that track! Are you listening Apple!!!


Working with Dr.Rex Devices

Dr.Rex devices are REX loop players and if we want to sequence them in Logic we need to get the corresponding MIDI file into Logic.

First off create a new Dr.Rex device. I’ve loaded a simple drum loop and named it ‘Acoustic Drums’.

dRex

Connect it to Rewire outputs 3-4 in Reason.

connect

Create a new ‘Aux’ channel strip in the Environment (See Step 4). This time select Reason -> RW:3-4. Give the channel strip a name.

dRexAux

Create a new track for the Dr.Rex player in the Arrange page and assign it to the Reason device (See Step 5).

assignDRex

In Reason select the Dr.Rex track in the sequencer window and click ‘To Track’ on the Dr.Rex device.

toTrack

Select the MIDI part that is created and go to File -> Export MIDI file. Navigate to the ‘MIDI Files’ folder we created in Step 1 and name and save the file.

export

Delete the MIDI file that was created on the Dr.Rex track as we don’t need it any more.

This next part is really important!!!!

Make sure that the transport track is selected!! If you don’t do this Logic will trigger notes any track that is selected (thus armed) in Reason regardless of the track your playing on in Logic. This could throw you a bit if you weren’t aware of it! Every time you create a new device in Reason it will highlight the track and you’ll see the red record button is on. Clicking the Transport track or any blank area below the track list will disable this.

This only applies to when your actually playing a sound via a MIDI keyboard in Live Mode. Playback is not effected by this.

transport


Back in Logic click the Media icon and choose Browser. Navigate to your ‘MIDI Files’ folder. You should see you MIDI file you exported from Reason. Every time you export a new MIDI file from Reason it will be waiting right here for you as Logic will remember this path in your Project, unless you change it!

browse

Just drag the the MIDI file onto the Dr.Rex track in the Arrange window!

dragMIDI

Your all set to sequence the Dr.Rex loop now in Logic as well as automate it’s parameters like Filter Freq (MIDI CC 74) etc. You can effect it with Logic/3rd Party plugins as it’s outputs are fed to the Logic mixer. Something you can’t do in Reason!!!

dRexMidi


Creative Routing Possibilities!

So there you have it! Logic’s Rewire integration with Reason is pretty seamless. Ableton too. Just having the sound set that Reason supplies (never mind all the Refill add ons!) is enough for most people to get great sonic results. The Orchestral sound bank is worth it alone, as Logics are a bit lacking. Being able to work in Logic with the MIDI and treating Reason purely as a virtual instrument is pretty cool.

There are of course a million creative ways you can wire Reason devices together and you can still build chains of devices before you bring them into Logic. You can also automate any part of the chain by creating a track for the device in question.

You can still build combinators and have access to all the parameters, devices and rotary knobs/buttons too. All sequenced and automated in Logic.

Try giving it a go and see what you can come up with. Good Luck!


Create a Dynamic Marble Simulation using Mograph in Cinema 4D

In this beginner/ intermediate level Cinema 4D tutorial, you will learn how to use a particle emitter and gravity from the Mograph module to create a dynamic simulation of marbles falling into a glass bowl. You will also learn a technique on how to make more glass look more convincing from the basic banji shader, and how to light your scene with global illumination.

Video 1

Download

Note: click the ‘Monitor’ icon to view tutorial in full-screen HD.


Don’t miss more CG tutorials and guides, published daily – subscribe to Cgtuts+ by RSS.

I Can’t Believe it’s Gone Premium!

Tuts+ Premium just got more awesome. Cgtuts+ and Activetuts+ have now joined our Premium program. Your Premium Membership already grants you access to the best and most in depth Photoshop, web development, vector, audio and After Effects tutorials and files. With CG Premium and Active Premium, you now have access to high-end computer graphics, Flash and ActionScript tutorials and source files.

We now offer 7 Premium programs for $9 a month. That’s $1.29 per Premium program, per month. You’ll get up to 28 new Premium tutorials and downloads in total each month as part of your membership. You’ll also get instant access to 283 exclusive tutorials and 716 source files – and counting – already available to Premium members.

Make sure you’re getting the best and most valuable education you can and say thank you to Tuts+ – become a member.

Want to know more?

To kick-off CG Premium, members will instantly get access to a brand new tutorial exclusive for Premium members. In it, you’ll learn how to Model, UV, and Texture a Mac-10 Submachine Gun

Our first Cgtuts+ Premium tutorial is loaded with tips.

Over the course of this 10 hour monster of a tutorial, you will gain access to time saving professional gun modeling tricks and techniques that are universal to any 3d modeling application. We’ll give you an in-depth look at using the revolutionary and intuitive Headus UVLayout to quickly and effectively lay out all of the gun’s UVs, and finally, some tried tested and true texture painting techniques that use a careful balance between diffuse, specular, and bump maps to create realistic and convincing final metal textures.


Learn the Secret to High-End CG Weapon Creation

Follow professional CG artist, Ben Tate, as he demonstrates his entire process of modeling, UV mapping and texturing an extremely high quality Mac-10 submachine gun.

In the first part of this mammoth series, we will discuss a variety of efficient and innovative modeling techniques to create a medium density model. You will learn how to break the model down into into its respective parts in the blockout stage, and the approaches and tools to use when crafting the more complex shapes and parts.

We’ll also discuss where and where not to use subdivision modeling to speed things up further. This tutorial is intended for intermediate to advanced CG artists who are looking to take their skills up a notch, or maybe learn a new trick or two.

CG Tuts textured machine gun

Activetuts+ has an amazing first Premium tutorial.

Build an OOP Based Turntable in AS3

You’ll build a turntable with controls which will allow users to view and rotate an object in 360°. You’ll use Object-Oriented Programming techniques so that you end up with a class (in a package) that can be re-used from project to project.

Professional and Detailed Instructions Inside

Premium members can Log in and Download! Otherwise, Join Now! Here’s a taster of what you can expect from this tutorial.

Get a Flash Education from the Professionals with Active Premium

Your most regularly updated source for Flash education just got a little more Incredible! Today we’re happy to announce that Activetuts+ is opening the doors to its brand new Premium program. As seen on our sister sites Psdtuts+, Vectortuts+, Cgtuts+, Audiotuts+, Nettuts+ and Aetuts+, our Premium Program will offer tutorials that go into even more detail than our regular free tuts, giving you an inside look on the techniques used by professionals in the field.

If you can’t wait to get started with your membership you can become a Premium member for as little as $9. You’ll also get instant access to 279 exclusive tutorials and 701 source files – and counting – available as part of our other Premium programs.

Want to know more?

We’ll still be publishing the same amount and quality of free tutorials, but once a week we’ll be publishing extra special ‘Premium’ content for members only. These tutorials will be a level above what we usually offer. With the help of Premium subscribers we are able to invest in higher-end, more in-depth tutorials showcasing thoughtfully coded techniques that will blow you and your clients away.

To kick-off Active Premium, members will instantly get access to a brand new tutorial exclusive for Premium members. In it, you’ll learn how to Build an OOP Based Turntable With AS3


This Premium Tutorial is Filled with Creative Tips

You’ll build a turntable with controls which will allow users to view and rotate an object in 360°. You’ll use Object-Oriented Programming techniques so that you end up with a class (in a package) that can be re-used from project to project.


Professional and Detailed Instructions Inside

Premium members can Log in and Download! Otherwise, Join Now! Here’s a taster of what you can expect from this tutorial.


That’s just the tip of the iceberg.

As soon as you join, you’ll instantly have access to 200+ tutorials and 700+ downloads from our Photoshop, Vector, Audio, After Effects, Computer graphics, and Web Development programs.

Here’s a full break-down:

1. Exclusive bonus tutorials teaching professional AS techniques

There are few industries where the techniques and methods of the professionals are so guarded in secrecy. We’ve lined up some of those professionals who are happy to break that unspoken oath of silence and teach you how things are done by the pros. You’ll get tutorials that are in-depth and challenging, yet clearly taught and easy to follow. Video lessons make learning impressive techniques easy, and each Premium tutorial comes with a full set of assets and source files you can use as you follow along. At less than the cost of a takeaway dinner, you’ll learn breathtaking techniques that will elevate your multimedia projects to another level.

2. Exclusive source files for every tutorial

Great source files are hard to find, even if you pay big bucks for them. For $9 a month you’ll have access to the source files for every new tutorial we publish on the site, for as long as you’re a Premium member. As the site grows older this collection will increase to hundreds of files that you can use in your own projects, both personal and commercial. If you love Flash, you’ll know how big this is!

3. Access to all Premium content, on all Tuts+ sites, past and present

While Active Premium members will have access to immediately download project files, you will also be able to raid the archives of Psd Premium, Vector Premium, CG Premium, Audio Premium and Net Premium. You will immediately have access to over 200+ members-only tutorials and video training, and over 700 download packs and source files for design, illustration, audio production and web development. You will also unlock the doors to all new Premium material published while you are a member. If another site goes Premium you will get access to Premium content for that site as well.

All for $9 a month, or $22 for 3-months, or $78 for one year (save $30).

4. You help keep Activetuts+ strong and healthy

Though we sell a small amount of advertising on the site, it only covers a tiny fraction of our costs. We pay at least $150 per tutorial, and have salaried editors running the site. This adds up to thousands of dollars in costs each month. Our Premium members allow us to stay sustainable, to keep publishing great free content and to increase the quality of tutorials on the site. When you sign-up to Premium, you help Activetuts+ stay strong and healthy into the future.

5. Premium isn’t for you? We’ll buy back your first month. It’s our 100% money back guarantee.

If you’re not 100% happy with Premium, we don’t want your money. That’s why we will buy back your subscription if you decide it’s not for you. You have one full month to make sure you’re getting value for money. Our friendly support team is on hand at all times to make good on our 100%, no-questions asked money-back guarantee.

Once you’re a member, login at the Tuts+ Dashboard and go to ‘Premium Content’ to claim your downloads.