Google App Engine can be used as a free and convenient way around restrictive or missing cross domain policy files. This tutorial will show you how to create a GAE proxy that provides access to restricted resources for your Flash application.
Final Result Preview
Let’s take a look at the final result we will be working towards:
That’s just sent some test data to a remote spreadsheet hosted on Google Docs. This would not work without a crossdomain.xml file on the receiving domain – yet, the cross domain policy file on Google Docs does not allow this, and I can’t change it. Read on to find out how this was done.
Why Use a Proxy?
In my last Quick Tip A Guide to Cross Domain Policy Files I showed you how cross domain policy files are used by Flash to determine what data can be accessed from remote domains. While being able to control access to resources is great for administrators, it is a pain for Flash developers trying to access data on a server that does not have a cross domain policy file, since no policy file means no access. Setting up a cross domain policy file can be easily overlooked, and I have run into more than one web service provider that didn’t think to cater for Flash developers.
I also mentioned that the issue was easily circumvented by use of a proxy. The idea behind a proxy is that it will accept connects from remote Flash applications (by supplying the appropriate crossdomain.xml file), then act as an intermediary passing data back and forth. The only real requirement of a proxy server (as it relates to Flash) is that it should be able to access public resources regardless of the permissions that may or may not be granted by a cross domain policy.
The really good news is that you can setup just such a proxy with no up front costs using Google App Engine (GAE). GAE will host a web application, and assuming your traffic requirements are below their threshold, there is no charge. What I will demonstrate here is how to create a simple GAE web application that can act as a proxy, allowing Flash applications to access resources that would otherwise be off limits.
Step 1: Google Spreadsheets and the Dreaded crossdomain.xml
There is a really neat feature in Google Docs that allows you to create a web form which can be used to populate a spreadsheet. I have set up just such a form here, with the results of this form being published as a public web page here. The form is a standard HTML form, which can be submitted programmatically using a standard HTTP POST operation.
I was recently in a position where I needed to collect some feedback from a Flash application I had distributed. These forms seemed like a great way to do that. There were no hosting costs for me, the results could be easily analyzed directly by the spreadsheet, and I could be pretty sure that a Google service like Docs would be reliable. The only problem was the cross domain policy.
<?xml version="1.0"?>
<!DOCTYPE cross-domain-policy SYSTEM "http://www.macromedia.com/xml/dtds/cross-domain-policy.dtd">
<cross-domain-policy>
<site-control permitted-cross-domain-policies="none" />
</cross-domain-policy>
This particular policy file allows no access to the http://spreadsheets.google.com/ domain for remote Flash applications. And sure enough, if you try to submit a form programmatically from Flash, it will fail.
This is a perfect example where a proxy can help.
Step 2: Create a GAE Application
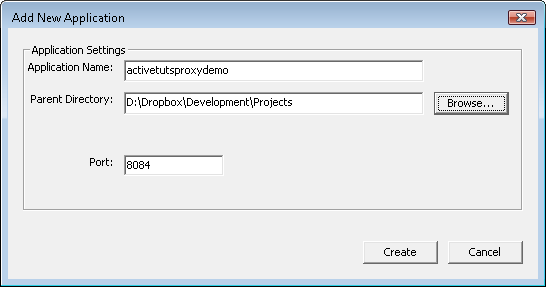
Sign up for an App Engine account. You will be asked to create a new application. Here I have created an application called activetutsproxydemo. You will have to pick your own unique application name.

Step 3: Get the GAE SDK
Download and install the App Engine SDK. This will install an application called Google App Engine Launcher. Run it and click File | Create New Application…
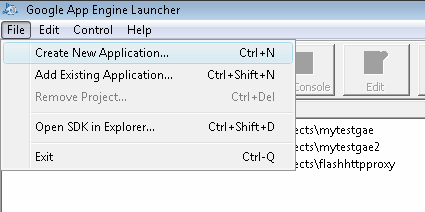
Type in the name of the application you created in Step 1, select a location for the application’s files to be stored, and click the Create button.
Step 4: Modify the main.py File
The Google App Engine Launcher will create a default application for you in the directory you specified. You should see a file called main.py. Overwrite the contents of this file with the following Python code:
from google.appengine.ext import webapp
from google.appengine.ext.webapp.util import run_wsgi_app
import urllib
from google.appengine.api import urlfetch

class GoogleForm(webapp.RequestHandler):
	def post(self):
		destinationURL = "http://spreadsheets.google.com/formResponse?formkey=dHh4VTRVbGtSM3ZycUtpbEFKSUJ2Znc6MA&ifq"
		form_fields = {
			"entry.0.single": self.request.get('entry.0.single'),
			"entry.1.single": self.request.get('entry.1.single'),
			"entry.2.single": self.request.get('entry.2.single'),
			"entry.3.single": self.request.get('entry.3.single'),
			"pageNumber": "0",
			"backupCache": "",
			"submit": "Submit"
		}
		form_data = urllib.urlencode(form_fields)
		result = urlfetch.fetch(url=destinationURL, payload=form_data, method=urlfetch.POST, headers={'Content-Type': 'application/x-www-form-urlencoded'})
		print result

class CrossDomain(webapp.RequestHandler):
    def get(self):
		self.response.headers['Content-Type'] = 'text/xml'
		self.response.out.write("""<?xml version="1.0"?> <cross-domain-policy> <allow-access-from domain="*" /> </cross-domain-policy>""")

application = webapp.WSGIApplication([('/googleform', GoogleForm), ('/crossdomain.xml', CrossDomain)], debug=True)

def main():
    run_wsgi_app(application)

if __name__ == "__main__":
    main()
You can find more information about how this code works in the GAE documentation, but I’ll highlight the important bits here.
This line says that the GoogleForm class will be executed when the http://youapplicationname.appspot.com/googleform address is accessed, and the CrossDomain class will be executed when the http://youapplicationname.appspot.com/crossdomain.xml address is accessed.
application = webapp.WSGIApplication([('/googleform', GoogleForm), ('/crossdomain.xml', CrossDomain)], debug=True)
The CrossDomain class will output a cross domain policy file that allows full access to the domain by remote Flash applications.
class CrossDomain(webapp.RequestHandler):
    def get(self):
		self.response.headers['Content-Type'] = 'text/xml'
		self.response.out.write("""<?xml version="1.0"?> <cross-domain-policy> <allow-access-from domain="*" /> </cross-domain-policy>""")
The GoogleForm class is used to pass the incoming HTTP POST request to the Google Docs Form.
class GoogleForm(webapp.RequestHandler):
	def post(self):
The destinationURL variable defines the URL that the form will post to (no, this is not the same as the URL used to view the form, but rather the URL assigned to the form tag’s action attribute.
destinationURL = "http://spreadsheets.google.com/formResponse?formkey=dHh4VTRVbGtSM3ZycUtpbEFKSUJ2Znc6MA&ifq"

The form_fields variable maps the incoming HTTP POST variables with those that need to be supplied to the Google form.
form_fields = {
	"entry.0.single": self.request.get('entry.0.single'),
	"entry.1.single": self.request.get('entry.1.single'),
	"entry.2.single": self.request.get('entry.2.single'),
	"entry.3.single": self.request.get('entry.3.single'),
	"pageNumber": "0",
	"backupCache": "",
	"submit": "Submit"
}
The data in the fields is URL encoded. This is a little redundant, because they should already be encoded by the Flash application when they are sent, but it doesn’t hurt to make sure.
form_data = urllib.urlencode(form_fields)
The data is then re-POSTed to the Google servers, and the result is saved in the result variable.
result = urlfetch.fetch(url=destinationURL, payload=form_data, method=urlfetch.POST, headers={'Content-Type': 'application/x-www-form-urlencoded'})
The result is then printed, which has the effect of sending it back to the Flash application.
print result
Step 5: Upload the Application
Select your GAE application in the Google App Engine Launcher and click the Deploy button.

You will prompted for your Google credentials, and then the application will be uploaded.

Step 6: Test Your Application
Go to http://yourapplicationname.appspot.com/crossdomain.xml (you can see my crossdomain.xml file here). If all went well, you should see an XML file (you may need to view the page source to see the policy file).

If you see something similar to the image above, your GAE web application is up and running.
Step 7: Accessing the Form with Flex
The MXML file below is an example of how to do an HTTP POST action using the HTTPService class.
<?xml version="1.0" encoding="utf-8"?>
<mx:Application
xmlns:mx="http://www.adobe.com/2006/mxml"
layout="absolute"
width="550"
height="400"
applicationComplete="onAppComplete()">
<mx:Script>
<![CDATA[
import mx.rpc.events.FaultEvent;
import mx.controls.Alert;
import mx.rpc.events.ResultEvent;
import mx.rpc.http.HTTPService;
private function onAppComplete():void
{
var variables:Object = new Object();
variables["entry.0.single"] = "test0";
variables["entry.1.single"] = "test1";
variables["entry.2.single"] = "test2";
variables["entry.3.single"] = "test3";
var service:HTTPService = new HTTPService();
service.url = "http://spreadsheets.google.com/formResponse?formkey=dHh4VTRVbGtSM3ZycUtpbEFKSUJ2Znc6MA&ifq";
service.resultFormat = HTTPService.RESULT_FORMAT_TEXT;
service.method = "POST";
service.addEventListener(ResultEvent.RESULT, function(event:ResultEvent):void
	{
		Alert.show("Data was sent successfully!");
	}
);
service.addEventListener(FaultEvent.FAULT, function(event:FaultEvent):void
	{
		Alert.show("There was an error!");
	}
);
service.send(variables);
}
]]>
</mx:Script>
</mx:Application>
The variables variable maps thePOST variable names to the data that will be sent.
var variables:Object = new Object(); variables["entry.0.single"] = "test0"; variables["entry.1.single"] = "test1"; variables["entry.2.single"] = "test2"; variables["entry.3.single"] = "test3";
Next we create a new instance of the HTTPService class.
var service:HTTPService = new HTTPService();
We need to specify which URL we will be POSTing to. For this first test we will try POSTing to the Google form directly. This will actually fail, but it is a good demonstration of why we need to use a proxy in the first place.
service.url = "http://spreadsheets.google.com/formResponse?formkey=dHh4VTRVbGtSM3ZycUtpbEFKSUJ2Znc6MA&ifq";
We tell the HTTPService object that we are expecting plain text in response.
service.resultFormat = HTTPService.RESULT_FORMAT_TEXT;
We also need to tell the HTTPService object that we want to perform an HTTP POST operation.
service.method = "POST";
Some event handlers are set up to let us know if the operation was successful or not.
service.addEventListener(ResultEvent.RESULT, function(event:ResultEvent):void
{
Alert.show("Data was sent successfully!");
}
);
service.addEventListener(FaultEvent.FAULT, function(event:FaultEvent):void
{
Alert.show("There was an error!");
}
);
Finally, we send the data off.
service.send(variables);
Step 8: Compile the Application
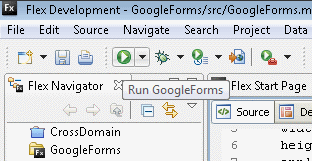
If you compile and run the application using the button with the green arrow on it, you will find that it actually works.
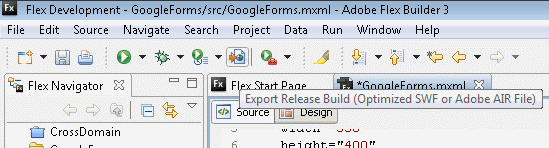
So what is the big deal? Why go to all the trouble of creating a proxy? Well, the application will work on your local machine because the /bin-debug/ directory where Flex places the compiled SWF is a trusted location. This means the application will be able to access the Google server. To simulate how the application would work on a web site though you need to compile a release version.
Now, when you run the SWF from the /bin-release/ folder, you will see that the operation has failed. This is how the SWF will act when it is uploaded to a web site.


Step 9: Using the Proxy
Using the GAE proxy is a simple case of changing the URL that is assigned to the HTTPService object.
service.url = "http://activetutsproxydemo.appspot.com/googleform";
Now when you run the application, either from the bin-debug or bin-release directories, the operation will complete successfully.

Conclusion
Creating a Google App Engine proxy application will allow you to easily access resources on servers that would otherwise exclude Flash applications. As long as your application is not requesting massive resources you should find that you will not cross the thresholds for the free GAE service.
However, don’t be tempted to create a more generalized proxy. While it would be possible to create a proxy that used a special variable to determine the destination URL, making the application capable of acting as a proxy for any resource, such a server would be quickly exploited by other developers. Here we have hard coded the destination url, meaning that at worst someone could use this proxy to pass data to the Google Docs form. This makes it of little use to anyone else, and reduces the likelihood that the service will be abused.
I hope you liked this tutorial, thanks for reading!
It is always hard to find well-informed people on this subject topic, you sound like you are aware of exactly what you are talking about! Bless you
I wanted to thank you for this great read!! I definitely enjoying every little bit of it I have you bookmarked to check out new stuff you post