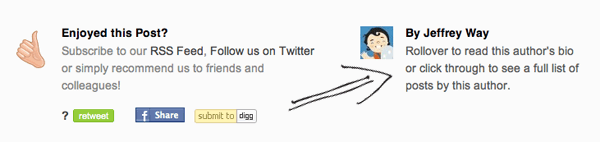
Many popular blogs these days are authored by multiple contributors. Today, we’ll create a simple WordPress plugin that will allow us to add the post author’s biography to the conclusion of each post, much like you see on Nettuts.
1. Have a Bio Ready
If you don’t already display authors’ biographical info, then the you can add and edit biographical info by heading to the users pane from within the WordPress dashboard, selecting a user, and filling in a quick bio. We’re also going to be adding a gravatar for the author, so ensure that you also set an email address.

2. Create the Necessary Files
We’ll need to create a single file that contains the functionality of our plugin. Fire up your FTP of choice, and, within the wp-content/plugins/ folder, create a file called ntauthorbio.php. In order for WordPress to recognize our plugin, we need to create a quick header comment in our file, much like you do at the top of style.css. Paste the following code into your file, and, of course, make adjustments accordingly.
/*
Plugin Name: Nettuts Author Bio
Plugin URI: http://www.nettuts.com/
Description: This plugin adds an authors bio to his/her post
Author: nettuts
Version: 0.1
Author URI: http://www.nettuts.com/
*/
3. Functions & Actions
Next, we’ll create the base for our plugin. Paste the following after the opening comment header.
function author_bio_display($content)
{
	// this is where we'll display the bio
}

function author_bio_style()
{
	// this is where we'll style our box
}

function author_bio_settings()
{
	// this is where we'll display our admin options
}

function author_bio_admin_menu()
{
	// this is where we add our plugin to the admin menu
}

add_action('the_content', 'author_bio_display');
add_action('admin_menu', 'author_bio_admin_menu');
add_action('wp_head', 'author_bio_style');
“Hooks are provided by WordPress to allow your plugin to ‘hook into’ the rest of WordPress; that is, to call functions in your plugin at specific times, and thereby set your plugin in motion.”
Above we’ve created four functions that our plugin will require to work properly. Each function has a specific purpose (as commented above), and also, each is tied to a specific action (apart from author_bio_settings, which will be called from another function.
When developing plugins, it’s important to understand what a ‘hook’ is. A hook is a place in the running cycle where we can hook into WordPress, and call our functions. For example the hook used above, for author_bio_display, is the_content; this means that when WordPress uses the_content (used for displaying a post/page’s main content), it will first call the function we’ve given it.
- the_content – the content of the page/post is displayed
- admin_menu – called when the sidebar in the admin dashboard is created
- wp_head – lets us add code to the head tags of the page. This is why you include wp_head() when designing your themes.
4. The Display Function
The most important function in our plugin is the display function, which will handle the process of actually displaying the information after the content. Before we start, it’s important to note that this function accepts a parameter, called $content. This means that the content of the page/post is passed to our function, so we can then append our author bio.
Let’s start with a simple if/else statement.
function author_bio_display($content)
{
	// this is where we will display the bio

	if ( is_single() || is_page() )
	{
		$bio_box = // placeholder;
		return $content . $bio_box;
	} else {
		return $content;
	}
}
Above, we check to see if the content is being displayed on a single post using is_single(), or a page using is_page(). If either returns true, we can post our box which will be placed in the $bio_box variable. Otherwise, if we’re on some different page, such as the archives or front page, we should simply return the content untouched.
Now we need to add our code for the box to appear, change your $bio_box to match the following code.
$bio_box =
'<div id="author-bio-box">
	'.get_avatar( get_the_author_meta('user_email'), '80' ).'
	<span class="author-name">'.get_the_author_meta('display_name').'</span>
	<p>'.get_the_author_meta('description').'</p>
	<div class="spacer"></div>
</div>';
The styling, of course, can be changed later to fit your own tastes, but for now, we’ll use a simple box, and will add some CSS to style it shortly.
We’re using a few functions above to retrieve our required data. get_avatar() is a built-in function in WordPress that will return a user’s gravatar, if they have one, according to their email. We pass the get_avatar() function two parameters; the author’s email, and a size for the image (80px*80px in our case).
The function get_the_author_metacan retrieve any piece of information about a registered WordPress user. A full list of the items you can return can be found on WordPress Codex.
If we now run our plugin, we should see something that resembles this:
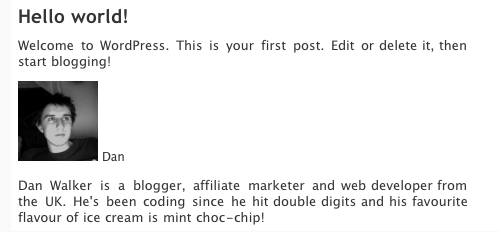
It’s not the prettiest looking biography, but we now have the basic functionality we’re after. If you’re still having problems, ensure that the author of the post/page has a biography and/or gravatar, and also ensure that the plugin has been activated in the plugins section of the dashboard. Let’s next style things a bit.
5. Making it Pretty
If you’re a designer, here’s your chance to do as you please! My code below is just enough to make our box look clean and simple. To provide an example of how wp_head() can be used, we’ll insert the CSS for this box into the head tag of our document. However, you can also simply place this within your stylesheet.
This author_bio_style() function needs to return a simple block of CSS.
function author_bio_style()
{
	// this is where we'll style our box
	echo
	'<style type=\'text/css\'>
	#author-bio-box {
		border: 1px solid #bbb;
		background: #eee;
		padding: 5px;
	}

	#author-bio-box img {
		float: left;
		margin-right: 10px;
	}

	#author-bio-box .author-name {
		font-weight: bold;
		margin: 0px;
		font-size: 14px;
	}

	#author-bio-box p {
		font-size: 10px;
		line-height: 14px;
		font-style: italic;
	}

	.spacer { display: block; clear: both; }
	</style>';
}
The above code doesn’t require much explanation; CSS is beyond the scope of this tutorial. Generally, we’re just creating a box with a border, and floating the image left. Finally, we add a spacer to make sure the box is big enough to fit the image and text in. You could also use the clearfix hack, or even overflow:hidden to achieve this effect. Ultimately, that will depend on your specific layout.
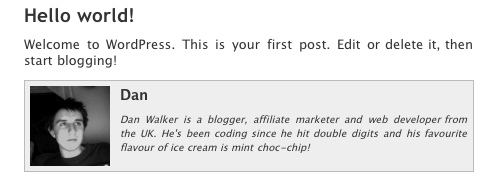
Your new fangled box should look similar to mine now; see below.
6. Making a Settings Page
Before we wrap up, let’s take a look at adding a settings page in the dashboard for our plugin. Most plugins rely on some sort of settings section to provide a bit more flexibility without the user having to edit any code.
There are numerous options we could add; such as, where the box appears (top or bottom), the colors used, exclude certain users, and so on. For this tutorial, I’ve chosen to specify if the plugin can appear on only pages, only posts, or both. Hopefully this will be enough to show you the ropes. At that point, you can extend the functionality how you see fit.
Making the Page
We need to setup a page in the admin dashboard. To do so, we need to tell WordPress what to do when the admin_menu action triggers. To compensate, we’ll edit our author_bio_admin_menu() function to look like the code below:
function author_bio_admin_menu()
{
	// this is where we add our plugin to the admin menu
	add_options_page('Author Bio', 'Author Bio', 9, basename(__FILE__), 'author_bio_settings');
}
The above code creates an options page in the dashboard, and passes the following parameters:
- Menu Name – Author Bio
- Page Title – Author Bio
- Access Privilege – 9 – or, only Administrator access
- Handle
- The required function – author_bio_settings()
- We next need to provide the page some content. Since we called author_bio_settings() when creating the page, that’s the function we’ll be using to display our options form and update the database.
The Settings Function
Simply put, this function needs to display a form with the options. It also needs to check whether the form has been submitted, and, if so, store the new values in the database. First, let’s concentrate on creating the form.
function author_bio_settings()
{
	// this is where we'll display our admin options

	$options['page'] = get_option('bio_on_page');
	$options['post'] = get_option('bio_on_post');

	echo '
	<div class="wrap">
		'.$message.'
		<div id="icon-options-general" class="icon32"><br /></div>
		<h2>Author Bio Settings</h2>

		<form method="post" action="">
		<input type="hidden" name="action" value="update" />

		<h3>When to Display Author Bio</h3>
		<input name="show_pages" type="checkbox" id="show_pages" '.$options['page'].' /> Pages<br />
		<input name="show_posts" type="checkbox" id="show_posts" '.$options['post'].' /> Posts<br />
		<br />
		<input type="submit" class="button-primary" value="Save Changes" />
		</form>

	</div>';
}
We start by grabbing some options from the database. Of course, we don’t currently have a method for setting them yet, so they’ll be blank for now. Next, we display the form, which is already styled by WordPress’ dashboard CSS. You’ll notice we’re displaying a (currently unset) variable called $message; this is so we can notify the user when we update the settings if it was successful.
We print our options at the end of the checkbox code. If the user turns an option on, we need to store it in the database as ‘checked’ in order to check the checkbox. The functions we use to get and set options are get_option() and update_option() respectively. The get function requires the name of the option (so it’s important to be unique), and the update option needs the name of the option and the new value. If the update function doesn’t find the option, it simply creates a new one.
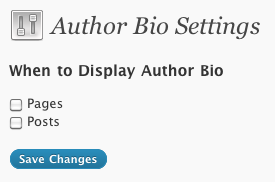
So far your page should look like do:
Now, let’s add our code to take the values sent by the form, and update the options in the database. The form contains a hidden value, called action, which is set to ‘update.’ We’ll check if that value is set, and if so, we update our options. This code should be placed at the top of our autor_bio_settings() function.
if ($_POST['action'] == 'update')
{
	$_POST['show_pages'] == 'on' ? update_option('bio_on_page', 'checked') : update_option('bio_on_page', '');
	$_POST['show_posts'] == 'on' ? update_option('bio_on_post', 'checked') : update_option('bio_on_post', '');
	$message = '<div id="message" class="updated fade"><p><strong>Options Saved</strong></p></div>';
}
If the form has been submitted, we use the ternary operator (if you’re unsure of how these work, look them up – they’re a simple form of if/else) to check whether the checkboxes are checked or not. If they are, then we set the option as ‘checked;’ otherwise we set it as blank. Finally, we set the message displayed to a successful dialog, already styled by WordPress.
Changing the Output
Now, we should be able to set options and see them change in our options page; however, the functionality of our plugin will not alter yet as we’ve not told it to do so. So the final step in our project is to make the display function react to these options. In our author_bio_display() function, prepend the following code to the top, in order to get the options previously set.
$options['page'] = get_option('bio_on_page');
$options['post'] = get_option('bio_on_post');
Now that we have these values, we only need to execute the display code if the option is set. To do so, we change our if statement accordingly.
if ( (is_single() && $options['post']) || (is_page() && $options['page']) )
Here we have implemented two conditions that, if met, will cause our box to display. Not too hard, right? Here’s our full plugin:
<?php
/*
Plugin Name: Nettuts Author Bio
Plugin URI: http://www.nettuts.com/
Description: This plugin adds an authors bio to his/her post
Author: nettuts
Version: 0.1
Author URI: http://www.nettuts.com/
*/

function author_bio_display($content)
{
	// this is where we will display the bio

	$options["page"] = get_option("bio_on_page");
	$options["post"] = get_option("bio_on_post");

	if ( (is_single() && $options["post"]) || (is_page() && $options["page"]) )
	{
		$bio_box =
		"<div id="author-bio-box">
			".get_avatar( get_the_author_meta("user_email"), "80" )."
			<span class="author-name">".get_the_author_meta("display_name")."</span>
			<p>".get_the_author_meta("description")."</p>
			<div class="spacer"></div>
		</div>";

		return $content . $bio_box;
	} else {
		return $content;
	}
}

function author_bio_style()
{
	// this is where we will style our box
	echo
	"<style type=\"text/css\">
	#author-bio-box {
		border: 1px solid #bbb;
		background: #eee;
		padding: 5px;
	}

	#author-bio-box img {
		float: left;
		margin-right: 10px;
	}

	#author-bio-box .author-name {
		font-weight: bold;
		margin: 0px;
		font-size: 14px;
	}

	#author-bio-box p {
		font-size: 10px;
		line-height: 14px;
		font-style: italic;
	}

	.spacer { display: block; clear: both; }
	</style>";
}

function author_bio_settings()
{
	// this is where we will display our admin options
	if ($_POST["action"] == "update")
	{
		$_POST["show_pages"] == "on" ? update_option("bio_on_page", "checked") : update_option("bio_on_page", "");
		$_POST["show_posts"] == "on" ? update_option("bio_on_post", "checked") : update_option("bio_on_post", "");
		$message = "<div id="message" class="updated fade"><p><strong>Options Saved</strong></p></div>";
	}

	$options["page"] = get_option("bio_on_page");
	$options["post"] = get_option("bio_on_post");

	echo "
	<div class="wrap">
		".$message."
		<div id="icon-options-general" class="icon32"><br /></div>
		<h2>Author Bio Settings</h2>

		<form method="post" action="">
		<input type="hidden" name="action" value="update" />

		<h3>When to Display Author Bio</h3>
		<input name="show_pages" type="checkbox" id="show_pages" ".$options["page"]." /> Pages<br />
		<input name="show_posts" type="checkbox" id="show_posts" ".$options["post"]." /> Posts<br />
		<br />
		<input type="submit" class="button-primary" value="Save Changes" />
		</form>

	</div>";
}

function author_bio_admin_menu()
{
	// this is where we add our plugin to the admin menu
	add_options_page("Author Bio", "Author Bio", 9, basename(__FILE__), "author_bio_settings");
}

add_action("the_content", "author_bio_display");
add_action("admin_menu", "author_bio_admin_menu");
add_action("wp_head", "author_bio_style");

?>
Voila
Hopefully if everything went according to plan, you should now have a working authors’ biography box after your posts/pages. Further, you now have a custom settings page in your WordPress dashboard, that you’re free to extend how you see fit.