6 Elements of Design for Striking Photographs

What makes a striking photo? Often, it’s merely ordinary things composed in an ordinary manner. That’s because they always tend to have a single theme or idea, and because clutter is kept to a minimum. They are simple, true, and sincere. Today we’re looking at the elements of design (line, shape, form, texture, color etc) that can turn a simple subject into a striking photo.

Successful photos rely on order, and the main elements that bring and emphasize order in a composition are: line, shape, form, texture, pattern, and color. Every photograph, intentionally or not, contains one or more of these element, which are known as the elements of design.

All of these elements have a huge impact on a photo, especially the line, texture, and color. Usually we recognize and utilize these elements unconsciously. This depends on the individual’s sensitivity to the different visual components out there, and is very much affected by the person’s memories and life experiences that are registered on their own personal mind tape.


Line

Out of the 6 elements of design, line is the strongest and most important and influential. Without line there can be no shape. Without shape there can be no form. Without form there can be no texture and there can be no pattern. Lines are powerful tools that can be used smartly to lead the viewers eyes towards the point of interest in a photograph, and alter the overall feeling and mood of an image.

Lines can be vertical, horizontal, diagonal, or curved. Lines can be short or tall, can be thick or thin. Lines can lead you away, or move you forward in an image. A line’s emotional effect on an image cannot be overlooked. They sometimes feel restful, soothing, rigid, active, guiding, or threatening.

Thin lines can be experienced by some as unstable, and by others as vulnerable. Thick lines can be experienced as rigid and dependant, or can be experienced as dominating or stern. Curved lines are often perceived as soft, soothing, settling, and relaxing. Jagged lines can be perceived as forceful, chaotic, sharp, and threatening.

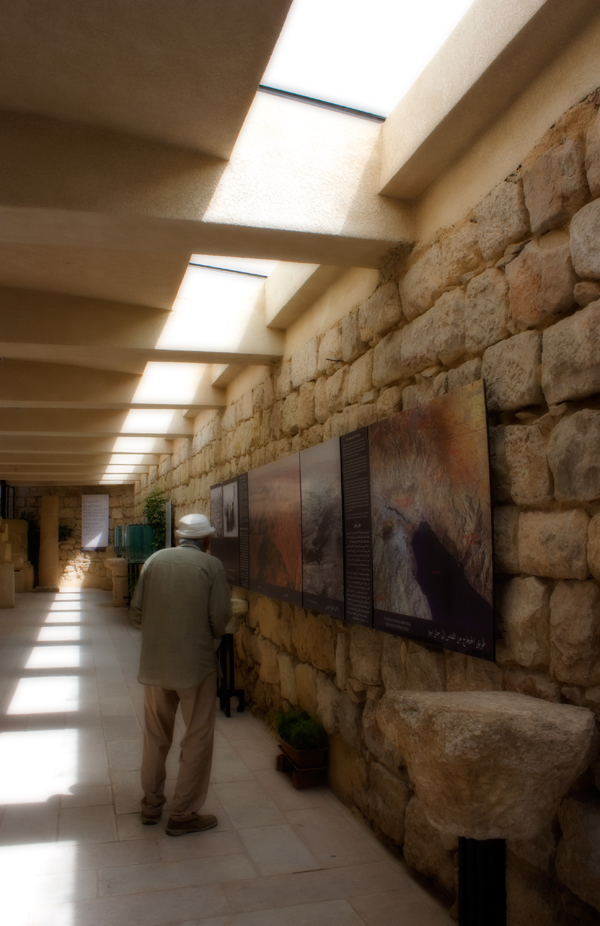
Vertical lines in a photograph tend to convey different moods, ranging from power and strength, to growth. Vertical lines can include strands of hair, poles, trees, buildings, and a lot of other different objects that expand vertically rather than horizontally.

Horizontal lines in a photo tend to cast a feeling of restfulness, permanency, and stability. If you want to further accentuate the restful, stable feeling of a horizontal line in an image, a good way is to use horizontal framing rather than vertical.

Layers of multiple horizontal lines in an image can create drama and rhythm, and can become the main interest of the image all by themselves. Horizontal lines can include horizons, seas, laying people, street sides, and almost anything that expands horizontally.

Diagonal lines work well to guide the viewers’ attention towards the main subject of your photo. They can convey a sense of action and render photos as dynamic and interesting. Diagonal lines can be the shape of a path, a line of trees, a fence, river or any other component of an image.


Shape

The second most fundamental element of design is shape, because shape is the principal element of identification. The most important thing to keep in mind when shape is the essential element in an image is that it is best defined when the subject is frontlit or backlit. For that shape to be successfully identifiable, it needs to be in strong contrast with its surroundings so that it is detached from the clutter around it.

Shapes in images can also be seen as silhouettes – these are best shot several minutes before sunset up to several minutes following it, as well as several minutes before sunrise up to several minutes following it. It is also worth mentioning that silhouettes are the purist and strongest of all shapes.


Form

Form is basically a three-dimensional shape, and is best accentuated by side lighting since it casts soft elegant shadows, and the difference between light and shadows gives a better illustration of the depth of an object and amplifies the sensual understanding of its meaning and message.


Texture

No design element is more capable of moving your deep emotions than texture. The challenge of seeing and capturing texture is mostly based on one element – light. Texture can be accentuated by the side light of early sunny mornings or early evenings, or by overhead light when the sun is vertical and high in the sky.

With the sun high in the sky, the roughness of the walls of buildings, or the wood textures of tree trunks, or any kind of texture along vertical surfaces is emphasized as the overhead light casts small shadows along those surfaces. While the impact is subtle, it adds more depth, interest, and reality to the shots.

Furthermore, it is worth noting that texture as a background can create an exciting and emotion-filled composition. And with the correct use of texture, pictures can become more alive and almost three dimensional.


Pattern

Life is full of patterns. It is all part of our cosmic existence, for without patterns our lives would be utter chaos. Most patterns we don’t recognize or we overlook because of our busy, routine-driven, daily lives.

Two techniques come into practice while working with patterns; you can emphasise the pattern, or you can break it:

Emphasising a pattern can accentuate a sense of size and expansion. The idea is to zoom in onto the pattern and fill the frame with it. Emphasized pattern can include faces amongst a crowd, a line of homogenous plants, bricks of a wall, etc

Breaking a pattern is all about finding an object that disrupts the continuous flow of a pattern. It can be an object that is in clear contrast with the rest of the objects; be it in shape, color, or even texture. You might need to handle your composition with extra care while trying to render a broken pattern, and the rule of thirds can come in handy in such situations.

For example, you can place your "odd" object along one of the thirds or on one of their intersecting points. You can also play with your depth of field. Have the contrasting item in sharp focus and the items around it fading slowly into the out-of-focus. Broken patterns can be found naturally, or some situations can be manipulated to disrupt readily existing patterns.


Color

Color is characterized by attributes such as value, hue, and saturation. Colors, and how they’re arranged, can either make or break a shot. Different colors can send out different messages, and they indeed have an important visual weight and impact on a photo.

Vibrant colors are energetic, interesting, and active. So are reds and yellows. Blues and greens are comforting and soothing. The path towards creating creative photos benefits from a high understanding of colors and their impact on an image, as well as a high awareness of colors surrounding you.

There are colors everywhere. Macro insect photography is filled with interesting colors. Nature, cities, people and their clothing, houses, streets, skies, beaches – everything around you is filled with color. You just need to be aware of it, and train your eyes to see it. Paying attention to color and it’s emotional messages and meanings is an important step towards photographic maturity.

It is worth mentioning that there are two types of colors; subtractive and additive. Each type has two sets of its own; primary colors, and secondary colors. Painting, photography, and printing use subtractive colors, and this is our concern in this post.

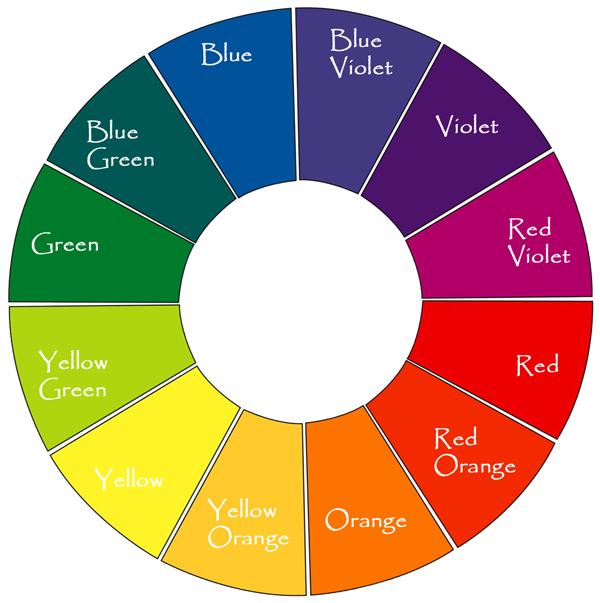
Red, blue, and yellow are called primary subtractive color, from these colors the secondary subtractive colors violet, orange, and green emerge. Mixing red and blue creates violet. Mixing blue and yellow creates green, mixing yellow and red creates orange. Mixing equal amounts of blue, red, and yellow produces black.

Pairs of colors that fall opposite to each other on the above color wheel are called complementary colors. These pairs complement and intensify one another when put together. Studying the color wheel can give you a better understanding as to how colors affect or complement each other, so that you can use this knowledge to better prevail the correct meanings and messages in your photography.

Note that yellow, red, and orange are considered to be warm colors. These are associated with sun and fire. Blue, violet, and green are considered cool colors. These are associated with snow, water, and shadows.


Conclusion

Elements of design are the most basic visual components of any composition. Understanding the elements of design, how they affect and complement each other, and what messages they convey is the way to step up with your photographic images and create stunning work that reaches out to people’s hearts and souls.

hese are the building blocks for creating your own work of art. Putting these elements together, and knowing how/when to use them will make your photos far more effective and purposeful. These elements are all around us, we just need to train our eyes to see and capture them, and our minds and souls to translate them into conveying our own emotions and ideas. Then, and only then, will our work become eye-catching and dramatic.

Build Some Sturdy Steel Structures – Day 2

In this two part tutorial we’ll explain how to make a logo with a 3D simulation of a steel structure using Cinema 4D and establish the movement. Today we’ll be bringing our renders over into After Effects to put it all together. You can watch part one here.


Preview

Want access to the full AE project files and assets for every tutorial on Aetuts+, including this one? Join Ae Premium for just $9/month. You can view the final effect preview video below.

Tutorial

Download Tutorial .flv

File size 412MB


Create an Awesome Hangman Game in Flash Using AS3 – Active Premium

It’s time for another Active Premium tutorial available exclusively to Premium members. If you want to take your ActionScript skills to the next level, then we have an awesome game development tutorial for you, courtesy of Carlos Yanez.


This Premium Tutorial is Filled with Creative Tips

Developing a game is must-have skill if you are a Flash Developer; it makes use of many different ActionScript methods and properties, plus you will have plenty of fun in the process! In this tutorial, I will show you how to create an advanced Hangman game using ActionScript 3.0.

I’ll demonstrate the game development process from the Graphical User Interface design using Flash Tools and a little bit Photoshop, to the code part using the power of ActionScript 3. Let’s play!


Professional and Detailed Instructions Inside

Premium members can Log in and Download! Otherwise, Join Now! Below are some sample images from this tutorial.


Active Premium Membership

We run a Premium membership system which costs $9 a month (or $22 for 3 months!) which periodically gives members access to extra tutorials, like this one! You’ll also get access to Psd Premium, Vector Premium, Audio Premium, Net Premium, Ae Premium and Cg Premium too. If you’re a Premium member, you can log in and download the tutorial. If you’re not a member, you can of course join today!

Also, don’t forget to follow @activetuts on twitter and grab the Activetuts+ RSS Feed to stay up to date with the latest tutorials and articles.

How to Mix the Bass Guitar – Basix

The bass guitar, along with the drums is the foundation of the rhythm section. It needs to sound deep and punchy without overpowering other elements in the mix. We need the bass guitar to groove and supply us with a steady rhythm as well as defining the melodic and chordal structure of the song.

In the following Basix tutorial I’m going to go through a few of the factors that can make your bass guitar sound better. We’ll be using EQ to sculpt our bass sound, compression to steady our dynamics as well as discussing the use of amping afterwards and the taboo of using reverb.

http://www.sxc.hu/profile/docjo48


Placement

First of all, the general rule dictates that bass instrument should be anchored to the center. I wouldn’t recommend panning your bass guitar around the stereo spectrum much since it will just weaken the overall impact of the bass track. Low end instruments such as bass guitar and kick drum as well as driving elements like the snare and vocal should be placed in the center.

We’ll be using a bass track played by a friend of mine, Jorge Perelló. You could do worse things than check out his Myspace page, and give his interesting songs a listen.


EQ

I actually equalize a track before I compress, but then I place the compression plug-in before the EQ in the insert chain. It’s an easy way to trim the fat from the track before you compress the bass and make it steady. I needed to cut out a few frequencies in order to fully appreciate the sound I had, so if I had compressed the bass beforehand those frequencies just would have annoyed me and I wouldn’t have been able to correctly compress the bass guitar to my liking.

I start by filtering out the very low end of the bass guitar. There is not a lot of stuff going on under 40 Hz so it’s safe to trim that off with a high-pass filter. You can get rid of unnecessary high-end as well by filtering out the top with a low-pass filter.

After I filter out what I don’t need I start hunting down problematic frequencies. The best way to EQ out excessive frequencies is with a narrow boost, sweeping around until Mr. Frequency Annoyance jumps out at you. I’m cutting two frequencies that are actually pretty close together, but it’s a better idea to cut both of them with a narrow Q instead of scooping everything out with one big cut. That way you only take out the frequencies that are causing you problems instead of compromising other adjacent frequencies.

See here where I cut both at 128 Hz and 185 Hz. By sweeping the spectrum with a narrow boost I was able to pinpoint those annoying frequencies that were very unflattering to the sound of the bass. The low mid frequencies can cause frequent problems in mixing, and the boomy and muddy nature of the low mids can cause instruments to lose clarity and punch. I cut out the problem frequencies in the low mids and decided to give the bass guitar a little low end boost at 80 Hz. The combination of the low shelving EQ and the filtered low end causes the shelving equalizer to look like a broad bell boost, instead of the low end shelving EQ it’s supposed to be. But that’s ok, we only want to give it some boost in that area anyway.

Due to the funky nature of this particular bass track I wanted to bring out a little bit more of the attack of the strings. By boosting around 700 Hz, or 680 Hz to be exact, I was able to accent the subtle string sound of the bass guitar. Unnecessary slap sound from the fingerboard can be cut out at 2-3 kHz as well as giving a little space for the vocal that resides in that area.

In my opinion, EQ is the most important tool to master as it can have such a profound effect on your tracks. With only EQ we’ve managed to filter out unnecessary high and low end, cut out extravagant muddiness and enhance the frequencies that flatter this particular playing.

This is what we started with:

Download audio file (bassdry.mp3)

Here is the bass guitar track after we’ve EQed it.

Download audio file (basseqonly.mp3)

Much tighter, cleaner and better sounding.

A quick note on filtering: Some engineers get pretty drastic with their filtering, wanting the bass to only occupy the very low end of the bass range. Therefore they filter out everything else to make room for all the other elements a song might have, such as keyboards, guitars, lots of vocals etc. Popular music can sometimes have this sort of approach, where the bass is filtered drastically like in the audio example below. In solo mode it might sound pretty drastic to untrained ears, but when you pile on layers of instruments found in a typical pop song you sometimes won’t notice that there is something lacking from the bass guitar’s high end.

Download audio file (bassfilter.mp3)


Compression

Compression, in this instance, didn’t play such a pivotal part in shaping the bass guitar sound. Having a good bass player with a steady hand can be a really good substitute for compression, as this case demonstrates. The playing is very steady and although dynamic, isn’t all over the place like you would find with an inexperienced bass player. That said, I did insert some compression on the part, but mostly for evening out the peaks and controlling the overall steadiness of the bass guitar part.

I usually start with a ratio of 8:1 on bass tracks but I trimmed it down to 5:1 since it didn’t seem to need any heavy handed compression. This is very “suave” compression, as the knee is also very soft, gradually applying compression instead of clamping down on the sound right away. I didn’t want to clamp down on the funkiness so the attack is set fairly slow, but the release much faster, allowing the bass to breathe.

Here’s what we’ve got so far:

Download audio file (basseqcomp.mp3)


Reverb?

Reverb can throw any definition and clarity of the bass guitar out the window. Adding reverb will instantly make a bass lose punch and sound muddy in a mix. It’s a good idea to steer clear of any reverb when creating your mix due to aforementioned consequences, although some tracks have used reverb on their bass tracks for effect. The song Hang Me Up to Dry by the Cold War Kids is a good example of a bass guitar with reverb that actually adds to the song instead of buries the low end in mud.

Just listen to how reverb can quickly ruin our bass track in the following example.

Download audio file (bassreverb.mp3)

So you see how reverb on the bass would leave the low end unanchored and shaky instead of tight and well defined. Leave reverb on bass guitar for effects only, but not as a integral part of the sound.


Amp Simulation

This bass was recorded direct, through a DI box straight into the desk. Sometimes this can leave the bass signal a little dry and lifeless. The playing shines through but there’s something lacking from the sound due to the lack of recording through an amplifier. Using amp simulators can quickly give a nice rounded and amplified edge to the bass guitar’s DI signal. You could say that we’re cheating by adding an amp sound afterwards, but sometimes that’s what we need to do to get a good source sound that we can play with afterwards.

Listen to the added sound Logic’s Bass Amp give the signal.

Download audio file (bassamp.mp3)


Conclusion

Now we’ve taken a good performance that’s a little lacking in quality

Download audio file (bassdry.mp3)

and transformed it into a nicely EQed, compressed and rounded bass track.

Download audio file (bassamp.mp3)

Using the typical mixing tricks of EQ and compression with a little cheating in the bass amp department we’re able to mix together a nicely sounding bass guitar track in just a few easy steps. Now, depending on the genre, sound and wants of the mixing engineer and bass player we would maybe EQ differently, compress harder or add different effects such as fuzz or distortion for an extra edge to the sound. Also, depending on the context of the rest of the instruments we might need to accommodate the bass part with more cutting to make it fit in with the rest of the instruments such as the kick drum and electric guitar. But for now, following these easy steps I hope I have given you a sense of direction when it comes to mixing your bass guitar tracks.

Any great effects or tips you have added to your tracks that you would like to share? Any drastic EQing, crazy effects or overdrive that have worked well for you? Share it in the comments!


Best of Tuts+ – April

April was an enormous month for Tuts. In one month Tuts introduced Creative Sessions, teaching the theory behind the techniques and practices that get used in tutorials and by professionals in the field. We also saw Cgtuts+ and Activetuts+ commence their Premium Programs and introduced Moneybookers as an alternate payment method, for those who don’t have PayPal. On top of that we also introduced Pre-paid memberships so if you don’t have a credit card, you can still become a Premium Member. Here’s a selection of the best from each site, just in case you missed it amongst all the action.

Psdtuts+ – Photoshop Tutorials

  • How to Create an Incredible Typographic Illustration – Part 1

    All work and no play makes Jack a dull boy. In this two-part tutorial, we’re going to learn how to bring a simple proverb into a complex typographic illustration that achieves a level of realism without actually using any photos. Yes, we’re going to build this idea from the bottom up. In the first part, learn how to model your own objects in Cinema 4D and prepare them for isolation in Photoshop.

    Continue Reading

  • Give a Photo a Complete Glamour Makeover With Stunning Light and 3D Effects

    Have you ever wanted to see what you would look like after a complete makeover? Today, I’m going to show you how to transform a regular, every day photo into a real glamour shot. In this tutorial, you will learn how to retouch a model’s face and subtly manipulate her hair. In addition, we will enhance the canvas by adding attractive lighting and 3D effects. This tutorial requires considerable Pen Tool skills, but with perseverance and a passion for design, you will certainly be able to achieve great results.

    Continue Reading

  • Create an Angelic Sculpture Made of Ice in Photoshop

    Sometimes all you need to create an incredible photo manipulation in Photoshop is a rough sketch, some nice imagery, and some knowledge of how to use Photoshop’s transformation tools. In today’s tutorial we will demonstrate how assemble an angelic ice sculpture from a rough sketch and some beautiful scenic photos.

    Continue Reading

  • Turn a Flawless Blonde Beauty Into a Sword-Wielding Fantasy Action Hero

    In today’s tutorial we are going to turn a flawless blonde beauty into a sword-wielding survival huntress. To do this we are going to make her skin sweaty and dirty, her dress stained and torn, we’ll add blood stains to the sword, manipulate her hair, and create a post-apocalyptic background full of smoke and fire effects. It’s gonna be a gas!

    Continue Reading

  • Quick Tip: Create a Realistic Paper Texture in 5 Minutes

    In this quick tip tutorial, we will learn how to create a realistic paper texture from scratch in just 5 minutes. To do this we will use some simple filters and effects. Let’s get started!

    Continue Reading

Activetuts+ – Flash, Flex and ActionScript Tutorials

  • Exclusive Freebie: The Piecemaker XML Gallery

    To kick us off in style, here’s the awesome Piecemaker gallery created by Björn from Modularweb. Besides the freebie, you’ll find extensive documentation and a tut explaining the native 3D features of Flash CS4. Over to you, Björn..

    Continue Reading

  • A better way to build flash banners

    A Better Way to Build Flash Banners

    Banner development is often plagued by multiple files, fragmented code and messy timelines. This tutorial will show you how you can create a project template to serve as a solid base which will help you develop robust banners quickly, freeing you up to focus on bringing the creative idea to life.

    Continue Reading

  • How to Create a Flash Menu in 20 Minutes

    How to Create a Flash Menu in 20 Minutes

    Imagine you’ve promised your client he will have that menu idea you told him about later on today, when you meet. You open up Flash and begin a rough but great example, which you can code or extend later. During this tut we’ll focus on making just such a menu; as customizable as possible, without using any classes, just component parameters.

    Read More

  • Quick Tip: How to Automatically Resize an Image to Fit the Screen

    Quick Tip: How to Automatically Resize an Image to Fit the Screen

    This Quick Tip explains how to use an image as a website background and scale it proportionally to the stage size. It’s great for when you’re using a SWF that’s full-height and full-width inside a webpage.

    Read More

  • Throw Objects by Creating a PanAndThrow Class

    Throw Objects by Creating a PanAndThrow Class

    In this tutorial we will be mocking up and finishing a pan and throw class that will allow us to add this effect to any element we want. To accomplish this, we will create a image viewer – but not your average viewer. Here we’ll have zooming, throwing, panning.. Almost sounds like a ninja app, huh?

    Visit Article

Aetuts+ – Adobe After Effects Tutorials

  • Discover How To Recreate the Sherlock Holmes End Credits Effect

    Discover How To Recreate the Sherlock Holmes End Credits Effect

    After Effects, my dear Watson! This tutorial uses hand drawn elements, textures, and pre-matted motion elements to recreate a look that is similar to the Sherlock Holmes credits. It gives you basics to build on. The great thing about this effect is that it is made to look organic and not 3D and effects heavy, but it still turns out looking really professional. It does not require very much expertise in free hand drawing seeing that all you have to do is trace a still image. Take this tutorial and build upon it to create something awesome.

    Visit Article

  • Create A Realistic Glass Reflection

    Create A Realistic Glass Reflection

    Transparency is an important element to reflect in one’s relationships and if we can help you in that area it’d be our pleasure! In this tutorial you’ll find out how to create a realistic glass reflection on a 3D object, created within After Effects. We’ll then simulate a normal pass and have it reflect the environment with the “normality” free plug-in.

    Visit Article

  • Get Caught Up In A Spider Web Tutorial – AE Premium

    Get Caught Up In A Spider Web Tutorial – AE Premium

    Learn how to use Trapcode Form to create a stylistic and dynamic Spider Web. This tutorial will show you how to “think outside the box” when it comes to using plug-ins to get away from that “preset” look.

    Visit Article

  • Welcome CS5! An Intro To The New “Roto Brush”

    Welcome CS5! An Intro To The New “Roto Brush”

    A HUGE welcome to After Effects CS5! In this tutorial, I’ll be going through and explaining the new “Roto Brush” tool included within CS5. It isn’t a “keyer”, it’s not quite a “magic wand”, I wouldn’t even call it a “pen”. You’re just gonna have to watch the tutorial to find out what this amazing new feature is made of!

    Visit Article

  • 61 Mesmerizing VFX Breakdowns

    61 Mesmerizing VFX Breakdowns

    A subject we haven’t touched on for a couple months is the wonder of visual effects and compositing breakdowns. Take a look at the largest roundup of this genre to date!

    Visit Article

Audiotuts+ – Audio and Production Tutorials

  • Quick Tip: How to Create Interesting Drum Patterns Quickly<br />

    Quick Tip: How to Create Interesting Drum Patterns Quickly

    Here is a quick and effective way of creating original and complex drum patterns spontaneously. I am using Logic, but the concept is not DAW specific.

    Visit Article

  • How To Recognize Frequencies

    How To Recognize Frequencies

    In the last installment we studied the first four octaves of the frequency spectrum with pink noise. Now we’ll continue with the rest of the octaves and revisit the others using music samples.

    Visit Article

  • 6 Apps & Websites to Get Your Ear in Shape

    6 Apps & Websites to Get Your Ear in Shape

    If you followed along with us a few weeks ago, you know how much interval ear training can help you as a musician and how to get started with training itself. If you haven’t read it, head on over to Boot Camp for Your Ear.
    This time, we’re going to look at a bunch of applications and websites that will help you with regular ear training sessions. Most of these go beyond intervals, of course.

    Visit Article

  • 8 Free, Cross-Platform Apps for Musicians

    8 Free, Cross-Platform Apps for Musicians

    Like most of us when we’re in the studio, it’s hard to get me to work with anything other than the industry standards; Pro Tools, Reason, Logic (which sort of falls into that category), and so on. But given the rising prices of just about everything under the sun, not to mention the chronic emptiness of the musician’s wallet, it’s worth taking a look at the alternatives out there that can be had for free.

    Visit Article

  • Basix: How to Record the Acoustic Guitar

    Basix: How to Record the Acoustic Guitar

    Recording acoustic instruments can be scary for beginners. In this day and age many people just plug in and play their instruments, electric guitars, basses and synths, never needing to record an instrument except the odd vocal track. True as it may be that we get better sounds out our guitar plug-ins and software synths with every update, we must not forget how to record a “proper” instrument, in the real world.

    Visit Article

Cgtuts+ – Web Development Tutorials

  • An Archiviz Workflow Overview in 3ds Max, Sketchup, and Digital Fusion

    An Archiviz Workflow Overview in 3ds Max, Sketchup, and Digital Fusion

    In this Architectural Visualization workflow overview you will learn how to use Google Sketchup for photo matching, create a Vray-proxy in 3ds Max, use Max script to speed up your workflow, reduce render times when creating a large scene, set render layers in 3ds Max, and do some post production in Digital Fusion.

    Visit Article

  • Model, Texture, and Render the Legendary Katana in Maya – Day 1

    Model, Texture, and Render the Legendary Katana in Maya

    In this 3 part Maya workflow tutorial you will learn how to model, texture, and render a Katana, the legendary Samurai sword. For the modeling portion, we will use Maya’s basic polygon editing tools, while UVlayout will be used to create the UVs, and of course Photoshop to create the textures. We will also briefly cover Mental Ray for rendering the final image.

    Visit Article

  • Create Convincing Looking Clouds using Pyrocluster in Cinema 4D

    Create Convincing Looking Clouds using Pyrocluster in Cinema 4D

    This tutorial will demonstrate the ease and versatility with which you can create convincing looking gas effects using Cinema 4D’s Pyrocluster. You will learn how to optimize your scene and tune it to your own visual tastes, while focusing on creating realistic clouds as the subject matter. The basic techniques, however, can be applied to a variety of different scenarios and effects.

    Visit Article

  • Create a Logo Dispersion Effect using Particle Flow and After Effects

    Create a Logo Dispersion Effect using Particle Flow and After Effects

    As you may know, when you get a grasp on particles in CG, the possibilities of what you can accomplish are nearly limitless. In this 3ds Max based Particle Flow tutorial, you will learn an easy method of dispersing a logo into particles using materials.

    Visit Article

  • Quick Tip: Simulating Chains using Reactor in 3ds Max

    Quick Tip: Simulating Chains using Reactor in 3ds Max

    In this short tutorial, you will learn how to simulate chains, necklaces, or pearls using an easy and very efficient method with reactor in 3ds Max. After watching this, you will be able to simulate chains in just a few short seconds, a skill which can prove to be very useful in countless different situations.

    Visit Article

Nettuts+ – Web Development Tutorials

  • Quick Tip: HTML5 Features you Should be Using Right Now

    Quick Tip: HTML5 Features you Should be Using Right Now

    With all this talk about HTML5 not being complete until 2022, many people disregard it entirely – which is a big mistake. In fact, there are a handful of HTML5 features that we can use in all our projects right now! Simpler, cleaner code is always a good thing. In today’s video quick tip, I’ll show you a handful of options.

    Visit Article

  • Combining Modern CSS3 and HTML5 Techniques

    Combining Modern CSS3 and HTML5 Techniques

    Just because some techniques don’t work in decade old browsers doesn’t mean that you shouldn’t be learning everything you can! Stay on the cutting edge, as we use everything from CSS shadows and animations, to HTML 5 mark-up and local storage, to utilizing jQuery to work with the Picasa API. We’ll also take advantage of the excellent jQuery library, and review some best practices when coding.

    Visit Article

  • Quick Tip: An Introduction to jQuery Templating

    Quick Tip: An Introduction to jQuery Templating

    JavaScript Templating is a neat idea: it allows you to easily convert JSON to HTML without having to parse it. At Microsoft’s MIX10 conference, they announced that they are starting to contribute to the jQuery team. One of their efforts is to provide a templating plugin. In this quick tip, I’ll show you how to use it!

    Visit Article

  • 10 Kick-Ass Magento Templates

    10 Kick-Ass Magento Templates

    I’m proud to announce that ThemeForest is now selling Magento eCommerce templates at cheap prices that any business or individual can afford. We’ve launched with thirty-five awesome Magento templates, but we’re just scratching the surface. By the end of the year, ThemeForest will be the premier location for buying and selling Magento templates! Here are some of the best that we’ve launched with.

    Visit Article

  • Quick Tip: Notable New Features in Dreamweaver CS5

    Quick Tip: Notable New Features in Dreamweaver CS5

    If you’re a Twitter user, it was difficult not to be aware of Adobe’s CS5 global launch presentation. While they did an excellent job of promoting Photoshop and Flash, other applications, such as Dreamweaver, only received limited coverage. Nonetheless, take a look at some of the awesome new features in Dreamweaver CS5, slated to be released in mid-May.

    Visit Article

Phototuts+ – Photography and Post-processing tutorials

  • Advanced Macro and Still Life Photography

    Advanced Macro and Still Life Photography

    You face special challenges when shooting objects that are close-up, or capturing still life. As with most subjects, many of these challenges have to do with light quality and quantity. With macro photographs, the challenge grows as the subjects get smaller. This article delves into designing for still-life and macro photography, outlines high and low-key techniques, and discusses the importance of depth of field.

    Visit Article

  • Quick Tip: 5 Useful New Features in Adobe CS5

    Quick Tip: 5 Useful New Features in Adobe CS5

    Today marks the launch of the latest edition of Adobe’s Creative Suite – CS5. In today’s Quick Tip, we’ll be taking a look at a few of the new features in Photoshop CS5 that are particularly useful for photographers. We’d also love to hear what you’re looking forward to, and whether you’ll be upgrading!

    Visit Article

  • Simple Steps for Shooting Amazing Silhouettes

    Simple Steps for Shooting Amazing Silhouettes

    Silhouettes can be an excellent way to add drama to a scene. The stark contrast and lack of detail in the subject infuse a psychological effect into the image that can be beautiful, mysterious, or even frightening.
    Today we’ll look at a few suggestions to keep in mind the next time you set out to shoot some silhouettes. We’ll also examine the settings used in some real-life amazing silhouette shots to see what we can learn from them.

    Visit Article

  • The Almighty Histogram – Your Guide to Better Exposure

    The Almighty Histogram – Your Guide to Better Exposure

    In this tutorial you’ll learn about the histogram, and what it’s able to tell you about your photography. If you’re going to use the back of your camera as guide to judging exposure, then you need the histogram. Understanding it fully will help you capture better, more flexible images!

    Visit Article

  • The Ultimate Guide for Buying Your First Digital SLR

    The Ultimate Guide for Buying Your First Digital SLR

    Let’s assume that you’ve been shooting with your “point and shoot” for a while now, and you’ve taken some pretty nice snapshots. But maybe you are starting to feel a little limited by what the camera is capable of doing. You’ve read up on photography, and there are things you want to work on. You feel it is time to step up!
    This guide will help you to understand some of the basic features of Digital SLR cameras (DSLRs), and hopefully help you find one that fits both your needs and budget.

    Visit Article

Vectortuts+ – Adobe Illustrator and Vector Tutorials

  • Time-Savers: 400+ Stock Images, Retro Vectors

    Time-Savers: 400+ Stock Images, Retro Vectors

    Stock images can save you many hours of work on illustration and allow you to focus your attention on the important task of designing. Finding the right vector for you, however, is a completely different matter, and can sometimes take just as long as creating a vector image yourself! That’s why in this post we have rounded up a total of over 400 retro-themed vector images which you can use in your own projects.

    Visit Article

  • How To Create Outstanding Modern Infographics

    How To Create Outstanding Modern Infographics

    Merge form and function to create outstanding modern infographics. In this tutorial you will learn that data doesn’t have to be boring, it can be beautiful! Learn how to use various graph tools, illustration techniques and typography to make an accurate and inspiring infographic

    Visit Article

  • Inspiration: Amazing 3D Typography

    Inspiration: Amazing 3D Typography

    Three-dimensional typography is something we’ve seen a lot of recently, and it doesn’t seem to be dying down, either. This post showcases a huge collection of 3D typography, and we have no doubt whatsoever that it is going inspire!

    Visit Article

  • Quick Tip: The Tilde Key Trick

    Quick Tip: The Tilde Key Trick

    This screencast covers fun with the Tilde key and Adobe Illustrator. Works with any Shape Tool, the Line Segment Tool, the Arc Tool, the Spiral Tool, and more. Use this technique to quickly make complex shape patterns.

    Visit Article

  • Create a Realistic, Vector Building Illustration

    Create a Realistic, Vector Building Illustration

    We have another great Vector Premium tutorial available exclusively for Premium members today. If you want to learn how to create realistic vector buildings, then we have a massive and extremely detailed tutorial for you.

    Visit Article

Creative Sessions

  • The Elements of Cute Character Design

    The Elements of Cute Character Design

    You’ve always wanted to develop a character which has the potential to enchant the world and to compete with Hello Kitty? In this article I’d like to present some elements making a character cute and lovable and to support you in achieving your goals. First, I talk about why something is regarded as cute. Afterwards I’d like to offer an overall view on cute proportions and as a conclusion consider general rules and tips. The goal is to create a manual of cute character design which can be universally used in the process of design.

    Visit Article

  • Roughly Speaking: Character Design Sketching Approaches

    Roughly Speaking: Character Design Sketching Approaches

    Character design comes in many styles, but they all start with the rough sketch. Often overlooked in online tutorials, technique and process videos, they are the foundation to creating quality characters. The following is an overview of rough sketches from some fantastic character design artists, with many different styles and approaches.

    Visit Article

  • Character Design – Nailing the Basics

    Character Design – Nailing the Basics

    If you’re thinking of becoming a professional illustrator, character design will come up as a client request again and again, so keeping up on current trends is a must. To get started creating your own characters, you’ll need to nail the basics, which includes: getting comfortable sketching, refining your process, and streamlining your overall approach.

    Visit Article

  • Creating Personal Character Designs with Precision

    Creating Personal Character Designs with Precision

    Designing a character can apply to both personal and professional projects. The character can be a mascot that works in the context of a multi-national brand, or it can simply be inspired by a well-known character within pop culture. The later is usually referred to as “Fan Art.” The character “Mickey Rat” first appeared in the early 1970’s as a subversive underground comic that I enjoyed as a kid. Many artists over the years have taken their own approach with the character, and this article goes over my creation of this vectorized vermin.

    Visit Article

  • How to Make an Animated Paper Robot

    How to Make an Animated Paper Robot

    In this tutorial we’ll go through the steps of designing and making an animated paper robot character. Not just a picture, this is a moving character that will sit nicely on top of your computer monitor. Push the robot body up and down and he stretches out his robot claws! We’ll start with the lines ready and learn the craft of coloring and then physically putting this paper character together..

    Visit Article

FreelanceSwitch

  • Keeping In Touch with Prospective Clients

    Keeping In Touch with Prospective Clients

    A lot of your success as a freelancer will depend on your persistence.
    It takes many forms – your persistence in learning and improving your skills, the persistence that’s involved in bringing a long, difficult project to completion, and the topic of this article, persistence in keeping in touch with the people who may do business with you.

    Visit Article

  • Turning Your Knowledge into Products

    Turning Your Knowledge into Products

    One of the big downsides of the freelance world is that when you’re not doing billable work, your income goes to zero. So, there’s a lot of talk about creating income streams that aren’t dependent on your selling your time.

    Visit Article

  • Why I Believe in Pricing Work Based on Value

    Why I Believe in Pricing Work Based on Value

    For freelancers, the question of how to price your services is always up for debate. Should you charge by the hour or per project? What should your hourly rate be? What type of payment terms should you require? The answers to these questions will vary based on your industry, your reputation, and your personal preferences for your business. But there is one thing that I believe should factor into every pricing decision you make:
    Price your services based on value.

    Visit Article

  • Setting Your Standards as a Freelancer: A Few Suggestions

    Setting Your Standards as a Freelancer: A Few Suggestions

    Having standards is important when you’re trying to find and work with clients on your own. It’s surprisingly tempting not to stick to your standards: a quick project that you wouldn’t normally take can look pretty appealing if you’re having a slow month. But sticking to your guns can be important in more ways than one. If you take that problematic job, not only are you doing something that you don’t want to do, but you’re also likely to hand in work that you know isn’t as good as you could do. Even worse, that sub-standard job can take up the time you need to find higher paying clients, sticking you in a position where you can’t afford to move forward.

    Visit Article

  • Get Business Buzzing with a Buzz Piece

    Get Business Buzzing with a Buzz Piece

    Most business models can attest to the power of a buzz piece. This marketing tool provides valuable information for prospective clients, the ability to transform readers into customers and a ton of exposure. So if you don’t have one, you should absolutely consider it.
    Here’s what you need to know about buzz pieces.

    Visit Article

We’ll be publishing the best of Tuts+ each month, so you get to see the best of everything.


Quick Tip: 10 Things To Do Before You Hit Record

While it can highly tempting to jump right into recording, great recordings (just like great paintings, photos, books, businesses, speeches, etc.) come from taking time to plan ahead. The term “fix it in the mix” is the dangerous and should be banished from your vocabulary. Something that’s been fixed in the mix will never sound as if you got it right in the first place, and usually it takes way longer than if you fixed it up front. Here are ten steps to getting your recording right from the very beginning.


1. Determine Your Destination

Many songwriters approach recording like playing with building blocks: they start off with a foundation (a song that works well for their instrument and voice), then they add more blocks (other instruments) on top until it feels right. This sometimes works, but it can be hit and miss and can waste a lot of time adding instruments that will not be used in the end result. Decide what you want the end result to be before you do anything else. Knowing your destination will affect every other decision you make during the recording.


2. Review Dynamic Changes

Take a moment to look at the song objectively. How does it change over time. Listen for changes in volume, tone, intensity, instrumentation, rhythm, and key. A song needs some of these dynamics to be interesting. If the song sounds and feels the same the whole way through, it gets boring very quickly.


3. Follow The Interest

Listen to the song the whole way through and ask yourself where your attention lies during each part of the song. When the lead instrument (often the vocals) stops, what takes over to draw your attention through the song?


4. Bring In Fresh Ears

Bring in someone who hasn’t heard the song before and have them provide constructive criticism. If the arrangement is poor, or the song is too long, it’s better find out before recording.


5. Ask “What Is This Instrument Doing?”

Determine each instrument’s role in this particular arrangement. What does it have to offer to the mix? This will help you choose the instruments to use when recording, the mics you want to use, and the placement of those mics. If the acoustic guitar is only there to add sparkly high end, then you don’t need a full sounding guitar, or a mic with lots of low-end.


6. Look For Competing Instruments

Are those two guitars serving the same purpose? Are the guitar and keyboard playing the same riff? If so, there’s potential for them to get in each other’s way and conflict with each other. Solutions can include changing the arrangement (a different octave or rhythm for one of the instruments), choice of instruments (make one guitar part a Stratocaster, the other a Les Paul), or equalization (one deep and full, the other bright and present).


7. Subtract

Remove any instruments that aren’t adding to the mix. Also, remove an instrument if the conflicts from the previous step can’t be resolved. Once you’ve done that, remove any frequencies that aren’t necessary (if can’t hear the low end on that guitar in a big mix, cut the low end out. It’ll just add muddiness).


8. Find The Best Instrument For The Job

The key here is for the job. A concert grand piano may sound excellent, but it will likely seem out of place in a bluegrass tune. Similarly, you’ll rarely see a jazz drummer with a 28″ kick drum. Pick the instrument that works best for the destination you determined in Step 1.


9. Find The Best Room For The Job

Sounds an awful lot like Step 8, but the room you record in can make a huge difference to your recording. Even if you record in a home studio, there are plenty of environments available to you: living room, bathroom, stairwell, garage. Try different rooms and use the one that’s best for that instrument and how it fits into that song.


10. Experiment With Different Mics And Placement

I can’t emphasize this enough: take the time upfront to find the perfect mic and placement. If you take the time to get this right, mixing will be done as simple as pushing up the faders. I know this is repeating myself, but ban the phrase “fix it in the mix” from your studio.


Best of Tuts – April

April was an enormous month for Tuts. In one month Tuts introduced Creative Sessions, teaching the theory behind the techniques and practices that get used in tutorials and by professionals in the field. We also saw Cgtuts+ and Activetuts+ commence their Premium Programs and introduced Moneybookers as an alternate payment method, for those who don’t have PayPal. On top of that we also introduced Pre-paid memberships so if you don’t have a credit card, you can still become a Premium Member. Here’s a selection of the best from each site, just in case you missed it amongst all the action.

Psdtuts+ – Photoshop Tutorials

  • How to Create an Incredible Typographic Illustration – Part 1

    All work and no play makes Jack a dull boy. In this two-part tutorial, we’re going to learn how to bring a simple proverb into a complex typographic illustration that achieves a level of realism without actually using any photos. Yes, we’re going to build this idea from the bottom up. In the first part, learn how to model your own objects in Cinema 4D and prepare them for isolation in Photoshop.

    Continue Reading

  • Give a Photo a Complete Glamour Makeover With Stunning Light and 3D Effects

    Have you ever wanted to see what you would look like after a complete makeover? Today, I’m going to show you how to transform a regular, every day photo into a real glamour shot. In this tutorial, you will learn how to retouch a model’s face and subtly manipulate her hair. In addition, we will enhance the canvas by adding attractive lighting and 3D effects. This tutorial requires considerable Pen Tool skills, but with perseverance and a passion for design, you will certainly be able to achieve great results.

    Continue Reading

  • Create an Angelic Sculpture Made of Ice in Photoshop

    Sometimes all you need to create an incredible photo manipulation in Photoshop is a rough sketch, some nice imagery, and some knowledge of how to use Photoshop’s transformation tools. In today’s tutorial we will demonstrate how assemble an angelic ice sculpture from a rough sketch and some beautiful scenic photos.

    Continue Reading

  • Turn a Flawless Blonde Beauty Into a Sword-Wielding Fantasy Action Hero

    In today’s tutorial we are going to turn a flawless blonde beauty into a sword-wielding survival huntress. To do this we are going to make her skin sweaty and dirty, her dress stained and torn, we’ll add blood stains to the sword, manipulate her hair, and create a post-apocalyptic background full of smoke and fire effects. It’s gonna be a gas!

    Continue Reading

  • Quick Tip: Create a Realistic Paper Texture in 5 Minutes

    In this quick tip tutorial, we will learn how to create a realistic paper texture from scratch in just 5 minutes. To do this we will use some simple filters and effects. Let’s get started!

    Continue Reading

Activetuts+ – Flash, Flex and ActionScript Tutorials

  • Exclusive Freebie: The Piecemaker XML Gallery

    To kick us off in style, here’s the awesome Piecemaker gallery created by Björn from Modularweb. Besides the freebie, you’ll find extensive documentation and a tut explaining the native 3D features of Flash CS4. Over to you, Björn..

    Continue Reading

  • A better way to build flash banners

    A Better Way to Build Flash Banners

    Banner development is often plagued by multiple files, fragmented code and messy timelines. This tutorial will show you how you can create a project template to serve as a solid base which will help you develop robust banners quickly, freeing you up to focus on bringing the creative idea to life.

    Continue Reading

  • How to Create a Flash Menu in 20 Minutes

    How to Create a Flash Menu in 20 Minutes

    Imagine you’ve promised your client he will have that menu idea you told him about later on today, when you meet. You open up Flash and begin a rough but great example, which you can code or extend later. During this tut we’ll focus on making just such a menu; as customizable as possible, without using any classes, just component parameters.

    Read More

  • Quick Tip: How to Automatically Resize an Image to Fit the Screen

    Quick Tip: How to Automatically Resize an Image to Fit the Screen

    This Quick Tip explains how to use an image as a website background and scale it proportionally to the stage size. It’s great for when you’re using a SWF that’s full-height and full-width inside a webpage.

    Read More

  • Throw Objects by Creating a PanAndThrow Class

    Throw Objects by Creating a PanAndThrow Class

    In this tutorial we will be mocking up and finishing a pan and throw class that will allow us to add this effect to any element we want. To accomplish this, we will create a image viewer – but not your average viewer. Here we’ll have zooming, throwing, panning.. Almost sounds like a ninja app, huh?

    Visit Article

Aetuts+ – Adobe After Effects Tutorials

  • Discover How To Recreate the Sherlock Holmes End Credits Effect

    Discover How To Recreate the Sherlock Holmes End Credits Effect

    After Effects, my dear Watson! This tutorial uses hand drawn elements, textures, and pre-matted motion elements to recreate a look that is similar to the Sherlock Holmes credits. It gives you basics to build on. The great thing about this effect is that it is made to look organic and not 3D and effects heavy, but it still turns out looking really professional. It does not require very much expertise in free hand drawing seeing that all you have to do is trace a still image. Take this tutorial and build upon it to create something awesome.

    Visit Article

  • Create A Realistic Glass Reflection

    Create A Realistic Glass Reflection

    Transparency is an important element to reflect in one’s relationships and if we can help you in that area it’d be our pleasure! In this tutorial you’ll find out how to create a realistic glass reflection on a 3D object, created within After Effects. We’ll then simulate a normal pass and have it reflect the environment with the “normality” free plug-in.

    Visit Article

  • Get Caught Up In A Spider Web Tutorial – AE Premium

    Get Caught Up In A Spider Web Tutorial – AE Premium

    Learn how to use Trapcode Form to create a stylistic and dynamic Spider Web. This tutorial will show you how to “think outside the box” when it comes to using plug-ins to get away from that “preset” look.

    Visit Article

  • Welcome CS5! An Intro To The New “Roto Brush”

    Welcome CS5! An Intro To The New “Roto Brush”

    A HUGE welcome to After Effects CS5! In this tutorial, I’ll be going through and explaining the new “Roto Brush” tool included within CS5. It isn’t a “keyer”, it’s not quite a “magic wand”, I wouldn’t even call it a “pen”. You’re just gonna have to watch the tutorial to find out what this amazing new feature is made of!

    Visit Article

  • 61 Mesmerizing VFX Breakdowns

    61 Mesmerizing VFX Breakdowns

    A subject we haven’t touched on for a couple months is the wonder of visual effects and compositing breakdowns. Take a look at the largest roundup of this genre to date!

    Visit Article

Audiotuts+ – Audio and Production Tutorials

  • Quick Tip: How to Create Interesting Drum Patterns Quickly<br />

    Quick Tip: How to Create Interesting Drum Patterns Quickly

    Here is a quick and effective way of creating original and complex drum patterns spontaneously. I am using Logic, but the concept is not DAW specific.

    Visit Article

  • How To Recognize Frequencies

    How To Recognize Frequencies

    In the last installment we studied the first four octaves of the frequency spectrum with pink noise. Now we’ll continue with the rest of the octaves and revisit the others using music samples.

    Visit Article

  • 6 Apps & Websites to Get Your Ear in Shape

    6 Apps & Websites to Get Your Ear in Shape

    If you followed along with us a few weeks ago, you know how much interval ear training can help you as a musician and how to get started with training itself. If you haven’t read it, head on over to Boot Camp for Your Ear.
    This time, we’re going to look at a bunch of applications and websites that will help you with regular ear training sessions. Most of these go beyond intervals, of course.

    Visit Article

  • 8 Free, Cross-Platform Apps for Musicians

    8 Free, Cross-Platform Apps for Musicians

    Like most of us when we’re in the studio, it’s hard to get me to work with anything other than the industry standards; Pro Tools, Reason, Logic (which sort of falls into that category), and so on. But given the rising prices of just about everything under the sun, not to mention the chronic emptiness of the musician’s wallet, it’s worth taking a look at the alternatives out there that can be had for free.

    Visit Article

  • Basix: How to Record the Acoustic Guitar

    Basix: How to Record the Acoustic Guitar

    Recording acoustic instruments can be scary for beginners. In this day and age many people just plug in and play their instruments, electric guitars, basses and synths, never needing to record an instrument except the odd vocal track. True as it may be that we get better sounds out our guitar plug-ins and software synths with every update, we must not forget how to record a “proper” instrument, in the real world.

    Visit Article

Cgtuts+ – Web Development Tutorials

  • An Archiviz Workflow Overview in 3ds Max, Sketchup, and Digital Fusion

    An Archiviz Workflow Overview in 3ds Max, Sketchup, and Digital Fusion

    In this Architectural Visualization workflow overview you will learn how to use Google Sketchup for photo matching, create a Vray-proxy in 3ds Max, use Max script to speed up your workflow, reduce render times when creating a large scene, set render layers in 3ds Max, and do some post production in Digital Fusion.

    Visit Article

  • Model, Texture, and Render the Legendary Katana in Maya – Day 1

    Model, Texture, and Render the Legendary Katana in Maya

    In this 3 part Maya workflow tutorial you will learn how to model, texture, and render a Katana, the legendary Samurai sword. For the modeling portion, we will use Maya’s basic polygon editing tools, while UVlayout will be used to create the UVs, and of course Photoshop to create the textures. We will also briefly cover Mental Ray for rendering the final image.

    Visit Article

  • Create Convincing Looking Clouds using Pyrocluster in Cinema 4D

    Create Convincing Looking Clouds using Pyrocluster in Cinema 4D

    This tutorial will demonstrate the ease and versatility with which you can create convincing looking gas effects using Cinema 4D’s Pyrocluster. You will learn how to optimize your scene and tune it to your own visual tastes, while focusing on creating realistic clouds as the subject matter. The basic techniques, however, can be applied to a variety of different scenarios and effects.

    Visit Article

  • Create a Logo Dispersion Effect using Particle Flow and After Effects

    Create a Logo Dispersion Effect using Particle Flow and After Effects

    As you may know, when you get a grasp on particles in CG, the possibilities of what you can accomplish are nearly limitless. In this 3ds Max based Particle Flow tutorial, you will learn an easy method of dispersing a logo into particles using materials.

    Visit Article

  • Quick Tip: Simulating Chains using Reactor in 3ds Max

    Quick Tip: Simulating Chains using Reactor in 3ds Max

    In this short tutorial, you will learn how to simulate chains, necklaces, or pearls using an easy and very efficient method with reactor in 3ds Max. After watching this, you will be able to simulate chains in just a few short seconds, a skill which can prove to be very useful in countless different situations.

    Visit Article

Nettuts+ – Web Development Tutorials

  • Quick Tip: HTML5 Features you Should be Using Right Now

    Quick Tip: HTML5 Features you Should be Using Right Now

    With all this talk about HTML5 not being complete until 2022, many people disregard it entirely – which is a big mistake. In fact, there are a handful of HTML5 features that we can use in all our projects right now! Simpler, cleaner code is always a good thing. In today’s video quick tip, I’ll show you a handful of options.

    Visit Article

  • Combining Modern CSS3 and HTML5 Techniques

    Combining Modern CSS3 and HTML5 Techniques

    Just because some techniques don’t work in decade old browsers doesn’t mean that you shouldn’t be learning everything you can! Stay on the cutting edge, as we use everything from CSS shadows and animations, to HTML 5 mark-up and local storage, to utilizing jQuery to work with the Picasa API. We’ll also take advantage of the excellent jQuery library, and review some best practices when coding.

    Visit Article

  • Quick Tip: An Introduction to jQuery Templating

    Quick Tip: An Introduction to jQuery Templating

    JavaScript Templating is a neat idea: it allows you to easily convert JSON to HTML without having to parse it. At Microsoft’s MIX10 conference, they announced that they are starting to contribute to the jQuery team. One of their efforts is to provide a templating plugin. In this quick tip, I’ll show you how to use it!

    Visit Article

  • 10 Kick-Ass Magento Templates

    10 Kick-Ass Magento Templates

    I’m proud to announce that ThemeForest is now selling Magento eCommerce templates at cheap prices that any business or individual can afford. We’ve launched with thirty-five awesome Magento templates, but we’re just scratching the surface. By the end of the year, ThemeForest will be the premier location for buying and selling Magento templates! Here are some of the best that we’ve launched with.

    Visit Article

  • Quick Tip: Notable New Features in Dreamweaver CS5

    Quick Tip: Notable New Features in Dreamweaver CS5

    If you’re a Twitter user, it was difficult not to be aware of Adobe’s CS5 global launch presentation. While they did an excellent job of promoting Photoshop and Flash, other applications, such as Dreamweaver, only received limited coverage. Nonetheless, take a look at some of the awesome new features in Dreamweaver CS5, slated to be released in mid-May.

    Visit Article

Phototuts+ – Photography and Post-processing tutorials

  • Advanced Macro and Still Life Photography

    Advanced Macro and Still Life Photography

    You face special challenges when shooting objects that are close-up, or capturing still life. As with most subjects, many of these challenges have to do with light quality and quantity. With macro photographs, the challenge grows as the subjects get smaller. This article delves into designing for still-life and macro photography, outlines high and low-key techniques, and discusses the importance of depth of field.

    Visit Article

  • Quick Tip: 5 Useful New Features in Adobe CS5

    Quick Tip: 5 Useful New Features in Adobe CS5

    Today marks the launch of the latest edition of Adobe’s Creative Suite – CS5. In today’s Quick Tip, we’ll be taking a look at a few of the new features in Photoshop CS5 that are particularly useful for photographers. We’d also love to hear what you’re looking forward to, and whether you’ll be upgrading!

    Visit Article

  • Simple Steps for Shooting Amazing Silhouettes

    Simple Steps for Shooting Amazing Silhouettes

    Silhouettes can be an excellent way to add drama to a scene. The stark contrast and lack of detail in the subject infuse a psychological effect into the image that can be beautiful, mysterious, or even frightening.
    Today we’ll look at a few suggestions to keep in mind the next time you set out to shoot some silhouettes. We’ll also examine the settings used in some real-life amazing silhouette shots to see what we can learn from them.

    Visit Article

  • The Almighty Histogram – Your Guide to Better Exposure

    The Almighty Histogram – Your Guide to Better Exposure

    In this tutorial you’ll learn about the histogram, and what it’s able to tell you about your photography. If you’re going to use the back of your camera as guide to judging exposure, then you need the histogram. Understanding it fully will help you capture better, more flexible images!

    Visit Article

  • The Ultimate Guide for Buying Your First Digital SLR

    The Ultimate Guide for Buying Your First Digital SLR

    Let’s assume that you’ve been shooting with your “point and shoot” for a while now, and you’ve taken some pretty nice snapshots. But maybe you are starting to feel a little limited by what the camera is capable of doing. You’ve read up on photography, and there are things you want to work on. You feel it is time to step up!
    This guide will help you to understand some of the basic features of Digital SLR cameras (DSLRs), and hopefully help you find one that fits both your needs and budget.

    Visit Article

Vectortuts+ – Adobe Illustrator and Vector Tutorials

  • Time-Savers: 400+ Stock Images, Retro Vectors

    Time-Savers: 400+ Stock Images, Retro Vectors

    Stock images can save you many hours of work on illustration and allow you to focus your attention on the important task of designing. Finding the right vector for you, however, is a completely different matter, and can sometimes take just as long as creating a vector image yourself! That’s why in this post we have rounded up a total of over 400 retro-themed vector images which you can use in your own projects.

    Visit Article

  • How To Create Outstanding Modern Infographics

    How To Create Outstanding Modern Infographics

    Merge form and function to create outstanding modern infographics. In this tutorial you will learn that data doesn’t have to be boring, it can be beautiful! Learn how to use various graph tools, illustration techniques and typography to make an accurate and inspiring infographic

    Visit Article

  • Inspiration: Amazing 3D Typography

    Inspiration: Amazing 3D Typography

    Three-dimensional typography is something we’ve seen a lot of recently, and it doesn’t seem to be dying down, either. This post showcases a huge collection of 3D typography, and we have no doubt whatsoever that it is going inspire!

    Visit Article

  • Quick Tip: The Tilde Key Trick

    Quick Tip: The Tilde Key Trick

    This screencast covers fun with the Tilde key and Adobe Illustrator. Works with any Shape Tool, the Line Segment Tool, the Arc Tool, the Spiral Tool, and more. Use this technique to quickly make complex shape patterns.

    Visit Article

  • Create a Realistic, Vector Building Illustration

    Create a Realistic, Vector Building Illustration

    We have another great Vector Premium tutorial available exclusively for Premium members today. If you want to learn how to create realistic vector buildings, then we have a massive and extremely detailed tutorial for you.

    Visit Article

Creative Sessions

  • The Elements of Cute Character Design

    The Elements of Cute Character Design

    You’ve always wanted to develop a character which has the potential to enchant the world and to compete with Hello Kitty? In this article I’d like to present some elements making a character cute and lovable and to support you in achieving your goals. First, I talk about why something is regarded as cute. Afterwards I’d like to offer an overall view on cute proportions and as a conclusion consider general rules and tips. The goal is to create a manual of cute character design which can be universally used in the process of design.

    Visit Article

  • Roughly Speaking: Character Design Sketching Approaches

    Roughly Speaking: Character Design Sketching Approaches

    Character design comes in many styles, but they all start with the rough sketch. Often overlooked in online tutorials, technique and process videos, they are the foundation to creating quality characters. The following is an overview of rough sketches from some fantastic character design artists, with many different styles and approaches.

    Visit Article

  • Character Design – Nailing the Basics

    Character Design – Nailing the Basics

    If you’re thinking of becoming a professional illustrator, character design will come up as a client request again and again, so keeping up on current trends is a must. To get started creating your own characters, you’ll need to nail the basics, which includes: getting comfortable sketching, refining your process, and streamlining your overall approach.

    Visit Article

  • Creating Personal Character Designs with Precision

    Creating Personal Character Designs with Precision

    Designing a character can apply to both personal and professional projects. The character can be a mascot that works in the context of a multi-national brand, or it can simply be inspired by a well-known character within pop culture. The later is usually referred to as “Fan Art.” The character “Mickey Rat” first appeared in the early 1970’s as a subversive underground comic that I enjoyed as a kid. Many artists over the years have taken their own approach with the character, and this article goes over my creation of this vectorized vermin.

    Visit Article

  • How to Make an Animated Paper Robot

    How to Make an Animated Paper Robot

    In this tutorial we’ll go through the steps of designing and making an animated paper robot character. Not just a picture, this is a moving character that will sit nicely on top of your computer monitor. Push the robot body up and down and he stretches out his robot claws! We’ll start with the lines ready and learn the craft of coloring and then physically putting this paper character together..

    Visit Article

FreelanceSwitch

  • Keeping In Touch with Prospective Clients

    Keeping In Touch with Prospective Clients

    A lot of your success as a freelancer will depend on your persistence.
    It takes many forms – your persistence in learning and improving your skills, the persistence that’s involved in bringing a long, difficult project to completion, and the topic of this article, persistence in keeping in touch with the people who may do business with you.

    Visit Article

  • Turning Your Knowledge into Products

    Turning Your Knowledge into Products

    One of the big downsides of the freelance world is that when you’re not doing billable work, your income goes to zero. So, there’s a lot of talk about creating income streams that aren’t dependent on your selling your time.

    Visit Article

  • Why I Believe in Pricing Work Based on Value

    Why I Believe in Pricing Work Based on Value

    For freelancers, the question of how to price your services is always up for debate. Should you charge by the hour or per project? What should your hourly rate be? What type of payment terms should you require? The answers to these questions will vary based on your industry, your reputation, and your personal preferences for your business. But there is one thing that I believe should factor into every pricing decision you make:
    Price your services based on value.

    Visit Article

  • Setting Your Standards as a Freelancer: A Few Suggestions

    Setting Your Standards as a Freelancer: A Few Suggestions

    Having standards is important when you’re trying to find and work with clients on your own. It’s surprisingly tempting not to stick to your standards: a quick project that you wouldn’t normally take can look pretty appealing if you’re having a slow month. But sticking to your guns can be important in more ways than one. If you take that problematic job, not only are you doing something that you don’t want to do, but you’re also likely to hand in work that you know isn’t as good as you could do. Even worse, that sub-standard job can take up the time you need to find higher paying clients, sticking you in a position where you can’t afford to move forward.

    Visit Article

  • Get Business Buzzing with a Buzz Piece

    Get Business Buzzing with a Buzz Piece

    Most business models can attest to the power of a buzz piece. This marketing tool provides valuable information for prospective clients, the ability to transform readers into customers and a ton of exposure. So if you don’t have one, you should absolutely consider it.
    Here’s what you need to know about buzz pieces.

    Visit Article

We’ll be publishing the best of Tuts+ each month, so you get to see the best of everything.


Reads That Lead To Results

“You poor stupid guy, you never can tell what some people will buy.” –The Lorax

Having read The Lorax twice a day for the last few weeks, I can recite it with my eyes closed. Now, no matter where I am, sections just pop out of my mouth. Luckily, the people on the receiving end are friends or family and not during a work presentation. Although it’s the story my two-year old falls asleep to, it actually DOES contain valuable life lessons. This one’s lesson?

Buyer beware.

Actually, it’s a book review article, but I do want to stress that you read book reviews before you go getting reference materials to learn a new skill. I’m currently in the middle of reading a stack of books that hundreds of Amazon readers have recommended to see if they’re really that good.

The first is actually an entire series of books call The Missing Manuals published by O’Reilly. I’m not sure where I first learned about this set of books, I think it was some random blog. But then I was trying to learn CSS, and it just wouldn’t click. Writing CSS was an arduous task that I just couldn’t seem to wrap my brain around it. Then my husband’s cousin recommended CSS: The Missing Manual, which he was using in class. The book was recommended to him by his professor. After reading the first chapter and a half, suddenly I got it. Now I can sit and write code without thinking until the cows come home! I have since collected a couple of other Missing Manuals which have greatly improved my coding skills.

What makes the books so great? They don’t make your eyes glaze over when you read them. They are actually written the way I think and talk on a regular basis. I read the first couple of paragraphs and kept saying to my husband, “I GET it. This guy writes like I think,” and, “No, honey, I mean I FINALLY. GET. IT.” Previously, my favorite software and coding books were The Bible series which is dry, boring, and usually made me nod off a little. But I liked those because almost everything was there. But they don’t hold a candle to the Missing Manuals. When I’m in the bookstore and I see strangers looking for certain kinds of books, I impose myself upon them and insist that they HAVE to try the Missing Manuals. None of you realize this, but for me to randomly start talking to complete strangers willingly is a huge deal. That’s how good I think these books are.

Also, O’Reilly usually does a buy 2 get 1 free deal if you order through their website.

The other book I’ll be reviewing for you today is one that was recommended to me by a friend and coworker. Using this book, she has gone from selling her homemade product to a few people on Etsy to selling in retail shops, hiring her own employees and has been featured in InStyle magazine, among others. The book I speak of is called Craft, Inc.: Turn Your Creative Hobby Into a Business by Meg Mateo Ilasco. Because my friend Emily is doing so insanely well, I bought it, and now I’m recommending it to you. While I haven’t quite gotten to the heights she has, I’m slowly on my way. It’s an informative, easy to read book that explains the essentials: from the legal paperwork, to forcing yourself to clear time in your schedule, to making sure you’re not underselling yourself.

Perhaps the most important lesson I’ve taken from this book is that I am not charging enough for my product. I love how well written it is. Though it’s not a Pulitzer prize candidate, it has definitely given me the motivation I need. All I have to do is read one page and I’m itching to whip out my blow torch and lose myself in the land of fire and molten silver. (Sadly enough, I always read it right before naptime is over. Blow torch + 2-year old = BAD. IDEA.) If you’re passionate about something you do, teach, or make, this book will help you become as successful as my friend Emily.

I’ll stop at two books today. I’m in the middle of reading some other books that you may or may not have heard of around the office. I’ll let you know what I think of them. Also, don’t forget about your local library. You can borrow as many books as you want—for FREE! And if you don’t like them, you just send them back!

WordPress hack: Get popular posts by comments count

Simply paste the following code where you want to display your most popular posts to be displayed:

$pop = $wpdb->get_results("SELECT id, post_title, comment_count FROM {$wpdb->prefix}posts WHERE post_type='post' ORDER BY comment_count DESC LIMIT 10");

<ul>
foreach($pop as $post) : ?>
<li> <?php echo $post->post_title; ?> </li>
<?php endforeach; ?>
</ul>

Thanks to Neil Skoglund for this nice piece of code!

Looking for WordPress hosting? Try WP Web Host. Prices starts at $5/month and you can try it for free!

WordPress hack: Get popular posts by comments count

Introducing WordPress 3 Custom Taxonomies

WordPress 3 fills in a number of important gaps towards being a serious content management system. The easy-to-use custom taxonomies function gives site designers some powerful tools for building a good information architecture. Learn what taxonomies are, why they’re useful, and how to use them in today’s tutorial!


What is a Taxonomy?

Taxonomies are different methods for classifying things.

Taxonomies are different methods for classifying things. This tutorial uses an example of posts about different desktop computers, which can be classified by a number of distinct criteria, including:

  • Amount of RAM
  • Size of hard drive
  • Speed of CPU
  • Type of CPU
  • Operating system installed
  • and so forth…

A Brief History of WordPress Taxonomies

Categories

Category Example

Prior to version 2.3, WordPress had only one generic taxonomy, called Category, for Posts. This worked well for blogs, as you could create a top-level category called “Desktop Computers,” with a subcategory called “RAM,” which may have subcategories such as “Less than 1 GB,” “1 GB,” “2 GB to 4GB,” and so on. A second child category of “Desktop Computers” might be called “Operating System,” with subcategories such as “Windows XP,” “Mac OS,” “Red Hat,” “Ubuntu,” and so forth.

When a system allows you to have categories that can be divided into subcategories, we call it a hierarchical structure. The best you could do for a serious site architecture prior to WordPress version 2.3 was to create a large hierarchy of categories, where the top level categories represented large taxonomy groups.

Tags

Tags Example

Version 2.3 of WordPress added another type of taxonomy called Tags. While categories are usually thought out in advance, specific to the types of content on a site, tags provide a more freeform, impromptu method of classifying content.

For instance, when writing a Post about a particular desktop computer, tags allow the author to type one or more keywords such as “gaming,” “tivo,” “noisy fan,” and so forth. These keywords might not make sense as site-wide categories, but help provide some additional classification to a post. Site visitors could then easily find all the posts tagged with “noisy fan” later. The freeform nature of tags, however, doesn’t help us build a solid classification system around known values such as operating system types or CPU types. Tags are also one-dimensional, not allowing any hierarchical structure.

Single-Level Custom Taxonomies

Single-Level Custom Taxonomies

WordPress version 2.8 made it possible to add custom classification schemes with just a few changes to the code on your site. This allowed you to build a list of possible operating systems, separate from a list of possible RAM types, and so on. It did not, however, allow these custom taxonomies to be built in a hierarchy similar to the generic categories taxonomy.

Fully Hierarchical Custom Taxonomies

Fully Hierarchical Custom Taxonomies

Finally, WordPress version 3 gives us fully hierarchical custom taxonomies. Notice how the hierarchical nature allows us to simplify the Operating System taxonomy, for instance, by pushing all the different Windows variants under a “Windows” parent classification. This will allow visitors to see all posts classified with any Windows operating system, or allow them to be more specific and see only posts classified with Windows XP, for instance.


Creating a Custom Taxonomy

Editing your theme’s functions.php file

WordPress version 3 does not allow you to create custom taxonomies from the administration screen. To initially define your custom taxonomies without a plugin, you’ll need to add a little bit of code to your theme’s functions.php file. This isn’t too difficult — just follow my lead.

To add custom taxonomies, we need to edit the “functions.php” file found inside your theme directory. For instance, I’m using the default “twentyten” theme that comes with WordPress 3.0, and my WordPress installation is in a directory named “wp.” My functions.php file is then at:
[website_root]/wp/wp-content/themes/twentyten/functions.php.


Adding the Taxonomies in Code

We’ll stick with the Desktop Computer example, adding separate taxonomies for RAM, Hard Drive, and Operating System. At this point, we’re simply adding the taxonomies themselves, like empty containers. Fortunately, we can add and manage the different classifications, such as “Windows XP,” from the comfort of the admin dashboard.


Step 1 One Function to Create Them All

First, we need to build one function that creates all the taxonomies we need. We’ll call the function “build_taxonomies.” Let’s add this function to the bottom of the functions.php file.

function build_taxonomies() {
    // code will go here
}

Step 2 Defining the Taxonomies

Next, for each taxonomy we want to create, we need to call a particular WordPress function with the right parameters. Here’s the function, and its important parameters explained.

register_taxonomy(
	'internal_name',
	'object_type',
	array(
		'hierarchical' => {true|false},
		'label' => 'Human Readable Name',
		'query_var' => {true|false},
		'rewrite' => {true|false}
	)
);
  • internal_name: What will this taxonomy be called from inside WordPress, in the database and template files?
  • object_type: Which types of content can be classified with this taxonomy? Possible values are “post, page, link,” and then names of custom post types we’ll learn to create in a future tutorial.
  • Next comes an array of optional parameters. We’ll use the most important ones here in this tutorial, but a full list can be found on the Function Reference / register_taxonomy Codex page. The parameters we’ll use are:
  • hierarchical: If ‘true,’ this taxonomy has hierarchical abilities like WordPress Categories. If ‘false,’ this taxonomy behaves much like freeform Tags.
  • label: This is the human-readable name used in your site’s interface to label the taxonomy.
  • query_var: If ‘true,’ we’ll be able to ask WordPress for posts dependent upon the selections for this taxonomy. For example, we could search for all the posts where the operating system taxonomy has ‘Windows’ selected.
  • rewrite: If ‘true,’ WordPress will use friendly URL’s when viewing a page for this taxonomy. For example, a page listing all the posts with the “Windows” operating system selected would be represented by the following url: http://domain.com/operating_system/windows

Our entry specific to adding the Operating System taxonomy looks like so:

register_taxonomy( 'operating_system', 'post', array( 'hierarchical' => true, 'label' => 'Operating System', 'query_var' => true, 'rewrite' => true ) );

Go ahead and add that to your “build_taxonomies” function.

More information:

“register_taxonomy” is further defined within the WordPress codex.


Step 3 Calling the Taxonomy-Creating Function

We need to add one more line to the “functions.php” file so our “build_taxonomies” function will actually be executed. We’ll “hook” the “build_taxonomies” function to the “init” event by adding the following code:

add_action( 'init', 'build_taxonomies', 0 );

You can add this line anywhere, but I generally add it above the function we’re calling, so it would look like this:

// Custom Taxonomy Code
add_action( 'init', 'build_taxonomies', 0 );

function build_taxonomies() {
    register_taxonomy( 'operating_system', 'post', array( 'hierarchical' => true, 'label' => 'Operating System', 'query_var' => true, 'rewrite' => true ) );
}

More information:

Learn more about add_action.


Adding Classifications to the New Taxonomy

Viewing taxonomy classifications

Once you’ve added the “Operating System” taxonomy to the “functions.php” file correctly, it should show up as a new item in the “Posts” panel of your dashboard. Click the taxonomy’s name to add and edit the classifications you want to include.

Adding taxonomy classifications

Now, you can add and edit Operating Systems just as you would add generic Categories.


Adding More Taxonomies

If you want to add the “RAM” and “Hard Drive” taxonomies to follow along with the example, just add the following to your functions.php file:

register_taxonomy( 'ram', 'post', array( 'hierarchical' => true, 'label' => 'RAM', 'query_var' => true, 'rewrite' => true ) );
register_taxonomy( 'hard_drive', 'post', array( 'hierarchical' => true, 'label' => 'Hard Drive', 'query_var' => true, 'rewrite' => true ) );

Once finished, the changed section of your functions.php file will look something like this:

// Custom Taxonomy Code
add_action( 'init', 'build_taxonomies', 0 );

function build_taxonomies() {
register_taxonomy( 'operating_system', 'post', array( 'hierarchical' => true, 'label' => 'Operating System', 'query_var' => true, 'rewrite' => true ) );
register_taxonomy( 'ram', 'post', array( 'hierarchical' => true, 'label' => 'RAM', 'query_var' => true, 'rewrite' => true ) );
register_taxonomy( 'hard_drive', 'post', array( 'hierarchical' => true, 'label' => 'Hard Drive', 'query_var' => true, 'rewrite' => true ) );
}

Creating a Post Using your New Taxonomy

Creating post with classifications

Create a few new posts, and you’ll see your new taxonomy options appear in the Edit Post screen. Select whatever classifications you feel apply to your posts.


Showing a Post’s Various Taxonomies

Nothing we’ve done so far can be seen by your site visitors. We’d like for posts to show what custom taxonomies they’re classified in, just like posts commonly reveal their categories and tags.

To do so, we only need to make a simple addition to the loop in certain template files.


Displaying Taxonomy Classifications on Individual Pages

In the twentyten theme, and many others, a post’s categories and tags are listed below the body text. We’re going to add custom taxonomy information, if it exists, just before the category and tag information.

Taxonomy info on single posts

To make this happen, we’ll need to edit the “single.php” template file, which is normally called to display an individual post. My single.php file is at: [website_root]/wp/wp-content/themes/twentyten/single.php.


Step 1 Find the Right Place to Add Code

In single.php, find the line with:

<div class="entry-utility">

This appears just before the:

<div id="nav-below">

In twentyten, this div contains the categories, tags, permalink, and other data for the current post. We’ll put our taxonomy information just above this div.


Step 2 Retrieve Taxonomy Information About the Current Post

Populate some variables for holding the taxonomy information output and the different taxonomy information we may expect to find.

<?php
// Let's find out if we have taxonomy information to display
// Something to build our output in
$taxo_text = "";

// Variables to store each of our possible taxonomy lists
// This one checks for an Operating System classification
$os_list = get_the_term_list( $post->ID, 'operating_system', '<strong>Operating System(s):</strong> ', ', ', '' );

Here, we’re calling the WordPress function “get_the_term” list with the following parameters:

  • $post->ID : the id of the current post.
  • ‘operating_system’ : the name of the custom taxonomy we’re checking for data. We’re asking if the current post has been given any classifications in the ‘operating_system’ taxonomy.
  • ‘Operating System(s)’ : If anything is returned, this is the string we’d like to have in front of it.
  • ‘, ‘ : If multiple items are returned, this is the string we’d like to have them separated by.
  • : If anything is returned, this is the string we’d like to have behind it. In this case, we want nothing added behind the result.

We’ll do the same for the other two taxonomies we might expect to contain data:

$ram_list = get_the_term_list( $post->ID, 'ram', '<strong>RAM Option(s):</strong> ', ', ', '' );
$hd_list = get_the_term_list( $post->ID, 'hard_drive', '<strong>Hard Drive Option(s):</strong> ', ', ', '' );

More information:

Learn more about “get_the_term_list.”


Step 3 Format Results from Classifications, if Any

Check for results in each of the three possible taxonomies. If they exist, add them to our output, as well as a linebreak.

// Add OS list if this post was so tagged
if ( '' != $os_list ) {
    $taxo_text .= "$os_list<br />\n";
}
// Add RAM list if this post was so tagged
if ( '' != $ram_list ) {
    $taxo_text .= "$ram_list<br />\n";
}
// Add HD list if this post was so tagged
if ( '' != $hd_list ) {
    $taxo_text .= "$hd_list<br />\n";
}

Step 4 Display Classification Results, if Any

Check to see if the above steps resulted in any taxonomy information at all to output. If taxonomy info exists, we’ll output it wrapped in a div of class “entry-utility.”

// Output taxonomy information if there was any
// NOTE: We won't even open a div if there's nothing to put inside it.
if ( '' != $taxo_text ) {
?>
<div class="entry-utility">
<?php
echo $taxo_text;
?>
</div>
<?
} // endif
?>

Step 5 Check Your Results

Visit a post page, and you should see any custom taxonomy classifications listed below.

Taxonomy info on single posts 2

Viewing a List of Posts by Taxonomy Classification

Now our individual posts tell us what custom taxonomies they have been classified with. When they list a custom taxonomy classification, they also provide a link to list all posts under that classification. For instance, clicking the “Mac OS” link next to “Operating Systems” under our post will theoretically list all the posts with the “Mac OS” operating system classification.

However, this doesn’t happen out of the box with WordPress version 3. We’ll have to make a custom template file for displaying taxonomy archives in order for it to work. WordPress already lets visitors view all posts assigned to a particular category, or all posts given a certain tag. When we’re done here, we’ll be able to view all posts assigned to particular classifications in our custom taxonomies, too.

To make this happen, we’ll need to create the “taxonomy.php” template file. WordPress will try to use this file any time it wants to list posts in a custom taxonomy.


Step 1

Open the “category.php” file, copy its contents, and paste it into a new file called “taxonomy.php.” Save taxonomy.php in the theme directory. For instance, my taxonomy.php file is at:
[website_root]/wp/wp-content/themes/twentyten/taxonomy.php.


Step 2 Get Information About Current Taxonomy Classification

In the taxonomy.php file, we need to get information about the taxonomy being listed. We’ll probably want the name and description (if any) for the selected classification.

Just under <?php get_header(); ?>, add the following line:

$term = get_term_by( 'slug', get_query_var( 'term' ), get_query_var( 'taxonomy' ) );

This gets all of the information about the taxonomy that called this page and returns it as an object into the variable $term. For example, the “Mac OS” classification returns an object as such:

stdClass Object
(
    [term_id] => 13
    [name] => Mac OS
    [slug] => mac-os
    [term_group] => 0
    [term_taxonomy_id] => 22
    [taxonomy] => operating_system
    [description] =>
    [parent] => 0
    [count] => 2
)

Step 3 Display Classification Name and Description

We want to change the page name to tell visitors what they’re looking at. Since we started with the category.php template, we can take the line that used to print the category name and change it a bit to give us our desired page name and, if applicable, description.

Change the following line from category.php:

printf( __( 'Category Archives: %s', 'twentyten' ), '<span>' . single_cat_title( '', false ) . '</span>' );

To read as follows:

printf( __( 'Posts classified under: %s', 'twentyten' ), '<span>' . $term_name . '</span>' );

This changes the static text beginning the line, and then inserts the name of the classification. (Note: for proper localization, we would need to add ‘Posts classified under:’ correctly to the languages/twentyten.pot file. That’s outside the scope of this tutorial, but be aware of the transgression here.)

Then add the following:

if ('' != $term_descr ) {
echo "<p>$term_descr</p>\n";
}

If a description exists for this classification, it will be displayed just beneath the title.

Taxonomy Archive Page

After making changes to taxonomy.php, visit one of your posts that has been given a custom taxonomy classification. Because of our earlier work in the file “single.php,” the post should show custom classifications below it. Simply click one of those classifications to see the taxonomy listing at work.


Conclusion

I hope this tutorial explained clearly what taxonomies are and showed you how to make use of them in WordPress 3 as a powerful organizational tool. I hope to provide a follow up tutorial soon explaining WordPress custom post types, their tight relationship with custom taxonomies, and how to use them. Thanks so much for taking the time to visit Nettuts!


Create a Chalkboard Icon Using Photoshop and IconBuilder – Screencast

In today’s screencast we will review a tutorial originally written by author Leslie Nayibe. Leslie’s tutorial demonstrated some of the fundamental processes of creating an icon in Photoshop. Today, we will be recreating that tutorial in video format.

View the written version of this tutorial Create a Chalkboard Icon Using Photoshop and IconBuilder


No Smock Required: 30+ Awesome Digital Painting Tutorials

Over the years, digital painting has become a much more popular art form, in which traditional art/painting techniques such as watercolors, acrylics and oils are applied to a digital canvas using modern technology such as a graphics tablet and stylus. Although digital painting is a form of digital art, you don’t have to be a super whizz at Photoshop (or your chosen application) to be good at digital painting; it’s so realistic and alike to normal painting that your traditional skills are much more important than your computer skills, allowing traditional artists of all ages to give digital painting a shot; computer literate or not.

As well as digital painting, some applications such as Corel Painter use other art forms such as charcoal, pastels, airbrushes, pens and even pencils, as well as various different tools to experiment with, as if you were painting the “old-fashioned” way.

Being able to draw or paint is always handy when following tutorials like this, however if you feel you’re not great at drawing or painting, there’s no harm in trying the following tutorials, they’re bound to improve your skills in one way or another! There is a selection of over thirty superb and stunning tutorials below, from realistic portrait painting to fantasy anime scenes.


Making of Boudicca


Making of Beauty on the Bed


Feathers and Angel Wings


Umbrella Sky


Making of My Prince


Making of Binah


Making of Jealous Bodyguard


Painting Fantasy Eyes


Red Assassin Digital Painting


Spider Harp


Digital Cloud Painting


Digital Painting Tutorial


Making of Lida


Shilin’s Domain


Making Frodo


Making of Yuka


First Digital Painting


Hair Painting Tutorial


Painting a Car Digitally


Think I’m Too Fat Digital Painting


Making of The Leg


How to Draw a Portrait in Photoshop


Making of Pandora


Skin Painting Tutorial


Lip Painting Tutorial


Hair Painting Tutorial


Make Beautiful Paintings Using Brush Settings


Create a Painting from a Portrait Photograph


Romantic Couple Painting


Painting Jake Sully’s Avatar


Digital Painting Tutorial


You May Also Like


Inspiration: Concrete Jungle

Modern cities have had a great influence on the human condition. Architecture can stir up certain human feelings and moods and it’s these moods that make it art. Nowadays the world is changing so rapidly, it’s reflected in urban landscapes. We often don’t notice our surroundings over the hustle and bustle of daily life. This collection of urban landscapes give us a chance to take a closer look at the concrete jungle we live in.


City Limits

by devouredex


City

by Aldy


Future

by Larin-Nickolay


City of the Dreams

by bosetsu-chan


Inspirate Pages 06-07

by Laiin


City Smog

by aztrakhan


City Vector

by joshblalock


Lots Of Stuff

by Andy Council


City

by claudelle


City

author unknown


City Pattern

by patswerk


The City Art 7

by Skylow


City

by Larin-Nickolay


City Block

by velocitri


Venetia in my Mind…

by anyama


Big Tree

by RichardMarrIV


New York

by RichardMarrIV


Tokyo

by RichardMarrIV


Metropolis

by jongart


City Scene 2

by jongart


Calle Madero

by Pando1


Snowstorm in the City

by mmn22


San Francisco, California

by mmn22


City Brand

by Jawa-Tron


City

by schizophrenic-brain


City 110410

by M-a-c-h-a


Lots Of Stuff

by Andy Council


Vector City

by Taro


Vector City

by muzikman9090


Kotagila

by vektorscksprojekt


Kuala Lumpur City Centre

by Cheeweng


A City Evening

by starmandx


Globe City

by foozface


City

by ShiryuLover


Przedborz Postcard

by kjutenkadli


30’s City for my Bedroom

by mgolass


Bridge and City

by Kempo1987


Urban – But It’s Too Full

by armogeden


Body Building

by Eyemelt


You may like…


Interview with Kevin Suttle

To quote his blog Commented Out, Kevin Suttle is a Flash Platform developer based in Cincinnati Ohio. He specializes in ActionScript, Flex, User Interface Design and Experience Design. He’s a hugely active member of the Flash Community and recently I caught up with him to ask a few questions..


QTell us about how you got started with Flash and what attracted you to the language?

I always find it interesting to hear others’ answers to this question. For me, I never set out to build RIAs. I got into digital art during my time at the University of Cincinnati. I never had any programming or computer science classes (and still don’t). I actually only had one class where Flash was taught, and honestly, I didn’t pay much attention. At the time, I never thought I’d use it. I was using Director quite a bit though, which is funny now that I look back. [Laughs].

At first my “art” was strictly illustrations and manipulations of my photography, but I found myself wanting the expression to go further. So, I started working on these short, artsy film projects. They weren’t great, but honestly, they weren’t for anyone else. I integrated some heavy audio production, because music is such a staple in my life, but still, I felt like something was missing. That’s when I found Flash. I needed to be able to manipulate my creations. I grew to become fascinated with UI design, Interaction Design, and User Experience studies, all of which are perfectly malleable thanks to the Flash Platform.


QYou have been very involved in the Adobe Pre-release program. Of course you can’t talk about your specific contributions, but can you tell people why you feel the program is important and how it helps shape the future of the IDE and platform in general?

Yes, I have. It is an absolute honor to be invited to help shape the future of Flash, and I personally have taken it very seriously. I have always been very passionate about making the things we use on a daily basis better, not just software. And after the article I wrote about my concerns with the Flash IDE, I received a chance to let my voice be heard, directly by Adobe’s ears.

I have suggested almost 150 bugs/feature requests, and in the process I learned a TON about Flash, Adobe, and real-world, large-scale software development in general. For example, if I make what I see as a small feature request or bug fix suggestion, and I receive feedback that it can’t/won’t be done, naturally, I’d like to know why. Through the team, and some incredibly intelligent veterans of the Flash community, you begin to understand what’s going on under the hood of the Flash IDE and engineering and really take that into account the next time you ask for something. Even the smallest additions or fixes require many rounds of review from many different parts of the product team. There’s a lot more than just adding your ‘Make me coffee’ component. [Smiles, scratches beard].

I also think there are a lot of misconceptions about the Pre-release Program. It’s not only the Flash elite or “favorites”. Heck, I’m in there! It’s also not a place to whine and cry about things you feel are important or need to be fixed without contributing something valuable as a suggestion. You’re going to have that in any product program, but when it comes to the Adobe Pre-release Program, the community needs to be aware that it’s a privilege, not a right. Sorry, just needed to get that off of my chest. Adobe takes some unneeded flack for it.


QTell us about how Twitter has played a role in bringing your name to the forefront of the Flash community and how you are using it to help brand yourself as a community expert.

Twitter is by far the most powerful networking tool in the history of all recorded time. [Looks around. “Am I right?! Eh? EH?”] Just kidding. It’s cool. But it has presented me with several exclusive opportunities. I have won books, VIP seating at MAX, a ticket to FlashPitt, where I won a copy of FDT, the list goes on and on. It has also helped me get my name out into the community. However, I like to think I have some sort of knowledge and perspective to back up any attention I receive. Twitter is a interesting social experiment in self-marketing. There are Twitter rock stars who only exist within the public timeline, and don’t give back or add anything of their own. There are also those at the opposite end of the spectrum, who think that the only thing worth talking about is themselves. I like to think I’ve found a happy medium and have leveraged Twitter by blogging/tweeting what I think is fresh and unique content, and then allowing the Twittersphere to decide whether or not it gets distributed. To me, that’s the best way to measure the success of my contributions.

Twitter is also really great for identifying and enforcing the sense of family within the Flash community. I have also made some great friends through Twitter, present company excluded. [Winks, laughs awkwardly.]

As for the “community expert” label, I wasn’t nominated for Adobe’s Community Expert program this year. While I initially was super disappointed, I’m actually glad I didn’t make the cut. It means I need to work harder and contribute more this year.


QYou have been contributing greatly to shaping the Flash And The City conference behind the scenes. Tell us about why you chose to donate your time to this cause and what you think will make this conference different to others?

What initially drew me to Flash and the City was the fact that Elad Elrom was putting it together as just another member of the Flash community. He had no agenda or corporate affiliation, and still doesn’t. He just wanted a truly community-driven event. Then, when I saw how creatively and uniquely designed it was, I was really intrigued and told myself that I had to participate in any way I could. At first, I had just planned on speaking, but the more I talked to Elad, we realized that we shared the same vision for what the event should be. Now, I’m handling a lot of communication with the speakers, helping organize and plan, and I’m working on several Flash-based projects built for FATC as well. Working with Elad, Jose Marquez Antonio Russo, Thomas Joos, and THE Jesse Freeman, building the event’s brand is really exciting. There are some fun surprises that I think everyone involved, as well as the Flash community at large is going to be really proud of.

FATC is going to be epic because of the networking opportunities, helping new Flashers get up to speed, and giving seasoned pros some new inspiration to reinvigorate their development processes. There are so many things planned that will really make people glad they made the trip to New York. There are a lot of things I can’t talk about yet, and I personally cannot wait!


QYour post on insideRIA highlighting the AIR 2.0 and Flash Player 10.1 touch features was well received. Tell us about what attracted you to the topic and what you hope to play with first when it is officially released?

That article was like my personal thesis. I spent almost 6 months researching it because I wanted to be able to create touchscreen content as soon as I could. I think I mentioned this in the article, but in my mind, Flash was always meant to be interacted with physically. I still see Flash as an artistic medium, and when you bring that direct, tactile connection to it, it becomes so much more compelling. Look at what the iPhone and this [bleepity-bleep] tablet have done for multi-touch. Consumers expect it now. I’m so glad that Flash will finally be able to exist on that level and bring rich, innovative experiences to users on [cough] almost, any platform. I have a lot of ideas for data-visualization and UI hybrids that I’m hoping to release later this year. Stay tuned!


QTell us what is your favorite part of Flash and what do you feel needs more attention in next version of the Flash Player?

My favorite part of Flash is the community. Seriously. Not just because it’s full of really awesome people, but the fact that the community is what drives adoption rates, new APIs, and the authoring tools. Our relationship with Adobe is mutually exclusive and I love it. People in the community push the envelope in Flash. I think of individuals like Sean Moore, who I just saw demoing a brain activity API, or Robert Penner who has shifted the paradigm of the Event model with Signals. There are countless Flashers that I am inspired by on a daily basis, and I am hoping to contribute more to the open-source world this year as well.

To better answer your question, my favorite thing about Flash as a platform is the versatility. There are so many things we can do with Flash, and quickly. Flash is on microwaves, cars, TVs, DVRs, the list goes on and on. We all like to nitpick now and then about certain hiccups, but if it were really that bad, we’d jump ship. Flash enables you to create memorable user experiences, jaw-dropping 3D generative art, and silky smooth user interfaces. The biggest misconception about Flash is that it’s limiting. If anything, it affords you the freedom to create whatever your imagination can conjure up.

As far as the next version of Flash Player, there are a few things on my wish list. Obviously, it can never get too fast, so performance is always at the top of my list. Mobile is on it’s way to becoming the first stop in development processes with AIR Mobile, and Flash Player 10.1 is supposed to be dramatically faster than 10.0, which will be really nice. Beyond that, I’d love to see Flash become a first class citizen to those who don’t embrace it now. There is this whole HTML5 thing going on and many developers are proclaiming the death of Flash and that the iPad is the coffin it’ll be buried in. I personally, disagree completely, but that’s a separate blog post. We need to find ways to move the web forward together. I think the web is at a pivotal point, and that Flash needs to adapt to continue to thrive. I’m not going to say that Adobe needs to Open Source the Player, but there are some really clever people out there who can figure out ways to better integrate Flash with more semantic HTML content. The future is definitely going to be interesting, and I can’t wait to be a part of it.

Thanks for having me!