WordPress 3 fills in a number of important gaps towards being a serious content management system. The easy-to-use custom taxonomies function gives site designers some powerful tools for building a good information architecture. Learn what taxonomies are, why they’re useful, and how to use them in today’s tutorial!
What is a Taxonomy?
Taxonomies are different methods for classifying things.
Taxonomies are different methods for classifying things. This tutorial uses an example of posts about different desktop computers, which can be classified by a number of distinct criteria, including:
- Amount of RAM
- Size of hard drive
- Speed of CPU
- Type of CPU
- Operating system installed
- and so forth…
A Brief History of WordPress Taxonomies
Categories
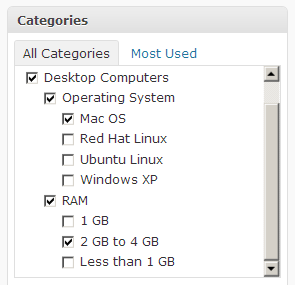
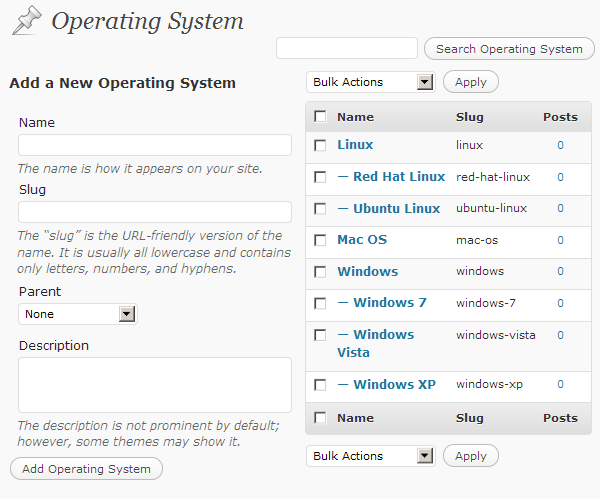
Prior to version 2.3, WordPress had only one generic taxonomy, called Category, for Posts. This worked well for blogs, as you could create a top-level category called “Desktop Computers,” with a subcategory called “RAM,” which may have subcategories such as “Less than 1 GB,” “1 GB,” “2 GB to 4GB,” and so on. A second child category of “Desktop Computers” might be called “Operating System,” with subcategories such as “Windows XP,” “Mac OS,” “Red Hat,” “Ubuntu,” and so forth.
When a system allows you to have categories that can be divided into subcategories, we call it a hierarchical structure. The best you could do for a serious site architecture prior to WordPress version 2.3 was to create a large hierarchy of categories, where the top level categories represented large taxonomy groups.
Tags
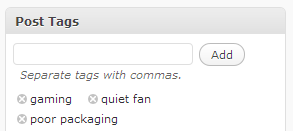
Version 2.3 of WordPress added another type of taxonomy called Tags. While categories are usually thought out in advance, specific to the types of content on a site, tags provide a more freeform, impromptu method of classifying content.
For instance, when writing a Post about a particular desktop computer, tags allow the author to type one or more keywords such as “gaming,” “tivo,” “noisy fan,” and so forth. These keywords might not make sense as site-wide categories, but help provide some additional classification to a post. Site visitors could then easily find all the posts tagged with “noisy fan” later. The freeform nature of tags, however, doesn’t help us build a solid classification system around known values such as operating system types or CPU types. Tags are also one-dimensional, not allowing any hierarchical structure.
Single-Level Custom Taxonomies
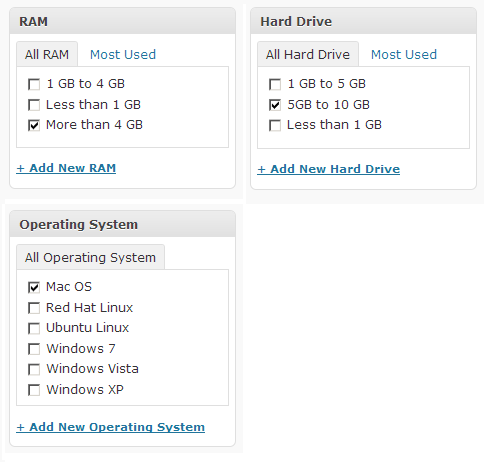
WordPress version 2.8 made it possible to add custom classification schemes with just a few changes to the code on your site. This allowed you to build a list of possible operating systems, separate from a list of possible RAM types, and so on. It did not, however, allow these custom taxonomies to be built in a hierarchy similar to the generic categories taxonomy.
Fully Hierarchical Custom Taxonomies
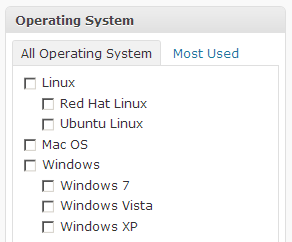
Finally, WordPress version 3 gives us fully hierarchical custom taxonomies. Notice how the hierarchical nature allows us to simplify the Operating System taxonomy, for instance, by pushing all the different Windows variants under a “Windows” parent classification. This will allow visitors to see all posts classified with any Windows operating system, or allow them to be more specific and see only posts classified with Windows XP, for instance.
Creating a Custom Taxonomy
Editing your theme’s functions.php file
WordPress version 3 does not allow you to create custom taxonomies from the administration screen. To initially define your custom taxonomies without a plugin, you’ll need to add a little bit of code to your theme’s functions.php file. This isn’t too difficult — just follow my lead.
To add custom taxonomies, we need to edit the “functions.php” file found inside your theme directory. For instance, I’m using the default “twentyten” theme that comes with WordPress 3.0, and my WordPress installation is in a directory named “wp.” My functions.php file is then at:
[website_root]/wp/wp-content/themes/twentyten/functions.php.
Adding the Taxonomies in Code
We’ll stick with the Desktop Computer example, adding separate taxonomies for RAM, Hard Drive, and Operating System. At this point, we’re simply adding the taxonomies themselves, like empty containers. Fortunately, we can add and manage the different classifications, such as “Windows XP,” from the comfort of the admin dashboard.
Step 1 One Function to Create Them All
First, we need to build one function that creates all the taxonomies we need. We’ll call the function “build_taxonomies.” Let’s add this function to the bottom of the functions.php file.
function build_taxonomies() {
    // code will go here
}
Step 2 Defining the Taxonomies
Next, for each taxonomy we want to create, we need to call a particular WordPress function with the right parameters. Here’s the function, and its important parameters explained.
register_taxonomy(
	'internal_name',
	'object_type',
	array(
		'hierarchical' => {true|false},
		'label' => 'Human Readable Name',
		'query_var' => {true|false},
		'rewrite' => {true|false}
	)
);
- internal_name: What will this taxonomy be called from inside WordPress, in the database and template files?
- object_type: Which types of content can be classified with this taxonomy? Possible values are “post, page, link,” and then names of custom post types we’ll learn to create in a future tutorial.
- Next comes an array of optional parameters. We’ll use the most important ones here in this tutorial, but a full list can be found on the Function Reference / register_taxonomy Codex page. The parameters we’ll use are:
- hierarchical: If ‘true,’ this taxonomy has hierarchical abilities like WordPress Categories. If ‘false,’ this taxonomy behaves much like freeform Tags.
- label: This is the human-readable name used in your site’s interface to label the taxonomy.
- query_var: If ‘true,’ we’ll be able to ask WordPress for posts dependent upon the selections for this taxonomy. For example, we could search for all the posts where the operating system taxonomy has ‘Windows’ selected.
- rewrite: If ‘true,’ WordPress will use friendly URL’s when viewing a page for this taxonomy. For example, a page listing all the posts with the “Windows” operating system selected would be represented by the following url: http://domain.com/operating_system/windows
Our entry specific to adding the Operating System taxonomy looks like so:
register_taxonomy( 'operating_system', 'post', array( 'hierarchical' => true, 'label' => 'Operating System', 'query_var' => true, 'rewrite' => true ) );
Go ahead and add that to your “build_taxonomies” function.
More information:
“register_taxonomy” is further defined within the WordPress codex.
Step 3 Calling the Taxonomy-Creating Function
We need to add one more line to the “functions.php” file so our “build_taxonomies” function will actually be executed. We’ll “hook” the “build_taxonomies” function to the “init” event by adding the following code:
add_action( 'init', 'build_taxonomies', 0 );
You can add this line anywhere, but I generally add it above the function we’re calling, so it would look like this:
// Custom Taxonomy Code
add_action( 'init', 'build_taxonomies', 0 );

function build_taxonomies() {
    register_taxonomy( 'operating_system', 'post', array( 'hierarchical' => true, 'label' => 'Operating System', 'query_var' => true, 'rewrite' => true ) );
}
More information:
Adding Classifications to the New Taxonomy
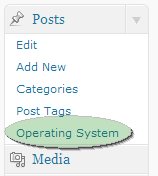
Once you’ve added the “Operating System” taxonomy to the “functions.php” file correctly, it should show up as a new item in the “Posts” panel of your dashboard. Click the taxonomy’s name to add and edit the classifications you want to include.
Now, you can add and edit Operating Systems just as you would add generic Categories.
Adding More Taxonomies
If you want to add the “RAM” and “Hard Drive” taxonomies to follow along with the example, just add the following to your functions.php file:
register_taxonomy( 'ram', 'post', array( 'hierarchical' => true, 'label' => 'RAM', 'query_var' => true, 'rewrite' => true ) );
register_taxonomy( 'hard_drive', 'post', array( 'hierarchical' => true, 'label' => 'Hard Drive', 'query_var' => true, 'rewrite' => true ) );
Once finished, the changed section of your functions.php file will look something like this:
// Custom Taxonomy Code
add_action( 'init', 'build_taxonomies', 0 );

function build_taxonomies() {
register_taxonomy( 'operating_system', 'post', array( 'hierarchical' => true, 'label' => 'Operating System', 'query_var' => true, 'rewrite' => true ) );
register_taxonomy( 'ram', 'post', array( 'hierarchical' => true, 'label' => 'RAM', 'query_var' => true, 'rewrite' => true ) );
register_taxonomy( 'hard_drive', 'post', array( 'hierarchical' => true, 'label' => 'Hard Drive', 'query_var' => true, 'rewrite' => true ) );
}
Creating a Post Using your New Taxonomy
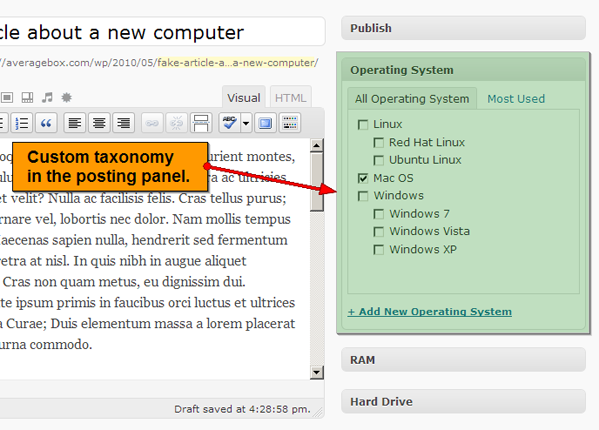
Create a few new posts, and you’ll see your new taxonomy options appear in the Edit Post screen. Select whatever classifications you feel apply to your posts.
Showing a Post’s Various Taxonomies
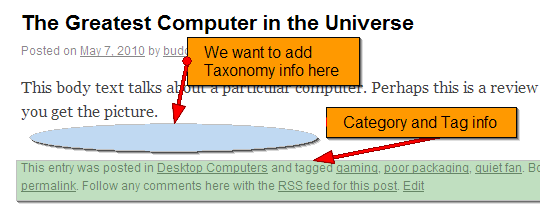
Nothing we’ve done so far can be seen by your site visitors. We’d like for posts to show what custom taxonomies they’re classified in, just like posts commonly reveal their categories and tags.
To do so, we only need to make a simple addition to the loop in certain template files.
Displaying Taxonomy Classifications on Individual Pages
In the twentyten theme, and many others, a post’s categories and tags are listed below the body text. We’re going to add custom taxonomy information, if it exists, just before the category and tag information.
To make this happen, we’ll need to edit the “single.php” template file, which is normally called to display an individual post. My single.php file is at: [website_root]/wp/wp-content/themes/twentyten/single.php.
Step 1 Find the Right Place to Add Code
In single.php, find the line with:
<div class="entry-utility">
This appears just before the:
<div id="nav-below">
In twentyten, this div contains the categories, tags, permalink, and other data for the current post. We’ll put our taxonomy information just above this div.
Step 2 Retrieve Taxonomy Information About the Current Post
Populate some variables for holding the taxonomy information output and the different taxonomy information we may expect to find.
<?php
// Let's find out if we have taxonomy information to display
// Something to build our output in
$taxo_text = "";

// Variables to store each of our possible taxonomy lists
// This one checks for an Operating System classification
$os_list = get_the_term_list( $post->ID, 'operating_system', '<strong>Operating System(s):</strong> ', ', ', '' );
Here, we’re calling the WordPress function “get_the_term” list with the following parameters:
- $post->ID : the id of the current post.
- ‘operating_system’ : the name of the custom taxonomy we’re checking for data. We’re asking if the current post has been given any classifications in the ‘operating_system’ taxonomy.
- ‘Operating System(s)’ : If anything is returned, this is the string we’d like to have in front of it.
- ‘, ‘ : If multiple items are returned, this is the string we’d like to have them separated by.
- ” : If anything is returned, this is the string we’d like to have behind it. In this case, we want nothing added behind the result.
We’ll do the same for the other two taxonomies we might expect to contain data:
$ram_list = get_the_term_list( $post->ID, 'ram', '<strong>RAM Option(s):</strong> ', ', ', '' );
$hd_list = get_the_term_list( $post->ID, 'hard_drive', '<strong>Hard Drive Option(s):</strong> ', ', ', '' );
More information:
Learn more about “get_the_term_list.”
Step 3 Format Results from Classifications, if Any
Check for results in each of the three possible taxonomies. If they exist, add them to our output, as well as a linebreak.
// Add OS list if this post was so tagged
if ( '' != $os_list ) {
    $taxo_text .= "$os_list<br />\n";
}
// Add RAM list if this post was so tagged
if ( '' != $ram_list ) {
    $taxo_text .= "$ram_list<br />\n";
}
// Add HD list if this post was so tagged
if ( '' != $hd_list ) {
    $taxo_text .= "$hd_list<br />\n";
}
Step 4 Display Classification Results, if Any
Check to see if the above steps resulted in any taxonomy information at all to output. If taxonomy info exists, we’ll output it wrapped in a div of class “entry-utility.”
// Output taxonomy information if there was any
// NOTE: We won't even open a div if there's nothing to put inside it.
if ( '' != $taxo_text ) {
?>
<div class="entry-utility">
<?php
echo $taxo_text;
?>
</div>
<?
} // endif
?>
Step 5 Check Your Results
Visit a post page, and you should see any custom taxonomy classifications listed below.
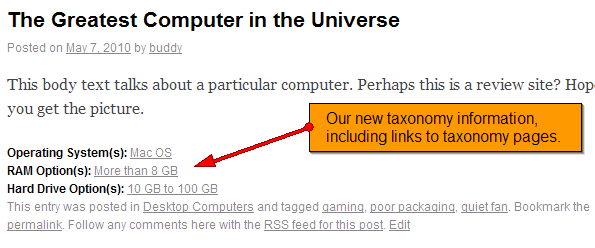
Viewing a List of Posts by Taxonomy Classification
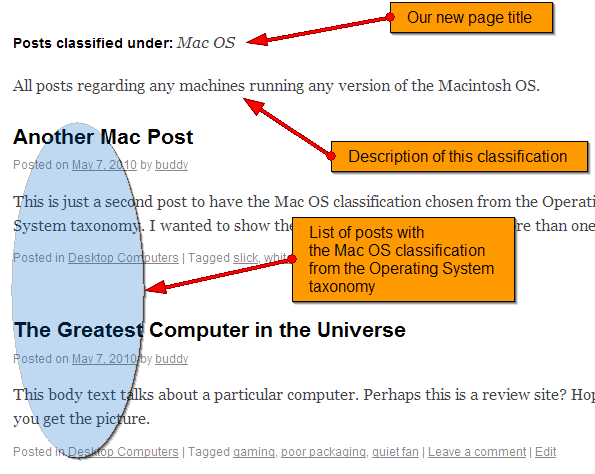
Now our individual posts tell us what custom taxonomies they have been classified with. When they list a custom taxonomy classification, they also provide a link to list all posts under that classification. For instance, clicking the “Mac OS” link next to “Operating Systems” under our post will theoretically list all the posts with the “Mac OS” operating system classification.
However, this doesn’t happen out of the box with WordPress version 3. We’ll have to make a custom template file for displaying taxonomy archives in order for it to work. WordPress already lets visitors view all posts assigned to a particular category, or all posts given a certain tag. When we’re done here, we’ll be able to view all posts assigned to particular classifications in our custom taxonomies, too.
To make this happen, we’ll need to create the “taxonomy.php” template file. WordPress will try to use this file any time it wants to list posts in a custom taxonomy.
Step 1
Open the “category.php” file, copy its contents, and paste it into a new file called “taxonomy.php.” Save taxonomy.php in the theme directory. For instance, my taxonomy.php file is at:
[website_root]/wp/wp-content/themes/twentyten/taxonomy.php.
Step 2 Get Information About Current Taxonomy Classification
In the taxonomy.php file, we need to get information about the taxonomy being listed. We’ll probably want the name and description (if any) for the selected classification.
Just under <?php get_header(); ?>, add the following line:
$term = get_term_by( 'slug', get_query_var( 'term' ), get_query_var( 'taxonomy' ) );
This gets all of the information about the taxonomy that called this page and returns it as an object into the variable $term. For example, the “Mac OS” classification returns an object as such:
stdClass Object
(
    [term_id] => 13
    [name] => Mac OS
    [slug] => mac-os
    [term_group] => 0
    [term_taxonomy_id] => 22
    [taxonomy] => operating_system
    [description] =>
    [parent] => 0
    [count] => 2
)
Step 3 Display Classification Name and Description
We want to change the page name to tell visitors what they’re looking at. Since we started with the category.php template, we can take the line that used to print the category name and change it a bit to give us our desired page name and, if applicable, description.
Change the following line from category.php:
printf( __( 'Category Archives: %s', 'twentyten' ), '<span>' . single_cat_title( '', false ) . '</span>' );
To read as follows:
printf( __( 'Posts classified under: %s', 'twentyten' ), '<span>' . $term_name . '</span>' );
This changes the static text beginning the line, and then inserts the name of the classification. (Note: for proper localization, we would need to add ‘Posts classified under:’ correctly to the languages/twentyten.pot file. That’s outside the scope of this tutorial, but be aware of the transgression here.)
Then add the following:
if ('' != $term_descr ) {
echo "<p>$term_descr</p>\n";
}
If a description exists for this classification, it will be displayed just beneath the title.
After making changes to taxonomy.php, visit one of your posts that has been given a custom taxonomy classification. Because of our earlier work in the file “single.php,” the post should show custom classifications below it. Simply click one of those classifications to see the taxonomy listing at work.
Conclusion
I hope this tutorial explained clearly what taxonomies are and showed you how to make use of them in WordPress 3 as a powerful organizational tool. I hope to provide a follow up tutorial soon explaining WordPress custom post types, their tight relationship with custom taxonomies, and how to use them. Thanks so much for taking the time to visit Nettuts!