10 Things I Learned from the jQuery Source


It’s jQuery on the big screen. We’ll open the jQuery source and run through how the jQuery object works, covering self-executing anonymous functions as a global abatement technique, several interesting jQuery methods, internal jQuery paradigms, and hidden enhancements. You’ll learn JavaScript techniques you can apply to your own code, as well as the basic workings of jQuery itself.


About Paul

Paul Irish is well-respected in our industry and has contributed to various open source projects that many of us use every day, including:

He’s also one of the hosts of the YayQuery podcast, which (obviously) focuses on the jQuery library. Be sure to subscribe if you’d like to stay up to date on the latest news in jQuery.

YayQuery

Thanks for watching! Did you enjoy the screencast?

World Cup Productivity Watch

Except in the United States (for the most part), the World Cup is a huge deal.  My brother, for example, works for an American multinational in Brazil and the company had to bring in TV sets for workers to watch games lest half the office be out sick on game days.  It’s just the way it is there – we love football – and foreigners doing business with Brazil just need to adjust.  But if you’re the person trying to get some information from my brother while he and his co-workers are watching a game, you might get frustrated.  Who cares if they’ll make up for the work later, you need the numbers now!

So, is the World Cup affecting your work?  If so, how are you dealing with it?

HTML5 Microdata: Welcome to the Machine


I don’t think it is hyperbole to say that HTML5 will change the way that you think about web development. I welcome many of the changes as they make development easier, and the user experience richer. With any change, though, there is certain to be a bit of trepidation and controversy. One addition that certainly is not without its controversy is the Microdata specification, but I believe the benefits of this very simple specification are going to change how you look at your mark-up in the very near future.


Introduction and Scope: Context for Machines

I am focusing on the Microdata specification in this tutorial. You do need to understand that the specification is not solid at the moment, nor is it widely adopted. In fact, during the course of my writing, the specification changed. That said, Microdata has been adopted by Google as another way of providing rich search results back to the user. In addition to being an immature specification, there is a bit of controversy surrounding Microdata.

To understand the controversy, you need to understand that Microdata is a subset of making a document have meaning to machines, just as it has meaning to a reader of the document. With meaning, I mean providing the meta data in such a way that can be used by a machine reading the document and to allow that data to be processed. It’s controversial as there are other formats and specifications that also have this same end goal in mind. RDFa and Microformats are two of these other formats which you might be familiar with, and may well be using today.

In a perfect world, there wouldn’t be competing specifications that we would have to aware of, but unfortunately, there are far greater issues to worry about. In addition, each format has its downside, in terms of use. All of this aside, let’s instead stick to the positive and learn what the specification brings to us, as well as what we can utilize today to add a bit more meaning to our documents.

One note before we get started: regardless of the format that you prefer, you should never have one set of mark-up for what your users see, and another set for what machines see. There may be times when you do need to provide specific meta data to a machine, but the use should be the exception, and not the rule. The purpose of these formats is to provide context, not to trick a search engine or other application into reading more into a page than what is actually there. You will regret using tricks using the hidden attribute or display: none, as it would definitely be frowned upon.

“Microdata is a subset of making a document have meaning to machines, just as it has meaning to a reader of the document. With meaning, I mean providing the meta data in a way that can be used by a machine reading the document and to allow that data to be processed”


Microdata in Theory: The Big Picture

Suppose you are a collector of comic books. I would bet a person that collects comics not only reads up on the upcoming issues, but also explores the web to complete their collection of comics as well as their knowledge of the stories they are interested in. That exploration might be as simple as spending time at Google, typing in query after query about your interest. Some pages will be hit or miss, as they might mention Superman, but not necessarily in the context that you are after. It would be nice if Google had context from the pages that they had indexed to serve you the correct search results. That provides a richer experience for the user, and it connects you with the people that value your website. It’s a win / win.

Let’s take that a step further past search results. Say you write an application that joins like-minded and willing websites to combine their knowledge about comic books. We could obviously write a scraper, but we don’t really have the context, as probably none of the websites are using the same format to display their results. We might have to write several scraper formats just to get the basic information. Instead, we can define a new format specification and with the help of Microdata and the five attributes that will ease this problem.


Microdata in Theory: New Global Attributes

Microdata introduces five simple global attributes (available for any element to use) which give context for machines about your data. These five new attributes are: itemid, itemprop, itemref, itemscope, and itemtype. Microdata is basically a group of item value pairs and the attributes give meaning to our items. Let’s look at them in detail.

The itemscope attribute is a boolean attribute that tells any machine that is reading our document that there is Microdata on this page, and this is where it starts. You are creating the item with the use of itemscope. Any element with an itemscope can also have the itemtype attribute. The itemtype is a valid URL which defines the item and provides the context for the properties. Also, you could have an itemid, which is the vocabulary that the item type uses, so that we are making descriptions in the proper format of the definition.

Using the example from the specification:

<dl itemscope
    itemtype="http://vocab.example.net/book"
    itemid="urn:isbn:0-330-34032-8">

We have an item identified by our itemscope. The item definition can be found at http://vocab.example.net/book, and the exact meaning of the item can be found using the vocabulary of the itemid. In this case, we are identifying a book with the isbn of 0-330-34032-8.

The final two attributes for the Microdata is itemprop and itemref. Itemprop defines a property of the item. Remember, Microdata is basically item value pairs, meaning here is the value for this property. So, the itemprop is giving the context of our item. Finally, we have itemref, which allows us to keep the flow of our documents for our users. Remember, we are giving context to our HTML document, not trying to build a new document for an application or search engine. Let’s look at our example again, this time deviated a bit from the provided example from the specification:

<dl itemscope
    itemtype="http://vocab.example.net/book"
    itemid="urn:isbn:0-330-34032-8"
    itemref="author_information">
 <dt>Title
 <dd itemprop="title">The Reality Dysfunction
 <dt>Author
 <dt>Publication date
 <dd><time itemprop="pubdate" datetime="1996-01-26">26 January 1996</time>
</dl>
<div id="author_information" itemprop="author">Peter F. Hamilton</div>

In our example, we have properties with values now. We also keep with the flow of the document, by referencing an ID of author information. A machine would then be able to understand this by parsing our item, and getting this context, and if we think in an array format:

Item
Type: http://vocab.example.net/book
ID: urn:isbn:0-330-34032-8
title = The Reality Dysfunction
pubdata = 1996-01-26
author = Peter F. Hamilton

Now, our array of data can be translated by a machine, or changed to other formats such as JSON, N-Triples, or any other internal format that an application might need.

This is the reason I like Microdata, because it’s easy to understand and easy to execute. Let’s look at some examples that we can use today, particularly in how we can provide some context to Google, and how they might use that context. I will keep the format as close to the Google examples as I can, but change the products, people, to different real world examples.


Microdata in Practice: People and Businesses

If you have ever searched someone’s LinkedIn results, you might have seen something like this:

My LinkedIn Result

Google will process three formats currently. They are RDFa, Microformats, and you guessed it, Microdata. We can now provide context from our HTML to give better search results. While LinkedIn uses Microformats, let’s see if we can get a similar result using Microdata:

 <div itemscope itemtype="http://data-vocabulary.org/Person">
 <img src="avatar.jpg" itemprop="photo">
  My name is <span itemprop="name">John Cox</span>, and I am a <span itemprop="title">writer</span> for
  <a href="http://net.tutsplus.com" itemprop="affliation">Nettuts+</a>.
  I live in
  <span itemprop="address" itemscope
    itemtype="http://data-vocabulary.org/Address">
    <span itemprop="locality">Louisville</span>,
    <span itemprop="region">KY</span>
  </span>
</div>

While this little snippet produces something that looks like this unformatted:

Ugly Picture

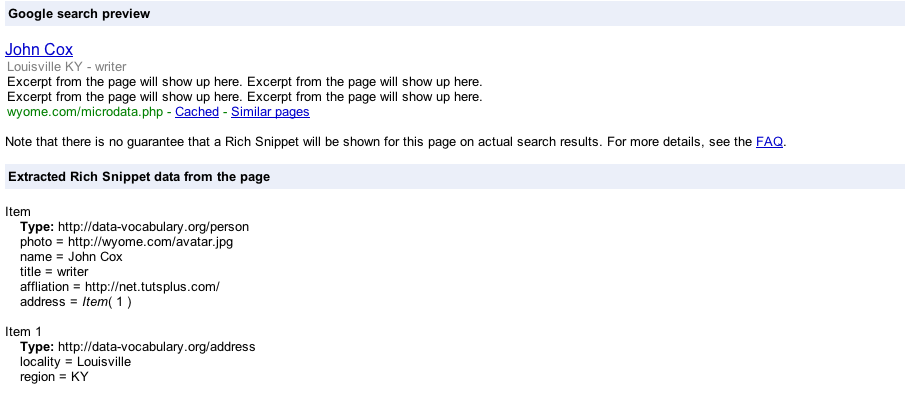
When I test what the Google results would show about me, I get this:

Microdata Rich Snippet

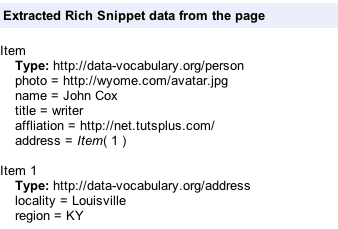
While the snippet is interesting, notice also the extra context that Google has about me:

Microdata Information

The more context I provide, the more context that Google or any other application that reads my page will have about me.

Let’s take this one step further, and look at a business or organization, and see if we can’t give a little more context for a machine. In this example, I will use Nettuts+.

<address itemscope itemtype="http://data-vocabulary.org/Organization">
    <span itemprop="name">Nettuts+</span>
    Postal Address:
    <span itemprop="address" itemscope
      itemtype="http://data-vocabulary.org/Address">
      <span itemprop="street-address">PO Box 21177</span>,
      <span itemprop="locality">Melbourne</span>,
      <span itemprop="region">Victoria</span>,
      <span itemprop="country-name">Australia</span>.
    </span>

    <span itemprop="geo" itemscope itemtype="http://www.data-vocabulary.org/Geo/">
        Latitude: <span itemprop="latitude">37.49 S </span>
        Longitude: <span itemprop="longitude">144.58 E</span>
    </span>

    Phone: <span itemprop="tel">+61 (0) 3 9023 0074</span>

    <a href="http://net.tutsplus.com/" itemprop="url">Nettuts+ | Web development tutorials, from beginner to advanced.</a>.
</address>

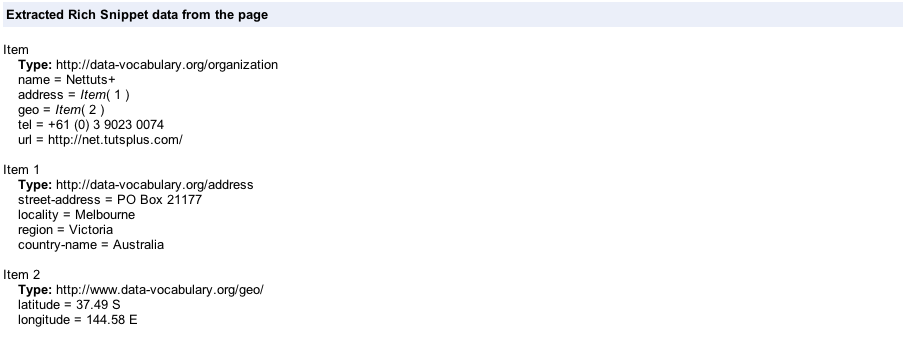
Unfortunately, Google does not have a rich snippet for organizations yet, but let’s look at the data that they do see.

Nettuts+ Organization Data

Again, we are providing context back to a machine, which can be used in various ways, such as plotting our organization on a map with relative ease.


Microdata in Practice: Products and Reviews

Another practical use for Microdata is giving more context about the products that we sell, whether that is about the product, or perhaps how people rate the product. Let’s take a look at product information first.

<div itemscope itemtype="http://data-vocabulary.org/Product">
  Brand: <span itemprop="brand">Bridgestone</span>
  Category: <span itemprop="category">Truck Tires</span>
  <h1><span itemprop="name">R-195F</span>  </h1>
  <span itemprop="photo"><img src="http://www.bfentirenet.com/tires/b_r195f.jpg"/></span>
  On sale for <span itemprop="price">$300.09</span>.
  Find more information from <a href="http://www.bridgestonetrucktires.com" itemprop="url">Bridgestone</a> .
</div>

Once again, Google does not have a rich snippet for a product, but we can see the context that they see when they parse our page:

Product Snippet

They do have a rich snippet for reviews though, and that is what we are building towards. Let’s say that we allow ratings about our products:

  <div itemscope itemtype="http://data-vocabulary.org/Review">
    <span itemprop="itemreviewed">R-195F</span>
    By <span itemprop="reviewer">John Cox</span> on
    <time itemprop="dtreviewed" datetime="2010-06-10">June 10, 2010</time>.
    <span itemprop="summary">This tire runs forever!</span>
    Rating: <span itemprop="rating">4.5</span>
  </div>

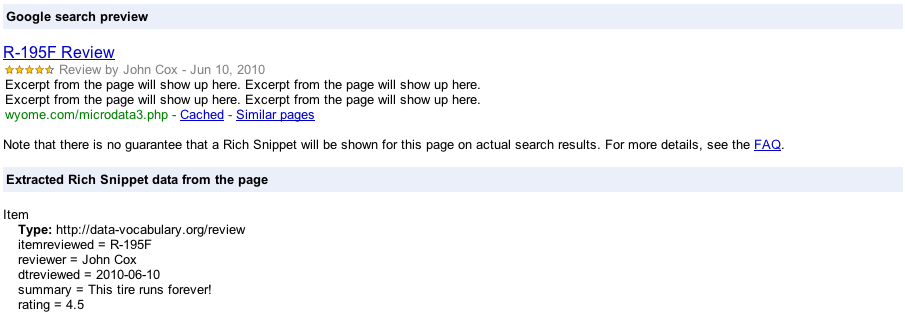
With just this little additional mark-up we can give context to our review for machines to consider. Google would display the review as:

Microdata Review

It’s all a matter of giving context through five simple global attributes. We can now provide a consistent method of giving that context, whether we are reviewing tires, or websites, or games.


Microdata in Practice: Events

The final example to talk about is the ability of giving some context of upcoming events through Microdata. Events are a common searched item. You may well be working on a website that has scheduled events, which you want to show. Let’s give a little more context for machines and see how it might be used:

<div itemscope itemtype="http://data-vocabulary.org/Event">
   <a href="http://www.thedevilmakesthree.com" itemprop="url" >
    <span itemprop="summary">The Devil Makes Three</span>
  </a>
   <img itemprop="photo" src="http://www.thedevilmakesthree.com/MediaFiles/right_column/do-wrong-right.jpg" />
  <span itemprop="description">We are off again down the eastern side of these United States on our way to The Bonnaroo music festival. We The Devil Makes Three will be performing <span itemprop="eventType">concerts</span> for your enjoyment in eight states over the next two weeks. </span>
  <time itemprop="startDate" datetime="2010-06-13">June 13th, 2010</time>
   <span itemprop="location" itemscope itemtype="http://data-vocabulary.org/Organization">
   <span itemprop="name">Bonnaroo</span>
  </span>
</div>

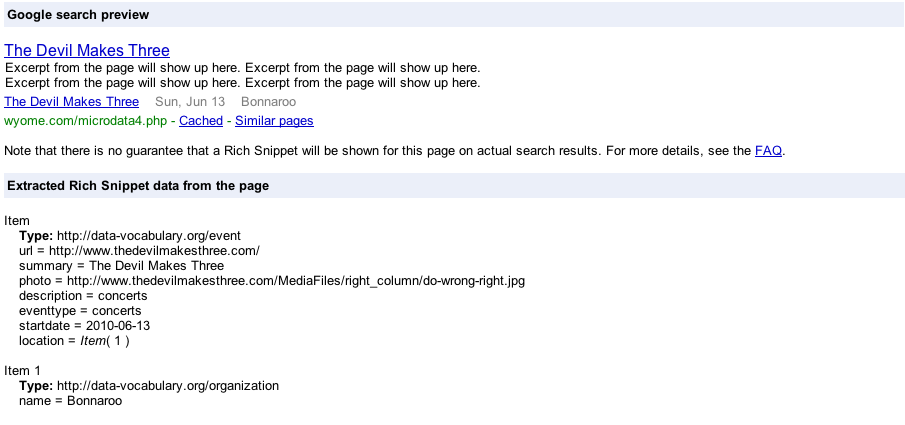
Which will produce a nice entry like this:

Microdata event

Now we have our event listed on our search result, in addition to our own website. Again, we are giving context to our data in a way that can be easily recognized by other applications.


Conclusion

It’s important to stress again that the Microdata specification is young, and is going through changes. It’s equally important to understand that while I focused on Google search results, there are plenty of other applications. For my purposes, Google presented me with the best way of showing Microdata in action, which was a bit of a challenge for me. The other alternate formats are much more mature, and have been in use for quite some time. Also, one other important consideration, is that Google is currently hand reviewing every rich text snippet entry:

Hand Review Process

Microdata is very easy to use, and implement. While the specification isn’t particularly clear for the layman on the definitions of the attributes, I do hope I helped shed some light. It doesn’t take much to be an expert with Microdata, at least until the specification changes (again). Please share your thoughts and experiences with this young HTML5 format in the comments.

Helpful Tips for Solving Common Camera Failures

All photographers invest in their gear and desire rigid build quality in any purchase. But the truth of the matter is that cameras are just machines and we are just human – problems happen! Today we’re going to take a look at a few common camera failures, and suggest a few fixes.

Whether we like it or not, our cameras break down on us sometimes and things can go wrong. With all this heavy usage and the wearing and tearing that goes along with it, it is only normal that camera parts jam and buttons don’t always fire correctly. But with a little insight and some practice, those problems can be avoided and minimized. I’m going to introduce you to the most familiar and annoying camera hazards along with suggested precautions on each.


Shutter Failing to Open, or Close, or Fully Close

As we all know, the shutter is a camera component that goes up for a specific period of time allowing light to pass through the lens, hitting a photographic film or a light-sensitive sensor to expose a scene and permanently register it. When the scene is registered, that shutter goes back down.

If the shutter jams along the way failing to go up or failing to go back down accurately, you’re likely to get really bright, over-exposed photos due to the shutter not going down in a timely manner. And you’ll also get underexposed images when the shutter is stuck closed.

To determine whether or not you have a jammed shutter, set your camera to any mode other than Auto, turn the flash off, turn your camera around so that the front is facing you, and then press the shutter release while looking through the lens.

You should see a tiny flicker at the center of your lens as the shutter goes up and down during the exposure. If you do not see a flicker, then your shutter is stuck. You can also remove your lens, set a slow shutter speed, and look into the camera’s body cavity while taking a picture or two. If one or both of the shutter curtains is stuck, you’ll be able to tell.

Some of the possible reasons for shutter jamming or failing to go up or back down:

  • Faulty timer
  • Shutter curtains might be slightly misaligned
  • Camera hasn’t been used in a while

To fix your stuck shutter, I’m going to list a couple of ways below (via Do It Yourself Digital Camera Repair). If you choose to go with either one or the other, you should be extra careful. Please note that it is always highly preferable that you send your camera to a specialized store or to your camera retailer to fix it for you. Fixing your camera’s shutter is a very complicated process, and you will most likely cause damage to your camera.

If fixing it would cost way too much than you’re willing to pay (and sometimes it may well do), and the only other choice would be to retire it, then you can use one of these two fixes:

Sometimes a power interruption can jog the shutter open if its stuck, so what you will do is:

  1. Set your camera to manual
  2. Turn off any features that might drain the battery (image stabilization, flash, LCD view …etc)
  3. Set your shutter to the slowest speed possible (15-30 seconds)
  4. Take a picture
  5. Open the battery door during the exposure and then close it right up. The momentarily power interruption during exposure time might be able to jog your shutter open
  6. Repeat until your shutter un-jams.

My other suggestion requires extra caution, and my advice is to not get into it unless it’s your last resort. What you will do is tap your camera solidly against a wooden surface, and then fire the shutter release button a few times. This can sometimes jog the shutter open.


Soft Focus or Problems When Switching Location

A rapid change of location on a photo shoot from extra warm to extra cold environments or vice versa can cause condensation to build up on your camera lens, and sometimes the camera’s internal parts, causing them to fog up. Condensation forms on surfaces that are significantly warmer or colder than the air temperature surrounding them.

Condensation can be controlled by gradually introducing your camera and gear to extremely different conditions. When changing location, seal your body and lenses along with a desiccant canister in an airtight plastic bag and let the equipment cool or warm gradually while inside the bag. This way moisture will build up on the plastic bag rather than on your gear.

Desiccant canisters are small, rigid, cylindrical containers filled with desiccants like silica gel, aimed at absorbing moisture. Please note that desiccants reach their maximum absorption capabilities with time, so make sure to replace them regularly.


Drained Batteries in Cold Weather

Battery performance drops off as the temperature falls below freezing. Nickel metal hydride and lithium-ion battery packs are better than alkaline batteries in these situations, but even the lithium-ions will eventually stop working once they’ve chilled long enough.

So when you’re planning a photo shoot in low temperatures it is essential to carry around extra batteries for all your gear. You can keep the spare batteries in relatively warm conditions such as your coat pocket where they can be kept warm and exchanged for the cold batteries from time to time as necessary.

Also be careful when changing batteries to introduce your spare ones to the colder environment gradually to avoid condensation.


Pre-Set Aperture Failing to Stop Down

We all know that aperture is the lens opening that controls how much light travels from a scene through the lens onto photographic film or digital sensor.

When you set an aperture opening (f-stop setting) and take a shot, that opening should stop down to that specified setting for the period of the exposure, and then open up again. Failing to do so would result in overexposed images, unwanted depth of field, and generally ruined images (unless you set the widest aperture opening).

Aperture failure to stop down is commonly due to sticky blades or a broken spring. To make sure the problem is with the aperture ring not stopping down, in manual mode set the smallest aperture opening with a slow shutter speed, turn the camera around so the front is facing you, and hit the release button. You should be able to tell if your aperture ring is working or not.

Sticky aperture is commonly seen in old lenses, when oil on the aperture blades congeals over time, causing the blades to close slowly or not at all. If this is the case, the lens needs to be disassembled, blades cleaned with a degreaser, and then oiled again. This is not something to try at home. Drop your camera off at a specialized repair store to get it fixed.

A sticky aperture ring can also be a result of leaving your camera in high temperature conditions for too long (such as locking it up in the car on a summer day). Oil can form on the aperture blades causing them to stick together. Lubricants in the focusing mechanism can also evaporate and condense on the iris diaphragm blades causing them to stick together. (eBay Guides)


Faint or No Images When Shooting With Flash

If you’re getting faint images, or perhaps correctly exposed images only expanding half way through your frame with the rest of the frame looking black when using a flash, this could be due to flash mis-synchronization.

Your camera and flash must be synchronized so that the shutter is fully opened to expose the scene when the flash fires. Otherwise, parts of your picture would turn out black or severly under-exposed. (Wikipedia)

This is a problem more common in older SLR cameras that have focal-plane shutters. A focal-plane shutter is a type of photographic shutter that is positioned immediately in front of the focal plane of the camera, that is, right in front of the photographic film or light sensitive image sensor.

In focal-plane shutters, there are actually two curtains that run horizontally across the film plane so that one curtain opens and then a second curtain follows behind it to control the time of an exposure (shutter speed). When the shutter is cocked, the shutter curtains are moved back to their starting positions, ready to be released again.(Wikipedia)

Since both curtains need to be completely out of the light path for the entire fame to be exposed by the brief light of the flash, you can’t use a shutter speed that is too fast.

Most modern 35mm and Digital SLR cameras now use vertical travel metal blade shutters. These work in precisely the same way as the horizontal shutters, but because of the shorter distance the shutter blades must travel and the faster metal construction, the shutter blades can travel across the plane in less time. This can result in faster flash synchronization speeds than those possible with the older horizontal-curtain focal-plane shutter, thus the problem with flash synchronization is less common.


Conclusion

Every photographer is likely to suffer ruined photographs at a certain point in time. The hazards I mentioned above are just a few of the most common problems photographers can face, but being aware of them and making it a habit to follow best practices handling your gear and equipment can help you keep these problems at bay.

Feel free to share any other solutions to these problems in the comments, or advice on different problems you encounter from time to time!

Create a Custom Radio Button from Scratch Using Flash – Basix

Using the Flash drawing tools we’ll create a nice looking Radio Button that will make use of the Timeline and Mouse Events in ActionScript 3 to perform a user declared action.


Final Result Preview

Let’s take a look at the final result we will be working towards:

Click the top radio box to see how it looks in action.


Step 1: Overview

From Wikipedia:

A radio button or option button is a type of graphical user interface element that allows the user to choose only one of a predefined set of options.

In this tutorial, we will create a custom Radio Button from scratch using Flash and ActionScript 3. Read on!


Step 2: Set Up Flash

Launch Flash and create a new document. Set the stage size to 320×190px, #181818 for the color, and the frame rate to 24fps.

(You can see some examples of Flash radio buttons in the “Match” box, above.)


Step 3: Interface

This is the interface we’ll use: a simple background with a title, some static textfields used as user feedback, a working radio button and two static demos. This will show you how can you enable or disable the radio button.

There is also a dynamic textfield (which says [Disabled] in the image) that will be modified by the working radio button.


Step 4: Background

Select the Rectangle Tool (R) and create a 320×40 px rectangle, place it on top of the stage and fill with this radial gradient: #D45C10 to #B43B02.

Now we need something to separate the sections.

With the same tool, create a 300×1 px rectangle and fill it with another gradient fill: #737173 to #181818. Duplicate this shape and place them in the center.


Step 5: Title

Select the Text Tool (T) and set this format in the Properties Panel: Helvetica Bold, 20pt, #FFFFFF. (If you’re on Windows, you probably won’t have the Helvetica font; use Arial instead.) Type a title and place the textfield in the top-left corner of the screen.

To get the letterpress effect, just duplicate (Cmd + D) the textfield, change its color to #8C2D00, move it 1px up and go to Modify > Arrange > Send Backward.

You should end with the following effect.


Step 6: User Feedback

We’ll create a series of static Textfields that will tell the user what every radio button represents. There are two types of textfields; a title and a description.

This is the format for the title: Myriad Pro Regular, 20pt, #DDDDDD.

For the descriptions we use: Myriad Pro Regular, 14pt, #BBBBBB.


Step 7: Radio Button Action

The Active Radio Button will do something when activated, for this example, a dynamic textfield will be changed showing the current status of the button.

Using the Text Tool (T), create a Dynamic Textfield and set statusField as its instance name, then place the textfield as shown in the next image:

As the button will be disabled by default, you can write [Disabled] in the textfield.


Step 8: Radio Button

Next, we’ll create the Radio Button.

It has three states:

  • Normal: In this state the button works normally.
  • Enabled: This state is shown when the user clicks on the button
  • Disabled: In this state, the button can’t be enabled.

Step 9: Background

Select the Oval Tool (O) and create a 128×128px circle (it doesn’t really matter the size you create it since you’ll be able to scale it, only for reference) with a 1px stroke color #AAAAAA and a #F7F3F7 to #BDBEBD gradient fill.


Step 10: Enabled Area

Now we’ll create the area that will change when the radio button is enabled.

Duplicate (Cmd+D) the background shape and resize it to 64×64px, change the stroke color to a #EEEEEE, #AAAAAA linear gradient and the fill to #C3C6C3, #B5B2B5.

Convert the shapes to MovieClip and double-click it to enter edit mode.

Create a new Frame (F6) and change the smaller circle fill to #D45C10, #B43B02.

This will be the frame shown when enabled.


Step 11: Disabled

This graphic will be shown when the radio button is disabled.

Create a new Frame (F6) and delete the center shape. Change the background gradient to #D4D2D4, #A2A3A2.

This will make the background darker and without the part that changes when enabled.


Step 12: Instance Names

Three Radio Buttons are placed in stage, one for each state.

Set the instance names as their section titles suggest, except for the enabled section, as that is an exclusive ActionScript keyword. Name that button enabledBox.


Step 13: Document Class

We’ll make use of the Document Class in this tutorial, if you don’t know how to use it or are a bit confused please read this QuickTip.


Step 14: New ActionScript 3 Class

Create a new ActionScript 3.0 Class and save it as Main.as in your class folder.


Step 15: Package

The package keyword allows you to organize your code into groups that can be imported by other scripts. It’s recommended to name them starting with a lowercase letter using intercaps for subsequent words for example: myClasses. It’s also common to name them using your company’s website: com.mycompany.classesType.myClass.

In this example, we’re using a single class, so there isn’t really a need to create a classes folder.

package
{

Step 16: Import Directive

These are the classes we’ll need to import for our class to work, the import directive makes externally defined classes and packages available to your code.

import flash.display.Sprite;
import flash.events.MouseEvent;

Step 17: Declare and Extend the Class

Here we declare the class using the class definition keyword followed by the name that we want for the class, remember that you have to save the file using this name.

The extends keyword defines a class that is a subclass of another class. The subclass inherits all the methods, properties and functions, that way we can use them in our class.

public class Main extends Sprite
{

Step 18: Constructor

The constructor is a function that runs when an object is created from a class, this code is the first to execute when you make an instance of an object or runs using the Document Class.

public function Main():void
{

Step 19: Set Radio Button State

Here we control the states of the three radio buttons in stage.

The first one will operate normally. The second one will be inactive and the last one will show as enabled.

active.stop();
inactive.gotoAndStop(3);
enabledBox.gotoAndStop(2);

Step 20: Handle Mouse Interaction

This code tells the Active radio button to listen for mouse events, and every time it detects a MOUSE_UP MouseEvent (this is when the button of the mouse is released), launch the changeState() function.

active.addEventListener(MouseEvent.MOUSE_UP, changeState);

Step 21: Perform an Action

This function will run every time the user clicks the radio button.

It checks if the button is currently enabled or disabled and performs a determined action in each of the cases. In this example, it changes the value of the dynamic textfield.

private function changeState(e:MouseEvent):void
{
if (e.target.currentFrame == 1)
{
	e.target.gotoAndStop(2);
	statusField.text = "[Enabled]"; //This is the action to perform
}
else
{
	e.target.gotoAndStop(1);
	statusField.text = "[Disabled]"; //This is the action to perform
}
}

Step 22: Full Code

If you are having trouble during any of these steps, remember that you can access the source files at the top of this tutorial. You can also take a look at the full ActionScript code to compare with yours:

package
{
	import flash.display.Sprite;
	import flash.events.MouseEvent;

	public class Main extends Sprite
	{
		public function Main():void
		{
			active.stop();
			inactive.gotoAndStop(3);
			enabledBox.gotoAndStop(2);
			active.addEventListener(MouseEvent.MOUSE_UP, changeState);
		}

		private function changeState(e:MouseEvent):void
		{
			if (e.target.currentFrame == 1)
			{
				e.target.gotoAndStop(2);
				statusField.text = "[Enabled]";
			}
			else
			{
				e.target.gotoAndStop(1);
				statusField.text = "[Disabled]";
			}
		}
	}
}

Conclusion

You have created a fully customizable Radio Button using these easy steps, use them to make your own Radio Buttons!

Next step: why not combine this with André Cavallari’s tutorial about creating Flash components to turn this into an object you could use in any project?

And a challenge for you: you’ve customized the appearance and made the toggle work; try putting five radio buttons on the stage and writing code to only allow one to be enabled at any time.

I hope you liked this tutorial, thank you for reading!

Create a Custom Radio Button from Scratch Using Flash

Using the Flash drawing tools we’ll create a nice looking Radio Button that will make use of the Timeline and Mouse Events in ActionScript 3 to perform a user declared action.


Final Result Preview

Let’s take a look at the final result we will be working towards:

Click the top radio box to see how it looks in action.


Step 1: Overview

From Wikipedia:

A radio button or option button is a type of graphical user interface element that allows the user to choose only one of a predefined set of options.

In this tutorial, we will create a custom Radio Button from scratch using Flash and ActionScript 3. Read on!


Step 2: Set Up Flash

Launch Flash and create a new document. Set the stage size to 320×190px, #181818 for the color, and the frame rate to 24fps.

(You can see some examples of Flash radio buttons in the “Match” box, above.)


Step 3: Interface

This is the interface we’ll use: a simple background with a title, some static textfields used as user feedback, a working radio button and two static demos. This will show you how can you enable or disable the radio button.

There is also a dynamic textfield (which says [Disabled] in the image) that will be modified by the working radio button.


Step 4: Background

Select the Rectangle Tool (R) and create a 320×40 px rectangle, place it on top of the stage and fill with this radial gradient: #D45C10 to #B43B02.

Now we need something to separate the sections.

With the same tool, create a 300×1 px rectangle and fill it with another gradient fill: #737173 to #181818. Duplicate this shape and place them in the center.


Step 5: Title

Select the Text Tool (T) and set this format in the Properties Panel: Helvetica Bold, 20pt, #FFFFFF. (If you’re on Windows, you probably won’t have the Helvetica font; use Arial instead.) Type a title and place the textfield in the top-left corner of the screen.

To get the letterpress effect, just duplicate (Cmd + D) the textfield, change its color to #8C2D00, move it 1px up and go to Modify > Arrange > Send Backward.

You should end with the following effect.


Step 6: User Feedback

We’ll create a series of static Textfields that will tell the user what every radio button represents. There are two types of textfields; a title and a description.

This is the format for the title: Myriad Pro Regular, 20pt, #DDDDDD.

For the descriptions we use: Myriad Pro Regular, 14pt, #BBBBBB.


Step 7: Radio Button Action

The Active Radio Button will do something when activated, for this example, a dynamic textfield will be changed showing the current status of the button.

Using the Text Tool (T), create a Dynamic Textfield and set statusField as its instance name, then place the textfield as shown in the next image:

As the button will be disabled by default, you can write [Disabled] in the textfield.


Step 8: Radio Button

Next, we’ll create the Radio Button.

It has three states:

  • Normal: In this state the button works normally.
  • Enabled: This state is shown when the user clicks on the button
  • Disabled: In this state, the button can’t be enabled.

Step 9: Background

Select the Oval Tool (O) and create a 128×128px circle (it doesn’t really matter the size you create it since you’ll be able to scale it, only for reference) with a 1px stroke color #AAAAAA and a #F7F3F7 to #BDBEBD gradient fill.


Step 10: Enabled Area

Now we’ll create the area that will change when the radio button is enabled.

Duplicate (Cmd+D) the background shape and resize it to 64×64px, change the stroke color to a #EEEEEE, #AAAAAA linear gradient and the fill to #C3C6C3, #B5B2B5.

Convert the shapes to MovieClip and double-click it to enter edit mode.

Create a new Frame (F6) and change the smaller circle fill to #D45C10, #B43B02.

This will be the frame shown when enabled.


Step 11: Disabled

This graphic will be shown when the radio button is disabled.

Create a new Frame (F6) and delete the center shape. Change the background gradient to #D4D2D4, #A2A3A2.

This will make the background darker and without the part that changes when enabled.


Step 12: Instance Names

Three Radio Buttons are placed in stage, one for each state.

Set the instance names as their section titles suggest, except for the enabled section, as that is an exclusive ActionScript keyword. Name that button enabledBox.


Step 13: Document Class

We’ll make use of the Document Class in this tutorial, if you don’t know how to use it or are a bit confused please read this QuickTip.


Step 14: New ActionScript 3 Class

Create a new ActionScript 3.0 Class and save it as Main.as in your class folder.


Step 15: Package

The package keyword allows you to organize your code into groups that can be imported by other scripts. It’s recommended to name them starting with a lowercase letter using intercaps for subsequent words for example: myClasses. It’s also common to name them using your company’s website: com.mycompany.classesType.myClass.

In this example, we’re using a single class, so there isn’t really a need to create a classes folder.

package
{

Step 16: Import Directive

These are the classes we’ll need to import for our class to work, the import directive makes externally defined classes and packages available to your code.

import flash.display.Sprite;
import flash.events.MouseEvent;

Step 17: Declare and Extend the Class

Here we declare the class using the class definition keyword followed by the name that we want for the class, remember that you have to save the file using this name.

The extends keyword defines a class that is a subclass of another class. The subclass inherits all the methods, properties and functions, that way we can use them in our class.

public class Main extends Sprite
{

Step 18: Constructor

The constructor is a function that runs when an object is created from a class, this code is the first to execute when you make an instance of an object or runs using the Document Class.

public function Main():void
{

Step 19: Set Radio Button State

Here we control the states of the three radio buttons in stage.

The first one will operate normally. The second one will be inactive and the last one will show as enabled.

active.stop();
inactive.gotoAndStop(3);
enabledBox.gotoAndStop(2);

Step 20: Handle Mouse Interaction

This code tells the Active radio button to listen for mouse events, and every time it detects a MOUSE_UP MouseEvent (this is when the button of the mouse is released), launch the changeState() function.

active.addEventListener(MouseEvent.MOUSE_UP, changeState);

Step 21: Perform an Action

This function will run every time the user clicks the radio button.

It checks if the button is currently enabled or disabled and performs a determined action in each of the cases. In this example, it changes the value of the dynamic textfield.

private function changeState(e:MouseEvent):void
{
if (e.target.currentFrame == 1)
{
	e.target.gotoAndStop(2);
	statusField.text = "[Enabled]"; //This is the action to perform
}
else
{
	e.target.gotoAndStop(1);
	statusField.text = "[Disabled]"; //This is the action to perform
}
}

Step 22: Full Code

If you are having trouble during any of these steps, remember that you can access the source files at the top of this tutorial. You can also take a look at the full ActionScript code to compare with yours:

package
{
	import flash.display.Sprite;
	import flash.events.MouseEvent;

	public class Main extends Sprite
	{
		public function Main():void
		{
			active.stop();
			inactive.gotoAndStop(3);
			enabledBox.gotoAndStop(2);
			active.addEventListener(MouseEvent.MOUSE_UP, changeState);
		}

		private function changeState(e:MouseEvent):void
		{
			if (e.target.currentFrame == 1)
			{
				e.target.gotoAndStop(2);
				statusField.text = "[Enabled]";
			}
			else
			{
				e.target.gotoAndStop(1);
				statusField.text = "[Disabled]";
			}
		}
	}
}

Conclusion

You have created a fully customizable Radio Button using these easy steps, use them to make your own Radio Buttons!

Next step: why not combine this with André Cavallari’s tutorial about creating Flash components to turn this into an object you could use in any project?

And a challenge for you: you’ve customized the appearance and made the toggle work; try putting five radio buttons on the stage and writing code to only allow one to be enabled at any time.

I hope you liked this tutorial, thank you for reading!

Quick Tip : Modelling and Rendering a Pillow in C4D

In this quick-tip tutorial we’ll be taking a look at the techniques required to model a basic pillow/cushion object in Cinema 4D. After applying a simple material, we’ll then investigate using Maxon’s “Advanced Render” system to add a depth of field (DOF) effect to our final render. For anyone doing arch-vis interiors in C4D this tutorial is a must see!

Step 1

Create a cube with 760cm x 280cm x 760cm sizes and 50 x 1 x 50 segments.


Step 2

After making your object editable (shortcut “C”) select the “loop selection” tool.


Step 3

Select all of the side faces on the cube object by clicking one of the side polygons.


Step 4

Add the “Cloth” tag to our cube by right-clicking it’s name in the “Objects” tab, and selecting the option shown.


Step 5

After selecting the “Cloth” tag, switch to the “Dresser” Tab and turn on “Dress Mode”. With that done, change the “Relax” and the “Dress-O-matic” step values to 35 and set the “Width” to 5 cm. Then press the “Set” button in the “Seam Polys” row.


Step 6

Now click the “Dress-O-matic” button to have C4D automatically create our basic pillow shape.


Step 7

We now need to go in and delete the “Cloth” tag that we previously added to our object, so select the “Cloth” tag itself and hit backspace on your keyboard.


Step 8

With our pillow selected, go to “Character > Cloth NURBS”. Drag the pillow object onto the “Cloth NURBS” object to create a parent-child relationship.


Step 9

Now create a new material, by going to “File > New Material” in the Materials tab.


Step 10

Click on the color swatch and select a color for your pillow. Click “Ok” to confirm.


Step 11

From the basic options, turn on the “Bump” channel checkbox.


Step 12

With the “Bump” channel options visible, click the “Texture” dropdown arrow, and go to “Surfaces > Simple Noise”.


Step 13

Click on the “Simple Noise” text to access the shader properties.


Step 14

Set the U and V Frequency values to “40″.


Step 15

Click the back button at the top of the material editor to return to our noise settings.


Step 16

Change the “Blur offset” to 1 %.


Step 17

Now drag and drop the new material from the material tab on to the pillow object in the viewport, which will add the tag shown.


Step 18

We now need to create an environment for our pillow, so first create a “Floor” object.


Step 19

Now create a “Sky” object.


Step 20

Open the “Render Settings” window.


Step 21

Click the “Effect” button and add “Global illumination” from the dropdown. Repeat this process to add “Depth of Field”.


Step 22

In the “Depth of Field” settings tab, change the “Blur Strength” to 15%. You can now close the “Render Settings” window.


Step 23

Now’s the time to create a slightly more interesting scene! So create several copies of the “Cloth NURBS” object and arrange them roughly like I have in the image below. You can also create different copies of the pillow material, allowing you to add different colors to each pillow object.


Step 24

Create a “Camera” object.


Step 25

Select the camera, and under the “Depth” tab enable “Front Blur” and “Rear Blur”.


Step 26

Switch to “Right view” (Press F3). We now need to set the focus point. This is done using the square in the centre of the camera cone. Click and drag the middle of the 3 centre points to set your focus point. You can also click and drag the other points to control the blurry areas in your final render.


Step 27

We now need to set our camera as the main scene camera, so go to “Cameras > Scene Cameras > Camera”.


Step 28

Now click the render button to see the final result.


Step 29

After rendering, I apply a basic S-curve to the final image using the curves tool in Photoshop.


Don’t miss more CG tutorials and guides, published daily – subscribe to Cgtuts+ by RSS.

Basic Principles of Digital Matte Painting


Digital Matte Painting is a huge creative field that can add wonder and excitement to static film shots. Learn about digital matte painting principles, like set extension, camera mapping, as well as professional tips that matte painters employ.


Introduction

Ever wonder how those incredible scenes of panoramic vistas, impossible futuristic cities, or fantastic alien worlds come to life? It’s all through the magic of matte painting. If only I had a dollar (hey, inflation!) for every time someone responded, “Map painting?” But you know what I’m talking about, right? If you don’t, a brief history lesson is in order.

Ages ago, extremely talented artists painted these realistic scenes on large sheets of glass. It really is a lost art nowadays. The painting included blank areas that would get filled in with live action. The filmed segments were optically composited with the painting for the final result. A matte is a solid shape that is used to block out areas of the film frame so that no image gets exposed there. A simple matte shot would require a shot of the painting with a matte to block out the live area, the film sequence with a matte to block out everything but the live area, and a final piece of film for everything to be exposed onto.

The Digital Revolution

With the invention of Adobe Photoshop, things began to change. What used to require laborious work in a film studio with several lengths of film and expensive, specialized cameras can now be done on a home computer with easily available software. No matter how you approach it, Photoshop has become an integral part of the process. The simplest matte paintings are ones in which the camera is stationary throughout the entire sequence. This is called a locked-off shot. Creating a matte painting for this kind of shot can be fairly easy. Only one frame, or plate, of the footage is needed. It can be opened in Photoshop and the new areas painted right on top.

The Right Size

The first thing to decide is what size to make your painting. In Photoshop, set your Image Size in pixel increments. Don’t worry about inches or Resolution; they don’t matter here. All you care about is pixel width and height. How big your painting’s dimensions should be depends on its intended use. DVD is 720×480 pixels. HD is 1920×1080 pixels. Film sizes start at 2048×1080 (commonly called 2K) and can go up from there to 3K, 4K, and beyond.

For many special effects studios, the exact resolution they work in is proprietary. So the size to make your image depends on what medium you are doing a matte painting for. A little trick employed by most professional matte painters is to work at 150 or 200% of the final size. This is because imperfections and painted artifacts get minimized when the final image is sized down. This technique can produce detail that is hard to paint by hand and can also get rid of some traces of hand painting. So, if you are doing a matte painting for HD footage, you may want to work in 2880×1620 or even 3840×2160 pixels.

You can see how easy it is to end up with huge files, so a fast processor and lots of RAM are essential. Also, remember to work in RGB mode, which has a larger color gamut than CMYK. Photoshop works natively in RGB; some of its filters and functions won’t work in CMYK. Some jobs may even require working in 16-bit color mode for smoother transitions and gradients.

Set Extension

A common application of matte painting is set extension. This is where only the background immediately behind the action is filmed and for practical, budgetary, or other reasons, the rest must be painted in later. The simplest set extensions are on locked off shots. In working on this kind of shot, the first thing to do is determine the perspective of the scene by finding its vanishing points. This is easily accomplished with the line tool in Photoshop. Use bright colors so that the lines stand out from the background. A good tip here is to use vector lines on shape layers so that they can easily be repositioned.

Filling in the nonexistent set is mainly done with the brush and clone tools. Pick colors directly from the source plate so that your new painting will match. But a close inspection reveals that hand-painted areas lack the photographic grain found in the plate. Since the grain in the footage animates, it is usually added back in during compositing, but the matte painter may need to provide an alpha channel of the new painted area to the compositor.

If you need to add the grain in for a still or to see how closely your painting matches the plate, Photoshop’s Grain, Film Grain, and Add Noise filters are very helpful. The Grain filter is perhaps the most useful choice, because it has different types you can choose to best match your photo. Apply the grain to a layer filled with 50% gray and set to Overlay blending mode. The gray becomes transparent and all you will see on that layer is the grain, which you can take down in opacity to match your plate. Usually, only a small percentage is needed. This grain layer’s opacity is 8% and it matches the plate seamlessly.

turtlehands_500

Camera Mapping

Thanks to advances in 3D animation, matte paintings no longer need to be static shots. Simple geometry can be built in a 3D environment that matches the scene. The matte paintings are then projected onto those shapes, similar to how slides are projected onto a screen. The painting is no longer a flat, 2D image, but has some dimension to it. This technique is known as camera mapping and it allows a virtual camera to be animated in 3D space around the matte painting.

The difference in depth allows for parallax, where objects closer to the camera move more than objects farther away. Because the projected paintings may not cover all sides of the 3D geometry, the camera is a bit limited in what it can shoot, so this approach is referred to as 2.5D. More extensive mapping can cover all surfaces, but then the scene becomes less a matte painting and more a fully rendered, immersive 3D environment.

Conclusion

Obviously, there is much more to say on this subject and this had been just a brief introduction. Matte painting is closely tied into other special effects areas like compositing, texturing, and 3D animation.


Creative Sessions: Digital Illustration Launch

This month on Creative Sessions the vast creative landscape of Digital Illustration. Most successful illustrators have some level of traditional training that they mix with digital techniques, which are indispensable in the field today. We cover a plethora of subjects on digital illustration spanning digital painting, vector illustration, 3D techniques, and more.

Learn basic theory on matte painting and how to incorporate surreal concepts into your work. Look over the shoulder of a master vector artist making realistic vector motorcycle art, and learn how to push 3D techniques and Photoshop tools to create nostalgic magazine covers that have a vintage painted feel, but utilize modern tools to speed up illustration time. We’ll cover business strategies, like building your niche and promoting your work. We’ll also be exploring how to develop your artistic style and various illustrator’s strategies on how they make their work stand out.


Participate in this Session’s Group Project

Jump over to this Session’s creative project on Illustrating Creative Passion. In this session’s project the brief is to create an illustration that communicates on a gut emotional level. Capture raw feelings as you illustrate on the theme of “Creative Passion.” Dig deep into your core as an artist and communicator to illustrate the gritty essence of artistic feeling. Show us your artistic spirit, represent it with a discernible metaphoric image, or impassioned colorful storm. You can post your projects in the comments here and get some feedback from the community.


Download this Session’s Cover Art as a Digital Wallpaper

Jump over to this session introduction to download this session’s wallpapers made by Chris Leavens .

sample

More Creative Sessions

Creative Sessions logo.Every month we’ll be running a two week Session on a creative topic. Our second Session, beginning today, is on Digital Illustration, and future Sessions will be on varied topics like interface design, gaming design, and creative freelancing. Unlike regular Tuts+ content, Sessions content is more theoretical, opinion based and will often cross many disciplines.

Awesome Links #1

Freebie: FreelanceSwitch Business Card Template

Nothing says “I’m a professional” more than a good business card.  And while we discussed business card design here this week, our sister site FreelanceSwitch gives you a free template to download so that you can get started showing people how awesome your work is – and you’re being awesomely productive because most of the work’s already done for you!

7 Tips for a Fabulous Outdoor Movie Night

A movie is the perfect escape from the daily rigors of work and gives you a chance to recharge your batteries so you can maintain a high level of productivity.  Outdoor movie nights are becoming more and more popular these days, so here’s a few tips to make sure you put together one that goes off without a hitch!

A Great Starting Point for Productive Trip Planning

Kayak’s got an awesome feature that allows you to narrow down vacation spots by price, location and even temperature range.  It’ called “Explore” and you should do just that!

30+ Things You Have to Know about being a Freelancer

New strategies such as telecommuting and flex hours are being used for those who want to stay with their current employer and work from home.  But what if you want to strike out on your own and – gasp – freelance?  Here’s 30-odd things that will you need to know before striking off into (or running away from) the realm of self-employment.

Sleep and Your Productivity

If you’re tired, you’re not as energetic.  If you’re not as energetic, you’re not as productive.  How can you get the much-needed sleep you deserve?  Michael Hyatt has some thoughts on this…

CSS: Noob to Ninja, Parts 5-7: Premium Exclusive


This exclusive premium video series will take you from being an absolute CSS “noob,” all the way up to ninja-status, capable of wrangling even the most obnoxious of browsers into place. The series begins with the basics: the syntax, properties, etc. However, each new video expands upon the previous, as you work your way up and improve your skills. This week, you’ll have access to Parts 1-4 in the series. The remaining six episodes will be available later this month!

If you’re switching over from a graphic design career, or are hoping to finally dig into CSS from scratch, this will be the series for you. And even if you have a modest level of experience and want to take your skills to the next level, learning the latest CSS3 techniques, the latter part of this series will surely quench that thirst! Become a Premium member! In the next three parts in this series, you’ll learn quite a bit – everything from ways to organize your stylesheets, to the ins and outs of positioning, to semantics. Don’t fall behind! Become a Premium member!


The Full Screencast Series: Exclusive to Premium Members

  • Part 1: Preparation
  • Part 2: CSS Properties
  • Part 3: Typography
  • Part 4: Floats
  • Part 5: Positioning
  • Part 6: Semantics, List Items, and Menus
  • Part 7: CSS Organizational Techniques
Video Sample

Join Net Premium

NETTUTS+ Screencasts and Bonus Tutorials

For those unfamiliar, the family of TUTS sites runs a premium membership service. For $9 per month, you gain access to exclusive premium tutorials, screencasts, and freebies from Nettuts+, Psdtuts+, Aetuts+, Audiotuts+, and Vectortuts+! For the price of a pizza, you’ll learn from some of the best minds in the business. Become a Premium member!

WordPress hack: Display post thumbnail in your RSS feed

Simply paste the following code in your functions.php file. The post thumbnail should be visible once you saved the file.

function diw_post_thumbnail_feeds($content) {
	global $post;
	if(has_post_thumbnail($post->ID)) {
		$content = '<div>' . get_the_post_thumbnail($post->ID) . '</div>' . $content;
	}
	return $content;
}
add_filter('the_excerpt_rss', 'diw_post_thumbnail_feeds');
add_filter('the_content_feed', 'diw_post_thumbnail_feeds');

Thanks to Jeff Starr for this great tip!

Looking for WordPress hosting? Try WP Web Host. Prices starts at $5/month and you can try it for free!

WordPress hack: Display post thumbnail in your RSS feed

What You Really Need Is A Manifesto

One really awesome way to give your personal productivity a nice boost is to get your very own manifesto. Not to be confused with the mission statement, a manifesto is like the mission statement’s tougher, cooler older brother or sister. The awesome one that everyone likes, everyone respects and everyone emulates because they’re totally punk rock and better than you at everything.

Don’t let the most famous manifesto dissuade you either. Yes, I know Karl Marx wrote one. But so did Guy Kawasaki, career renegade Jonathan Fields and designer Bruce Mau. In fact, there is a whole website dedicated to people’s manifestos on various topics ranging from change and achievement to creativity and how to give a compelling presentation.

A manifesto is a bold statement, or extended mantra, that sets a tone for your day, your career, heck, even your life. It’s a road map to awesomeness that should induce a surge of adrenaline pulsing through your body with each reading.

The Jerry Maguire Fiasco was an isolated incident.

But don’t confuse this soon be be penned narrative on your inherent greatness with the dreaded Jerry Maguire fiasco. That won’t happen. Sure, he had an epiphany, ran out in the middle of the night after writing his impassioned document to get it printed and bound at Kinko’s, only to hand it out to everyone, freak out, have second thoughts and then find himself having to scream “show me the money” into a telephone.

This isn’t your destiny.

(Note: Jerry did however win in the long run by sticking to his vision.)

And besides, your manifesto is for you and you only. It’s a catalyst for what is to come. Because the truth is that nothing can really stop you from doing what you want to do except a lack of passion. Your manifesto is food for that inner engine that will drive you forward. This is fantastic productivity fuel.

What is stopping you?

Now I want to have a really transparent, honest moment. Here’s a big secret, but it may be tough to swallow. This is also a confession. Okay, here goes: When I’ve had set backs, failures, disappointments in my career, at the heart of it all has been the bitter truth that I didn’t want it badly enough.

I trudged my way toward a goal because it seemed like the thing to do. There was no focus; there was no passion; there was no manifesto. I’ve learned my lesson. Now I write them all the time. And they don’t need to be etched in stone or on some elaborate bronze tablet for it set a tone. What matters is that you believe in your words and more importantly, that you believe in yourself.

Pen…Meet Paper.

All it takes is those first few words committed to paper and you’re on your way. So write. Get something down on paper, or in a word doc, a napkin might even be nice. Mine would have a coffee stain on it for effect. Keep refining your manifesto as you go. This is a living document, not dogma. But, it should inspire; the words should ring true. They should speak to you, motivate you and catapult you toward what you really want to accomplish.

This may seem an odd exercise, but some of the greatest companies on earth have manifestos, mantras, and driving principles that come to define the essence of who they are and these documents are foundational to their success. Why should you be any different? Don’t you deserve the same?

How to Create a Lustrous Electric Guitar


In this tutorial you will learn how to create a realistic looking electric guitar. We will start with basic shapes and build our way up using a couple of simple yet effective techniques. You will learn how to use 3D Effect, Scale and Blend Options, to make a guitar worthy of even the most rockin’ of vector fans!

Continue reading “How to Create a Lustrous Electric Guitar”