Using Twitter’s @Anywhere Service in 6 Steps

Using Twitter’s @Anywhere Service in 6 Steps

Last week, Twitter released @Anywhere, which, with only a few added lines in your code, can bring all of Twitter’s platform functionalities into your website. @Anywhere can allow for anything, ranging from converting a simple @username into a clickable link, to even creating new tweets directly from your personal site. I’ll show you exactly how to do so in this tutorial!

Twitter Anywhere

Before you Begin, Create an Application

In order to begin using @Anywhere, you must have an API key. What? You don’t have it? No problem. Just go here and register a new application  (don’t register it from here).

  • If you have a local server installed, set it to a domain (developertutorial.com, for example), as it won’t work with your localhost (if you don’t know how, check out this tutorial, the hosts file part is particularly important).
  • If you don’t have a local server, then leave this section blank. Just remember that for production, you will have to set it to the domain you are working on.

And finally, set the default access type to Read & Write. This is very important!

Now, you will be redirected to the application settings page. Copy the consumer key (API Key), and let’s get started using @Anywhere.


Including @Anywhere’s Javascript

Open your new HTML file, and, inside the <head> tag, include:

<script src="http://platform.twitter.com/anywhere.js?id=APIKey&v=1" type="text/javascript"></script>

Your code should look like:

<!DOCTYPE HTML>
<html>
<head>
<title>@Anywhere</title>
<meta http-equiv="Content-Type" content="text/html; charset=UTF-8" />
<link href="styles.css" rel="stylesheet" type="text/css" />
<script src="http://platform.twitter.com/anywhere.js?id=APIKey&v=1" type="text/javascript"></script>
</head>
<body>
...
</body>
</html>

Replace APIKey with the Application’s API Key you got in the previous step. The parameter v=1 is the version. Perhaps in the future, Twitter will add new features and maybe new syntaxes. To prevent breaking the existing @Anywhere code, they will be preserving old code if specified. Version 1 supports every major browser, including IE6.

After including this JavaScript file, we can access the twttr object, which will invoke the anywhere() function with a parameter when @Anywhere is ready:

twttr.anywhere(function(twitter) {
	// Actions when @Anywhere is ready
});

The parameter (in this case twitter) is the object we will be using, similar to jQuery’s $.

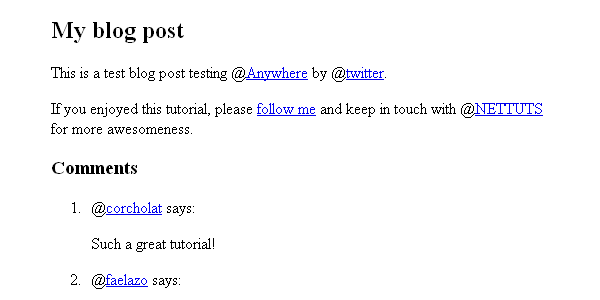
Next, we need to create an HTML base. Copy and paste the following code, and place it within the “body” tag.

<div id="main">
	<div class="post">
		<h2>My blog post</h2>
		<div class="content">
			<p>This is a test blog post testing @Anywhere by @twitter.</p>
			<p>If you enjoyed this tutorial, please <a href="http://twitter.com/faelazo" class="hovercard">follow me</a> and keep in touch with @NETTUTS for more awesomeness.</p>
		</div>
	</div>
	<div class="comments">
	<h3>Comments</h3>
	<ol>
		<li><span class="author">@corcholat</span> says:
			<p>Such a great tutorial! </p>
		</li>
		<li><span class="author">@faelazo</span> says:
			<p>You should also follow @smashingmag</p>
		</li>
	</ol>
	</div>
</div>

Now let’s dig in.


1. linkifyUsers: Convert @something into Links

@Anywhere lets us to convert @mentions into links. This functionality is called linkifyUsers, and is pretty straight-forward: it sets the HTML element you wish to convert to a link.

Since we want all the document’s @mentions to be converted into links, we just call the linkifyUsers() function in the body element:

twttr.anywhere(function(twitter) {
	twitter("body").linkifyUsers();
});
linkifyUsers result

As mentioned previously, the “twitter” parameter, inside the callback function, is much like jQuery’s “$” alias; f we want to convert @mentions into links, but only those within a certain section, we can use a CSS selector, as shown below.

twttr.anywhere(function(twitter) {
	twitter(".post").linkifyUsers();
});

linkifyUsers() accepts an object as a parameter, with two properties: className and success. With className, you can specify a class to be applied when the @mentions are found; so, for example, you could add an unsemantic ‘red’ class and specify in your CSS:

	.red { color:#f00; }

Here’s the code.

twttr.anywhere(function(twitter) {
	twitter("body").linkifyUsers({
		className:'red'
	});
});

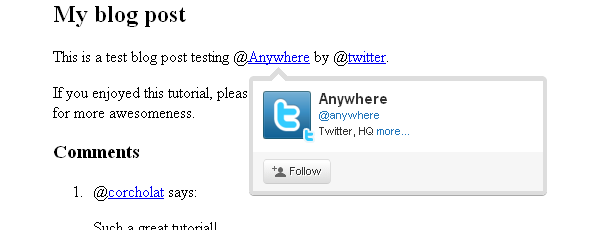
2. hovercards: Display Additional Information on Hover

hovercards() converts @mentions to links, but also loads a small pop-up tooltip on mouseover. Here’s a basic example of its usage.

twttr.anywhere(function(twitter) {
	twitter.hovercards();
});
hovercards result

However, hovercards() is flexible enough to include certain elements even if they don’t have a @mention in them. In the HTML, I’m linking “follow me” to http://twitter.com/faelazo; but @anywhere is smart enough to convert this link to a hovercard. By adding a class of “hovercard” to the anchor tag, Twitter will handle the rest!

twttr.anywhere(function(twitter) {
    // Find the @mentions and linkify as usual
    twitter("body").hovercards();

    // Let's find the elements which has a hovercard class
    twitter(".hovercard").hovercards({
        username: function(node){
            var twitter_regexp = /twitter\.com\/([a-z0-9_]*)\/?(.*)?/gi;
            if(node.href.match(twitter_regexp) && (twitter_match = twitter_regexp.exec(node.href))){
                return twitter_match[1];
            }
            return '';
        }
    });
});

The username parameter takes a function with a parameter that will be the object found (in this case node). Here’s what happens inside the function, line by line.

var twitter_regexp = /twitter\.com\/([a-z0-9_]*)/gi;

This is a regular expression. It will match a twitter.com/ string with alphanumeric values and an underscore.

if(node.href.match(twitter_regexp) && (twitter_match = twitter_regexp.exec(node.href))){

If the regexp matches the href property from the node element, then set the variable twitter_match to capture the values in an array.

return twitter_match[1];

It will return the match found.

We add a “return” just in case the element does have a class, but does not refer to twitter.com; so there will be no match. If it returns false or NULL, the script throws an error. With an empty string, it shows a hovercard but with no user found.

Now, if this is a bit too complicated, you can always simplify the process, and add the username as the title attribute of the anchor tag.

<a href="http://twitter.com/faelazo" class="hovercard" title="faelazo">follow me</a>

And just return the node’s title attribute. Much easier, right?

twitter(".hovercard").hovercards({
    username: function(node){
        return node.title;
    }
});

“hovercards” can be applied to any element (even a div), just as long as it specifies a username.

twitter("#main").hovercards({ username: function(){ return 'therrorcom'; }});

3. followButton: Invite to Follow with Just One Click

followButton() will append a button to follow the username parameter in the element previously specified.

The following code will append a button to follow Nettuts+ in the #main div.

twttr.anywhere(function(twitter) {
    twitter("#main").followButton("nettuts");
});
followButton result

followButton() expects one parameter: the username to follow. Simple enough, eh?


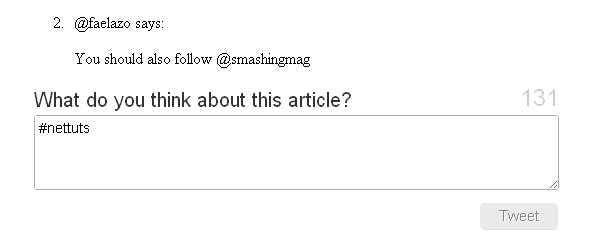
4. tweetBox: Tweets From your Site

tweetBox() will append a box in which the users can enter their comments and tweet them via your site.
tweetBox can receive an object as parameter, with the following properites:

  • counter (boolean, default true)
    Whether or not to show the counter for remaining characters.
  • height (integer, default 65)
    The height of the box, in pixels.
  • width (integer, default 515)
    The widht of the box, in pixels.
  • label (string, default “What’s happening?”)
    The text above the box.
  • defaultContent (string, default none)
    You can enter by default the URL, a @mention, a #hashtag, etc.
  • onTweet (function)
    It’s called after the tweet button is pressed. It receives two arguments: plain text tweet and HTML tweet.

A default tweetBox can be called after the element with the comments class with the following snippet.

twttr.anywhere(function(twitter) {
    twitter(".comments").tweetBox();
});

So if you want a custom label, content, and a callback when the tweet has been sent, use this code.

twitter(".comments").tweetBox({
    label: 'What do you think about this article?',
    defaultContent: '#nettuts ',
    onTweet: function(plain, html){
        // Actions when tweet is sent
    }
});
custom tweetBox result

onTweet might be useful if you are planning to replace the default comment area with the CMS you are using. You would still need a database and a table to show the comments, right? So you can hack the CMS a little and make a AJAX request with the onTweet event to insert the tweet into your database.


5. connect: Sign in a User to your Application

As you probably saw, the two last methods require confirmation to grant permission to the application. @Anywhere has a method to check if the user is logged in with the application (not on twitter). You can use conditionals to whether or not to show certain elements.

This snippet will append the connect button in the element with a comments class.

twttr.anywhere(function(twitter) {
	twitter(".comments").connectButton();
});
custom tweetBox result

If you need a button with a different size, you can pass an object literal with the property size and value small, medium, large or xlarge. Note that “medium” is the default value.

twttr.anywhere(function(twitter) {
	twitter(".comments").connectButton({ size: 'large' });
});

The Twitter object includes some extra goodies; one is currentUser, which is an object; the other is isConnected(), which is a function that returns a boolean. From here, we can create some conditional statements.

twttr.anywhere(function(twitter) {
	if(twitter.isConnected()){
		alert('Welcome, you are connected');
	} else {
		twitter(".comments").connectButton();
	}
});

If isConnected() returns true, we can show some user information, such as the username (screen_name), profile picture (profile_image_url), followers or following. Here’s a list for the information that the application can access. Let’s see the currentUser object in the final roundup.


6. Final Roundup: Mixing it All Together

I will be modifying the div with the comments class.

<div class="comments">
	<h3>Comments</h3>
	<ol>
		<li><span class="author">@corcholat</span> says:
			<p>Such a great tutorial! </p>
		</li>
		<li><span class="author">@faelazo</span> says:
			<p>You should also follow @smashingmag</p>
		</li>
	</ol>
	<div class="add">
		<h3>Add comment</h3>
		<div class="author"></div>
		<div class="box"></div>
	</div>
</div>

Now let’s include jQuery to make things a bit easier. Insert, between <head> and </head>, the following code:

<script src="http://ajax.googleapis.com/ajax/libs/jquery/1.4.2/jquery.min.js" type="text/javascript"></script>

Now we have a space to add comments. First, let’s use the isConnected() conditional to show a button if the user is not signed into our application; this button will be appended to the element with an "add" class.

if(twitter.isConnected()){
    twitter(".comments").connectButton();
}

Now let’s use Twitter’s currentUser object. This object can retrieve information with the data() method. So the following snippet will retrieve the user’s screen_name.

twitter.currentUser.data('screen_name');

@Anywhere lets us specify callback functions for the connectButton feature. As an argument, it accepts an object with two properties: authComplete and signOut; both are functions, so when signOut is invoked, we could refresh the page. The same holds true for authComplete. Let’s replace the connectButton() line with this snippet:

twitter(".comments > .add").connectButton({
    authComplete: function(user) {
        location.reload();
    },
    signOut: function() {
        location.reload();
    }
});

This is pretty straightfoward: we pass an object as the argument, then set both the signOut and authComplete functions to reload the page. Note that I’ve dropped the else clause for the isConnected() conditional in order to set the signOut event.

Next, let’s add a tweetBox inside the conditional.

if(twitter.isConnected()){
    $(".comments > .add > .author").html('<img src="'+ twitter.currentUser.data('profile_image_url') +'" /> <a href="http://twitter.com/'+ twitter.currentUser.data('screen_name') +'">'+ twitter.currentUser.data('screen_name') +'</a> | <a href="javascript:twttr.anywhere.signOut();">Sign out</a>');
    twitter(".comments > .add").tweetBox({
        label: 'What do you think about this article?',
        defaultContent: '#nettuts '
    });
}

If the user is logged in, a follow button should be there. Again, inside the conditional:

twitter(".comments > .add").followButton("nettuts");

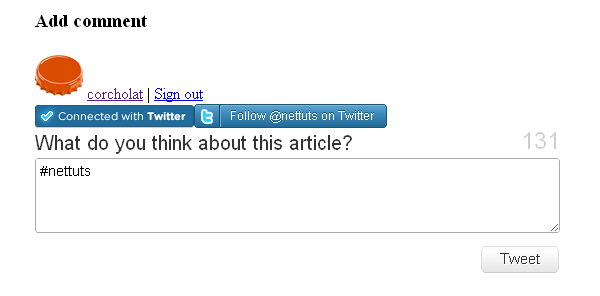
Here is the whole conditional, rounding up all of the @Anywhere features.

if(twitter.isConnected()){
    $(".comments > .add > .author").html('<img src="'+ twitter.currentUser.data('profile_image_url') +'" /> <a href="http://twitter.com/'+ twitter.currentUser.data('screen_name') +'">'+ twitter.currentUser.data('screen_name') +'</a> | <a href="javascript:twttr.anywhere.signOut();">Sign out</a>');
    twitter(".comments > .add").tweetBox({
        label: 'What do you think about this article?',
        defaultContent: '#nettuts '
    });
    twitter(".comments > .add").followButton("nettuts");
}
Final roundup

Conclusion

@Anywhere is obviously Twitter’s response to Facebook Connect. They’re hoping to bring this platform to as many sites on the web as possible; and while the service is still young, and the documentation could definitely be improved, it’s definitely promising! Please show us what you’ve done with @Anywhere in your own websites!

WordPress Theme Amendment

WordPress Theme Amendment
Hi there,

Please take a look at my website www.newtinnitustreatments.com.

I need some help amending the wordpress theme, for which I can provide the file:

1 I want to keep the same simple feel and colour scheme, but I want it to fill the whole screen (like this, for exmaple http://veoreport.com/).

2 I wish to retain the header and articles in the same position.

3. I wish it to stay as 2 columns, sizes as they are now.

4. It is very slow loading and cluttered with code – I would like it simplified to be fast loading.

5. I would like to be able to customize the heading fonts and colours, and paragraph fonts/text too.

Any questions, please just ask.

Best wishes,

Andrew

Fast Php Fix – Add Upload

Fast Php Fix – Add Upload
PROJECT IS OPEN AGAIN… Programmed couldn’t do it.

I have a PHP script at http://www.lawmarketingsystems.com/todo/index.php

I need someone to modify the script so there is a browst button, and the script will be able to upload a file, zip, pdf, etc.

Then make the todo list a hyperlink so that it can be downloaded when someone clicks on the task list.

Should be a very easy fix.

If you have a few minutes now and want to do this, I will award right away if you have the time and can work on now.

I’ll be here for a few hours and would like this completed today.
Also getting a small error message on cron job and just want to make sure that is working. Emails send, but output error.

Matt

Re-vamp Webstore

Re-vamp Webstore
Hello! We are a small wholesale company looking to revamp our current website / store. Basically, there are two components. The main page is a company info/informational page. Then there’s a tab on the side that says “online store” and it takes you to www.xxxxxxx.com/onlinestore, where you can buy our retail products online. There is a shopping cart already in place but we are looking for 2 bids: 1) to change and update the feel of both components, and 2)to redo the website entirely. Pricing is negotiable based on experience, portfolio, and ease of use. Please contact me for more information about the company. Thank you!

Develop Calculator

Develop Calculator
Hi all,
We need someone to develop Calculator.

1. The look and feel will be similar to the example image posted

2. The functionality will be similar to the example image posted

3. All calculations will be simple and we will provide detailed explanations.

4. need to ensure that this is NOT downloaded but stays on our site.

Would like this to have a license key to work.

Thanks

Joomla E-commerce Fix

Joomla E-commerce Fix

I need a programmer with experience in Joomla.

My website: http://www.diamondnailsupply.com/

These are the tasks:

1. Insert order status module. (No payment option set up yet)
2. Price options. Take a look at this link:

http://www.diamondnailsupply.com/en/online-store.html?page=shop.product_details&category_id=32&flypage=tpflypage.tpl&product_id=35

This product at 4oz is $4.99, 8oz $10, 16oz $20. I want the customer to be able to select the 4oz option, or 8oz, or 16oz. The module in place only let the customer select the 8oz or 16 oz. We also need to add the title of the product to that page.

3. Fix the “shop-online store” page.

http://www.diamondnailsupply.com/en/online-store.html

I want the empty space to the right to display featured products like in the home page.

4. Fix the category page.

http://www.diamondnailsupply.com/en/online-store.html?page=shop.browse&category_id=38

When the customer clicks on the product category, the list of items show up but the pictures are missing. I want the picture of each product to display at that empty white space.

This project shouldn’t take more than an hour. If you finish these 4 requirements, there are other small tasks to be done and i will pay you extra. Thank you.

Cre Loaded 6.15 – 1504 Unknown

Cre Loaded 6.15 – 1504 Unknown
Moved website to a new server – I believe the problem is related to the new server using MysQL5 and PHP 5.

1054 – Unknown column ‘p.products_id’ in ‘on clause’

select count(p.products_id) as total from products_description pd, products p left join manufacturers m on p.manufacturers_id = m.manufacturers_id, products_to_categories p2c left join specials s on p.products_id = s.products_id where p.products_status = ‘1’ and p.products_id = p2c.products_id and pd.products_id = p2c.products_id and pd.language_id = ‘1’ and p2c.categories_id = ’31’

Php Script Fix Add Upload

Php Script Fix Add Upload
I have a PHP script at http://www.lawmarketingsystems.com/todo/index.php

I need someone to modify the script so there is a browst button, and the script will be able to upload a file, zip, pdf, etc.

Then make the todo list a hyperlink so that it can be downloaded when someone clicks on the task list.

Should be a very easy fix.

If you have a few minutes now and want to do this, I will award right away if you have the time and can work on now.

I’ll be here for a few hours and would like this completed today.

Matt

Phpmydirectory New Search 2

Phpmydirectory New Search 2
Hi, I want to add some functionality to my existing PhpMyDirectoy (PHP) software. Basically, I want to add some more functionality to Search.

Specifically:

The Search needs to be adjusted to have three different input fields (two are already existing) to search the listings with different criteria, Keyword (quick search, is already existing but may need modification to find “titles”), a Catagory Search, here a dropdown of existing Catagories is in place at the moment.

Location filed is already existing but needs to adjusted to find the cities accurately (remapping).

When the user inputs in to the fileds we would like a suggestion function. When the first letters are entered valid searches (Keywords, Catagory or Location should be suggested).

The existing Search can be viewed under:

http://www.localwebpages.co.nz/directory

TERMS AND CONDITIONS
1) You should have experience with MyPhpDirectory (PHP) software.
2) DO NOT BID IF YO DO NOT SPEAK GOOD ENGLISH.
3) You will work on my servers, I will provide you usernames and passwords for everything.
4) Escrow Payment is released when work is 100% done to my satisfaction.

Thanks!

Tags: PHP, MySQL, PhpMyDirectoy

Php Ecommerce Finishing

Php Ecommerce Finishing
Hi all PHP developers,

we are urgently looking for PHP developer/gugu to help us with one e-commerce website. It is a pure PHP website which is nicely build and structured and we need someone to finish it very urgently.

Templates have been done, project management, news module and we need order process, payment integration and cart facility, again all templates are done and completed. Past programmer has fell ill and can not complete the work.

we use SVN with preview server set up so all is ready for you to work on.

How To Integrate Google Analytics Tracking Into Your Apps In 7 Minutes

How To Integrate Google Analytics Tracking Into Your Apps In 7 Minutes

Ok, maybe that title is +- 3 minutes depending on how efficient you are ;) .

What?

So, why would you want to integrate Google Analytics into your iPhone application.  Duh, for the same reasons you would integrate it into your site.  Google has extended their killer analytics platform to include mobile devices including the iPhone and Android devices.

The analytics API gives you some very powerful options to get as nitty gritty as you would like in your application tracking.

Why?

Uhh, because stats are freakin sweet.  Even if you don’t have a million+ downloads of your app, it is still interesting to know how your users are using your application.  Being able to track every single action made by a user is priceless when thinking about the direction of your app including what features to add, improve, or scrap.

Imaging spending all of your time on some complex feature to find out that only 1% of your users even care about that feature.  How could you know that only 1% of your users actually care about that feature unless you are doing some sort of tracking.

So before you add that super duper all in one end all be all 1337 feature to your app, consider reading the rest of this tutorial and add stat tracking first.  It is quick and painless and I promise that it will be totally worth it.

Configuring your Google Analytics Account

Google Analytics is a free server provided by Google.  If you dont already have an account, you can sign up for one with your existing Gmail account.  http://google.com/analytics. Sign up and log in.

The first thing you will want to do is Add a new Website Profile.

On the next page:

  • Select Add a Profile for a new domain
  • Enter in some URL – This doesn’t really matter since google doesn’t use it to identify your app.  A good convention is iphone.yoursite.com or appname.yoursite.com so that you know these stats are for your iPhone app.
  • Select your country and timezone
  • Click Finish

Pretty simple… On the next screen, make sure you copy the Web Property ID. This number (begins with UA) is what we will be using to uniquely identify your application.

That’s all for the web side of things!  Now on to the iPhone part.

Download the Google Analytics Library and Add It To Your Application

This could not be easier.  Head on Over to http://code.google.com/apis/analytics/docs/tracking/mobileAppsTracking.html . They explain much of the steps  so you could read the rest there, but I will lay them out in detail here with screesnhots.  Download the Analytics SDK for iPhone and extract it.

There are 2 files that are important.  Drag both files from the Library folder into your XCode project.  These files are GANTracker.h and libGoogleAnalytics.a.

When XCode pops up the confirmation box, make sure that you check the box that says “Copy items into destination group’s folder (if needed)”.  This will ensure that the code gets place in your project directory.

Include CFNetwork and Link Against the sqlite framework

The google analytics framework requires the use of CFNetwork (for interent connection detection) and the sqlite framework (most likely to store events when the user does not have internet).

Let’s start by adding CFNetwork to the project. Right click on the frameworks folder and select Add -> Existing Frameworks.  Next, select CFNetwork.framework from the list and click Add.

Now we need to link the project against libsqlite3.0.dylib.  To do this Click Project -> Edit Active Target “<project name>” where <project name> is the name of your XCode project.

Next, click the + button at the bottom to bring up the library picker. Select libsqlite3.0.dylib and click Add

Including and Initializing the Tracker

Since the Analytics tracker is a singleton class, we only have to initialize it once and the rest of the application can use the same instance.

Let’s start by opening up the app delegate and adding the code to import the Google Analytics framework.

#import "GANTracker.h"

Now you need to initialize the tracker… Make sure you have the UA number handy that you received from Google earlier.  Add the following code to you applicationDidFinishLaunching method.

[[GANTracker sharedTracker] startTrackerWithAccountID:@"UA-15609865-3"
				dispatchPeriod:10
				delegate:nil];

Make sure you replace my UA number with yours. The dispatchPeriod variable tells the tracker how often to report back to Google. Google suggests using 10 seconds in their example so we’ll stick to that.

Tracking Pageviews and Custom Events

Google gives you 2 different ways to track how your users use the application.  The first way is via pageviews.  Pageviews work just like they do in the browser as if the user navigated to a new page in your website.  Some examples of when to use pageview are when you have a tab interface or a flipside view controller.  I would not suggest using a pageview every time the user performs an action such as click a button.

The second way is via custom events.  These are really cool.  With custom events, you can easily see HOW your users are using your application.  Examples of events are button clicks, typing in a textbox, submitting high scores, etc…

We will see an example of implementing each of these methods and take a look at how they appear inside of the Google Analytics website.

Pageview method

Here is an example of a pageview when the user first launches the app.  Put this code inside of your applicationDidFinishLaunching method.

NSError *error;
if (![[GANTracker sharedTracker] trackPageview:@"/app_launched"
                                        withError:&amp;error]) {
     // Handle error here
   }

Note that the “app_launched” is essentially our page name similar to index.html or aboutus.php. You can add this code anywhere in you app that you want to add a page view. Make sure you include the GANTrack.h file and change the pagename for each new location.

Event method
Here is an example of an event that gets fired when the user presses a Save button.

- (IBAction) saveTheWorld:(id) sender
{
	NSError *error;
	if (![[GANTracker sharedTracker] trackEvent:@"button_click"
				             action:@"save_the_world"
					      label:@"my_label"
					      value:-1
					  withError:&amp;error]) {
		// Handle error here
	}
}

What’s really cool about event tracking is you have 3 levels of customization. You have the category, the action, and the label. How you organize it is up to you, but make sure the grouping makes sense. In the example above, I will use the category “button_click” every time a user clicks any button. The action will determine which button was clicked (in this case, it’s “save_the_world”). Finally, the label is just another level. I’d suggest using the UDID of the users device.

Now that we have implemented our code, let’s take a look inside of our Google Analytics account and see what the stats look like.

This is just some of our sample data from another app.  Notice the interface is exactly the same as it is when you are tracking website statistics.  It shows you unique visits as well as pageviews.  You get all of the advanced reporting too including time spent on each “page”.

Now we take a look at events.  To find the actions click Content -> Event Tracking inside of your Google Analytics Page.

In the above screenshot, we see tracking for an event called “clap”.  It shows us the number of times the users “clapped” within a given day.

Conclusion

One last thing I want to mention before concluding this tutorial. Google Analytics stats are 1 day behind.  What this means is, you won’t see your stats appear immediately.  So, before you comment here because you don’t see the stats appearing, please please please wait one day and check your stats again.  That is all :)

Be one of the cool kids, follow me on Twitter.

Happy iCoding