Skype Message Sender Php
I am looking for a php script to send automatic text messages to skype users in php.
So I just need a script that sends a text message to a skype account.
Freelance Projects, Design and Programming Tutorials
Skype Message Sender Php
I am looking for a php script to send automatic text messages to skype users in php.
So I just need a script that sends a text message to a skype account.
Graphical Website Template
I am looking for a one page graphically intensive mini site template. It needs to be ready to impletment, not a .jpg that I would need to slice up, but rather an html, css, or php template complete with very creative header, footer (with possible mirror reflection below) and rather nice background. The header, footer and background images will need to be supplied with all layers available, so I can make subtle changes down the road in photoshop.
This is a GPS / fishing related website. See my site at http://www.bestgpsspots.com and http://www.hotspotsfishingchip.com to get an overview of my product and a good idea of what I want to convey. Your extensive professional graphics talent and creativity will be needed on this project. Two examples of mini site templates that I like are at:
http://www.internetmarketinggonewild.com/ and also
http://www.24hourinternetbusiness.com/
These are very nice examples of professional graphics talent that I am looking for. Please do not bid on this project unless you know you have the talent to take on this project and turn it around in 2-4 days. Additional projects are possible after this one.
WordPress Squeezepage Job
Seeking a programmer, to install a squeezepage in wordpress similar to: http://www.itsallaboutbiz.com/squeeze/?page_id=3. I would like to turn my html squeezepage (www.viralmarketing2themax.com) to wordpress.com. I would like at the footer, to link to my salespage, and the second link would be to my disclaimer page. Copy and paste for the squeeze page, sales, and disclaimer will be provided. The site that I want to convert to this theme is: http://www.viralmarketing2themax.com/.
Please bid on this project.
Modify Scparedirector Php
Standalone cpa-redirector is a very small php script that washes the referrer before forwarding traffic out. The code is available here.
http://www.contentgeneration.org/cpa-redirector-2/
There are several versions of this software. I am interested in the Standalone versions, not the WP version.
This program washes the referrer info and passes traffic to a URL that is set as hard variable in the PHP code. I wish to have the code modified so that the forwarding URL is determined by passing a parameter through the incoming URL.
for example, with the current code: index.php?mn=1234 will wash and pass traffic to the URL set in the $cpa_offer_url variable
I wish to change it so that:
index.php?mn=1234&url=http://www.google.com will wash and pass traffic to google. Verify that the referrer washing effect works by sending traffic to http://www.whatismyreferrer.com.
I have attached 3 versions of this software. Please modify all three versions to work this way.
Openid Integration (re-post)
I need help integrating OpenID (http://openid.net/) with the existing users system on the existing website. You need to help me install and connect with (any working) OpenID class and perform common OpenID actions (register, login, etc.) using simple forms. Specifically, you need to help me integrate the part where the OpenID class sends form to OpenID provider and pickups returning POST form data so that I can process it. So, 1. integrate OpenID class, 2. submit form to OpenID provider, 3. read response. PHP/MySQL. If you have any questions, ask on PMB.
Fix Website Problems
Hello I have a small website that a previous coder/designer left us hanging with after being paid for the job he didn’t complete it like promised and has caused me and my clients a massive amount of problems by not completing the job as promised I really need someone who can start work right now and help me work out numerous small issues on the site and also maybe help me make a WORKING wysiwyg editor to edit the pages with because he gave us one that is so buggy it doesn’t even work like he promised… I don’t have a very big budget as this is for a non profit site. so please if someone out there has a kind heart and can do this for 20.00 and help me knock the few remaining problems out today that would be much appreciated…
I need someone who is good in php/mysql as well as graphic design as far as editing images and correcting image related issues like changing the text on a header for example or re making the header using the proper images if need be to correct the header text..
Oscommerce-addshipestimate/fix
This project has a few aspects to it:
#1
Add Freight Estimate without having to sign up as a Customer – the customer should only be required to enter a zip code on the shopping_cart.php page in a section called “Calculate Shipping” and click a button that says something like “Go” and then the negotiated rates from UPS should appear (using our settings in the UPS Shipping Module) for the Ground Shipping method – without having to click the checkout button or sign up as a customer. We can be flexible for how this actually works (let’s communicate on this if you have any ideas), but ideally, I would like this to work somewhat similar to how it does on www.academyfence.com.
#2
Fix the error processing credit card page (checkout_payment.php) so it provides more detail when there is a problem. See the attachment or, to replicate the issue, try to check out and enter the wrong exp date on the form. You will see that there is no msg to the customer that describes the problem. The only notification that they receive appears in the address window of the browser, but not on the webpage itself. Customers who enter their info incorrectly probably have no idea that the info is incorrect and they probably end up not completing the transaction.
#3
Fix the error w/the Product Specials – when we click on a Product Special it jumps to the Shop.php page instead of straight to the product we want. It should go straight to the Product we want – and this should continue to function this way after we change the Product Special to another product.
#4
Fix the 2 errors w/the State – When the customer goes to check out and clicks the “continue” button to become a new customer (create_account.php):
1. State needs to be a drop down box (not a free form field)
2. If they fill out the form and click the “continue” button everything is fine if they entered all the info correctly. But if they entered ANY wrong info (for example a Street Address that was too short) it informs them of the mistake that they need to correct – which is good – but the problem is that the State will now default back to “AL” even though they may have initially entered something else. If they do not catch that the State was changed to “AL” then that is how it is saved. So to fix this, if they make a mistake on the form and click “continue” it should not change the State to “AL”, but, rather, it should retain the State selection that they made initially.
Vbulletin Modifications 2
Hello,
We are looking to do some custom modifications to vBulletin 4.0.
Please reply with examples to vBulletin ‘Customization’ Jobs that you have worked on.
We will send the project description to chosen freelancers who express their interest and are eligible to be considered.
Please note that all canned responses will be ignored. We are not looking for anything other than vBulletin at the moment. So, please restrict your samples to vBulletin only.
Please post your detailed message on the message board. We are looking for serious freelancers who can deliver as promised.
We will have some ongoing customizations on vBulletin and will be awarded to the selected freelancer based on the quality of work done on the current project.
Best Regards.
Magento Tax Configuration
Hi,
We need to setup a custom tax extension for the US State of California, which calculates taxes based on city and county (NOT zip code).
1. California taxes will be calculated by a custom extension that you will build, that works as follows:
a. If a user selects “California” as state for SHIPPING address, then a new drop down will appear that says, “County.” Based on that selection, taxes will be calculated for that order based on spreadsheet data imported.
b. There will be a backend Magento tool that client can upload a CSV file that contains the latest tax information. That file is attached, and includes a column for county and for tax rate.
Fix WordPress Site For Plugin
Hello,
Please bid to fix the inner page WordPress template of http://tinyurl.com/yflybg6 to work with the WPML plugin.
English about us (template works perfectly but now menu links have extra //)
Non-English versions of about us (all of which have defects):
-German: http://tinyurl.com/yzvzq72
-Spanish: http://tinyurl.com/yfxqtkc
-Japanese: http://tinyurl.com/ylsnuck
-Mandarin Simplified (Chinese): http://tinyurl.com/yjjo84s
Thanks
Add Products To Magento
Hello I need a data entry person who knows how to add products to magento. i cant be teaching you unless if you are in Chennai (India).
I have around 400 items to be added.
you work will be to upload images and categorize the products in the right place. each product will take maybe 2mins.
let me know if you can do it and past experience will be a BIG PLUS.
Thank you.
Regards
Sha
Payment Processor
payment processor with all the features of Alertpay but with the following extra features:
1. ability to convert amount in account to any of the following currrencies:
Naira.
Cedis
Cefars
Rand
Euro
Dollars
Swiss Franc
Yen
Pounds
2. opportunity for merchants to signup and sell units of the e-currency in their country.
3. automatic logout from account within 10mins of inactivity.
4. photo andutility bill validation on accounts – like in Alertpay
5. directory of sites accepting the e-currency
6. IP login check like in Liberty reserve with verification code systems.
7. Transaction code to complete sending out of funds from individuals account.
8.opportunity to open individual and business account like in ALertpay.
9. opportunity to exchange the e-currency to/from the following payment solutions:
Liberty reserve.
Perfect Money
ALertpay
C-gold
Pecunix
10. Email alerts on all transactions.
I Need A Reliable Programmer
I have a couple ads posted on here, and people keep starting and have to quit because they don’t know what they are doing…
I need a e-commerce design and setup with some custom php programming to do a multi-search. (Brand: Model: Model Number: (image pop up when they hover over the model number): Search
And I need about 600 images uploaded to a site; the images to be placed in the pages; all images to be linked to it’s own page; and a product page coded in HTML and have the product information added for all products…
If you are RELIABLE and can do the job RIGHT, then please give me a bid in the PMB with prices for both jobs – and a link to 5-10 of your best work… Do not send me a pre-written message; be a little creative and write something original so I know that I can actually SPEAK to someone and not a auto message.
I would prefer if you are in the USA so I can call you.
Mobile Webportal
Mobile website where you register with your phone number and will able to upload picture to profile, ability to add, edit and delete contacts as well as post your personal profile slogan.
1. Mail:Connect and Access 9jamail on your fone.
2. Fun & Utilities: directory containing games, ringtones,wallpapers,themes e.t.c
3. Chat: able to enter chat room and chat with the entire room or with one of the members in the room. ability to create private rooms and invite members to the room.also opportunity to do conference chat with several members of a room that are online.
Mobile website built to allow inserting of adverts from PPC search engines and customly created ads by me. fully functional CMS administrative panel.
How to Use the jQuery UI Autocomplete Widget
In this tutorial we’ll be looking at one of jQuery UI 1.8’s newest components – the Autocomplete widget. Auto-completing text fields can be a popular choice with visitors to your site because they make entering information much easier. They can be used on product search fields for example, or when a visitor must enter a country, or a city, or anything else that may be a choice from a common dataset. As well as being popular with visitors, the jQuery UI Autocomplete is popular with developers because it’s easy to use, powerful and flexible.
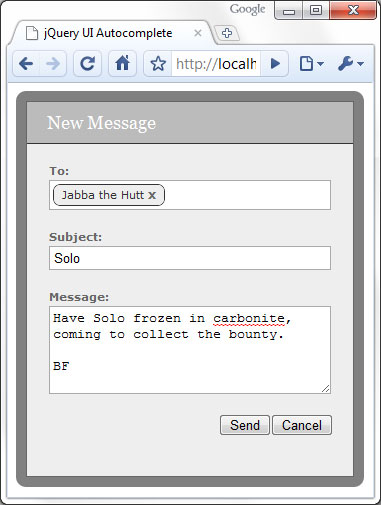
I’m not a massive fan of Facebook, I much prefer Twitter (@danwellman btw), but one Facebook feature I do like is the messaging feature which lets you send a message to a friend or friends. I like how the autocomplete is used to make selecting your friend’s names easier, and how the names are formatted once they have been selected and added to the ‘to’ field, e.g. they each have a close link in them that allows the name to be easily removed without having to select any text.
In this tutorial we’ll use the jQuery UI Autocomplete widget to replicate this aspect of Facebook’s messaging system. We won’t be looking at actually sending messages however. This is what we’re going to create:
We’ll need to build a custom download of jQuery UI containing just the components we need; head over to the download builder at http://jqueryui.com/download. We’ll need to use the following core components:
We’ll also need the Autocomplete widget itself so ensure that just the above items, as well as Autocomplete, are checked in the Components section at the left. Use the default theme (UI Lightness) and ensure that version 1.8 is selected at the right.
Once downloaded, create a new folder on your computer and call it autocomplete. Then open the archive and copy the css and js folders into the new folder you just created. This will give you all of the library files required for this example including jQuery itself, so this doesn’t need to be downloaded separately.
Let’s look at the HTML for the <form> first of all:
<div id="formWrap">
	<form id="messageForm" action="#">
		<fieldset>
			<legend>New message form</legend>
			<span>New Message</span>
			<label id="toLabel">To:</label>
			<div id="friends" class="ui-helper-clearfix">
				<input id="to" type="text">
			</div>
			<label>Subject:</label>
			<input id="subject" name="subject" type="text">
			<label>Message:</label>
			<textarea id="message" name="message" rows="5" cols="50"></textarea>
			<button type="button" id="cancel">Cancel</button>
			<button type="submit" id="send">Send</button>
		</fieldset>
	</form>
</div>
It’s a pretty standard form; there’s an outer container <div> we can use for styling and the <input> that the Autocomplete will be attached to is also within a <div> element; we’ll style the <input> so that it’s slightly hidden, and we’ll style the <div> so that it looks like the other fields in the form. We give the container for the <input> the ui-helper-clearfix class name to make use of this utility class from jQuery UI’s CSS framework.
We’ll also need to link to the files we unpacked from the jQuery UI archive, as well as a custom stylesheet; the following files should go into the <head> of the page:
<link rel="stylesheet" type="text/css" href="css/ui-lightness/jquery-ui-1.8.custom.css">
<link rel="stylesheet" type="text/css" href="css/autocomplete.css">
The following files should go at the end of the <body>:
<script type="text/javascript" src="js/jquery-1.4.2.min.js"></script>
<script type="text/javascript" src="js/jquery-ui-1.8.custom.min.js"></script>
We use a very simple, neutral theme in this example, most of which is purely as an example. Very few of the styles are required and most can be changed if necessary. The following CSS is used in the autocomplete.css style sheet (all of the jQuery UI styling is in the jquery-ui-1.8.custom.css style sheet):
#formWrap {
	padding:10px; position:absolute; float:left; background-color:#000;
	background:rgba(0,0,0,.5); -moz-border-radius:10px;
	-webkit-border-radius:10px; border-radius:10px;
}
#messageForm {
 width:326px; border:1px solid #666; background-color:#eee;
}
#messageForm fieldset {
	padding:0; margin:0; position:relative; border:none;
	background-color:#eee;
}
#messageForm legend { visibility:hidden; height:0; }
#messageForm span {
	display:block; width:326px; padding:10px 0; margin:0 0 20px;
	text-indent:20px; background-color:#bbb;
	border-bottom:1px solid #333;	font:18px Georgia, Serif; color:#fff;
}
#friends {
	width:274px; padding:3px 3px 0; margin:0 auto;
	border:1px solid #aaa; background-color:#fff; cursor:text;
}
#messageForm #to {
	width:30px; margin:0 0 2px 0; padding:0 0 3px;
	position:relative; top:0; float:left; border:none;
}
#messageForm input, #messageForm textarea {
	display:block; width:274px; padding:3px; margin:0 auto 20px;
	border:1px solid #aaa;
}
#messageForm label {
	display:block; margin:20px 0 3px; text-indent:22px;
	font:bold 11px Verdana, Sans-serif;	color:#666;
}
#messageForm #toLabel { margin-top:0; }
#messageForm button { float:right; margin:0 0 20px 0; }
#messageForm #cancel { margin-right:20px; }
#friends span {
	display:block; margin:0 3px 3px 0; padding:3px 20px 4px 8px;
	position:relative; float:left; background-color:#eee;
	border:1px solid #333; -moz-border-radius:7px;
	-webkit-border-radius:7px; border-radius:7px; color:#333;
	font:normal 11px Verdana, Sans-serif;
}
#friends span a {
	position:absolute; right:8px; top:2px; color:#666;
	font:bold 12px Verdana, Sans-serif; text-decoration:none;
}
#friends span a:hover { color:#ff0000; }
.ui-menu .ui-menu-item { white-space:nowrap; padding:0 10px 0 0; }
To give the form a nice transparent border with rounded corners we use the CSS3 RGBa rule and the -moz-border-radius, -webkit-border-radius and border-radius rules; most popular browsers now support these rules, including Firefox, Safari, Chrome and Opera. IE doesn’t support either of them, and although it can use a filter to implement rudimentary opacity, rounded corners would need to be supported through the use of images. The effectiveness of the RGBa transparency isn’t shown to its fullest in this example; but this type of form would probably be used as a floating modal overlay in a full implementation, which would sit above actual content on the page.
The container <div> around the <input> field that the Autocomplete text field will be attached to is given the same positioning and styling as the <input> elements, but the <input> within this container has its border removed so that it is hidden. We also reduce its width and float it to the left. This is so that when we add the formatted recipients to the <div> the <input> won’t overflow and increase the height of the <div> unnecessarily.
We also style the recipients, which will be added to the <div> as <span> elements containing a link. Mostly these are styled to match the basic theme and are also given rounded corners. It’s important that these elements are made block-level and also float so that they stack up correctly. We also need to override some of the Automcomplete styling provided by the jQuery UI theme we are using; the last selector simply prevents the individual suggestions in the menu breaking between words, which happens because we have made the <input> it is associated with so small.
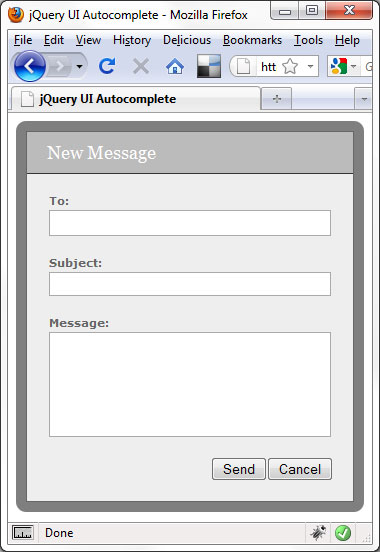
At this stage, the form should appear like this:
Next we need to attach the Autocomplete widget to the <input> within the <div>; to do this we can use the following script:
<script type="text/javascript">
	$(function(){

		//attach autocomplete
		$("#to").autocomplete({

			//define callback to format results
			source: function(req, add){

				//pass request to server
				$.getJSON("friends.php?callback=?", req, function(data) {

					//create array for response objects
					var suggestions = [];

					//process response
					$.each(data, function(i, val){
					suggestions.push(val.name);
				});

				//pass array to callback
				add(suggestions);
			});
		},

		//define select handler
		select: function(e, ui) {

			//create formatted friend
			var friend = ui.item.value,
				span = $("<span>").text(friend),
				a = $("<a>").addClass("remove").attr({
					href: "javascript:",
					title: "Remove " + friend
				}).text("x").appendTo(span);

				//add friend to friend div
				span.insertBefore("#to");
			},

			//define select handler
			change: function() {

				//prevent 'to' field being updated and correct position
				$("#to").val("").css("top", 2);
			}
		});
	});
</script>
The widget is attached to the <input> using the autocomplete() method. We supply an object literal as an argument to the method, which configures the source option and the select and change event callbacks.
The source option is used to tell the widget where to get the suggestions for the Autocomplete menu from. We use a function as the value of this option, which accepts two arguments; the first is the term entered into the <input>, the second is a callback function which is used to pass the suggestions back to the widget.
Within this function we use jQuery’s getJSON() method to pass the term to a server-side PHP file. The PHP file will use the term to extract matching contact names from a MySql database. We use a JSONP callback to process the data returned from the server; the callback function that is passed as the second argument to the source option expects to receive the data in an array, so we first create an empty array and then use jQuery’s each() method to process each item in the JSON array returned by the server. We simply iterate over each item in this array, and add each suggestion to our new array. Once our new array is built we pass it to the callback function for the widget to display in the menu.
We then define a handler for the Autocomplete’s custom select event; this function will be executed by the widget each time a suggestion is selected from the Autocomplete menu. This function is automatically passed two arguments – the event object and a ui object containing the suggestion that was selected. We use this function to format the recipient name and add it to the <div>. We simply create a <span> element to hold the text and an anchor element that can be used to remove the recipient. Once the formatted recipient has been created we just insert it directly before the camouflaged <input>.
Lastly we add a handler for the change event; this function will be invoked whenever the value of the <input> that the Autocomplete is associated with changes. We just use it to remove the value from the <input> because we’ve already added the formatted version to our container <div>. The carat looks a little high up once a formatted contact name has been added to the <div> so we also use this event handler to correct this.
This is all the configuration we need for this particular implementation, but there are still a couple of additional functions we need to add to tidy things up a little. After the autocomplete() method add the following code:
//add click handler to friends div
$("#friends").click(function(){

	//focus 'to' field
	$("#to").focus();
});

//add live handler for clicks on remove links
$(".remove", document.getElementById("friends")).live("click", function(){

	//remove current friend
	$(this).parent().remove();

	//correct 'to' field position
	if($("#friends span").length === 0) {
		$("#to").css("top", 0);
	}
});
The <input> that our Autocomplete is attached to is partially hidden and its container <div> is styled so that it appears like the other fields on the form; to complete the deception, we add a click handler to the container <div> so that clicking anywhere within it focuses the actual <input>. Visually and functionally now the <div> should be indistinguishable from a regular field.
We also need to handle clicks on the anchor that is added to each formatted recipient; we use jQuery’s live() method because these elements may or may not exist on the page at any given time and it is easier than binding the handler function each time we create one of these anchors. Whenever one of these anchors is clicked all we do is navigate up to the parent of the anchor that was clicked and then remove it from the page. Remember when we corrected the position of the carat earlier in the script? We just need to check whether all the recipients have been removed and if so, reset its position back to its default.
I used a MySql database containing a table listing each of the recipient names, and the following PHP file to accept the data sent by the getJSON() method and pull matching recipients from the database:
<?php

	//connection information
	$host = "localhost";
	$user = "root";
	$password = "your_mysql_password_here";
	$database = "test";
	$param = $_GET["term"];

	//make connection
	$server = mysql_connect($host, $user, $password);
	$connection = mysql_select_db($database, $server);

	//query the database
	$query = mysql_query("SELECT * FROM friends WHERE name REGEXP '^$param'");

	//build array of results
	for ($x = 0, $numrows = mysql_num_rows($query); $x  $row["name"]);
	}

	//echo JSON to page
	$response = $_GET["callback"] . "(" . json_encode($friends) . ")";
	echo $response;

	mysql_close($server);

?>
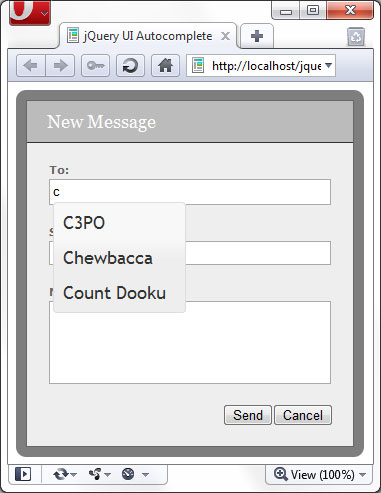
To run the downloadable example files, you’ll need a development web server with PHP installed and configured, as well as MySql and the appropriate database and table. When a letter is typed into the ‘to’ field, this letter is passed to the server and used to pull out each name that begins with the letter that was typed. The matching names are then passed back to the page as JSON and displayed in the suggestion menu:
This tutorial showed how to replicate Facebook’s message sending form, specifically, the way friends are added to the messaging form as recipients using an Autocomplete, and how the friend names are formatted once they have been added so that they can easily be removed. Our example form doesn’t actually do anything, but what we would need to do to actually send the form would be to pass the contents of the form to a server-side file for sending using AJAX, which could easily be hooked into the submit event of the send button used on the form.
The recipients would need to have some kind of meaning to back-end system of course, and would probably be mapped to email addresses in the database. We’d need to retrieve the textual content of each of the <span> elements before passing back to the server, although this would be a fairly trivial matter.
The jQuery UI Autocomplete widget makes it easy to connect to any datasource and contains a rich suite of event handlers that we can supply functions to in order to react to text being entered into the associated field, or a suggestion being selected from the menu. The widget is styled using jQuery UI’s extensive CSS framework and can easily be changed so that it matches your existing site theme. All in all, it’s an excellent widget that is easy to use and provides great functionality.