How to Use the jQuery UI Autocomplete Widget
In this tutorial we’ll be looking at one of jQuery UI 1.8’s newest components – the Autocomplete widget. Auto-completing text fields can be a popular choice with visitors to your site because they make entering information much easier. They can be used on product search fields for example, or when a visitor must enter a country, or a city, or anything else that may be a choice from a common dataset. As well as being popular with visitors, the jQuery UI Autocomplete is popular with developers because it’s easy to use, powerful and flexible.
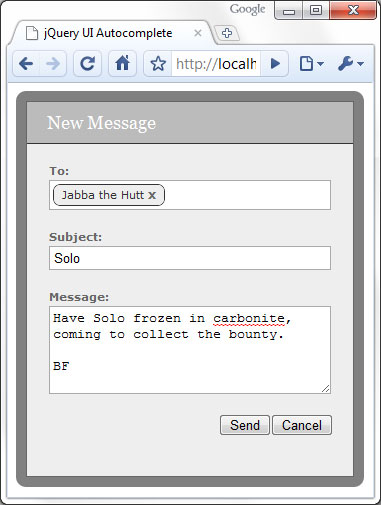
I’m not a massive fan of Facebook, I much prefer Twitter (@danwellman btw), but one Facebook feature I do like is the messaging feature which lets you send a message to a friend or friends. I like how the autocomplete is used to make selecting your friend’s names easier, and how the names are formatted once they have been selected and added to the ‘to’ field, e.g. they each have a close link in them that allows the name to be easily removed without having to select any text.
In this tutorial we’ll use the jQuery UI Autocomplete widget to replicate this aspect of Facebook’s messaging system. We won’t be looking at actually sending messages however. This is what we’re going to create:
Step 1 Getting Started
We’ll need to build a custom download of jQuery UI containing just the components we need; head over to the download builder at http://jqueryui.com/download. We’ll need to use the following core components:
- Core
- Widget
- Position
We’ll also need the Autocomplete widget itself so ensure that just the above items, as well as Autocomplete, are checked in the Components section at the left. Use the default theme (UI Lightness) and ensure that version 1.8 is selected at the right.
Once downloaded, create a new folder on your computer and call it autocomplete. Then open the archive and copy the css and js folders into the new folder you just created. This will give you all of the library files required for this example including jQuery itself, so this doesn’t need to be downloaded separately.
Step 2 The Underlying HTML
Let’s look at the HTML for the <form> first of all:
<div id="formWrap">
	<form id="messageForm" action="#">
		<fieldset>
			<legend>New message form</legend>
			<span>New Message</span>
			<label id="toLabel">To:</label>
			<div id="friends" class="ui-helper-clearfix">
				<input id="to" type="text">
			</div>
			<label>Subject:</label>
			<input id="subject" name="subject" type="text">
			<label>Message:</label>
			<textarea id="message" name="message" rows="5" cols="50"></textarea>
			<button type="button" id="cancel">Cancel</button>
			<button type="submit" id="send">Send</button>
		</fieldset>
	</form>
</div>
It’s a pretty standard form; there’s an outer container <div> we can use for styling and the <input> that the Autocomplete will be attached to is also within a <div> element; we’ll style the <input> so that it’s slightly hidden, and we’ll style the <div> so that it looks like the other fields in the form. We give the container for the <input> the ui-helper-clearfix class name to make use of this utility class from jQuery UI’s CSS framework.
We’ll also need to link to the files we unpacked from the jQuery UI archive, as well as a custom stylesheet; the following files should go into the <head> of the page:
<link rel="stylesheet" type="text/css" href="css/ui-lightness/jquery-ui-1.8.custom.css">
<link rel="stylesheet" type="text/css" href="css/autocomplete.css">
The following files should go at the end of the <body>:
<script type="text/javascript" src="js/jquery-1.4.2.min.js"></script>
<script type="text/javascript" src="js/jquery-ui-1.8.custom.min.js"></script>
Step 3 Styling the Form
We use a very simple, neutral theme in this example, most of which is purely as an example. Very few of the styles are required and most can be changed if necessary. The following CSS is used in the autocomplete.css style sheet (all of the jQuery UI styling is in the jquery-ui-1.8.custom.css style sheet):
#formWrap {
	padding:10px; position:absolute; float:left; background-color:#000;
	background:rgba(0,0,0,.5); -moz-border-radius:10px;
	-webkit-border-radius:10px; border-radius:10px;
}
#messageForm {
 width:326px; border:1px solid #666; background-color:#eee;
}
#messageForm fieldset {
	padding:0; margin:0; position:relative; border:none;
	background-color:#eee;
}
#messageForm legend { visibility:hidden; height:0; }
#messageForm span {
	display:block; width:326px; padding:10px 0; margin:0 0 20px;
	text-indent:20px; background-color:#bbb;
	border-bottom:1px solid #333;	font:18px Georgia, Serif; color:#fff;
}
#friends {
	width:274px; padding:3px 3px 0; margin:0 auto;
	border:1px solid #aaa; background-color:#fff; cursor:text;
}
#messageForm #to {
	width:30px; margin:0 0 2px 0; padding:0 0 3px;
	position:relative; top:0; float:left; border:none;
}
#messageForm input, #messageForm textarea {
	display:block; width:274px; padding:3px; margin:0 auto 20px;
	border:1px solid #aaa;
}
#messageForm label {
	display:block; margin:20px 0 3px; text-indent:22px;
	font:bold 11px Verdana, Sans-serif;	color:#666;
}
#messageForm #toLabel { margin-top:0; }
#messageForm button { float:right; margin:0 0 20px 0; }
#messageForm #cancel { margin-right:20px; }
#friends span {
	display:block; margin:0 3px 3px 0; padding:3px 20px 4px 8px;
	position:relative; float:left; background-color:#eee;
	border:1px solid #333; -moz-border-radius:7px;
	-webkit-border-radius:7px; border-radius:7px; color:#333;
	font:normal 11px Verdana, Sans-serif;
}
#friends span a {
	position:absolute; right:8px; top:2px; color:#666;
	font:bold 12px Verdana, Sans-serif; text-decoration:none;
}
#friends span a:hover { color:#ff0000; }
.ui-menu .ui-menu-item { white-space:nowrap; padding:0 10px 0 0; }
To give the form a nice transparent border with rounded corners we use the CSS3 RGBa rule and the -moz-border-radius, -webkit-border-radius and border-radius rules; most popular browsers now support these rules, including Firefox, Safari, Chrome and Opera. IE doesn’t support either of them, and although it can use a filter to implement rudimentary opacity, rounded corners would need to be supported through the use of images. The effectiveness of the RGBa transparency isn’t shown to its fullest in this example; but this type of form would probably be used as a floating modal overlay in a full implementation, which would sit above actual content on the page.
The container <div> around the <input> field that the Autocomplete text field will be attached to is given the same positioning and styling as the <input> elements, but the <input> within this container has its border removed so that it is hidden. We also reduce its width and float it to the left. This is so that when we add the formatted recipients to the <div> the <input> won’t overflow and increase the height of the <div> unnecessarily.
We also style the recipients, which will be added to the <div> as <span> elements containing a link. Mostly these are styled to match the basic theme and are also given rounded corners. It’s important that these elements are made block-level and also float so that they stack up correctly. We also need to override some of the Automcomplete styling provided by the jQuery UI theme we are using; the last selector simply prevents the individual suggestions in the menu breaking between words, which happens because we have made the <input> it is associated with so small.
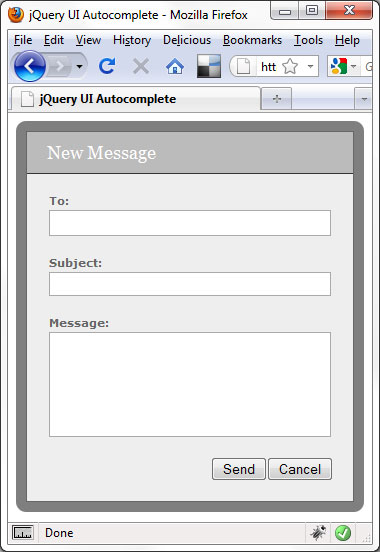
At this stage, the form should appear like this:
Step 4 Attaching the Autocomplete
Next we need to attach the Autocomplete widget to the <input> within the <div>; to do this we can use the following script:
<script type="text/javascript">
	$(function(){

		//attach autocomplete
		$("#to").autocomplete({

			//define callback to format results
			source: function(req, add){

				//pass request to server
				$.getJSON("friends.php?callback=?", req, function(data) {

					//create array for response objects
					var suggestions = [];

					//process response
					$.each(data, function(i, val){
					suggestions.push(val.name);
				});

				//pass array to callback
				add(suggestions);
			});
		},

		//define select handler
		select: function(e, ui) {

			//create formatted friend
			var friend = ui.item.value,
				span = $("<span>").text(friend),
				a = $("<a>").addClass("remove").attr({
					href: "javascript:",
					title: "Remove " + friend
				}).text("x").appendTo(span);

				//add friend to friend div
				span.insertBefore("#to");
			},

			//define select handler
			change: function() {

				//prevent 'to' field being updated and correct position
				$("#to").val("").css("top", 2);
			}
		});
	});
</script>
The widget is attached to the <input> using the autocomplete() method. We supply an object literal as an argument to the method, which configures the source option and the select and change event callbacks.
The source option is used to tell the widget where to get the suggestions for the Autocomplete menu from. We use a function as the value of this option, which accepts two arguments; the first is the term entered into the <input>, the second is a callback function which is used to pass the suggestions back to the widget.
Within this function we use jQuery’s getJSON() method to pass the term to a server-side PHP file. The PHP file will use the term to extract matching contact names from a MySql database. We use a JSONP callback to process the data returned from the server; the callback function that is passed as the second argument to the source option expects to receive the data in an array, so we first create an empty array and then use jQuery’s each() method to process each item in the JSON array returned by the server. We simply iterate over each item in this array, and add each suggestion to our new array. Once our new array is built we pass it to the callback function for the widget to display in the menu.
We then define a handler for the Autocomplete’s custom select event; this function will be executed by the widget each time a suggestion is selected from the Autocomplete menu. This function is automatically passed two arguments – the event object and a ui object containing the suggestion that was selected. We use this function to format the recipient name and add it to the <div>. We simply create a <span> element to hold the text and an anchor element that can be used to remove the recipient. Once the formatted recipient has been created we just insert it directly before the camouflaged <input>.
Lastly we add a handler for the change event; this function will be invoked whenever the value of the <input> that the Autocomplete is associated with changes. We just use it to remove the value from the <input> because we’ve already added the formatted version to our container <div>. The carat looks a little high up once a formatted contact name has been added to the <div> so we also use this event handler to correct this.
This is all the configuration we need for this particular implementation, but there are still a couple of additional functions we need to add to tidy things up a little. After the autocomplete() method add the following code:
//add click handler to friends div
$("#friends").click(function(){

	//focus 'to' field
	$("#to").focus();
});

//add live handler for clicks on remove links
$(".remove", document.getElementById("friends")).live("click", function(){

	//remove current friend
	$(this).parent().remove();

	//correct 'to' field position
	if($("#friends span").length === 0) {
		$("#to").css("top", 0);
	}
});
The <input> that our Autocomplete is attached to is partially hidden and its container <div> is styled so that it appears like the other fields on the form; to complete the deception, we add a click handler to the container <div> so that clicking anywhere within it focuses the actual <input>. Visually and functionally now the <div> should be indistinguishable from a regular field.
We also need to handle clicks on the anchor that is added to each formatted recipient; we use jQuery’s live() method because these elements may or may not exist on the page at any given time and it is easier than binding the handler function each time we create one of these anchors. Whenever one of these anchors is clicked all we do is navigate up to the parent of the anchor that was clicked and then remove it from the page. Remember when we corrected the position of the carat earlier in the script? We just need to check whether all the recipients have been removed and if so, reset its position back to its default.
Step 5 Additional Code and Resources
I used a MySql database containing a table listing each of the recipient names, and the following PHP file to accept the data sent by the getJSON() method and pull matching recipients from the database:
<?php

	//connection information
	$host = "localhost";
	$user = "root";
	$password = "your_mysql_password_here";
	$database = "test";
	$param = $_GET["term"];

	//make connection
	$server = mysql_connect($host, $user, $password);
	$connection = mysql_select_db($database, $server);

	//query the database
	$query = mysql_query("SELECT * FROM friends WHERE name REGEXP '^$param'");

	//build array of results
	for ($x = 0, $numrows = mysql_num_rows($query); $x  $row["name"]);
	}

	//echo JSON to page
	$response = $_GET["callback"] . "(" . json_encode($friends) . ")";
	echo $response;

	mysql_close($server);

?>
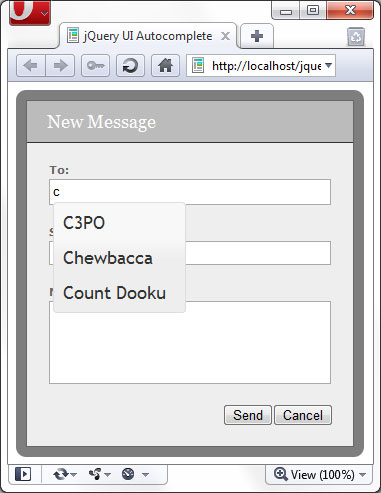
To run the downloadable example files, you’ll need a development web server with PHP installed and configured, as well as MySql and the appropriate database and table. When a letter is typed into the ‘to’ field, this letter is passed to the server and used to pull out each name that begins with the letter that was typed. The matching names are then passed back to the page as JSON and displayed in the suggestion menu:
This tutorial showed how to replicate Facebook’s message sending form, specifically, the way friends are added to the messaging form as recipients using an Autocomplete, and how the friend names are formatted once they have been added so that they can easily be removed. Our example form doesn’t actually do anything, but what we would need to do to actually send the form would be to pass the contents of the form to a server-side file for sending using AJAX, which could easily be hooked into the submit event of the send button used on the form.
The recipients would need to have some kind of meaning to back-end system of course, and would probably be mapped to email addresses in the database. We’d need to retrieve the textual content of each of the <span> elements before passing back to the server, although this would be a fairly trivial matter.
The jQuery UI Autocomplete widget makes it easy to connect to any datasource and contains a rich suite of event handlers that we can supply functions to in order to react to text being entered into the associated field, or a suggestion being selected from the menu. The widget is styled using jQuery UI’s extensive CSS framework and can easily be changed so that it matches your existing site theme. All in all, it’s an excellent widget that is easy to use and provides great functionality.