Enhance Your Flash Layouts with Draggable Windows

In this tutorial you’ll learn how to create draggable windows using Flash and AS3. I’ll cover the basics of drag&drop, window bounds, adding content, and how to minimize the window.


Final Result Preview

Let’s take a look at the final result we will be working towards:


Step 1: Create a New File

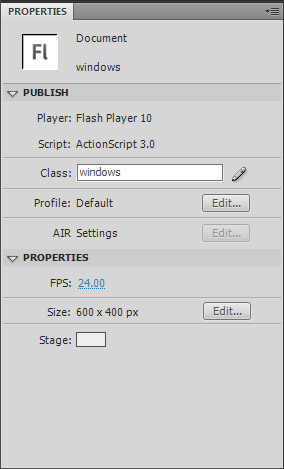
Okey, let’s gooo! Create a new document by hitting CTRL+N and selecting Flash File (ActionScript 3). Set the stage size to 600×400 px and the background color to #EEE. In the Properties window, set the class to windows and save your file as windows.fla.

Step 2: Design the windowArea

Select the Rectangle Tool (R) and draw a rectangle with 280×90 px. Select your shape, go to the Color palette (Window > Color) and create a gradient from #FFF to #CCC.

Hit F for the Gradient Tool, select your gradient, rotate it 90 degrees (by holding the Shift button while you rotate) and shorten it so it adapts the rectangle.

Select all the shape, hit F8 to Convert to Symbol, name it windowArea and set the registration point to the top left.
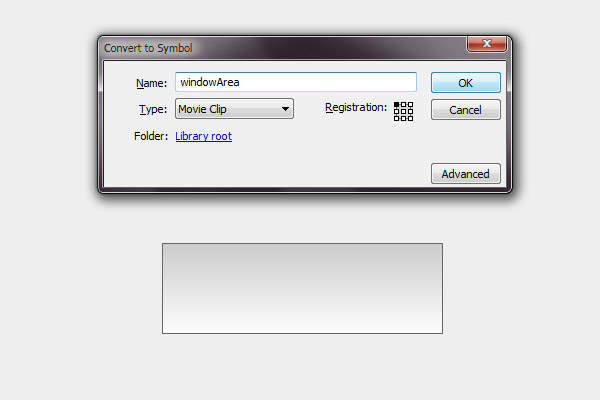
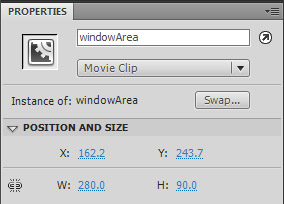
Select the symbol and in the Properties window set the instance name to windowArea.

For the border, use the Glow filter, with a 2px blur, strength 500%, color #666666. I used a glow because if you use a stroke, when you resize the Window the stroke will also resize.

Step 3: Design the windowBar Button

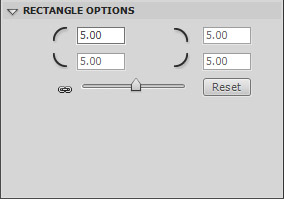
Select the Rectangle Tool (R) again and draw a rectangle with 280×22 px and a 1px stroke with the color #666. Create another rectangle on top of this, but this time in the Rectangle Options set the Rectangle corner radius to 5.
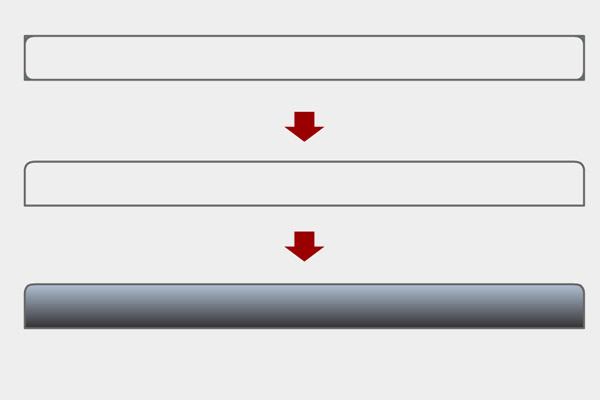
Now, eliminate the necessary corners like on the image below.

Then, paint your shape, select it, go to the Color palette (Window > Color) and create a gradient from #999 to #333. Rotate the gradient 90 degrees, like we did on the previous step.
Select the all shape, hit F8. Name: windowBar; Type: Button; Registration: top left.
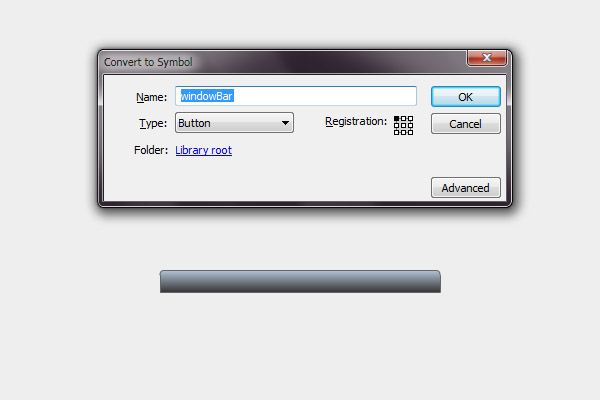
Select the symbol and in the Properties window set the instance name to windowBar.

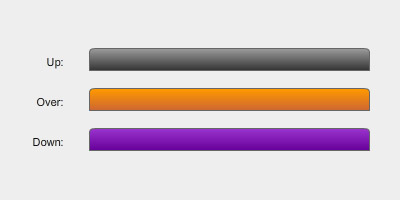
Double click the shape, create keyframes for the Over and Down states. Now change the colors for each one.

I’ve chosen:

  • Over: gradient from #FF9900 to #CC6633
  • Down: gradient from #9933CC to #660099
Step 4: Create the Minimize Button

Create a round rectangle with 14×11 px, 5px radius, and change it so it looks something like below.

The minus sign you do by creating a rectangle 5×2 px with the color #999. Set the instance name to minimizeBtn.

I used the same colors from the windowBar, but the UP State with a 40% alpha for the gradient.


Step 5: Create the Window

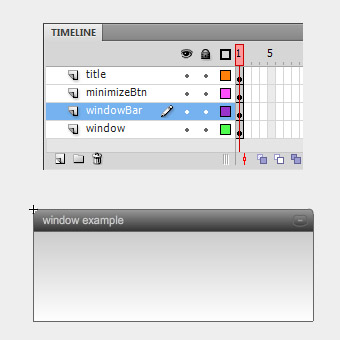
Arrange all shapes in form of a window, hit F8 and create a MovieClip with the name window and registration: top left.

In the Library, right click the Window and go to Properties. Set the class to window. This way the window will be assigned to the class we’ll be creating later.
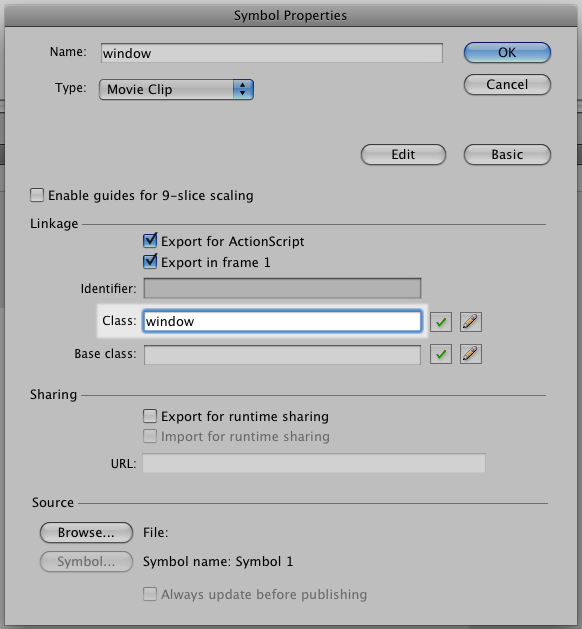
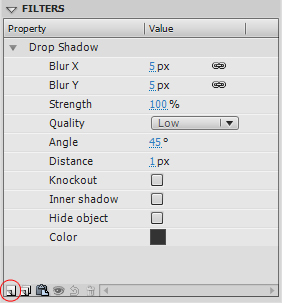
Select the symbol and in the Properties window set the instance name to window. In the Filters, click Add filter (the circled button in the image below), and add a Drop Shadow with the color #333 like below:
Double-click the symbol to edit it. Select all (CTRL+A), Right Click > Distribute to layers.

In a new layer, write the text for the window’s title with Arial, 11pt, color #CCC, letter-spacing: 1. Set it to Dynamic Text and name it windowTitle.

Step 6: Create the ActionScript File

Now that the design is complete, let’s start coding our scene. The first thing we’ll do is create our ActionScript file.
Hit Ctrl+N or go to File > New and select ActionScript File. Save it in the same directory and with the same name (windows.as) of your FLA file.

Now let’s create our package and import the necessary classes:

package {
	import flash.display.MovieClip;
	import flash.events.Event;
	import flash.events.MouseEvent;
	import flash.events.KeyboardEvent;
	import flash.events.ContextMenuEvent;
	import flash.geom.Rectangle;
	import flash.filters.DropShadowFilter;
	import flash.text.TextFormat;
	import fl.transitions.Tween;
	import fl.transitions.easing.*;
	import fl.transitions.TweenEvent;

	public class window extends MovieClip {

	}
}

Step 7: Add Event Listeners

Now you need to assign functions to our buttons. You’ll need a function to when we start to drag the windowBar, another to stop the drag, one to bring the window to top when you click it, and another to minimize it.

Add these Event Listeners to the public function Window() in our code:

public class window extends MovieClip {

	// variables
	public var title:String;

	public function Window() {

		// set windowTitle
		title = windowTitle.text;
		windowTitle.mouseEnabled = false;

		// windows functions
		this.addEventListener(MouseEvent.MOUSE_UP, onWindowClick);
		this.windowBar.addEventListener(MouseEvent.MOUSE_DOWN, onWindowStartDrag);
		this.windowBar.addEventListener(MouseEvent.MOUSE_UP, onWindowStopDrag);
		this.minimizeBtn.addEventListener(MouseEvent.MOUSE_UP, minimizeWindow);
	}

}

The public var title is used for the window’s title. We’ll be using this later.

Since the windowTitle is a dynamic text we disable its mouse functions so that they won’t affect the dragging area of the windowBar.


Step 8: onWindowStartDrag Function

This is where we start having fun! Copy the following code after the public function Window():

/* START DRAG
**********************************************************/
private function onWindowStartDrag(e:MouseEvent):void {

	var windowWidth  = this.width;
	var windowHeight = this.height;

	var windowBarWidth  = e.target.width;
	var windowBarHeight = e.target.height;

	var boundsRect:Rectangle;

	// window's draggable boundaries
	if (windowArea.visible) {
		boundsRect = new Rectangle(0, 0, stage.stageWidth-windowWidth, stage.stageHeight-windowHeight);
	} else {
		boundsRect = new Rectangle(0, 0, stage.stageWidth-windowBarWidth, stage.stageHeight-windowBarHeight);
	}
	//trace(boundsRect);
	this.startDrag(false, boundsRect);

	// bring window to front
	stage.addChild(this);
}

The first thing we do here is create variables to the widths and heights of the Window and the windowBar.

Next, the window’s boundaries. We’ll create two boundaries: one when the window is normal (if windowArea is visible) and another when it is minimized. You do this by creating a rectangle with the size of the stage. The rectangle supports four attributes (x, y, width, height). It’ll start in the corner of the screen (x: 0; y: 0) and extend to the other corner of the screen. Because the bounds are related to the registration point of the window, we’ll need to subtract the window width and height (or the windowBar‘s in case the window is minimized).

After the bounds have been set, we’ll set the window to drag. We’ll drag this, the Window class. In other words, the whole window.

this.startDrag(false, boundsRect);

The startDrag function supports two attributes: lockCenter and bounds. If you don’t want any bounds just write this:

this.startDrag(false);

If we have several windows we’ll need to bring the current window to the top of the display. We do this with the addChild by adding it again to stage:

// bring window to front
stage.addChild(this);

Step 9: onWindowStopDrag Function

This one is really simple. We’ll use the stopDrag function here. Just copy the following to your code after the previous onWindowStartDrag function:

/* STOP DRAG
**********************************************************/
private function onWindowStopDrag(e:MouseEvent):void {
	this.stopDrag();
}

Step 10: Bring Window to Front

Again, really simple. When we click the window we’ll bring it to front using addChild.

/* WINDOW CLICK
**********************************************************/
private function onWindowClick(e:MouseEvent):void {
	// bring window to front
	stage.addChild(this);
}

Step 11: minimizeWindow Function

To minimize/show the window, we’ll toggle the visibility of the windowArea like this:

/* MINIMIZE WINDOW
**********************************************************/
private function minimizeWindow(e:MouseEvent):void {

	windowArea.visible = !windowArea.visible;
}

You can improve this by fading out the window and hiding it, and vice-versa:

/* MINIMIZE WINDOW
**********************************************************/
private function minimizeWindow(e:MouseEvent):void {

	var fade:Tween;

	if (windowArea.visible) {
		fade = new Tween(windowArea, "alpha", Strong.easeOut, 1, 0, 0.5, true);
		fade.addEventListener(TweenEvent.MOTION_FINISH, fadeFinish);
	} else {
		fade = new Tween(windowArea, "alpha", Strong.easeOut, 0, 1, 0.5, true);
		windowArea.visible = !windowArea.visible;
	}

	fade.start();

	function fadeFinish(e:TweenEvent):void {
		windowArea.visible = !windowArea.visible;
	}
}

The Tween supports the following values:

Tween(object, "property", EasingType, begin, end, duration, useSeconds);

For more extensive reading, use the LiveDocs.

In our case, what we’re doing is, if the windowArea is visible (meaning: not minimized), it will fade out the windowArea and when the tween finishes (TweenEvent.MOTION_FINISH), it will hide the windowArea. Vice versa if it’s minimized.


Step 12: Set the Title

We’ll use the variable t to change the windowTitle. The other two lines are just to resolve a letter spacing issue. If you don’t write them Flash will reset the letter spacing to zero.

/* SET WINDOW'S TITLE
**********************************************************/
public function Title(t:String):void {

	var fmt:TextFormat = windowTitle.getTextFormat();
	windowTitle.text = t;
	windowTitle.setTextFormat(fmt); // letter spacing issue

	title = t;
}

This function will be used later like this:

YourWindowName.Title("Name of your window");

Step 13: Set the Size

This function will receive two attributes: the Width and Height of the window. If neither is filled, it will be set to the default size (280×112 px)

What we do here is change the width of the windowBar, the windowArea and the windowTitle. For the height we just change the windowArea‘s, leaving the height of the Window to its default size, just like a normal window.

When resizing we’ll have to reset the position of the Minimize Button. Which is equal to the window’s width minus the button’s width and 6px.

/* SET WINDOW'S SIZE
**********************************************************/
public function Size(Width:int = 280, Height:int = 112):void {

	// change width
	windowBar.width = Width;
	windowArea.width = Width;
	windowTitle.width = Width - 45;

	// change content height
	windowArea.height = Height;

	// reset minimizeBtn scale/position
	minimizeBtn.x = Width - minimizeBtn.width - 6;
}

This function will be used later like this:

YourWindowName.Size(350,200);

Step 14: Give it a Nice Shadow

Remember when we placed a Drop Shadow under the Window? Well, if you place the window by code you’ll need to add the drop shadow by code as well.
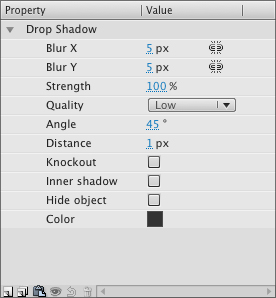
All of the above attributes can be set by code. Copy the function and change the values according to your own taste:

/* SET FILTER: DROP SHADOW
**********************************************************/
public function DropShadow(color:String = "333333"):void {

	var dropShadow:DropShadowFilter = new DropShadowFilter();

	dropShadow.blurX = 5;
	dropShadow.blurY = 5;
	dropShadow.strength = 1;
	dropShadow.quality = 1; // 1- low; 2- medium; 3- high (max: 15)
	dropShadow.angle = 45;
	dropShadow.distance = 1;
	dropShadow.alpha = 1;
	dropShadow.knockout = false;
	dropShadow.inner = false;
	dropShadow.hideObject = false;
	dropShadow.color = int("0x" + color);

	this.filters = new Array(dropShadow); // add filter to the window
}

This function will receive a String with the color’s hexadecimal code. If this is not filled, the default color value will be #333333.

The quality can go from 1 to 15, being 1 2 3 – low, medium and high. We used low, here.

The color must be converted from a String to an int.

After defining the attributes we must add the filter to the window like in the last line. This will create an Array of filters. Which means you could add other filters to the Window as well.

this.filters = new Array(dropShadow);

This function will be used later like this:

YourWindowName.DropShadow("FF0000"); // adds a red shadow

Step 15: Adding a Window by Code

Now change to your Flash file, create a new layer, name it as3 and hit F9 for the ActionScript (or go to Window > Actions).

Adding a Window is very simple. All you need to do is create a variable (let’s call it myWindow), assigning it to the Window class and the add the Window to stage:

var myWindow:window = new window;

addChild(myWindow);

This will produce a Window with its default values.


Step 16: Changing the Values

You can change several attributes of the Window:

  • Title
  • Shadow
  • Size
  • X and Y position
  • Content

Again, the first thing to do is to create the variable assigned by the Window class:

var myWindow:window = new window;

Then you can start changing the attributes:

Changing the Title:

myWindow.Title("Cabo Verde");

Changing the Shadow:

myWindow.DropShadow("66CC00"); // adds a nice lime shadow

Changing the Size:

myWindow.Size(350,200);

Changing the Position:

myWindow.x = 20;
myWindow.y = 20;

Adding the window to stage:

addChild(myWindow);

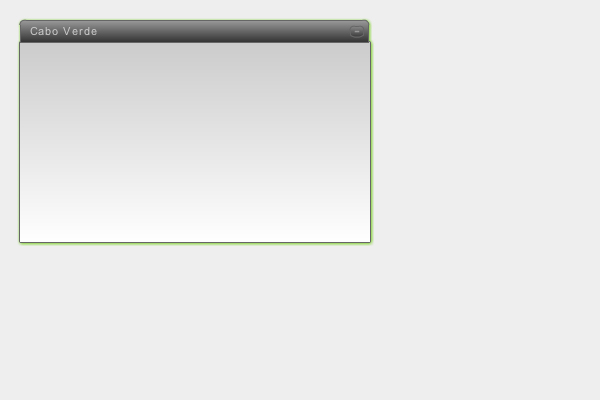
The all code will be like this:

var myWindow:window = new window;

myWindow.Title("Cabo Verde");
myWindow.DropShadow("66CC00");
myWindow.Size(350,200);
myWindow.x = 20;
myWindow.y = 20;

addChild(myWindow);
Step 17: Using Additional Windows

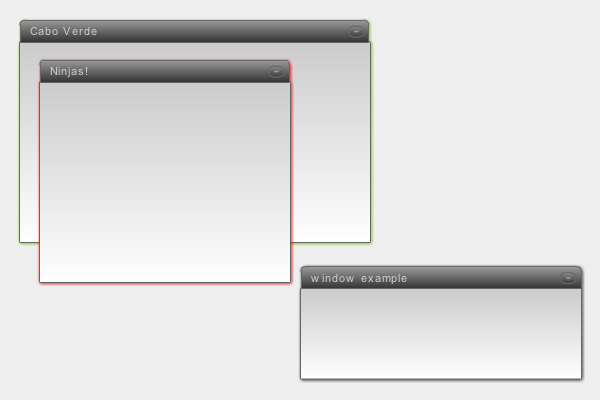
Here’s another example with two windows added by code and a default one in the stage:

var janela:window = new window;
var janela02:window = new window;

janela.Title("Cabo Verde");
janela.DropShadow("66CC00");
janela.Size(350,200);
janela.x = 20;
janela.y = 20;

janela02.Title("Ninjas!");
janela02.DropShadow("FF0000");
janela02.Size(250,200);
janela02.x = 40;
janela02.y = 150;

addChild(janela);
addChild(janela02);
If you need to know the window’s title, you can use this:

trace(janela.title);

Milestone

Well done for following so far! You should now have achieved a result similar to what we looked at in the beginning:


Step 18: Different Content in the Windows

If you notice by now, you can change all the window’s attributes but the content remains the same. So let’s create the content.

Open the Window’s MovieClip, create a new layer for the content and go to Insert > New Symbol (CTRL+F8). Choose MovieClip, name it content and hit OK. Now place it at X:0, Y:22.

Select the new content symbol you just created, and set its instance name to CONTENT.

Double-click the content, name the existing layer content and create another one named as3. In the latter, hit F9 and write:

stop();

This will be our default content. Meaning, nothing!

Now create another keyframe and place an image for example. Bear in mind the size of the window you’ll be using. Add another keyframe and write some text in it. Now we have 3 keyframes: 1. no content, 2. image, 3. text.

As for the code, add this to your class file:

/* CHANGE CONTENT
**********************************************************/
public function Content(c:int):void {

	CONTENT.gotoAndStop(c);
}

Really simple. We’ll just say which keyframe we’ll want to go to.

You’ll also need to change the minimizeWindow function to this:

/* MINIMIZE WINDOW
**********************************************************/
private function minimizeWindow(e:MouseEvent):void {

	var fade:Tween;

	if (windowArea.visible) {
		CONTENT.visible = !CONTENT.visible;
		fade = new Tween(windowArea, "alpha", Strong.easeOut, 1, 0, 0.5, true);
		fade.addEventListener(TweenEvent.MOTION_FINISH, fadeFinish);
	} else {
		fade = new Tween(windowArea, "alpha", Strong.easeOut, 0, 1, 0.5, true);
		windowArea.visible = !windowArea.visible;
		CONTENT.visible = !CONTENT.visible;
	}

	fade.start();

	function fadeFinish(e:TweenEvent):void {
		windowArea.visible = !windowArea.visible;
	}
}

Step 19: Changing the Content in the Code

In the previous example, add this to the code:

janela.Content(2); // goes to the image keyframe

Here is the complete code:

var janela:window = new window;
var janela02:window = new window;

janela.Title("Cabo Verde");
janela.DropShadow("66CC00");
janela.Size(350,240);
janela.Content(2); // goes to the image keyframe
janela.x = 20;
janela.y = 20;

janela02.Title("Ninjas!");
janela02.DropShadow("FF0000");
janela02.Size(250,200);
janela02.Content(3); // goes to the text keyframe
janela02.x = 40;
janela02.y = 150;

addChild(janela);
addChild(janela02);

Conclusion

So, there’s a simple way to create a draggable window (much like we see on Windows). If you want to go further, you can change the content MovieClip, adding text, buttons, images, etc. You could add scrollbars, call content through XML, or whatever you can think of. The possibilities are endless!

Here’s another awesome example:

This is eXOTRik, and I hope you found this useful. It’s my first tutorial, hope to bring you some more ninja tricks. Ayaaaa!

Working in a Collaborative Group Environment

As a professional designer for five years, I have learned a few things about the industry, but none are as important as the following: Understanding how to work within collaborative groups is absolutely essential to creating great work, and advancing your career. Group dynamics obviously depend on the type of place you work at. I have now tried both sides of the spectrum (in-house and agency) and while they are totally different, the concept of working within groups is still relevant. Today, I will be sharing a collaborative project that we have recently completed at my current place of employment, Huffy Bicycles.

Having previously worked at the world’s largest branding agency, a group project at an in-house corporation is a completely different animal than I was previously exposed to at the agency. I will not go into the differences between in-house and agency settings, but if you are an in-house designer I highly recommend visiting the AIGA In-house website for some good reading.


Basic Collaboration Tips

  • Check your ego at the door. Don’t be an “I know everything” person… you don’t.
  • It is about the team. Teams will almost always come up with better solutions than individuals. Don’t think of ideas as my idea, but rather our idea.
  • Not every idea is a good idea, but it should be considered anyways.
  • Document the journey. Showing all the effort that went into coming up with the final solutions will help with the sell in to the client, management, or whoever you need to sell your ideas to.

On a side note, John Lasseter has some great tips for creative’s to review.


The Project – Huffy Branded Proprietary Grips

In an effort to step-up the quality on our adult product, we decided the obvious thing we can improve on is one of the major consumer touch points, the grips. Our adult bicycle line is segmented into three categories: Mountain, Comfort, and Cruisers. We decided that we would end up with 2-3 solutions for each category. We had one lead designer on this project, with four other designers jumping in at various stages.


Research – To get to where you are going, you have to know where you have been and how others got there

As a team, we decided to take a trip to retail and visit some of the stores our (and our competitor’s) product is sold at. We visited all of the major retail stores and as a team, we discussed areas of opportunity. We considered variables such as Shape, Size, Texture, Pattern, Material and Branding.

It really is an eye-opening experience to walk around with a specific aspect in mind (such as grips) and just take a look at what is out there in the marketplace. How important are the grips to a bicycle? Watch your average consumer walk up to a bicycle rack and pull a bike out. Their hands immediately get a feel for the bike by gripping the bars.


Sketching – Get to the point you think you are done, then keep going

The first stage was just getting ideas out on paper. At this point it isn’t about who can sketch the best, but rather getting your concept down on paper. Sketches should be as detailed as they are needed to be, based on the audience. Since this was an internal design project, the sketches didn’t need to be as refined. Creatives naturally understand things more visually than non-creatives, and can visualize the final product better.

After we put all the sketches on the wall, we talked about what was working, and what else we needed to add to fill gaps. We also noticed some themes or ideas that several of the designers were hitting on in slightly different forms, so we started to bucket these themes together as single ideas. Below you will see just a small sample of the sketches.


Refining – The power of the dots

At this point we decided to mix it up a bit. After our critique, we decided that we needed to narrow down, and refine the concepts. We then started to pick other designer’s sketches off the wall and improve on them. This accomplished two things: one, it allowed us to incorporate the group feedback in to a better, more well thought out design. And two, this turned these concepts even more from a my idea feeling into an our idea feel.

After we had completed the refining process, it was time to narrow down to the concepts that we felt as a team would best accomplish the goals and objectives we had from the beginning. We had each designer mark their four favorite sketches with a dot, and the nine concepts with the most dots move forward. The whole group had spoken – democracy at work.

Below you can see three buckets we had for our Mountain Bikes.


Execution – It is all about the details

For the next step in this process, we had to create 2D artwork that we could pass on to our CAD artists. At this point, most of the concept work was done, so the lead designer took over on this portion of the project. This is fairly straight forward, but the devil is in the details.

After we received the CAD drawings back from the 3D artist, again we got together as a group and gave feedback. Every step of this project has been about the team, and this was no exception.


Production – The waiting game

At this point the creative work was done, and it was now just a waiting game to get in actual samples. When they finally arrived, it was a great site to see the whole team crowded around a table looking at all the new grips that we had created as a team. Below you can see some images of our final production grips.


Conclusion

Working in groups can be very stressful at times, and there will always be time and budget issues when you start making the groups larger, but working in groups produces better work. Learning how to manage those groups, and the timing and budget issues that come with group projects is a great way to start to get management experience, especially for young designers who are still a few years out of college. I really hope you enjoyed this real-world example of a creative collaboration project at Huffy.

And the Winners of our July Competition are…

Our July Competition asked you to showcase one of your models in the amazing new v1.01 release of 8MonkeyLabs’ Marmoset Toolbag. We had an amazing selection of entries to choose from so without much further ado, let prize-giving commence!
After gathering all of the entries together it took both myself, the 8MonkeyLabs team and the Tuts+ management to come to a final decision, and it was a very close call between several finalists – we were all amazed at the quality of the work shown! However there were 3 licenses to give away so we had to eventually decide on 3 winners.

And they are, in no particular order :

Winner 1 – Konrad Beerbaum

Konrad’s FlakCannon model, with it’s HDR reflections, bump mapping and excellent overall texture work caught our eye straight away. Great work Konrad!


Winner 2 – Matt Dirks

Matt’s cell-shaded mercenary character certainly stood out from the other entries, showing another side to Marmoset Toolbag that all of the judges loved. Plus the pose is just awesome…


Winner 3 – Reggie Santiago

Reggie’s detailed WoW-esque wagon model showed yet another way that Marmoset Toolbag can be used to display your final models in your portfolio (and we especially loved the lighting on this one!)


Honourable Mention – Nick Sukharichev

Nick’s presentation of his Ogre character model has earned him this honourable mention! I particularly loved how the Ogre’s mace shifts slightly out of focus as it passes the camera – an awesome touch!


So congratulations to our winners, and well done to everyone who entered! I know it’s a little clichéd but it really was very difficult to narrow it down to the three eventual winners. I also want to thank the 8MonkeyLabs team for supplying the great prizes and for their support in the comments.

I can’t wait for our next competition, but in the meantime there are rumours of an exciting giveaway coming very soon…


Don’t miss more CG tutorials and guides, published daily – subscribe to Cgtuts+ by RSS.

Overview of The Foundry’s New “CameraTracker” Plug-in – Part 2

In Part 2 of the Tuts+ network’s look at the new CameraTracker plugin from The Foundry, Marc Leonard takes us through how to use data exported from After Effects to reconstruct the original 2D plate within Cinema 4D, allowing us to place new elements in true 3D space.

This tutorial is Part 2 of a special series being published across the Tuts+ network. Click here to view Part 1, and Click Here to view Part 3 over on Aetuts+.


Tutorial

Download Video

File size 237MB

This tutorial is Part 2 of an exclusive series being published today across the Tuts+ network. Click here to view Part 1 over on Aetuts+.


Don’t miss more CG tutorials and guides, published daily – subscribe to Cgtuts+ by RSS.

Project Management Software Review: 5pm

My boyfriend’s company recently switched project management tools and my boyfriend was so happy with the new program, 5pm, that he told me all about it (yeah, we’re geeks).  I quickly became very curious about the seemingly great features and so I signed up for 5pm’s 14-day free trial.

What is 5pm?

It’s a web-based project management and time tracking software that allows team members to log information on how they’re progressing on tasks related to a given project.

How does it work?  How do you use it?

  • A project administrator creates a 5pm site for his or her team (for example workawesome.5pmweb.com).
  • The administrator may sign up anyone using just their email, which I found a bit invasive because the notification email isn’t a request for confirmation of account setup but rather simply tells the recipient that he or she has been signed up for the website and gives them their password.
  • The administrator may create different types of accounts: user, administrator, external user and client, and there may be multiple administrators, who may then assign tasks to users and choose to hide tasks from clients.
  • Users can download a desktop widget to easily track time (more about it below).
  • Users may also go on their team website to check on the progress of any project at any given time.

Navigation is really easy!  There’s one landing page and all navigation is done through there (see a screen shot below).  This page contains permanent tabs through which users can switch among projects, timeline, reports and profiles.  Clicking on a tab takes a user into that section of their site, where the user will find a list of drop-down menus that make for effortless navigation among tasks, member profiles, different types of reports and other functions.  Administrators can also create different groups and invite different team members to each group.  All it takes to switch between groups is a click on the drop-down menu at the top of the page.

Landing page on 5pm

Users may also upload files so that everything related to a project is right there for all members working on that project to see.

The desktop time tracking widget is one of my favorite features.  Users download this widget and it stays on top of all windows (with the option to hide it).  To track time, users select the project and the task related to that project from the drop-down menu at the bottom of the timer then click the play button to start tracking time.  One annoying thing about the timer is that it logs time in increments of 15 minutes but only when a user goes over a 15-minute chunk, otherwise the user has to manually enter the time.  For example, if a user worked for 25 minutes he or she will need to manually select a whole 30 minutes from the drop-down menu.

The desktop time tracking widget

The main other features include links to iCal and google docs, an RSS feed, a free mobile app and even the ability to import information from Basecamp.

The Downside

The price isn’t very friendly.  Unless you can afford to pay $175/month for unlimited space and users, you’re likely to find yourself out of space, as 5pm offers a low space limit.  The least expensive account costs $18/month and allows up to 5 users to work on up to 10 projects for a total of 1GB of space, which I can’t see working for a designer who might want to upload files for client approval for example.  The largest allocation of space other than unlimited is 12 GB for $88/month.

Prioritizing tasks doesn’t work well at all. Although there is an option to select the priority of a task, a user can only see if a task is urgent by going into the task and not by looking at the list of tasks in their project.  This might be a big problem for users who have many projects on their plate, since prioritizing tasks is essential to completing them on time.

The timeline is not very useful.  Though there are options to view the calendar of tasks by day, week and month, all that switching among views does is stretch or shrink the view of the monthly calendar.

Who is 5pm for?

The pricing was a bit steep for me, so I think some individual freelancers would be inclined to feel the same.  However, teams (remote or local) with a decent budget that are collaborating on projects and freelancers with small budget and files who want to send information on project progress to their clients would find 5pm useful.

If you’d like more information about the software you may visit its website.  5pm was developed by Quatre Group, LLC, an American software company and they had no involvement in my writing this review.

Who Is Your Mentor?

There are some things that you knew how to do from the moment you arrived on this planet.  Eating – yup, sleeping – yup, and a few other related “projects”.  But for everything else you do, you had to learn by watching or listening to someone else.  You might have done this as a child, watching your parents make funny noises until you realized it was their own language.  Or you might have learned this as a teenager, learning how to drive a car with the help of a very patient parent or a professional instructor.

Chances are, you weren’t born knowing exactly how to do your job, whether it’s your current position or your dream position – unless your dream position involves eating, sleeping, and er, other biological needs.

Martha wrote a great post about the benefits of mentoring over on FreelanceSwitch, as well as some good info on the different types of mentors that are out there.  The act of teaching someone can help reinforce your knowledge of your job, as well as provide you with a welcome boost to your ego, while the opportunity to learn from an expert in your field can pay off handsomely now and in the future.

Are you looking for someone that you can mentor, or are you looking for someone to mentor you?  Hopefully, your answer is “yes” to both.

How do you foster your mentor relationship?  Please share some of the tips and tricks on how to find and develop a positive mentor relationship.

Does Value-Based Compensation Increase Productivity?

Within the model of value-based compensation, you are rewarded strictly for results. The amount of hours spent or the degree of effort is irrelevant; you are paid only for tangible, measurable value produced, regardless of the duration or difficulty of the work.

For those used to a predictable hourly wage, value-based compensation may sound risky. Work impediments like sudden sickness or family emergencies can show up later as missing money on your paycheck. Most feel that the employer should handle the ups and downs of the business and provide workers with a steadier form of payment.

But if your payment is stabilized with a steady hourly wage, you’ll miss out on the booms as well as the busts. You may be saved from a slow week, but you can also miss the payout of an amazingly productive week. Plus, while hourly pay may tempt you to work slowly, value-based compensation provides strong motivation to improve your skills and your efficiency.

Businesses would love to pay strictly for results. Workers would love immediate rewards for working harder, faster and more effectively. Value-based compensation seems like a win-win for both parties, yet it’s not the most commonly-used compensation model.

Clearly, value-based pay compels you to work harder and faster. But, do the benefits of value-based compensation outweigh the risks? Would it truly make you more productive and consequently earn you more money – or is money even the biggest driving factor?

Creating a Newsletter in Word in 10 Steps

In my past articles, I’ve discussed how to create several customizations with your Microsoft Office suite.  Creating a newsletter in Word is a simple 10-step process. Here’s how to do a newsletter in Word:

Step 1

Open up a new document in Word & by clicking on the Microsoft Icon on the top left.

Step 2

Click on the Page Layout Tab and select the Columns Icon. There choose Three Columns.

Step 3

Next thing, double click on the Header Section and add a title. Set the font to bold and relatively large.

Step 4

Add a rectangle via the Insert Tab > Shapes. We will set this shape behind the title and give it a color.

Step 5

I chose a blue color and placed the shape behind the text. You can do so by rich clicking on the shape and in the pop up window select Order and Place Behind Text.

Step 6

Now add some text. Since we added three columns, we already have a nice looking layout.

Step 7

Let’s add some headers and sub headers. Add a header before your text in a nice big font. I chose Arial Black, 24pt. In word you have preset Style for headers, sun headers and so on. You can save your own style too. To do so, just highlight the text, right click and in the pop up window choose Styles > Save Selection as a new Quick Style.

Step 8

Add another sub title (e.g. a quotation). Quotations stand out nicely in a newsletter and highlight a message well. Repeat step 7 and add this to the quick styles so you can add it at any time.

Step 9

Let’s add a picture. Enter with the cursor at a point between the text where you would like to add an image. The add a paragraph and select the Insert Tab, choose Picture and browse to the image you would like to add.

Step 10

This is what we have so far. I added a footer the same way I added a header in step 3.

Conclusion

I fancied up the newsletter a bit by adding a First Edition Tab, a by-line and some vertical lines. All elements are easily added via the Insert Tab. In case you have more to say, just add another page, the header and footer will stay, so will the columns and your newsletter will look continues. Now if you like, you can convert it into a PD via the Acrobat Tab in Microsoft or print it out on your desktop printer.

So far I’ve offered four tutorials on how you can customize Microsoft Office for your own needs – and there’s more to come. However, if there’s a piece of software that you’d love WorkAwesome to post a walkthrough of or would like more tips and tricks that you can use with Microsoft Office, leave a note in the comments.

What’s Your #1 Question About Increasing Productivity?

When I worked in an office several of my co-workers asked me how I managed to keep my desk organized and clean at all times, how I managed to whip together all sorts of travel plans without a headache, and even whether I actually got any work done with my flexible work schedule (my time of arrival was 10-ish and I even did my grocery shopping during the workday).

As a WorkAwesome writer, I try to write about what I think is useful to my awesomely dedicated readers based on experience – and on whatever I come across in my daily life.  I’m no productivity oracle but I want to help answer reader questions about increasing productivity.  You can always email me with your questions, but for now . . .

If you rubbed your monitor and I floated out in a poof of smoke as your little productivity genie, what 1 question would you ask me?

Is Talent All You Need To Succeed?

Talent is considered an innate, natural ability. You’re born with it or without it, and supposedly you can neither gain it nor lose it. Talent isn’t learned or developed; it’s discovered by the lucky owner or by the observant talent scout.

Skills, however, are developed. Skill is acquired through training, so unlike talent, we do have some general control over how skillful we are. You can gain skill as quickly as you can learn, and you lose it as quickly as you forget.

Managers often follow a “hire for talent, train for skill” philosophy, leading us to believe that talent is more valuable than skill. What hiring managers often overlook is that highly-developed skills, besides being extremely valuable, are indicative of a strong work ethic. Skills are a testament to a person’s dedication; talent is nothing more than a gift supposedly given at birth.

If you’re wondering if you can succeed on talent alone, ask the talented writer who never got around to finishing his book, or the gifted athlete who missed too many practices to retain his high-paying contract. They’d tell you that the recipe for success has more than one ingredient, and that talent is nothing without the support of skill and dedication.

Perfecting the Art of a Two Minute Tone Job

Let’s set the stage. You’re a professional photographer on assignment in a far off land. Suddenly, you find yourself in the middle of a disaster. Photo editors from around the world are contacting you for images, and they want them yesterday. To make matters worse, your laptop battery barely has enough charge to make it though a YouTube video. What do you do? Well, you’ve got to tone your photos fast. Really fast!


When You Just Can’t Take Your Time

When I was in college studying photojournalism, we were transitioning from film to digital. Our professors told us not to rush into switching our cameras, and to reinforce this, they told us toning a photo on a computer should take you just as long as making a print in the darkroom.

They said this to encourage us to be precise and careful when toning images on a screen. Little did we know that once we were all working in the professional world, we’d be transmitting images straight to the web with laptops from our cars. Deadlines are always getting tighter, and because of this I’ve developed a quick toning process that will work for 90% of the images I shoot.


The Tools

Under normal circumstances, you want to take your time and utilize the proper Photoshop tools for the job. But we’re in a war zone with a satellite phone. We want a hammer and some duct tape, not a needle and thread. So we’re going to be using three tools to get our images in shippable shape. Levels, Hue/Saturation and the Lasso Selection tool.


Using Levels

Most people who know Photoshop well, will tell you that the Curves tool gives you more control and is better to use than Levels. That’s true, but Levels is easier to use and in my experience in Curves, half way through toning, I often just want to start over. It’s easy to get off track.

For this workflow, we are only using Levels to adjust exposure and contrast. We’ll be adjusting color issues with different tools. Below is the unedited image that I’ll be using Levels on.

Understanding Each Pointer

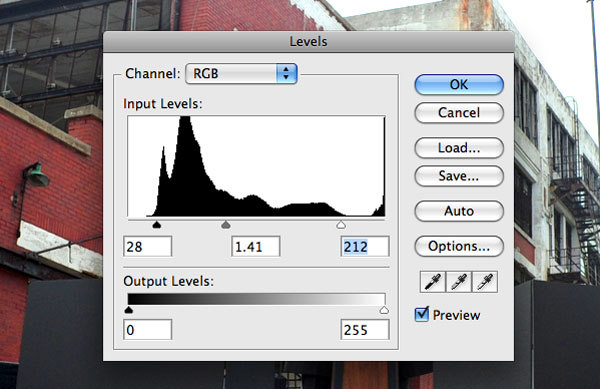
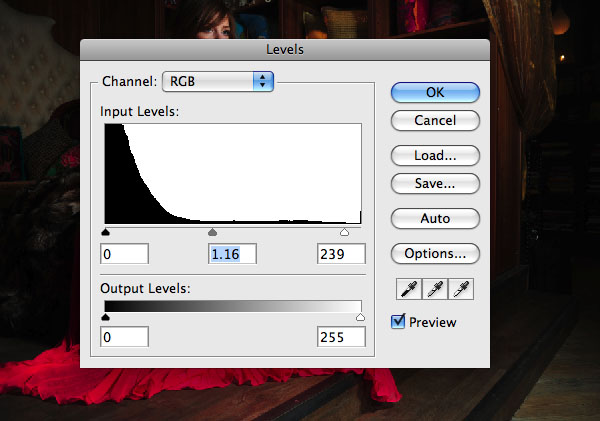
Start with the highlights pointer on the right. Look at the histogram and drag the highlights pointer into where your histogram starts to rise. There may be blips on the far right, but ignore those. Next, adjust your midtones with the middle pointer. For this, look at your image, if it’s a little dark move the pointer right, and visa versa.

The shadowy parts of your image are controlled by the left pointer. You can’t make them brighter, so moving it to the right will make more things darker. Slide this at least to where your histogram starts to rise as well. Go back to the middle slider and tweak the midtones to your liking. Here’s a look at the levels adjustment after I finished.

The Results

Low resolution web images don’t need hours of work because, no matter how hard you try, your image will look different depending on the quality and type of screen the viewer is using. Newsprint, the low quality paper most newspapers use, is also quite forgiving because of the printing process and how the paper holds ink. They’ve called you, you’re dodging bullets, and you don’t need museum-quality archival prints. As you can see, the final image is more than acceptable for publication.


Hue/Saturation

I personally believe that Hue/Saturation is the most important tool in Photoshop. I use it on almost every image I tone. It can be used to correct for mixed lighting, bad white balance, flat grey tones and a bunch of other problems. There are four things you need to know about in the Hue/Saturation tool to get you going. Below is an unaltered image I’ll be using to demonstrate this tool.

Hue

The Hue slider is the first of the three sliders in the box. For our purposes, hue mean color. By moving this slider, you are shifting the color. Think about the rainbow or a color spectrum. First comes red, then orange, yellow, green, blue, indigo, then purple.

This slider moves things along this color spectrum. Move the slider slightly to the right, and the reds in image will turn orange, the oranges will turn yellow, and so on. Below, you’ll see how the colors have shifted in this way.

Saturation

The next slider is Saturation. I think of saturation as richness or fullness. If you crank this slider all the way to the right, your image will look neon. If you move it all the way in the other direction, you will have pulled all the richness and color out and made your image look black and white.

In the image below, I stopped just short of both ends. The left side of the image is now under saturated, and the right side is over saturated.

Isolating Colors

At the very top of the Hue/Saturation box, you’ll see the “Edit:” and then a clickable drop-down menu that is set on “Master.” Being set on Master means your adjustments apply to all colors, but if you select one of the colors from the drop down menu, you can make adjustments only to that color.

Once you’ve selected one of those colors, you also have the option of moving your mouse over to the image (it will look like an eyedropper), and fine tuning your adjustment by manually picking a spot on the image that contains the color you want to work on.

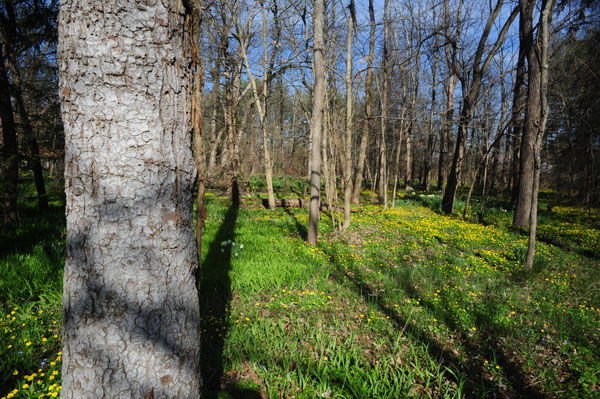
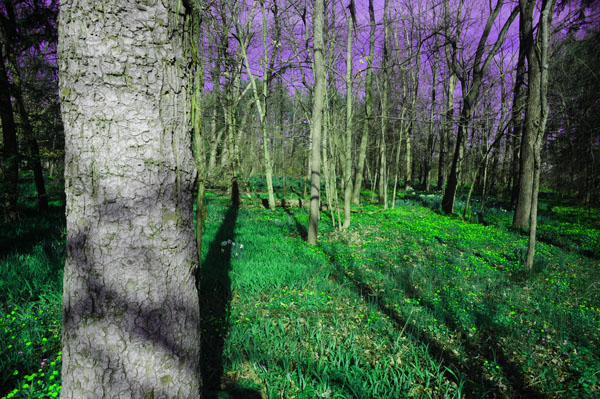
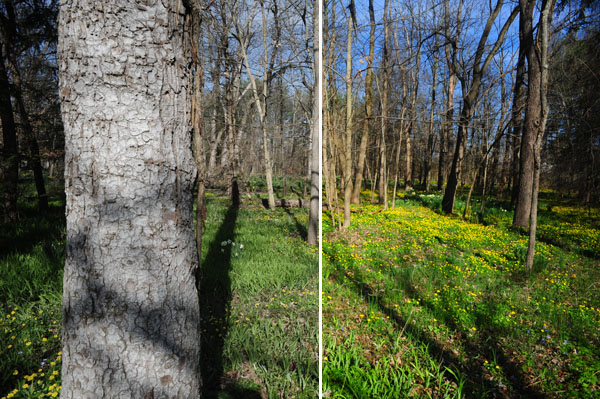
In the image below, I chose “Blues” from the drop-down menu, and over-saturated the sky. I then opened Hue/Saturation up again, selected “Greens” and used my eyedropper to select the grass, then desaturated it.

A Practical Example: 1

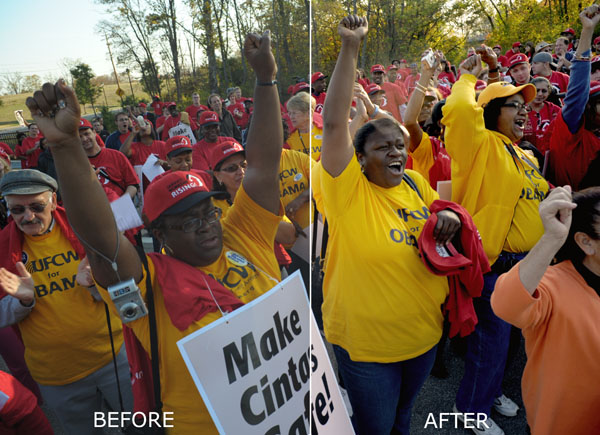
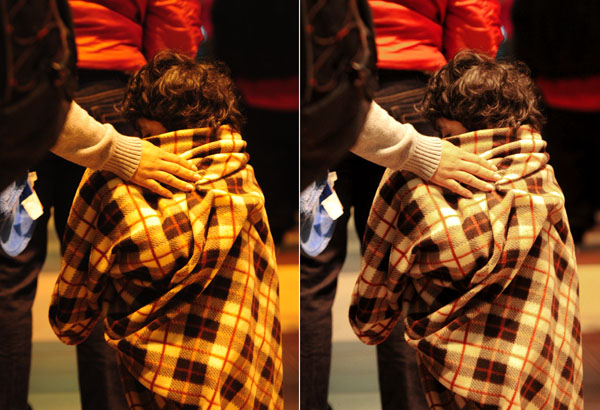
The above examples were extreme and altered an already publishable image. In the image below, I isolated the yellows and oranges in the image to correct for the extremely yellow lighting in the image. The white balance settings on your camera only go so far sometimes. The left side of the image is unedited, the right side shows the changes made with the Hue/Saturation tool.

A Practical Example: 2

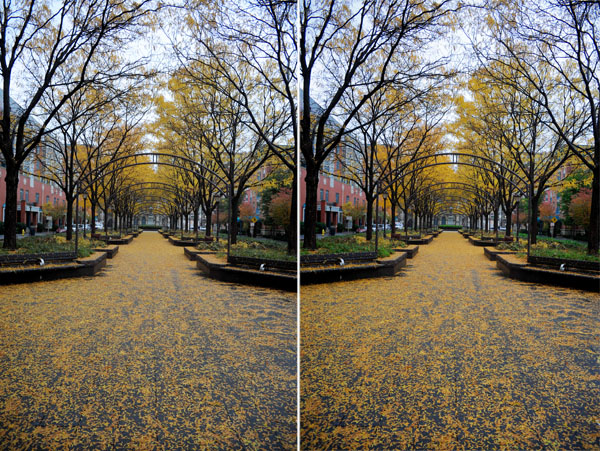
Now let’s use the tool to add Saturation and bring in the sky. In order to do this, I chose the yellows from the drop down menu to bring out the leaves. I did the same for the greens to bring out the bushes.

I then used the eyedropper to select the color of the sky, which turned out to be cyan, not blue. So I slightly shifted the color back to blue, using my hue slider, and then bumped up the saturation. You’ll commonly find that grass and leafy plants may look green, but are actually yellow, and that skies look blue, but are actually cyan. Shifting these colors using the hue slider can really improve the final look of your images.


The Lasso Tool

The lasso selection tool is the final thing you need. It doesn’t do anything by itself, but it allows you to utilize both levels and hue/saturation on specific parts of your image rather than the whole thing. The lasso tool paired with Photoshop’s feathering feature can easily replace the dodge and burn tools and allow you to correct specific areas of an image.

It’s an undervalued tool because people think they need to draw neat, tidy lines around things. Feathering, a sort of blurring of the edges of your selection, allows you to be less precise, but at the same time it makes your adjustments look more natural. Below, you’ll see the image I plan to adjust using the lasso tool.

Making Your Selection

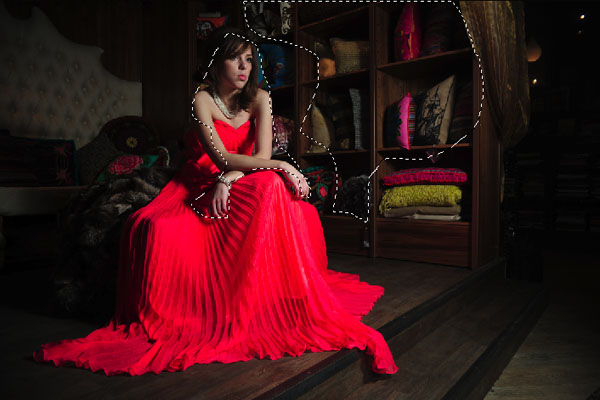
As you can see in the image, the main subject is exposed very well. But the surrounding background is a little dark. There are certain parts of this image that I want to bring out a little. You can see that I’ve made three selections.

Usually I would make each of these separately and adjust them individually, but there are now incoming mortar shells bombarding the hotel, so we need to move quickly. You can also see that my selections are a little wobbly and not very exact… we’re being bombed, what do you expect?!

Feathering The Selection

Feathering is something that’s done to a selection to make your alterations fade into the surrounding area. After you apply the feather, you’ll physically see your selection change. The edges will seem rounder.

To apply a feather, look in your top menu, and click on “Select” then “Modify” then “Feather.” It will ask you what radius you want. This all depends upon the resolution of your camera and the size of your selection.

For the selections below (this image was taken with a 12 megapixel camera), I used a 100 pixel radius. The radius determines how far from your original selection your alterations will blend. If the alterations don’t seem to be working, lessen your radius. If the drop off of your alteration looks too drastic, then increase your radius.

Making Your Alterations

For the image below, I went into levels and made my changes. I started with the midtones pointer, and used it to brighten everything up. Because the midtone adjustment washed out the shadows a little bit, I darkened them back up by moving the shadow pointer to the right.


Bringing It All Together

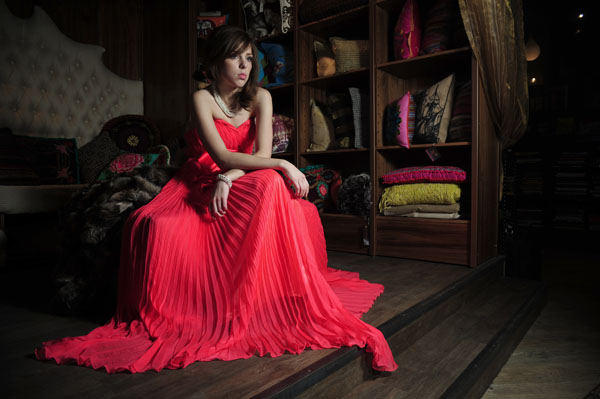
For the next series of images, we’re going to run through the entire process. Some images, might not need all of these steps, but I found one that can use all of them. Here’s the unedited image.

Levels

This image has some dramatic light in it, so we don’t want to over do it with levels. I chose to brighten up everything slightly, and as you can tell the histogram has heavy shadows, so I left those alone.

This is the result after performing the levels adjustment. Total time 20 seconds.

Hue/Saturation

There are a couple different issues going on with this image. First, the dress has a slight “neon” tinge. To correct this, I chose “Reds” from the drop-down menu. I moved the saturation slider to -29. At this point, the tone seemed a little off, so I adjusted the hue slider to +3, which moved the color from more of a pink color back to red.

You can see the results of this adjustment below. I think we might be pushing one minute now, and that’s a good thing, because I think I hear insurgents on the roof and earthquake has knocked out the power.

Lasso

Now, I’m going to bring out the tones in those pillows and adjust her face a little bit as well. For the pillows, I’m using a selection with a 120 pixel radius. I’m going to do each selection separately, but I want to show you both of them in the same image. Again, I’m going to do two separate tone adjustments, one for each selection.

For the face and arms, I’m using a 70 pixel feather. I then did a level adjustment which significantly brightened the highlights, slightly raised the midtones and darkened the shadows a touch. I also went into the Hue/Saturation tool and increase the saturation that was lost in the initial adjustment. I changed the saturation to +17, and the hue to -2. You can see the result below.

For the pillows, I used a radius of 100 pixels for the feather. For the levels, I raised the highlighters pointer about a third of the way to the left. That’s it for the levels. I then wanted to make that bright pink pillow a little less intense because I thought it was a little distracting. So, I selected “Reds” from the drop-down menu, then used the eyedropper to specifically select that color (which turned out to be actually be magenta). I lowered the saturation to -38.

You can see the final image with all of the adjustments below. Total time, around two minutes!


Conclusion

So the next time you’re photographing polar bears, the piece of ice you’re sitting on breaks off, and you’re slowly drifting farther and farther away from your Wi-Fi station, you’ll be able to transmit those images quickly.

Or maybe you just like spending your time taking pictures instead of editing them. Either way – now you’re prepared!

50 Examples of Remarkable Photography in the Rain

Just because the sun isn’t shining, you can still get creative with your photography! The lighting may not be perfect, but rain, snow, and sleet introduce a whole new range of challenges and opportunity for capturing wonderful images. Grab your umbrella, and join us after the break for some stunning examples of rain photography, and a few tips on how to shoot your own!


4 Tips For Shooting in the Rain

Hit the Streets

When the rain starts falling, the streets take on a completely different appearance. The umbrellas come out, overcoats are thrown on, and people hurry to their destination. You’d think that this might lead to a dreary, uninteresting scene, but this isn’t necessarily the case!

You can capture the classic “sea of umbrellas” shot, focus in on individual people, or increase your shutter speed to better illustrate the idea of everyone rushing to get out of the rain.

Alternatively, try a different perspective as in the image below. Find a high vantage point, and just wait for a scene full of bright, vivid umbrellas!


Get Outside, and Get Wet!

The classic portrait is often taken in perfect lighting conditions, with carefully chosen lighting, and a beautifully made-up model. Throw that over-used scenario out the window, and head out into the rain!

People behave incredibly naturally when out in a torrential downpour; they giggle, cringe, and embrace the surreality of the situation. It’s the perfect chance to capture natural expression, and a memorable portrait.

Of course, you may be lucky enough to capture someone really appreciating the rain. The below image exudes relief, thanks, and praise that rain has come to this person’s world:


Get Cosy

If you’d prefer not to get completely drenched, we’ll let you off with this option – stay inside, open the curtains, and stare out a rainy window. Everyone can empathise with this wonderful, cosy feeling, and it’s the perfect backdrop to a moody portrait of someone looking into the distance.

If you’d prefer not to go with such a cliché, try photographing another object with a “rainy window” backdrop to convey a different set of emotions. It’s an easy way to experiment with rain photography, without the inconvenience of actually being in the rain…


Above All, Keep Your Camera Dry!

However carried away you become with the wonder of a downpour, don’t forget that your camera won’t appreciate the rain as much as you do! Make sure that you have someone holding an umbrella for you, or buy a waterproof case for your Digital SLR (there are plenty of different ones available!)


50 Remarkable Rain Photography Examples

Raining….

Rain Photography

A walk in the rain

Rain Photography

Soho ghostly meetup

Rain Photography

Whitechapel

Rain Photography

Rach in the rain

Rain Photography

Umbrella Day

Rain Photography

Stormy Days

Rain Photography

A Magical Main Street

Rain Photography

Tango Sepia

Rain Photography

Art 38 Basel

Rain Photography

Amsterdam

Rain Photography

Ombrelli per una mostra su Amedeo Modigliani

Rain Photography

A Buddha in the Rain

Rain Photography

Road man

Rain Photography

When it rains…

Rain Photography

Rainy and hot

Rain Photography

Walking in the Rain

Rain Photography

Paper Boats

Rain Photography

Catching the rain

Rain Photography

Prairie Magic

Rain Photography

Pink Rain

Rain Photography

Sun.. stay here.. Please!

Rain Photography

Rain

Rain Photography

Walk on a rainy day

Rain Photography

something coloured in front of a grey sky

Rain Photography

Falling rain on leaves in the gutter

Rain Photography

In the Rain in Tokyo

Rain Photography

Nothing gonna stop me now

Rain Photography

Islington

Rain Photography

Rainy walk

Rain Photography

Hit, Miss, Hit

Rain Photography

British summer

Rain Photography

de dos en dos

Rain Photography

Still More Rain On Yonge

Rain Photography

Fall(en) Leaf

Rain Photography

Rain

Rain Photography

Spiders Web

Rain Photography

City rain

Rain Photography

[no rain]

Rain Photography

Fake Rain Drops on a Leaf

Rain Photography

Walking home in the rain

Rain Photography

Frozen Time

Rain Photography

Shrimpboat After the Rain

Rain Photography

Hawaiian Rainy Bokeh

Rain Photography

Rain Kiss

Rain Photography

premisas y conclusiones

Rain Photography

And It Could Rain For Days

Rain Photography

It’s going to rain

Rain Photography

Descending Temple Steps

Rain Photography

Share Your Own Rain Photographs!

I hope you’ve left feeling inspired to get out in the rain, and take your camera with you. We’d love to see some of your own images shot in the rain, so feel free to leave a few links in the comments below!

The Theory and Psychology of Framing Your Image

Today, we’re taking a look at the theory and psychology behind the size, framing, and visual weight of different elements in your photographic composition. You’d be surprised how much there is to learn about this choice, and the impact your decision can have!


Introduction

Photographs are our visions, created within the viewfinder, composed and registered with a click of a button. Sometimes this initial composition is the final composition, and sometimes it’s not. Sometimes we compose our scene with the intent of creating our final vision right at that moment, whereas sometimes we compose a scene with the intent of later cropping or extending our vision.

Most 35mm format photos are taken tightly, composing for the final image. Large formats however, allow us to crop and recompose without jeopardizing the quality of our image. And finally, square formats are less convenient for final compositions and are often later cropped to more desirable ones.


Frame Dimensions and Direction

Unlike other forms of graphic art, a photograph has always been bound by spatial dimensions that are limited to the image frame. And more often than not, those dimensions guard and eventually influence the composition of our scenes.

Up until the whole evolution of digital photography, the most common image frame format was that of a 3:2 width to height ratio, which is the standard frame format of a 35mm film with dimensions of 36x24mm. With the advancement of digital photography, the more natural frame format of a 4:3 width to height ratio was soon adopted in low to medium level consumer cameras. This allowed for a more horizontally expanded, naturally viewed image frame especially on computer screens and standard size print paper.

The 35mm film format was subtly transferred into digital photography creating something of a gap between the professional/serious amateur photographer, and other photographers. And its long lived popularity is just a little evidence of how easily our sense of visceral composition adapts.

Horizontal or Vertical?

Our natural vision often suggests a horizontal view (because of the way we naturally observe with our eyes) which may be the most influential reason why photographs are often composed horizontally rather than vertically. Another, less fundamental, reason is the ease of hand holding a camera in a horizontal manner due to build and design.

When a subject is vertically elongated, it makes more sense and is more naturally perceived by human vision when framed vertically. If our scene or subject expands horizontally (or equally in both directions), it is more naturally perceived by human vision framed horizontally.

Positioning Within the Frame

Furthermore, when an object is framed horizontally, it is more convenient for the viewer’s eye to be composed off-center, slightly leaning more to one side of the frame. And when an object is framed vertically, it is more convenient if the subject was placed off-center either to the top or the bottom of the frame, with the lower placement being more suitable and natural since it suggests and conveys stability rather than causing a feeling of somewhat downward looking, head lowered sensation.

If a vertical subject is horizontally framed, it is often composed towards either end of a horizontal frame so as to motivate the eye to move horizontally along the frame.

Within a square frame, however, this becomes more complicated because of the frame’s lack of directional emphasis. Only few cameras actually offer a frame of 1:1 width to height ratio, and it is common for photographers of such a frame shape to compose their scene leaving loose or unused ends for vertical or horizontal cropping later on.

Since most subjects are not naturally square, a square frame offers a challenge for a successful composition. Since most landscape shapes are often conceived and framed horizontally, a square frame might impose a challenge for controlling an image’s visual flow.

A square frame could, however, sometimes offer an interesting or even refreshing change from the more familiar vertically or horizontally elongated frame shapes. It can even be a more convenient format for symmetrical subjects (such as in the photo below by Elena Erda).

It is important to keep in mind that these ideas are suggestions, rather than actually rigid rules that must always be followed.


Subject Placement Within the Frame

With a Single Subject

When there’s just a single subject to be framed, it might seem logical to place it dead centre – with equal empty space around it in all directions. Sometimes this actually works, but the problem with this kind of framing is predictability. It’s always worth looking away from this option, and experimenting with positioning the subject at different sides of the composition to see which works best.

This becomes more important if the subject is relatively small in size compared to the full surrounding space. When the subject is off-center, it creates tension within your image. This tension can be described as a physiological force, which in photography gives an extra edge to your photos, conveying excitement and creating drama.

If your subject is off-center, it gives off the feeling that it’s either striving towards the center to once again become balanced in a logical place, or that it is trying to move even further away from the center towards the edge of the photograph. Fairly high level theory, I agree, but worth considering!

With Multiple Subjects

If there are other subjects to be framed as well, your composition needs to balance these subjects within the frame. I want to show you an example illustrating what I’m talking about, and I really couldn’t think of any better example than Trey Ratcliff’s famous photo: The Lonely Trinity.

In this picture, you can clearly see how Trey brilliantly balanced his photo by arranging the three main elements of his image in a triangular way, having every two opposite subjects balance each other out, ending up with a pleasing composition:


Visual Weight

When viewing a photograph, you usually look first at what interests you the most. That said, there are a few undisputable facts that are known to govern what interests viewers the most and what grabs their attention (and in what sequence).

Of course, figuring out how people view a scene is a complex process, but there is a general consensus over what attracts the eye first- either because we tend to relate to these emotionally and personally, or because we unconsciously rely on them to get a feeling or reaction.

For example, faces are known to be the most attracting visual element – in particular the eyes and the mouth. After all, these are what we look at for guessing how people feel, what they think of a particular situation, or how they’re going to react.

After that, writing tends to attract the eye the most. Writing conveys a high level of information about a specific situation. Even if written in a foreign language, writing still adds a great aesthetic quality to a work of art simply because of the fact that it represents an informational source or element.

Next comes other elements in the frame, determined by their prominence and the space given to them within the composition.


Conclusion

A visual work of art has always been, and always will be, subject to individual interpretation. Perhaps no artist will ever be able to perfectly direct their audience in the right direction.

What a photographer can do, to help viewers understand the sense of art in their work, is give them a little incentive or push in the right direction by observing and understanding the visual weights of different elements. Using these carefully can help a photo tell a story, engage an emotion, or draw all the readers attention to one particular point.

Building Persistant Sticky Notes with Local Storage


HTML5 local storage is like cookies on steroids; it’s incredibly simple to use and yet still so powerful. In this tutorial, I’ll show you how to create “sticky notes” functionality, that allows your users to take persistent notes while browsing your site.


Step 1: The HTML

Because of the dynamic nature of this project, there isn’t really much to code in the way of regular old semantic markup. We’ll just simulate a web page by putting together some filler content:

	<!DOCTYPE html>
	<html>
	<head>
		<meta charset='utf-8' />
		<title>HTML 5 complete</title>
		<link rel="stylesheet" href="default.css" />
		<link rel="stylesheet" href="stickies/stickies.css" />
		<!--[if IE]>
		<script src="http://html5shiv.googlecode.com/svn/trunk/html5.js"></script>
		<![endif]-->
	</head>
	<body>
		<article>
			<header>
				<h1> Sample Article Title</h1>
			</header>
			<p>Lorem ipsum dolor. . . </p>
			<!-- a few lorem-ipsum paragraphs later . . . -->
			<footer>
				<p>Copyright 2010 Andrew Burgess</p>
			</footer>
		</article>

		<script src="http://ajax.googleapis.com/ajax/libs/jquery/1.4.2/jquery.min.js"></script>
		<script src="http://ajax.googleapis.com/ajax/libs/jqueryui/1.8.2/jquery-ui.min.js"></script>
		<script src="json2.js"></script>
		<script src="stickies/stickies.js"></script>
		<script>
		</script>
	</body>
	</html>

There are a few important things to notice here: we’re including two CSS files: the first one is the simple styling for the page, which we’ve called default.css. Then, we’ve got a special CSS files for styles relating to our sticky notes; it’s called stickies.css, and as you can see, it lives in the “stickies” folder. At the bottom, we’re including four scripts:

  • jQuery, from Google’s CDN
  • JQuery UI, from Google’s CDN
  • JSON2, from Douglas Crockford
  • Our own stickies.js, which lives in the “stickies” directory

Then, we’ve got an empty script tag that we’ll use to start the engine a bit later.

And that’s it for HTML!


Step 2: The CSS

The contents of default.css is incredibly simple:

	body {
		margin:0;
		padding:0;
		background:#ccc;
		font:14px/1.5 "Helvetica Neue", Helvetica, Arial, san-serif;
	}
	article, footer, header { display: block; }
	article {
		width:880px;
		background:#fff;
		margin:auto;
		padding:40px;
	}
	article header {
		color:#474747;
		border-bottom:1px solid #474747
	}
	article footer {
		font-size:90%;
		color:#ccc;
	}

That’s it; now, there’s the CSS from stickies.css to look after … but we don’t have that markup yet. So let’s start some JavaScript, and when that’s done, we’ll look at the CSS for the sticky notes.


Step 3: The JavaScript

Here’s the skeleton for our JavaScript application:

	var STICKIES = (function () {
		var initStickies = function () {},
			openStickies = function () {},
			createSticky = function (data) {},
			deleteSticky = function (id) {},
			saveSticky   = function () {},
			markUnsaved  = function () {};

		return {
			open   : openStickies,
			init   : initStickies
		};
	}());

We’ve got a few interesting techniques going on here. First is the self-involking function: it might look like we’re assigning a function to the variable STICKIES, but if you look closely at the end of the function, you’ll see that we’re running it right away. As a hint—to remind us that this isn’t a normal function—we’re wrapping the entire function in parentheses. So, STICKIES isn’t a function, it’s the returned value from that function, which is an object, in this case.

That brings us to the next technique: closure. Notice that of the six functions we create, only two of them are exposed to the user (really, only one is necessary for the usage we’re planning; if we wanted to build support for creating notes into your website, we could expose the createSticky and deleteSticky). Even though the self-involking function finishes executing before we even use the methods, we’ll be able to use the other functions that we’ve defined.

Okay, let’s move on to the content of these function.


initStickies

We’ll start by looking at the initStickies function:

	var initStickies = function initStickies() {
		$("<div />", {
			text : "+",
			"class" : "add-sticky",
			click : function () { createSticky(); }
		}).prependTo(document.body);
		initStickies = null;
	},

This is pretty simple. We’ll be using jQuery to create elements quite a bit, and we’re using some special syntax in v. 1.4: that’s passing an object literal with the specs for the element as a second parameter to the jQuery function. Here, we’re creating a button to create a new note. That mean we need a new div; we’re setting the text to ”+” and giving it a class “add-sticky”; then, we’re setting a click handler to call the createSticky method (it’s important to call createSticky from inside a function, and not have the click handler call directly to createSticky; this is because createSticky can take a single parameter, and we don’t want that to be the event object). Finally, we’re prepending this div to the body. We end by setting initStickies to null; yes, we’re essentially getting rid of the function that we’re running. This assures us that this function will only be run once; we don’t want the user of our API to inadvertantly add multiple “add note” buttons to page.

openStickies

Let’s move on to the next method, openStickies:

	openStickies = function openStickies() {
		initStickies && initStickies();
		for (var i = 0; i < localStorage.length; i++) {
			createSticky(JSON.parse(localStorage.getItem(localStorage.key(i))));
		}
	},

We start by running initStickies … but what’s with the fancy syntax? Well, you’re probably familiar with && operator: the boolean AND operator. You’d usually use it to check multiple conditions in an if-statement. Here’s what it actually does: it evaluates the first expression, and if that comes out true, it will go on to evaluate the second expression. In this case, if initStickies has not been set to null yet, we’ll run the function. This avoids the error that would come from trying to run a null variable as a function.

Next, we’re looping over each item in localStorage. Here’s what we do in that for-loop (from inside to outside):

  • localStorage.key() is a great function that returns the key name of localStorage value; it takes a number as a paramter. It’s a great way to loop over each item in localStorage.
  • Once we have the key for a stored item, we can pass it to localStorage.getItem() to get its value.
  • Then, we pass that value to JSON.parse(); this comes from Crockford’s library. Because we’re storing a few values for each note, we’re using JSON.stringify() on the other end to turn an object into a JSON string, which we store. Here, we’re converting it from a string back into an object.
  • Finally, we pass that object to createSticky(), which turns it back into a sticky note.

createSticky

Now, let’s look at that createSticky method.

	createSticky = function createSticky(data) {
		data = data || { id : +new Date(), top : "40px", left : "40px", text : "Note Here" }

		return $("<div />", {
			"class" : "sticky",
			'id' : data.id
			 })
			.prepend($("<div />", { "class" : "sticky-header"} )
				.append($("<span />", {
					"class" : "status-sticky",
					click : saveSticky
				}))
				.append($("<span />", {
					"class" : "close-sticky",
					text : "trash",
					click : function () { deleteSticky($(this).parents(".sticky").attr("id")); }
				}))
			)
			.append($("<div />", {
				html : data.text,
				contentEditable : true,
				"class" : "sticky-content",
				keypress : markUnsaved
			}))
		.draggable({
			handle : "div.sticky-header",
			stack : ".sticky",
			start : markUnsaved,
			stop  : saveSticky
		 })
		.css({
			position: "absolute",
			"top" : data.top,
			"left": data.left
		})
		.focusout(saveSticky)
		.appendTo(document.body);
	},

Yes, it’s long, but it’s not going to be too hard. First, notice that this function takes a data object; as we just saw in openStickies, we’re passing the stored data to this function. However, if we aren’t passing in any data (i.e., we’re creating a brand new note), we’ll create the default note object. Since all notes have to be created at one point, all notes will start with this configuration. Notice that for the note id, we’re using +new Date(); that prepended unary plus operator converts the date we get from new date to a number, so this statement results in a number representing the number of milliseconds since January 1, 1970. Obviously, this number will be continually changing, so it’s a great way to uniquely identify each note.

The rest of the function is a long string of chained jQuery methods. Before we go through this, notice that we’re returning the result. If we exposed this method to developers using our mirco-API, it would return a reference to the sticky note div element.

So, here’s what’s going on:

  • First, we create the div that is the shell of the sticky note. Using that helpful jQuery 1.4 syntax, we give it a class of “sticky” and the id from the data object.

  • Then, we prepend a div to that one; this div gets a class “sticky-header”. div.sticky-header then gets two spans appended to it. The first, span.sticky-status, gets a click handler that calls the saveSticky function. However, that’s actually a hidden feature: this span will display the status of the sticky: saved or unsaved. There will be a few ways the sticky saves its data to localStorage; it’s possible that the user will think that clicking ‘unsaved’ will save the note, so we’ll provide them with that functionality. The second span, span.close-sticky, will be the delete button: when the user clicks it, we’ll remove the sticky from localStorage, via the deleteSticky method. We pass that method the note id.

  • Next, we’re appending another div to the main div.sticky; notice that we set the html property to data.text; when we save the note’s text, we’re using jQuery’s html() method, because using text() gets rid of line-breaks. We also set contentEditable:true on this div, because it’s the content of the note. As such, it also gets the class sticky-content. Finally, when a key is pressed on this div (meaning the user is changing the content), we want to mark it as unsaved, so we’ll call that function (which we’ll make soon).

  • Now, we’re using the jQuery UI draggable feature to make our sticky note moveable. In our parameter object, we’re using the handle property to make our notes only movable from the header bar. The stack property is a selector for the draggable elements to want to “stack”; by setting this, the currently dragged note will always come to the top. Finally, when we start dragging the note, we want to mark it as “unsaved” (because we have to save its coordinates, too), and when we stop dragging, we’ll save that sticky.

  • Next, we’re setting some styles for our div.sticky; we position it absolutely, and then set its top and left values to the ones in the data object. This way, the note will keep its position as well as its content when we refresh the page.

  • Finally, we’ll set an event handler for when we focusout of the sticky (essentially, click outside it after clicking inside it): we want to save the sticky. Lastly, we’ll append it to the body. For reference, here’s the html structure that we should have generated:

<div class="sticky ui-draggable" id="1281194825332" style="position: absolute; top: 40px; left: 40px;">
	<div class="sticky-header">
			<span class="sticky-status"></span>
			<span class="close-sticky">trash</span>
	</div>
	<div contenteditable="true" class="sticky-content">
		Note Here
	</div>
</div>

And that’s our createSticky function.

deleteSticky

Now we have the deleteSticky function; it’s really simple:

	deleteSticky = function deleteSticky(id) {
		localStorage.removeItem("sticky-" + id);
		$("#" + id).fadeOut(200, function () { $(this).remove(); });
	},

As you recall, the deleteSticky function takes the id of a note as its parameter. localStorage.removeItem() is the method of the hour: we pass it the key to a locally-stored value to remove that key-value pair (Notice that when we store the note data, we’re prepending “sticky-” to the id). Then, we find the element with the given id, fade it our, and remove it. Note deleted!

saveSticky

Second-to-last might be the most important method today: saveSticky: this is the glue that makes it all work.

	saveSticky = function saveSticky() {
		var that = $(this),  sticky = (that.hasClass("sticky-status") || that.hasClass("sticky-content")) ? that.parents('div.sticky'): that,
		obj = {
			id  : sticky.attr("id"),
			top : sticky.css("top"),
			left: sticky.css("left"),
			text: sticky.children(".sticky-content").html()
		}
		localStorage.setItem("sticky-" + obj.id, JSON.stringify(obj));
		sticky.find(".sticky-status").text("saved");
	},

The first line is a bit of resolution: there are three different elements we can call this function from. First, we’ll “jQuerify” this into that; then, if the element has either the “sticky-status” or “sticky-content” classes, we’ll get the parent div.sticky; if it doesn’t have either of those classes, then it’s div.sticky itself, so we’ll just use that.

Then, we need to get the values we want to store. As you can see, we’re getting the id, offset from the top and left, and the html of the child .sticky-content; remember, we’re using html() instead of text() because we want to keep the line breaks. Then, we use localStorage.setItem to store the data. Remember, it takes two parameters: the key and the value to store. Since localStorage only stores strings, we use JSON.stringify() to convert the object to a string.

Lastly, change the sticky status to “saved.”

markUnsaved

We’ve got one last function, which is just a helper function:

	markUnsaved = function markUnsaved() {
		var that = $(this), sticky = that.hasClass("sticky-content") ? that.parents("div.sticky") : that;
		sticky.find(".sticky-status").text("unsaved");
	}

Again, we have to start by resolving the reference to div.sticky; once we do, we can simply find the status span and set the text to “unsaved.”

Believe it or not, that’s all the JavaScript.


Step 4: The CSS, Revisited

Now that we know what our sticky note markup is, we can style it. It’s pretty simple; but look it over, and I’ll make a few comments at the end:

	:focus {
		outline:0;
	}
	.add-sticky {
		cursor: default;
		position:absolute;
		top:1px;
		left:1px;
		font-size:200%;
		background:#000;
		color:#fff;
		border:2px solid #fff;
		border-radius:40px;
		-webkit-border-radius:40px;
		-moz-border-radius:40px;
		text-align:center;
		line-height:25px;
		width:30px;
		height:30px;
	}
	.add-sticky:hover {
		background: #474747;
	}
	.sticky {
		width:300px;
		background:#fdfdbe;
		box-shadow:3px 3px 10px rgba(0,0,0,0.45);
		-webkit-box-shadow:3px 3px 10px rgba(0,0,0,0.45);
		-moz-box-shadow:3px 3px 10px rgba(0,0,0,0.45);
	}
	.sticky-content {
		min-height:150px;
		border-left:3px double rgba(238, 150, 122, .75);
		margin-left:30px;
		padding:5px;
	}
	.sticky-header {
		padding:5px;
		background:#f3f3f3;
		border-bottom:2px solid #fefefe;
		box-shadow:0 3px 5px rgba(0,0,0,0.25);
		-webkit-box-shadow:0 3px 5px rgba(0,0,0,0.25);
		-moz-box-shadow:0 3px 5px rgba(0,0,0,0.25);
	}
	.sticky-status {
		color:#ccc;
		padding:5px;
	}
	.close-sticky {
		background:#474747;
		float:right;
		cursor:default;
		color:#ececec;
		padding:1px 5px;
		border-radius:20px;
		-webkit-border-radius:20px;
		-moz-border-radius:20px;
	}

There are a few points of interest here:

  • Some browsers put an outline around elements with contenteditable=true when you’re editing the content. We don’t want that, so we’re getting rid of it with our :focus declaration.
  • The “Add Sticky” button is positioned in the upper-left corner; it looks vaguely similar to the “Add Dashboard Widget” in Mac OS X.
  • We’re using the border-radius and box-shadow CSS3 properties (and their appropriate vendor-prefix incarnations).
  • We’re also using rgba() for our shadow colours. It takes four parameters: the red, greed, and blue colours, and the alpha (transparency) value.

Other than that, it’s just your standard CSS. Here’s what a styled note should look like:

Note

Step 5: Starting The Stickies

Now that we’ve made our API, it’s time to get it started; we can do that from the extra empty script tag in our index.html file:

	STICKIES.open();

Conclusion: The Final Product

Well, we’re done! Here’s the final product in action:

That’s all I’ve got for today; how do you plan to use HTML5 local storage to spice up your web projects? Let me know in the comments!