In this tutorial you’ll learn how to create draggable windows using Flash and AS3. I’ll cover the basics of drag&drop, window bounds, adding content, and how to minimize the window.
Final Result Preview
Let’s take a look at the final result we will be working towards:
Step 1: Create a New File
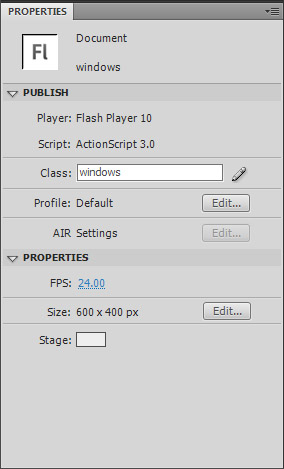
Okey, let’s gooo! Create a new document by hitting CTRL+N and selecting Flash File (ActionScript 3). Set the stage size to 600×400 px and the background color to #EEE. In the Properties window, set the class to windows and save your file as windows.fla.
Step 2: Design the windowArea
Select the Rectangle Tool (R) and draw a rectangle with 280×90 px. Select your shape, go to the Color palette (Window > Color) and create a gradient from #FFF to #CCC.
Hit F for the Gradient Tool, select your gradient, rotate it 90 degrees (by holding the Shift button while you rotate) and shorten it so it adapts the rectangle.
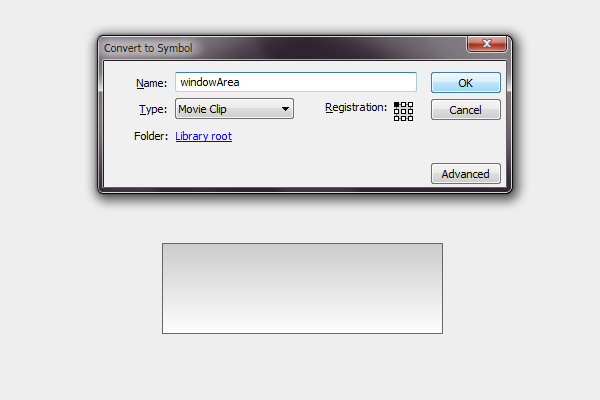
Select all the shape, hit F8 to Convert to Symbol, name it windowArea and set the registration point to the top left.
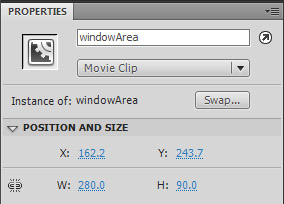
Select the symbol and in the Properties window set the instance name to windowArea.
For the border, use the Glow filter, with a 2px blur, strength 500%, color #666666. I used a glow because if you use a stroke, when you resize the Window the stroke will also resize.
Step 3: Design the windowBar Button
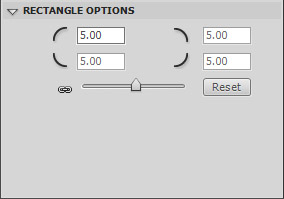
Select the Rectangle Tool (R) again and draw a rectangle with 280×22 px and a 1px stroke with the color #666. Create another rectangle on top of this, but this time in the Rectangle Options set the Rectangle corner radius to 5.
Now, eliminate the necessary corners like on the image below.
Then, paint your shape, select it, go to the Color palette (Window > Color) and create a gradient from #999 to #333. Rotate the gradient 90 degrees, like we did on the previous step.
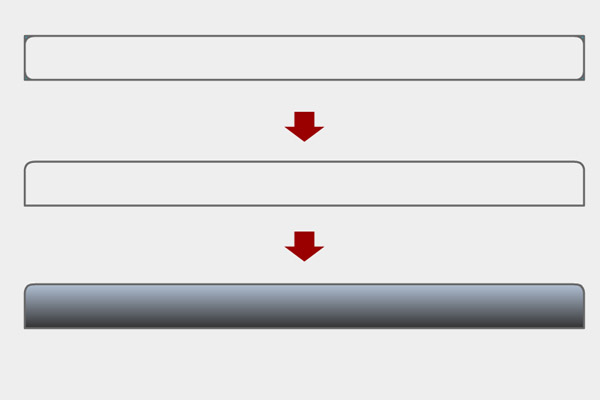
Select the all shape, hit F8. Name: windowBar; Type: Button; Registration: top left.
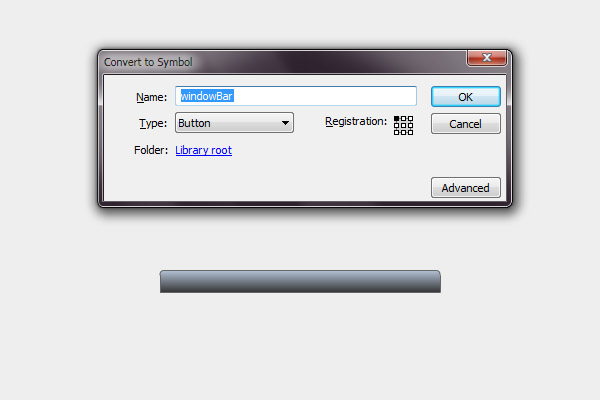
Select the symbol and in the Properties window set the instance name to windowBar.
Double click the shape, create keyframes for the Over and Down states. Now change the colors for each one.
I’ve chosen:
- Over: gradient from #FF9900 to #CC6633
- Down: gradient from #9933CC to #660099

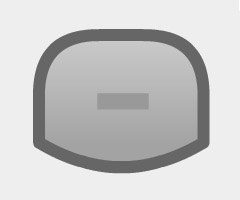
Step 4: Create the Minimize Button
Create a round rectangle with 14×11 px, 5px radius, and change it so it looks something like below.
The minus sign you do by creating a rectangle 5×2 px with the color #999. Set the instance name to minimizeBtn.
I used the same colors from the windowBar, but the UP State with a 40% alpha for the gradient.
Step 5: Create the Window
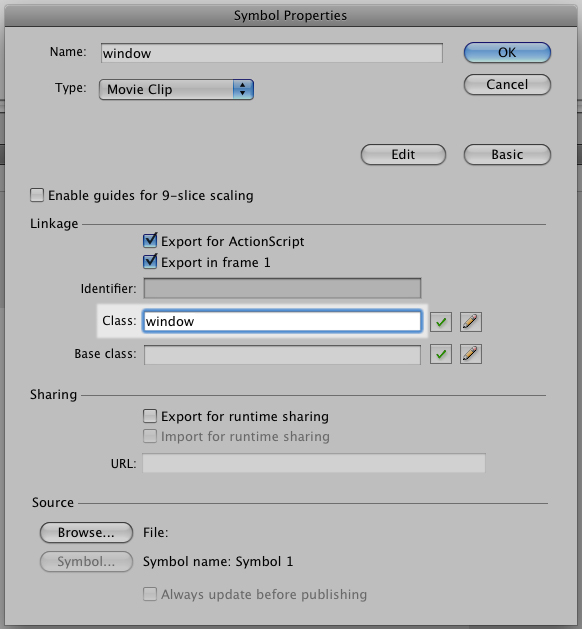
Arrange all shapes in form of a window, hit F8 and create a MovieClip with the name window and registration: top left.
In the Library, right click the Window and go to Properties. Set the class to window. This way the window will be assigned to the class we’ll be creating later.
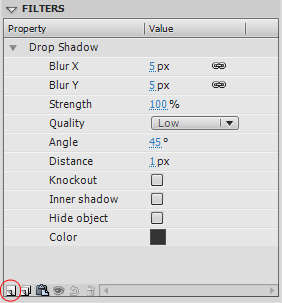
Select the symbol and in the Properties window set the instance name to window. In the Filters, click Add filter (the circled button in the image below), and add a Drop Shadow with the color #333 like below:
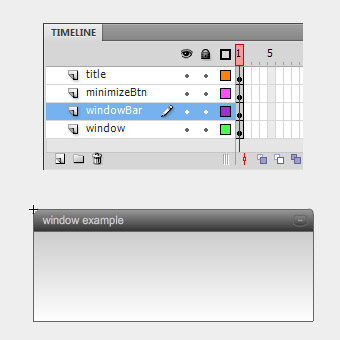
Double-click the symbol to edit it. Select all (CTRL+A), Right Click > Distribute to layers.
In a new layer, write the text for the window’s title with Arial, 11pt, color #CCC, letter-spacing: 1. Set it to Dynamic Text and name it windowTitle.
Step 6: Create the ActionScript File
Now that the design is complete, let’s start coding our scene. The first thing we’ll do is create our ActionScript file.
Hit Ctrl+N or go to File > New and select ActionScript File. Save it in the same directory and with the same name (windows.as) of your FLA file.
Now let’s create our package and import the necessary classes:
package {
	import flash.display.MovieClip;
	import flash.events.Event;
	import flash.events.MouseEvent;
	import flash.events.KeyboardEvent;
	import flash.events.ContextMenuEvent;
	import flash.geom.Rectangle;
	import flash.filters.DropShadowFilter;
	import flash.text.TextFormat;
	import fl.transitions.Tween;
	import fl.transitions.easing.*;
	import fl.transitions.TweenEvent;

	public class window extends MovieClip {

	}
}
Step 7: Add Event Listeners
Now you need to assign functions to our buttons. You’ll need a function to when we start to drag the windowBar, another to stop the drag, one to bring the window to top when you click it, and another to minimize it.
Add these Event Listeners to the public function Window() in our code:
public class window extends MovieClip {

	// variables
	public var title:String;

	public function Window() {

		// set windowTitle
		title = windowTitle.text;
		windowTitle.mouseEnabled = false;

		// windows functions
		this.addEventListener(MouseEvent.MOUSE_UP, onWindowClick);
		this.windowBar.addEventListener(MouseEvent.MOUSE_DOWN, onWindowStartDrag);
		this.windowBar.addEventListener(MouseEvent.MOUSE_UP, onWindowStopDrag);
		this.minimizeBtn.addEventListener(MouseEvent.MOUSE_UP, minimizeWindow);
	}

}
The public var title is used for the window’s title. We’ll be using this later.
Since the windowTitle is a dynamic text we disable its mouse functions so that they won’t affect the dragging area of the windowBar.
Step 8: onWindowStartDrag Function
This is where we start having fun! Copy the following code after the public function Window():
/* START DRAG
**********************************************************/
private function onWindowStartDrag(e:MouseEvent):void {

	var windowWidth  = this.width;
	var windowHeight = this.height;

	var windowBarWidth  = e.target.width;
	var windowBarHeight = e.target.height;

	var boundsRect:Rectangle;

	// window's draggable boundaries
	if (windowArea.visible) {
		boundsRect = new Rectangle(0, 0, stage.stageWidth-windowWidth, stage.stageHeight-windowHeight);
	} else {
		boundsRect = new Rectangle(0, 0, stage.stageWidth-windowBarWidth, stage.stageHeight-windowBarHeight);
	}
	//trace(boundsRect);
	this.startDrag(false, boundsRect);

	// bring window to front
	stage.addChild(this);
}
The first thing we do here is create variables to the widths and heights of the Window and the windowBar.
Next, the window’s boundaries. We’ll create two boundaries: one when the window is normal (if windowArea is visible) and another when it is minimized. You do this by creating a rectangle with the size of the stage. The rectangle supports four attributes (x, y, width, height). It’ll start in the corner of the screen (x: 0; y: 0) and extend to the other corner of the screen. Because the bounds are related to the registration point of the window, we’ll need to subtract the window width and height (or the windowBar‘s in case the window is minimized).
After the bounds have been set, we’ll set the window to drag. We’ll drag this, the Window class. In other words, the whole window.
this.startDrag(false, boundsRect);
The startDrag function supports two attributes: lockCenter and bounds. If you don’t want any bounds just write this:
this.startDrag(false);
If we have several windows we’ll need to bring the current window to the top of the display. We do this with the addChild by adding it again to stage:
// bring window to front
stage.addChild(this);
Step 9: onWindowStopDrag Function
This one is really simple. We’ll use the stopDrag function here. Just copy the following to your code after the previous onWindowStartDrag function:
/* STOP DRAG
**********************************************************/
private function onWindowStopDrag(e:MouseEvent):void {
	this.stopDrag();
}
Step 10: Bring Window to Front
Again, really simple. When we click the window we’ll bring it to front using addChild.
/* WINDOW CLICK
**********************************************************/
private function onWindowClick(e:MouseEvent):void {
	// bring window to front
	stage.addChild(this);
}
Step 11: minimizeWindow Function
To minimize/show the window, we’ll toggle the visibility of the windowArea like this:
/* MINIMIZE WINDOW
**********************************************************/
private function minimizeWindow(e:MouseEvent):void {

	windowArea.visible = !windowArea.visible;
}
You can improve this by fading out the window and hiding it, and vice-versa:
/* MINIMIZE WINDOW
**********************************************************/
private function minimizeWindow(e:MouseEvent):void {

	var fade:Tween;

	if (windowArea.visible) {
		fade = new Tween(windowArea, "alpha", Strong.easeOut, 1, 0, 0.5, true);
		fade.addEventListener(TweenEvent.MOTION_FINISH, fadeFinish);
	} else {
		fade = new Tween(windowArea, "alpha", Strong.easeOut, 0, 1, 0.5, true);
		windowArea.visible = !windowArea.visible;
	}

	fade.start();

	function fadeFinish(e:TweenEvent):void {
		windowArea.visible = !windowArea.visible;
	}
}
The Tween supports the following values:
Tween(object, "property", EasingType, begin, end, duration, useSeconds);
For more extensive reading, use the LiveDocs.
In our case, what we’re doing is, if the windowArea is visible (meaning: not minimized), it will fade out the windowArea and when the tween finishes (TweenEvent.MOTION_FINISH), it will hide the windowArea. Vice versa if it’s minimized.
Step 12: Set the Title
We’ll use the variable t to change the windowTitle. The other two lines are just to resolve a letter spacing issue. If you don’t write them Flash will reset the letter spacing to zero.
/* SET WINDOW'S TITLE
**********************************************************/
public function Title(t:String):void {

	var fmt:TextFormat = windowTitle.getTextFormat();
	windowTitle.text = t;
	windowTitle.setTextFormat(fmt); // letter spacing issue

	title = t;
}
This function will be used later like this:
YourWindowName.Title("Name of your window");
Step 13: Set the Size
This function will receive two attributes: the Width and Height of the window. If neither is filled, it will be set to the default size (280×112 px)
What we do here is change the width of the windowBar, the windowArea and the windowTitle. For the height we just change the windowArea‘s, leaving the height of the Window to its default size, just like a normal window.
When resizing we’ll have to reset the position of the Minimize Button. Which is equal to the window’s width minus the button’s width and 6px.
/* SET WINDOW'S SIZE
**********************************************************/
public function Size(Width:int = 280, Height:int = 112):void {

	// change width
	windowBar.width = Width;
	windowArea.width = Width;
	windowTitle.width = Width - 45;

	// change content height
	windowArea.height = Height;

	// reset minimizeBtn scale/position
	minimizeBtn.x = Width - minimizeBtn.width - 6;
}
This function will be used later like this:
YourWindowName.Size(350,200);
Step 14: Give it a Nice Shadow
Remember when we placed a Drop Shadow under the Window? Well, if you place the window by code you’ll need to add the drop shadow by code as well.
All of the above attributes can be set by code. Copy the function and change the values according to your own taste:
/* SET FILTER: DROP SHADOW
**********************************************************/
public function DropShadow(color:String = "333333"):void {

	var dropShadow:DropShadowFilter = new DropShadowFilter();

	dropShadow.blurX = 5;
	dropShadow.blurY = 5;
	dropShadow.strength = 1;
	dropShadow.quality = 1; // 1- low; 2- medium; 3- high (max: 15)
	dropShadow.angle = 45;
	dropShadow.distance = 1;
	dropShadow.alpha = 1;
	dropShadow.knockout = false;
	dropShadow.inner = false;
	dropShadow.hideObject = false;
	dropShadow.color = int("0x" + color);

	this.filters = new Array(dropShadow); // add filter to the window
}
This function will receive a String with the color’s hexadecimal code. If this is not filled, the default color value will be #333333.
The quality can go from 1 to 15, being 1 2 3 – low, medium and high. We used low, here.
The color must be converted from a String to an int.
After defining the attributes we must add the filter to the window like in the last line. This will create an Array of filters. Which means you could add other filters to the Window as well.
this.filters = new Array(dropShadow);
This function will be used later like this:
YourWindowName.DropShadow("FF0000"); // adds a red shadow
Step 15: Adding a Window by Code
Now change to your Flash file, create a new layer, name it as3 and hit F9 for the ActionScript (or go to Window > Actions).
Adding a Window is very simple. All you need to do is create a variable (let’s call it myWindow), assigning it to the Window class and the add the Window to stage:
var myWindow:window = new window;

addChild(myWindow);
This will produce a Window with its default values.
Step 16: Changing the Values
You can change several attributes of the Window:
- Title
- Shadow
- Size
- X and Y position
- Content
Again, the first thing to do is to create the variable assigned by the Window class:
var myWindow:window = new window;
Then you can start changing the attributes:
Changing the Title:
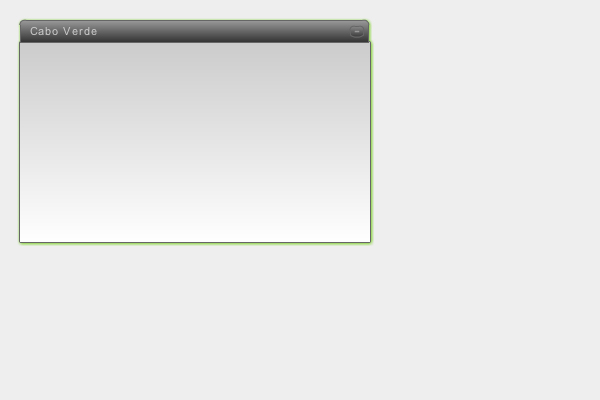
myWindow.Title("Cabo Verde");
Changing the Shadow:
myWindow.DropShadow("66CC00"); // adds a nice lime shadow
Changing the Size:
myWindow.Size(350,200);
Changing the Position:
myWindow.x = 20;
myWindow.y = 20;
Adding the window to stage:
addChild(myWindow);
The all code will be like this:
var myWindow:window = new window;

myWindow.Title("Cabo Verde");
myWindow.DropShadow("66CC00");
myWindow.Size(350,200);
myWindow.x = 20;
myWindow.y = 20;

addChild(myWindow);
Step 17: Using Additional Windows
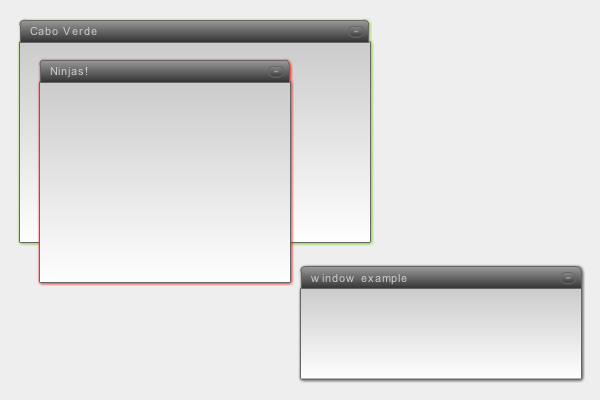
Here’s another example with two windows added by code and a default one in the stage:
var janela:window = new window;
var janela02:window = new window;

janela.Title("Cabo Verde");
janela.DropShadow("66CC00");
janela.Size(350,200);
janela.x = 20;
janela.y = 20;

janela02.Title("Ninjas!");
janela02.DropShadow("FF0000");
janela02.Size(250,200);
janela02.x = 40;
janela02.y = 150;

addChild(janela);
addChild(janela02);
If you need to know the window’s title, you can use this:
trace(janela.title);
Milestone
Well done for following so far! You should now have achieved a result similar to what we looked at in the beginning:
Step 18: Different Content in the Windows
If you notice by now, you can change all the window’s attributes but the content remains the same. So let’s create the content.
Open the Window’s MovieClip, create a new layer for the content and go to Insert > New Symbol (CTRL+F8). Choose MovieClip, name it content and hit OK. Now place it at X:0, Y:22.
Select the new content symbol you just created, and set its instance name to CONTENT.
Double-click the content, name the existing layer content and create another one named as3. In the latter, hit F9 and write:
stop();
This will be our default content. Meaning, nothing!
Now create another keyframe and place an image for example. Bear in mind the size of the window you’ll be using. Add another keyframe and write some text in it. Now we have 3 keyframes: 1. no content, 2. image, 3. text.
As for the code, add this to your class file:
/* CHANGE CONTENT
**********************************************************/
public function Content(c:int):void {

	CONTENT.gotoAndStop(c);
}
Really simple. We’ll just say which keyframe we’ll want to go to.
You’ll also need to change the minimizeWindow function to this:
/* MINIMIZE WINDOW
**********************************************************/
private function minimizeWindow(e:MouseEvent):void {

	var fade:Tween;

	if (windowArea.visible) {
		CONTENT.visible = !CONTENT.visible;
		fade = new Tween(windowArea, "alpha", Strong.easeOut, 1, 0, 0.5, true);
		fade.addEventListener(TweenEvent.MOTION_FINISH, fadeFinish);
	} else {
		fade = new Tween(windowArea, "alpha", Strong.easeOut, 0, 1, 0.5, true);
		windowArea.visible = !windowArea.visible;
		CONTENT.visible = !CONTENT.visible;
	}

	fade.start();

	function fadeFinish(e:TweenEvent):void {
		windowArea.visible = !windowArea.visible;
	}
}
Step 19: Changing the Content in the Code
In the previous example, add this to the code:
janela.Content(2); // goes to the image keyframe
Here is the complete code:
var janela:window = new window;
var janela02:window = new window;

janela.Title("Cabo Verde");
janela.DropShadow("66CC00");
janela.Size(350,240);
janela.Content(2); // goes to the image keyframe
janela.x = 20;
janela.y = 20;

janela02.Title("Ninjas!");
janela02.DropShadow("FF0000");
janela02.Size(250,200);
janela02.Content(3); // goes to the text keyframe
janela02.x = 40;
janela02.y = 150;

addChild(janela);
addChild(janela02);
Conclusion
So, there’s a simple way to create a draggable window (much like we see on Windows). If you want to go further, you can change the content MovieClip, adding text, buttons, images, etc. You could add scrollbars, call content through XML, or whatever you can think of. The possibilities are endless!
Here’s another awesome example:
This is eXOTRik, and I hope you found this useful. It’s my first tutorial, hope to bring you some more ninja tricks. Ayaaaa!