What Goes in Your Mouth Comes out in Your Reports

Many people don’t take into account the importance of a balanced diet let alone when it’s related to work. Employees often put work before health, drinking multiple cups of coffee or skipping lunch or dinner in exchange for more time to do those reports, never wondering about the effects these habits have on their health. I turned to an expert for advice.

Louise Horner is an Australian dietitian. Among her nutrition-related activities is presentations in the workplace, from which she drew the following advice:

  • Drink WATER. “The most important thing for working in an office is WATER.” Air conditioning or heating systems make people tired. Most workers react by filling up on coffee, which may boost their energy in the short term but doesn’t do much good in the long term. “Drink at least 500 ml of water and this will help fight fatigue.”
  • Plan for the week. “Have a week of supplies ready on Mondays, including fruit, nuts, tins of tuna, soups, vita wheats or rice cakes as nibbles so you are less likely to over indulge in that birthday cake or the cookie jar.”
  • Eat regular meals. “Take breakfast cereal (high fiber/low fat) to work and eat that if you’ve rushed out the door.” This will make you less likely to pick on options that aren’t very healthy as the day progresses. Eat regular meals and avoid being overly hungry or you will be again tempted by (and may over eat) quick, high fat/high sugar fixes.
  • Get peer support. “It’s a good idea to get the entire office on board to eat healthier and support each other to do the same. Choose healthy lunches, agree to have healthy morning or afternoon tea as this will make it a lot easier to remove the temptations or to resist them.”

Just eating regular meals isn’t all there is to it, of course. What you eat is very important. Fast food every day and your arteries will let you know when they’re full, literally. Nothing but salads every day and you’ll collapse sooner or later. If you don’t put into your body the necessary and proper fuels how can you expect your body to function properly? And remember that your brain is part of your body.

If you’re a junk foodie it may be hard to acquire good eating habits, which are usually associated with celery sticks — oh SO tasteless. Well, yeah: our tongues love fatty, sugary and salty treats. The owners of fast food joints and restaurants know this and they’ve got pros working on it.

The Deal with the Fatty Stuff

In a recent article (editor’s note: the Guardian has since removed the content from the page) in The Guardian, David A. Kessler discussed the rising rate of obesity, especially in the UK and the US. A former commissioner of the U.S. Food and Drug Administration (FDA), Kessler tells us how food engineers develop foods to make us feel good while eating and to make us eat more while still feeling unsatisfied, leading us to stuff ourselves:

  • A combination of high levels of sugar, fat and salt will make us love a food and want to eat more of it.
  • If you chew less you’ll eat faster and won’t feel how full you’re getting; by the time you feel full you’ll have overeaten. For you to chew less, food joints make foods just soft enough so you feel like you’re chewing enough but also so that the food sort of melts in your mouth.

I’d thought that restaurants would want to serve smaller portions so that their food costs would decrease but it turns out that foods that are high in sugar, fat and salt make the customers somewhat “addicted” to the foods since this combination offers the eater a bigger “reward” than milder foods; the more they feed you the more you want to eat. This reward is none other than increased levels of dopamine, the same chemical whose level is elevated when people use cocaine.

So of course it’s hard to go from a junk food diet to a healthy one: “junk foodies” are pretty much addicts. Louise Horner recognizes this challenge and offers these tips:

  • If you’re a savory buff try low fat pretzels, popcorn with some salt but NO butter, a small handful of nuts and rice cakes.
  • If you have a sweet tooth try dried fruit, raisin toast, low fat/low sugar chocolate milk, low fat/low sugar fruit yogurts and fruit generally.
  • Munching on celery sticks is healthy but not very enjoyable so slowly introduce fruit and veggie snacks if you’re not used to them — start by putting them in sandwiches or making salads. (Author’s note: I like to dip celery sticks and strips of bell pepper in hummus or yogurt/spinach dip).

We maintain our computers, our cars and other mechanisms we need in our work lives but sometimes we forget that our bodies are also necessary for us to work (duh!). We need to put our health at the top of our priority lists.

Memories Photography Competition: Voting Round 1

A huge thank you to everyone who entered our recent photography competition. We’ve received some absolutely phenomenal photos, and I’m thrilled to open up voting for you to choose your favourite! Read on to view the images, and find out how to choose the winner.


The Voting Process

We’ve gone through all the submissions received, and picked around 150 that we feel are worthy of putting to a reader vote. If yours wasn’t included, we hope you won’t be discouraged and will try again next time!

Voting will take place in three parts of around 50 images each, with the 10 highest rated photos of these three rounds going into a “final”.

This is the first round, and the next two will be published over the coming two weeks. If you don’t see your photo here today, don’t worry – it’s probably coming up in round two or three.

Spend some time looking over the following photos and, when you’ve decided which you’d like to win, scroll to the bottom of the page to cast your vote! You’ll be able to vote once for each round, and again in the final!


The Competition Finalists – Round 1 of 3


Entry Number: 1

This little guy wasn’t very happy about being woken up from his afternoon nap. It only took a few minutes of bonding with his dad to get him happy, smiling and ready for his very first birthday party. For many of us, we don’t remember our first birthday party or many of our first celebrations. The family, friends and of course the Dads never forget these little happy memories.


Entry Number: 2

Although I still read Mickey Mouse, but those old black and white ones reminds me of my childhood, the ones you see in the picture are around 14 years old.


Entry Number: 3

I took this photo on a walk with my daughter and fiance on a beautiful spring day 3 years ago. It is uploaded as shot, completely unedited. This photo represents two sets of memories for me – of my own childhood and the time I was able to spend with my daughter that spring and summer.


Entry Number: 4

This photograph of a worn, wrinkled cricket ball rekindles many different memories for me, family and friends. Shot with the addition my father’s 1970’s Tamron lens fitted to my DSLR, I have and will continue to capture my teenage events through the same lens as he did when he was a teenager. From my father’s point of view, this picture represents the passing of a hobby – photography – to the next generation of his family. From my mothers point of view, it is not the mechanics behind the image but the subject – the cricket ball which was used by her, her siblings and their friends.

It rekindles the enjoyment they had playing cricket together during the summer. For me, the photograph represents memories which I have not seen, but have heard about. In the summer, I play cricket with my siblings and friends, sometimes using this ball, again bringing down a hobby to to the next generation of my family. I feel that the vividness of the red in the ball shows that it still has some life left in it and it will be used further in the future generations


Entry Number: 5


Entry Number: 6


Entry Number: 7

Memories, it can be anything. Starting from a small significant thing, music and other. Some time it takes us to our childhood or even takes part in memories about our first love. The fragment space of full memory is reflected on my photo, but there are no things that could remind of something, there are only the trails of those things.


Entry Number: 8

I took this photo at a Civil War Living History Event. How appropriate for an assignment on memories is an event that brings the past alive? This woman reminds me a bit of my grandmother who used to knit caps for me when I was very young.

More than that, it looks as if the knitter was thinking about something very pleasant that happened in her past. The blurred background is like some distance place that remains only in her memories.


Entry Number: 9

Dad hosing the backyard. A tipical new year holiday afternoon. It is summer here in South America, and it reminds me of my childhood in the brazilian countryside.


Entry Number: 10

In this picture a kid his enjoying a sweet right to the end…. reminds me of how I enjoyed those chocolates given to me by my mother as a reward for working hard at school (Even though i hardly worked :) ) A child has the innocence that would take you years back in the past and make you remember all those incredible small moments that you would usually forget….


Entry Number: 11

I captured this image of my two sons during their first beach trip. What’s better than sun, sand, and water to play in. They were a little afraid of the ocean, so we setup a small pool on the beach and let them play with their sailboats and shovels. I will never forget their reaction to their first beach experience, and this photo sums all that up.


Entry Number: 12

A moment taken to indulge in a forgotten childhood, a playground brings out any inner child. It is an intrinsic memory, kept within as your body instinctively reaches for that swing.

You stop as you realise it is a memory resurfacing, taking over for that brief moment. You realise and sit, laughing at the child you so briefly let out.


Entry Number: 13

I have always been fascinated by the sneakers you might see hanging on the telephone lines around various cities. Although the meaning of the sneakers is debatable, no matter which meaning you believe is true they all somehow invoke a moment or memory.

A large moment or memory I have is of course, film. The look and feel is really something that is hard to replicate, especially in print. The natural nostalgia that the grain has is something I miss at times and my goal was to get a personal feeling back in a digital format.
I hope you enjoy the image as much as I enjoyed making it.


Entry Number: 14

This is a training for the Ames Fire Department. When I was a boy I wanted to be a fire fighter. When I grew up I became an Emergency Medical Technician and now I am in college to be a police officer. You could say this picture created all my dreams.


Entry Number: 15

One thing I hope a never forget is playing this game with the master at it (aka, my dad). The game is an old one called Acquire and is the best strategy game out there. Period.

When I first started playing this game, I was, understandably, terrible at it. Over the next few years, I got better, even to the point where I could win the occasional game, but I don’t think I’ve ever been able to match the level of skill my dad plays at.

I hope I never forget all the fun times I had playing this with my dad. Maybe some day when I have kids I’ll be able to pass it along to them.


Entry Number: 16

This photo means to me that we have to remember about those we love and communicate with them as often as we can, especially now when it’s so easy to do. And we also have to keep them in memory when they leave us, cause memories are the only things we leave after.


Entry Number: 17

They say that “The eyes are the window to the soul”. I can’t think of a truer description of my wife, Tanya, or this photo of her. She has the most gorgeous eyes I have ever seen. Beyond their stunning blue color and clarity, they reflect a much deeper inner beauty. She is as kind as the day is long, quick to offer a smile and an encouraging word, and always seems to offer something that will make you laugh and forget the troubles of the moment.

On this day, we were visiting Seneca Lake, located in New York state’s gorgeous wine country. We lazily made our way to each of the vineyards, sipping wine, talking, laughing, and simply enjoying life. I happened to catch Tanya glancing wistfully at the beauty of our surroundings and snap this picture. Despite the thousands of photos I have taken of Tanya over the years, this one seemed to capture her beauty better than any other.


Entry Number: 18

This photo reminds me of how simple the times were back when i had not a care in the world, being at a very young age then.

Although I didn’t have much money to spend to take great quality photos with a SLR or anything, I still had the passion to capture the moment. Regardless of the digital quality, I still felt the moment had to be captured somehow to express how I seen it


Entry Number: 19

Eternal memory was left to us by our grandfathers who were at war for the Native land, for the future generation, in the Second World War. We cannot feel all their pains and sufferings, but we can store memoirs on them and be proud of their courage. War, in which practically in each family somebody has lost, forever remains in memory of generations.


Entry Number: 20

Two quotes come to mind whenever I see this picture I took during a church organized mission trip to Selangau indigenous longhouse.

“Children have neither a past nor a future. Thus they enjoy the present – which seldom happens to us.” Jean de la Bruyere

“Every child is an artist. The problem is how to remain an artist once we grow up.” Pablo Picasso

The children were coloring the eggs for easter which was the message we wanted to send across to the people during this mission trip. I do like to think we did a good job seeing how happy they were from this picture.


Entry Number: 21

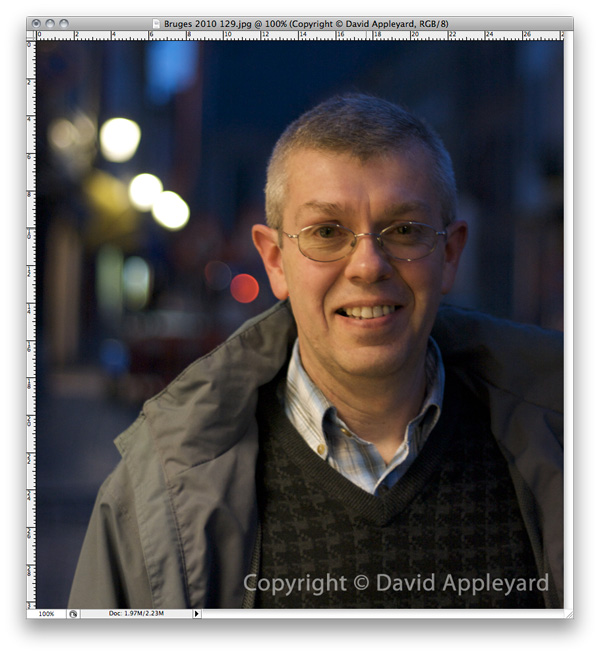
In India, I saw this old man sitting on the corner of road alone. I stopped my Motor Cycle and went near to him asked him ” can i take a snap of you”. He replied “me?”. I said “yes,sir! i want to take a photograph of you… smiling sir.”

“My smile and happiness gone along with my Late wife… my son have sleeping disease which doctors told cannot able to cure. My daughter not accepting me and she think I’m a burden for her. Only My Daughter-in-law is only going for work and earning money but its not enough for spending my sick son and for her expenses so i don’t want to be a burden for them at home so, I will be sitting here and spending my life by thinking about my wife and the good memories we had together”.

He continued “I want to die but I fear of pain because i think enough of pain in my life at least i don’t want to die with Pain, Death – Where are you ? take me with you without pain.”

I never expected this answer from him.. but i got an opportunity to meet a man living only with his memories. So much pain in this world.


Entry Number: 22

Today’s Joy, Tomorrow’s Memories! – My title says it all… I agree not only joy and rejoicing last forever but we never wait for a sorrows to sit in our head. In this picture I want bring out the memories of each and everyone’s childhood period. A time where full of happiness and joy which never comes back for us, but I’m happy that I have captured this movement for 6 children.


Entry Number: 23

This frame was just a quick moment, but always reminds me of a insignificant yet important childhood memory. Sometimes the most powerful memories we have are more represented by feelings than actual events. The feeling of comfort, warmth or home may have come from just a moment on your mothers lap, but can last a lifetime. Although there is a good deal of DOF here, there’s a fake tilt-shift added which brings the focus even more onto the girls face, and makes the frame just a little dreamy.


Entry Number: 24

This picture was taken on my uncle’s farm in the Free State, South Africa on my Gran’s 90th birthday. Her 88 year old sister is sitting next to her. She had a stroke 3 days later and passed away 3 months after that.

This will forever be the memory I have of my fantastic Granny who always had time for any of us, age 1 or 11 or 17 or 30. She was an amazing woman. And now, memories are all we have left.


Entry Number: 25

These are all the kicks and shoes that don’t fit my daughter anymore. They grow fast.


Entry Number: 26

I enjoy the fact that someone took the the time to collect all these items from so many places.


Entry Number: 27

As a child, I went on quite a few family vacations to Walt Disney World in Orlando, Florida. I developed a major love of Disney World and still consider it one of my favorite places to visit, despite being “just a theme park” to some.

Whenever I go, I have an immediate sense of nostalgia just remembering the good times my family and I have had there. Recently I went back – without my family – and was struck by how much I missed being a kid. The autograph books, the mouse ear hats (oh, well I did rock the mouse ears), the balloons… I realized that just because I am an adult now, that doesn’t mean I can’t relive my childhood whenever I go back to Disney World.


Entry Number: 28

When my boyfriend and I went to Florida last September, I had no idea that he was counting on me to wake up to photograph the sunrise one morning. I love sunrises and make it a point on most vacations to wake up for at least one. Long story short, he knew me well enough to secretly plan his proposal for whichever morning I’d decide to roll us out of bed to head for the beach.

After the sun had risen about 45 minutes later, I started to pack my camera equipment away, ready to hit the shower and eat breakfast back at the hotel. But instead, Jon proposed.

It was even more incredible than I’d have imagined that moment to be. I wanted to document it somehow, but in the true essence of early morning photography, I was still in my pajamas… and don’t even get me started on my hair. I snapped a few self portraits of us, but I wanted something that we could frame and look at forever, to preserve the memory of that special morning.

I set my tripod back up and adjusted the settings to create a silhouette of the two of us, backlit by the sunrise. I am so happy with the way this picture turned out. It brings us right back to that September morning in Florida: sand between our toes, waves washing around our ankles, and a ring upon my finger.


Entry Number: 29

Washed and nostalgic memories looking at a little girl trying to make her kite fly.


Entry Number: 30

Washed and nostalgic memories looking at a little girl trying to make her kite fly.


Entry Number: 31

A picture of a little girl playing by the river can make one recall memories of themselves when they were once a little kid playing by the water. There is nothing better than throwing rocks at the water and just reminds me of the life when we were kids as life was so simple and enjoying without the stress and pressures of an adult life.


Entry Number: 32

Being read to as a baby is something that all babies have the experience of. Although most of us would not remember the actual instances, when we see it happen, we know we have been in that role before and its nice to continue the cycle of life and read and educate to the next generation.


Entry Number: 33

This photo is the literal act of memory. It was taken with the purpose of reminding me, if I ever forgot, about where I had been and where I was going. As the photo was being taken (with the self-timer, an act of creating memory pre-emptively) I was mulling everything I had been through over in my head. When I look at this photo, I literally remember remembering and remember remembering to remember and I remember what I am to remember. It is deliberate, like the art of memory, and accidental like the fact of memory.


Entry Number: 34

This is Víctor David Finol Arraiz, my firstborn son, three weeks after he was born. A few days before taking this picture I dropped one of my vintage lenses, and its mechanism got stuck. I disarmed it and looking through it I got the idea for this photo. The effect is real, it is not edited. It was taken with an old 50mm Pentax manual lens, through an old 50mmChinon lens. It’s memorable to me, to my family, because the lens in the picture was the first lens I bought (fist one I ever broke, too) and used on my first DSLR ever, taken within the first month of living in my first apartment, and the subject is my parents first grandson. I have gotten many complements on this picture, and I think it is one my son will proudly hang on his wall when he is a man.


Entry Number: 35

Traveling was one of the most incredible parts of living in China. Life in the Chinese countryside was far different from anything I had ever seen in America, and even anything in Beijing. This picture was taken in Yunnan, China after a long walk through the Chinese countryside. We arrived at an overlook and stopped to watch the sun set. The mountains around us were terraced for miles without the help of modern machinery. The water-filled rice paddies reflected the sun up the canyon, creating a dream-like effect. This picture reminds me of that incredible sunset, but also of all the other incredible things I saw traveling.


Entry Number: 36

This picture was taken in an art district called M50 in Shanghai, China. My American parents had come to visit me over Christmas break and some of their old friends were showing us around Shanghai (they are the silhouettes in this picture). This picture reminds me of the confusion I felt when they came: my American life and my Chinese life were overlapping and I wasn’t sure what to make of it. It was a taste of what life would be like returning to the States.


Entry Number: 37

Memories are heartbeats
Sounding through the years
Echoes never fading
Of our smiles and our tears.
Moments that are captured
Sometimes unaware
Pictured in an album
Or a lock of hair.

Images that linger
Deep within the mind
Bit of verse we cherished
Once upon a time.
Through the musty hallways
Of the days we knew
Ever comes the vision
Beautiful and true.

Memories are roses
Blooming evermore
Full of fragrant sweetness
Never known before.
Life must have a meaning
Goals for which to strive
Memories are lights that burn
To keep the heart alive


Entry Number: 38


Entry Number: 39

This photo was taken in January of this year during a visit in LA to surprise my friend on her birthday, and is probably my favorite photograph I’ve taken in the 6 years or so I’ve been pursuing photography as a hobby. The photo was taken during lunch at the same restaurant we all ate lunch at after we met for the first time. This place serves to remind me of what was essentially the starting point of my relationship with my two best friends, who unfortunately now live 4 hours away.

Every time I see this photo, it instantly transports me back to LA, back to this booth, in this restaurant, with my best friends, and the incredible memories I’ve had with them come rushing back into my mind. Whenever I am having a bad day, something isn’t going right, or I just need a reminder of some of the greatest moments I’ve had in my life, I pull out a creased, wrinkled copy of this photo from my wallet; when I unfold it, I can feel me fear, worries, and anxieties !
fading away, and I know that all will be right in the world.


Entry Number: 40

My little brother on learning to ride a bycicle. My papa is seen in the background, helping him hold balance. This picture was taken during the summer, at our summerhouse.

Learning to ride a bycicle is an important thing in Denmark, and is a skill you will need the rest of your life. To me, this event was fun to document. I hope to pass print of it on to my brother, once he grows old enough to appreciate it.


Entry Number: 41

I took the day off to photograph what I anticipated would be a very interesting day of protest marches through the streets of Pittsburgh, during the G-20 Summit. There were some very tense moments between police and protesters the day before the march and during it as well. The police were clearly out in force and clearly were going to safeguard the property of the city and its citizens.

Amidst the crowds, many of which were clearly angry and expressing a great deal of frustrations with the G-20 Summit leaders who in habited Pittsburgh’s Convention Center, I found this beautiful young lady. She was dancing through the streets with some of her fellow theater students from Carnegie Mellon University. I didn’t catch her name, but affectionately dubbed her, “Sister Moon Child”, due to her expressive eyes and playful nature.

She was a real delight, signing, chanting, and dancing for approximately three miles through the streets of downtown Pittsburgh. Her expressive eyes and facial expressions reminded me of Annie Lennox quite a bit. Of all the people that marched that day, she and her colleagues surely got the most exercise! She seemed to have no ax to grind, but was simply there to express her artistic talents and provide a bit of joy and levity in a somewhat tense environment.

Seven months after posting her photo on my flickr site, I was surprised to see a note from her on one of her photos. She had apparently found the photos I took of her and provided her name and website links. I was pleased to finally find the true identity of the beautiful and talented lady I first called “Sister Moon Child”.


Entry Number: 42

Me and some friends went down to the water and took some photos, i kinda like this one. How he sits there, memories.


Entry Number: 43

The photo was taken in Alma-Ata, Kazakhstan, on 9 of May, which is the official Victory day in Kazakhstan. The man was staying in front of the scene and stared at actors performed period of WW-II. Alone man with no motion, no emotion in crowd around even when performance ended.


Entry Number: 44

This picture i shot when i went to countryside, at the evening children of this village usually come to the river and jump from the bridge, this scene made me remember about my childhood when i was the same age.


Entry Number: 45

This is a really poor boy from Brazil, that lives in a really poor house, with not even a TV, with his parents and 9 siblings.

You can see the memory in his eyes, from a life of pain and effort to help his parents bring the food home and keep him and his siblings safe from hunger.


Entry Number: 46

Memories. Those moments where you know it will be embedded into your mind forever. It could be the simplest of day or the most emotional night where you know that you captured a moment. Memories are those things that when you are taking a stroll in the park or a cruise in the car you begin to reflect back on. I want the memories that will bring back the simplicity and natural connection. You can always find a memory between the love of two.


Entry Number: 47

This picture is my cousin. She lives in peru. She is always serious – maybe because she lives in a poor community. She’s strong, taking care of her brother and her sister. When she looks at you sometimes you can see her love and sadness. She goes on strong one step at the time. I call this photo “Into Your Eyes”
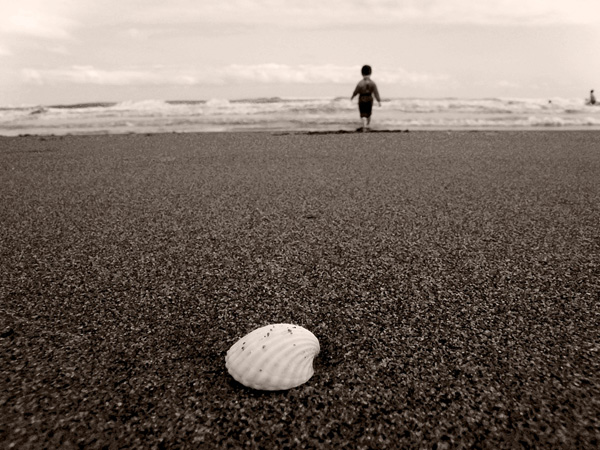

Entry Number: 48

Shells thrown into the sea travel far to the horizons and after years, I still come back every evening, in hope of finding the shell I have thrown into the sea , so to revive the old memories of mine!


Entry Number: 49

A picture of my father from New Year’s Eve, a couple of years ago. In that time I was staying with my parents, but now I’ve moved some hundred miles away and I can’t see them as often as I wanted too. This reminds me of celebrating New Year’s Eve with all the family, having a nice meal together.


Entry Number: 50

This photo was taken on one of the last mornings of my family’s vacation in Hughada, Egypt. We had a two-week stay at a wonderful resort that was right on the Red Sea. Every morning we would get up at around 5:30am to go down to the beach and watch the beautiful sunrise. This photo shows just a piece of the joy that we experienced.

The Red Sea has such beautiful and calm mornings that we enjoyed every day. We had a great time with friends and each other. It was one of the best vacations I’ve ever had. It’s also one of my last with my family, as I will be going away to college this next year. That fact makes it all the more special to me personally. I want to keep the memory brought out by this photo for many years to come.


Cast Your Vote

Which image did you like best in this round?survey software


Coming up Next…

Stay tuned to the site, because we’ll be posting up the second round of voting later this week. Best of luck to all our photographers!

The Comprehensive Concert Photography Primer

Concert photography can be a tough challenge for new photographers. Without the right gear and realistic expectations, it can be one of the most frustrating arenas to enter. When I started shooting concerts, I read everything I could get my hands on to prepare myself as best as I could, but I still learned most of my lessons the hard way. From the other side of trial and error, here are a few things every concert photographer should know.


Step 1: The Right Lens

First, you need fast glass. If you’re unfamiliar with the term, it is used to describe lenses with a high maximum aperture (low number). You can use a zoom lens with a maximum aperture of f/2.8 or a prime lens with an aperture of f/1.8. I use a 50mm f/1.4 prime lens for the majority of my concert photography.

Using a flash is a possibility, but you can’t rely on it. Many venues, bands, and publicists follow the “first three songs, no flash rule,” or they simply don’t allow flash photography. That is why prime lenses are a great place to start. They offer great value for the sharpness and speed they will allow you to achieve.


Step 2: Speed, and How To Capture It

Second, keep in mind that this is a passive form of photography. You won’t be directing people or have any sort of control over the action that unfolds. Your advantage lies in the ability to compose images on the fly. The action will unfold at an alarming pace and you need to keep up with your shots. Musicians that have experience performing have likely developed an act or routine or simply get into the show and move around more than your typical subject.

Like in many cases, the simplest answer is the right one; you need a fast shutter speed. This is why I put a big emphasis on fast glass. With it, you will be able to better capture musicians with a shutter speed that would not be possible to achieve on a kit lens or one lacking a high maximum aperture without sacrificing exposure. Many of my favourite concert captures were shot at 160th of a second at f/2.0.


Step 3: Sensitivity – No, Not That Kind

Third, consider the context and purpose of your photos when purchasing new gear and choosing camera settings. ISO plays an important role in your camera’s ability to deal with noise. You’re likely already aware that the higher ISO setting you use, the more sensitive your camera’s sensor is to light and the brighter your image will be at the expense of adding more grain to your photo.

Many of the new models of cameras have much better performance at higher ISO settings with less noise and better quality images, so it’s something to take note of when deciding to upgrade your body or to buy that new prime lens.

Along the same line of reasoning, consider this: the extra shutter speed gained from increasing your ISO from 800 to 1600 (eg. going from 1/60th to 1/125th) can be the difference between having a blurry shot versus a sharp image capturing the performer’s movement. Many publications and websites would much prefer a sharp and slightly grainy image to a blurry image with no noise.


Step 4: Do Your Homework

Fourth, it may not be as exciting as the show itself, but do some research before you attend. You will be able to score lots of advance information regarding how the musicians move, what the venue is like, and the lighting used, by browsing photos from past shows to help you achieve a great photo and get the upper hand over the other photographers in the pit.

Many photographers blog about the shows they shoot and offer tips and advice as well as write-ups on many of the shows they attend. These posts are a gold mine for information; they often contain specific camera settings and gear used. A great place to start is Todd Owyoung’s site I Shoot Shows.


Step 5: Set Realistic Expectations

Many will be drawn to this type of photography with the promise of magazine and album covers, roaring crowds and meeting rockstars. I’m definitely not telling you to abandon your dreams or give up hope, but to simply be patient. Getting published in one form or other and meeting your favourite band are definitely attainable goals, but expecting them to happen within weeks or even months of starting isn’t realistic or fair to yourself. I say this because it takes time to adjust, hone your skills, and get noticed. Once you do, you’ll be happy you stuck with it.


Step 6: Save Your Hearing

I am going to assume that if you’re pursuing any sort of concert photography, that you’re also a music fan in some form. Otherwise I’m humbled by your interest in this type of photography for what they do to your hearing. Concerts are loud, so you’ll want to invest in ear plugs. Even if you buy a cheap pack of the disposable foam kind, I highly recommend you make the investment because it will allow you to continue to enjoy music a few years down the road.

It’s a very simple step and might be uncomfortable for some, but hearing loss cannot be regained over time so it’s a very important part of concert photography. I personally use ER 25 Musician’s Ear Plugs by Etymotic Research, which are form fitted to my ear by taking a mold and reduce sound by 25 decibels. Find a pair that are affordable and comfortable, and keep them with your photo gear.


Step 7: Getting Access

The eventual goal of a concert photographer is to have a small network of publicists and editors to work with. Publicists will allow you to gain access to the show, as they work for the bands and labels. However, you now face the chicken and egg problem of concert photography. You can’t get proper access to shows without the above mentioned connections, but you can’t make these connections without a portfolio of concerts you’ve shot.

This isn’t as great a problem as it sounds. If you’re lacking a portfolio of concert photography, you simply need to start at the bottom. You can contact bands and venues asking if they’d like photos of a performance, take advantage of free shows and battle of the bands, or pay for the ticket yourself until you are established in some degree.

A word of warning: concerts with more popular bands and expensive tickets will likely have a photo pit (a section surrounded by barriers) and will require a photo pass to shoot. If you ignore this warning you could be kindly asked to leave by security if caught shooting the show.


Step 8: Shooting the Show

Okay, so you got this far. Seems like a lot of work just to take photos at a show right? Probably, but I’m trying to help you do it right the first time. You’ve packed your bag and checked your gear, and now you’re all set to capture your favourite musician.

Please, arrive early and shoot the opening acts. This is important for a number of reasons – you’ll get used to the lighting at the venue, you’ll get a vibe from the crowd, and most importantly you’ll have practice shooting in all the conditions specific to this show that will help you achieve better results for the headlining act.

It’s also worth noting that opening acts probably don’t receive as much attention from photographers so they’ll likely be more thankful for your hard work. Also consider shooting in RAW, as it will help you get the most out of your photos while editing due to the extreme lighting conditions you’re facing at a concert.


You’ll want to move around as you shoot, because taking all of your photos from one angle is boring and doesn’t help you to improve. The trouble is that you’ll need to work your way through the crowd in many situations and most concert-goers like hanging on to their spot.

Be polite, smile, gesture towards your camera when needed and simply ask if you can stand in their spot for a song or two to grab some photos. Make sure to say thanks when you’re done and keep moving. This is the best approach I’ve found because no one likes the jerk photographer that shoulders and elbows his or her way through the crowd.

Get yourself in a comfortable position near the stage, choose some starting settings on your camera (e.g. ISO 800 125th f/2.0) and take a few photos. Check your exposure and adjust accordingly. You’ll likely find a setting that works for most of the lighting conditions used at the venue and will be able to make minor adjustments to only shutter speed or aperture allowing you to focus on following the action and composing your shots. Make sure to have fun, it is a concert after all, and if you think you missed a shot, take more.


Step 9: The Aftermath

You’ve made it home after surviving the sweat, noise, and crowd – but the work isn’t done. If you’re shooting for a publication or blog of some kind, you likely have a deadline to meet. Even if you’re not you should still impose one on yourself. Handing in photos on time will serve to create a good reputation for yourself.

As this is only a primer I won’t go into too much detail regarding editing, but I will say that you will eventually develop your own style. Most of your editing will be done in your favourite RAW editor, such as Apple’s Aperture or Adobe’s Lightroom.

You’ll be following general journalistic guidelines in that you’ll want to improve the quality of your photos without misrepresenting what actually occurred at the show. The key is to experiment within reason.


Conclusion

Concert photography is a lot of fun and very rewarding, but it is unlikely that you will bring enough revenue to pay the bills solely on these images. If you are an avid music fan or are just looking for another avenue to channel the creative side of your photography, it’s worth the effort and this primer should help you get your foot in the door.

There are no secrets or shortcuts and it can be hard to measure your progress, but you’ll be happy for sticking it out and meet a lot of amazing and interesting people along the way.

Friday Photo Critique #30

Friday Photo Critique is our weekly community project, where we publish a photograph submitted by one of our wonderful readers, then ask you all to offer constructive feedback on the image.

It’s a great way to learn more about photography, express your viewpoint, and have your own image critiqued. Your response will also be displayed with a link to your website or portfolio, so be sure to enter it correctly when submitting a comment!


Quick Ground Rules

  1. Play nice! We’ve deliberately chosen photographs that aren’t perfect, so please be constructive with any criticism.
  2. Feel free to offer any type of advice – composition, lighting, post-processing etc.
  3. You can also link to photographs that you feel offer a great example of this type of image shot exceptionally well.

Without further ado, here is this week’s candidate for Friday Photo Critique!


The Photograph

Photo Critique

Photographer: Phillip Jacobs

Please let us know what you think in the comments – how would you have approached the scene or taken the photo differently? A massive thank you to everyone who commented last week.

The most constructive and helpful comments will be featured on the site, and you’ll also be given priority to feature your own work in a future Friday Photo Critique!.

Kinetic Photography: Techniques and Stunning Examples

Today we’re going to take a brief look at a particular moving type of photography that attempts to channel chaos into beauty: kinetic photography. As you can see in the image below, the results vary incredibly and are often quite stunning.

So what is kinetic photography and how can you do it? Read on to find out!


A Rough Definition

Writing about kinetic photography is probably a great way to garner snide comments about what “real photography” is and isn’t. However, though some professionals will scoff at the idea, many photographers from every part of the talent spectrum can’t help but appreciate the attractive results coming out of this small movement.

Obviously, judging from the examples below and the inclusion of the word “kinetic,” this type of photography uses motion heavily. There are a couple of techniques that fit the category of kinetic photography but all of them essentially use light and motion to create abstract shapes in the resulting photograph. The peculiar part is that, rather than utilizing a moving subject, most kinetic photographers instead opt to use camera motion to produce the desired effect.

The most common form of kinetic photography is known as camera tossing. This growing group of intrepid and/or crazy photographers has discovered that by tossing their cameras into the air with an open shutter, they can achieve some outstandingly interesting photographs.

If you value your camera equipment, odds are bells and whistles are going off in your brain to inform you that this is a bad idea. In a sense, you’re exactly right. The camera acrobatics described below are not for the cautiously minded photographer, so if you fit into this category then you might want to stay in the camp that appreciates these photos without making any attempt to duplicate them.

Most importantly, if you attempt any of the methods below, be forewarned that it might result in damaged equipment and we here at Phototuts+ accept zero responsibility either for your temporary loss of sanity or permanent loss of a functioning camera. Not to mention the hospital/dentist bills that result from a heavy chunk of metal and plastic crashing into your face!


Camera Tossing: The Safe Method

The headline here is a bit of a misnomer. Tossing your camera is pretty much never going to be a “safe” way to spend an afternoon, but this method is at least a little less likely to end in tears than the alternative.

The first thing you’ll want to do is make doubly sure that your camera’s strap is secure. Now that you’ve checked your strap twice, check it again just to make certain it isn’t going anywhere. Next, adjust your settings so that your exposure is long enough to keep your shutter open for the duration of the swing, and make sure everything else limits the incoming light enough to not result in a completely overblown photo with little to no detail. We’ll look at how to do this a little later in the article when we examine some examples.

Now hold firmly to your strap, click the button and let her rip. The possibilities here are nearly endless. You can toss, swing, shake, twirl or any any combination of these methods to create some wildly diverse results. Experiment around to see what you like best. Try creating fluid arcs of light or jagged zig zags. There’s pretty much no wrong way to do it as long as you’re having fun and enjoying the results.

Another even safer method to replicate this effect is to cheat completely by placing your camera on a tripod and proceed to shake or spin your subject. One photographer claimed that he used this method and simply shook some Christmas lights during a lengthy exposure. The result was excellent and in no way inferior to “the real thing.”


Camera Tossing: Extreme

Some particularly passionate members of the camera tossing community claim that it’s not really camera tossing unless your camera is airborne and strapless. Obviously, this method requires excellent hand-eye coordination, someone experienced in the art of catching wildly moving flying objects and a fearless streak.

Remember that the key here is motion and not necessarily a contest to see how high you can go. Focus on flipping the camera in different directions to produce results that you simply couldn’t get by holding the camera and spinning around.


Helpful Tips

No matter which of the methods above you plan on using, here are a few things to consider.

Lighting

Obviously, lighting is going to play a huge role in the quality of your results. Many experienced kinetic photographers recommend starting out in a fairly dark room. Try varying your light sources to see what works best. Start with a single light source and gradually introduce more complexity while monitoring and adjusting your setup to fit your desired result.

Once you’ve mastered the technique in a controlled environment indoors, you’ll gain some insight into the appropriate lighting conditions. Armed with this knowledge, venture outdoors and hunt for locations that will provide you with strong results.


Use a Cheap Camera

Remember that by doing this, you’re jostling around a piece of equipment that was designed to remain fairly stable. Even if you are confident that you can catch the camera every time, the harsh treatment could do significant damage to the internal components of your camera.

For this reason, it’s probably best that you put down the Canon EOS 5D and try this out on something that you won’t mind breaking. You’ll be much better off if you simply assume that it will be a damaging experiment and choose your equipment accordingly. Honestly, the effects are so simple to create that even really cheap cameras can produce fantastic results.


A Soft Landing

Another good idea to keep things safe is to create a soft, well-cushioned place for the camera to land (whether or not you plan on catching it). Try standing over a couch or bed on your first few attempts. Even a soft landing could jar your camera’s finer components but you’ll at least be a lot better off than you would be on a hard wood floor or concrete sidewalk should everything come crashing down.


Be Patient

Though many that attempt camera tossing seem to get lucky on the first attempt, don’t expect to produce jaw dropping results in your first few minutes. It will take lots of time and experimentation to determine what works best with your particular camera and environment.


Examples and Camera Settings

Now that we’ve discussed both the literal and figurative ups and downs of kinetic photography, let’s take a look at how a few examples were shot.

And Now For The Egg Toss.., 2008

The smooth arcs in the example above suggest that the camera spun around quite a few times on its journey. One of the most important things we see here is that the photographer used a Fujifilm FinePix Z10fd, which usually runs below $200. Other hints at the quality of the camera are evident in the fairly high amount of color noise despite the low ISO (200).

You might be tempted to really crank your exposure but remember that gravity will ensure that your camera only stays in the air for about a second, so using an exposure of just over a second or less like we see here is enough to do the trick. If your environment is bright enough, you might even want to cut this time in half as in the image below.

Camera Toss 4

This shot features a much broader spectrum of color and what appears to be a more controlled spin. Here we see another photographer using a camera in the $200 range, this time a Fujfilm FinePix A340. The fairly wide aperture and long exposure time are geared towards letting more light in while the low ISO keeps everything from becoming too blown out.

Camera Toss (First Attempt!)

For this shot, photographer Christian O’Brien left a brief message regarding his technique: “This is my first attempt at a camera toss photo. Taken with a Fujifilm A180 with lights provided by a Mitel 5212 office phone on my desk! Taken by tossing the camera about 20cm in the air directly above my desk phone with a 1 second exposure (I think, it’s just a basic point and shoot!) ”

The result is an impressively intricate swirl of red light that any kinetic photographer would be proud to claim.


More Examples

To end out the post, here are a few more excellent examples of kinetic photography.

williamcho

williamcho

greeblie

Mini D

clickykbd

add1sun

cavrchota

Mini D

nataliej

Mini D

stravenue42

greeblie

nataliej

add1sun

amedina

cdresz

chickeninthewoods

Diluted

quinet

quinet

Mole_Farmer

otfrom


More Kinetic Photography Resources

Can’t get enough kinetic photography? Check out these other great resources for more information and examples.


Closing Thoughts

To sum up, kinetic photography is risky, unpredictable and tons of fun. If you work up the courage to give it a shot, we definitely want to see the results. Post a link in the comments below and tell us how you went about it!

A Comprehensive Introduction to Focus Stacking

In this video we will show you a simple camera technique that will help you produce a deep depth of field, even when shooting with mid to wide lens apertures. Called “focus stacking”, it’s a technique that every photographer should be aware of.


Video Summary

We start off explaining why keeping close up images sharp even at small apertures is a problem, and then show a set of images shot at F5.6 on a table top to use as a demonstration.

The video then moves on to discuss various software available for producing focus stacking images. Using Photoacute Studio we combine our table top demo images and compare the results to the same image shot at F16.

For those of you without this this software, we then use Photoshop to show another more “manual” method of doing focus stacking.

In conclusion, we briefly show some tips and settings when shooting images for focus stacking, and outline an experiment shooting focus stacking outside in the landscape.


Watch the Video


Sample Image

The Simple Guide to Mounting a Remote Camera

Looking to capture action in two places at once? Need to place a camera somewhere hard to shoot handheld? This article will give you step-by-step tips to setting up a remote camera using professional practices for safety and control.

A remote camera allows photographers to capture action in different ways than a traditional handheld camera.

Remote cameras are mainly used by sports photographers, nature photographers and event photographers. For example, remote camera setups are typically used at basketball games behind the backboard to capture impressive shots of players dunking. Nature photographers use remote cameras to capture animals such as hummingbirds appearing at a feeder.

A basketball remote image.

Step 1: Equipment

Remote cameras take some specialized equipment to trigger the camera and ensure its stability.

DSLR Camera

Any type of DSLR camera will work for a remote camera as long as it has a motor drive connection (usually mid-range cameras).

For the lens, I personally like to use a wide angle for my remote cameras, such as a 12-24.

Camera Support

First, you’ll need some kind of camera support. Depending on your situation, I’d recommend a tabletop tripod or a Manfrotto Magic Arm and Manfrotto Super Clamp.

The Magic Arm and Super Clamp allow you to place your camera in almost any location, as long as you can clamp it onto something. This is the typical setup for sports photographers, as it can hold a large amount of weight and provide security for your camera. You can also use a tabletop tripod to put the camera low to the ground.

A Magic Arm and Super Clamp.

Camera Trigger

Along with support for your camera, you’ll also need a triggering device. Pocket Wizards are the industry standard for wirelessly triggering your camera. You can also use a remote shutter cable or a “eBay trigger.”

Along with the camera trigger, you’ll need a motor drive cable to connect the triggering device to the camera.

Safety Cables

Finally, you’ll need safety cables. Safety cables are a must to protect your property, others’ property and to prevent personal injury. It will ensure your camera stops if it falls. Some locations require them, along with proof of liability insurance.

Gaffers Tape

It’s always nice to have a roll of gaffers tape handy to control loose cables and cords.


How It All Fits Together

Below is a view of the final setup, here’s how the equipment breaks down:

  • 1 – DSLR camera
  • 2 – Magic Clamp and Super Arm
  • 3 – Safety Tables
  • 4 – Pocket Wizard (or other triggering device)
  • 5 – Motor drive cable
A remote camera fully setup.

Step 2: Find the Perfect Setup

Remotes are often used where photographers normally wouldn’t be able to be.

With this in mind, look for something very low or in a unique position. For basketball games, for example, remotes are typically behind the backboard, on the stand or padding. For horse racing, remotes are typically placed low to the ground near the finish line to capture the winning shot.

You may also want to use a remote to camera a scene that you’re already capturing with another camera, such as at a wedding. For example, you could place a remote camera upstairs in the church pointing towards the altar.


Step 3: Connect the Magic Arm to Super Clamp

For the rest of this article, I’m assuming you’re using a Magic Arm and Super Clamp. If you’re using a tabletop tripod, it’s very simple – just place the camera on the tripod and secure; and, of course, ensure the area around the tripod is clear and make sure it can’t easily be knocked over.

When you first use a Magic Arm it can be a bit of a pain. First, loosen all the screws and flex it around a bit. Then, attach the Magic Arm to the Super Clamp. Make sure you securely fasten it.

A Magic Arm and Super Clamp joined together.

Step 4: Attach Your DSLR to the Setup

Once your Magic Arm and Super Clamp are connected, attach your DSLR to the setup. Make sure to fully tighten all screws.

You can also attach the camera after Step 5 – it depends all on your personal preference. I prefer to attach it before the setup is fully in place.

Attach the DSLR to the Magic Arm on the baseplate, as shown here.

Step 5: Find the Surface You Want to Mount the Camera to and Mount

Before you mount the camera, apply some gaffer tape to the surface to prevent the Super Clamp from peeling any paint or causing any damage. Gaffer tape is made to control cords at events and leaves very little residue.

Now, attach the Magic Arm and Super Clamp setup to the surface. Once it’s securely on the surface, you can begin to move it to find the perfect placement for your camera. This may take some time to get perfect and level, so allow plenty of time for these adjustments.

For the purposes of this tutorial, I’ve mounted the remote camera to a lighting stand.

A remote camera mounted.

Step 6: Configure Your Trigger

As mentioned in Step 1, for your setup to work as a remote you need a trigger.

Pocket Wizards are easy to configure: simply select a channel on each one and attach one to your primary camera and the second one to the remote camera. Each Pocket Wizard will need to be set in “Transmit” or “Receive” mode depending on its use. If you’re shooting in a large venue, make sure the channel you use isn’t being used by another photographer.

On the remote camera, you attach the trigger via a motor drive cable. This attaches differently on each camera, so make sure to check your manual. You can then place your trigger in your flash shoe for easy holding, or can mount it beside the camera.

On your primary camera, the trigger will typically go into your flash shoe and no separate cord will be needed.

A Pocket Wizard, which is used to trigger the remote camera.

Step 7: Attach Your Safety Cables

One of the most important steps comes near the end, in which you will need to attach the safety cables. Safety cables come in many shapes and sizes, but all of them make sure your camera is secure and safe.

A set of safety cables.

Most cameras come with a great place to attach these cables: where the shoulder strap connects.

A fully setup remote camera with safety cables attached.

Step 8: Set Your Focus

Setting your focus can be a challenge depending on the sport or event.

You’ll have to manually focus everything and then put a piece of tape over the controls and focus ring to ensure the camera doesn’t accidentally change focus. This varies by sport and event, so make sure to allow time to test first.


Step 9: Test Everything

Now that it’s all set up, take some test shots and make sure it works! Some things you may have to adjust include focus and the level of your camera.

A dining room table

Step 10: Shoot and Enjoy

Once everything is set and tested, and tested again, shoot and enjoy!

A floor mounted basketball remote.

Conclusion

Here are a few links to help you setup your remote camera.

Pocket Wizard makes the industry standard remote trigger.

PShizzy talks in-depth about setting up a floor level remote camera at basketball games.

Strobist explains in detail how Pocket Wizards work with a camera.

A remote camera is a great way to be in two places at once and grab a unique view of an event. Have any questions or want to share an experience you’ve had? Leave a comment below!

60 Fascinating Alien Lichen Landscapes

Lichens are one of the most beautiful flora nature has to offer. They’re like alien landscapes in miniature. And the sheer variety of shapes, colors, and textures is enough to keep a photographer busy for quite a while!

Lichens are most often found on trees (living or dead) or rocks in damp areas. They can often be found near the shoreline of oceans or lakes, as well as in the forest, in cemeteries (on gravestones) and pretty much anywhere else it’s cool and damp. Whether you take photos of lichens from a distance or close-up, they’re a varied and interesting subject.

Below are sixty lichen photos to give you an idea of the varieties available. Feel free to share your favorites or other lichen photos in the comments.

Green Lichen by kaibara87

Map Lichen by Vik Nanda

Lichen by pfly

Lichen @ Pinnacles by Dawn Endico

Stonewall Rim-Lichen and Bare-Bottom Sunburst Lichen by pellaea

Pixie-Hair Lichen by pellaea

Wolf Lichen on Douglas Fir – Colockum Road by brewbooks

Lichen by Athena’s Pix

British Soldiers Lichen Caldonia Bellidiflora by brewbooks

Club-Mushroom Lichen by pellaea

Lichen by stephcarter

Lichen It by Vik Nanda

Lichen by jenny downing

Lichen at Mt Waterman by steveberardi

Snow, Rock, Lichen 1 by Ctd 2005

Lichen by Paul J. Morris

Lichen by ColinD40

Pixie Cup Lichen by pfly

Brown-Eyed Sunshine Lichen by pellaea

Lichen Landscape by photon ?

Variable Wrinkle-Lichen and Coastal Thornbush Lichen by pellaea

Lichen by nojhan

Lichens on a Tree by Steve Newcomb

Lichen Bloom by Arenamontanus

Rock Lichen by Ben Coulson

Yellow Map Lichen by pellaea

Lichens by mricon

Slender Orange Bush Lichen by pellaea

Varied Rag Lichen by pellaea

Lichen by tristrambrelstaff

Armored Fog Lichen by pellaea

Lichen II by mricon

Pixie-Hair Lichen by pellaea

Lichens by kevin.wailes

Elegant Centipede Lichen by pellaea

A Little Lichen by backpackphotography

Lichen by Minette Layne

Enchanted Lichen Trees by Jon Garvin

Lichens and Caterpillar by amy_b

Lichen Bug by lostash

Reddish Lichen by kaibara87

Flashy-Green Lichen by backpackphotography

Armored Seafog Lichen by pellaea

Lichens by jayhem

Lichen by treehouse1977

Lichen by Tim Green aka atoach

Lichen by Paul J. Morris

Lichen & Moss #2 by Jon Garvin

Thrift and Lichen by AdamKR

Autumn Lichen by pfly

Macro Lichens by Three if by Bike

Lichen by wit

Lumpy and Unlickable Lichen by FeatheredTar

Wood Lichen by Nogwater

Lichen 2 by vivevans

Lichen Tooth by Mike McCaffrey

Lichen by Tom Colls

Moss and Lichen by graymalkn

Bouquet Seafog Lichen by pellaea

Reindeer Lichen by bgeissl

Perfect Photography Technique for People & Portraits: Part 2

Today we are going to present the second part of “Photography Technique for People & Portraits”. In this article we focus upon the methods and techniqes for taking exellent photos of kids, groups, and more candid images.


Create a Nice Day

Whether it’s Murphy’s Law or just unfortunate scheduling, oftentimes the weather you have when shooting people is more gloomy and overcast than what you were hoping for. Pictures without sunshine, however, can still look good if you know a few quick techniques.

The first thing to look for is some sort of contrasting background, such as the light sweater and dark green foliage of 2-1. This contrast helps to separate the subject from the background. The next thing is to set the white balance to cloudy, giving the image a neutral or warm tone in an overcast situation. It might be necessary to either use a manual white balance setting to further warm the scene, or to use some of the color enhancements in Photoshop Elements.

Additionally, by over exposing 1/3 to 2/3 of a stop, you can brighten an overcast scene enough that it does not look gloomy.

Setting the camera manually to +2/3 over the meter reading, to 1/250 sec. at f/4 at ISO 250, helps an overcast scene overcome a gloomy look.

Using black and white is also a great way to deal with overcast situations. In 2-2, the kids have very light skin tone and hair, so putting them against the sky complements them. Adding a very small amount of fill flash can also just add a little life to an overcast portrait.

The fill flash was set to –1 2/3, which is just enough light to add a sparkle to the kids’ eyes. The exposure was 1/125 sec. at f/6.7 at ISO 200 using a manual exposure.


Kids, Candids, and Environmental Photography

This might appear to be a wide-ranging section, but these topics are more related than you might think. A large part of shooting people when you are out and about – either for candid shots or environmental shots – has to do with being ready for anything.

Making certain that the camera is set to do what you want it to do before you even sling the camera strap over your shoulder saves a lot of time and allows you to get the shot, instead of missing it because you were fiddling with your camera. Working with kids is much the same, but having patience as well as forethought is immensely helpful.

In 2-3, an overcast day makes the light rather flat, but with a camera already with a telephoto lens, the white balance set to cloudy, and the exposure set correctly in Aperture Priority mode, when the little cowboy takes a stroll over the small bridge, everything is ready without having to give him any direction.

Exposure was set to f/3.5 in Aperture Priority automatic, which allowed for the background to be slightly out of focus, letting the subject pop out of the background. The shutter speed is 1/250 sec., which stopped his movement.

Having the camera already set makes it easy to capture far more beautiful light when the sun pops out unexpectedly, like it did a few minutes later. Notice in 2-4 that the foreground is dark, meaning that he is in the sun, but just outside of the shade in front of him. The only difference in the settings between the two images was that the aperture was set to f/4 in 2-4 as opposed to f/3.5 in 2-3 in order to get slightly more depth of field with the lens zoomed to a longer telephoto.

The exposure in this image was f/4 at 1/750 sec. Using Aperture Priority allows you to control the depth of field, quickly maintaining the correct exposure by letting the camera determine the shutter speed.

When shooting candid photographs it also is very important to recognize the importance of the moment that you are photographing and be ready to capture it. Legendary Photographer Henri Cartier-Bresson called this “the decisive moment.”

Now that you have looked at so many lighting situations, you should be able to read what the light is doing and already have in mind what you and the camera should be doing to capture the light as needed to create your image.

In creating more of an environmental portrait, waiting for the moment, and waiting for the lighting at that moment is just as important. When the subject just sits comfortably in a favorite chair and the light from a large picture window lights up the subject’s face, don’t hesitate for one moment. In trying to capture people’s nature and their essences, it is important that they are comfortable. This is far more important than making sure that the subjects have big smiles.

Being comfortable with the camera allows you to work quickly so that the subject doesn’t lose interest or the look that first captivated you. In 2-5, using a thumb switch to quickly access the spot meter in order to capture the delightful window light on this subject’s face happens in a snap. The result tells a far bigger story of who this man is than if he were posed and directed.

A spot meter determined that an exposure of 1/40 sec at f/4 was correct to capture the light on this subject’s face. The texture of the face, hands, and shirt is a result of light from a big window.

Using the different exposure modes, Aperture Priority, Shutter Priority, Program, or Manual has a lot to do with personal preference and how things work best for you in each situation. Each exposure mode has its own advantages and disadvantages. No matter which one you select, make sure that you monitor what choices the camera is making as it corresponds with the decisions that you make. If you use Aperture Priority, make certain that you still have a fast enough shutter speed to stop your action, and if you use Shutter Priority, make certain that you have the depth of field that you need.

When shooting people, the situation is often dynamic. A very posed portrait quickly becomes a great candid look at a couple as they react to their kids hamming it up in 2-6. Being able to keep your eye in the viewfinder to capture priceless moments that can never be reposed is a great skill to develop.

The exposure for this image was set to 1/125 sec. at f/4, using ISO 400. The meter reading was taken with the center-weighted meter set to Manual exposure mode.

When the focus of the image is a person, capturing even just part of the face can be an effective way to get a sense of the essence of the subject. Using a telephoto lens helps to limit the depth of field. In 2-7, the background becomes totally obscured. The telephoto lens in this case was a 200mm, and the lens along with the aperture of f/2.8 keeps the depth of field very shallow.

This is useful when the subject is against a distracting background and keeps the distractions to just background shapes. This shallow depth of field situation is particularly demanding on the focus, so make sure that your focus is locked on and that you refocus the camera often when shooting that tightly. Any camera or subject movement could result in out-of-focus images.

With the brim of his hat blocking quite a bit of light from his face, it was important to set the exposure correctly. This exposure was 1/250 sec. at f/2.8 with the exposure compensation set to +1/2.

The same situation crops up with kids even more frequently. Shooting children is challenge enough, but they also work against photographers by being happiest where there is the most clutter. By getting a child close to a window to create nice, soft light and then using a shallow depth of field and a telephoto lens to eliminate any clutter, you can create great images of kids, as in 2-8.

A large window on the shady side of the house makes for great soft light, and getting tight with a telephoto lens eliminates distractions. 105mm Nikon Macro with an exposure ISO 200 at 1/250 sec., f/3.2.


Working With Groups

When lighting groups, you face a number of challenges. Photos of one person can use very shallow depth of field, but even one other person can change the amount of depth of field necessary for an image. Furthermore, getting good light on everyone in the group is always a challenge. People can cast shadows on one another if the scene is side-lit, or if in the shade, almost invariably one tiny ray of light is hitting one person, causing him to be washed out while everyone else is properly exposed.

So working with groups can be just as much about location as it is about lighting. Finding the location with even or flat light can be a challenge, but when the groups are large, you need light that covers all the people in the group so that you can see everyone’s face.

The obvious problem is that when the light is shady or overcast, you have less light and, thus, less depth of field. Using a wide angle lens can help with depth of field because there is more inherent depth of field as the lens gets wider.

Increasing the ISO is another way to increase the depth of field. In order to get the most people in focus, increasing the ISO from 100 to 200 allows for an aperture of f/8 as opposed to f/5.6 to be used in 2-9. This small increase in ISO really does not change the image quality substantially, but increases the depth of field a fair amount. Even increasing the ISO to 400 is acceptable in most cases, unless you know the image will be printed extremely large.

Large groups like this often cause a photographer to split some differences in order to get the best possible shot. Trade-offs between image quality and depth of field, and between depth of field and the risk of blur, are all things to weigh into your photography.

Getting everyone in the shade and setting the white balance for shade was the best way to have the whole group evenly lit. f/8 at 1/45sec. at ISO 200 with the fill flash set to normal.

Remember to shoot a lot when it comes to large groups. Blinks often ruin great group photos. According to the Commonwealth Scientific and Industrial Research Organization, for groups of fewer than 20 people, if you divide the amount of people by three, and take that many shots, you have a 95-percent chance of getting at least one shot without blinks.

When shooting smaller groups, lighting can be more creative and dramatic. But remember it is still important to make sure that light is on everyone in the scene. Using a large white reflector next to the camera brightens up everyone’s face quite a bit, even though everyone is in shadow in 2-10. Having the subjects in shadow and the background lit up so brightly can cause the meter to underexpose the subject too much. Make sure that you get your meter reading from the light hitting the subject, by either zooming in close on one of their faces or using the spot meter.

Using an exposure of 1/60 sec. at f/5.6 in the Manual exposure mode after metering for their faces, the brightness of the background was disregarded. ISO was set to 100, and the white balance was set to shade.

If you have something to bounce the light off of, using a strobe unit for a group shot is helpful in making sure that any deep shadows are filled in. The light in 2-11 is a dappled sunlight, making the light slightly different on each girl. Using the ceiling of the gazebo, the light from an on-camera strobe is bounced up, softening the strobe and evening out the light. When you don’t have anywhere to bounce the light, but you still want to soften it, you can buy a light modifier for your on-camera strobe.

The strobe was bounced up into the ceiling, which evened the light from the faces that were in shadow and the faces that were in sunlight. Exposure of 1/60 sec. at f/5.6 at ISO 100.

A light modifier can be anything from a 3 × 5 index card to a very expensive piece of plastic that is designed and shaped to fit directly onto your strobe. These modifiers all do essentially the same thing – redirect and diffuse the light, so that it doesn’t appear like such a harsh blast. There are a number of companies that make light modifiers, including Lumiquest, Sto-Fen, Chimera, and Gary Fong.

Most of these still work with the TTL sensor in the camera so that your exposure is accurate, and most camera shops have these accessories. If none of those are available, and you are trying to avoid the harshness of direct strobe, you can use tissue paper or even copy paper loosely taped over the flash head in a pinch to help diffuse the strobe light.

When composing groups, one thing to keep in mind is to try to keep the faces in triangles. This is easy when you are shooting a group of three or six, but when you have four faces, it becomes harder. By composing the faces in triangles, the image becomes more dynamic and balanced. In 2-11, the triangle created by the faces is obvious; in 2-12, the diamond shape created by the faces is made up of a number of triangles: mother, father, and baby; mother, father, son; and so on.

The flash came through an umbrella, creating nice side light. The exposure was set to 1/40 sec. at f/5; the slow shutter captures the fire light; and a gel placed on the strobe balances the ambient color temperature.

It is also important to get the faces close to the same plane for two reasons; the first is to keep everyone in focus, especially when dealing with shallow depth of field or telephoto lenses. The second reason is to keep everyone in the same light, and shadows often happen with sidelight. Make sure to get as much of everyone’s face out of the shadow and into the light as possible.

Some digital cameras now have the ability to fire their strobes without being attached to the camera. This usually entails a camera with an attached strobe to be the master or commander unit, and a second strobe to be the remote unit. The light from the master strobe can be turned up, down, or off, as can the remote unit. These strobes are all connected through an infrared sensor system that is wireless, so the “Through The Lens” metering system still works, making this system seamless and easy to use (see 2-12).


Taking a Candid Shot

Taking a candid photo can be challenging because you might have to take a few to get just the right shot. You can’t easily tell your subject to move into the right light, because the image would no longer be candid.

I took this picture under a shady tree at a park at noon. Almost any time of day you can shoot photos of people in the shade. Some dappled light is on his hair, and the background is bright. Make sure to get your exposure from the subject, not from the background. The exposure here was ISO 200 at 1/80 second at f/6.3. I used the evaluative meter and the shade white balance. Another tip is to get lower when taking photos of kids; get on their level. They behave better, and your photos turn out better.


Getting the Flash Off Your Camera

If your digital camera does not have the capability to be fired via a wireless remote system, you have other ways to get your flash off of the camera. The first thing that is needed is some way to sync the camera and the flash together. The cheapest thing to get is a sync cord. A sync cord is connected to the PC socket. PC does not mean personal computer in this instance, but stands for Prontor Compur – an industry standard compact electrical socket that connects the camera to the flash.

Not all cameras have PC sockets, but if your digital camera has a hot shoe to place a strobe, you can get an accessory PC socket adapter to put on the hot shoe for $10–$20. Most large on-camera strobes have a PC socket. Take your camera and flash to the camera store to make sure you get the cord with the correct connections needed.

If you don’t want to use a cord, you can use a number of wireless sync solutions that use either radio signals or infrared signals, such as Quantum’s Radio Slave, and the Pocket Wizard family of products. These units have a transmitter that attaches to the hot shoe of your camera and a receiver that attaches to your flash via a very short PC/sync cord.


Thanks for Reading!

I hope you enjoyed this two part series on lighting for people and portraits. We’ve covered quite a bit of ground, and shared plenty of useful information. If you have any tips or suggestions of your own, I’d love to hear them in the comments!

Quick Tip: Automated Watermarking With Photoshop

People have mixed opinions over watermarking photographs, and whether it’s really necessary. The fact remains that it’s a good way to prevent your images being copied without attribution and many photographers find it incredibly reassuring. Although several photo-management apps such as Lightroom and Aperture have in-built watermarking functionality, today I’ll be showing you how to quickly automate the process in Photoshop!


Step 1. Choose Your Watermark

When I do choose to watermark images, I go down the route of a simple written copyright notice in the lower corner of a photograph. It’s possible to do far more advanced and thorough watermarking, but I feel this often distracts from the image itself.

The first step is to choose the text you’d like to be replicated on each image. For my example, I’ll be using Copright © David Appleyard


Step 2. Open and Resize a Photo

Next, open a sample photograph in Photoshop and resize it to the dimensions that you most commonly work with. I’m going with 800px wide.


Step 3. Start Recording a New Action

We’ll be using Photoshop’s “Actions” panel for this. It should be visible towards the right of your screen – if not, click Window > Actions to show it. We want Photoshop to essentially record the steps we make from this point on, to be able to replicate them in the future.

To create a new Action and start recording, click the “New” button and give your action a name. From this point on, be sure to only follow the instructions given here, and don’t click anything else!


Step 4. Type & Format Your Watermark

The next step is to type your watermark, as you’d like it to appear on every photo. When you’ve done that, format the text to look as you’d like – bold, italic, colour, opacity etc. When done, click another tool to finish editing the text layer.


Step 5. Position the Watermark

I’m going to assume that you’d always like the watermark to appear in the lower right corner of the image. To do this, take a look at the Layers palette and select both your photography and text layer (Ctrl-Click or Command-Click both layers to select them both).

Then, look to the top menu and select Layer > Align >Right Edges, followed by Layer > Align > Bottom Edges. Your watermark should snap to the lower right-hand edge. You’ll probably want a little padding, so proceed to select only the text layer, then just nudge it 20px left and 20px up with your keyboard arrow keys.


Step 6. Stop Recording

You’re all done, so click the square button just below your current Action to stop the recording process. You should now be left with an Action that you can re-use time and time again! Just open an image and hit the “Play” button. If you’d like to automate the process for a folder of images, you can do so using File > Automate > Batch.

Have fun, and do share your own methods and tips for watermarking in the comments!

Friday Photo Critique #29

Friday Photo Critique is our weekly community project, where we publish a photograph submitted by one of our wonderful readers, then ask you all to offer constructive feedback on the image.

It’s a great way to learn more about photography, express your viewpoint, and have your own image critiqued. Your response will also be displayed with a link to your website or portfolio, so be sure to enter it correctly when submitting a comment!


Quick Ground Rules

  1. Play nice! We’ve deliberately chosen photographs that aren’t perfect, so please be constructive with any criticism.
  2. Feel free to offer any type of advice – composition, lighting, post-processing etc.
  3. You can also link to photographs that you feel offer a great example of this type of image shot exceptionally well.

Without further ado, here is this week’s candidate for Friday Photo Critique!


The Photograph

Photo Critique

Photographer: David Borel

Please let us know what you think in the comments – how would you have approached the scene or taken the photo differently? A massive thank you to everyone who commented last week.

The most constructive and helpful comments will be featured on the site, and you’ll also be given priority to feature your own work in a future Friday Photo Critique!.

Creating a CMS Website with SiteGrinder and Pagelime

In this tutorial, you will learn how to take a Photoshop file, and convert it to a valid, jQuery enabled, Pagelime CMS integrated website, ready to hand off to your clients with no coding, using Photoshop, SiteGrinder 3 and Pagelime.


Prefer a Video Tutorial?

Before We Get Started

SiteGrinder 3 is a fantastic, feature packed piece of software, by the guys over at Media Lab, which allows you to take a website mocked up in Adobe Photoshop, and export it into a fully valid, chopped and functioning website in minutes with no coding knowledge necessary. Pagelime is a simple CMS, designed with your clients in mind, that allows immediate integration into a website without any coding skill required. Pagelime allows your client to simply and easily make edits to content, change images, add and delete pages and basically manage their own website in a way they can understand, all within a clean, brand-able, web based application.

A Quick Note

The tutorial is approximately 10-15 minutes long, and assumes a general working knowledge of SiteGrinder 3. If you’re not quite up to snuff on your SiteGrinder skills, visit Media Lab’s SiteGrinder 3 TV site for a great set of video tutorials that will more than get you up to speed on how to implement your site. Overall, the system is really cool and has a TON of features. We highly recommend starting with the Essentials 1 – Workflow, I personally enjoyed the Buttons and Animation which details how to painlessly add jQuery effects and really nice drop-down menus, and Essentials 2 – Content. If you only have time for one, just watch Essentials 1 – Workflow to get up to speed.

I’ll be walking you through in general step by step instructions with more in-depth information within each step.

Step 1 Open your PSD Site Design in Photoshop

Today we will be using a “Compani” template that the SiteGrinder crew has generously lent us, however, almost any website mocked up in Photoshop can become “SiteGrinder ready,” through the process of adding SiteGrinder hints and formatting your layers appropriately. Again, this tutorial assumes you have knowledge of the SiteGrider markup and using hints. If you don’t, we recommend that you visit SiteGrinder 3 TV and catch up with the first two parts of the SiteGrinder essentials. To download this template or a slew of any other templates, you can visit their wiki page with the template downloads.


Step 2 Make sure any images you want to edit through Pagelime have the “-content” hint attached to them.

Because SiteGrinder does not make image CSS classes accessible to the user by default, through adding the “-content” hint, we can force SiteGrinder to render the image (IMG) tag within a DIV. This DIV will then be available later in the SiteGrinder 3 Design Manager to have a CSS class added to it. This is important because for Pagelime to work correctly, all editable regions, or, “things you want the client to be able to change,” must be tagged with the same special CSS class, we’ll get to this in more detail in step 4.


Step 3 Save the PSD file and then navigate to File >>> Automate >>> SiteGrinder 3

If the SiteGrinder 3 Engine is not already open, this will launch the SiteGrinder 3 engine. After the Engine launches, SiteGrinder will generate a report on any errors or warnings it may find in the template. Review the errors and fix any serious errors that apply* (you can also choose to ignore them, the site should still build). After you have resolved the errors, continue to the Build and Deploy page. Here, you should check off the pages you want to have built by SiteGrinder. In this tutorial, we will only be building out the home page. After the desired pages are selected, click “Build”.

*Note: If you are using the SiteGrinder 3 test template with a demo or basic version of SiteGrinder 3, it’s possible that you might encounter a report with 2 “serious” errors. Look through the errors carefully. It’s most likely that the errors are being thrown because you are referencing tags such as -$ or -blog within the template that require additional plugins. The Commerce Add On for -$ and The Control Add On for -blog. If that is the case, you can continue anyway. In this tutorial, we are not building out the “store” or “blog” page, so these errors are irrelevant.


Step 4 After the buildout is complete, click on the page file name to enter the Design Manager.

The Design Manager is where you can make additional edits and style declarations to the design and CSS class implementation. Most of your text and border effects should be done here and not in the PSD. Additionally, you will be able to customize your animation/jQuery functions from this screen as well. Again, for more details on, check out Site Grinder TV.

For this tutorial, we will not be creating any real CSS styles with attributes. Instead, we are simply adding a class name to a few tags on the site for Pagelime to use. In the Design Manager, navigate to the “border and background styles” dropdown menu. Using the dropdowns next to the elements, add a new style called “editable” with no additional attributes. Click Apply. After applying the style once, it will be accessible in all the other drop-down menus. Select each other region you would like to be editable by Pagelime and then apply to those elements.

When the site gets implemented into Pagelime in step 13, we’ll define this css class “editable” as the signal class for Pagelime to make regions user editable. Essentially this tag can be called anything you want it to be, as long as it’s unique, however, we suggest you make it something understandable for easy reference.


Step 5 Once you’ve set all the classes, click back to Photoshop to see the main SiteGrinder 3 engine module.

In the deploy area, select the newly built pages. Once you’ve checked the pages to deploy, select the site you want to deploy out to in the lower drop-down called “Deploy To.” You may have to create a new site if you do not have any previous sites. Just give it a name, select local only and click OK.

This “site” simply refers to how the directory on your local computer will be referenced. Don’t worry too much about what it’s called; you just need to be able to identify it later. The name also cannot have any spaces or special characters.


Step 6

At this point, the site HTML and markup is already compete, this was accomplished in the “Build” stage, Sitegrinder is now just recompiling and saving those .html and related files to your compute in the directory you selected.


Step 7 Once you’ve set all the classes, click back to Photoshop to see the main SiteGrinder 3 engine module.

It looks similar to the Design Manager and will have a local address. You need to define which page will be the default loading page on your site, or the “Index”. Check the “index” box next to the desired page, this will cause SiteGrinder to rename that file to “index.html” upon FTP upload to your server.


Step 8

Once this is all inputted, click OK.

The server address will most likely start with ftp. When setting the Remote Path, it is highly recommended you use the “Browse” feature for the most accurate directory. The “HTTP Address” will be where SiteGrinder will direct you after upload, so it’s probably best to choose the domain or sub directory where you are uploading.


Step 9 To push the site to the server, go back to the Upload Menu and choose Upload Everything

On the first upload, either upload option will do the exact same thing, since there are essentially no files on your server. However, just to be safe, when uploading a new deploy for the first time, I always choose Upload Everything to make sure I’ll get a fresh clean copy on my server.

>


Step 10 After the upload is complete, click “open site”.

This will display your page (or whatever you entered as your HTTP Address). You can see that your page is now live. That’s about it for the SiteGrinder portion, next we’ll move on to implementing the site into Pagelime for easy editing.


Step 11 Login to Pagelime.

If you are new to Pagelime, you can visit the Sign Up Page, to get a free account to use with SiteGrinder. Pagelime is a great simple CMS that will cut implementation time dramatically and give your client something they can understand.

Pro Tip:

When you sign-up for a PRO or Business Account, in addition to all the standard Pagelime features and plugins, you’ll have the ability to completely customize and brand the backend. Pagelime gives you the ability to entirely white-label the CMS from URL to logo and color scheme. This will allow you to offer your client a consistent and branded experience while working with you and on their site. It will also allow you to markup the service and add cash-flow to your revenue stream. You can setup clients on automatic recurring billing cycles for using your CMS aka Pagelime right from within the Pagelime Account/Billing Manager.


Step 12 Click, “Add New Site”, enter the full directory address, including the the index.html, setup the FTP settings, and choose a site title.

If you need any further assistance on this page, Pagelime has some extremely helpful tool-tips that show up on the right hand side when each field is selected. Use these as reference for what to enter and how to format it. You can also test your connection at the bottom of the page. It’s recommended that you use the “Browse” feature when selecting the file path as that will ensure the most accuracy. Also, make sure to change your Advanced settings (next step) before clicking “Save Site Settings”


Step 13 Under the “Advanced” tab, make sure to change the editable CSS class name to “editable”

This can be changed to whatever special class you named in the SiteGrinder Design Manager in step 4.

This is how Pagelime will identify which regions should be editable. If this class name does not match the class you added in step 4, or if the classes you added in step 4 are inconsistent with this “Editable CSS Class Name” across your pages, you will not be able to edit those regions within the Pagelime Site Editor. However, if you forgot to add the class to a region, don’t freak out, and if you’re not afraid of a little HTML code, than you don’t even have to go back to step 4. You don’t even have to use an external editor like Dreamweaver either. Instead, when you’ve selected a page to edit in the Pagelime Site Editor, use the right drop-down and select edit code. This will open up a rich, highlighted syntax view of your sites raw code that will allow you to manually add CSS classes. For more details on this process, check out a tutorial about it, called Manually adding CSS Classes through the Pagelime Site Editor

If the SiteGrinder 3 Engine is not already open, this will launch the SiteGrinder 3 engine. After the Engine launches, SiteGrinder will generate a report on any errors or warnings it may find in the template. Review the errors and fix any serious errors that apply* (you can also choose to ignore them, the site should still build). After you have resolved the errors, continue to the Build and Deploy page. Here, you should check off the pages you want to have built by SiteGrinder. In this tutorial, we will only be building out the home page. After the desired pages are selected, click “Build”.

*Note: If you are using the SiteGrinder 3 test template with a demo or basic version of SiteGrinder 3, it’s possible that you might encounter a report with 2 “serious” errors. Look through the errors carefully. It’s most likely that the errors are being thrown because you are referencing tags such as -$ or -blog within the template that require additional plugins. The Commerce Add On for -$ and The Control Add On for -blog. If that is the case, you can continue anyway. In this tutorial, we are not building out the “store” or “blog” page, so these errors are irrelevant.


Step 14 Click Save Site Settings

Saving Site Settings will confirm and save the FTP and Pagelime settings you just entered. This will also cause Pagelime to Reload. After it’s done, you can navigate back to the Site Dashboard.


Step 15 If you are editing images, make sure to activate the Image Gallery Plugin under Site Features on your site dashboard.

This plugin will allow you to upload and manage images through Pagelime. It is required that you have this plugin updated to manage ANY images on a Pagelime enabled site. If you want to get fancy with your images, we also recommend turning on Image Optimization which will allow you to control image quality and add photo effects from within Pagelime.

From the Site Features menu, you can also activate a number of additional features such as Page Templates and Content History. Content History can be extremely helpful when making continuous edits to a site as it will log all of your previous edits from a session and will allow you to roll-back content if an error or incorrect change is made.


Step 16 You’re almost done! You are ready to rock and roll with edits.

Just click on an image or text, either the main area or the little black edit bubble. This will open up either a WYSIWYG editor (which also has an HTML view) or the ZoomCrop browser for images. From here, you simply edit the content, save, and then when your done with all changes on a page, click the publish button on under “Page Actions.” This will push all of your edits live to your public site.

To pass this off to your client, you would create a new user under your Account Manager and give them permissions to the site. That user would then log in via either your custom URL or cms.pagelime.com – it’s that simple. The actual editing is covered in the video below, or we also have a shorter 5 minute video that gets straight to editing if you need a refresher.

Note, that when editing the images inside these DIVs, you need to hover over the center of the image and look for the little image icon. Click this area to access the ZoomCrop browser. Remember, the Image Gallery Plugin must be enabled. If you click the DIV tag, you activate the image in a WYSIWYG editor which, although can work, is not what we want and will not give us the best editing control for our images. This situation is created because SiteGrinder created a DIV around the image. If you would like to fix this manually, you can edit the code and remove the editable tag from the surrounding div and instead move the class to the IMG tag, again, this can be done all within Pagelime easily, see our blog post/tutorial about it called Manually adding CSS Classes through the Pagelime Site Editor


Step 17 Edit your content, Publish as normal and never deal with minor Client Content edits ever again!

To publish, click the “Page Actions” drop-down and click publish, then, BAM!, you’re done!


Conclusion

Thanks for following along in this tutorial. If you have any questions, comments, troubleshooting, wishes, hopes or dreams about Pagelime, you can visit the PageLime forums, or thedocumentation wiki.


Quick Tip: “Popular Posts By Comment Count” SQL Query in WordPress

You might have noticed that the Tuts+ sites have a section on the home page where we list the most popular posts of the month, according to comment count. While there are numerous plugins available, it’s always best to write the code yourself if you can. Too much abstraction is never a good thing! Luckily, once we learn how to query WordPress’ database, tasks like this become a cinch!

Prefer to watch this video on Screenr?


The SQL Query

To query WordPress’ database, we can use the $wpdb->get_results() method. As the parameter, we simply pass a SQL query. In this particular example, let’s say that we only want to display a list of popular posts within our sidebar. We can use the following query:

$pop = $wpdb->get_results("SELECT id, post_title, comment_count FROM {$wpdb->prefix}posts WHERE post_type='post' ORDER BY comment_count DESC LIMIT 10");

id, post_title, and comment_count our columns within the database.

MySQL DB

Because WordPress allows you to set a custom prefix for your database tables, we need to fetch that prefix dynamically, by using {wpdb->prefix}posts. In this case, that results in “wp_posts”. Next, we must ensure that we only display posts, and not anything else, such as attachments or pages. Finally, we ORDER BY comment_count. That’s the point of all this right? Display the most commented postings?

Now that our SQL query has been executed, we can simply use a foreach statement to filter through the results, and display them on the page.

$pop = $wpdb->get_results("SELECT id, post_title, comment_count FROM {$wpdb->prefix}posts WHERE post_type='post' ORDER BY comment_count DESC LIMIT 10");

foreach($pop as $post) : ?>
<li> <?php echo $post->post_title; ?> </li>
<?php endforeach; ?>

Note that the $post variable will have access to any of the columns that we fetched. In our case, we’d have access to:

  • $post->id : The id of the post
  • $post->post_title : The title of the post
  • $post->comment_count : The number of comments for that particular post.

If you need the permalink, you can either also SELECT from the “guid” column, or you can just use the get_permalink($post->id) method, and pass in the id of the post accordingly.

Once you’ve learned how to directly interact with the WordPress database, you then have a lot of power at your disposal; this is only the tip of the iceberg!

Any questions? Thanks for viewing or reading!


We Need an Awesome Weekly Writer

It’s that time again; I’m in need of a kick-ass – and consistent – author to help out on Nettuts once per week. Your duties will be to write an in-depth tutorial or article each week on anything ranging from PHP to JavaScript to CSS. Your pay will begin at $200 per article, resulting in roughly $800 per month. However, if you do a great job, you’ll also be invited to write a Premium tutorial every month, which would increase your pay to around $1100 – $1200 each month. Not bad for a once a week gig!

When I make these kinds of posts, I receive far too many one-sentence emails that don’t help. This time, to apply (and note that not many people do), I need you to email me with a few sentences about yourself, and a link to something that you’ve written on the web. It can be a link to your blog, or even a tutorial you’ve written for another web development tutorial site. If this is not included, your email will be deleted. Please email [email protected] with this information. Thanks, everyone!


Free Copies of “jQuery: Novice to Ninja”

A few weeks ago, the amazing guys at SitePoint sent me a handful of copies of their latest book, “jQuery: Novice to Ninja,” to give away to our community. As their first book to focus specifically on jQuery, the final product is a resounding success, covering the absolute basics up to building your own plugins. The writers, Earle Castledine and Craig Sharkie have really done a great job simplifying as much as possible so that even the absolute beginners can immediately dive into working in jQuery.

jQuery Novice to Ninja

How to Win

We’re going to make this one as simple as possible. Rather than leaving a comment to enter, all you have to do is follow us on Twitter, and tweet <a href="http://www.twitter.com/nettuts"@nettuts stating that you want the book. I’ll then sort through the first thirty tweets, and choose a handful of winners! That’s it. Please note that these are hard-copies. The winners will be announced on Sunday, May 2nd, US time.

Novice to Ninja