Learn 3D From the Pros With CG Premium

Your most regularly updated source for computer graphics education just got a little more Incredible! Today we’re happy to announce that CGtuts+ is opening the doors to its brand new Premium program. Like our sister sites Psdtuts+, Vectortuts+, Audiotuts+, Nettuts+ and Aetuts+, our Premium Program will offer tutorials that go into even more detail than our regular free tuts, giving you an inside look on the techniques used by professionals in the field.

If you can’t wait to get started with your membership you can become a Premium member for as little as $9. You’ll also get instant access to 279 exclusive tutorials and 701 source files – and counting – available as part of our other Premium programs.

Want to know more?

We’ll still be publishing the same amount and quality of free tutorials, but once a week we’ll be publishing extra special ‘Premium’ content for members only. These tutorials will be a level above what we usually offer. With the help of Premium subscribers we are able to invest in higher-end, more in-depth tutorials showcasing thoughtfully developed techniques that will blow you and your clients away.

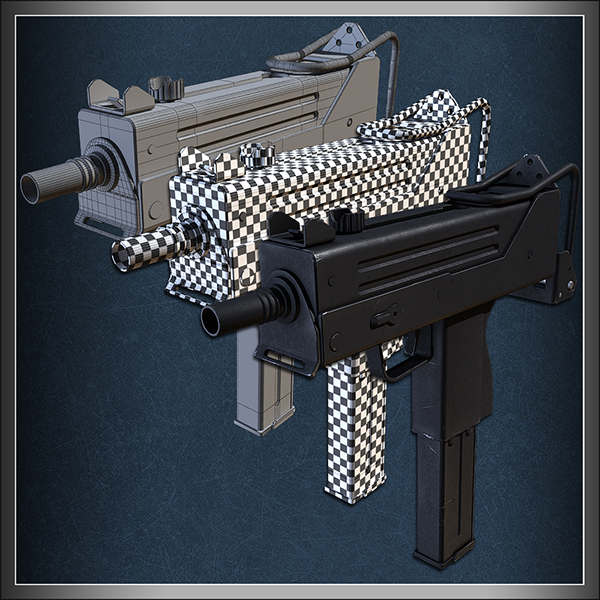
To kick-off CG Premium, members will instantly get access to a brand new tutorial exclusive for Premium members. In it, you’ll learn how to Model, UV, and Texture a Mac-10 Submachine Gun


This Premium Tutorial is Loaded with Tips

Over the course of this 10 hour monster of a tutorial, you will gain access to time saving professional gun modeling tricks and techniques that are universal to any 3d modeling application. We’ll give you an in-depth look at using the revolutionary and intuitive Headus UVLayout to quickly and effectively lay out all of the gun’s UVs, and finally, some tried tested and true texture painting techniques that use a careful balance between diffuse, specular, and bump maps to create realistic and convincing final metal textures.


Learn the Secret to High-End CG Weapon Creation

Follow professional CG artist, Ben Tate, as he demonstrates his entire process of modeling, UV mapping and texturing an extremely high quality Mac-10 submachine gun.

In the first part of this mammoth series, we will discuss a variety of efficient and innovative modeling techniques to create a medium density model. You will learn how to break the model down into into its respective parts in the blockout stage, and the approaches and tools to use when crafting the more complex shapes and parts.

We’ll also discuss where and where not to use subdivision modeling to speed things up further. This tutorial is intended for intermediate to advanced CG artists who are looking to take their skills up a notch, or maybe learn a new trick or two.

CG Tuts textured machine gun

That’s just the tip of the iceberg.

As soon as you join, you’ll instantly have access to 200+ tutorials and 700+ downloads from our Photoshop, Vector, Audio, After Effects, Computer graphics, and Web Development programs.

Here’s a full break-down:

1. Exclusive bonus tutorials teaching professional CG techniques

There are few industries where the techniques and methods of the professionals are so guarded in secrecy. We’ve lined up some of those professionals who are happy to break that unspoken oath of silence and teach you how things are done by the pros.

The tutorials are in-depth and challenging, yet clearly taught and easy to follow. Video lessons make learning impressive techniques easy, and each Premium tutorial comes with a full set of assets and source files you can use as you follow along. At less than the cost of a pizza, you’ll learn breathtaking techniques that will elevate your computer graphics projects to another level.

2. Exclusive source files for every tutorial

Great source files are hard to find, even if you pay big bucks for them. For $9 a month you’ll have access to the source files for every new tutorial we publish on the site, for as long as you’re a Premium member. As the network grows older this collection will increase to hundreds of files that you can use in your own projects, both personal and commercial. If you love all things CG, you’ll know how big this is!

3. Access to all Premium content, on all Tuts+ sites, past and present

While CG Premium members will have access to immediately download project files, you will also be able to plunder the archives of Psd Premium, Active Premium, Vector Premium, Audio Premium and Net Premium. You will immediately have access to over 200+ members-only tutorials and training videos, and over 700 download packs and source files for design, illustration, audio production and web development. You will also unlock the doors to all new Premium material published while you are a member. If another site goes Premium you will get access to Premium content for that site as well.

All for $9 a month, or $22 for 3-months, or $78 for one year (save $30).

4. You help keep CGtuts+ strong and healthy

Though we sell a small amount of advertising on the site, it only covers a tiny fraction of our costs. We pay at least $150 per tutorial, and have a salaried editor running the site. This adds up to thousands of dollars in costs each month. Our Premium members allow us to stay sustainable, to keep publishing great free content and to increase the quality of tutorials on the site. When you sign-up to Premium, you help Cgtuts+ stay strong and healthy into the future.

5. Premium isn’t for you? We’ll buy back your first month. It’s our 100% money back guarantee.

If you’re not 100% happy with Premium, we don’t want your money. That’s why we will buy back your subscription if you decide it’s not for you. You have one full month to make sure you’re getting value for money. Our friendly support team is on hand at all times to make good on our 100%, no-questions asked money-back guarantee.

Once you’re a member, login at the Tuts+ Dashboard and go to ‘Premium Content’ to claim your downloads.

Creating a Next-Gen Video Game Hot Rod: the Complete Workflow – Day 7

Now that we’ve wrapped up the UV’s in the previous part, it’s time to get to business with some serious normal map baking. You’ll be taken from a simple bake that shows an almost ideal baking scenario, to some very difficult examples such as the drivetrain and engine. Smoothing groups, UV splits/seams, cage setup and tweaking, and filtering settings, etc.. are all covered in detail. A few exceptionally difficult normal map problems, as well as their respective solutions, are also shown in this video.

This tutorial is Day 7 in a series – Go to Day 1, Day 2, Day 3, Day 4, Day 5, or Day 6.

Video 1

Download

Note: click the ‘Monitor’ icon to view tutorial in full-screen HD.

Video 2

Download

Note: click the ‘Monitor’ icon to view tutorial in full-screen HD.

Video 3

Download

Note: click the ‘Monitor’ icon to view tutorial in full-screen HD.

Video 4

Download

Note: click the ‘Monitor’ icon to view tutorial in full-screen HD.

Video 5

Download

Note: click the ‘Monitor’ icon to view tutorial in full-screen HD.

This tutorial is Day 7 in a series – Go to Day 1, Day 2, Day 3, Day 4, Day 5, or Day 6.

Don’t miss more CG tutorials and guides, published daily – subscribe to Cgtuts+ by RSS.

Quick Tip – Create Realistic Condensation on Glass with Maya Paint Effects

In this Maya Quick Tip tutorial, you will learn how to create realistic looking condensation any object, specifically cold glass, and then quickly render it for a nice polished final effect using Maya Paint Effects.

Step 1

Model your glass object. It could be a bottle, window, or anything that gives you the feeling of coldness.

Step 2

Switch to the “Rendering Menu” by pressing “F6″ on your keyboard, select the object, and then go to “Paint Effects > Make Paintable”.

Step 3

Open “Visor” by going to “Window > General Editors > Visor”.

Step 4

Select “Surface Bubbles” from the list.

Step 5

Start drawing the bubbles on the object’s surface. If the bubbles direction is reversed, simply undo, select the object, then go to “Edit NURBS > Reverse Surface Direction”, or “Normals > Reverse” if the object is made with Polygons. Now draw again. Note: To control the brush size, press “b” and hold while moving your mouse Left or Right.

Step 6

When you have finished drawing your bubbles, you may need to edit the following properties:

  • Sample Density: Increases or decreases the bubble density.
  • Surface Offset: Controls the distance between the object and the bubbles.
  • Smoothing: Smooths the bubbles path (underlying curve).
  • For me, the Density = 0.6, the Surface Offset = -0.010, and the Smoothing = 10.

    Step 7

    After that you can also add some tiny bubbles to fill in the empty area.

    Step 8

    Now you can render you scene using “Maya Software” or “Mental Ray”.

    For Maya Software Render, adjust the “Specular” and “Depth Shadow” attributes in the “Attribute Editor”. This will allow the “strokeSurfaceBubbles” brush to get a better render.

    For Maya Mental Ray Render, convert the Paint Effects to Polygons, and use “Mia_Material > Glass Presets” for the bubbles on the surface. You can use IBL to give reflections too if you like.

    Don’t miss more CG tutorials and guides, published daily – subscribe to Cgtuts+ by RSS.

    Unwrap a Cartoony Gatling Gun in Luxology Modo 401 – Basix

    In the second part of this Modo Basix tutorial, we will be continuing from where we left off in the modeling portion of the series, and going on to use many of Luxology Modo’s innovative UVW unwrapping tools to layout the UVs of our cartoony gatling gun model, and get it ready for texturing and materials. When you are finished, you should know everything that you need to get started unwrapping your own 3d models in this incredibly powerful package!!

    This tutorial is Day 2 in a series. Go to Day 1.

    Video 1

    Download

    Note: click the ‘Monitor’ icon to view tutorial in full-screen HD.

    Video 2

    Download

    This tutorial is Day 2 in a series. Go to Day 1.

    Don’t miss more CG tutorials and guides, published daily – subscribe to Cgtuts+ by RSS.

    Kludge City 01.7 (Maya script)

    Kludge city is a procedural building and skyscraper generator being developed by Visual Effects Artist, Ed Whetstone, as part of his short film project, “The Deliverator”. It is open-source, and freely available for anyone to use or edit, so head on over to www.whetstonevfx.com and download it now!

    License Type: Freeware

    File Size: 708.4 KB

    Release v01.7

    KludgeCity requires Maya 2009 and above. Each new version will be updated below.


    Installation

    In order to install KludgeCity, simply right-click the link below, and save the EdW_KludgeCity.mel file to your maya scripts directory. This is usually located in My Documents > Maya > Maya (Version) > Scripts. If you have Maya open, restart Maya. Then, type the following code into the Script Editor.

    source EdW_KludgeCity;
    EdW_KludgeCity;

    KludgeCity version 0.1.7

    To download older versions of the tool, go to www.whetstonevfx.com/kludgecity.html.

    General Workflow

    KludgeCity is a procedural system for generating buildings — you only need one piece of geometry built in order to get started — something I refer to as a “footprint”. Once you create a footprint and load it into the system, simply change the variables in the KludgeArchitect rollouts, and press the Execute button. The building will be generated wherever the footprint is located in your scene, using whatever units you have set up in Maya. Currently, KludgeCity is still very easy to break, so you must follow a couple of rules when creating your footprints.

    Footprints

    In order to create a custom Kludge Building, you must supply the system with footprint geometry to work from. This geometry must be a single, planar, continuous grid of quads or tris, at least eight divisions across at its thinnest point. A few valid footprints:

    For complete tutorial instructions on how to use Kludge, go to www.whetstonevfx.com/kludgecity_tutorial.html.


    Don’t miss more CG tutorials and freebies, published daily – subscribe to Cgtuts+ by RSS.

    Achieving Realism and Depth using Render Layers in Maya – Day 2

    Throughout the course of this two part rendering tutorial you will learn how to use the powerful render layers inside Maya 2010, and also how to output them and prepare them for compositing. In the second part, you will see how you can use After Effects to composite all of those rendered layers to achieve a more realistic look with custom depth of field.

    This tutorial is Day 2 in a series. Go to Day 1.

    Step 1

    To continue from the last step of the previous tutorial you need to have 150 images rendered in the ambient occlusion and beauty pass folders, and 300 overall in the zdepth folder. Alternately, you can simply use the images provided in the Project Files download.

    Step 2

    Open the zdepth folder and you’ll see two types of files. One is a TIFF format with no information in it, and the second one is TIFF format too, but with the zdepth information contained in it. You can easily see which one is the depth one because there is ‘_depth’ written at the end of every frame. You need the ones with the depth information.

    Step 3

    To open the files you need a viewer called fcheck which comes pre-installed with Maya. Go to the installation directory of Maya (usually is – ‘C:\Program Files\Autodesk\Maya2010’), then go to the bin folder and scroll down until see the fcheck program. Open it.

    Step 4

    Now to check if the zdepth information is ok, open the first file from the zdepth pass. Go to ‘File -> Open Image’, navigate to your zdepth folder, and click on the first image that ends with ‘_depth’.

    Step 5

    If everything is okay you should see a grayscale image of the zdepth pass and on top of the image there should be an indicator that you’re in the Z buffer channel.

    Step 6

    Go to ‘File -> Open Animation’ to load the whole render animation of the zdepth layer.

    Step 7

    In the window that shows up, make sure that ‘Z Buffer’ is checked, otherwise you won’t be able to open your animation with the embedded zdepth channel.

    Step 8

    Open the fist file that contains the zdepth pass.

    Step 9

    Your animation should now start to play. Press the ‘Stop’ button so that the program doesn’t take more CPU power.

    Step 10

    To export your zdepth animation to a TIFF that After Effects can read, go to ‘File -> Save Animation’.

    Step 11

    Select the ‘TIFF’ option from the ‘Save as type’ menu.

    Step 12

    Make sure that you’re saving in the zdepth folder, and for the ‘File name’ type ‘zdepth_’. Click ‘Save’.

    Step 13

    Now delete all of the files from the zdepth folder, except the ones that you converted (which start with ‘zdepth_’).

    Step 14

    You should now have only the ‘zdepth_’ files in your zdepth folder.

    Step 15

    Run After Effects and go to ‘Composition -> New Composition’. This will make a composition that you can start adding the rendered layers to.

    Step 16

    In the window that pops up, change the ‘Composition Name’ to ‘compositing_layers’. Then make the resolution of the composition the same as that of the rendered layers. To do this, un-check the ‘Lock Aspect Ratio’ checkbox.

    Step 17

    Now change the ‘Width’ to 700 and the ‘Height’ to 405, so it matches the resolution of the rendered images.

    Step 18

    Also, make sure that ‘Pixel Aspect Ratio’ is set to ‘Square Pixels’, and the ‘Frame Rate’ is 25. This is so the video won’t have any stretching and will run smoothly.

    Step 19

    Now you need to set the duration of the composition. To do this, simply divide the total number of frames by the number of frames per second that your frame rate is set to. In this case you have 150 frames, and a frame rate of 25 frames per second, so 150 divided by 25 equals 6 seconds long.

    Step 20

    To start importing the render layers, go to ‘File -> Import -> File…’.

    Step 21

    Locate your ‘Beauty_Pass folder and click on the first image of the sequence.

    Step 22

    Check the ‘TIFF Sequence’ checkbox, so that it’ll load all of the frames in the folder at once, and then click ‘Open’.

    Step 23

    In the window that pops up, select the first option ‘Ignore’, because you don’t have an embedded alpha channel in your sequence.

    Step 24

    Now right click onto the newly imported sequence, click ‘Rename’, and then rename the sequence to ‘beauty_pass’.

    Step 25

    Right click it again and go to ‘Interpret Footage -> Main…’.

    Step 26

    Here you need to set the ‘Assume this frame rate:’ attribute to 25 frames, otherwise the footage will be cutoff when you put it into the composition.

    Step 27

    We will repeat this procedure for the remaining render layers. Go to ‘File -> Import -> File…’.

    Step 28

    This time navigate to your ‘Ambient_Occlusion’ folder and select the first frame.

    Step 29

    Again, make sure that ‘TIFF Sequence’ is checked, and then click ‘Open’.

    Step 30

    Set the alpha to ‘Ignore’ again.

    Step 31

    Right click on the sequence, click ‘Rename’, and this time rename it to ‘ambient_occlusion’.

    Step 32

    Right click on it again and go to ‘Interpret Footage -> Main…’.

    Step 33

    Set the ‘Assume this frame rate:’ to 25 again.

    Step 34

    Now to import the final render layer. Again go to ‘File -> Import -> File…’

    Step 35

    This time go to your ‘zdepth’ folder and select the first image.

    Step 36

    Check ‘TIFF Sequence’ and then open the image.

    Step 37

    Right click on the imported sequence, click ‘Rename’, and rename it to ‘zdepth’.

    Step 38

    Right click and select ‘Interpret Footage -> Main…’.

    Step 39

    Set the ‘Assume this frame rate:’ to 25 frames per second.

    Step 40

    Now double click on the ‘compositing_layers’ composition to open it.

    Step 41

    Click and hold on the ‘beauty_pass’ sequence, and drag it to the layers panel to import it in the ‘compositing_layers’ composition.

    Step 42

    Then click, hold, and drag the ‘ambient_occlusion’ sequence to the layer panel, but make sure that it sits on top of the ‘beauty_pass’ layer.

    Step 43

    Click, hold, and drag the ‘zdepth’ sequence this time, and again place it on top in the layer panel.

    Step 44

    Un-check the layer visibility option for the ‘zdepth’ layer, because it is going to be used as information for the depth of field to calculate which objects are going to be blurred and which are not.

    Step 45

    Press the ‘Toggle Switches / Modes’ button, so you can see the layer blending options.

    Step 46

    Now you should be able to see the blending options for the layers, and that all of them are set to normal.

    Step 47

    Click on the blending options for the ‘ambient_occlusion’ layer.

    Step 48

    From the menu that comes up, select the ‘Multiply’ option, so that the white color from the ambient occlusion becomes transparent.

    Step 49

    Now, only the shadow part of the ambient occlusion layer should be visible. The image should look much better already, but in this case the dark areas are a little bit too strong.

    Step 50

    To make the AO effect a little less visible, you will need to change the opacity of the ‘ambient_occlusion’ layer. Click on the arrow next to the color tag of the layer.

    Step 51

    You should see the ‘Transformation’ attributes tab for the layer. Click its arrow to expand it.

    Step 52

    Then click on the opacity attribute, and change it to 50. Now the effects should be much more subtle.

    Step 53

    You can now click on the arrow for the ‘ambient_occlusion’ layer to close its attributes.

    Step 54

    Now you need to create an adjustment layer, so that the zdepth pass can be applied onto all of the layers. Right click on the layer panel, and select ‘New -> Adjustment Layer’.

    Step 55

    Right click on the new adjustment layer, select ‘Rename’, and rename it to ‘zdepth_adjustment’.

    Step 56

    Select the ‘zdepth_adjustment’ layer.

    Step 57

    Go to ‘Effects -> Blur & Sharpen -> Lens Blur’. This will add the depth of field effect to your adjustment layer, which means it will be added to all of the other layers as well.

    Step 58

    You should be able to see the effects controls in the top left of the screen. If not, right click on the ‘zdepth_adjustment’ layer, and select ‘Effects -> Effects Controls’.

    Step 59

    Now you need to select from which layer the depth information should be coming. Naturally, we want it to be coming from the ‘zdepth’ layer, so left click on the ‘Depth Map Layer’ attribute, and select the ‘zdepth’ layer.

    Step 60

    Make sure that the ‘Depth Map Channel’ is set to ‘Luminance’, so it will get the information from the zdepth layer correctly. Also check the ‘Repeat Edge Pixels’, so you won’t get any artifacts around the corners of the image.

    Step 61

    ‘Blur Focus Distance’ is the main attribute that will help you adjust and animate the depth of field. Every step of the value represents different a color value of the grayscale zdepth image. So when you put a value for the attribute, only certain objects that correspond to that value in the grayscale range will be affected. Which values you will use depends on how wide is your grayscale range is, so it’s better to check first which values correspond best to your current situation.

    Step 62

    For the first frame, let’s say that you need the painting canvas to be in focus. The corresponding value for that would be 170, so put that in the ‘Blur Focus Distance’.

    Step 63

    When the first frame is ready, you can start animating the depth of field effect. First you will need to expand the ‘zdepth_adjustment’ layer, so you can see the effect attributes in the time line. Click on the arrow of the zdepth adjustment layer, then click the next arrow that shows up next to ‘Effects’, and then expand the ‘Lens Blur’ effect if it isn’t already expanded.

    Step 64

    Now click the stopwatch, next to the ‘Blur Focus Distance’ attribute, so you can animate it.

    Step 65

    Drag the time slider to 2 seconds, and set the ‘Blur Focus Distance’ to 147. This will create a new key at 2 seconds, and will bring the drawer with the glass object into focus.

    Step 66

    Now go to 3.5 seconds, and set the ‘Blur Focus Distance’ to 90. This will keep the table and couches in focus.

    Step 67

    Go to the first frame again, but this time click the stopwatch for the ‘Iris Radius’ attribute. This will determine how blurred the depth of field will be. The initial radius of 15 is fine for this frame.

    Step 68

    Now go to 4.5 seconds, and set the ‘Iris Radius’ to 7, to make things look more natural.

    Step 69

    You are now ready to render the composition with all of the layers combined! First switch to the ‘Project’ tab, so you can see your ‘compositing_layers’ composition.

    Step 70

    Next, open the ‘Render Queue’ tab, next to the layer panel. If you don’t see it press ‘Ctrl+Alt+0′.

    Step 71

    Click, hold, and drag the ‘compositing_layer’ composition into the ‘Render Queue’. You should see the output settings for the composition.

    Step 72

    Click on the ‘Lossless’ setting in the ‘Output Module’ attribute, to bring up the output file type settings.

    Step 73

    Click on the ‘Format’ options menu and select ‘Quick Time Movie’. You can use any format or compression settings that you want.

    Step 74

    Click on the ‘Output To:’ attribute, and select where you want the composition to be saved. Then click ‘Render’, wait until it renders out, and go to the output folder to view the final composition!!

    This tutorial is Day 2 in a series. Go to Day 1.

    Don’t miss more CG tutorials and guides, published daily – subscribe to Cgtuts+ by RSS.

    Getting “Prosonal”

    One of the things that can have a strong impact on how awesome your work is—or becomes—is how you handle yourself both personally and professionally. As I’ve said before, it’s a tricky balance. So tricky, in fact, that it may not even be worth challenging. I mean, trying to shift between how you act and react on a professional level versus how you do so on a personal level is as daunting as it sounds. You’ve got be constantly aware of where you’re at, what you’re doing—you have to mind you p’s and q’s all the time. With that in mind, I’m going to propose something radical to you.

    Don’t.

    You shouldn’t even bother trying. What’s the point of distilling the personal from the professional? It’s an exercise in futility—I tried it for years. It just doesn’t work.

    Have you ever switched places of employment and said to the following to yourself:

    “I’m going to be a different person at this new job.”

    – You, upon starting a new job…and three days prior to you going back to old habits at said new job.

    I’ll bet you have. There’s always going to be an aspect of how you were perceived at work—or how you delivered yourself—that you’d like to leave behind. Nothing wrong with that. It’s natural. But it’s also useless to create a character that you’ll play at this new job. Unless you’re an actor, you’re not going to be able to pull it off.

    All the World’s a Stage

    Let’s discuss actors for a moment. They go from role to role, some stay in the same one for years while others diversify and portray several in that same timeframe. Consider your work environment, your track record for a moment. Have you moved from job to job? Things gotten stale so you moved on? Did you wear out your welcome? What happened?

    Actors go from character to character because that is their job. It’s their calling. However, you’ve likely seen examples of “fans” of these actors having difficulty discerning who the actor is in real life versus the characters the play. This isn’t ideal for the actor, nor is it ideal for the fan. Both are bound to be disappointed or, worse, dangerous. But do you put your “fans” (friends, colleagues, etc.) in the same position by how you interact personally and professionally? It can be just as disappointing…and dangerous.

    The Value of You

    Ideally, you do what you do because you enjoy it. That’s what it ultimately boils down to. So why do some people put forward a professional persona when they are on the job? Shouldn’t their real, natural persona be enough? You have to let the genuine article flow through…that’s what wins over people. Not to mention the fact that you’ll enjoy your work that much more if you do.

    Society places an awful lot of value on “what” you are, not “who” you are. What you are is based on who you are, anyway. Think about it…what you’ve achieved is a result of who you are as a person. No matter how you got to that “what,” it’s your “who” that guided you there. Forget about the material aspect of all of that. The real value isn’t what you’ve gained—or how you gained it. It’s who you were that has the inherent value. The ultimate value of you is based on that—everything else is built from that.

    That said, why should you even be concerned about the “when” you are by putting forth different versions of “you” in personal and professional matters? That’s really just another facade…and it’s about as useless as all of the “what” you get to bring with you when you shuffle off this mortal coil.

    Enter Wisdom

    Obviously there are lines in the sand that must be drawn. You’re not going to go out and have a few beers during your work day because it’s how you lead your life when you’re “off the clock.” This is where wisdom comes into play. When we’re younger, we do a lot of things that we probably—nay, definitely—should have avoided doing. I’m sure you can think of plenty, so let’s discuss why the wisdom achieved only through years of experience makes these things happen less and less. Be mindful, though. Wisdom is muddied sometimes behind objectives that may seem more important at the time—such as landing that big contract or pulling an all-nighter when rest is what’s needed. Wisdom helps you land that contract without compromising yourself and kept you out of the notion of an all-nighter to begin with. Don’t bury it behind goals or priorities. Tap into it to help you achieve and clarify them.

    Be of One Mind

    I challenge you to skip being professional. Don’t dwell on being personal in situations, either. Instead, be prosonal. The word is simply a portmanteau of both—and note I put the “professional” component first. Be of one mind, one personality. Be genuine. If you lay it out there as yourself and without all of the baggage that comes with having to balance two different ideals, you’ll find things will start to work out better.

    Do it over the long haul and they’ll work out awesome.

    Don’t Increase Your Willpower — Reduce Your Options

    A little over a year ago, I started going on a low information diet. Rather than just reduce the number of feeds in my RSS reader, I dumped them all in one shot. I knew myself well enough to realize that I would open up the reader the moment I felt the need to postpone taking action on something important. So I still found myself opening the reader, but there was nothing in it that would serve as a tool for procrastination. Rather than just limiting my email consumption to one or two scheduled sessions per day, I added Gmail.com to Leechblock, a Firefox extension that blocks your access to designated sites for designated time periods.

    The principle is simple: it’s easier to increase our concentration by controlling our environment than controlling our attention. By setting the conditions in which we operate on the front end, we spare ourselves the order of having to make moment-to-moment decisions for staying on task. I kept trying to open GReader and Gmail, despite my conscious commitment to the low information diet. The problem isn’t changing a behavior, it’s changing a habit, and a habit is much more deep-seated and has more momentum than a single action.

    Habit Handicapping

    There are probably a million ways to change a habit, but I see three main ones. We can identify the psychological cause that drives the habit. I’m too much of a pragmatist to find much reassurance in that approach, at least when it comes to getting past procrastination. We can identify distractions and triggers that divert us from the critical path, like instant messages and phone calls. I think this is necessary but not sufficient. It’s one thing to know that a ringing cell phone is distracting, but trying to ignore it when it rings requires willpower, and exercising that willpower is itself a distraction — like consciously trying not to think of pink elephants.

    The third way is habit handicapping: limiting your ability to engage in a unproductive habit. Returning to the GReader/Gmail example, I created a framework in which I didn’t have to tell myself not to check RSS feeds or email. I was free to check them, even if they yielded no results. For a few weeks, I still opened these sites reflexively, then my brain finally made the connection: opening these sites will just show an empty page. Break the causal connection between a habit and its effect by changing the effect. Disrupting that habit has since served its purpose, and now I’m using an RSS reader again, but in a unique way that I’ll explain in an upcoming post.

    But surely you can cheat if you really want to indulge in the habit? Absolutely. The point isn’t necessarily to remove the possibility to succumbing to habit, but to put enough sand in the gears to make habitual behavior a conscious choice.. You can leave ice cream in the freezer and resolve to avoid eating it, or you can throw it out so that you have to drive to the store if your sweet tooth is really that strong. I prefer the latter. Imagine how much more fit employees would be in an office without vending machines or coffee makers.

    Other examples:

    • Increasing your writing output by composing on a legal pad instead of looking for a fancier writing tool with internet access
    • Deleting your browser bookmarks so that you have to access your favorite time leeches by typing in their urls. Those who are apprehensive about losing their bookmarks permanently can always save them to a flash drive first
    • Leaving cash at home to avoid the vending machine at work
    • Installing a call filter app on your phone that blocks designated calls, or all calls, at designated times. I have mine automatically set to route calls to voice mail during work hours, so I never have to hear or attempt to ignore a ringing phone

    Willpower is overrated. We know it, yet we pay lip service to it. Powerful CEOs get things done in large part because they have professional gatekeepers to control their environment, not because they have iron wills. In a world rife with interruption (including self-interruption), controlling our environment is an executive skill that we all need to master.

    Reading Blogs Like Books

    In my last post, I talked about how I gave up reading blogs for a while by dumping all of my feeds from Google Reader. Initially I still found myself opening GReader, but since it was devoid of content, the habit died much more quickly than if I would have just tried to restrain myself from opening GReader.

    A couple of months later, when I felt that I had the habit under control, I started adding a feed or two — or six or eight — to the reader, until I realized that I was back where I started. Whenever I was bored or anxious, feed reading was my crutch activity. So I dumped the feeds again and recovered.

    But then I started thinking about the root of the problem. What is it about RSS that makes it so addictive? Why do I find books so much more satisfying to read than blogs? Books obviously treat their subject matter in more depth, but perhaps there’s a better reason. Books provide closure. They have a beginning, middle and end. Using an RSS reader, that experience can be approximated with blogs.

    The Case Against Serial Content

    Blogs manage our expectations in ways that can be counterproductive. Content that’s automatically delivered to an inbox on a daily or hourly basis conditions readers to live in a state of constant anticipation, contributing to what’s usually referred to as Continuous Partial Attention (CPA). As long as something is waiting for us in one of our inboxes, we feel compelled to keep up with the flow of information.

    The alternative is to catch up rather than keep up. Catching up is the default mode of consuming information in books. All the information is sitting out there in a bundle that you can read from start to finish in one or more sittings, providing a sense of closure. If you feel the need to read more of a book after finishing it, it’s usually to fill in gaps in understanding; it’s not just a ritual behavior of checking for more information.

    Keeping up is the default mode of consuming information in blogs. There’s always something new to read, so there’s never a sense of closure. While blogs are almost never structured to have a beginning-middle-end lifecycle, it’s pretty easy to set them up so they can be read in one or a few sittings without the need to “follow” them indefinitely.

    Setting up Your Blog in Google Reader

    You can probably use any RSS reader for this, but Google Reader is familiar enough. Since we want to move from keeping up with blogs to catching up (with the exception of WorkAwesome, of course), the first step is to dump all of your RSS feeds. There’s no need to freak out about permanently losing the dozens of feeds you’ve curated for yourself over time. Just export them as an OMPL file that you can re-import if necessary. Go to Settings | Reader Settings | Import and Export, click on “Export your subscriptions as an OMPL file”, and save to your desired location.

    You’ll notice above that I mentioned setting up your “blog” rather than “blogs”. There’s nothing to stop you from performing the following operation on multiple blogs at once, but I highly recommend reading one blog at a time from beginning to end, removing that blog from the reader, then moving on to the next one rather than scrambling your brains with a bunch of disparate content.

    Add the first blog to your GReader as you would any other blog: either by clicking on the site’s RSS chicklet or by hitting the a key for “Add a subscription” and adding the feed’s URL. The reader will populate with all of the feed’s new items. If you’re not already in List View, switch to it now by hitting the 2 key. Now we want to delete the current feed’s contents by hitting Shift-a for “Mark all as read”.

    Now click the “View all items” link in the view pane, which will show you a complete list of all the blog’s posts. You can move the focus up and down through the list using the n key for Next and the p key for Previous. You can open the current header in focus with the o key, and close it by hitting the o key again. If you happen to be stuck with partial feeds that require you to click through to the site, you can use the v key without the need to open the header with the o key first; this will open the post in a new tab or window, depending on your browser settings. For more efficient reading, check to see whether the site offers a full feed. To skip the a post, mark it as read with the m key.

    What’s nice about processing the full feed in list view is that you can glance at the headers without getting lured into the post contents unless you deliberately open them. Now you can run through an entire blog from beginning to end (or end to beginning, as is the default) by highlighting the next header with the n key, opening and closing the article with the o key, or marking it read with the m key. When you’ve completed the entire feed, refresh the view with the r key. The feed with now either be empty or have any posts that have arrived since you began reader. Process these the way to do with the initial batch, refresh, and repeat until you’re at inbox zero.

    Then remove the feed from your reader. You’ve caught up, you don’t need to keep up. Rinse and repeat with your other feeds. This doesn’t have to be done in one sitting. It takes as long as it takes. I’ve found that the easiest way to complete all of feeds is to abandon as many as possible. I noticed that many of the blogs I was reading were simply regurgitating information from a much smaller set of authority blogs, so there wasn’t much point to rereading the same content with a slightly different spin.

    Don’t Keep the Feeds

    But what if you want to keep up with new posts? I recommend two approaches. Either go to the blogs manually occasionally (not daily) and quickly scan for new updates, or add them back into GReader long enough to process any new posts, then dump the feed again. The principle is to prevent automating the delivery of new content, so that you can maintain more conscious control of what you consume. You’ll find that it’s psychologically healthier to expose yourself to new content on an as-needed basis than to keep yourself running on the information treadmill.

    Editor’s Note: Oops! I published these posts out of sequence, and you can expect the precursor to this piece, titled Don’t Increase Your Willpower — Reduce Your Options, shortly.

    Get Promoted Without Working Any Harder

    This isn’t a get-rich quick scheme. There’s no trickery or deception involved. Believe it or not, promotions and raises are usually made based on perceived competence—the important word being perceived. These tips are not meant to hide incompetence (if that’s your problem you need a whole different article!). These are here to help you show your boss and coworkers how competent you are, and to keep you from accidentally convincing people you aren’t.

    Speak Well

    It doesn’t matter how brilliant the words coming out of your mouth are; if you mumble and use slang your listeners will value what you say far less than if you speak clearly and confidently. Pick any great speech from history and imagine it with mumbled slang and you’ll see what I mean: “Umm… y’know I, like, have a dream or somethin’, right. That, uh… maybe this country will, like…”

    Quick tips for speaking better:

    • Speak from your diaphragm. Breathe from the bottom of your belly and push your speech out from your there.
    • Throw away “uh”, “er”, “like”, and any other words that don’t have any meaning.
    • Avoid slang.
    • Don’t swear.

    Dress Professionally

    You’ve probably heard the phrase “dress for the job you want, not the job you have”. It’s a bit cliché, but it absolutely works. This doesn’t mean that you need to wear a three-piece suit to do data entry, but it does mean dress professionally. You may be able to get away with a polo shirt in your office, but you’ll command more respect if you wear a button up shirt. Wearing what you can “get away with” gives the impression that your attitude towards work is to only do what you have to. Making the effort to dress nicer that you have to implies that you’re willing to go the extra mile in your work.

    Be Extra Punctual

    If you’re late people notice and think poorly of you for it, so being on time is a no-brainer, but if you want to be noticed then show up 15 minutes early for work every day. You don’t have to start working the moment you get there—in fact you can use that time to have a cup of coffee or discreetly surf the internet. Just being there makes you look good, and your boss will definitely notice.

    Good Posture

    Good posture goes hand-in-hand with speaking well. If you’re constantly slouching or hunched over you simply look bad. If you stand straight and confident, you’ll come across dynamic and confident. There’s a reason that you never see slouchy pictures of CEOs, great political leaders, or super heroes. It’s because you wouldn’t respect them as much.

    To improve your posture try a technique my chiropractor calls “The Woodcutter”. Start by standing with your feet shoulder width apart. Then raise your arms straight above your head like you’re about to chop wood. Now leaving your body in the same position, lower your arms to your side. Your shoulders should be relaxed, your chest forward, your head tall as if pulled by a string from above, and your pelvis rotated slightly forward. Give it a try. You’ll feel better and look better.

    Propose Solutions, Not Problems

    Here’s what most people find a problem at their work: they complain about the problem. The way to stand out is to present a solution, not a problem. Let’s look at an example: your office store room is crowded and nobody can ever find what they need. Everyone in your office gripes about this problem. Instead of just complaining, you, being destined for greatness, take two minutes to look at how it can be fixed.

    When everyone else is telling your boss “the stock room’s a disaster”, you go to your boss and say “I noticed that the stock room is pretty disorganized. Perhaps we can get the maintenance guy to put shallower shelves in. This would give us more room to move in there, and prevent things from being lost behind other items. Once the new shelves are in we can label each shelf so that our supplies are consistently put in the same spot, making them easier to find”.

    In the situation above, you look good for being a creative thinker and problem solver, and even better: you didn’t have to do any additional work. You just had to approach it from a different angle.

    Conclusion

    There you go: five super-easy, painless ways to look smarter, more competent and ready for a promotion, and all without actually working any harder. No overtime, no added stress. Here’s my challenge to you: try these for one month. If nobody comments on what a great job you’re doing, I’ll refund your admission price to this blog.

    How to Concatenate Multiple CSV Files in Excel

    Do you have a bunch of similarly formatted Excel spreadsheets piling up in your Documents folder? I don’t know about you, but I’d rather see one large worksheet than see the same collection of data spread out over dozens of worksheets. Let’s roll them all up into one.

    Move Your Files into Your Main Directory

    OK, I’ll be honest. We’re doing most of the work in the Windows command prompt, not Excel per se; but a post title like “How to Do X in DOS” doesn’t have the same sex appeal. Ultimately, though, your CSVs are going to be opened and edited in Excel.

    For most people, their main directory is their C: drive, as opposed to My Documents or another folder further down your PC’s hierarchy. You can actually perform the following operation on any folder, but since we’re going to change directories in the command prompt, you’ll have less typing to do if you paste them directly into C: using Windows Explorer. If you want to use another drive, like E: or F: or whatever you’ve mounted for an external drive, that’s fine too.

    Open the Command Prompt and Change Directories

    From the Start menu, type cmd into the search box and hit Enter. From the command prompt (where the cursor is blinking), type cd c:\:, with a space between “cd” and “c:\”, and hit Enter. The prompt will change from whatever its previous directory was to — you guessed it — C:\. Naturally, if you put your files in another drive, substitute the appropriate drive letter.

    Copy Your CSVs into a Single File

    This is where the magic happens. Type copy c:\*.csv c:\filename.csv, with a space between “copy:\*.csv” and “c:\filename.csv” (substituting filename with your new file name) and hit Enter. This takes all of the CSV files in the drive and merges them, so you’ll want to make sure that if you do this more than once, don’t leave older CSV files in that directory if you don’t want them to be merged.

    Dedupe Repeat Headers

    Fire up Excel and open up the  file (you might have to select All Files instead of All Excel Files). Assuming you generated the original files from the same source, it’s likely that each of those worksheets had the same headers, which will repeat themselves in your new aggregate file. If the source files have slightly different headers, like “Sales for January” and “Sales for February”, you may or may not want to remove the additional headers. If you do decide to remove near-identical headers, you’ll have to do a Find-and-Replace for the unique substring (e.g. “January”) to make the them completely identical.

    Note that we are going to remove all duplicate rows, not just the headers. For most people, duplicate rows are redundant information. If that’s not the case for you, you’ll have to remove the header rows by hand.

    To remove duplicate rows, hit Ctrl-A to Select All, then in the Data tab (Excel 2007 and 2010), select Remove Duplicates in the Data Tools group, uncheck “My data has headers” (your top header will remain intact), click OK, and voila — a single header for all of your rows.

    That’s basically it. Give you new file a good scan to make sure your data is formatted correctly, and if everything checks out, go ahead and remove the source CSV files from your C:\ drive.

    So You Think You’re Ready For Management? Think Again.

    So a great management position has just come your way and you’d love that new title — not to mention the salary bump. But, before you rush to submit your application think long and hard about whether you have not only the right skills, but also the right personality for the job — especially if the managerial position you’re interested in includes supervising others.

    No matter how good that pay increase may sound or how impressive the title may be, understand that not everyone is cut out for management. Sure, you may have been with at the company for several years now and you may have mastered the skill set required for your current position. But that still doesn’t necessarily qualify you for management. Being an effective manager requires a set of interpersonal skills and personality traits that may not be required for your current position.

    Let’s take Carl’s* situation as an example:

    A senior graphic designer with several years of professional experience, Carl had longed for the day when he would be able to advance to the level of creative director, a position that requires strong people supervision and leadership skills. Carl was creative and very proficient on the last design software. The position would require him to manage a team of designers, present ideas and be responsible for directing the creative department’s projects. So when a position opened up at his company, Carl jumped at the opportunity to apply. However, soon after his promotion, it became quickly apparent that he had overestimated his preparedness for the position. Despite being newly-promoted, he was often late or absent as he tended to ongoing personal issues, leaving his staff to work around his frequent absences and take on additional responsibilities because he wasn’t available.

    Additionally, as a result of his frequent absences, his time management suffered and his projects were often late. On top of that, Carl had low self esteem issues that caused him to feel insecure when leading meetings, making decisions, providing employee feedback, establishing a direction for his team and selling others on his ideas. Soon, his staff lost faith in his ability to lead them. As such, some followed his poor example and began to also slack on their own work commitments, while others began job-hunting, rather than continuing to work on his team. Carl’s boss was forced to give him an ultimatum: Improve your performance or lose your job. Unfortunately for him, Carl’s performance never substantially improved. In the end, he lacked the key personality traits and skills that his management position required – as well as the ability to adapt his behavior enough to correct the problems.

    So, before you apply for that next management opening, be sure to ask yourself these 7 important questions (and be brutally honest with yourself when you answer them):

    1. Do I have self-confidence?

    As a manager, enforcing procedures, establishing a solid direction for your team, providing constructive feedback, and getting buy-in on your ideas requires confidence and conviction. If you have a tendency to crumble when presented with negative feedback or you back down easily when faced with opposition, management may not be a good personality fit for you. If you don’t have confidence in yourself, your team won’t have confidence in you either.

    2. Do I have strong planning skills?

    Successfully leading a team or implementing a project demands that you not only know what the end-result should be, but that you also have the ability to identify the key steps necessary to make it happen. To do that, you need to be able to create a clearly-defined project plan that will help you and your team stay on track by establishing goals, individual roles, and action items. If this level of detail is just not your thing, you’re likely to have a difficult time keeping your team moving in the right direction and effectively executing your vision.

    3. Am I good at quickly making sound decisions?

    When members of your staff bring to your attention operational issues (i.e., equipment purchases, departmental processes, etc.) which require you to make a decision, they will expect you make sound judgment call in a timely manner. If you tend to labor over the pros and cons of even the most basic decisions or you routinely delay decision-making in hopes that someone else will make the decision for you, you’re probably more of a follower, than a leader. If you can’t make a good decision, you won’t make a good manager.

    4. Do I know how to motivate others?

    Getting a team pumped up and keeping their morale high is critical to the success of any team. One of the easiest ways to motivate your team is to be appreciative of the work they do. Simply giving praise for a job well done can be a huge motivator. If team members know that their contributions are genuinely appreciated, they’re much more likely to go that extra mile when it’s needed. But, if giving someone a compliment makes you feel uncomfortable or you believe that the only a pat on the back employees deserve is their paychecks, you’ll likely have a very hard time keeping your team motivated and eager to go above and beyond on the job.

    5. Am I good at following through on what I say I‘m going to do?

    Nobody likes empty promises. Likewise, your staff will feel the same way. They will count on you to do what you say you’re going to do, when you say you’re going to do it. If you have a bad habit of repeatedly missing deadlines, dropping the ball on key tasks or not following up on issues, that will quickly erode a team’s ability to trust you to meet your managerial obligations. Once that trust is gone, so is your reputation as a manager.

    6. Am I a good communicator?

    One of the easiest ways to get the reputation as a ‘bad manager’ is by being a poor communicator. If you like the idea relying on occasional emails and meeting infrequently in person to touch base your team, you’ll be in for a rude awakening. Effective managers are expected to meet with their teams routinely to provide them with direction, project updates, constructive feedback, or solutions to operational roadblocks.

    7. Would I be able to set a good example for my team?

    Becoming a manager doesn’t mean that you no longer have to follow the laws of the land. If you have a tendency to show up late for work, you frequently call in sick or often allow your personal life to impact your work time, you will set a poor example for your team. Do as I say, not as I do may work for children. But, that decree isn’t very effective in the workplace.

    If you answered ‘NO’ to three or more of these questions…

    Chances are that you’re not ready for management. However, if you feel that you still want to pursue a management position, start taking the steps necessary to improve your weak areas. This may include:

    • Enrolling in management training.
    • Volunteering to lead a complex team project that requires project planning, task assignment, and interpersonal skills.
    • Joining a public speaking group like, Toastmasters, to sharpen your presentation skills.
    • Getting potential personal distractions in order (ie., reliable child care arrangements, relationship problems, health issues, etc.)
    • Asking a manager whose style you admire to serve as your mentor.

    While these highlighted tasks can lead to management skill improvement, it’s also important to understand that other key personality traits (ie, a passive demeanor, a poor self image, low stress tolerance, etc.) may not be as easy to overcome. If you’re currently dealing with some of these personality-related roadblocks , you should seriously reconsider if management is a good fit for you.

    The Bottom Line: Before you apply for that next open management position, be very honest with yourself about not only your skill set, but also your personality type and your personal habits. It’s true that the world is full of managers who wouldn’t be able to pass the above test, but we have a name for those people: “BAD MANAGERS.” Don’t become yet another member of that infamous club. Instead, if you believe you have potential to be a manager, set your sights on becoming the most effective leader you can be. Do that by getting your personal issues in check and developing the proper leadership skills prior to throwing your hat into the management ring.

    *The name Carl is a pseudonym.

    Stop Being Nervous About Public Speaking

    I need you to give a presentation on our reorganization plan to the rest of the group. This is your baby, so there’s no one more qualified than you to explain it.

    Why are you hiding under the desk? Stop sobbing. It’s only 30 people. Sure the big boss will be there. But this is your chance to show everyone what you got.

    And you’re afraid to show everyone you have a severe case of stage fright.

    You need to relax. You can do this. Even if you’re a certified introvert. Let me tell you how I get through these presentations.

    It’s not about you

    I know why you’re nervous. You’re afraid of making a mistake in front of an audience. Don’t want to look like a fool. But no one is coming to see you. They don’t care what you look like. There is a problem, and they want to find out what your solution is.

    You owe them something. Don’t spend any time worrying about how you can mess up. Focus on what they want to know – not your ego.

    Talk to someone

    It’s still hard to shake off that nervousness. You’re going to stand in front of a group armed with a podium, projector and laser pointer. You’re brushing up on all the formal speechifying tips. Speaking like this in front of so many people is new.

    So throw all that out of your mind. Imagine what you would say if you sat at a table with someone. What would you say?

    Explain this to the audience like you would to just one person. Be direct, clear and friendly. Imagine talking to someone you know. What would it take to explain this to your spouse or bowling buddy?

    This is going a long way to making your presentation more relaxed and natural.

    Watch your jargon

    You have specific language to describe what you do. And you use it everyday with coworkers. Will your audience understand this language? If you’re speaking to anyone who comes from outside your professional circle, it’s a good bet you’re using words they’re not familiar with.

    Also, remember that you’re giving this presentation because you know something that your audience doesn’t. So by definition they’re probably going to have trouble with some of the vocabulary.

    The trick is to use language that someone outside your office will understand without talking down to them.

    Don’t be afraid to use notes

    President Obama arguably is one of the best speakers of our time. And he uses a teleprompter. There’s no shame in using notes.

    That doesn’t mean it’s OK to read from a script. You need to have familiarity with the content. Use the notes to remind you of what you’re going to say.

    I love 3 x 5 index cards. I write a point on each card, turning a stack into an outline. Then it’s real easy to re-organize the speech by switching the order of the cards. Adding new points or throwing out unneeded parts is easy with index cards. While I work on the presentation, I add notes to each card to help me through it.

    The trick is to have just enough information on each card so I can absorb it with a glance. The glances come during the pauses found in every speech and presentation. I use the pauses to check my cards. It keeps me on track and in the flow of conversation.

    Practice, practice, practice

    Stand up and practice out loud. This isn’t just a memorization step. It’s a chance to listen to yourself. That’s why you should record your practice. Listen for awkward phrases and gaps in logic. Put yourself in the audience and look for weaknesses in your presentation. It becomes much easier to spot the areas needing improvement.

    And time yourself. You have a time limit for your presentation. See how close you are to that time. Despite what I first said, you’re going to be a bit nervous. And that’s going to speed up your delivery. But your speech will be slowed by questions and objections. So your practice time can be close to what you actually deliver.

    Friends don’t let friends use PowerPoint

    I have lost too much time in my life to weak PowerPoint slides. Too many people use them to spell out the same words they’re speaking. Lord help me.

    But sometimes you need some help. Guy Kawasaki has great advice on using PowerPoint. Basically, keep it down to 10 slides in 20 minutes. Anything more is bordering on information overload.

    Images have impact

    OK, here’s a chance to use PowerPoint effectively. Find powerful images to illustrate your point. It will help the audience remember what you say. They will associate your words to the image on the screen. That strengthens the memory they will have. Plus when they see similar images later, they will be reminded of what you say.

    Get help

    I am a member of Toastmasters – an international public speaking club. Each meeting allows members a chance to give speeches and get feedback. There is a structured program that helps me develop public speaking skills one speech at a time. The feedback is invaluable (I’m working on increasing my speaking volume) and the more experienced speakers are incredibly informative to watch.

    This is the best opportunity you will have to develop the skills and confidence you will need to rock your presentations.