Bring a Photograph to Life Using Levels With Zones

In this tutorial you’ll learn how to use levels in Photoshop to add a spark of life to an otherwise dull photograph. We’ll divide the image into different zones in order to process them independently, achieving an interesting look. Let’s get to work!


Watch the Video


Step 1

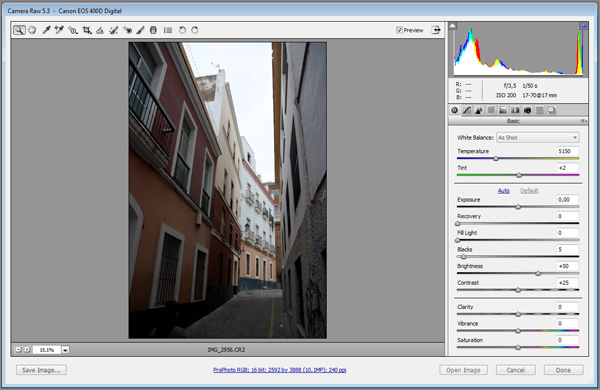
The first step is to open the image to pre-process it with Camera Raw. If you have a raw file (like .CR2 files on Canon cameras) just open it in Photoshop. If you are using a JPEG image to start, go to File > Open As, choose “Camera Raw” as the file type and open your file. Then the Camera Raw dialog will appear.

Open file in Camera Raw

This is the original image:

Original image

Step 2

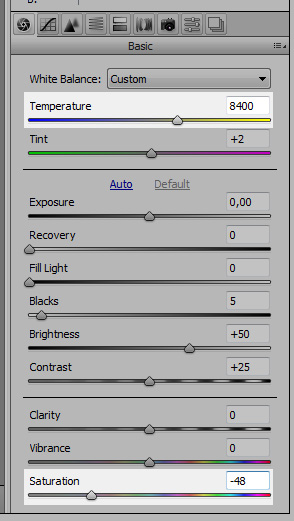
Increase the temperature using the first slider. We’re looking for a warm look, so choose a value close to 8000k. Also, decrease the saturation to give it an older look. Do not change Contrast or Blacks as we will be changing them later using levels and curves.

Temperature and saturation in Camera Raw

Step 3

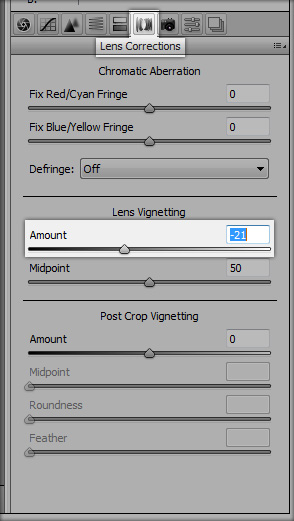
Go to Lens Correction and add some Lens Vignetting by moving the Amount slider down to -21. Then hold Shift and the “Open Image” button will change to “Open Object”. Click it.

Vignetting in Camera Raw

Step 4

Before starting to tweak levels and curves, remove anything you don’t want in your final image. In the example image there was a girl in the bottom left corner that I had to remove using the Clone Stamp Tool (S). Right-Click the layer and select Duplicate Layer, click OK and then Right-Click the new layer and select Rasterize Layer.

This way you will keep a copy of the original raw file that you can edit in Camera Raw just Double-Clicking on the layer’s thumbnail. Do your cloning and healing process in the new layer.

Removing unwanted people and objects from image

Step 5

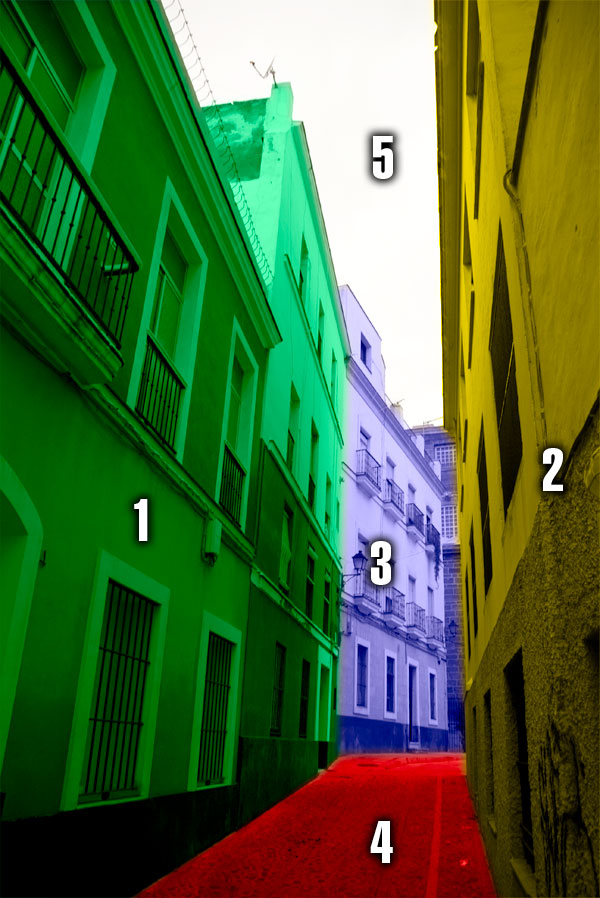
Now we will start working with the different zones of the image. We can divide our image in 5 sections:

  1. The left walls in the foreground.
  2. The right walls in the foreground.
  3. The white building in the background.
  4. The road.
  5. The sky.
The five zones of the image

Step 6

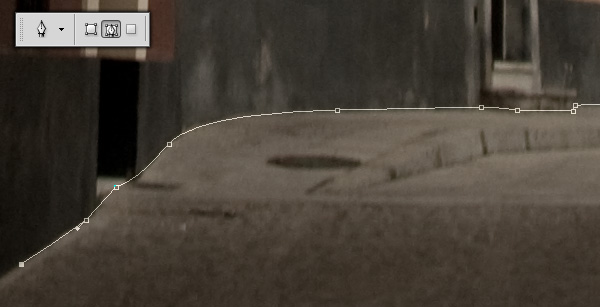
We will start with the 4th zone: the road. Choose the Pen Tool (P) and select the Paths option (second button) in the upper toolbar. Now draw the shape of the road.

Selecting the road with the Pen Tool (P)

Step 7

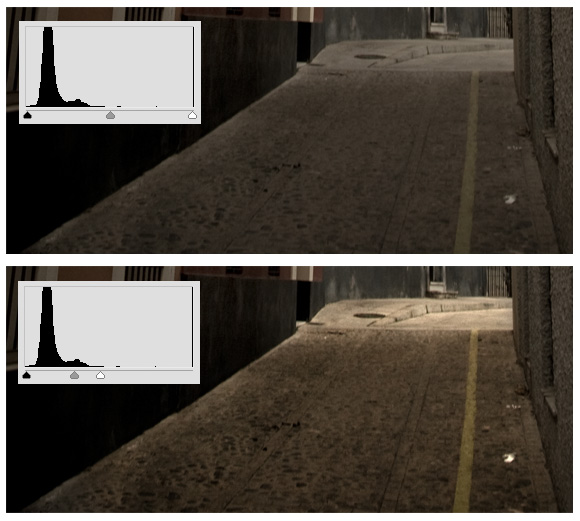
Once you finish with the Pen Tool, Right-Click the newly created shape and select Make Selection. Make sure Anti-Aliased is ticked and Feather Radius is set to 0px, then click OK. Now go to Layers > New Adjustment Layer > Levels and create a new levels layer called “Road”.

New Levels Adjustment layer on selected zone

Now let’s adjust the levels. Double-Click on the Road Levels layer and the Levels Adjustment window will appear. Now move the black handle to the beginning of the histogram, and the white handle to the end of the histogram.

This increases the contrast of the area, as the white point of the histogram matches the white point of the area, and the same with the black point. However, you have to be careful because the smaller the area between the black and white handles, the less information you leave on that area. Move the middle handle to the right until it looks good.

Levels Adjustment

Step 8

Now repeat the process with the first, second and third sections (refer to Step 5). Use the Pen Tool (P) (or any other selection tool you prefer) to select the area, make a new Levels Adjustment Layer and move the handles to match the histogram.

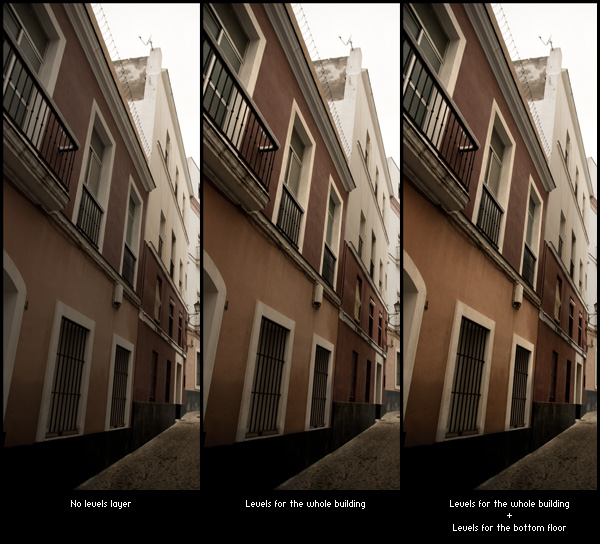
Sometimes, like with the left wall, it’s good to make more than one adjustment layer: one for the whole area, and another one for a smaller area within. For instance, for the left wall I used a layer for the whole building, and then another layer for bottom floor of the first building.

Comparison of no levels, some levels and full levels adjustments.

Step 9

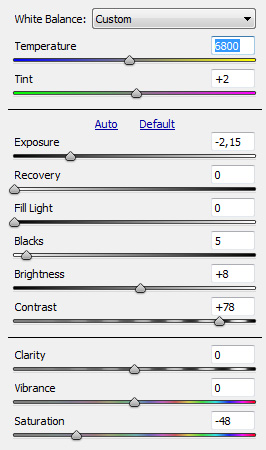
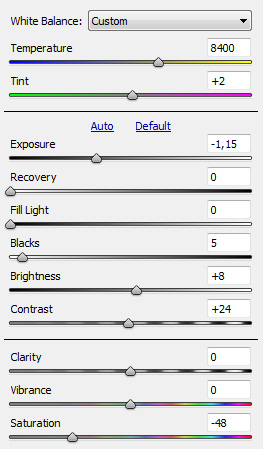
Once the road and all the buildings have their own Levels Adjustment Layer, let’s work with the sky. Right-Click on the first layer (the original image, not the rasterized one) and select New Smart Object via Copy. Rename the layer to “Sky Layer” and move it to the foreground. Double-Click it to edit it in Camera Raw and use the following settings:

Camera Raw settings for sky layer

Notice that we have decreased the temperature, in order to cool the sky a little bit. Also we have decreased the exposure and increased the contrast in order to get some details in the clouds. Now use the Pen Tool (P) to select the sky, bordered by the buildings’ roofs.

Right click the new path and choose Make Selection, and use the selection as a mask for the Sky layer. It’s good to feather after having set the mask rather than before, as you can see how the different values for the feather work in real time, using the Masks panel.

Selecting the sky

Step 10

The buildings are very bright, and the sky is quite dark, so let’s ease that difference a bit. Create a New Smart Object via copy from the original one and use these adjustments in Camera Raw:

Camera Raw settings for new layer

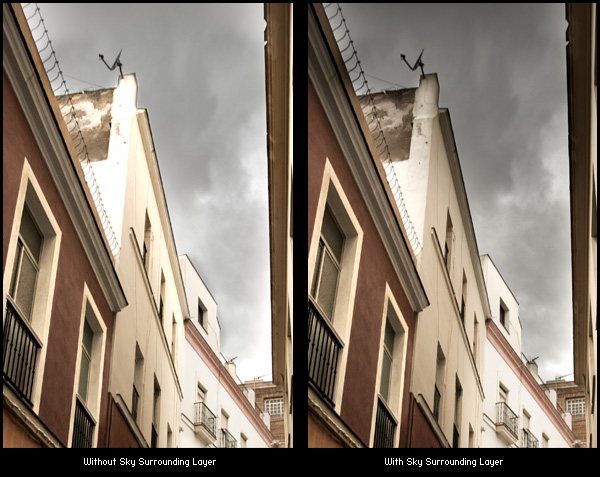
Rename the layer to “Sky surroundings” and Ctrl-Click on the mask of the Sky layer. Go to Select > Modify > Expand and use a value of 100px. Choose the Sky Surroundings layer and then click on Layer > Layer Mask > Reveal Selection. Now it’s time to feather the mask a little bit using Select > Refine Edge. A Feather value about 70px is OK, but experimenting is key.

Comparison, with and without Sky Surrounding Layer

Step 11

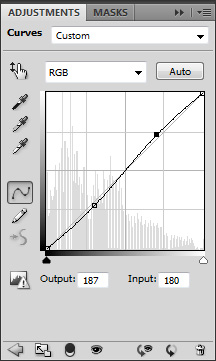
To end up, make a loose selection of the sky and make a new Levels Adjustment Layer to tweak it a bit. Optionally you can add a global levels layer. Now go to Layer > New Adjustment Layer > Curves, name it “General Curves”, and choose Linear Contrast from the dropdown menu on the Adjustments Panel. It will increase the general contrast a little.

General curves adjustment

Finally, let’s add a black border: Go to Image > Canvas Size, disable Relative, and use 50px as width and height. Click OK, create a new background layer and fill it with black. We’re done!


Conclusion

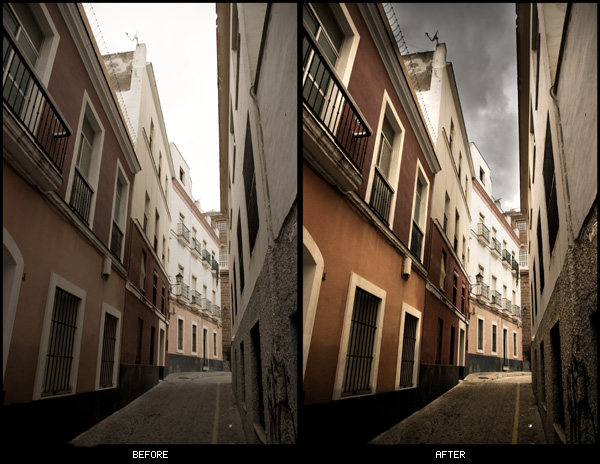
Although the process is pretty simple, the results are quite impressive. Here you can compare the original image and the final one.

Comparison of before and after

And the final result:

Final result

Thanks for reading, and let us know whether you feel this effect is useful for any of your own images!

Create a Jumping Lamp Animation in C4D – Day 2

This tutorial is a relatively quick overview of setting up a scene with a rigged animated object in Cinema4D. Although it should be simple to follow along to anyone with a basic knowledge of Cinema 4D, this tutorial is mainly aimed at artists migrating to Cinema4D from another package. It quickly and concisely demonstrates how to use the basic modeling tools, set up a rig with bones, use constraints, change the type of keyframes, use the auto keyframe tool, clean up keyframes, work with the time line, set up lights, set up materials, apply the materials to objects and render out an animation. Everything you need to quickly get into Cinema4D.

This tutorial is Day 2 in a series – Go to Day 1.


Video 1

Download

Note: click the ‘Monitor’ icon to view tutorial in full-screen HD.

Video 2

Download

Note: click the ‘Monitor’ icon to view tutorial in full-screen HD.


This tutorial is Day 2 in a series – Go to Day 1.


Don’t miss more CG tutorials and guides, published daily – subscribe to Cgtuts+ by RSS.

Procedural Modeling with MEL Script in Maya

This tutorial introduces the exciting possibilities for modeling using Maya’s MEL scripting language. In this first part, we will learn the basics of MEL commands, and create two procedural model scripts that could be useful in your own workflows.

Looking Under the Hood

The Maya Embedded Language (or MEL) is the command structure that Maya uses to create just about everything you see on-screen. Every time you create an object or move a vertex, a MEL command is called to make that action happen. Even all of the windows, shelves, tabs, menus and editors are generated and organized using MEL scripts. If you wanted, you could completely re-build the Maya interface using nothing but MEL, making the scripting language an incredibly powerful tool to have under your belt as an artist. If you can use scripting to automate the most time-consuming parts of your work, then you can spend that much more time making your work stand out.

The best place to learn about specific MEL commands is in the Technical Documentation portion of the Maya Docs, and the best way to get familiar with the concepts behind MEL is to see them in action. Let’s dig into the system and get started with our first script.


Script One

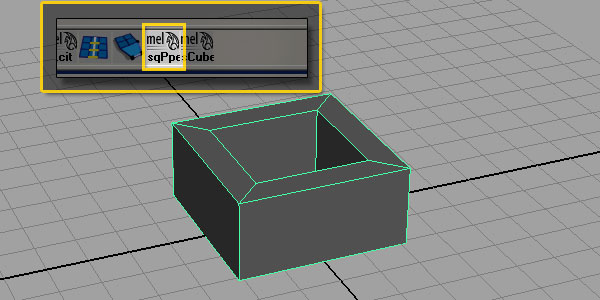
The first script will create a square pipe with the flat sides aligned on the X and Z axes. We’ll run through the creating the script, and make a shelf button to access it.


Step 1

Write out your Pseudo-code.

Pseudo-code is a plain-English form of a script, with every major step listed out. When you start working on complex scripts it becomes very important to outline your scripts before you ever get started. For us, the pseudo-code might look like this:

Create four-sided polygon pipe
Rotate 45 degrees in Y
Move to sit on the ground plane
Move pivot point to origin
Freeze transformations

Step 2

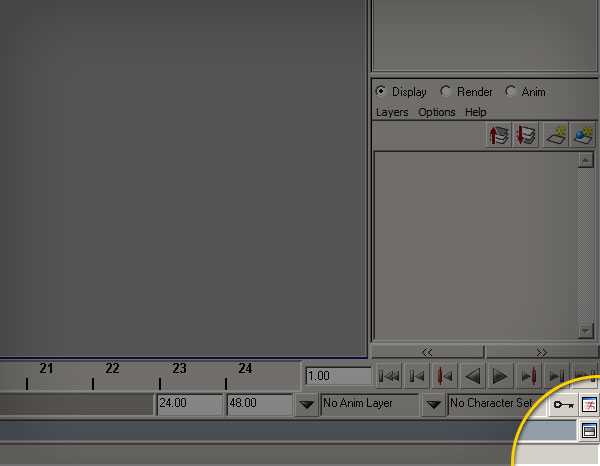
Open the script editor by clicking the button on the lower right-hand side of the main Maya window.

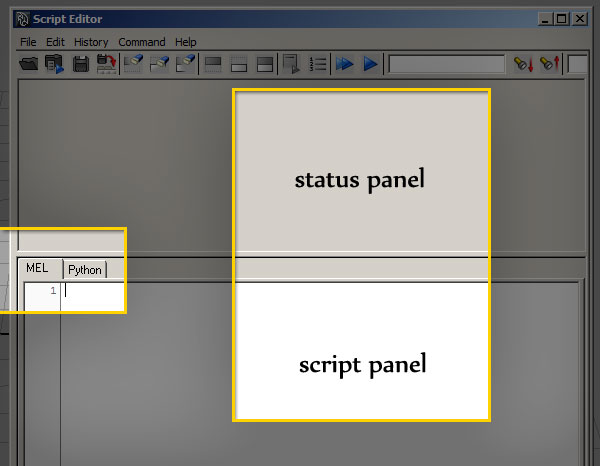
Inside the script editor, there are two main panels, the status panel above, and the MEL/Python window below. Make sure that the MEL tab is selected.


Step 3

Draw a “pipe” primitive in the Maya scene.

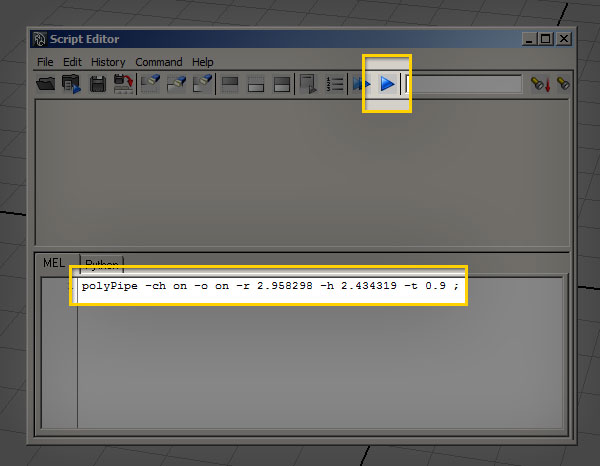
You should see something similar to this in the status panel of the script editor window:

polyPipe -ch on -o on -r 2.958298 -h 2.434319 -t 0.9 ;
// Result: pPipe1 polyPipe1 //

Step 4

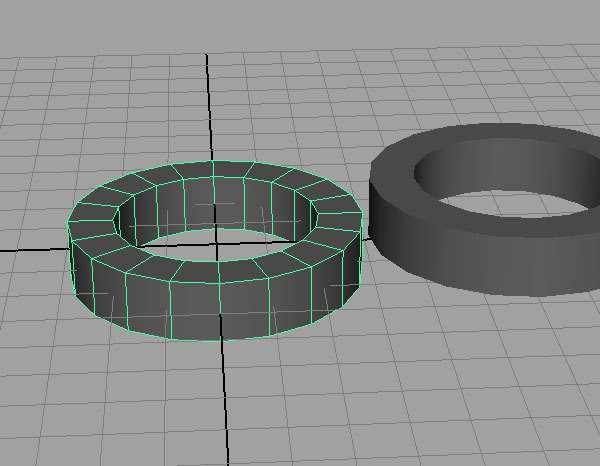
Copy and paste the polyPipe command from the status line into the Script Editor.

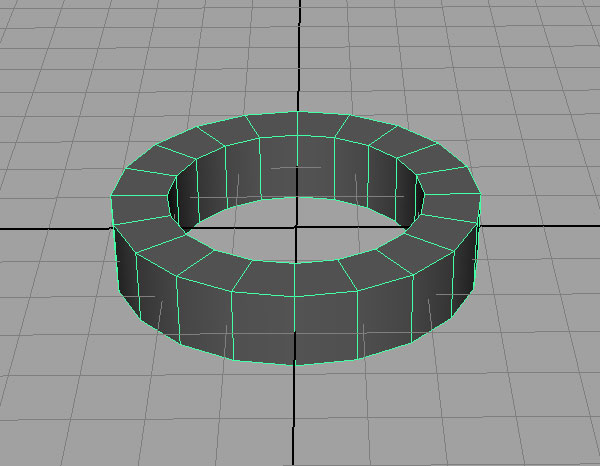
You should get an exact duplicate of the first polyPipe, this time located exactly on the origin.


Step 5: Breaking Down the Code

The polyPipe command you just used is one of thousands of MEL commands available to you. Their structure (what programmers call syntax) is pretty much the same for every command:

melCommand -flag value -flag2 value targetObject;

The first part is the command itself, and the flags (denoted by the dash character) define certain attributes of the command. Commands that manipulate objects which already exist often require a target, which tells the command what object to change. Each command also requires a semicolon, which marks the end of the command.

In the example of polyPipe, the three flags below define the radius, height, and thickness of the created pipe.

-r 3.162278 -h 3.514619 -t 0.8

We’ll go over other flags in detail later in the tutorial, when we put the script together.

The procedural modeling workflow in MEL is essentially just a clever chaining-together of commands that create or manipulate geometry in Maya.


Step 6

Delete the original pipe, and select the one you just created using the MEL command.


Step 7

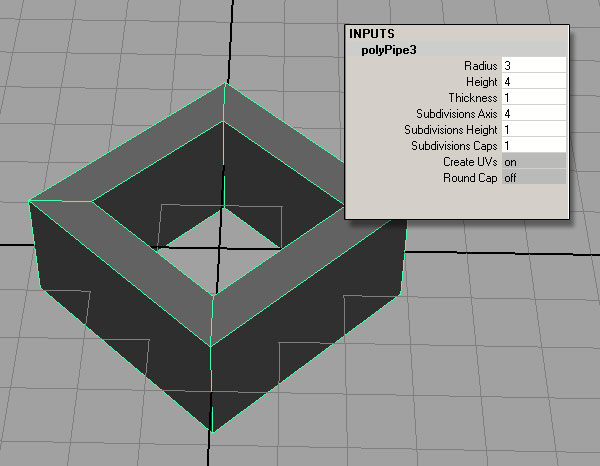
Set the number of axis subdivisions to four, and choose some “nice” integer numbers for the height, radius, and depth. We’ll change these later on, and they’ll make the example easier.

These settings can be adjusted with the polyPipe command at the time that the object is created using flags, so don’t worry about what the script editor gives you.


Step 8

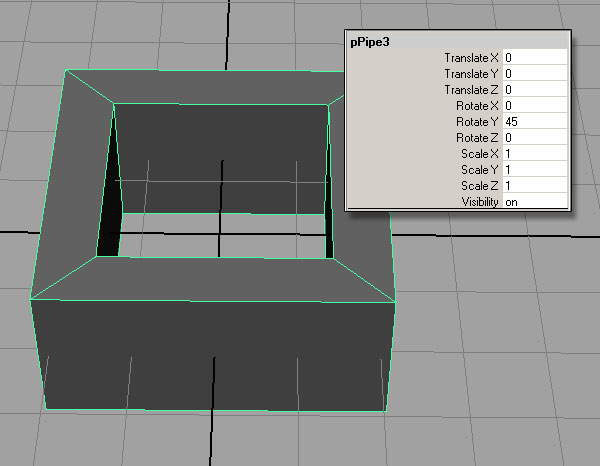
Rotate the object on the Y-axis by 45 degrees

If you rotate the object by hand, the result in the script editor should be something like this:

rotate -r -os 0 -45 0;

If you rotate the object by typing in the rotation value, the result will be:

setAttr "pPipe3.rotateY" 45;

For now, we will use the rotate command in our script. In later tutorials, we will use setAttr to work with specific object attributes.


Step 9

Move the pipe so that it is sitting on the grid plane

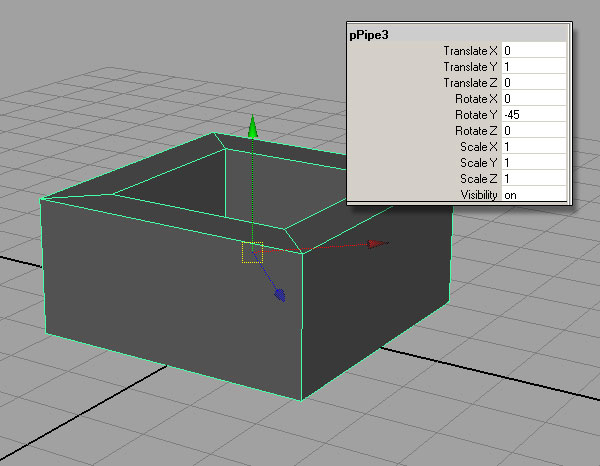
If you move the object by hand, the code in the script editor should be:

move -r 0 1 0;

If you move the object by typing in the y-value:

setAttr "pPipe3.translateY" 1;

Again, we will use the move command instead of setAttr.


Step 10

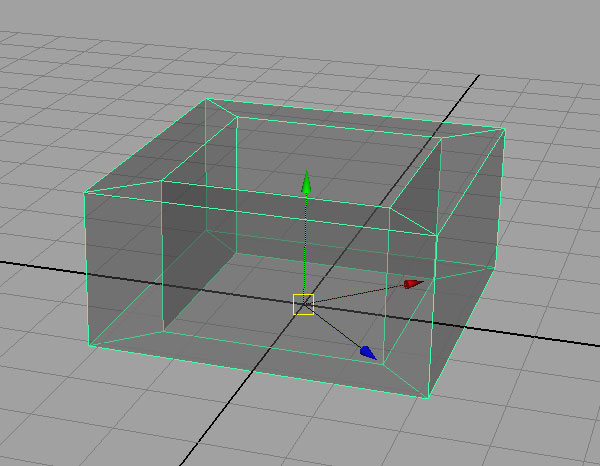
Press “insert” and move the pivot of the pipe down to the origin.

This will allow you to easily scale the pipe from a ground plane. This is the code I get in the script editor:

move 0 0 0 pPipe3.scalePivot pPipe3.rotatePivot;

Notice that the code here has two targets – polyPipe3.rotatePivot and polyPipe3.scalePivot. This means that the code can only be used when the object in question is named polyPipe3. In later tutorials, we’ll address this issue by using variables, but for now, we’ll work around it by using a different command that does the same thing:

xform -a -rotatePivot 0 0 0 -scalePivot 0 0 0;

Step 11

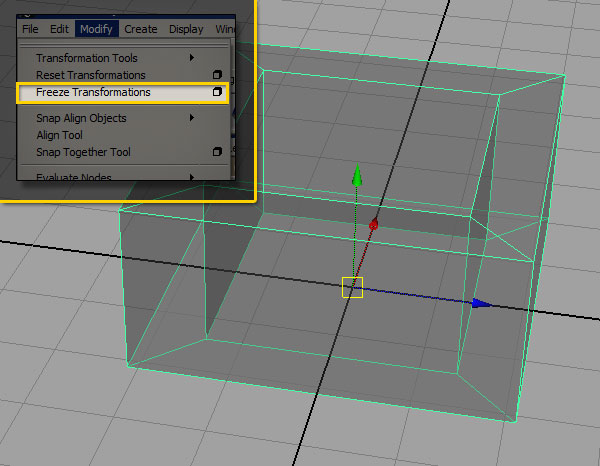
Freeze the transformations on the object by going to the modify menu, and choosing Freeze Transforms.

The code in the script editor:

makeIdentity -apply true -t 1 -r 1 -s 1 -n 0;

makeIdentity is one way to freeze the transforms, but it is not a very intuitively-named command. Maya has quite a few built-in scripts that automate certain processes, including freezing transforms.


Step 12: Let’s try that again…

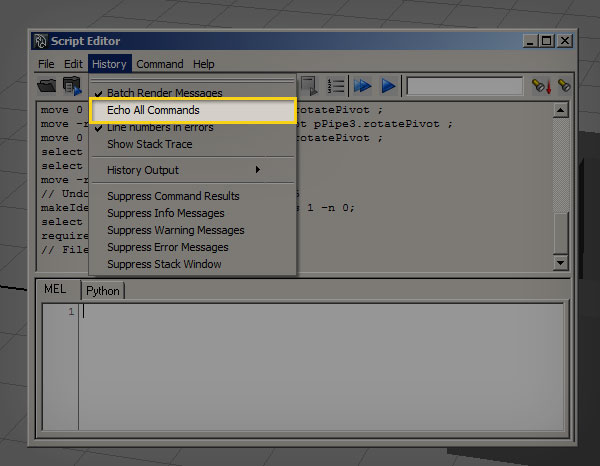
In the script editor, go to History and turn on Echo All Commands. This forces the script editor to “echo” or display all of the commands that maya runs, even if the user did not actively engage them.


Step 13

Freeze the transforms again, and take a look at the output from the script editor. You’ll see the following code:

FreezeTransformations;
makeIdentity -apply true -t 1 -r 1 -s 1 -n 0;

FreezeTransformations is a maya helper script, a “runtime command” that calls makeIdentity. Unlike regular Maya commands, runtime commands generally start with capital letters. Be careful when using these script-commands inside your code, because they may not be supported the same way across all installs of Maya. For FreezeTransformations, the drawback is that the command takes the values that are set in the Freeze Transform Options dialog box, which may be set differently depending on the last time you used the it. I rarely change the settings from the default, so I’m comfortable using FreezeTransformations, and other helper scripts. This is a personal preference, but I feel that the convenience of using runtime commands exceeds the risk that a script might break. However, it is important to understand that in complex scripts, runtime commands can cause problems, and using any script that relies on maya dialog-boxes is bad practice if you’re planning on giving the script to anyone else. That having been said, using Echo All Commands is a good way to find the background scripts and commands that aren’t listed in the Technical Documentation.


Step 14: Putting It All Together

So far, we’ve gone through five commands that can be put together to create our object. Let’s line those commands up with our pseudo-code, and take a look at each one’s specific flags. Each flag has two “modes”, a long name and a shorthand. Typically, the shorthand has just one or two letters. I personally prefer to use the shorthand whenever possible, but using the full name can be helpful for beginners, and makes your code more readable to non-scripters. Let’s break down the commands:

//Create four-sided polygon pipe (a double-forward slash denotes a comment in the code, which is ignored by MEL)
polyPipe -r 3 -h 4 -t 1 -sa 4;

Relevant flags:

  • -radius (-r) defines the radius of the pipe
  • -height (-h) defines the y-height
  • -thickness (-t) defines the thickness of the polyPipe, measured from the exterior edge of the radius inward
  • -subdivisionsAxis (-sa) defines how many sides the polyPipe has
//Rotate 45 degrees in Y
rotate -r -y 45;

Relevant flags:

  • -relative (-r) rotates the object relative to its current position
  • -rotateY (-y) set the rotation on the y axis
//Move to sit on the ground plane
move -r 0 1 0;

Relevant flags:

  • -relative (-r) moves the object relative to its current position

The move command here uses a slightly different syntax from the rotate command. 0 1 0 is shorthand for translate 0 in x, translate 1 in y, and translate 0 in z. MEL is a very flexible language, and often has more than one way to do the exact same thing. In this instance, we could have also done:

//Move to sit on the ground plane
move -r -y 1;

The choice is yours, and a big part of scripting is developing your own preferences and styles.

//Move pivot point to origin
xform -ws -rp 0 0 0 -sp 0 0 0;

Relevant flags:

  • -worldSpace(-ws) move to an absolute position in world-space
  • -rotationPivots (-rp) move the rotation pivots in the x, y, and z directions
  • -scalePivots (-sp) move the scale pivots in the x, y, and z directions

xform has a huge number of flags, and can be used for a huge number of functions. We will definitely see this one again in future tutorials.
//freeze the object’s transformations
FreezeTransformations;


Step 15

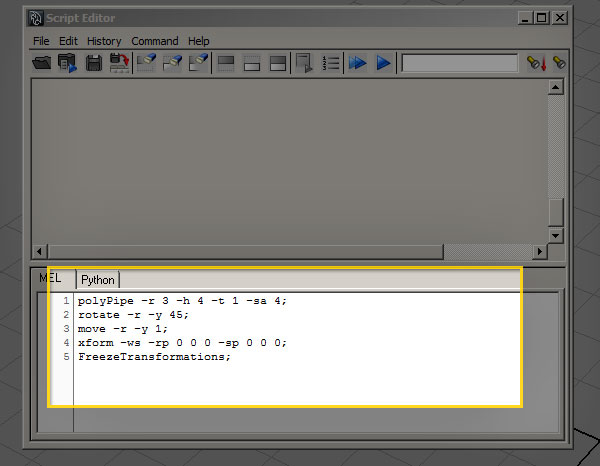
Put all of the commands into the script editor. This is what you should have:


Step 16

Highlight the code in the script editor, and middle-mouse drag the script to the ‘polygons’ shelf. This will create a custom shelf icon with your script associated with it. Every time you click that button, the script will execute.


Step 17

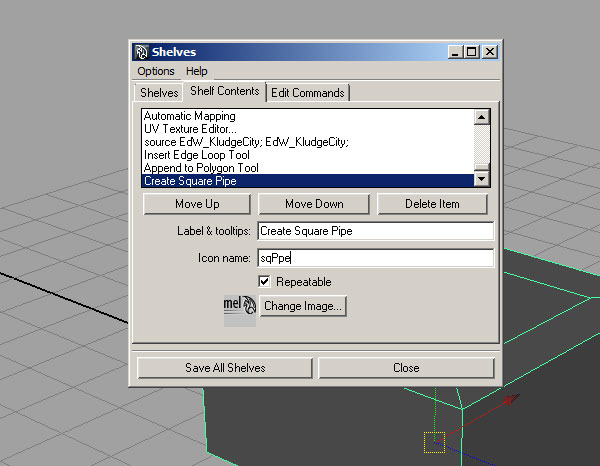
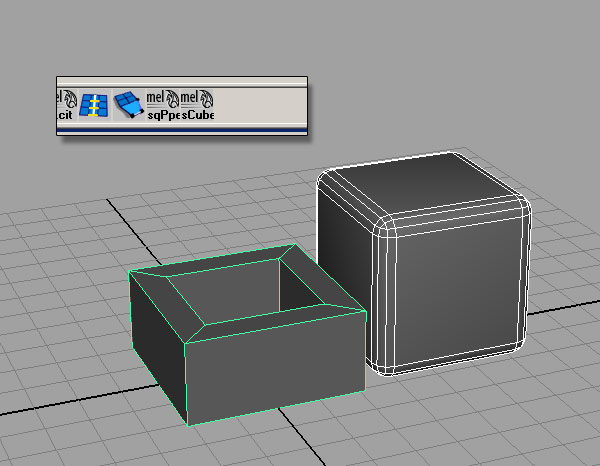
To add a custom label to the shelf button, access the shelf editor by clicking and holding on the downward-facing arrow on the far left of the window. Inside the Shelf Editor, find your newly-created button, and add a label and icon name. The icon name should usually be under five characters. Congratulations! You’ve now completed your first MEL-driven modeling script.


Script 2

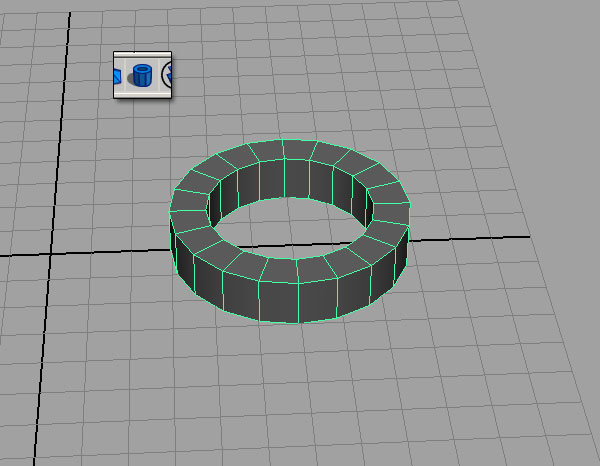
Now that we’ve learned the ropes, let’s blaze through one more similar example. Here we’ll apply what we’ve already learned and create a basic “rounded cube” model.


Step 1

Write out your Pseudo-code.

Create a polygon cube
Move to sit on the ground plane
Move pivot point to origin
Freeze transforms
select all edges of the object
bevel edges with three divisions

Step 2

Create the polygon cube command

//create a cube
polyCube -w 4 -h 4 -d 4 -sx 1 -sy 1 -sz 1;

Relevant flags:

  • -width (-w)
  • -height (-w)
  • -depth (-w)
  • -subdivisionsX (-sx)
  • -subdivisionsY (-sy)
  • -subdivisionsZ (-sz)

Step 3

Create the “move to ground plane”, “move pivots”, and “freeze transforms” commands, just like the previous script.

//move the cube
move -r 0 2 0;
//Move pivot point to origin
xform -ws -rp 0 0 0 -sp 0 0 0;
//freeze
FreezeTransformations;

Step 4

Use a command to select all the edges of the cube. There are a couple of ways you could go about doing this. Since the object is already selected when MEL generates it, I like to use one of Maya’s helper scripts to do this.

//select edges
ConvertSelectionToEdges;

Step 5

Use a bevel command to create new edges on your cube.

//bevel
polyBevel -oaf 1 -o .2 -sg 3 -fn 1 -mv 1 -sa 180;

Relevant flags:

  • -offsetAsFraction (-oaf) when true, the bevel amount will be determined by a fraction of the length of adjacent edges.
  • -offset (-o) determines the amount of beveling to add
  • -segments (-sg) the number of edges to add to the beveled edges
  • -fillNgon (-fn) when true, will subdivide the corners where the bevel creates n-sided faces
  • -mergeVertices (-mv) when true, will merge the created vertices of the filled n-sided faces
  • -smoothingAngle (-sa) Determines at what angle the bevel should harden normals

Step 6

Put it all together:

polyCube -w 4 -h 4 -d 4 -sx 1 -sy 1 -sz 1;
move -r 0 2 0;
xform -ws -rp 0 0 0 -sp 0 0 0;
FreezeTransformations;
ConvertSelectionToEdges;
polyBevel -oaf 1 -o .2 -sg 3 -fn 1 -mv 1 -sa 180;

Step 7

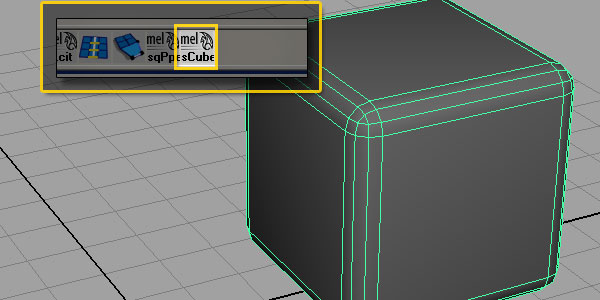
Create your shelf icon, rename it, and we’re done!


Premium Members: Contribute Your Testimonials

We have started to collect testimonials from happy Premium members to display on our Tuts+ Testimonials page. If you’d like your testimonial featured on the page, please leave your testimonial in a comment on this post. We’ll publish your name and a link to your website with your testimonial.

If you’re a Premium member, please take a minute to let us know what you think about Premium. What would you say to someone considering signing up for a membership?


12 Rocking Guitar Effects Videos on YouTube

Guitarists continue to love their effects units – both onstage and in the studio. There is an amazing variety of effects units available, and an almost infinite way to combine them. Here are 12 of the best YouTube videos demonstrating effects units and setups, starting with how The Edge sets up his rig.


1. U2’s The Edge Demonstrating His Guitar Rig (1/2)

“U2’s The Edge demonstrating his guitar rig (2/1) Sir John Rogerson’s Quay Dublin September 2008.”


2. U2’s The Edge Demonstrating His Guitar Rig (2/2)

“U2’s The Edge demonstrating his guitar rig (2/1) Sir John Rogerson’s Quay Dublin September 2008.”


3. Herman Li Video Game Guitar Effects

“Herman Li from Dragonforce explains the video game effects used in Inhuman Rampage.”


4. How to Use a Guitar Effect Pedal : Pre-Delay Effects for the Electric Guitar

“Learn how to use the pre-delay effects pedal when playing the electric guitar in these free online music video lessons.”


5. BOSS GT-8 Guitar Multi Effects Processor

“Johnny Guides you on a Tour of the BOSS GT-8 Guitar Multi Effects Processor”


6. Marshall Jackhammer Guitar Pedal, Gearwire

“Marshall Jackhammer Guitar Pedal. (not me) Notice the TV in the background has information on the Pedal.”


7. Boss Dyna Drive DN-2 Effects Pedal Demo

“Jason D. Spencer of World Music Supply demonstrates the extremely versatile Boss Dyna Drive DN-2 effects pedal.”


8. Richie Kotzen Zoom G2R Signature Guitar Effects Pedal Demo

“Check out Richie Kotzen demoing his new Zoom G2R signature guitar effects pedal!”


9. TC Electronic G Natural Acoustic Guitar Effects Processor

“In this video, singer-songwriter Laura Clapp of TC-Electronic demonstrates this sweet processor for acoustic guitar.”


10. Gig FX guitar effects pedal demo VOD Kilowah Chopper Pro Chop Megawah All of Them Part 1 of 2

“Most of the line from Gig Effects….very cool, optical pedals. Their wah pedals completely RULE! And I totally dig the VOD, which is three Chandler Tube Drivers that you can set up any way you’d like. This is the first demo I’ve done in STEREO, so forgive the blips and clips in the tone…I suck at the tech side of videos…and alot of other things as well!”


11. U2 – Metallica – Green Day – ACDC – Guitar Effects and Tones with Line 6 M9


12. Z Vex Effects Guitar Pedals Roundup

“This is a brief roundup of almost all Z Vex pedals (by Mr. Vex himself) taken from the NAMM exhibition at 2006 by gearwire.com. Mr. Vex keeps his usual humour and good mood (I love that!) despite the fatigue of the show… My favourite, of course, is the Wah. ”


Create a Surrealist Inspired Masterpiece – Psd Premium Tutorial

Today, we have another Psd Premium tutorial exclusively available to Premium members. If you want to take your design skills to the next level, then we have an awesome tutorial for you. Learn more after the jump!


This Premium Tutorial is Filled with Creative Tips

Today’s tutorial takes a heavy dose of inspiration from two of the greatest surrealist painters of all time: René Magritte and Salvador Dali. The surrealist art movement began shortly after the end of first world war and its influence can still be seen today, most notably in advertising; how many times have you seen a product depicted out of context, or in an extraordinary juxtaposition? Surrealism challenges our preconceptions of reality and adds new meanings to familiar objects. Done well, it also uses the canvas as a portal that leads the viewer into another dimension; so let’s throw reality out of the window and get to it!


Professional and Detailed Instructions Inside

Premium members can Log in and Download! Otherwise, Join Now! Below are some sample images from this tutorial.


Psd Premium Membership

As you know, we run a premium membership system here that costs $9 a month (or $22 for 3 months!) which gives members access to the Source files for tutorials as well as periodic extra tutorials, like this one! You’ll also get access to Net Premium and Vector Premium, too. If you’re a Premium member, you can log in and download the tutorial. If you’re not a member, you can of course join today!


Profile: Bojan Stefanovic, AKA Logoholic

Bojan Stefanovic, the man behind logoholik.com, has made two stunning confessions. Ones that may turn the design world on its head: he has never even tasted coffee and all of his logo designs and corporate identity creations are done on a PC.

We know those go against all of your sensibilities and moral codes. We realize this will probably make you start to question your existence. We can’t apologize for being the bearer of bad news though, as this doesn’t change the fact that he’s just an all-around cool guy. At 36 (“and a half”), Stefanovic states that he’s only accomplished about half of what he’d hoped to by this age. But based on the success he’s enjoyed thus far, it makes you wonder what’s left on his list.

Sci-fi and Computer Science

As an outgoing child growing up in Serbia, Stefanovic was drawing comic books even before entering elementary school. One of his biggest regrets, though, is not keeping the originals of his take on the 1979 sci-fi hit “Battlestar Galactica,” which were aptly titled “Space guy” and “Star Quest.” As his creativity has never waned, neither has his love of anything sci-fi.

The Serbian economy was suffering at the time that Stefanovic was preparing to embark on his educational pursuits. While he went to the electro-technical school Nikola Tesla and later applied for a Bachelors degree in Computer Science, he never had a chance to finish because the need to work and earn money trumped all.

A lack of confidence in his abilities led to another educational disappointment:

There was a time I regretted not applying to Belgrade’s Academy of Art. [I had] been going to drawing lessons and studying the history of art for two years, but never had the guts to actually enter the qualifying exam. [It was] a bit of a frightening experience in those days, since only a dozen students got the chance to qualify every year there.

bojan-stefanovic-logoholik-1

For Now

Stefanovic’s creative career doesn’t end there, obviously. In fact, it was just beginning because over the years, his logo and corporate branding work has earned him the honor of being a featured artist at LogoPond, as well as having his creations published on Logolounge, Taschen, Logoliscious and Logo Nest. That’s it “for now,” he adds.

It’s partly that confidence that has won him clients all around the world including in the US/Canada, Western Europe, Australia, Asia, the rest of Europe (“in that order.”) The other part, of course, is his immense talent and ability to design with a “minimum possible amount of elements while portraying a maximum impact [with the] right message.” Through his creative logo and corporate identity designs, he empowers companies to find and express their own identities.

spry_BS

These days Stefanovic is just as much a family man as he is a corporate identity creator. He and his wife Ivana are the proud parents of a “three and something” year old daughter, Lana. They are enjoying a change of scenery after moving into their own apartment last year and love the fact that they “no longer have to face those beauties in life again-rent and a mortgage.” Their home is decorated in a similar fashion to how he designs: “modern lines, [and] an almost jazzy style.”

Like most parents, his weekdays start with getting Lana up and taking her to kindergarten and his weekends involve bath time and many attempts to coax her to sleep. While she is too young to understand her father’s job now, she isn’t too young to reap the benefits of having her daddy run a well-organized, successful design company.

webhome_BS

Putting It All Out There

Stefanovic gets most of his logo-related work through logoholik.com, a website that, in effect, puts it all out there. Right away a client knows if he’s accepting new clients (he is) and with a few more clicks, one can get an idea of what their money will get them. This is a rarity in the world of “we can only give you a quote once we know all of the specs of your project.” Yet in this universe that is fueled by instant gratification, this in-your-face approach works for him.

One thing noticeably absent from his website is any sort of “About Me” section. An accidental oversight or a purposeful omission? When asked, Stefanovic replied that he “uses the power of micro-blogging instead and we should follow him on Twitter (@logoholik) to get the quirky details.”

corporate_Identity_BS

Throughout the years Stefanovic has honed his talents in various places like a print shop, prepress bureau, design studio and advertising agency. While working at these places allowed him to grow as a designer, he realized that there will probably never be a time where he’s able to showcase his entire range of capabilities.

Even once he became “his own boss,” his work for clients was only the tip of the iceberg when it came to the designs he was capable of. Enter the Concept Lounge. It’s the section of his website which is an “extension of [his] portfolio, properly addressed as experiments, self projects and unused concepts.” It doesn’t generate a lot of pre-made logo sales for him, but he feels it takes him at least one step closer to a more complete representation of his skill set.

overtime_BS

R&R

Like many designers, Stefanovic takes advantage of his proximity to a large metro area when in search of inspiration. Unlike many designers, though, he’s also has the ability to take breaks in the country, a place that surely is a welcome distraction from the hustle and bustle of city life.

When it’s time to take a break from even that, Stefanovic jumps on his KORG SP-250 keyboard. This no doubt takes him back to a time when his aspiration in life was not to create the kind of art he is known for today, but the musical kind. He claims to have spent the better part of two years playing with sequencers and keyboards, only to be beat to the New Wave music punch by the band Prodigy. Why bother if “[they are] already covering all things I wanted to express,” he says with a laugh.

Self-expression doesn’t seem to be something that Stefanovic has a problem with. If he’s not designing logos or corporate identities, he will no doubt be doing something creative that highlights his immense talent.

And to think we’ve only seen the first half of what he hopes to accomplish in his career.

chessrepublic_BS


Audacity: The Versatile Audio Tool for Everyone

I spend a lot of time looking at other people’s computers, and I see Audacity installed on a lot of them. Not many software programs deserve the adverb “versatile”, but Audacity is one of them. It is the Swiss Army knife of audio applications.

This article was previously published on the AudioJungle blog, which has moved on to a new format in 2010. We’ll be bringing you an article from the AudioJungle archives each week.

Audacity is used for all sorts of audio tasks. There may be more specialized applications in each category, but Audacity does a great job. If you have anything to do with audio, this program deserves to be in your toolbox.

And Audacity is not only free of cost, it is open-source software. Among other things, this means it will always be free of cost. It also means that if the current development team lose interest in the project, others are able to take it up. Audacity will be there for you in the future. Your investment in learning the program will not go to waste.

Audacity has a lot of enthusiastic fans, and it is an excellent audio application to get started with. How do people use Audacity?

What Audacity Can Do For You

  1. Record live audio. I have seen Audacity used to record live events, presentations, and speeches. It’s also a great tool if you want to email someone a simple audio message. Just plug in your headset, hit record, and start talking.
  2. Record audio from YouTube. There are tools that allow you to download YouTube videos, but what if you only want the audio? Use Audacity – see the tutorial below.
  3. Convert records and cassettes to MP3. I’m old enough to remember records and cassette tapes. I once used Audacity to convert all of my music cassettes to MP3. Just plug your cassette player’s line out into your computer’s line in, and off you go.
  4. Convert between audio formats. Audacity supports Ogg Vorbis, MP3, WAV or AIFF formats, and converts between them. It imports and exports all formats supported by libsndfile, however does not currently support WMA, AAC, or most other proprietary or restricted file formats.
  5. Create a podcast. It’s amazing how many people get started in podcasting with Audacity, even if they move on to more sophisticated software down the track. In fact, many stay with it.
  6. Edit digital audio files. Audacity allows you to edit an audio file in many ways, including deleting segments of the file. This is useful for cutting out unwanted audio at the beginning and end of a live recording, and removing inappropriate comments and bloopers during a presentation. Basic editing functions include copy, cut, paste and delete, and also has a drawing tool to edit individual sample points. It has an unlimited undo capability, and allows editing of very large files.
  7. Visualize and plot frequencies of a digital audio file. Audacity includes a Spectrogram mode for visualizing frequencies, and a Plot Spectrum command for detailed frequency analysis.
  8. Change the pitch of an audio file. Use Audacity to alter the pitch of your recording without altering its tempo. Or alter the tempo without altering the pitch, so you can listen to lectures and presentations much quicker than they were originally given.
  9. Combine digital audio files. Audacity allows you to join and layer different audio files into a single file, even if they were originally recorded at different sample rates.
  10. Add effects to digital audio files. Use Audacity to add reverb and other effects to your audio. Or use it to remove static, hiss or hum. Audacity has some built-in effects, including echo, phaser, wha-wha and reverse, and also supports LADSPA and VSI plug-ins.
  11. Create multi-track recordings. Audacity supports an unlimited number of tracks. While listening to the existing tracks, you can record new ones, making the program appropriate for multi-track recording. You can monitor volume levels before, during and after recording. Audacity even allows you to record up to 16 tracks simultaneously, making it useful for recording an entire band or orchestra at once.

What Audacity Can’t Do

Being a Swiss Army knife, Audacity has some limitations when you compare its features with more specialized software.

  1. Audacity can’t play or record MIDI.
  2. Audacity does not support WMA, AAC, or most other proprietary or restricted file formats.
  3. Audacity has less plug-ins and effects than a specialized DAW.
  4. Audacity has limited multi-track editing and mixing features compared to a specialized DAW. In particular, Audacity cannot apply effects in real-time.

Audacity Tutorials

One testament to Audacity’s popularity is the number of tutorials around the Net that teach you how to use it. Here are some of the best, including some basic tutorials that get you started.

Step-by-Step Instructions

Youtube Video Tutorials

Do You Use Audacity to Multi-track?

Audacity shows a lot of promise for multi-track recording. How does it live up to that promise in real life in a professional context?

In our article “8 Free, Cross-Platform Apps for Musicians“, Joel describes Audacity in these words, “Every studio, home or professional, needs a good dedicated audio editor to run alongside the DAW. Audacity fills this role perfectly. You could even make a demo of a full song using Audacity, with a bit of work, though I wouldn’t recommend it!” In response, several commentators [to the original AudioJungle article] disagreed, and praised Audacity’s ability to go further:

Man, I really think you missed the train when it comes to Audacity. Yeah, you can use it to make a demo or whatever, but it’s so much more versatile than that. We used to use it in high school to make mix compilations for dance and cheer routines, smoothly blending from one song to another. We also used it in choir to remove the voice from songs in order to have a clean background for performers to sing to in concerts. Bottom line, Audacity is a great tool for all kinds of audio editing. (Steven)

Steven uses Audacity to combine songs with an auto-fade effect, and to remove voices from recordings. But the context is high school.

i must disagree with ya on audacity mate, i have done a whole mess of stuff with audacity alone, link attached. presently i use a compiled version that is asio based, and have done 24 tracks at a time with no difficulty, the worst thing imo is that ya cannot do realtime effects. the new audacity will even do midi. here’s a link…i am a deaf old guitar player so my mixes may be kinda dodgy, but that’s me more than the software. http://indiehitsproductions.com/members/25/audio.php (pink)

Pink uses Audacity as his only multi-tracking tool, and has a complaint about the way it does effects. If you find Pink’s recordings dodgy as he warns, do you think it is because of his ears, or the limitations of the software?

Audacity has a place in professional work, but how far can you take it before you need to turn to a professional dedicated DAW? How do you use Audacity in a professional context? What are your experiences with the program?

This article was originally published some time ago. Please let us know in the comments if any of the links are dead or have changed.


Workshop #67: Lorianna’s Ocean by Michael Brown

At Audiotuts+ we irregularly put up a reader track for workshopping and critique (find out how to submit a track). This is how it works: you upload your song, and every week or so we’ll publish one here and step away from the podium. The floor is yours to talk about the track and how the artist can fix problems in and improve upon the mix and the song.

This track has been submitted for your friendly, constructive criticism. They have put their track (and their heart and soul) in your hands to learn and get useful feedback.

  • Do you enjoy the song or track itself? Does it have potential?
  • Can the arrangement be improved?
  • How did you find the mix? What would you do differently?
  • What do you enjoy about the rhythm track? What can be done to improve it?
  • Is the choice of instruments relevant and effective for the style/song?
  • Are the lyrics (if any) effective? Does the style, arrangement and genre of the song suit them?
  • Can you suggest any specific techniques that might improve the track?
  • Do you have any other constructive feedback?

Lorianna’s Ocean by Michael Brown

Description of the track:

I recorded this using Sonar 7 and Gigastudio 3. The drums are SessionDrummer, within Sonar, with a live egg shaker (a blue one, ’cause they sound the best :) ), triangle, and ride cymbal. This is my first attempt at accentuating what is essentially a prog rock track with Gigastudio orchestration.

Download audio file (LoriannasOcean.mp3)

Terms of Use: None.

Have a listen to the track and offer your constructive criticism for this Workshop in the comments section.


Submit Your Tracks for Workshopping

Need constructive criticism on your own tracks? Submit them using this form.


Friday Photo Critique #31

Friday Photo Critique is our weekly community project, where we publish a photograph submitted by one of our wonderful readers, then ask you all to offer constructive feedback on the image.

It’s a great way to learn more about photography, express your viewpoint, and have your own image critiqued. Your response will also be displayed with a link to your website or portfolio, so be sure to enter it correctly when submitting a comment!


Quick Ground Rules

  1. Play nice! We’ve deliberately chosen photographs that aren’t perfect, so please be constructive with any criticism.
  2. Feel free to offer any type of advice – composition, lighting, post-processing etc.
  3. You can also link to photographs that you feel offer a great example of this type of image shot exceptionally well.

Without further ado, here is this week’s candidate for Friday Photo Critique!


The Photograph

Photo Critique

Photographer: Stu Greenham

Please let us know what you think in the comments – how would you have approached the scene or taken the photo differently? A massive thank you to everyone who commented last week.

The most constructive and helpful comments will be featured on the site, and you’ll also be given priority to feature your own work in a future Friday Photo Critique!.

Quick Tip: Create a Wood Panel Texture in Photoshop

In today’s quick tip tutorial we will demonstrate how to create a wood panel texture in Photoshop. Let’s get started!


Step 1

Start by opening a new document. For this tutorial, I chose 900 x 600 pixels with a transparent background. Fill the document with #473722


Step 2

Duplicate layer 1 and name this duplicate "fibers". Set your foreground color to #746045, and then go to Filter > Render > Fibers and use the following settings:


Step 3

Hit “OK” and you should end up with the following:


Step 4

Duplicate the previous layer and name it "knots". We are now going to add what I call knots in the wood. To do this, go to Filter > Liquify. In the upper left-hand panel, select the Twirl Clockwise Tool (C). On the right side panel, your settings may differ from mine depending on the size you made your document, but for the sake of this tutorial your settings should match mine: Brush Size – 151, Brush Density – 62, Brush Pressure – 100, Brush Rate – 50. Leave all other settings as is. On your document, click in the desired spot and quickly drag upwards or downwards with your mouse button still pushed. You should have something similar to this:


Step 5

Make a new layer and name it “separator 1″. We are now going to make the notches or separators in the paneling. Select the rectangular marquee tool
and set it to a fixed ratio with a width of 4px and height of 600px and then place it somewhere near the left side of your document. Fill this block with #806d53.
Should look like the following:


Step 6

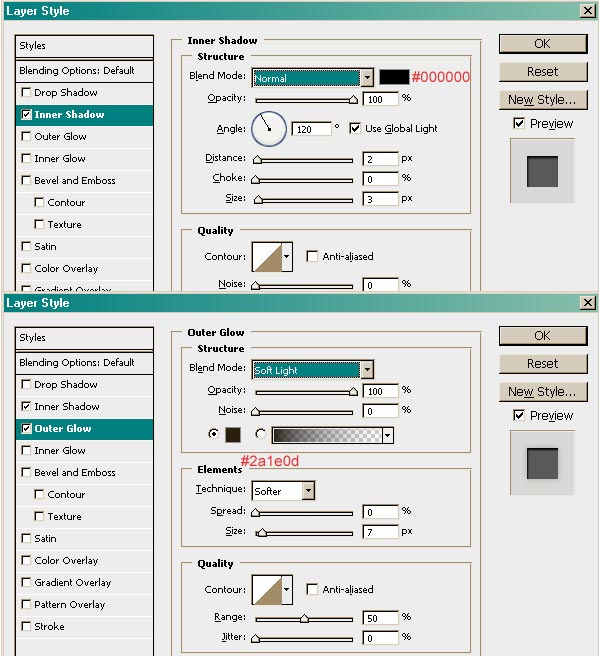
Now we make the line look more realistic! Double click the separator 1 layer to bring up the blending options and match it with the following settings:


Step 7

Duplicate your first separator about 4 different times and place them so that they’re not evenly spaced. For added touches, you can place some text that
looks as if it was carved in, like so:


Final Image

You’re all finished! I hope you enjoyed this tutorial.


7 Simple and Useful Command-Line Tips

One of the most useful, but under-used, tools a web developer has is the command-line. The terminal often scares people away; so here’s where we demonstrate some of the most useful day-to-day commands.


1. The Basics

If you’re new to the command-line, you’re going to want to know a few things to help find your way around.

Changing directories

You can change to a different directory with the following:

cd ../relative/path/to/other/directory/or/file
cd /absolute/path/to/other/directory/or/file

If you get lost, you can go back to your “home” directory with the command “cd ~”.

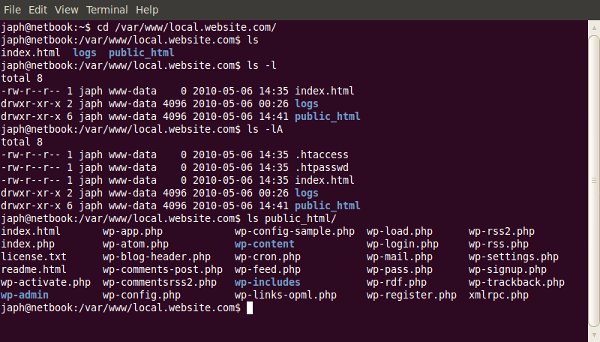
Listing files and directories

If you need to know what files a particular directory contains:

ls ../relative/path/to/other/directory/or/file
ls /absolute/path/to/other/directory/or/file

You can use the “-l” switch to show the contents as a list, and the “-A” switch to also show hidden files (on Linux based machines, files and directories whose name begins with a “.” are considered ‘hidden’).

Showing your current directory

Sometimes you just want to know what directory you’re currently in!

pwd

This will display a path to your current folder.

Copying files

Copying files from one place to another is quick and easy:

cp /files/or/directories/to/copy /directory/to/copy/to/

You can also use the “-R” switch when copying to make it recursive, so all sub-directories and files are also copied.

But typing is slow, and what if I can’t remember the exact path or command?

Most of the time, the command-line has tab-completion enabled, so you can start typing the name of a command or a file path, press tab, and it will complete it for you. If there is more than one option, it won’t complete for you but if you double-press tab, it will list the options.

Tab-completion makes typing out long file paths much faster!

How do you know what options a command has?

There are a few ways to determine what options a command has. Most commands have a –help (or -help, or -h) operator available, which lists the possible arguments and options you can use:

cd --help

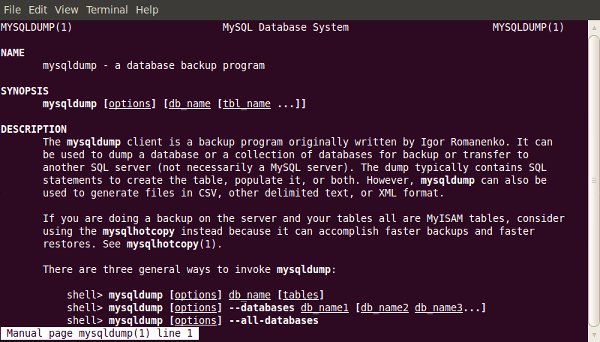
If you find that the brief help given by the –help operator isn’t enough, you can read more detail with the man program:

man mysqldump

Which will tell you all about the “nano” program. Simple commands like “cd” may not have an entry in man.


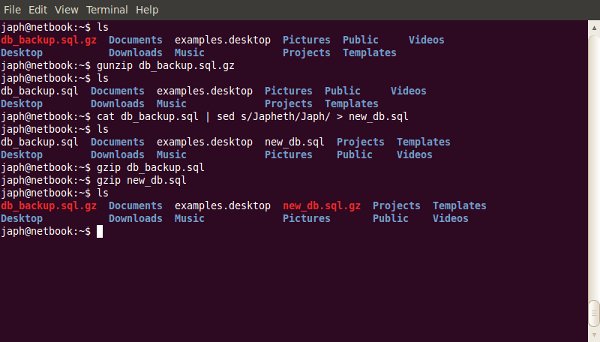
2. Making a Database Backup (with GZip Compression)

Backing up your database is something you should do often. Like most things, there are a lot of ways to do this, but using the command-line is one of the best. Why? Because it helps you get around potential problems like execution timeouts for tools like phpMyAdmin, and potential network dropouts from using a local administration tool like MySQL Workbench.

The command to run the backup is fairly small, but may require some explaining:

mysqldump -u mysqluser -p mysqldatabase

Now, to explain what’s going on here! The “mysqldump” program is a tool for creating database backups. The parameters being used are:

  • “-u” switch means you’re going to specify a username to connect with, which must follow, like “-u mysqluser” above
  • “-p” switch means you’re either going to immediately specify the password to use (with no space), or it’ll prompt you for one
  • The final parameter used in the example above is the name of the database to backup (of course!)

If you ran the command above, you would’ve seen the contents of your database go whizzing by on the screen. That’s good, because we know that part works (actually connecting to the database), but it’s also bad, because… where did it go? Answer: nowhere! It scrolled past, and that was it. Now we need to capture it and put it in a file.

To place the contents of the output into a file, for back-up purposes, we need to use what’s called a redirection.

mysqldump -u mysqluser -p mysqldatabase > db_backup.sql

So we added a redirecter, and the filename we wanted the output to go into. Now you should be able to see a file named “db_backup.sql”, and if you open it you can see a SQL script with the structure and content of your database ready for restoration or migration.

One last thing that could be useful for a backup, is compressing the SQL script. For this example, I’m going to use GZip compression, because it’s quite common, but you could also use Bzip2 or something else.

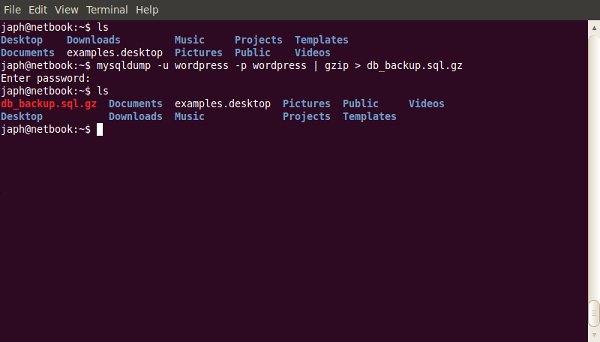
To add compression into this command, we just do what’s called piping. We pipe the output from the mysqldump through gzip, and then redirect it into the file we want, like so:

mysqldump -u mysqluser -p mysqldatabase | gzip > db_backup.sql.gz

I also added the “.gz” to the filename, so I know it’s compressed and not just plain text anymore (it’ll also be smaller!)


3. Restoring from a Database Backup (with GZip Compression)

So you’ve got a backup of your database (either using the method above, or some other way), and something has gone wrong and you need to restore, or you’re migrating it to a new server. You could use one of the other tools mentioned before, but in the example of phpMyAdmin, what if your database backup file is bigger than the allowed upload size? Well luckily, the command-line doesn’t mind.

The command to restore is very similar to the one for backing up. Firstly, without GZip compression:

cat db_backup.sql | mysql -u mysqluser -p mysqldatabase

We use the “cat” command to output the contents of the backup script, and pipe its contents into the mysql program. As you can see, the mysql program takes the same options as the mysqldump one does in section two.

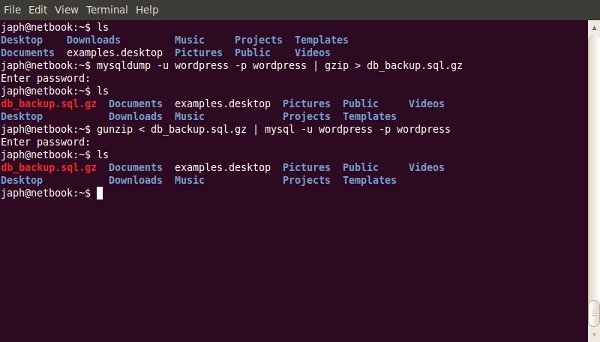
Now if the script was GZip compressed, we can’t just output its contents into mysql, as it will be compressed data instead of a nice SQL script. So we do the following:

gunzip < db_backup.sql.gz | mysql -u mysqluser -p mysqldatabase

See, it’s very familiar, just switched around a bit.

What’s happening here is we run “gunzip” too and redirect the backup script into it to be decompressed. We then pipe the decompressed output into the “mysql” program.


4. Find / Replace in a Text File

Sometimes you have a big file, like maybe a database export, and you need to do some find / replace on it… but it won’t open in any of your text editors, because your machine runs out of memory trying to open it! Well, here’s a way around that, by using the command-line and a little regular expressions.

The way this works is to output the contents of the SQL script (or whatever file you’re using), pipe it through a program called “sed,” which is specifically form manipulating streaming content, and then redirect that output into the new file. Sound complicated? Well… I guess it is a little, but the command itself looks simple!

cat original_dump.sql | sed s/Japheth/Japh/ > new_dump.sql

The new part here is really the “sed” program. Basically what it’s doing is taking input and matching the first pattern (in this case, my name, “Japheth”), and replacing it with the second pattern (in this case, a shortening of my name, “Japh”), then outputting that.


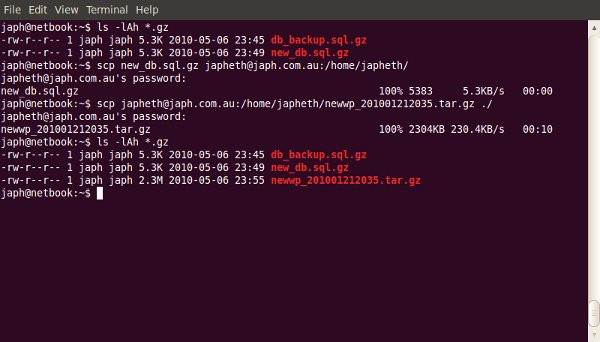
5. Securely Copying Files to / from a Server (over SSH with SCP)

If you’re working on the command-line and need to copy a file, especially if you need to do it securely, why go and fire up your FTP client? Just use a program called Secure Copy, or SCP, which is especially for doing remote file copying securely. Secure Copy uses SSH to copy the files, so you need to make sure you can connect to the remote computer via SSH first (I’ll talk about this a little more at the end of the article, so hold that thought).

The syntax of the scp command is similar to that of the cp command covered in section one, with the addition of the hostname of the remove computer and the username to connect with:

scp /path/to/local/file username@hostname:/path/to/copy/to/

The bits to note are “username@hostname:”, which, as I explained above, are the username to use and hostname to use when connecting. You will be prompted to enter the password for that user, and you also will get a progress indicator for the copying so you can see how it goes.

You can use the “-r” switch (note: it’s lowercase for scp, uppercase for cp) with secure copying to make it recursive. Also, if this is the first time using SCP or SSH to connect to the remote machine, you may be asked to accept an RSA fingerprint for security, which you should accept (assuming you’re certain you’re connecting to the correct server).

It’s worth mentioning that this works both ways. You can also copy files from the remote computer to your local machine by switching the arguments around:

scp username@hostname:/path/to/remote/file /local/path/to/copy/to/

If you’re SSHed into one web server, and you want to copy files to another one, you can use this command to copy the files directly without having to download them to your local computer first!


6. Finding Specific Files in a Large Project

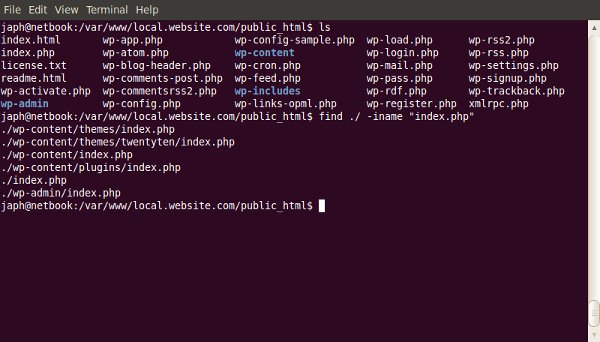
Finding a file with a particular name

Want to find a specific file but not sure where in the many directories of your project it’s hiding? (or even if there’s more than one!)

find ./ -iname "index.php"

The “find” command is for locating files within a directory heirarchy. It has many options, so its uses are quite varied. Here I’ve specified to search in the current directory with “./”, and used the “-iname” switch, which means to search for a file with a name like the one I supply. There is also a “-name” switch, but the “-iname” switch is case-insensitive, so it’ll find INDEX.php as well.

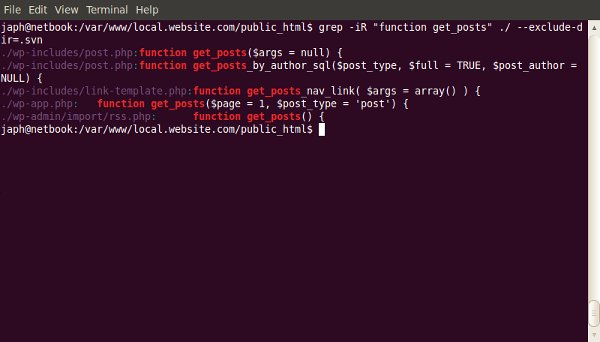
Finding a file with particular content

Ever known that you had written a function for something, but can’t remember which file it was in?

grep -iR myFunction ./

“grep” is a program for printing out lines that match a particular pattern. You can provide it with some switches, like the “-i” for making it case-insensitive, and “-R” for making it recursive in my example. Then provide a pattern, and the path to search in (here I’m searching the current directory with “./”). This example will show the filename and the line in that file for any matches it finds to “myfunction” (case-insensitve because of the “-i”).

If your projects are Subversion working copies, you may find that it’s annoying to see results from the “.svn” directories. To exclude particular directories from the search, use the “–exclude-dir=” switch, for example “–exclude-dir=.svn”.


7. Performing Bulk Actions on Specific Files

Now we know how to find particular files; what if we want to do particular things with those files? For example, I often work on a Mac, and find that when I save files to Windows shares or Linux Samba shares on the network, Mac OS X kindly litters “._filename” files everywhere. So I like to be able to clean these up regularly.

To find such files, I use both methods from the previous section for finding files with a particular name:

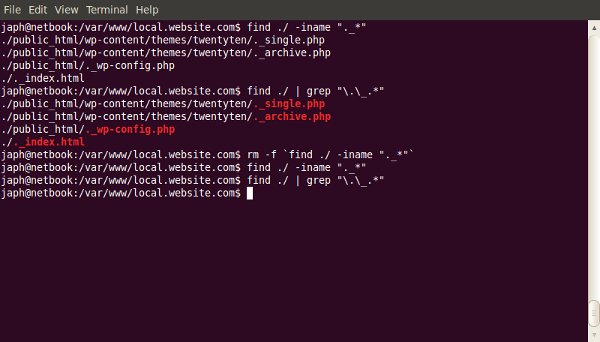
find ./ | grep "\.\_.*"

We’re finding a way to output all files in the current directory (recursively), and are then piping the output to grep, which ensures that it matches my regular expression. The regular expressions just says, “match anything that starts with a literal . followed by a literal _ followed by 0 or more of anything else.” Run it like so to make sure you see the desired files.

Now to do something with all the files you captured from that command, you wrap it with back-quotes (“). If I wanted to delete all of them:

rm -f `find ./ | grep "\.\_.*"`

I have the “rm” command (to remove, or delete, files) with a “-f” switch (which means to force a delete without asking for confirmation), and it will run for each file returned by the command within the back-quotes!

I feel it would be irresponsible not to mention here that you should be very careful using the “rm” command. If you use the “rm” command with the “-f” switch, make sure you know exactly what you’re going to be deleting, and that you really want it gone! If you use “-f”, you won’t get a second-chance.


How do I get Command-line Access to my Web Host?

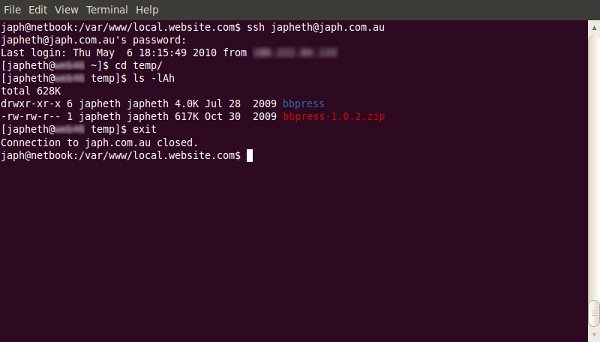
I mentioned earlier in the article about connecting to a remote computer via SSH. A lot of these commands are most useful when used on your web server, which likely runs linux, so you’ll need to be able to connect to the command line. The way to do so is by using a program called SSH, which does it securely.

On Mac OS X, or on linux, you can run SSH from the Terminal application:

ssh username@hostname

If you’re on Windows, you’ll need to use a freely available program called PuTTY.

You will be prompted for your password when you are connecting.

If you do not have SSH access to your web host already, you will most likely be able to request it, and they will set it up for you.


In Summary…

Like most things, “you don’t know, what you don’t know.” It might seem difficult to discover how to use the command-line; but there’s a huge amount of power available to you once you wrap your head around it! Hopefully, this article will get you started exploring! Any questions?


Interview With Fantasy Artist Skam Works

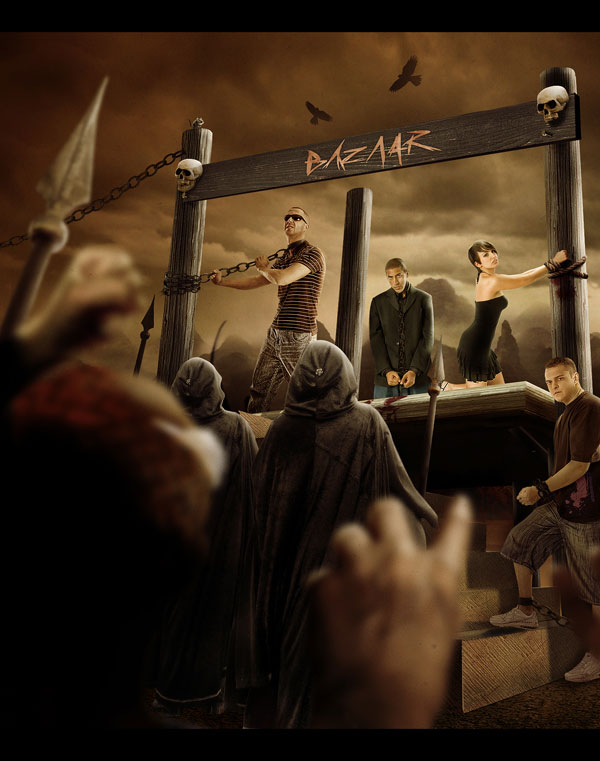
Artist Maksimilijan Gecevic, better known as Skam, is a master of producing fantasy artworks. His visuals show vivid events unfolding in practically every illustration he creates. In our interview Skam talks about the benefits of being in a design collective as well as some of his upcoming projects. So let’s get into another interview with a great artist.

Q Welcome to Psdtuts+, please introduce yourself. Could you tell us where you’re from and how you got started in the field?

Hello, glad to be here! My name is Maksimilijan Gecevic and I am from Zagreb, Croatia. I went to a School of Applied arts and I’m currently finishing Faculty of graphic arts in Zagreb. Before I started doing digital artworks I was more into traditional techniques as it was mostly what we learned in school; the basics of traditional art.

I got more involved in digital art in college where I started to combine those two techniques but later I found myself creating digital art and graphic design. It all started when I was creating some album covers, posters and logos for fun. But now I rarely sit and draw something traditional. I still draw sketches or doodles for some digital works, and knowing the basics really helps to improve digital artworks later on.

Q All your art has amazing imagery in it, where do you get the inspiration to create scenes like “Evil” and “Dreaming?”

Well, it depends. I get inspiration from everywhere, sometimes ideas just pop into my head. I see a movie or read something that gives me an idea. I like to think of a background story for every piece that I make, so basically, I do as much daydreaming as possible so I can come up with great ideas.

Q You are a member of SlashTHREE a great design collective, in your opinion what are the positives of joining a design collective and submitting your work. Has it benefitted you in any way yet?

I joined SlashTHREE about a year ago, and I have definitely improved since then because the artists there push each other to work on a higher level, giving each other critiques, pointing out things you might not notice, and they don’t let up until you show some progress. But seriously, joining collectives are great for artists to improve and grow. In the end, it gives more exposure to your work. So yeah, I definitely benefitted from it.

Q “Devotion” is a beautiful piece that was featured for SlashTHREE’s latest pack. Please talk about how you made this incredible illustration and what this piece is showing us.

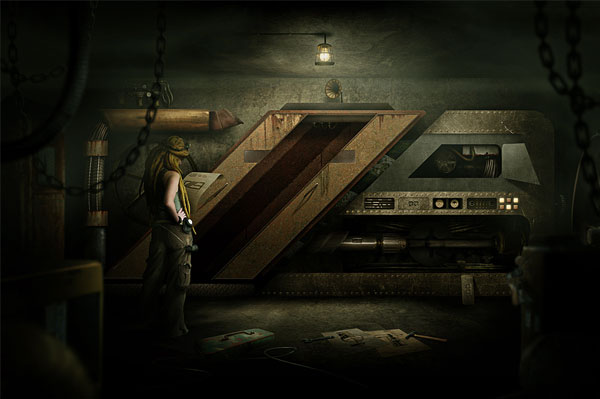
With Devotion, I was inspired by couple of movies I saw with aliens so I wanted to create something with that theme, but in a way to show different kinds of connections, or call it relationship between humans and aliens, in a way I see it if something like that would ever happen.

Basically the story itself is up to viewers to imagine, but one of the ideas was actually a love story behind it all. It was created as half manipulation and half illustration because I’m trying to include more painted and illustrated elements to my works so they could be less "cold“ like when they are 100% manipulated, but still on another level when there is some mixed media in it. The ship was mostly painted with some manipulated details, while cityscape was a stock, same for the girl which was exactly what I was looking for in this piece so in the end it turned out like I wanted to. Glad you liked it!

Q All of your fantasy scenes look absolutely seamless with the photo-manipulation techniques. Talk a little about what you put into them when making these illustrations.

I try to include both manipulated and painted elements in my work and blend them together in the end. The key to making these illustrations work is the details. Correct lighting is very important and it’s something that you can’t really learn from a tutorial; you really have to trust your own eye and make those decisions on your own. It is really important to learn, observe, and explore.

Q What plans do you have for the future of your graphic design career? Any upcoming projects you would like to talk about?

Right now my main goal is to finish college and create as many pieces as possible. I would love to make some kind of art book in the near future and I am working on some projects that are still in preproduction for a computer game but it’s still a bit early to make any announcements at this time. A bit further in the future, I hope to have my own design studio and do what I do now but I suppose we shall see how that goes.

Q Are there any specific techniques you use when designing that you would suggest to someone who is starting out in the same field as you?

I can’t say that there are any specific techniques that I use but I think the most important thing that any designer can do is pay attention to details, highlights, as well as depth of field; which can bring a new dimension to a piece. My best advice to a young designer is to experiment and search for tips on their own. When create something, feel free to make things your own way because that is what will become your signature.

Q Thanks again for providing Psdtuts+ with this opportunity to interview you. Any final thoughts for our readers?
My pleasure, and thank you for having me! Thanks to everyone for reading this and I hope that I have inspired at least some of the young designers out there. Keep working, don’t rush, don’t give up and maybe we can collaborate on some projects in the future!


Where to find on the Web


51 After Effects Tutorials From Elsewhere!

    Wow, it really has been a while… What with NAB, and all the other crazyness going on in the After Effects world, I seemed to have forgotten about one of the most popular article subjects on this website… the tuts from elsewhere!

    • Video Copilot – Smoke Trails

      This is one of the first tutorials out showcasing Video Copilots new plugin, Optical Flares. This tutorial shows some cool uses for the plugin mixed up with Trapcode Particular.

      View Tutorial

    • Video Copilot – 3D Ball Dispersion

      Using only built in plugins, and a handy sequencer script, create a cascading, awesome looking effect.

      View Tutorial

    • Video Copilot – Shatterize

      Another tutorial using only the built in effects and the sequencer script, learn how to create a progressive shatter effect.

      View Tutorial

    • Video Copilot – 3D Ledge

      Sam Loya is back on the Video Copilot scene, and now he is contemplating suicide. Well, not really, its just some awesome green screen, tracking, and 3d compositing going on.

      View Tutorial

    • Motionworks – Inglorious Basterds Blood Splatter

      John Dickinson created this tutorial for Digital Juice TV based on the Inglorious Basterds promos seen out there. He manages to recreate the blood splatter effect pretty closely.

      View Tutorial

    • Motionworks – Roto Brush

      John has this cool roto brush tutorial, days after CS5 is announced, showing how it works, and pretty much how amazing it is.

      View Tutorial

    • Motionworks – Adobe Media Encoder

      Adobe Media Encoder has always been kinda… eh, at least for me. But the new CS5 Media Encoder is pretty robust.

      View Tutorial

    • Motionworks – Dynamic Link

      Dynamic Link is back in CS5 and better than ever. John takes a look at using it in the Production Premium CS5 edition.

      View Tutorial

    • Brad Chmielewski – Using Caps Lock When Rendering In After Effects

      Brad decides to put the old “caps lock makes you render faster” AE wive’s tale to rest and runs a sweet little experiment to see just exactly how well it works.

      View Tutorial

    • Artbeats & Steve Holmes – Firestarter

      Using some fire and flame effects from Artbeats, Steve puts together a cool quick tutorial on some simple motion graphics elements.

      View Tutorial

    • Artbeats & Steve Holmes – What’s on the Menu?
      Another Steve tutorial, this time a video one! Here he shows you how to take a cool clip and make a sweet looking looping HD DVD menu background.

      View Tutorial

    • Artbeats & Eran Stern – CLEFT

      Eran shows us how to create some 3D text inside of After Effects, and then use stock footage on some sound effects to really sell the effect you are going for.

      View Tutorial

    • CGtuts+ – Create a Cool Smoking Text Effect using Fluid Mapping with Particle Flow and AE

      Learn how to create some simple 3D text, and then using Particle Flow and FumeFX, create some convincing looking smoke, and composite all of that inside of AE.

      View Tutorial

    • CGtuts+ – Achieving Realism and Depth using Render Layers in Maya and AE

      In this two parter, learn how to use the powerful render layers in Maya 2010 to prepare them for compositing, then bring everything into AE to composite them together for a realistic look with a custom depth of field.

      View Part 1 View Part 2

    • CGtuts+ – Quick Tip – Exporting 3d Camera Data from Maya into After Effects

      In this quick tip, learn how to take camera data from Maya and bring it into After Effects.

      View Tutorial

    • CGtuts+ – Create a Logo Dispersion Effect using Particle Flow and After Effects

      Learn how to create a very simple particle dispersion effects using Particle Flow, then composite everything together in After Effects.

      View Tutorial

    • Amateur Media – Landscape in C4D and AE

      Make the barren landscape and text of this tutorial in C4D, and then bring that into After Effects to tweak your depth of field for the perfect effect.

      View Tutorial

    • Comedy Titles in Cinema 4D and AE

      Using some Optical Flares in compositing within AE, use some mograph-created C4D text and create the comedic titles open.

      View Tutorial

    • Natural & Unnatural Lighting with C4D AND AE

      Learn the difference between natural and unnatural lighting while lighting your scene.

      View Tutorial

    • RGTV – Episode 37: Creating a Holographic Interface Effect

      Aharon Rabinowitz shows you how he created some of the effects in the Holomatrix commercial, a new plugin from Red Giant Software.

      View Tutorial

    • RGTV – Episode 38: Creating a Music to Light Effect

      Learn how to use Trapcode Particular 2 to create the sound to light effect seen in Heroes last season.

      View Tutorial

    • RGTV – Episode 39: Creating a 1980’s Retro Video Game Look

      Using PlaneSpace, Particular, and Text Anarchy, Aharon Rabinowitz shows you how to create a vector style arcade game interface.

      View Tutorial

    • RGTV – Episode 40: Creating a Particular Shooters Effects

      In this tutorial, Harry Frank shows you how to create a Shooters effect using Particular, and also uses some Illustrator and C4D for the final touches.

      View Tutorial

    • RGTV – Episode 41: Creating a Stitch Effect with Trapcode Particular

      Michael Park from over at Creative Cow has this very math-intensive tutorial that might lose you, but stick with it, it has one hell of an outcome.

      View Tutorial

    • AEScripts.com – ArabicText

      One of the new scripts from AEScripts is ArabicText, which lets you properly enter arabic text, which is a difficult task if you have ever tried to do it.

      View Tutorial

    • AEScripts.com – True Comp Duplicator

      This handy script is useful, because not only will it duplicate your comp, but its entire hierarchy as well as subcomps.

      View Tutorial

    • AEScripts.com – Layer Marker Batch Editor

      This script allows you to batch edit all the layer marker attributes on all the selected layers.

      View Tutorial

    • AEScripts.com – LCDeffect

      This is a pretty straightforward script, what it does is allows you to get the look of and LCD screen in one click.

      View Tutorial

    • AEScripts.com – Skydome

      Another very handy script to have in the toolbox, Skydome create a 3D camera aware environment for your AE compositions.

      View Tutorial

    • AEScripts.com – Arrange Project Items Into Folders

      With a little pre-planning with naming images, run this script and it will arrange project items into folders based on a matching prefix.

      View Tutorial

    • AEScripts.com – ProjectInfoListExporter

      If you have a lot of elements and need a nice list of what your project consists of, run this, and it will export a document listing of your AE project assets.

      View Tutorial

    • AEScripts.com – TextReverser

      Very simple. It just reverses text. Pretty plain and simple… oh yeah and handy!

      View Tutorial

    • MaxAfter.com – Motion Graphic Design

      This is a very broad tutorial on just some basics of composition, graphic design and whatnot inside of After Effects.

      View Tutorial

    • Creative Cow – Lens Flare in AE and Premultiplication Explained

      Learn how to give a lens flare an alpha channel in After Effects.

      View Tutorial

    • Creative Cow – Subtract and Divide Blending Modes in AE

      Learn how to subtract and divide blending modes in AE. This is able to be done in CS5 natively, but not CS4 and below, so you need this workaround.

      View Tutorial

    • Creative Cow – After Effects CS5: Rotobrush

      Yet another look at one of the all star features in After Effects CS4 from Richard Harrington.

      View Tutorial

    • Greyscale Gorilla – How to Make the Discovery Channel Rebrand Cube Transition Effect with C4D and AE

      Nick Campbell goes into some in depth coverage on how to create Royale’s awesome transition effects seen on the Discovery Channel’s promo pieces.

      View Part 1 View Part 2

    • Greyscale Gorilla – Reflective and Refractive Glass Block in C4D and AE

      Learn all about reflection and refraction of glass materials for inside of C4D, and then bring that into AE for some final compositing.

      View Part 1 View Part 2

    • Greyscale Gorilla – Fun With Precomping in After Effects

      This is a cool tutorial that uses like, one little set of keyframes and a TON of precomping to make a really cool looking animation.

      View Tutorial

    • Greyscale Gorilla – How to Make a Simple Spin Logo Animation with C4D and AE

      Learn how to create this interesting spin animation in C4D, and then finish up in AE with some glow, curves, blurs and level adjustments to get a desired look.

      View Part 1 View Part 2

    • Greyscale Gorilla – How to Make the 2010 Winter Olympics Ice Cube Event Bumpers

      If you saw the Ice Cube bumpers at the Winter Olympics, Nick recreates that in C4D and composites the scene together in After Effects.

      View Part 1 View Part 2

    • Greyscale Gorilla – How to Make a Cascading Text Animation

      Learn how to create this cool looking effect where different colors and textures cascade up and down an object. Like always, composite it all together in After Effects at the end.

      View Part 1 View Part 2

    • Justin Young – Better Particle Control

      Check out Justin’s tutorial with some handy little tips on having some better control over your particle emissions.

      View Tutorial

    • Justin Young – Collect and Reduce in AE

      Learn some organizational techniques to apply to your projects inside of After Effects to work more efficiently.

      View Tutorial

    • Brad Zimmerman – Vintage Film Grain

      Brad from Church Media Design has this quick tutorial on how to create some vintage film grain on your videos.

      View Tutorial

    • CG Swot – Canyon Dusk Matte Painting in AE

      Dave Scotland walks us through the steps to create this great scene such as distributing layers in 3D Space and adding color correction and lighting effects to make everything work together correctly.

      View Tutorial

    • CG Swot – Cloudy Moonlit Night in AE

      Learn how to make this scene from scratch inside of After Effects using Particular, and some other effects.

      View Tutorial

    • CG Swot – Designing and Compositing a HUD

      With Iron Man releasing today, of course there was something with HUD in it. Learn how to create this effect with Dave Scotland in this five part tutorial.

      View Tutorial

    • CG Swot – Day-Night Earth Globe

      Learn how to build this scene with a little help from 3ds Max to create a falloff material, and otherwise build everything in AE.

      View Part 1 View Part 2

    • CG Swot – Composition is Everything

      Learn the basics of composition for when it comes to laying stuff out, or compositing large scenes inside of 3D and After Effects.

      View Part 1 View Part 2

    • Eran Stern – Look Ma, No Wires

      Learn how to create the look of flying people without having to rig up expensive wires and cranes and just do it on green screen.

      View Tutorial

    • If you enjoyed this post, please give it a vote on Digg or a stumble to say thanks!