One of the most useful, but under-used, tools a web developer has is the command-line. The terminal often scares people away; so here’s where we demonstrate some of the most useful day-to-day commands.
1. The Basics
If you’re new to the command-line, you’re going to want to know a few things to help find your way around.
Changing directories
You can change to a different directory with the following:
cd ../relative/path/to/other/directory/or/file
cd /absolute/path/to/other/directory/or/file
If you get lost, you can go back to your “home” directory with the command “cd ~”.
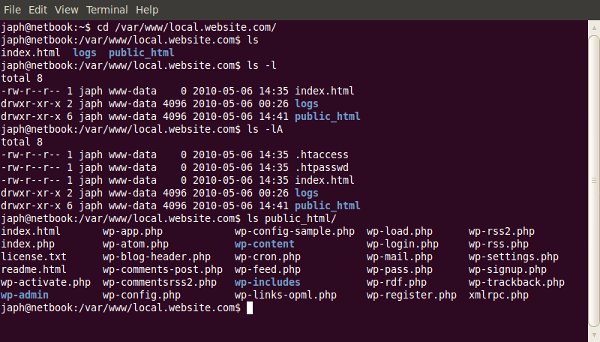
Listing files and directories
If you need to know what files a particular directory contains:
ls ../relative/path/to/other/directory/or/file
ls /absolute/path/to/other/directory/or/file
You can use the “-l” switch to show the contents as a list, and the “-A” switch to also show hidden files (on Linux based machines, files and directories whose name begins with a “.” are considered ‘hidden’).
Showing your current directory
Sometimes you just want to know what directory you’re currently in!
pwd
This will display a path to your current folder.
Copying files
Copying files from one place to another is quick and easy:
cp /files/or/directories/to/copy /directory/to/copy/to/
You can also use the “-R” switch when copying to make it recursive, so all sub-directories and files are also copied.
But typing is slow, and what if I can’t remember the exact path or command?
Most of the time, the command-line has tab-completion enabled, so you can start typing the name of a command or a file path, press tab, and it will complete it for you. If there is more than one option, it won’t complete for you but if you double-press tab, it will list the options.
Tab-completion makes typing out long file paths much faster!
How do you know what options a command has?
There are a few ways to determine what options a command has. Most commands have a –help (or -help, or -h) operator available, which lists the possible arguments and options you can use:
cd --help
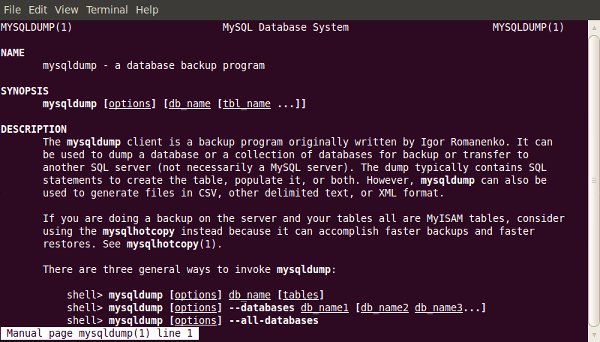
If you find that the brief help given by the –help operator isn’t enough, you can read more detail with the man program:
man mysqldump
Which will tell you all about the “nano” program. Simple commands like “cd” may not have an entry in man.
2. Making a Database Backup (with GZip Compression)
Backing up your database is something you should do often. Like most things, there are a lot of ways to do this, but using the command-line is one of the best. Why? Because it helps you get around potential problems like execution timeouts for tools like phpMyAdmin, and potential network dropouts from using a local administration tool like MySQL Workbench.
The command to run the backup is fairly small, but may require some explaining:
mysqldump -u mysqluser -p mysqldatabase
Now, to explain what’s going on here! The “mysqldump” program is a tool for creating database backups. The parameters being used are:
- “-u” switch means you’re going to specify a username to connect with, which must follow, like “-u mysqluser” above
- “-p” switch means you’re either going to immediately specify the password to use (with no space), or it’ll prompt you for one
- The final parameter used in the example above is the name of the database to backup (of course!)
If you ran the command above, you would’ve seen the contents of your database go whizzing by on the screen. That’s good, because we know that part works (actually connecting to the database), but it’s also bad, because… where did it go? Answer: nowhere! It scrolled past, and that was it. Now we need to capture it and put it in a file.
To place the contents of the output into a file, for back-up purposes, we need to use what’s called a redirection.
mysqldump -u mysqluser -p mysqldatabase > db_backup.sql
So we added a redirecter, and the filename we wanted the output to go into. Now you should be able to see a file named “db_backup.sql”, and if you open it you can see a SQL script with the structure and content of your database ready for restoration or migration.
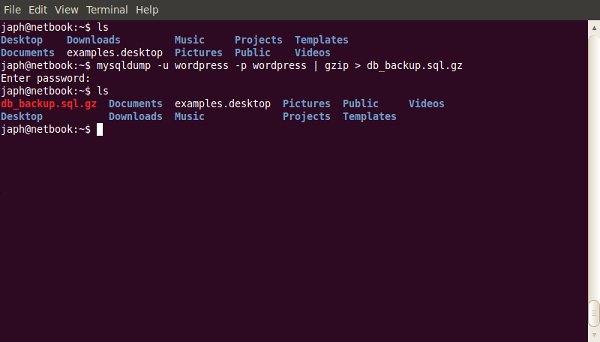
One last thing that could be useful for a backup, is compressing the SQL script. For this example, I’m going to use GZip compression, because it’s quite common, but you could also use Bzip2 or something else.
To add compression into this command, we just do what’s called piping. We pipe the output from the mysqldump through gzip, and then redirect it into the file we want, like so:
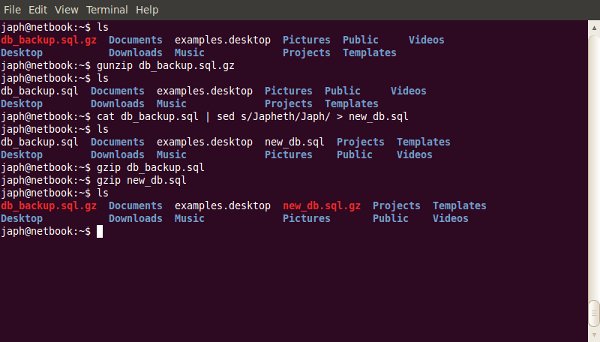
mysqldump -u mysqluser -p mysqldatabase | gzip > db_backup.sql.gz
I also added the “.gz” to the filename, so I know it’s compressed and not just plain text anymore (it’ll also be smaller!)
3. Restoring from a Database Backup (with GZip Compression)
So you’ve got a backup of your database (either using the method above, or some other way), and something has gone wrong and you need to restore, or you’re migrating it to a new server. You could use one of the other tools mentioned before, but in the example of phpMyAdmin, what if your database backup file is bigger than the allowed upload size? Well luckily, the command-line doesn’t mind.
The command to restore is very similar to the one for backing up. Firstly, without GZip compression:
cat db_backup.sql | mysql -u mysqluser -p mysqldatabase
We use the “cat” command to output the contents of the backup script, and pipe its contents into the mysql program. As you can see, the mysql program takes the same options as the mysqldump one does in section two.
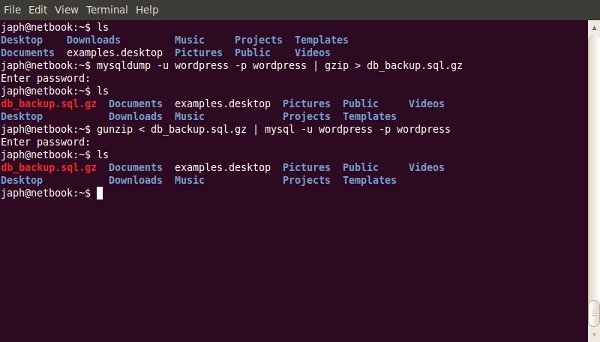
Now if the script was GZip compressed, we can’t just output its contents into mysql, as it will be compressed data instead of a nice SQL script. So we do the following:
gunzip < db_backup.sql.gz | mysql -u mysqluser -p mysqldatabase
See, it’s very familiar, just switched around a bit.
What’s happening here is we run “gunzip” too and redirect the backup script into it to be decompressed. We then pipe the decompressed output into the “mysql” program.
4. Find / Replace in a Text File
Sometimes you have a big file, like maybe a database export, and you need to do some find / replace on it… but it won’t open in any of your text editors, because your machine runs out of memory trying to open it! Well, here’s a way around that, by using the command-line and a little regular expressions.
The way this works is to output the contents of the SQL script (or whatever file you’re using), pipe it through a program called “sed,” which is specifically form manipulating streaming content, and then redirect that output into the new file. Sound complicated? Well… I guess it is a little, but the command itself looks simple!
cat original_dump.sql | sed s/Japheth/Japh/ > new_dump.sql
The new part here is really the “sed” program. Basically what it’s doing is taking input and matching the first pattern (in this case, my name, “Japheth”), and replacing it with the second pattern (in this case, a shortening of my name, “Japh”), then outputting that.
5. Securely Copying Files to / from a Server (over SSH with SCP)
If you’re working on the command-line and need to copy a file, especially if you need to do it securely, why go and fire up your FTP client? Just use a program called Secure Copy, or SCP, which is especially for doing remote file copying securely. Secure Copy uses SSH to copy the files, so you need to make sure you can connect to the remote computer via SSH first (I’ll talk about this a little more at the end of the article, so hold that thought).
The syntax of the scp command is similar to that of the cp command covered in section one, with the addition of the hostname of the remove computer and the username to connect with:
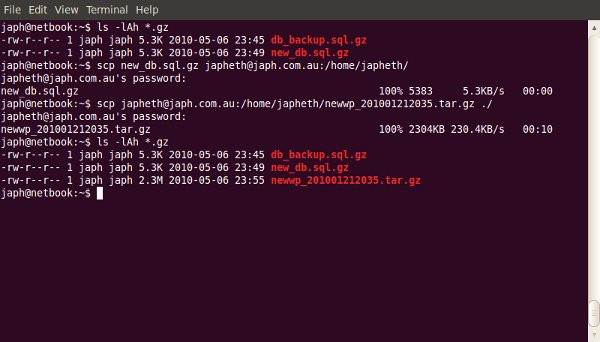
scp /path/to/local/file username@hostname:/path/to/copy/to/
The bits to note are “username@hostname:”, which, as I explained above, are the username to use and hostname to use when connecting. You will be prompted to enter the password for that user, and you also will get a progress indicator for the copying so you can see how it goes.
You can use the “-r” switch (note: it’s lowercase for scp, uppercase for cp) with secure copying to make it recursive. Also, if this is the first time using SCP or SSH to connect to the remote machine, you may be asked to accept an RSA fingerprint for security, which you should accept (assuming you’re certain you’re connecting to the correct server).
It’s worth mentioning that this works both ways. You can also copy files from the remote computer to your local machine by switching the arguments around:
scp username@hostname:/path/to/remote/file /local/path/to/copy/to/
If you’re SSHed into one web server, and you want to copy files to another one, you can use this command to copy the files directly without having to download them to your local computer first!
6. Finding Specific Files in a Large Project
Finding a file with a particular name
Want to find a specific file but not sure where in the many directories of your project it’s hiding? (or even if there’s more than one!)
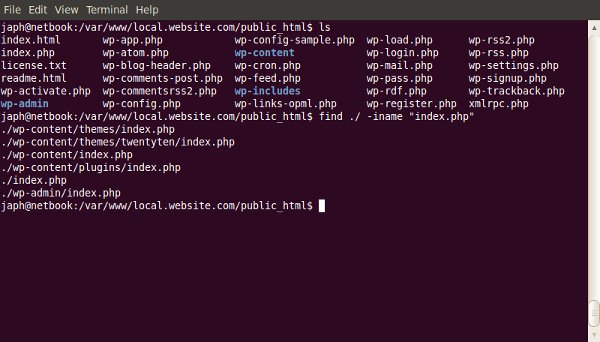
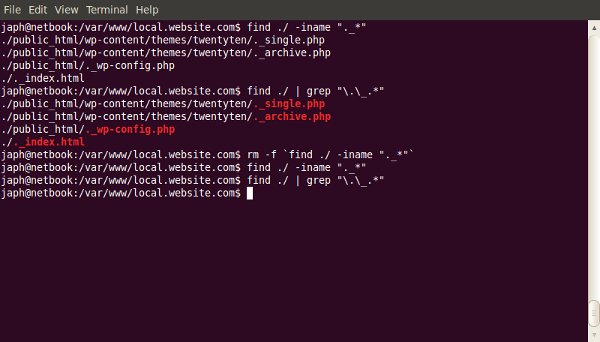
find ./ -iname "index.php"
The “find” command is for locating files within a directory heirarchy. It has many options, so its uses are quite varied. Here I’ve specified to search in the current directory with “./”, and used the “-iname” switch, which means to search for a file with a name like the one I supply. There is also a “-name” switch, but the “-iname” switch is case-insensitive, so it’ll find INDEX.php as well.
Finding a file with particular content
Ever known that you had written a function for something, but can’t remember which file it was in?
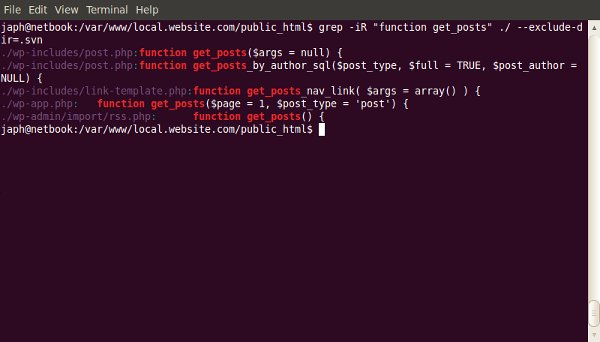
grep -iR myFunction ./
“grep” is a program for printing out lines that match a particular pattern. You can provide it with some switches, like the “-i” for making it case-insensitive, and “-R” for making it recursive in my example. Then provide a pattern, and the path to search in (here I’m searching the current directory with “./”). This example will show the filename and the line in that file for any matches it finds to “myfunction” (case-insensitve because of the “-i”).
If your projects are Subversion working copies, you may find that it’s annoying to see results from the “.svn” directories. To exclude particular directories from the search, use the “–exclude-dir=” switch, for example “–exclude-dir=.svn”.
7. Performing Bulk Actions on Specific Files
Now we know how to find particular files; what if we want to do particular things with those files? For example, I often work on a Mac, and find that when I save files to Windows shares or Linux Samba shares on the network, Mac OS X kindly litters “._filename” files everywhere. So I like to be able to clean these up regularly.
To find such files, I use both methods from the previous section for finding files with a particular name:
find ./ | grep "\.\_.*"
We’re finding a way to output all files in the current directory (recursively), and are then piping the output to grep, which ensures that it matches my regular expression. The regular expressions just says, “match anything that starts with a literal . followed by a literal _ followed by 0 or more of anything else.” Run it like so to make sure you see the desired files.
Now to do something with all the files you captured from that command, you wrap it with back-quotes (“). If I wanted to delete all of them:
rm -f `find ./ | grep "\.\_.*"`
I have the “rm” command (to remove, or delete, files) with a “-f” switch (which means to force a delete without asking for confirmation), and it will run for each file returned by the command within the back-quotes!
I feel it would be irresponsible not to mention here that you should be very careful using the “rm” command. If you use the “rm” command with the “-f” switch, make sure you know exactly what you’re going to be deleting, and that you really want it gone! If you use “-f”, you won’t get a second-chance.
How do I get Command-line Access to my Web Host?
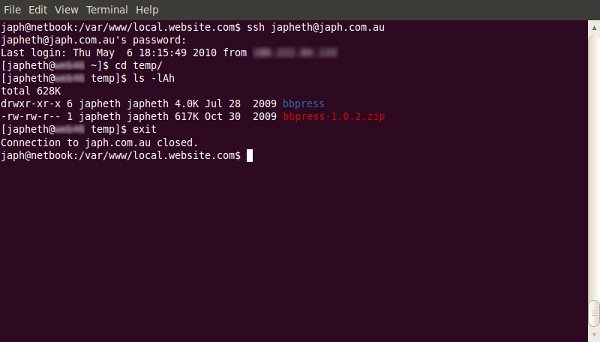
I mentioned earlier in the article about connecting to a remote computer via SSH. A lot of these commands are most useful when used on your web server, which likely runs linux, so you’ll need to be able to connect to the command line. The way to do so is by using a program called SSH, which does it securely.
On Mac OS X, or on linux, you can run SSH from the Terminal application:
ssh username@hostname
If you’re on Windows, you’ll need to use a freely available program called PuTTY.
You will be prompted for your password when you are connecting.
If you do not have SSH access to your web host already, you will most likely be able to request it, and they will set it up for you.
In Summary…
Like most things, “you don’t know, what you don’t know.” It might seem difficult to discover how to use the command-line; but there’s a huge amount of power available to you once you wrap your head around it! Hopefully, this article will get you started exploring! Any questions?