Creative Sessions: Interface Design Launch


Successful interfaces allow you to use them easily – they should feel seamless with the device you’re accessing with, and the experience you’re having. Successful interface designers have a theoretical foundation in numerous fields, which focus on planning and delivering great user experiences, as well as a strong graphic sensibility which they use to create interfaces that are attractive and fun to interact with. In this session we cover numerous subjects on Interface Design.

There are many fields that have risen in the last few years, such as Experience Design, Interaction Design, Information Architecture, and User-Centered Design that form the backbone of your interface design. We’ll be getting into these subjects in this session to give you a theoretical foundation and some starting points for study. We’ll also bring all this together and discuss interface design workflows of professionals and provide materials to learn Graphic User Interface (GUI) Design to get you on your way to creating professional interfaces.

Head over to our article on Getting Started with Interface Design to get going with a broad overview of interface design.


Participate in this Session’s Group Project

Jump over to this Session’s creative project on Create an Application Icon or Dashboard Widget. Choose the project to participate in that best fits your skill level and interest. This session’s Beginner/Intermediate project the brief is to make an icon for applications, which is great practice for building your GUI skills.

coda

We also have an Advanced project where you design a widget, which is a great way to get some hands on experience with designing interfaces, as they are typically smaller apps with a tight focus. You can post your projects in the comments here and get some feedback from the community.


Download this Session’s Cover Art as a Digital Wallpaper

Jump over to this session introduction to download this session’s wallpapers made by Wojciech Pijecki.


More Creative Sessions

Creative Sessions logo.Every month we’ll be running a two week Session on a creative topic. This Session is on Interface Design, and future Sessions will be on varied topics like, gaming design, and creative freelancing, and more. Unlike regular Tuts+ content, Sessions content is more theoretical, opinion based and will often cross many disciplines.

How to Create a Still Life in the Style of Primitive Art


In this tutorial we will review the basic rules of creating still life compositions. The techniques described here will help you to create artworks in the style of primitive art. There is no necessity to create a sketch at the beginning of your work. We will work to reproduce this style with the help of Adobe Illustrator tools. Let’s get started!

Continue reading “How to Create a Still Life in the Style of Primitive Art”

A Guide to Freezing and Bouncing in FL Studio

Freezing. Bouncing. Rendering tracks. Whatever you call it, it is a useful part of music production because it allows you to free up CPU power for more plugins and creates an audio file. While it’s not a one-click solution, bouncing in FL Studio is a process that is easy enough to be straightforward but complicated enough to give the user a lot of control. The first five steps may be all you need to know to get started with freezing tracks in FL Studio, and you can check out the rest of this tutorial to go in-depth with handling special circumstances.

To clarify, freezing a track means rendering that track as an audio file, and then disabling the plugins. This tutorial is about doing this process in a way that does not alter the sound of the track, and that allows you to keep the plugins in the project file in case you decide to “unfreeze” and adjust the plugins.


Example 1

Step 1: Project Data Folder

Before we begin, we can specify a folder to hold all our bounced audio material for this project. Use keyboard shortcut F11, and navigate to Project > General Settings, and click on the project Data Folder to do this.

Step 2: Select Timeline

For this first example, I have a synth that is sent to a mixer track, which is then routed to two other mixer tracks where it is being heavily effected and modulated. It’s an intro effects soundscape that is taking quite a bit of CPU. I’ll be using this to give an example of how to bounce a track with effects.

First, navigate to the part of the Playlist where the section you want to freeze is located, which in some cases will be the whole song or most of the song. Regardless of how big it is, select the section, and be sure to give enough space on the end for the sound to fade out. Muting the other tracks is not necessary, but may help with determining where the sound ends.

Step 3: Prepare for Rendering

Open the Mixer and click on the Arm Disc Recording button for each track you want to render, which in my case is the two effected tracks. Each time you click this button, a dialog will pop up asking you to give a name for the file. It won’t render the tracks until later, but this will give it a name to have ready.

Next, go to the Mixer’s dropdown menu, and select Disk recording > Render to wave files. I recommend having all the options selected.

Now FL Studio will render the files, and automatically save them in the project data folder, with the names we specified. When it’s done, check the Playlist to see the files appear.

Step 4: Disable or Delete Plugins, Save CPU Power

To finish the freezing process, mute the midi and automation clips in the Playlist or mute the plugins, and enable Smart Disable for all the instrument and effects plugins that went into making this sound. This will allow you to turn off the plugins and free up some CPU power, and you could reactivate the plugins later by muting the audio clips and enabling the plugins. Alternatively, you could delete the plugins and erase the clips, but then you would not be able to go back and alter the sound.

Step 5: Optional Finishing Touches

From here, you can choose to route the audio clips to the mixer however you want. Another note is that because I used this technique, I was able to get a separate audio file for both mixer tracks, and I took advantage of this by reusing one or both audio files at different times in the arrangement.

Perhaps you would like to signal that a track is frozen by noting it through a certain color and icon.


Example 2 Pattern freezing, Pre-FX bouncing

In the first example, we rendered a pattern post-fx. But often, you’ll want to freeze an instrument without the effects. At times you may want to render a pattern that repeats itself in the song. We’ll tackle both of these situations in the next example.

There are two patterns. One of which is called IntroPad, which plays three times, and the other is called sPad which plays once. The easiest way to render this would be to select the whole timeline and render it all, and sometimes the arrangement is so complicated that this is the best route. But this time, we could save some hard drive space by rendering the two patterns and then arranging the audio clips to match the song.

You may have noticed in the image that there is an obstacle preventing us from doing this disc space-saving plan, and that is that each pattern instance has unique automation. This is automating an EQ in the mixer FX. We can render the audio, one clip for each of the two patterns, without the EQ to get the unaffected instrument sound. Then we can reapply the same effects to the audio files and have the same sound.

An easier way to do this, however, is simply to route the instrument to a blank mixer track and render the audio files without any mixer effects or level/pan adjustments. Then, we’ll route the audio files to the mixer track that the instrument was originally linked to. This will freeze the instrument plugin, but our automation and effects settings will remain intact and tweakable.

Step 1: Route to Blank Mixer Track

First, let’s reroute the instrument to a blank mixer track.

Step 2: Select the Timeline

Then, we’ll select the timeline. While you could go into pattern mode, I prefer remaining in song mode and selecting the area in the Playlist, so that I can manually adjust the timing if the sound has long release.

Then following the same process from earlier, select the Arm Disc Recording button, and name the file the same as the pattern.

Step 3: Rendering the Files

From the Mixer menu, select Disc Recording > Render to Wave Files, and wait for the file to render. Next, let’s select the other pattern and do the same process.

After that, arrange the audio files to match the patterns.

Step 4: Route Back Into the FX Track

Then select the audio clips and link them to the mixer track that the instrument plugin was originally linked to.

Step 5: Muting and Disabling

Now that the routing is done, we’ll need to mute the original instrument. We should also select Smart Disable for the instrument in order to save CPU. (sound familiar?)

Step 6: Optional Finishing Touches

Lastly, let’s return the “blank” mixer track to its original blankness. Making a habit of this will keep the mixer neat and clear. The easiest way to do this is to navigate to the Mixer Presets folder in the Browser, and drag and drop the Default.fst file onto the mixer track.

Since we’ve muted the instrument, it doesn’t matter how we handle the midi clips in the Playlist. You could delete the clips if you want, but you might want to stack the midi clips with the audio to have a visual representation of the notes, or you may want to keep the midi on its own track and mute it to visually show that its been frozen. The following image shows what two visual techniques might look like:


Example 3, Partial Freezing

We’ve covered situations when you want to render a track with or without effects, but there is a third option. What about situations when you want to render a track with some of the effects? This is actually quite a common situation. For example, you might want to bounce down a track for which you’re sure about the compression, but still want to be able to tweak the EQ or Reverb. For this next example, I’m going to bounce the instrument and its compression, but not the EQ.

Here is the track in the Playlist.

Above is the mixer set up. As you can see, the track I want to freeze, which is the Distort Reese track, has two other tracks routed to it, which are Bass1 and Bass2. This sound is actually made up of two instrument plugins being sent through their own mixer tracks with their own effects, and then they are routed together to the same bus. I stand to save a lot of CPU by bouncing these instruments.

Step 1: Decide How Far

The basic idea is to decide how far into the signal chain to freeze the sound? What should be permanent? What should be adjustable?

First, mute all the effects plugins you don’t want to freeze, and be sure to note the values of the level and panning of this mixer track. We’ll need to set the panning to center and the level to the default value, so that when we route the audio back to this track it will be received by the EQ plugins the same as it was before the bounce, pre-level and pre-panning.

A note about the level, however, is that if setting the level to the default value causes the audio to clip, then you’ll want to keep the level at the setting it currently is, and then reset the level after bouncing. Resetting the fader makes it transparent, so that it won’t add or take away from the volume of the track.

Step 2: Bounce

Next, Arm disk recording and render the audio file.

Step 3: Mixer Routing, Flip the Plugins On/Off

Link the audio file to the mixer track, and turn on the effects that were turned off for the bouncing. Basically, what was off gets turned on, and what was on gets turned off, and disabled. Also, adjust the panning to its previous location and adjust the level if needed. This will result in having the same sound before we began this process, the only difference being that we save some CPU and we can’t adjust the frozen plugins.

Step 4: A Special Situation

In this situation, much of the automation was recorded to the same patterns as the notes, so we can’t mute the Midi track in the Playlist. You may be concerned about the notes in the track, but they will not cause anything since the instrument is muted.

That’s possibly all there is to know about bouncing in FL Studio. In the first example I covered the basic process for freezing in FL Studio, and in the other two examples I showed how to freeze without effects. Once you get this down, bouncing tracks will take only a minute, and this can be a handy technique to have available when the CPU starts getting overloaded. Thanks to freezing, you can keep loading new plugins as you need them.


Final Words

Aside from freeing CPU, there are other benefits to rendering tracks:

  • It makes the sound permanent. You don’t have to worry about accidentally changing it and it backs up your work for the future.
  • You can render groups/busses in order to make stems for mixers and remixers.
  • You can further edit and manipulate bounced tracks with audio-specific techniques like chopping, scratching,and stretching.


Quick Tip: Create a Pad From Scratch in Cakewalk z3ta

One of my favourite composers is Cliff Martinez, an ex-drummer of Red Hot Chilli Peppers. He is working as a film composer right now, scoring most of Steven Sodenberg’s features. The one thing that inspires me very much about his scores is that he uses a great deal of atmospheric pads, which definitely picture emotions and landscapes. A while ago I wanted to make some ambient-downtempo tracks and I can’t hide that I was greatly inspired by Cliff Martinez.

Then I came to a huge problem – I didn’t have any nice VST instruments around and I only had RgcAudio’s z3ta (which was later bought by Cakewalk). This plugin can be bought for $99 from the online Cakewalk store and in my opinion this is one of the greatest soft synths around. It is good for trance, drum and bass, chill-out and even some distorted industrial tracks.

In this quick tip, I’ll try to explain how to create a nice and unique pad that you can use in your music.


Step 1: Start the Synth Sound from Scratch

Load z3ta in your DAW (or standalone) and immediately after that create a new instrument. In order to do so, you’ll have to click PROGRAM → INITIALIZE (as in the picture). After that, in the oscillators pane, load a sine wave as our first oscillator. You can do this by clicking on WAVE and then by selecting SINE in the drop-down list.

If you don’t know what an oscillatoris, I’ll try to explain it simply. (If you would like to know more about them, perhaps you could try searching Wikipedia). The oscillator is a continuous audio signal, and has a specific form. In our case, we’ll be using a sine oscillator, which means that our audio wave will look like something like this:

Image taken from WikiPedia

You can hear what our single sine wave sounds like:

Download audio file (pad_1_sine.mp3)


Step 2: Load Different Sine Waves

Now, as you can probably hear, our sound is completely boring and mono. Therefore I’ll load two more sine waves and I’ll edit them in order to make the first and the third slightly out of tune. This is achieved with the help of the FINE slider.

As you can see from the picture, I increased the pitch of the first sine wave, the second one is normal, and the third one’s pitch is decreased.

You can hear how our sound has changed in a more sophisticated way:

Download audio file (pad_2_sine.mp3)


Step 3: Load Other Waveforms and Use Filtering

After I’ve done this, I decided to place two other waveforms – in my case two octaved saws. Click on the wave screen, then in the drop-down list select SAW → OCTAVED SAW.

I made them slightly out of tune, again.

You can hear how they sound from here:

Download audio file (pad_3_sine.mp3)

This is not very nice, right? You can hear that the saws have a very robotic feeling, that doesn’t come near to our ambient concept. Hence, I’ll send them to a low-pass filter. You can do this by using the BUS slider (marked in red) and after that by tweaking the cutoff frequency of the filter.

Download audio file (pad_4_sine.mp3)


Step 4: Polyphony

You’ve probably noticed that in our demos you can hear only G – A – G – G. But we’ll definitely want some chords out there. Examine the Master section controls of z3ta in the bottom right corner. You can adjust the POLY settings (marked with red on the image below). I changed the POLY settings to 16 – this means that the plugin will play simultaniously 16 different voices.

And our pad will sound like something like this:

Download audio file (pad_5_sine_chord.mp3)


Step 5: Editing ADSR Envelopes

ADSR stands for to Attack/Decay/Sustain/Release, which are the primary characteristics of the envelope of a tone. If you go back to the previous demos, you can hear that we have a very strong and quick attack, and after that the sound gets really low. In order to change this and to create a constant sound, we will tweak the sustain slider. The more we increase the sustain value, the more the sound will hold up with the same amplitude.

Also, we’ll edit the attack slider a bit because we want our sound to be smooth and subtle.


Step 6: LFO and Controllers

Perhaps some of you are wondering what an LFO is. LFO stands for Low Frequency Oscillator. LFOs are like normal oscillators, except for the fact that they are below 20 Hz. They can be used to create some pulse and in our case – to control different settings.

In the LFO panel, I’ll load three different types of low frequency oscillators, all of them with a sine form. You can see that there is a new button – SYNC. Sync allows us to make the waveform with specific rhythm. For example when you choose

The “1” means one beat. If the host tempo is set to 120 bpm the LFO will produce 120 cycles in this setting.

I created three different LFO’s, with different sync settings. After that I’ll connect them with some controllers:

As you can see from the picture, LFO controls main volume, LFO 2 – main pan, LFO 3 – filter cutoff. I’ve ranges in a certain way so that:


  • Volume will go heavily up and down with LFO1′s rhythm.
  • The sound will go from L to R with the rhythm of LFO 2.
  • The cutoff frequency of our filter will go slightly up with LFO3′s rhythm.

Download audio file (pad_7_sine.mp3)


Step 7: Finalizing Our Pad

Even after the last demo, we still have some problems: I personally don’t like the high frequencies (even though we have a filter applied), and even with the panning the pad sounds a bit mono. Now we have a huge arsenal of effect knobs and sliders to add variation and character to our synth sound. I’ll use chorus, delay and reverb to create some stereo effects and depth of the sound. I will also use a equalizer to shape the sound a bit.

Hear the final result:

Download audio file (pad_8_sine.mp3)

Don’t forget to save your file after tweaking!

Always save your patches and create an archive with sounds. In order to save the file, go to PROGRAM → SAVE PROGRAM FILE (.fxp).

And my final demo – a short track with a pad, a beat loop and a piano.

Download audio file (Final_Pad_Demo.mp3)

Good luck!


Creative Sessions: Interface Design Launch


Successful interfaces allow you to use them easily – they should feel seamless with the device you’re accessing with, and the experience you’re having. Successful interface designers have a theoretical foundation in numerous fields, which focus on planning and delivering great user experiences, as well as a strong graphic sensibility which they use to create interfaces that are attractive and fun to interact with. In this session we cover numerous subjects on Interface Design.

There are many fields that have risen in the last few years, such as Experience Design, Interaction Design, Information Architecture, and User-Centered Design that form the backbone of your interface design. We’ll be getting into these subjects in this session to give you a theoretical foundation and some starting points for study. We’ll also bring all this together and discuss interface design workflows of professionals and provide materials to learn Graphic User Interface (GUI) Design to get you on your way to creating professional interfaces.

Head over to our article on Getting Started with Interface Design to get going with a broad overview of interface design.


Participate in this Session’s Group Project

Jump over to this Session’s creative project on Create an Application Icon or Dashboard Widget. Choose the project to participate in that best fits your skill level and interest. This session’s Beginner/Intermediate project the brief is to make an icon for applications, which is great practice for building your GUI skills.

coda

We also have an Advanced project where you design a widget, which is a great way to get some hands on experience with designing interfaces, as they are typically smaller apps with a tight focus. You can post your projects in the comments here and get some feedback from the community.


Download this Session’s Cover Art as a Digital Wallpaper

Jump over to this session introduction to download this session’s wallpapers made by Wojciech Pijecki.


More Creative Sessions

Creative Sessions logo.Every month we’ll be running a two week Session on a creative topic. This Session is on Interface Design, and future Sessions will be on varied topics like, gaming design, and creative freelancing, and more. Unlike regular Tuts+ content, Sessions content is more theoretical, opinion based and will often cross many disciplines.

Create Astonishing Nightclub Themed 3D Typography


3D graphics are often created using several applications. Today, we will use Photoshop, Illustrator, and Cinema 4D to create a stunning nightclub themed 3D composite. Let’s get started!


Step 1

Our first step is to create our text in Illustrator. To do this, just open up Illustrator and type out some words as shown. I used the Clarendon Typeface.Now simply expand the type. Ungroup the Letters, select each word and group using pathfinder tool. Once this is done, lets save out our file as an Illustrator 8 file. This way, Cinema 4D can interpret the illustrator data and convert the text into splines with no work at all.


Step 2

Now import your splines (text) into Cinema 4D. Use the image below as a guide.


Step 3

Now, select the first word using either the selection tool, or via the objects panel. Right click in order to highlight and select Connect + Delete. This will make for easier extrusions so that we can extrude each word (i.e. lights) as apposed to each letter. Do this for every word.

Note: It is always good to rename your hierarchies, because once you have a lot of objects in the scene it makes for easier selection of objects and deformers.


Step 4

Lets Extrude now. Highlight a letter that you want (in this case lights) and then while holding alt click Extrude NURBS found in the NURBS modifiers. Now we will hover to the caps section of the attributes panel and give it a depth of 33, with fillet caps on the back and front, with 3 steps and 3 meters. And for the fillet type, lets change it from convex to half circle. Repeat this for all 3 words.


Step 5

Now let’s finish our text and position it for our final preview. We will now use the Mograph Module to create 3 copies of the text. To do this, click and highlight the extruded text you want, (example: lights) and click the Mograph tab and select Cloner object. Apply this method to all three words. If you only have one, then you are all set.


Step 6

Lets take this opportunity to light and set up our camera in the scene. Use the panning, rotating and zooming tools to get a view you are satisfied with. For this example, I will place it slightly above at an angle, so that we are looking down at the text, for a more dramatic feel. Now you will go to the layers panel, and once you have a position you like, click the target icon right next to the camera. See the picture for reference. This will essentially activate the camera.

Note: Once your camera is active, any zooming, panning or rotating of the viewport will affect the camera’s position. So if you want to rotate the text, simply click the target icon once more to deactivate. And once you want to go back to your final view, activate the camera.

Now we will light the scene! Lets go back up to the panel where we found the camera, and lets take 2 lights. Place one right above the text, and under shadow options choose soft. Now press Cmd/Ctrl + C to copy, then Cmd/Ctrl + V to paste. Now take this light copy and keep it on the same height as the first light and then move it forward on the Z-axis. Turn off shadows for this frontal light.


Step 7

Let’s create a sky object as well as a plane for reflections. We do not, I repeat do not want the sky object to be seen by our camera, so we will right click, the sky object, go to Cinema 4D tags, and click on compositing. Now move down to the attributes panel, and deselect Seen By Camera

Click on the Primitives panel to create a plane, make it real big by dragging the handles or by hovering to the attributes panel and scaling it via the scale parameters. Now place the plane up above the lights. Create a new material for the Panel, and click on the Luminance channel. This will make it 100% white as we will use it like a white card in a studio setup. Just like we did for the Sky object, we will also add a compositing tag to the plane so that the camera will not see it on the final render.

Lets now add a new material to the Sky object so that it can provide reflections for our scene. We will use an HDRI Map on the color channel so that it wraps around the scene once we add it to the sky object. To do so, we will have to take a material and drag it on to the object it corresponds to until we see a downward arrow (this is an indication that the material is being added).

Its actually a good idea for us to check out how our scene looks.


Step 8

I must admit, the picture above does not look anywhere descent at all. But its a start. Let’s begin to make things pretty by applying materials to the scene. Just follow the pictures below. It’s best to just show what is being done.


Step 9

We can now map the materials to the text. Its very important to follow the order presented below. For the Glow material, we need to click it, and under the attribute panel, we need to hover over to selection and type in R1 which will allow the material to ONLY be mapped to the beveled part of the text. For the black/face material, we will do the same but this time type in C1 to map the material to only the face.

Lets do a test render and see what we have so far.

You will notice two things: The picture looks A LOT nicer than before, and of course, the render time has increased, but not by much, maybe a 20 second difference. So we are still good to go.


Step 10

Now let’s add some Pizzazz to the scene. Rather than creating something from scratch, why not use our resources to our advantage. What is neat about Cinema 4D is that it comes with an extensive amount of free content. In this case, we want to import disco balls. To access them, we need to go to Window > Content Browser (or press Shift + F8). Under the preset folder, we will choose Advanced Renderer, then to caustics and open the volume caustic scene. Open it, and click on the disco ball and hit copy. Now File > Close, to bring up our lights out scene again, and past into the scene. Now we will place the disco balls onto a MoGraph Cloner Object as we did with the text. This time we will choose grid array in order to create multiple copies.

With the Cloner Object selected in the Objects Menu (Layers Panel), we will add a Random Effector to the Cloner Object. This will randomize our disco objects around the scene. The Random Effector can be found under the MoGraph Menu. Look at the Settings below in order to randomize the scene.

Let’s perform a test render to see where we are now.

This looks good! Now lets add some Light Rods to the scene. Use the same process that you used while adding Disco balls through the content browser. We will go to our content browser then Presets > Advanced Render > Global Illumination > Quiet Room.c4d

Copy a light rod, and paste it into your scene.

Using the scaling and rotating tools, make multiple copies of the rod and position them around the text as desired. Stay away from the Cloner objects for this one.


Step 11

We are all set with the scene. Now we will texture all the lights, group them, add them to an object buffer, as well as the text and the disco balls, and we will be all set to render and import to Photoshop, where we will do some extensive touch ups to make our final design standout. Follow the Texture channels presented below. Don’t hesitate, to mess around with color variations that appeal most to your eye. With that said, all that needs to be tweaked is the color of the Luminance channel since the lights are self-lit and give off lights.

Experiment with different colors and render.

Now we are ready to render, and make things look pretty in Photoshop. Select all the light rods, and press Alt + G to group them together. Now, add a compositing tag to the group and enable object buffer for alpha channel precision. Do the same for the disco balls and the text. Look at the picture below for reference.


Step 12

We are finally ready to render our image. Follow the settings below and render out. Since everything is pretty simple, the render should not take longer than 5 minutes, depending on your video card and ram equipment of course.

Your final image should look like this.


Step 13

Fire up Photoshop and let’s get it going. To start off, we need to isolate our elements. Let’s hover over to our channels panel next to the layers to select each alpha channel. You want to select each individual one and extract each elements accordingly.


Step 14

Once we have everything isolated, we can rid ourselves from the black background, and add a dark purple one.


Step 15

The piece is missing one quintessential effect; it lacks glossiness and glow. We must select all isolated elements (i.e. the disco balls, text and light rods) and duplicate them. Once this is done, you will need to merge them, desaturate the image by using the Cmd/Ctrl + Shift + U. Now we must go to Image > Adjustments > Brightness/Contrast, to suppress the darks and bring out the highlights.

Now we will apply a Gaussian blur with a diameter of 5.3. Once finished, blending mode needs to be set to screen and 75% opacity.


Step 16

Let’s add some lens Flares. In the source folder accompanied by this tutorial you will see not 1, but 6 lens flares I have rendered out for your use. These are stock photos, and you can use them as you please. For the purpose of this tutorial, lets use the chroma lens.tiff. Import it and lets give the lens and S curve in the curve editor and set its correspondent blending more to screen in order to make the black transparent.

Now lets add more lens flares. Choose which ever ones you see fit and place them on light rods and text edges.


Step 17

Lets add some nebula stocks to spiff the image up a bit more. A good place to look would be Moonchilde Stock whom has great collection of nebula stocks, pre-made in apothesis. Make sure you read and follow her policies and you should be good to go. Your image should look something like this now.


Step 18

Before we finish up, lets add some reflections to the face of our text and add some light streaks. With the magic wand, and with the text layer selected, select the black face of the text (the front). With the keyboard, let’s press Cmd/Ctrl + J to duplicate the selection. Now you have a layer with just the face of the text. Use this layer and a clipping mask for other images to stack on. This way, it looks as if the front of the text is reflecting some objects.

Now we will add light streaks.

Using the polygon selection tool, we will select the outside of the rectangle and feather the selection by 65%.

Now use a soft brush with 45% strength, and erase away any hard edges.

Let’s duplicate our light streak multiple times and then place them accordingly to create a light array.

Cmd/Ctrl + U to colorize the light streaks to an ominous Green, or what ever color you like.

Duplicate your light streak once it’s merged into one, and colorize the duplicate a different shade of purple.

Save your file to what ever format you desire it to be. I will export to a tiff. Then I will bring the tiff file into Photoshop and add a gradient map adjustment layer. Use your own color choice, or follow the one below. What ever the color you choose, make sure the blending mode of the gradient map is set to soft light.

Now lets add a photo filter adjustment layer with a density of 35%. Set the Opacity to 80%

Lastly, we will add a color balance adjustment layer. Use the settings below, or the ones desired by you.

Select all the layers and duplicate them. Now merge the duplicates. Filter > Noise > Add Noise. Set this new layer’s opacity to 35%.

Select the border of the image, feather the selection by 75% and apply a Gaussian blur of 45.0.


Final Image

That’s it! We are finally done with the project. Enjoy the outcome and make sure to play around with your own custom setting to give it more of a personal feel.

Asset Libraries and Blocks in iOS 4

iOS 4 presented a million billion new API’s by Apple’s count, but for this post I am going to show a quick demo of the new Assets Library API where you can now get to users photos and videos with more access than ever before. This new API relies on the new programming device called Blocks that has been introduced with iOS 4. Blocks are used through many of the new API’s as a kind of extended @selector. We will look into this new development device and make a small project to create our own UIImagePickerController. In the end we are going to create a tableview that is filled with all the photos within our library. Check out the video below or follow the steps typed out below.

Screencast

Using the Assets Library API in iOS 4 from Collin Ruffenach on Vimeo.

Creating the Project

Create a new project in xCode. Make it for the iPhone since this is an iOS 4 framework. A view based application will create a view controller for us, so lets use that. Call your project MyImagePicker.

Adding in the framework

This project will revolve around taking advantage of the AssetsLibrary framework introduced with iOS 4. Due to this you must have the newest xCode and iPhone SDK installed with iOS 4.0 support. If this is done you should be able to expand the frameworks folder of your project. Right click on UIKit.framework and select “Reveal in Finder”. This will open up the folder that contains all of the frameworks you can use in an iOS 4 project. Find AssetsLibrary.framework and drag into the Frameworks folder of your project. Once dragged in make sure that the Copy items into destination folder options is deselected and that it is set to recursively create groups for any added folders.

Using the framework with blocks

iOS 4.0 introduces a totally new programming concept for Objective C developers to take advantage of when creating their own code and when using Apple’s API. Blocks in the most simple terms are Objective C objects that are methods. A block uses the special character ^ to denote its beginning and is a required parameter of many of the API’s introduced within iOS 4.0. Apple has some great documentation on blocks, and how they conceptually fit into the current objective C landscape. You can see their concise but effective overview here. For our purposes I am just going to review the simple syntax of a block.

Before we dive into blocks lets take a look at the AssetsLibrary framework methods that will require them. The general flow of the object access we will be doing is as follows.

We are going to create an ALAssetsLibrary and call a method on it that will enumerate through all the ALAssetsGroups it has access to. For every ALAssetsGroup we will call a method on it which will enumerate through the ALAssets it has access to. We will save each ALAsset into an array we will use to populate our tableview. The two different enumerations we are going to perform is where the blocks will come in. But lets first set up our view controller appropriately.

MyImagePickerViewController.h

#import <UIKit/UIKit.h>;
#import <AssetsLibrary/AssetsLibrary.h>;
@interface MyImagePickerViewController : UIViewController {
 
	IBOutlet UITableView *tableview;
	IBOutlet UIActivityIndicatorView *activity;
 
	NSMutableArray *assets;
}
 
@property (nonatomic, retain) IBOutlet UITableView *tableview;
@property (nonatomic, retain) IBOutlet UIActivityIndicatorView *activity;
 
@end

We are going be using the assets array here to hold the assets that we are going to pull using the AssetsLibrary Framework.

Now open up MyImagePickerViewController.xib and drag in a UITableView and a UIActivityIndicatorView. With these in place connect them to the IBOutlets you created for this class. Also make sure to connect the UITableViewDataSource and UITableViewDelegate to the MyImagePickerViewController as well. With that done we can start to use the AssetsLibrary Framework.

Using the Asset Library

Now we are going to use our AssetsLibrary framework. This will be done within the viewDidLoad method of your MyImagePickerViewController.m. Put the following code in there.

1 - (void)viewDidLoad {
2
3    [super viewDidLoad];
4    [activity startAnimating];
5
6    void (^assetEnumerator)(struct ALAsset *, NSUInteger, BOOL *) = ^(ALAsset *result, NSUInteger index, BOOL *stop) {
7	if(result != NULL) {
8		NSLog(@"See Asset: %@", result);
9		[assets addObject:result];
10
11	}
12    };
13
14    void (^assetGroupEnumerator)(struct ALAssetsGroup *, BOOL *) =  ^(ALAssetsGroup *group, BOOL *stop) {
15	if(group != nil) {
16		[group enumerateAssetsUsingBlock:assetEnumerator];
17	}
18
19
20	[self.tableView reloadData];
21	[self.activity stopAnimating];
22	[self.activity setHidden:YES];
23    };
24
25    assets = [[NSMutableArray alloc] init];
26    library = [[ALAssetsLibrary alloc] init];
27    [library enumerateGroupsWithTypes:ALAssetsGroupAlbum
28					   usingBlock:assetGroupEnumerator
29					 failureBlock: ^(NSError *error) {
30						 NSLog(@"Failure");
31					 }];
32 }

We are going to be going though this code line by line. On line 4, we start animating our activity indicator. I will explain why we have to do that a little bit later. Lines 6 – 23 are the lines that will  declare the two blocks that we will use to fill our tableview with pictures. We are going to declare two blocks to use as parameters to methods within a ALAssetLibrary object and a ALAssetGroup object. The first method call we will make will be on our ALAssetLibrary object. So for the moment lets skip passed the block declarations and look at line 25. On line 25 we instantiate our NSMutableArray to hold the ALAssets that we will pull out from the AssetsLibrary. On line 26 we will create our ALAssetsLibrary object. We will call a single method on this object to loop through all of the assets in a library. The method is:

– enumerateGroupsWithTypes:usingBlock:failureBlock:

This method takes in 3 parameters. An ALAssetGroup type, a block to be performed on each group and a block to be performed on failure. Lets talk about block syntax. A block is a native Objective C object. It is a subclass of NSObject. With that said it is also an Objective C method. An objective C method is composed of three things. A return type, a parameter list and a piece of code to be executed. We are going to pass the assetsGroupEnumerator block object that declare on line 14 into this method. Lets take a look at how the block is declared.

You begin by specifying a return type for the block. Void in this case. Next you enclose a name for the block which is proceeded by a carrot ^ character. This is the special character Apple has decided on to denote blocks. You begin block names with blocks as well as the actual declaration of what a block is. This name is wrapped in parenthesis. This is followed by the parameter list that the block will accept. In this case it is a ALAssetsGroup object and a Boolean indicating whether to stop. Now I did not come up with these parameters by myself. Since I will be passing this block into an ASAssetLibrary the documentation will tell us what will be passed into the block. ALAssetsLibrary objects documentation can be seen here. With that all said, lets take a look at the code that will actually compose this block. Starting on line 15 we will make sure that we are seeing a valid group. If the ALAssetsGroup object that we are passed is valid then we will call another enumeration on the group which will enumerate through assets. This enumeration method also requires a block. We declared this block above. This block is called assetEnumerator. Once again we retrieved the parameters list from the documentation of the object asking for, in this case an ALAssetsGroup.

For this block, which begins on line 6, the block is passed an ALAsset object, an index and a stopping condition boolean. Within the code of the block we will ensure that the returned ALAsset is valid and if it is we will add it to our array which will hold all of our assets. With this block declared we pass it into the call to our ALAssetsLibrary object on line 16.  Once every group has been enumerated and our array is filled with all of our ALAssets we will tell the tableview to reload its data and get rid of our UIActivityIndicatorView.

With all of this done all that remains if filling in the required UITableViewDataSource methods. The tableview will be filled with the assets we collected. ALAsset objects are cool in that they include a method called -thumbnail which returns a CGImageRef to a thumbnail we will use. I won’t explain the development of these methods any further since they are pretty straight forward.

// Customize the number of sections in the table view.
- (NSInteger)numberOfSectionsInTableView:(UITableView *)tableView {
    return 1;
}
 
// Customize the number of rows in the table view.
- (NSInteger)tableView:(UITableView *)tableView numberOfRowsInSection:(NSInteger)section {
    return [assets count];
}
 
// Customize the appearance of table view cells.
- (UITableViewCell *)tableView:(UITableView *)tableView cellForRowAtIndexPath:(NSIndexPath *)indexPath {
 
    static NSString *CellIdentifier = @"Cell";
 
    UITableViewCell *cell = [tableView dequeueReusableCellWithIdentifier:CellIdentifier];
    if (cell == nil) {
        cell = [[[UITableViewCell alloc] initWithStyle:UITableViewCellStyleDefault reuseIdentifier:CellIdentifier] autorelease];
    }
 
	ALAsset *asset = [assets objectAtIndex:indexPath.row];
	[cell.imageView setImage:[UIImage imageWithCGImage:[asset thumbnail]]];
	[cell.textLabel setText:[NSString stringWithFormat:@"Photo %d", indexPath.row+1]];
 
    return cell;
}

Discover Propellerhead’s Reason

Reason is a software synth, a great source of samples, and a mature MIDI sequencer—but it cannot (yet) record audio. Because of its versatility—and despite its huge disability—it remains an incredibly useful and popular program.

This article was previously published on the AudioJungle blog, which has moved on to a new format in 2010. We’ll be bringing you an article from the AudioJungle archives each week.

Reason is used in two different ways: It is used as a sound source for playing live, using in sequencers, or recording by another DAW. And it is used as a complete DAW solution—by those who don’t need to capture sound from outside of their computers.

This makes Reason different: it is commonly used by those who have chosen different software as their preferred DAW. That may all change later this year when Propellerhead launch their new product: Record.

Reason is currently at version 4, and costs around $380—or around $570 for the Premium edition, which includes all four hypersampled ReFills: Reason Drum Kits, Reason Pianos, Abbey Road Keyboards and Reason Electric Bass.

This is our sixth article in the series “Exploring Digital Audio Workstations”. If you’ve missed the earlier articles, you can find them here:

Now let’s have a look at Reason.


History and Background

Reason is produced by the Swedish software development company, Propellerhead Software, who also produce ReCycle, Rebirth and ReWire. ReCycle is the first program they developed—a music loop editor—which was released in 1994.ReBirth emulated the early Roland drum machines commonly used in techno music.

The first version of Reason released in 2000, and was originally named Realizer. It was later renamed after a computer program in Douglas Adams’s novel Dirk Gently’s Holistic Detective Agency. Propellerhead gave Reason their focus, and did very well. The program could run on average computers, was priced competitively, and won the Musikmesse International Press Award in 2002.


Reason Features

Propellerhead’s Reason webpage describes the programs main four features. Rather than listing features in text, demonstration videos have been produced, which you can see below.

1. Thor Polysonic Synthesizer

thor

Propellerhead’s sound sources are probably the most popular feature of the software. The Thor synthesizer features four different filter types, six forms of synthesis, and extensive modulation capabilities. This video from Propellerhead takes you through the features:

2. RPG-8 Monophonic Arpeggiator

rpg8

This is a new feature in version 4. It is an advanced arpeggiator with a single-note repeat and manual mode. This video from Propellerhead takes you through the features:

3. Reason Sequencer

sequencer

The sequencer is the business end of Reason. It has many features, including vector and tempo automation, count-in, multiple lane tracks. To see them in action, have a look at this video tour from Propellerhead.

4. ReGroove Mixer

regroove

ReGroove is like quantizing, only different. Instead of aligning sounds to straight time, this module aligns it to the groove. This makes your music sound more natural and less mechanical. This video from Propellerhead demonstrates:


ReWire Reason to Connect with Other DAWs

If you’d like to use Reason as a sound source for another DAW (like Logic or Pro Tools), you need ReWire. ReWire was created by Propellerhead (in cooperation with Steinberg) as a means of connecting different audio applications in Windows and Mac OS so that MIDI and audio data can flow between them.

Propellerhead explain in broad terms: “ReWire is a system for transferring audio data between two computer applications, in real time. Basically, you could view ReWire as an ‘invisible cable’ that streams audio from one computer program into another.”

Its basic function is to connector a client “synth” application (for example, Reason, ReBirth, Renoise and VSampler – as well as DAW outputs) with a host “mixer” or “editor” application (for example, Ableton Live, Logic Pro, FL Studio or Pro Tools). The Propellerhead ReWire page has a complete list of ReWire enabled applications.


User Comments

What do Reason users think of the product? Here are some comments by users and reviewers that I found around the Net. I’d love to hear from you in the comments too.

  • “I was very impressed with how easy Reason 4 was to work with. I was able to make some real progress really quick, the transport features are similar to standard recording software (Logic/ProTools), the mixer and components are all easy to work with. The patches it comes with are plentiful and give you plenty of avenues of creativity. So I was off and running there. I started looking at Abelton but it felt very Windowsy to me. Being a completely saved man (mac man) I can’t be havin that. So it’s just Reason for now.” (Kyle)
  • “I really want to recreate the fat 80s synth sounds made by some of my favorite old-school synthpop artists, like Gary Numan, Devo, Blancmange, Fad Gadget, etc. I’d love to be able to recreate the sounds of Korgs, Juno and Jupiter 8s, and other analog synths, but have found that the monosynth and polysynth packs in Reason don’t come close — they just aren’t very rich or deep (I’ve had better luck with the synth pads in this department). Any good Refills for this? Or, better, any tricks to wring these kind of sounds from Reason by tweaking the settings?” (Allen)
  • “Regarding Reason, the more I look into the various complex host upgrades going around, the more strongly I consider going down the ‘Reason Only’ route for MIDI/Sequencing. As such, and having tested this upgrade very thoroughly at beta, I really couldn’t be more impressed.” (Headquest)
  • “What can’t you do with this thing? Score a movie check lay down the next pop, hip hop, RnB hit check, write a commercial jingle check, design some sounds, check. Okay here is the point; I layed down a hip hop track for a client using Reason logic and the Duende mini plugins, my competition used a fantom (nothing against roland) and guess who sold their track yeah that was me. Now of course the bass line was killer and I used Ampeg for it, but the point is music now a days is done inside the box (where I live) and Reason 4 is my fantom and my Akai drum machine rolled into one. Plus this thing is unlimitedly expandable through refills (i think a new one comes out daily). Forget what others are talking about if you do hip hop or RnB Reason 4 is the BEAST you need, but do me a favor and stop using the stock sounds. For real people spend some money on a refill or 2 or 3 or 4 or like me 32 and counting, or at the very least learn to tweak the sounds.” (William McKnight aka Fatboy)
  • “The new sequencer is worse than the old one, which was already bad. If you are using a keyboard and you record all your MIDI notes and automation, it works reasonably well. If you try to do anything manually there are a bunch of extra steps. The automation is a little easier to control. But, now you have to draw a clip before you can draw automation. You also have to draw a clip anytime you want to input any notes manually. If you are in the clip view and you get your note drawing tool out then go to note view, you are out of luck if there are already notes there, you have to go back to the pointer and select the clip, then draw the notes in. You can now have multiple sequencer tracks for one instrument. This is helpful and a hindrance. Zooming on the sequencer is unbearable. It zooms from the middle instead of the start. Lets say you recorded something and you want to fix the first notes. you have to make sure the beginning of your loop is in the middle of your window to zoom in properly. In older versions of reason you could play one instrument while looking at another sequencer’s notes. Now, the sequence you are looking at defaults your keyboard to that instrument.” (Richard Dean Anderson)
  • “For those of us who appreciate the ability to work within the virtual environment, using familiar ‘real world’ tools, Reason is indispensable. For instance: the Reason rack can be flipped around, revealing all the various connections on each device, while routing is accomplished by connecting the devices with animated patch cables. It is a truly surreal experience, which begs the question ‘Why isn’t everybody doing this?’”New in Reason 4, the Thor Polyphonic Synthesizer blew me away with its intense sounds and extreme flexibility. The presets alone were jaw dropping, let alone the sheer amount of editable parameters for manipulating them. I was also very impressed with the newly revamped sequencer. I am always impressed with Propellerhead’s ability to integrate new features without creating a massive learning curve for their users. Other new features like the RPG-8 Monophonic Arpeggiator and ReGroove Mixer inspire creative new ways for building tracks, while classic devices like Subtractor and Malstrom continue to hold their own as some of the best sounding recreations of analog gear to date.”For better or worse. Till death do us part. They’ll be prying this piece of software from my cold dead hands. I don’t need “a” reason to live… I need Reason 4 by Propellerhead to live.” (Joel Hart)

How do you use Reason? What do you think about? Let us know in the comments below.

http://www.reasonstation.net/propellerhead-record/

This article was written shortly before the release of Propellerhead Record. If you have any experience with Record, feel free to leave comments about it as well.


Wojciech Pijecki, a Designer That Rocks!


One thing that makes Psdtuts unique is the diverse group of authors that provide the content for us all to enjoy. We have authors living on just about every content; each of which brings their own unique experiences and style to the table. Today, we have decided to profile artist, designer, musician, and Psdtuts tutorial writer Wojciech Pijecki who has some fantastic digital art and insights to share. Find out more about Wojciech after the jump.


Wojciech Pijecki creates. Whether it’s digital art through ZeroBound or rock music with his band Anathomia, Wojciech surrounds himself in creativity.

Living in a small down in Poland hasn’t stopped him from perfecting his design skills through client work and as a regular tutorial-writer with Psdtuts+. Interesting enough, it was just a couple of years ago that Wojciech visited that site to learn how to use Photoshop. In his words he had, “no idea about graphic design.” It’s apparent that much has changed in two short years. He describes his work as “vivid!” and whatever he’s illustrating always tends to take on a life of its own. It’s no wonder that one of his favorite pieces of advice for budding digital artists is, “Every idea is worth bringing to life, but it’s the execution that makes it worth seeing.”

“Every idea is worth bringing to life, but it’s the execution that makes it worth seeing.”

Being an artistic child doesn’t necessarily mean that the path to pursuing that type of career is clear. Such is the case with Wojciech. After finishing Upper/Senior Secondary School, he went on to study programming, but only lasted a year. As he puts it, “I have no idea why, maybe because I was just forced to do something.” He eventually entered a vocational school to study in an advertising-type curriculum. It was around this time that Wojciech really started to dive into the digital arts in an attempt to absorb every bit of knowledge concerning the subject. To this day he scours the internet constantly; looking for the best images and any tutorial he can find to improve his already impressive portfolio.

Right now his design business is called ZeroBound, and while that seems like a fitting name for someone who never wants to stop learning, he says there is no meaning behind the words and that it “it just sounds cool to [him].” In fact, he thinks he’s going to change the name soon. It goes without saying that changing the name of a business after achieving a measure of success isn’t typical, but when it comes to Wojciech, there is little that falls into the realm of typical.

For one he says one of the biggest frustrations he runs into as a designer is running Photoshop on his computer, a Quad Core CPU with a 24" DELL monitor. Not needy clients or unpaid invoices. Granted, the program is a furious computing-power eater, but it’s not every day that this complaint is at the top of an artist’s list. In fact, the question seemed to get a bit of a rise out of Wojciech,

"Photoshop and CPU… %^$#@! The program and my computer sometime piss me off so much that I yell out loud. Imagine when you’re working on [an] important project, or you need to go somewhere and the CPU is loading, loading, loading and finally it goes [and] shuts down and you lose all [unsaved] data. Or when you’re working in Photoshop a big project (let’s say a PSD file around 2-3GB). Everything goes so slimy, so slow that you can eat your dinner while waiting to change brush. That’s very annoying."

What seems to be typical amongst creatives, though, is the disdain for PCs. Equipment frustrations aside, Wojciech considers himself very lucky to be able to do something he loves.

One trait that he’s known for is perfectionism. His attention to detail and his desire to choose the perfect color for every project can seem “crazy” at times for those around him: “Once I said to my friend "this needs to be moved 1 pixel to the side." Now he is considering me [to be] sick, as he didn’t see any difference in that project, but I had to move something one pixel.” It’s no doubt that that small change made all the difference to Wojciech. And it’s no doubt that such care for every step of the artistic process is what made him working on behalf of Brainnovative company all the while designing for clients such as Bookmaniak, Best Sport, Day Spa Zen, Miracle Lounge and others.

While one could easily assume that with a guy like Wojciech, his desire to constantly perfect his craft would take up all of his free time. Not so. In fact, he only works on the weekends if “no one is around.” Yet another trait that many designers do not share. He is found spending time with his girlfriend, taking in a concert or at home watching movies and some TV, the cartoons Futurama and The Simpsons being his favorites. Another of his favorite activities is playing the guitar, which he does in a rock band called Anathomia which was started a year and a half ago. While they haven’t acquired “any big achievements” yet, Wojciech is happy with people merely liking their music. In his typical fashion, Wojciech plans to constantly take it to the next level, “We will still move on, trying to reach the top, but [that’s] long way before us.”

One thing is for certain, though. If Wojciech continues on this current path in his design career, his band won’t be the only thing reaching the top.

Workshop #93: Como Aprender by Humming – Francisco Manzano

At Audiotuts+ we irregularly put up a reader track for workshopping and critique (find out how to submit a track). This is how it works: you upload your song, and every week or so we’ll publish one here and step away from the podium. The floor is yours to talk about the track and how the artist can fix problems in and improve upon the mix and the song.

This track has been submitted for your friendly, constructive criticism. They have put their track (and their heart and soul) in your hands to learn and get useful feedback.

  • Do you enjoy the song or track itself? Does it have potential?
  • Can the arrangement be improved?
  • How did you find the mix? What would you do differently?
  • What do you enjoy about the rhythm track? What can be done to improve it?
  • Is the choice of instruments relevant and effective for the style/song?
  • Are the lyrics (if any) effective? Does the style, arrangement and genre of the song suit them?
  • Can you suggest any specific techniques that might improve the track?
  • Do you have any other constructive feedback?

Como Aprender by Humming – Francisco Manzano

Artist’s website: www.humming.com.mx

Description of the track:

Hi, my name is Francisco Manzano. I am working in my project Humming, but I don’t know if my recording, mixing and mastering sounds great. All this is recorded with Record and Reason Propellerhead. I use only a guitar, bass and my vocal, recorded in my living room. And i use only for the monitors, my headphones AKG directly to my laptop.

So I would like a critique, because am not sure if i use the correct EQ, compression, and audio level on all my elements. I am doing 12 songs, and I have some problems deciding, but all this is because of my ears.

I am a fan of your blog, and I use your advice all the time, so i would like your critique. And if it is a bad critique, don’t worry. For me it is very helpful to see if I need to put this project on a professional studio or leave it and send it to distribution.

Another problem is why you need an MP3, my sound changes a lot on MP3. Maybe you need to make a post for a good transfer between WAV and MP3. Dont you think? Thanks in advance. FcoMG

Download audio file (11ComoAprender.mp3)

Terms of Use: Users can stream the track for the purposes of giving feedback but cannot download or redistribute it.

Have a listen to the track and offer your constructive criticism for this Workshop in the comments section.


Submit Your Tracks for Workshopping

Need constructive criticism on your own tracks? Submit them using this form.


Quick Tip: Using the Datagrid With XML

I’m going to demonstrate how to use the datagrid component with an xml file. When you need to display tabular data there is no quicker and easier way than to use a datagrid, and when paired up with an xml file it makes things all the better.


Step 1: Setting up the Flash Document

Create a new flash file (Actionscript 3.0). Set the document to 600x400px with a white background.

Save this file with the name xmlDatagrid.fla


Step 2: Add Components to the Document

Open the components window by going to Menu > Window > Components or pressing Ctrl+F7.

Drag a button, a combobox and a datagrid component to the stage.

Then delete the button, combobox and datagrid components off the stage; they are now in your library.

Here’s a preview of the xml document structure we will be using:

<?xml version="1.0"?>
<books>
	<book>
		<title>Learning ActionScript 3.0: A Beginner's Guide</title>
		<instock>yes</instock>
		<price>26.39</price>
	</book>
	<book>
		<title>Essential ActionScript 3.0</title>
		<instock>yes</instock>
		<price>34.64</price>
	</book>
</books>

The Source download contains three XML files: flash.xml, ajax.xml, and php.xml; each follow the same structure as the snippet above, but contain different books. You’ll need to place them in the same folder as your FLA.


Step 3: Open a New ActionScript File

Open a new actionscript file and save it with the name XMLDataGrid.as

Now open the package declaration and import the classes we will be using:

package {
	import flash.display.MovieClip;
	import flash.net.URLLoader;
	import flash.net.URLRequest;
	import flash.events.MouseEvent;
	import flash.events.Event;
	import fl.controls.DataGrid;
	import fl.controls.ComboBox;
	import fl.controls.Button;

Step 4: Extend the MovieClip Class and Declare Variables

The main document class must extend either the Sprite or MovieClip Class; here we extend the MovieClip Class. Declare the variables we will be using:

package {
	public class XMLDataGrid extends MovieClip {
		var dg:DataGrid;
		var cb:ComboBox;
		var urlLoader:URLLoader = new URLLoader();
		var loadButton:Button;
		var bookXML:XML;

Step 5: Set up the Constructor

Here we set up the constructor with three functions we will be using:

public function XMLDataGrid():void {
		setupGrid();
		setupComboBox();
		setupButton();
}

Step 6: Function Definitions

Here we define the functions we are using in the constructor:

private function setupGrid():void {
	dg=new DataGrid();

	dg.addColumn("Title");
	dg.addColumn("InStock");
	dg.addColumn("Price");
	//This sets the size of the datagrid
	dg.setSize(600,100);
	//This is how many rows you want the datagrid to show
	dg.rowCount=5;
	//When we add colums they are put into an array
	//Here we set the first column "Title" width to 450
	dg.columns[0].width=450;

	//This set the x and y position of the datagrid
	dg.move(0,100);

	addChild(dg);
}

private function setupComboBox():void {
	cb = new ComboBox();
	//This adds item to the comboBox
	cb.addItem({label: "Flash" });
	cb.addItem({label: "Ajax" });
	cb.addItem({label: "Php" });
	//This sets the x and y positions
	cb.move(200,50);

	addChild(cb);
}

private function setupButton():void {
	loadButton = new Button();
	loadButton.label = "Load Books";
	loadButton.addEventListener(MouseEvent.CLICK, loadBooks);
	loadButton.x = 200;
	loadButton.y = 325;
	addChild(loadButton);
}

The setupGrid() function creates a DataGrid component, which will display the data from the XML file we pass to it.

The setupComboBox() function creates a ComboBox, which is a drop-down list that we’ll use to allow the user to pick an XML file to be passed to the data grid.

The button created in setupButton() will be used to pass the XML file, which is selected in the combo box, to the data grid. We’ll write that code next.


Step 7: Define the loadBooks Function

The loadBooks function is used in the eventListener of the loadButton.

private function loadBooks(e:Event):void {
	//Here the cb.selectedLabel returns a string so we call toLowerCase() on it
	//and append .xml to it i.e. if 'Flash' is selected we load 'flash.xml'
	urlLoader.load(new URLRequest(cb.selectedLabel.toLowerCase()+".xml"));
	urlLoader.addEventListener(Event.COMPLETE, populateGrid);
}

Step 8: Define the populateGrid Function

The populateGrid function is used in the eventListener of the urlLoader in the loadBooks function.

	private function populateGrid(e:Event):void {
		var booksXML:XML = new XML( e.target.data);
		//How many items are in the xml file
		var booksLength:int = booksXML.book.length();

		//This removes all the previously added data in the datagrid.
		dg.removeAll();
		//Here we loop through the <book> nodes in the xml file, and add each as a row to the datagrid
		for (var i:int =0; i &lt; booksLength; i++) {
			dg.addItem({Title: booksXML.book[i].title, InStock: booksXML.book[i].instock,Price: booksXML.book[i].price});
		}
	} //Close out the class
} // This is closing the package out

Step 9: Set the Document Class and Test

Set the document class to “XMLDataGrid” and test the movie!


Conclusion

Here we learned that displaying tabluar data in flash is made easy with the datagrid component and that pairing it up with xml makes a great solution.

This is my first tutorial, I hope you have learned something useful and thanks for reading!

Validating Various Input Data in Flash

Today, almost everything on the web is based on user input. A contact form, a user registration form, a search box and so on. As a developer you can’t just rely on the user to write everything as it’s supposed to be. To be sure you always get the correct data from your users you will need to validate the input. Read on to find out how..

In this tutorial you will learn how various data is supposed to be structured and how to validate this data. Note that these methods may not be the best out there or the most complete solutions.

The following topics will be covered in this tutorial:

  • Date and time validation
  • E-mail validation
  • Web address validation
  • Phone number validation
  • International Standard Book Number (ISBN) validation
  • International Bank Account Number (IBAN) validation
  • Credit card number validation

Each topic is handled independently so you can follow the ones you are interested in.


Final Result Preview

This is how our validator will look:

There are multiple fields with the sole purpose of demonstration. In a real scenario you will rarely have all these fields in a single form.

In this tutorial I will only cover the coding part. You will find the graphic interface in the source files. To follow along you will need Flash CS3+.

To better understand this tutorial you must have some basic knowledge about Regular Expressions and string functions. Please check this resource about regular expressions in ActionScript 3.0 if you don’t feel comfortable with the syntax.

Understanding the .fla File

Well it’s not a very complicated interface. If you open the Validator.fla file in the begin folder of the Source download, you will find two frames: one locked, named ActionScript and another one called Interface.

The Interface layer is currently empty. There we will add our text boxes used for the data input.

On the ActionScript layer you will find this code:

var validator:Validator = new Validator();

stage.addEventListener(FocusEvent.FOCUS_IN, register);
stage.addEventListener(FocusEvent.FOCUS_OUT, unregister);

function register(e:FocusEvent):void
{
	e.target.addEventListener(Event.ENTER_FRAME, onFrameUpdate, false, 0, true);
}
function unregister(e:FocusEvent):void
{
	e.target.removeEventListener(Event.ENTER_FRAME, onFrameUpdate);
}

function onFrameUpdate(e:Event):void
{
	var input:String = e.target.text;
	var valid:Boolean;

	switch(e.target)
	{

	}

	if(valid)
		e.target.parent.validTick.gotoAndStop('valid');
	else e.target.parent.validTick.gotoAndStop('invalid');
}

The first line represents an instance of our future Validator class. We’ll use a separate AS file to contain this class, so that it can be used in other projects.

We add event listeners to the stage for focus events. We will use these events to validate our input data only when a text field has focus just to avoid unnecessary calculations.

The onFrameUpdate function is called on every frame when a text field has focus to validate the data in it.

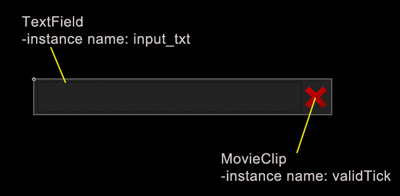
We’ll add our future code in the switch statement. Everything else remains unchanged over this tutorial. In the library you will find a MovieClip called TextBox. This has an input TextField with an instance name of input_txt and another MovieClip called validTick with two frames labeled “valid” and “invalid”.

Now let’s get to the coding.


Step 1: Preparations

First create a new ActionScript file and name it Validator.as

Paste or type in the following code:


package
{
	public class Validator
	{

		public function Validator()
		{
			trace('Validator created');
		}
	}
}

This will be the framework of our Validator class. We will add methods to this class for each validation type we perform. Place this file in the same folder as the Validator.fla file.


Step 2: Calendar Date Structure

The calendar date is one of the most frequently used data on the web. The structure varies from zone to zone. We will look at two main dates formats: United Kingdom version and United States version.

  • The UK date is expressed as DD-MM-YYYY.
  • The US date is expressed as MM-DD-YYYY.

In both cases DD stands for the day, MM stands for the month and YYYY stands for the year. It’s also possible to use another character for the separator, like a slash.

If you need further documentation you can learn more about calendar dates here.


Step 3: Calendar Date Check

Code

First of all we need to check to see if the date format is correct. Paste or type the following code in our Validator class just after the constructor:

public function checkDate(date:String):Boolean
{
	var month:String 		= "(0?[1-9]|1[012])";
	var day:String 			= "(0?[1-9]|[12][0-9]|3[01])";
	var year:String 		= "([1-9][0-9]{3})";
	var separator:String 	= "([.\/ -]{1})";

	var usDate:RegExp = new RegExp("^" + month + separator + day + "\\2" + year + "$");
	var ukDate:RegExp = new RegExp("^" + day + separator + month + "\\2" + year + "$");

	return (usDate.test(date) || ukDate.test(date) ? true:false);
}

Explanation

The first line in the function represents the pattern used to check the month:

var month:String 		= "(0?[1-9]|1[012])";

This pattern will match a number from 1 to 12. For numbers under 10 it will check for digits with leading zero or without.

The second line represents the day pattern:

var day:String = "(0?[1-9]|[12][0-9]|3[01])";

This will match a number from 1 to 31. As previously mentioned, for numbers under 10 it will check for digits with or without leading zero.

The next line represents the year pattern:

var year:String = "([1-9][0-9]{3})";

This will check for numbers between 1000 and 9999. Of course we could of used a pattern to check for years from 0 to more than 9999 but for the sake of ease we will check for numbers within these nine millennia.

The variable separator simply checks if one of these four separators is used: hyphen “-”, dot “.”, front slash “/” and white space ” “.

The two variables usDate and ukDate represent the regular expressions used to check a date. They are the same basically the only difference being the order of the month and day.

var usDate:RegExp = new RegExp("^" + month + separator + day + "\\2" + year + "$");

This will check to see if a valid month is at the beginning of the string. After it checks if a valid separator is used then it checks for a valid day. Next it uses a backreference to the second group used in the expression (the separator) to check if the second separator was used. And lastly it checks for a valid year at the end of the string.

The ukDate expression has the same effect. The only difference is that it will check for the day at the beginning of the string.

In the last line we test the string using the ternary operator to see if it is a valid date in any of the two formats and returns true or false, depending on the case. In a real case scenario you wouldn’t check for both these values as this can cause confusion if the DD is less than 13 (e.g. 01.06.2010).


Step 4: Calendar Date Implementation

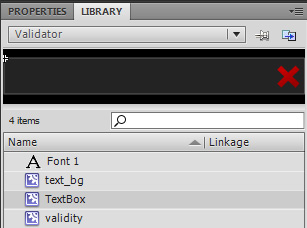
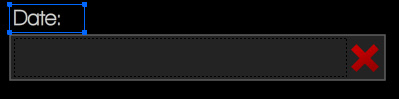
Open the Validator.fla file provided in the source files. Select the Interface layer and place an instance of the TextBox movie clip on the stage. To do this simply drag it from the library anywhere on the stage. Give it an instance name of dateField.

img1

Note: If you can’t see the library panel you can open it by going to Window > Library or by pressing CTRL+L

Using the Text Tool (Hotkey T) create a static text field just above the previously created instance of TextBox and write “Date:” in it.

img2

Select the ActionScript layer and open the Actions panel by pressing F9 or by going to Window > Actions. Type in the following code in the switch statement from the onFrameUpdate function on line 22:

case dateField.input_txt:
	valid = validator.checkDate(input);
	break;

This will validate the input using the validator instance as a date.

Test the movie by pressing CTRL+ENTER on the keyboard or going to Control > Test Movie. Enter a date in the text field in any format(UK or US) using the same separator between the month, day and year. If you entered a correct value the green tick should appear.


Step 5: E-mail Address Structure

An email address represents a reference to the electronic mail box where email messages are sent. The RFC specification states that an email address can be composed from the following:

  • Uppercase and lowercase English letters (a-z, A-Z)
  • Digits 0 to 9
  • Characters ! # $ % & ‘ * + – / = ? ^ _ ` { | } ~ .

Most likely you won’t find an email provider which allows all these characters in the email address. To validate such an email address requires a long and very complicated regular expression. As many companies(e.g. Yahoo!, MSN, Gmail) allow only email addresses which contain alphanumeric characters and hyphen “-”, dot “.” and underscore “_”, we will make a checker which we will work with these kind of addresses.

[Ed. Actually, Gmail addresses allow a + sign; we leave it as a challenge for you to implement that ;) ]

An email address is usually formed from the “username”(or “address”) an “@” sign and the domain(name and extension).

If you want to know more about e-mail addresses you can read the E-mail Address wiki page.


Step 6: E-mail Address Check

Code

Paste or type the following code in our Validator class just after the checkDate method:

public function checkEmailAddress(emailAddress:String):Boolean
{
	var address:String 		= "([a-z0-9._-]+)";
	var domainName:String 	= "([a-z0-9.-]+)";
	var domainExt:String	= "([a-z]{2,6})";

	var email:RegExp = new RegExp("^" + address + "@" + domainName + "\\." + domainExt + "$", "i");

	return email.test(emailAddress);
}

Explanation

The first line defines the pattern used to check the actual ‘address’ or username. This checks to see if it contains only the legal characters:

var address:String = "([a-z0-9._-]+)";

The second variable defined represents the domain name pattern. A valid domain name and subdomain name contains only alphanumeric characters, the dot ‘.’ and hyphen ‘-’:

var domainName:String 	= "([a-z0-9.-]+)";

Next there is the domain extension pattern used to check if the domain extension is a valid one. A Top Level Domain(TLD) can only contain characters from A to Z, case insensitive with 2 or more characters(in our case 6):

 var domainExt:String	= "([a-z]{2,6})";

To make the check even more strict you can check if the TLD is an existing one:

 var domainExt:String	= "(com|net|org|info|tv|mobi|museum|gov|biz|tel|name|edu|asia|travel|pro)";

These are just a few generic TLDs. You can see how this becomes quite long as you add more and more TLDs.

The email variable represents the Regular Expression used to test if the email address is a valid one. This checks if a valid username/address exists at the beginning of the email address, if it has the “a” sign somewhere in the middle after which it checks for a valid domain name and extension both separated by the dot “.” Character:

 var email:RegExp = new RegExp("^" + address + "@" + domainName + "\\." + domainExt + "$", "i");

Notice that we haven’t used any uppercase letters. This is because we made use of the case-insensitive modifier “i” as generally email addresses are case-insensitive.


Step 7: E-mail Address Implementation

Note: For more detailed instructions see step 4.

Open Validator.fla, make a new instance of the TextBox movie clip and give it an instance name of emailField.

Create a static Text Field over the TextBox and write in it “E-mail:”

Type the following code on line 25:

case emailField.input_txt:
	valid = validator.checkEmailAddress(input);
	break;

This will check the input data in the emailField TextBox as an e-mail address using the validator instance of the Validator class.

Test the movie and enter an e-mail address in the text field labeled with “E-mail”.


Step 8: Web Address Structure

Every time you surf the web you will most likely type a web address (URL) in your web browser to navigate to your desired location. Another place where you might use it is in a comment form where you are asked to type your website (address) or when manually submitting websites to a search engine.

A web address is made up of the following:

  • Protocol or scheme: http, https or ftp + “://”
  • Domain name: which can contain any alphanumeric character, dot “.” and the hyphen “-”
  • Domain extension: made up of alphanumeric characters

For a more detailed documentation about Web Addresses(URLs) see this page.


Step 9: Web Address Check

Code

Paste or type the following code in our Validator class just after the checkEmailAddress method:

public function checkWebAddress(address:String):Boolean
{
	var protocol:String 	= "(https?:\/\/|ftp:\/\/)?";
	var domainName:String 	= "([a-z0-9.-]{2,})";
	var domainExt:String	= "([a-z]{2,6})";
	var web:RegExp 			= new RegExp('^' + protocol + '?' + domainName + "\." + domainExt + '$', "i");

	return web.test(address);
} 

Explanation

The first line defines the pattern used to check the protocol. Usually this can be optional (depending on the case):

 var protocol:String 	= "(https?:\/\/|ftp:\/\/)?";

The second variable defined represents the domain name pattern. A valid domain name and subdomain name contains only alphanumeric characters, the dot “.” and hyphen “-”:

 var domainName:String 	= "([a-z0-9.-]{2,})";

Next there is the domain extension pattern used to check if the domain extension is a valid one. A Top Level Domain(TLD) can only contain characters from A to Z, case insensitive with 2 or more characters(in our case 6):

 var domainExt:String	= "([a-z]{2,6})";

To make the check even more strict you can check if the TLD is an existing one:

 var domainExt:String	= "(com|net|org|info|tv|mobi|museum|gov|biz|tel|name|edu|asia|travel|pro)";

These are just a few generic TLDs. You can see how this becomes quite long as you add more and more TLDs.

The web variable represents the Regular Expression used to test if the web address is a valid one. This checks if the provided address is made up from the protocol (optional) and domain (the domain must be made up of a domain name and a domain extension separated by the dot “.” character:

 var web:RegExp = new RegExp('^' + protocol + '?' + domainName + "\." + domainExt + '$', "i");
 

As in the case of the e-mail address web addresses are case insensitive so we use the “i”(case insensitive) modifier.


Step 10: Web Address Implementation

Note: For more detailed instructions see step 4.

Open Validator.fla, make a new instance of the TextBox movie clip and give it an instance name of webAddressField.

Create a static Text Field over the TextBox and write in it “Web address:”.

Type the following code on line 28:

case webAddressField.input_txt:
	valid = validator.checkWebAddress(input);
	break; 

This will check the input data in the webAddressField TextBox as a web address using the validator instance of the Validator class.

Test the movie and enter a web address in the text field labeled with “Web address”.


Step 11: Phone Number Structure

The most common place to use a phone number on the web is a contact form or SMS applications. A phone number is made up of the following two elements:

  • Country code: a number between 1 and 999 preceded by a plus “+” sign or double zeros “00″ (optional).
  • Local phone number: made up of only digits. The number of digits depends on the operator, country and phone number type.

Here you will find a complete list of country calling codes if you would like to restrict your phone number input to only several countries. Also you can check the Numbering Plan to see how telephone numbers are used in different networks and countries.


Step 12: Phone Number Check

Code

Paste or type the following code in our Validator class just after the checkWebAddress method:

public function checkPhoneNumber(phoneNumber:String):Boolean
{
	var countryCode:String 	= "((\\+|00)?([1-9]|[1-9][0-9]|[1-9][0-9]{2}))";
	var num:String 		= "([0-9]{3,10})";
	phoneNumber = phoneNumber.match(/[\+\d]/g).join('');
	var phone:RegExp = new RegExp("^" + countryCode + num +"$");

	return phone.test(phoneNumber);
} 

Explanation

The first line defines the pattern used to check the country code. As said this is a number between 1 and 999 preceded by “+” or “00″(optional):

 var protocol:String = "(https?:\/\/|ftp:\/\/)?";

The second variable represents the actual number. We will make it to check for a number with 3 to 10 digits:

 var num:String = "([0-9]{3,10})";

On the third line we strip our phone number of any extra spaces or separators keeping only the “+” sign and digits:

 phoneNumber = phoneNumber.match(/[\+\d]/g).join(''); 

The phone Regular Expression is the expression used to check if the phone number is made out of a country code and a local number:

 var phone:RegExp = new RegExp("^" + countryCode + num +"$");

The last line returns the result of testing the pattern over the provided phone number. Easy enough, right?


Step 13: Phone Number Implementation

Note: For more detailed instructions see step 4.

Open Validator.fla, make a new instance of the TextBox movie clip and give it an instance name of phoneNumberField.

Create a static Text Field over the TextBox and write in it “Phone number:”.

Type the following code on line 31:

case phoneNumberField.input_txt:
	valid = validator.checkPhoneNumber(input);
	break;

This will check the input data in the phoneNumberField TextBox as a phone number using the validator instance of the Validator class.

Test the movie and enter a phone number in the text field labeled with “Phone number”.

Well this is what you should have until now:

And this is the code:

package
{
	public class Validator
	{

		public function Validator()
		{
			trace('Validator created');
		}

		public function checkDate(date:String):Boolean
		{
			var month:String 		= "(0?[1-9]|1[012])";
			var day:String 			= "(0?[1-9]|[12][0-9]|3[01])";
			var year:String 		= "([1-9][0-9]{3})";
			var separator:String 	= "([.\/ -]{1})";

			var usDate:RegExp = new RegExp("^" + month + separator + day + "\\2" + year + "$");
			var ukDate:RegExp = new RegExp("^" + day + separator + month + "\\2" + year + "$");

			return (usDate.test(date) || ukDate.test(date) ? true:false);
		}

		public function checkEmailAddress(emailAddress:String):Boolean
		{
			var address:String 		= "([a-z0-9._-]+)";
			var domainName:String 	= "([a-z0-9.-]+)";
			var domainExt:String	= "(com|net|org|info|tv|mobi|museum|gov|biz|tel|name|edu|asia|travel|pro)";

			var email:RegExp = new RegExp("^" + address + "@" + domainName + "\\." + domainExt + "$", "i");

			return email.test(emailAddress);
		}

		public function checkWebAddress(address:String):Boolean
		{
			var protocol:String 	= "(https?:\/\/|ftp:\/\/)?";
			var domainName:String 	= "([a-z0-9.-]{2,})";
			var domainExt:String	= "(com|net|org|info|tv|mobi|museum|gov|biz|tel|name|edu|asia|travel|pro)";
			var web:RegExp 			= new RegExp('^' + protocol + '?' + domainName + "\\." + domainExt + '$', "i");

			return web.test(address);
		}

		public function checkPhoneNumber(phoneNumber:String):Boolean
		{
			var countryCode:String 	= "((\\+|00)?([1-9]|[1-9][0-9]|[1-9][0-9]{2}))";
			var num:String 		= "([0-9]{3,10})";
			phoneNumber = phoneNumber.match(/[\+\d]/g).join('');
			var phone:RegExp = new RegExp("^" + countryCode + num +"$");

			return phone.test(phoneNumber);
		}

	}

}

Compare your results with mine and make sure everything is where is supposed to be. Now… let’s move on!


Step 14: ISBN-10 Structure

International Serial Book Number, or for short ISBN, is an international identification number given to a book. ISBN numbers are unique and are only give once to a book. Until now we couldn’t check if the data was actually valid but ISBN numbers have a control digit which needs to be verified with a checksum algorithm.

The Checksum Algorithm:

  • We strip the number of slashes or spaces and store the last digit separately (this is the control digit).
  • We multiply every digit in the 9 digits number with his weight. The weights range from 10 to 2 starting from the first digit of the number.
    “>
  • We sum the resulted numbers and we extract the remainder for the division of the number with 11.
  • If the remainder is 0 the control character must be 0. If the remainder is not 0 we substract it from 11 and if the result is 10 the control character must be “x” else the control character must match the result.

If you need more detailed specifications about ISBN numbers you can find all about them Here. The wiki page contains details about both ISBN-10 and ISBN-13 numbers.


Step 15: ISBN-10 Check

Code

Paste or type the following code in our Validator class just after the checkPhoneNumber method:

public function validateISBN10(isbn10:String):Boolean
{
	isbn10 = isbn10.replace(/[ -]/g, '');

	if (isbn10.length != 10)
	{
		return false;
	}else
	{
		var valid:Boolean;
		var weights:Array 	= [10, 9, 8, 7, 6, 5, 4, 3, 2];
		var digits:Array 	= isbn10.split('');
		var control:String 	= digits.pop();
		var result:uint 	= 0;

		for (var i:uint = 0; i < 9; i++)
		{
			digits[i] = digits[i] * weights[i];
			result += digits[i];
		}
		result = (result%11==0)?0:(11 - result % 11);
		switch(result)
		{
			case 10:
				valid = (control.toLowerCase() == 'x');
				break;
			default:
				valid = control == String(result);
				break;
		}
		return valid;
	}
} 

Explanation

The first lines in our method strip the number of any spaces and hyphens. Then it checks if the length is correct. An ISBN-10 number must have 9 digits + a control character:

isbn10 = isbn10.replace(/[ -]/g, '');

if (isbn10.length != 10)
{
	return false;
}

In the else the variable valid stores the validity of the number and weights is an array with the weights of the digits:

var valid:Boolean;
var weights:Array 	= [10, 9, 8, 7, 6, 5, 4, 3, 2];

In the digits array we store the digits of the number and extract the last character which is the control character and store it in the control variable. The result variable will store the result of the check sum:

var digits:Array 	= isbn10.split('');
var control:String 	= digits.pop();
var result:uint 	= 0;

Now that we have every digit in the number we must multiply it by its weight. We can do this with a for-loop in which we multiply every element (digit) in the digits array with its corresponding weight and store the sum of these multiplications:

for (var i:uint = 0; i < 9; i++)
{
	digits[i] = digits[i] * weights[i];
	result += digits[i];
}

In the next line of code we check the remainder of the sum with respect to 11:

result = (result%11==0)?0:(11 - result % 11); 

This could have been done with an if statement but I’ve used the ternary operator which is a shorthand method. The ternary operator works like so variable = condition ? value1 : value2;. If the condition is true value1 will be given to the variable else it will receive value2.

Next we check the result with a switch statement and give the value to the valid variable. If it’s 10 then the the control character must be “x” else the result must match the corresponding digit:

switch(result)
{
	case 10:
	valid = (control.toLowerCase() == 'x');
	break;
	default:
	valid = control == String(result);
	break;
}

And lastly we return the result of the test.


Step 16: ISBN-10 Implementation

Note: For more detailed instructions see step 4.

Open Validator.fla, make a new instance of the TextBox movie clip and give it an instance name of ISBNField.

Create a static Text Field over the TextBox and write in it “ISBN number:”.

Type the following code on line 34:

case ISBNField.input_txt:
valid = validator.validateISBN10(input);
	break; 

This will check the input data in the ISBNField TextBox as a ISBN-10 using the validator instance of the Validator class.

Test the movie and enter a ISBN-10 number in the text field labeled with “ISBN number”.

Be aware that validating an ISBN-10 number doesn’t necessarily mean that this exists or belongs to any book.


Step 17: ISBN-13 Structure

“What? Another ISBN number?” you might say. Well, actually the previous number format is an old standard. This new ISBN-13 standard was introduced in 2005 and until 01.01.2007 the both formats were used for books. The ISBN-13 format has 12 digits and a thirteenth digit being the control digit.

The Checksum Algorithm:

  • We strip the number of spaces and hyphens.
  • We multiply every digit with its corresponding weight. The weights are 1 and 3 and are distributed like so:
    tabel1
  • We sum the resulted numbers and we extract the remainder for the division of the number with 10.
  • If the remainder is 0 the control character must be 0. If the remainder is not 0 we substract it from 10 and the result must match the control character.

Step 18: ISBN-13 Check

Code

Paste or type the following code in our Validator class just after the validateISBN10 method:

public function validateISBN13(isbn13:String):Boolean
{
	var digits:Array 	= isbn13.match(/\d/g);
	var control:uint 	= digits.pop();
	var result:uint;
	var weight:uint;
	if (digits.length != 12)
	{
		return false;
	}else {
		for (var i:uint = 0; i < 12; i++)
		{
			weight = (i % 2 == 0)?1:3;
			digits[i] = digits[i] * weight;
			result += digits[i];
		}
		result = (result % 10 == 0)?0:(10 - result % 10);
		return (result == control);
	}
}
 

Explanation

The digits array contains the digits of the number. We do this by extracting the digits from our number using the match method of the String class. After that we store the control digit in the control variable by extracting the last element in the digits array:

var digits:Array 	= isbn13.match(/\d/g);
var control:uint 	= digits.pop();

The weight variable will hold the current weight of a digit and the result variable will hold the result of the checksum:

var weight:uint;
var result:uint;

We use an in-else statement to see if there is the correct number of digits in the digits array, excluding the control digit.

In the for-loop we iterate through the digits array and multiply every digit with its weight (1 and 3 alternating them every digit) and store the sum in the result variable. If the position of the digit in the array is an even number the weight is 1 else the weight is 3. We do this by checking the remainder for the division of i by 2:

weight = (i % 2 == 0)?1:3;
digits[i] = digits[i] * weight;
result += digits[i];

Lastly we make division by 10 of the sum. If it’s 0 the result is 0 else we substract the remainder from 10:

result = (result % 10 == 0)?0:(10 - result % 10);
return (result == control);

If the result digit is the same as the control digit the number is valid.


Step 19: ISBN-13 Implementation

Open Validator.fla and modify the code on lines 34 to 36 like so:

case ISBNField.input_txt:
valid = validator.validateISBN10(input)||validator.validateISBN13(input);
	break;

This will check the number both as ISBN-10 and ISBN-13.

Test the movie and enter an ISBN number in the text field labeled with “ISBN number”. The same goes for this type of number as in the case of ISBN-10 ones. If a number is valid it doesn’t necessarily mean that it also exists.


Step 20: IBAN Structure

International Bank Account Number or IBAN for short is an international standard for numbering bank accounts. This is made up of the following:

  • Two alphabetic characters (uppercase) representing the country
  • A check number made up of two digits ranging from 00 to 99
  • Four alphabetic characters (uppercase) representing the bank who issued the number
  • An account number of various lengths depending on the country and bank

The Validation Algorithm:

  • We strip the number of spaces.
  • The first four characters in the number (country characters and control digits) are moved to the back of the number.
  • We convert all alphabetic characters in numbers like so:
    A = 10, B = 11, C = 12, …, Z = 35.
  • We compute the remainder of the division by 97.

The number is valid only if the remainder is 1.

Check this page for a complete documentation on International Bank Account Numbers.


Step 21: IBAN Check

Code

Paste or type the following code in our Validator class just after the validateISBN13 method:

public function validateIBAN(iban:String):Boolean
{
	var nums:Object 	= { A:10, B:11, C:12, D:13, E:14,
					F:15, G:16, H:17, I:18, J:19,
					K:20, L:21,	M:22, N:23, O:24,
					P:25, Q:26, R:27, S:28, T:29,
					U:30, V:31, W:32, X:33, Y:34, Z:35 };
	var chars:Array 	= iban.split('');

	for (var i:int = 0; i < 4; i++)
	{
		chars.push(chars.shift());
	}

	var exp:RegExp = /[a-z]/i;
	for (var j:int = 0; j < chars.length; j++)
	{
		chars[j] = exp.test(chars[j]) ? nums[chars[j].toUpperCase()] : chars[j];
	}
	iban = chars.join('');
	return modulus(iban, 97) == 1;
} 

Explanation

The nums object contains the corresponding number for each character:

var nums:Object 	= { A:10, B:11, C:12, D:13, E:14,
				F:15, G:16, H:17, I:18, J:19,
				K:20, L:21,	M:22, N:23, O:24,
				P:25, Q:26, R:27, S:28, T:29,
				U:30, V:31, W:32, X:33, Y:34, Z:35 };
 

The chars array contains the characters in the number:

 var chars:Array 	= iban.split('');

With the first for-loop we move the first four characters to the back by removing them from the beginning of the array and placing them to the back:

for (var i:int = 0; i < 4; i++)
{
	chars.push(chars.shift());
}

The exp regular expression is a simple pattern for alphabetic characters used to test every element in the chars array:

 var exp:RegExp = /[a-z]/i;

In the second for-loop we check every character in the chars array to see if it’s a letter and change it to its corresponding number using the nums object:

for (var j:int = 0; j < chars.length; j++)
{
	chars[j] = exp.test(chars[j]) ? nums[chars[j].toUpperCase()] : chars[j];
}

After converting every letter in a number we transform the array into a string and assign it to the iban variable:

 iban = chars.join('');

Lastly we return if the remainder of the division by 97 of the number is equal to 1 or not.

 return modulus(iban, 97) == 1;

You might wonder why I’ve used a custom function instead of the “%” operator. Well… if you think about it, the number has 20+ digits (very large) and the normal modulus operator will not work as expected. So we need to define a way to calculate the modulus for large numbers.

The Modulus Function

To calculate the modulus of large numbers I’ve used an implementation of the “divide and conquer” method. To keep it short this method substracts a part of the large number and makes the modulus of that part after which it appends the result to the remaining portion of the large number. For a more detailed presentation of this method see This link.

Paste or type the following code in our Validator class just after the validateISBN method:

public function modulus(largeNumber:String, mod:uint):Number
{
	var tmp:String 		= largeNumber.substr(0, 10);
	var number:String 	= largeNumber.substr(tmp.length);
	var result:String;

	do {
		result = String(Number(tmp) % mod);
		number = result + number;
		tmp = number.substr(0, 10);
		number = number.substr(tmp.length);

	} while (number.length > 0);

	return Number(tmp) % mod;
}

The tmp variable stores a part of the large number by substracting 10 characters from it:

 var tmp:String 		= largeNumber.substr(0, 10);

The number variable represents the large number which gets trimmed by the length of the tmp string:

 var number:String 	= largeNumber.substr(tmp.length);

The result variable will obviously hold the result of the division. In the do-while loop we compute the remainder for the division of the tmp number by the mod integer (the divider) and assign the value to the result:

result = String(Number(tmp) % mod); 

We add the result to the beginning of the large number and repeat the previously three steps while the number length is larger than 0:

number = result + number;
tmp = number.substr(0, 10);
number = number.substr(tmp.length);

And lastly we return the result of the modulus.


Step 22: IBAN Implementation

Note: For more detailed instructions see step 4.

Open Validator.fla, make a new instance of the TextBox movie clip and give it an instance name of IBANField.

Create a static Text Field over the TextBox and write in it “IBAN number:”.

Type the following code on line 37:

case IBANField.input_txt:
valid = validator.validateIBAN(input);
	break;

This will check the input data in the IBANField TextBox as an IBAN using the validator instance of the Validator class.

Test the movie and enter an IBAN number in the text field labeled with “IBAN number”.


Step 23: Card Number Structure

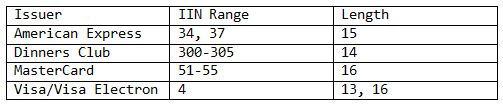
On the front of every credit or debit card you will find a number which varies in length. You use this number usually to make online payments using your credit card. As I said, the number varies in length and format depending on the company which it belongs to. But they all have one thing in common: they must pass a checksum algorithm. Credit cards numbers are validated using the Luhn (mod 10) algorithm.

Before we dive into the actual validation we need to check if the number belongs to any valid company. We will check for these three main card issuers: American Express, Dinners Club, MasterCard and Visa. The following table contains the number details for each company:

tabel2

The IIN Range is the number which the card number begins with.

The Luhn Algorithm

  • We double every second digit in the number starting from the first digit if the number has an even number of digits or starting from the second digit otherwise.
  • We sum the digits of the product together with the undoubled digits.
  • We check if the total sum modulo 10 is equal to 0 (or the number ends in 0) the number is valid.

For further reading see the Bank Card Number and the Luhn Algorithm wiki pages


Step 24: Card Number Check

Code

Paste or type the following code in our Validator class just after the validateIBAN method:

public function validateCardNumber(ccNumber:String):Boolean
{
	var americanExpress:RegExp 	= /^(34|37) ([0-9]{13})$/x;
	var dinnersClub:RegExp 		= /^(30[0-5]) ([0-9]{13})$/x;
	var masterCard:RegExp 		= /^(5[1-5]) ([0-9]{14})$/x;
	var visa:RegExp 			= /^4 ([0-9]{12} | [0-9]{15})$/x;
	var valid:Boolean;
	ccNumber = ccNumber.match(/\d/g).join('');

	if (americanExpress.test(ccNumber) || dinnersClub.test(ccNumber) ||
		masterCard.test(ccNumber) || visa.test(ccNumber))
		valid = true;

	return valid && luhnChecksum(ccNumber);
}

Explanation

The americanExpress regular expression defines the pattern used to check American Express card numbers. This will check for numbers beginning with 34 or 37 and has 13 more digits:

 var americanExpress:RegExp 	= /^(34|37) ([0-9]{13})$/x;

The dinnersClub regular expression defines the pattern used to check Dinners Club card numbers. This pattern checks if a credit card number begins with a number ranging from 300 to 305 and has 13 more digits:

 var dinnersClub:RegExp = /^(30[0-5]) ([0-9]{13})$/x;

The masterCard regular expression defines the patter for MasterCard card numbers. This pattern will check if the credit card number begins with a number between 51 and 55 and ends with 14 more digits:

 var masterCard:RegExp 	= /^(5[1-5]) ([0-9]{14})$/x; 

The visa regular expression defines the pattern for Visa/Visa Electron card numbers. This will check if the provided card number begins with 4 and ends with 12 or 15 mode digits:

 var visa:RegExp 	= /^4 ([0-9]{12} | [0-9]{15})$/x;

We use the extended modifier (“x”) in every expression so that whitespaces will be ignored from. This is used just to make the expression easier to read.

The Boolean variable valid will hold the validity status of the card number.

On the sixth line we extract the digits from our number (the number is usually written with hyphens or spaces for readability purposes):

 ccNumber = ccNumber.match(/\d/g).join('');

In the if statement we check if the number matches any of the four patterns defined earlier:

if (americanExpress.test(ccNumber) || dinnersClub.test(ccNumber) ||
	masterCard.test(ccNumber) || visa.test(ccNumber))
			valid = true;

On the last line we return true if the number is valid and passes the Luhn checksum.

The Luhn Algorithm

Type in or paste the following code after the validateCardNumber method in our Validator class:

public function luhnChecksum(number:String):Boolean
{
	var digits:Array = number.split('');
	var start:uint = (number.length % 2 == 0) ? 0:1;
	var sum:int;

	while (start < digits.length)
	{
		digits[start] = uint(digits[start]) * 2;
		start += 2;
	}

	digits = digits.join('').split('');

	for (var i:uint = 0; i < digits.length; i++)
	{
		sum += uint(digits[i]);
	}
	return (sum % 10 == 0);
}

The digits variable contains the digits of the number. The start variable is used to define from which digit to start doubling (this is represented by the index in the digits array). The sum variable holds the total sum. We use the while loop to double every second digit in the array. We also add 2 to the start variable to skip at every second digit in the array:

while (start < digits.length)
{
	digits[start] = uint(digits[start]) * 2;
	start += 2;
}

On the next line we transform the digits array into a string and split it again into an array. We do this because if the doubled numbers are bigger than 9 we must sum the digits (e.g. for 12 we do 1+2):

 digits = digits.join('').split('');

In the for-loop we simply sum all the digits:

for (var i:uint = 0; i < digits.length; i++)
{
	sum += uint(digits[i]);
}

And lastly we check if the remainder is 0 and return true or false otherwise:

 return (sum % 10 == 0);

Step 25: Card Number Implementation

Note: For more detailed instructions see step 4.

Open Validator.fla, make a new instance of the TextBox movie clip and give it an instance name of cardNumberField.

Create a static Text Field over the TextBox and write in it “Card number:”.

Type the following code on line 40:

case cardNumberField.input_txt:
	valid = validator.validateCreditCardNumber(input);
	break;

This will check the input data in the cardNumberField TextBox as a Card Number using the validator instance of the Validator class.

Test the movie and enter a Card Number number in the text field labeled with “Card number”.


Final code

Now this is how our final class looks:

package
{
	public class Validator
	{

		public function Validator()
		{
			trace('Validator created');
		}
		/**
		 * Validates a date in these two formats:
		 *
		 * DD MM YYYY
		 * MM DD YYYY
		 *
		 * The valid separators are dash "-", dot ".", front slash "/" and space " ".
		 *
		 * @param date The date to be validated.
		 * @return	Returns true if the date is valid or false otherwise.
		 */
		public function checkDate(date:String):Boolean
		{
			var month:String 		= "(0?[1-9]|1[012])";
			var day:String 			= "(0?[1-9]|[12][0-9]|3[01])";
			var year:String 		= "([1-9][0-9]{3})";
			var separator:String 	= "([.\/ -]{1})";

			var usDate:RegExp = new RegExp("^" + month + separator + day + "\\2" + year + "$");
			var ukDate:RegExp = new RegExp("^" + day + separator + month + "\\2" + year + "$");

			return (usDate.test(date) || ukDate.test(date) ? true:false);
		}
		/**
		 * Validates an email address. The address should have the following
		 * format:
		 *
		 * [user]@[domain].[domain_extension]
		 *
		 * @param	emailAddress
		 * @return	Returns true if the address is valid or false otherwise.
		 */
		public function checkEmailAddress(emailAddress:String):Boolean
		{
			var address:String 		= "([a-z0-9._-]+)";
			var domainName:String 	= "([a-z0-9.-]+)";
			var domainExt:String	= "(com|net|org|info|tv|mobi|museum|gov|biz|tel|name|edu|asia|travel|pro)";

			var email:RegExp = new RegExp("^" + address + "@" + domainName + "\\." + domainExt + "$", "i");

			return email.test(emailAddress);
		}
		/**
		 * Validates a web address. The address should have the following
		 * format:
		 *
		 * [protocol://(optional)][domain].[domain_extension]
		 *
		 * @param	address	The web address to be checked.
		 * @return	Returns true if the address is valid or false otherwise.
		 */
		public function checkWebAddress(address:String):Boolean
		{
			var protocol:String 	= "(https?:\/\/|ftp:\/\/)?";
			var domainName:String 	= "([a-z0-9.-]{2,})";
			var domainExt:String	= "(com|net|org|info|tv|mobi|museum|gov|biz|tel|name|edu|asia|travel|pro)";
			var web:RegExp 			= new RegExp('^' + protocol + '?' + domainName + "\." + domainExt + '$', "i");

			return web.test(address);
		}
		/**
		 * Validates a phone number. The phone number should have the following
		 * format:
		 *
		 * [countryCode(optional)][XXX][YYY][ZZZZ]
		 *
		 * Separators between X's, Y's and Z's are optional.
		 * Valid separators are dash "-", dot "." and space " ".
		 *
		 * @param	phoneNumber	The phone number to be checked.
		 * @return	Returns true if the number is valid or false otherwise.
		 */
		public function checkPhoneNumber(phoneNumber:String):Boolean
		{
			var countryCode:String 	= "((\\+|00)?([1-9]|[1-9][0-9]|[1-9][0-9]{2}))";
			var num:String 		= "([0-9]{3,10})";
			phoneNumber = phoneNumber.match(/[\+\d]/g).join('');

			var phone:RegExp = new RegExp("^" + countryCode + num +"$");

			return phone.test(phoneNumber);
		}
		/**
		 * Checks if an ISBN-10 number passes the checksum.
		 *
		 * @param	isbn10 The ISBN-10 number to be validated.
		 * @return	Returns true if the number is valid or false otherwise.
		 */
		public function validateISBN10(isbn10:String):Boolean
		{
			isbn10 = isbn10.replace(/[ -]/g, '');

			if (isbn10.length != 10)
			{
				return false;
			}else
			{
				var valid:Boolean;
				var weights:Array 	= [10, 9, 8, 7, 6, 5, 4, 3, 2];
				var digits:Array 	= isbn10.split('');
				var control:String 	= digits.pop();
				var result:uint 	= 0;

				for (var i:uint = 0; i < 9; i++)
				{
					digits[i] = digits[i] * weights[i];
					result += digits[i];
				}
				result = (result%11==0)?0:(11 - result % 11);
				switch(result)
				{
					case 10:
						valid = (control.toLowerCase() == 'x');
						break;
					default:
						valid = control == String(result);
						break;
				}
				return valid;
			}
		}
		/**
		 * Checks the format of an ISBN-13 number and validates it.
		 *
		 * @param	isbn13	The ISBN-13 number to be validated.
		 * @return	Returns true if the number is valid or false otherwise.
		 */
		public function validateISBN13(isbn13:String):Boolean
		{
			var digits:Array 	= isbn13.match(/\d/g);
			var control:uint 	= digits.pop();
			var result:uint;
			var weight:uint;
			if (digits.length != 12)
			{
				return false;
			}else {
				for (var i:uint = 0; i < 12; i++)
				{
					weight = (i % 2 == 0)?1:3;
					digits[i] = digits[i] * weight;
					result += digits[i];
				}
				result = (result % 10 == 0)?0:(10 - result % 10);
				return (result == control);
			}
		}
		/**
		 * Validates an IBAN number.
		 *
		 * @param	iban	The IBAN number to be validated.
		 * @return 	Returns true if the number is valid or false otherwise.
		 */
		public function validateIBAN(iban:String):Boolean
		{
			var nums:Object 	= { A:10, B:11, C:12, D:13, E:14,
									F:15, G:16, H:17, I:18, J:19,
									K:20, L:21,	M:22, N:23, O:24,
									P:25, Q:26, R:27, S:28, T:29,
									U:30, V:31, W:32, X:33, Y:34, Z:35 };
			var chars:Array 	= iban.split('');

			for (var i:int = 0; i < 4; i++)
			{
				chars.push(chars.shift());
			}

			var exp:RegExp = /[a-z]/i;
			for (var j:int = 0; j < chars.length; j++)
			{
				chars[j] = exp.test(chars[j]) ? nums[chars[j].toUpperCase()] : chars[j];
			}
			iban = chars.join('');
			return modulus(iban, 97) == 1;
		}
		/**
		 * Checks if the provided Credit Card number is a correct one for each
		 * of these providers: American Express, Dinners Club, MasterCard and Visa.
		 *
		 * @param	ccNumber	The credit number to be validated.
		 * @return	Returns true if the number is valid or false otherwise
		 */
		public function validateCardNumber(ccNumber:String):Boolean
		{
			var americanExpress:RegExp 	= /^(34|37) ([0-9]{13})$/x;
			var dinnersClub:RegExp 		= /^(30[0-5]) ([0-9]{13})$/x;
			var masterCard:RegExp 		= /^(5[1-5]) ([0-9]{14})$/x;
			var visa:RegExp 			= /^4 ([0-9]{12} | [0-9]{15})$/x;
			var valid:Boolean;
			ccNumber = ccNumber.match(/\d/g).join('');

			if (americanExpress.test(ccNumber) || dinnersClub.test(ccNumber) ||
				masterCard.test(ccNumber) || visa.test(ccNumber))
				valid = true;

			return valid && luhnChecksum(ccNumber);
		}
		/**
		 * Returns the modulus of a very large number.
		 *
		 * @param	largeNumber	The divided number.
		 * @param	mod			The dividing number.
		 *
		 * @return	Returns the remainder.
		 */
		public function modulus(largeNumber:String, mod:uint):Number
		{
			var tmp:String 		= largeNumber.substr(0, 10);
			var number:String 	= largeNumber.substr(tmp.length);
			var result:String;

			do {
				result = String(Number(tmp) % mod);
				number = result + number;
				tmp = number.substr(0, 10);
				number = number.substr(tmp.length);

			} while (number.length > 0);

			return Number(tmp) % mod;
		}
		/**
		 * Makes a Luhn mod 10 checksum for a specified number.
		 *
		 * @param	number	The number to be checked.
		 * @return	Returns true if the number passes the checksum or false otherwise.
		 */
		public function luhnChecksum(number:String):Boolean
		{
			var digits:Array = number.split('');
			var start:uint = (number.length % 2 == 0) ? 0:1;
			var sum:int;

			while (start < digits.length)
			{
				digits[start] = uint(digits[start]) * 2;
				start += 2;
			}

			digits = digits.join('').split('');

			for (var i:uint = 0; i < digits.length; i++)
			{
				sum += uint(digits[i]);
			}
			return (sum % 10 == 0);
		}
	}

}

I’ve added comments to the final result so that you remember how each method works and how the tested value should look like.

You can use this class in any of your AS3 projects.


Conclusion

Remember that even if you’ve validated your data this might not be real (as in the case of ISBNs, email addresses, IBANs etc) as many of these can be generated or random. But checking the data before registering it to your database, sending emails or submiting it to a payment server might catch some typos and get the user on the right track.

I hope this tutorial about various validations in ActionScript has helped you to understand the basics of input data validation. Next you can try to modify these methods and make them more restrictive, or more specific to your needs. Also you can try to make your own validation methods for any other data.

Thanks for reading my tutorial and please leave your feedback about it!

Assembly/Disassembly with Particle Flow in 3Ds Max

Being creative with the dynamic systems in our 3D applications can produce stunning, exciting and elegant results. In this tutorial, Sachin Joshi walks us through one such example using Particle Flow in 3Ds Max, showing us how to assemble and disassemble objects within your scene.


Video 1

Download

Note: click the ‘Monitor’ icon to view tutorial in full-screen HD.


Don’t miss more CG tutorials and guides, published daily – subscribe to Cgtuts+ by RSS.