One of my favourite composers is Cliff Martinez, an ex-drummer of Red Hot Chilli Peppers. He is working as a film composer right now, scoring most of Steven Sodenberg’s features. The one thing that inspires me very much about his scores is that he uses a great deal of atmospheric pads, which definitely picture emotions and landscapes. A while ago I wanted to make some ambient-downtempo tracks and I can’t hide that I was greatly inspired by Cliff Martinez.
Then I came to a huge problem – I didn’t have any nice VST instruments around and I only had RgcAudio’s z3ta (which was later bought by Cakewalk). This plugin can be bought for $99 from the online Cakewalk store and in my opinion this is one of the greatest soft synths around. It is good for trance, drum and bass, chill-out and even some distorted industrial tracks.
In this quick tip, I’ll try to explain how to create a nice and unique pad that you can use in your music.
Step 1: Start the Synth Sound from Scratch
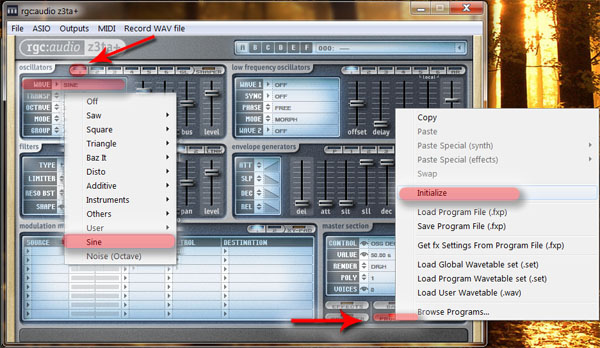
Load z3ta in your DAW (or standalone) and immediately after that create a new instrument. In order to do so, you’ll have to click PROGRAM → INITIALIZE (as in the picture). After that, in the oscillators pane, load a sine wave as our first oscillator. You can do this by clicking on WAVE and then by selecting SINE in the drop-down list.
If you don’t know what an oscillatoris, I’ll try to explain it simply. (If you would like to know more about them, perhaps you could try searching Wikipedia). The oscillator is a continuous audio signal, and has a specific form. In our case, we’ll be using a sine oscillator, which means that our audio wave will look like something like this:
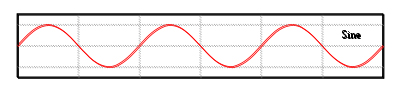
Image taken from WikiPedia
You can hear what our single sine wave sounds like:
Download audio file (pad_1_sine.mp3)
Step 2: Load Different Sine Waves
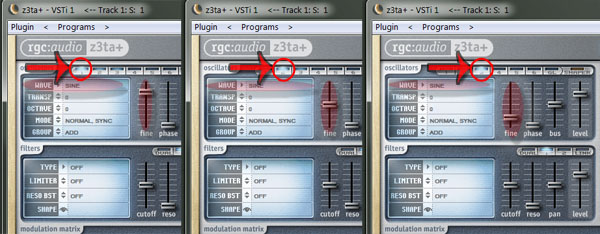
Now, as you can probably hear, our sound is completely boring and mono. Therefore I’ll load two more sine waves and I’ll edit them in order to make the first and the third slightly out of tune. This is achieved with the help of the FINE slider.
As you can see from the picture, I increased the pitch of the first sine wave, the second one is normal, and the third one’s pitch is decreased.
You can hear how our sound has changed in a more sophisticated way:
Download audio file (pad_2_sine.mp3)
Step 3: Load Other Waveforms and Use Filtering
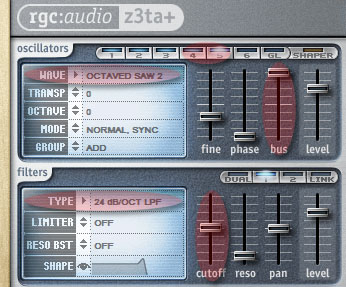
After I’ve done this, I decided to place two other waveforms – in my case two octaved saws. Click on the wave screen, then in the drop-down list select SAW → OCTAVED SAW.
I made them slightly out of tune, again.
You can hear how they sound from here:
Download audio file (pad_3_sine.mp3)
This is not very nice, right? You can hear that the saws have a very robotic feeling, that doesn’t come near to our ambient concept. Hence, I’ll send them to a low-pass filter. You can do this by using the BUS slider (marked in red) and after that by tweaking the cutoff frequency of the filter.
Download audio file (pad_4_sine.mp3)
Step 4: Polyphony
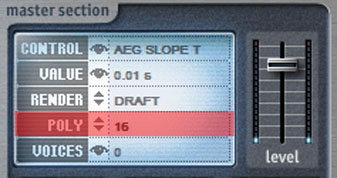
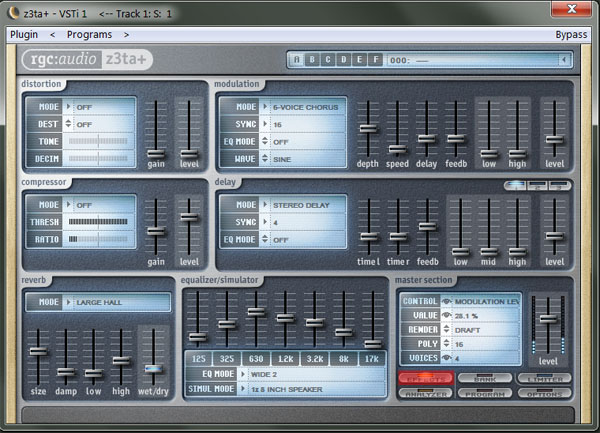
You’ve probably noticed that in our demos you can hear only G – A – G – G. But we’ll definitely want some chords out there. Examine the Master section controls of z3ta in the bottom right corner. You can adjust the POLY settings (marked with red on the image below). I changed the POLY settings to 16 – this means that the plugin will play simultaniously 16 different voices.
And our pad will sound like something like this:
Download audio file (pad_5_sine_chord.mp3)
Step 5: Editing ADSR Envelopes
ADSR stands for to Attack/Decay/Sustain/Release, which are the primary characteristics of the envelope of a tone. If you go back to the previous demos, you can hear that we have a very strong and quick attack, and after that the sound gets really low. In order to change this and to create a constant sound, we will tweak the sustain slider. The more we increase the sustain value, the more the sound will hold up with the same amplitude.
Also, we’ll edit the attack slider a bit because we want our sound to be smooth and subtle.
Step 6: LFO and Controllers
Perhaps some of you are wondering what an LFO is. LFO stands for Low Frequency Oscillator. LFOs are like normal oscillators, except for the fact that they are below 20 Hz. They can be used to create some pulse and in our case – to control different settings.
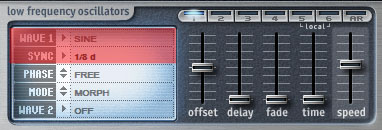
In the LFO panel, I’ll load three different types of low frequency oscillators, all of them with a sine form. You can see that there is a new button – SYNC. Sync allows us to make the waveform with specific rhythm. For example when you choose
The “1” means one beat. If the host tempo is set to 120 bpm the LFO will produce 120 cycles in this setting.
I created three different LFO’s, with different sync settings. After that I’ll connect them with some controllers:
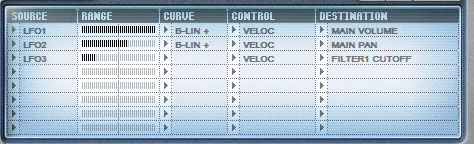
As you can see from the picture, LFO controls main volume, LFO 2 – main pan, LFO 3 – filter cutoff. I’ve ranges in a certain way so that:
- Volume will go heavily up and down with LFO1′s rhythm.
- The sound will go from L to R with the rhythm of LFO 2.
- The cutoff frequency of our filter will go slightly up with LFO3′s rhythm.
Download audio file (pad_7_sine.mp3)
Step 7: Finalizing Our Pad
Even after the last demo, we still have some problems: I personally don’t like the high frequencies (even though we have a filter applied), and even with the panning the pad sounds a bit mono. Now we have a huge arsenal of effect knobs and sliders to add variation and character to our synth sound. I’ll use chorus, delay and reverb to create some stereo effects and depth of the sound. I will also use a equalizer to shape the sound a bit.
Hear the final result:
Download audio file (pad_8_sine.mp3)
Don’t forget to save your file after tweaking!
Always save your patches and create an archive with sounds. In order to save the file, go to PROGRAM → SAVE PROGRAM FILE (.fxp).
And my final demo – a short track with a pad, a beat loop and a piano.
Download audio file (Final_Pad_Demo.mp3)
Good luck!