Freezing. Bouncing. Rendering tracks. Whatever you call it, it is a useful part of music production because it allows you to free up CPU power for more plugins and creates an audio file. While it’s not a one-click solution, bouncing in FL Studio is a process that is easy enough to be straightforward but complicated enough to give the user a lot of control. The first five steps may be all you need to know to get started with freezing tracks in FL Studio, and you can check out the rest of this tutorial to go in-depth with handling special circumstances.
To clarify, freezing a track means rendering that track as an audio file, and then disabling the plugins. This tutorial is about doing this process in a way that does not alter the sound of the track, and that allows you to keep the plugins in the project file in case you decide to “unfreeze” and adjust the plugins.
Example 1
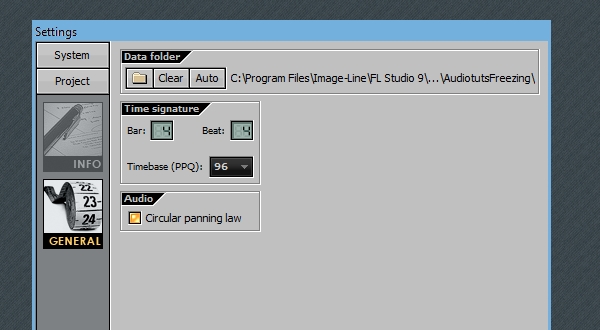
Step 1: Project Data Folder
Before we begin, we can specify a folder to hold all our bounced audio material for this project. Use keyboard shortcut F11, and navigate to Project > General Settings, and click on the project Data Folder to do this.
Step 2: Select Timeline
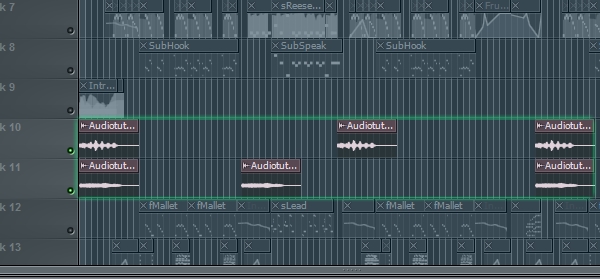
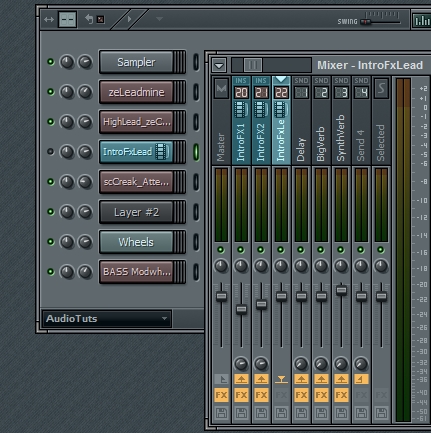
For this first example, I have a synth that is sent to a mixer track, which is then routed to two other mixer tracks where it is being heavily effected and modulated. It’s an intro effects soundscape that is taking quite a bit of CPU. I’ll be using this to give an example of how to bounce a track with effects.
First, navigate to the part of the Playlist where the section you want to freeze is located, which in some cases will be the whole song or most of the song. Regardless of how big it is, select the section, and be sure to give enough space on the end for the sound to fade out. Muting the other tracks is not necessary, but may help with determining where the sound ends.

Step 3: Prepare for Rendering
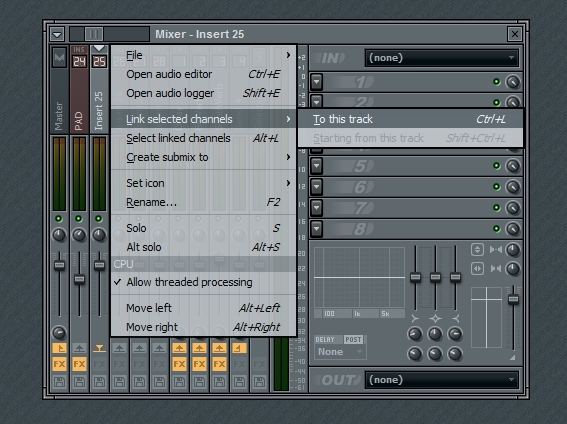
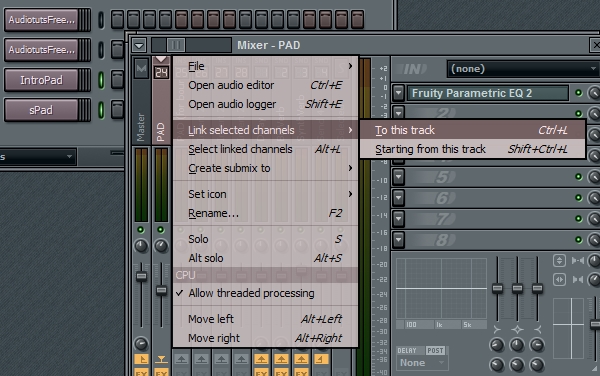
Open the Mixer and click on the Arm Disc Recording button for each track you want to render, which in my case is the two effected tracks. Each time you click this button, a dialog will pop up asking you to give a name for the file. It won’t render the tracks until later, but this will give it a name to have ready.
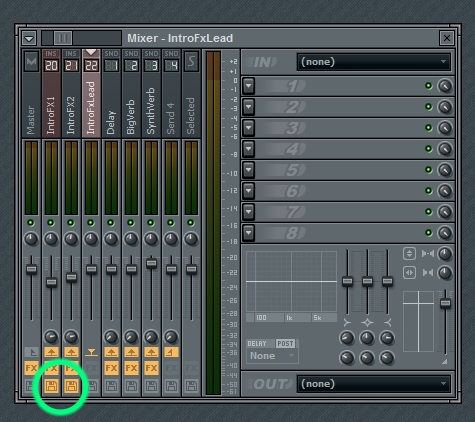
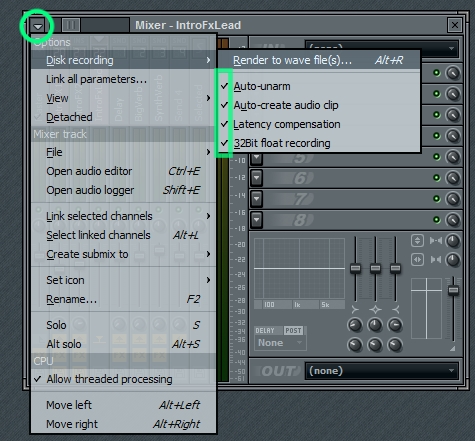
Next, go to the Mixer’s dropdown menu, and select Disk recording > Render to wave files. I recommend having all the options selected.
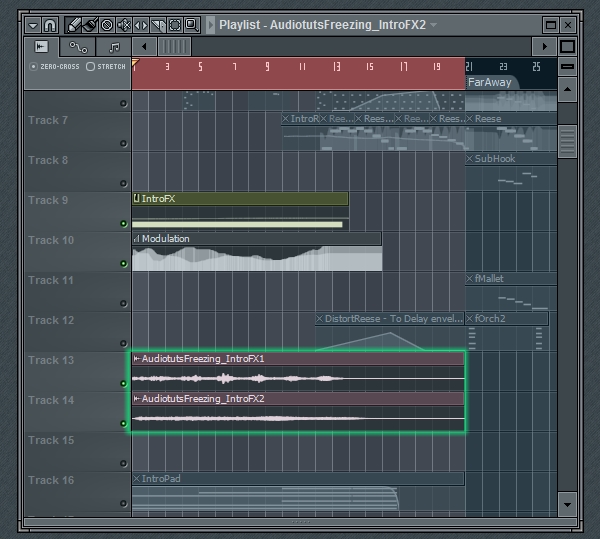
Now FL Studio will render the files, and automatically save them in the project data folder, with the names we specified. When it’s done, check the Playlist to see the files appear.
Step 4: Disable or Delete Plugins, Save CPU Power
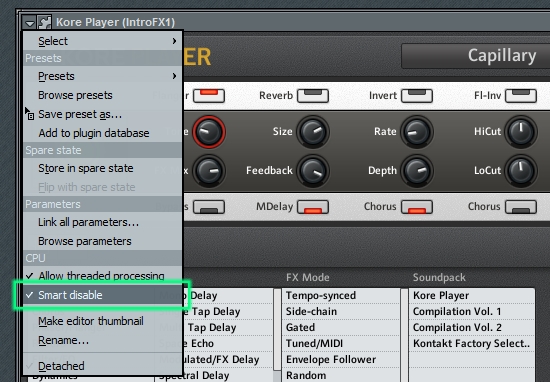
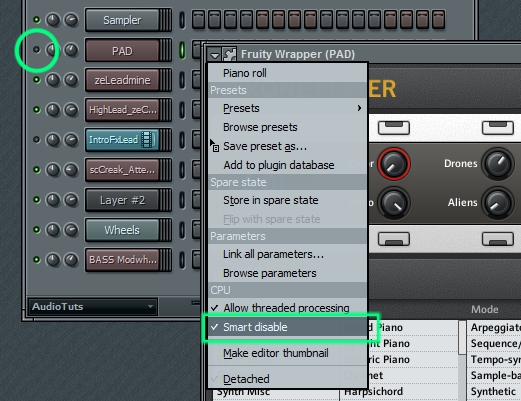
To finish the freezing process, mute the midi and automation clips in the Playlist or mute the plugins, and enable Smart Disable for all the instrument and effects plugins that went into making this sound. This will allow you to turn off the plugins and free up some CPU power, and you could reactivate the plugins later by muting the audio clips and enabling the plugins. Alternatively, you could delete the plugins and erase the clips, but then you would not be able to go back and alter the sound.
Step 5: Optional Finishing Touches
From here, you can choose to route the audio clips to the mixer however you want. Another note is that because I used this technique, I was able to get a separate audio file for both mixer tracks, and I took advantage of this by reusing one or both audio files at different times in the arrangement.
Perhaps you would like to signal that a track is frozen by noting it through a certain color and icon.
Example 2 Pattern freezing, Pre-FX bouncing
In the first example, we rendered a pattern post-fx. But often, you’ll want to freeze an instrument without the effects. At times you may want to render a pattern that repeats itself in the song. We’ll tackle both of these situations in the next example.
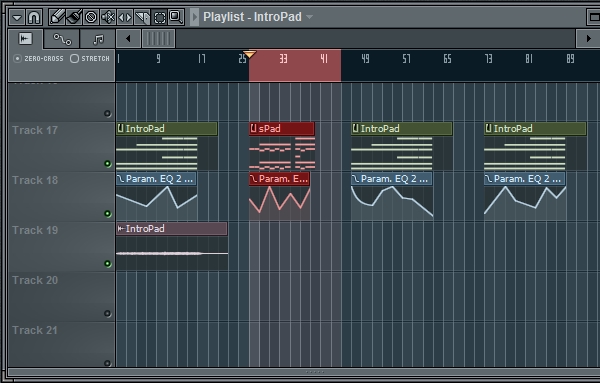
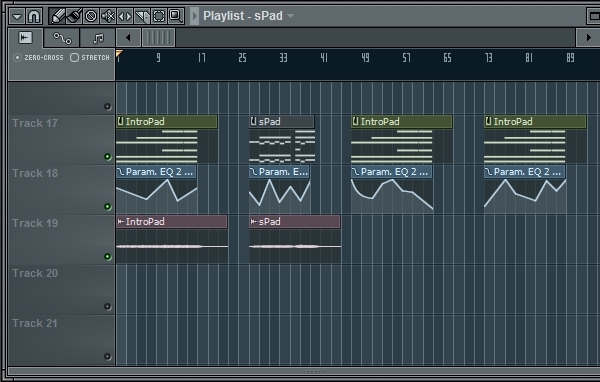
There are two patterns. One of which is called IntroPad, which plays three times, and the other is called sPad which plays once. The easiest way to render this would be to select the whole timeline and render it all, and sometimes the arrangement is so complicated that this is the best route. But this time, we could save some hard drive space by rendering the two patterns and then arranging the audio clips to match the song.
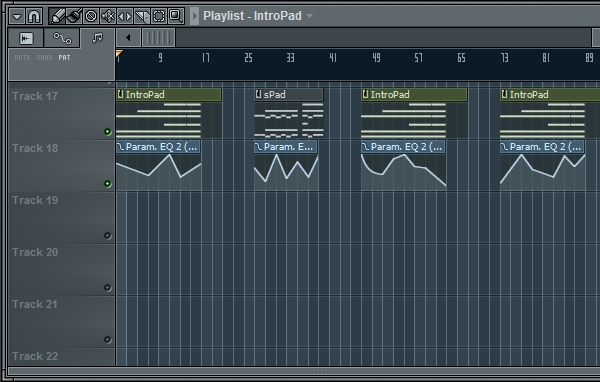
You may have noticed in the image that there is an obstacle preventing us from doing this disc space-saving plan, and that is that each pattern instance has unique automation. This is automating an EQ in the mixer FX. We can render the audio, one clip for each of the two patterns, without the EQ to get the unaffected instrument sound. Then we can reapply the same effects to the audio files and have the same sound.
An easier way to do this, however, is simply to route the instrument to a blank mixer track and render the audio files without any mixer effects or level/pan adjustments. Then, we’ll route the audio files to the mixer track that the instrument was originally linked to. This will freeze the instrument plugin, but our automation and effects settings will remain intact and tweakable.
Step 1: Route to Blank Mixer Track
First, let’s reroute the instrument to a blank mixer track.
Step 2: Select the Timeline
Then, we’ll select the timeline. While you could go into pattern mode, I prefer remaining in song mode and selecting the area in the Playlist, so that I can manually adjust the timing if the sound has long release.
Then following the same process from earlier, select the Arm Disc Recording button, and name the file the same as the pattern.
Step 3: Rendering the Files
From the Mixer menu, select Disc Recording > Render to Wave Files, and wait for the file to render. Next, let’s select the other pattern and do the same process.
After that, arrange the audio files to match the patterns.
Step 4: Route Back Into the FX Track
Then select the audio clips and link them to the mixer track that the instrument plugin was originally linked to.
Step 5: Muting and Disabling
Now that the routing is done, we’ll need to mute the original instrument. We should also select Smart Disable for the instrument in order to save CPU. (sound familiar?)
Step 6: Optional Finishing Touches
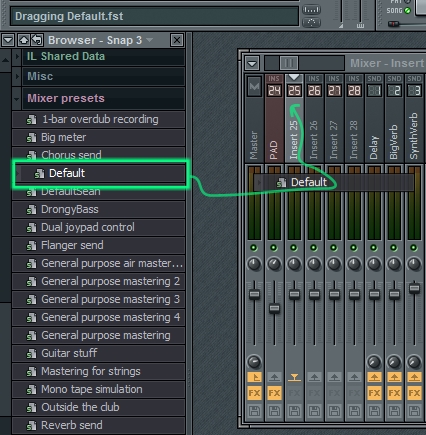
Lastly, let’s return the “blank” mixer track to its original blankness. Making a habit of this will keep the mixer neat and clear. The easiest way to do this is to navigate to the Mixer Presets folder in the Browser, and drag and drop the Default.fst file onto the mixer track.
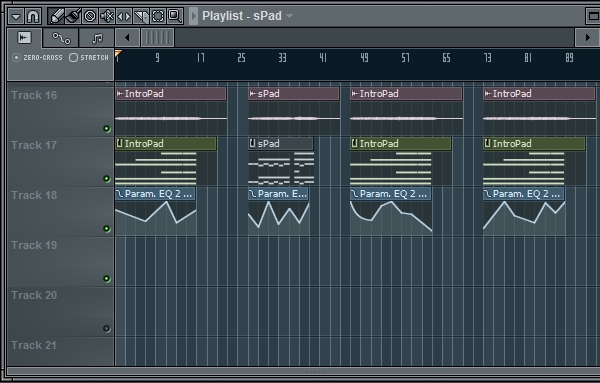
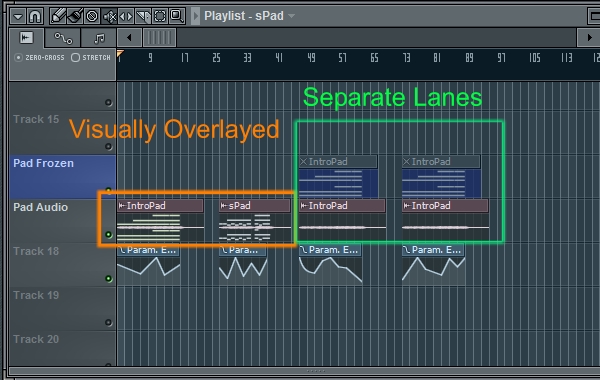
Since we’ve muted the instrument, it doesn’t matter how we handle the midi clips in the Playlist. You could delete the clips if you want, but you might want to stack the midi clips with the audio to have a visual representation of the notes, or you may want to keep the midi on its own track and mute it to visually show that its been frozen. The following image shows what two visual techniques might look like:
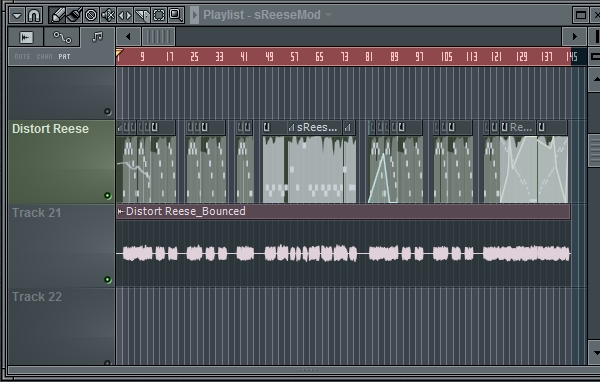
Example 3, Partial Freezing
We’ve covered situations when you want to render a track with or without effects, but there is a third option. What about situations when you want to render a track with some of the effects? This is actually quite a common situation. For example, you might want to bounce down a track for which you’re sure about the compression, but still want to be able to tweak the EQ or Reverb. For this next example, I’m going to bounce the instrument and its compression, but not the EQ.
Here is the track in the Playlist.
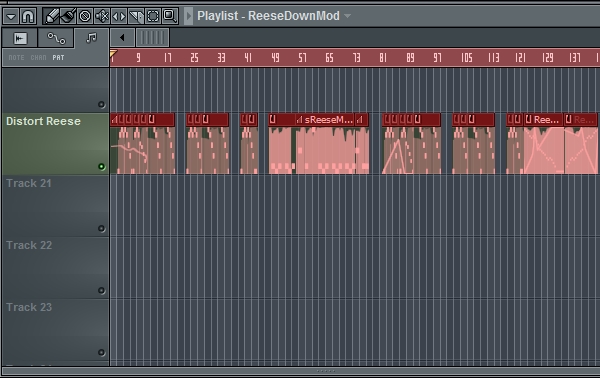
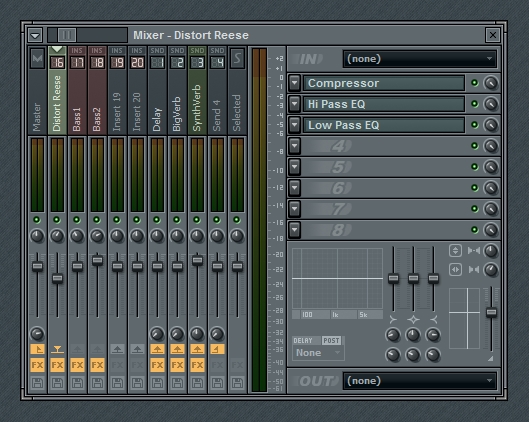
Above is the mixer set up. As you can see, the track I want to freeze, which is the Distort Reese track, has two other tracks routed to it, which are Bass1 and Bass2. This sound is actually made up of two instrument plugins being sent through their own mixer tracks with their own effects, and then they are routed together to the same bus. I stand to save a lot of CPU by bouncing these instruments.
Step 1: Decide How Far
The basic idea is to decide how far into the signal chain to freeze the sound? What should be permanent? What should be adjustable?
First, mute all the effects plugins you don’t want to freeze, and be sure to note the values of the level and panning of this mixer track. We’ll need to set the panning to center and the level to the default value, so that when we route the audio back to this track it will be received by the EQ plugins the same as it was before the bounce, pre-level and pre-panning.
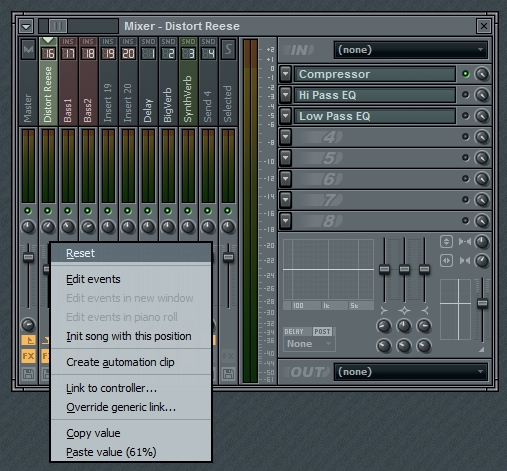
A note about the level, however, is that if setting the level to the default value causes the audio to clip, then you’ll want to keep the level at the setting it currently is, and then reset the level after bouncing. Resetting the fader makes it transparent, so that it won’t add or take away from the volume of the track.
Step 2: Bounce
Next, Arm disk recording and render the audio file.
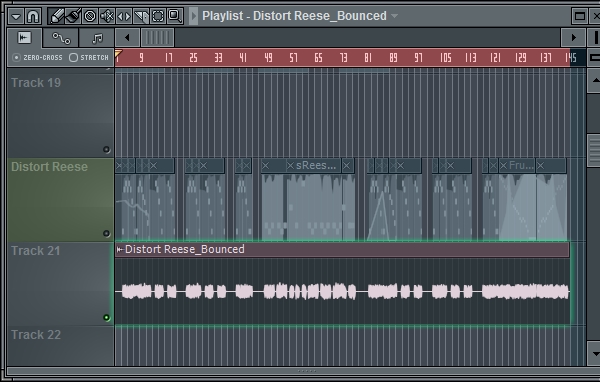
Step 3: Mixer Routing, Flip the Plugins On/Off
Link the audio file to the mixer track, and turn on the effects that were turned off for the bouncing. Basically, what was off gets turned on, and what was on gets turned off, and disabled. Also, adjust the panning to its previous location and adjust the level if needed. This will result in having the same sound before we began this process, the only difference being that we save some CPU and we can’t adjust the frozen plugins.
Step 4: A Special Situation
In this situation, much of the automation was recorded to the same patterns as the notes, so we can’t mute the Midi track in the Playlist. You may be concerned about the notes in the track, but they will not cause anything since the instrument is muted.
That’s possibly all there is to know about bouncing in FL Studio. In the first example I covered the basic process for freezing in FL Studio, and in the other two examples I showed how to freeze without effects. Once you get this down, bouncing tracks will take only a minute, and this can be a handy technique to have available when the CPU starts getting overloaded. Thanks to freezing, you can keep loading new plugins as you need them.
Final Words
Aside from freeing CPU, there are other benefits to rendering tracks:
- It makes the sound permanent. You don’t have to worry about accidentally changing it and it backs up your work for the future.
- You can render groups/busses in order to make stems for mixers and remixers.
- You can further edit and manipulate bounced tracks with audio-specific techniques like chopping, scratching,and stretching.