For photographers, hard disks are the 21st Century equivalent of filing cabinets. The same care that photographers took over the storage and protection of their negatives and transparencies in the past needs to be applied to their present-day digital files, be they RAW, JPEG, TIFF or even AVI and MPEG. In this tutorial, I am going to look at the different options available to photographers, illustrate the benefits and debunk some of the jargon.
The Basics
All computers contain a Hard Disk Drive (HDD). It is the part of the computer that deals with storage i.e. where our computer data is stored. HDD storage is measured in bytes and the measurements are calculated thus:
1000 bytes = 1 kilobytes (KB)
1000 kilobytes = 1 megabyte (MB)
1000 megabytes = 1 gigabyte (GB)
1000 gigabytes = 1 terabyte (TB)
These values aren’t exact (there are actually 1024 megabytes in a gigabyte, and so on), but they simplify everything and are a good rule of thumb.
The most recently released computers will contain what seems like an abundance of storage ranging from the 100s of Gigabytes (GB) to the Terabytes (TB). This always seems like more than enough at the time of purchase, but as technology advances at an exponential rate – known as Moore’s Law – the data that we will be producing in the future will use up that storage more and more quickly.
Real World Example: 10 years ago, my first digital cameras used to shoot at around 1 megapixel (1MP) and produced file sizes of about 500KB. Within a year, 2MP cameras were producing average file sizes of 1MB and a current 12MP camera can produce file sizes of 6MB.
Unfortunately, in many computers, the internal HDD is hard to get at and remains locked away in a fortress of screws and brackets. As it fills up, we need to look at an extra External HDD to store our data on. But, as HDDs contain many many moving parts, if we value our data, we also need to think about duplicating that data across two or three HDDs – see our excellent Quick Tip on backing up your data.
Understanding Connectivity
One of the key factors determining the suitability of one HDD over another is the way in which it connects to your computer. Different cables do different jobs. Some computers can connect to some cables and not others. Making sure you have the best option available to you can mean halving the amount of time you spend transferring or backing-up files.
When talking about any of the connection options, though, it boils down to how quickly the interface can transfer the data between you computer and your HDD. Just like your internet connection, this is measured in megabits per second (Mbits/s)
1. USB
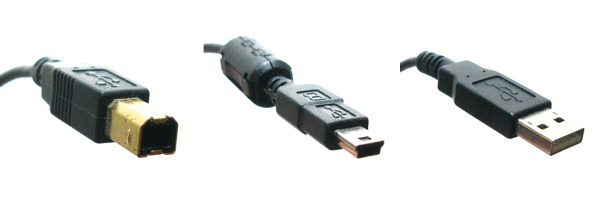
The Universal Serial Bus (USB) is probably the most familiar connection. There have been many versions of this connection starting with USB 1.0, the current USB 2.0 (since 2000) and the imminent USB 3.0. The difference between these versions is the speed at which it transfers data:
USB 1.0 – 12 Mbit/s
USB 2.0 – 480 Mbit/s
USB 3.0 – c. 3 Gbit/s
There are a few USB 3.0 HDDs for sale already but not many computers have a USB 3.0 port built into them just yet.
2. FireWire
More commonly found on Macs than PCs, FireWire has been through two versions:
- Left: FW 400 – 400 Mbit/s
- Right: FW 800 – 800 Mbit/s
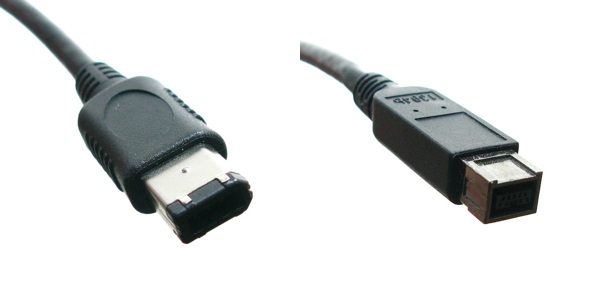
Until USB 3.0 becomes a standard on computers, FireWire provides faster transfer speeds than USB; because of the architecture, FireWire can sustain its throughput for the duration of the transfer, whereas USB has to “take breaks” and therefore does not provide a constant transfer rate of 480 Mbit/s
3. Ethernet
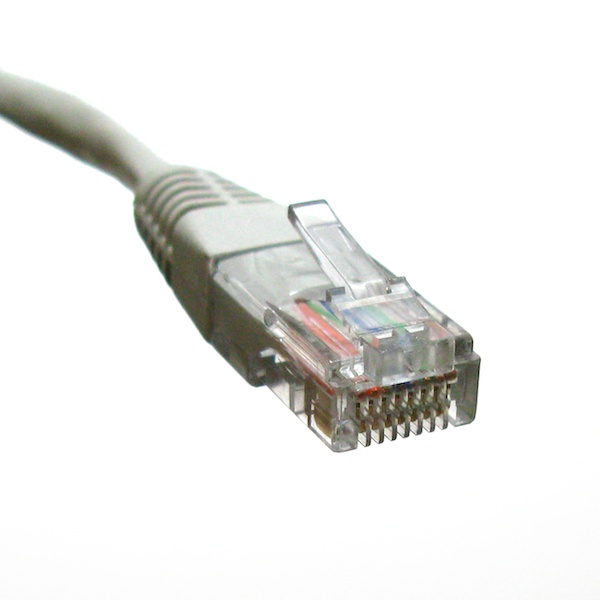
Again, a standard connection familiar to most, this connection has been through many variations over the years. The current version on most computers has a connection speed of 1 GBit/s. There aren’t many external HDDs with an ethernet connection as it is generally regarded as a networking protocol.
For storage, this connection would be more associated with servers or Network Attached Storage (NAS) drives. The 1 GBit/s speed is a theoretical maximum, but that bandwidth would have to be shared with other data being transferred on the network (internet connection, other users etc.)
4. eSATA – 3 GBit/s
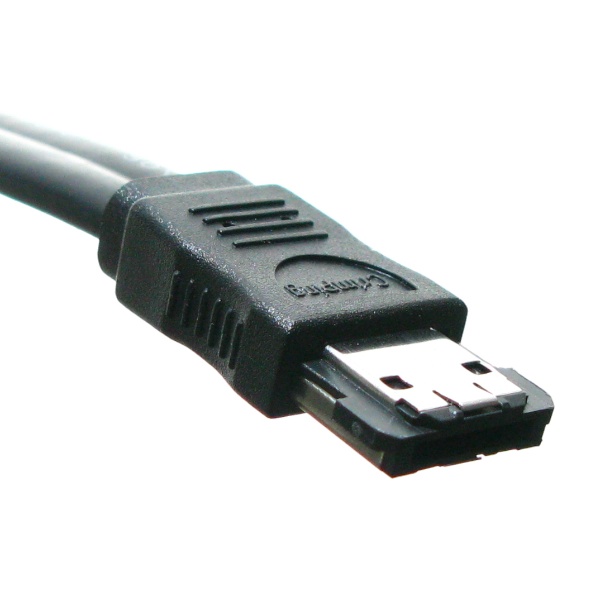
Based on the connection your computer’s internal HDD uses (SATA), e[xternal]SATA ports are harder to come by on most machines, but can be added via a PCI card on a PC / Mac Pro, or via a PCI Express card on a laptop. This can get costly, but the difference in transfer speeds speaks for itself.
Portable External HDDs
Most readers will be familiar with portable external HDDs. They are usually about the size of a notepad and available at any electrical store. But what are the options? What makes one more suitable than another?
1. Size
Portable external HDDs contain a smaller version of the HDD that is in your computer. The advantage is portability. The disadvantage is storage capacity: smaller disks (2.5″ HDDs) hold less data – a current maximum of 500GB to 750GB – rather than the 1TB to 2TB that you can expect in a desktop HDD (but, according to Moore’s Law, this will change year-on-year). You also pay a premium for the portability.
2. Power
The smaller HDDs use less power than their desktop buddies. Less power consumption means that they can be bus powered ie: powered by the bus port (USB, FireWire) that they are connected to the computer by and therefore do not require a separate power outlet.
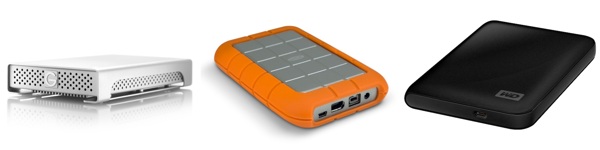
Some great examples of portable external HDDs are:
Desktop External HDDs
If portability is not a necessity for you, then a desktop based external HDD would be more suitable. They use the same size HDDs as your computer (3.5″ SATA drives) which means they are better value for your money (compared to the portables), come in larger capacities (1TB to 2TB) and usually provide multiple connection options (sometimes USB, FireWire AND eSATA). The downside is that they do need their own extra power supply.
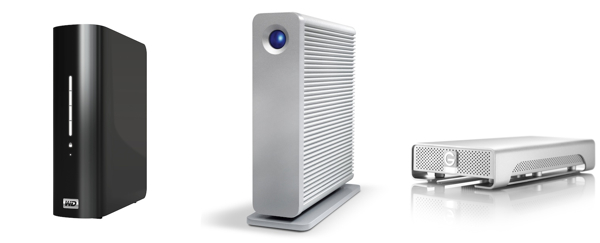
Some great desktop HDDs include:
Harnessing the Power of RAID
But what if 2TBs of storage is not enough for you? And what if you want to have your data duplicated automatically? Then you need to be looking at RAID hard drives.
RAID (Redundant Array of Independent Disks) is a method of combining individual HDDs together for different purposes. These are known as RAIDs 0, 1, 2, 3, 4, 5 and 6 and is the technology used in servers. Here are two useful examples of RAIDs:
- RAID 0 – combine two HDDs to supersize your storage (eg: 2x 2TB HDDs = c. 4TBs of storage). Ideal for those with large photo libraries.
- RAID 1 – have your data automatically written to two HDDs at the same time. This is also known as mirroring. If one HDD fails, your data is mirrored on the second.
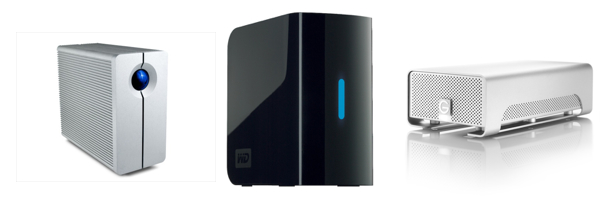
Generally speaking, the other RAID levels are for those dealing with servers. RAID 0 and RAID 1 options are built into some desktop external HDDs and therefore do not require any formatting or RAID knowledge; they just work out of the box as either a big disk or as a mirrored disk. Some great examples of desktop RAID HDDs include:
- LaCie 2Big Quadra – RAID 0 or 1
- G-Tech G-RAID – RAID 0
- Western Digital My Book Mirror Edition – RAID 1
Beyond RAID
What if you want both RAID 1 and RAID 0 without having to take a PhD? Welcome to the world of Drobo.

Data Robotics have a line of storage solutions that use a technology called Beyond RAID. Effectively, it is a mixture of a server and a NAS drive that works out of the box. It allows you to use your own 3.5″ SATA HDDs (eg: Western Digital Caviar Blue HDDs) that can be bought as components from a computer shop. It formats them to allow you to use the power of multiple disks to both increase your storage and mirror it in case of a HDD failure.
The Beyond RAID technology does mean that the actual capacity of the Drobo is less than the total storage of the HDDs you install (4x 1TB HDDs usually equates to just under 3TB of total storage – effectively you loose one drive as a mirror) but that is more than made up for by the fact that you have your data duplicated and the ability to swap a full drive for a larger capacity drive at any time. Their demo video offers a good explanation of how Drobo works.
I use a Drobo as my external HDD. What I like best is that I can add the storage that I can afford as I need it. I don’t have to buy an expensive 2TB HDD now; I can add a 500GB HDD every six months as the Drobo fills up, and, with falling prices, that last 500GB HDD will be a lot, lot cheaper next year than the 2TB is now. I can then keep adding 3.5″ HDDs up to a maximum of 16TB ie: 4x 4TB drives (when they exist).
Conclusion
I hope that this tutorial has shown you a few things that you didn’t know, or has answered some questions you might have had about storage. The world of storage solutions is huge, and everyone will have their own way of working (and their own preferred manufacturers).
These are just my thoughts on the easiest drives to use, but if you have any further questions, post them in the comments below and I will endeavour to answer them for you.