In this tutorial you will learn how to vector an execution axe from a reference. Discover essential techniques that you need as a vector artist, such as creating different types of shadows, specular and non-specular highlights, bitmap textures for surfaces, gradients for metals, and more. Let’s get started.
Tutorial Assets
The following assets were used during the production of this tutorial:
- For a reference image, I used a 3D asset of an execution axe found on Turbosquid. You can of course look for other axe image references before getting started.
- I also used the round any corner script found in the article 20 Free and Useful Adobe Illustrator Scripts.
Step 1: Prepare Canvas and Base of Handle
First of all, we’ll make the handle part of the axe. Then we’ll move to the metal head of it.
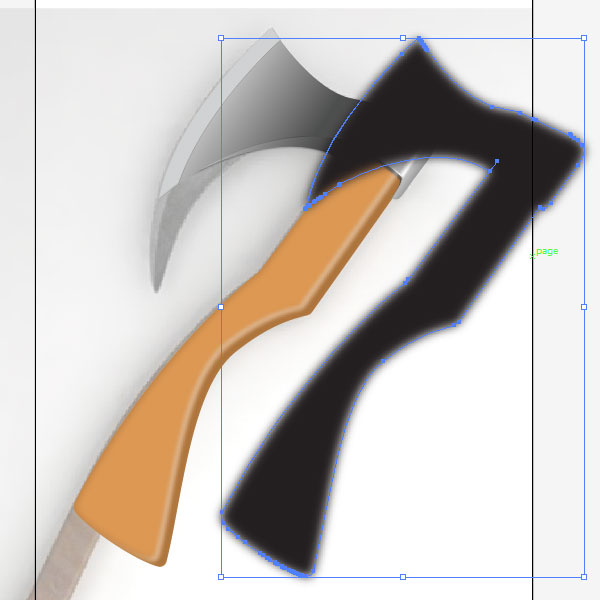
Now open Adobe Illustrator. Make a new document with the dimensions 800×1000 pixels. Import the reference image into Illustrator. Enlarge it so that the metal part becomes dominant in the canvas and almost half of the handle is in the canvas.
Turn down the Opacity of the image to about 50% so that you don’t see too much of detail. Now lock the image (Object > Lock > Lock Selection: Command + 2) so that we may not accidentally move it or disturb it in any way.
Set the fill color to none and stroke color to any that is easy to see over the image. Now take the Pen Tool (P) and start tracing the handle part of the axe. In my case, I decided to reduce the length of the handle from bottom and extend it over a little from above.
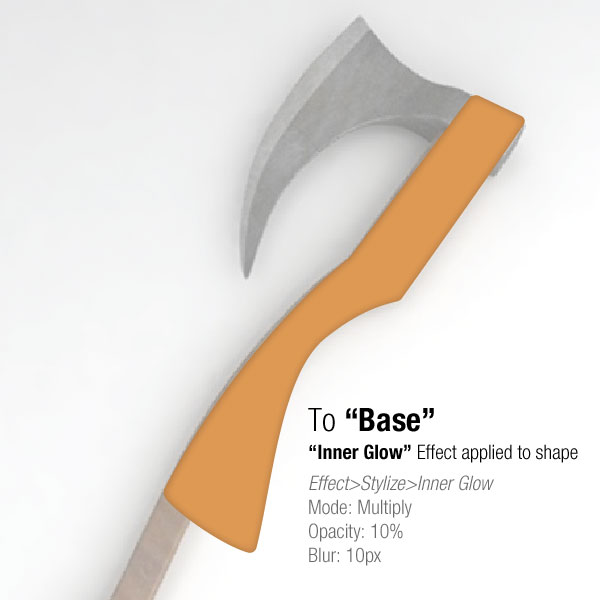
Now fill the base with a wooden color. I filled it with #dd9852. Now we’ll render all the corners with the “Round any Corner” Script. First install the script, then go to File > Scripts > Round Any Corner. Use the default value of 5 or increase it accordingly. Now name this object “Base.”
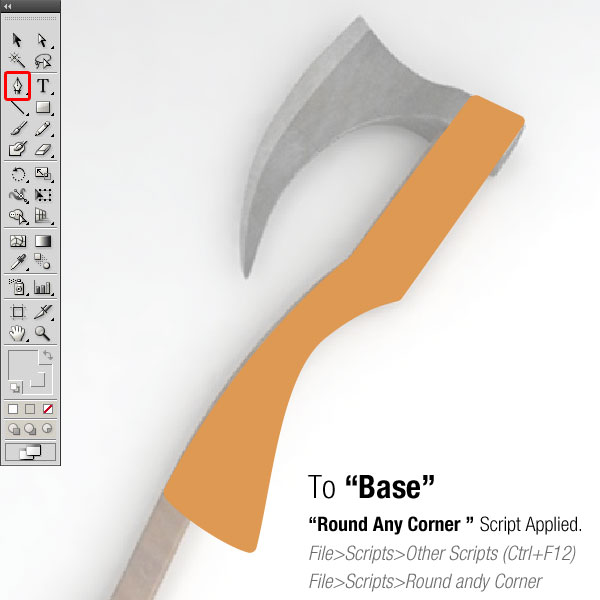
Now we need to add color burning effect. It will add to its 3d look. Add a Inner Glow (Menu Effect > Stylize > Inner Glow). Set Inner Glow Mode to multiply, Opacity to 10%, and Blur radius to 10 pixels.
You can trace the whole length if you like. As good practice use fewer nodes to draw the base handle and then convert them to curves to fit the shape. It will give you a clean edge and a smooth curve.
Step 2: The Side of the Handle
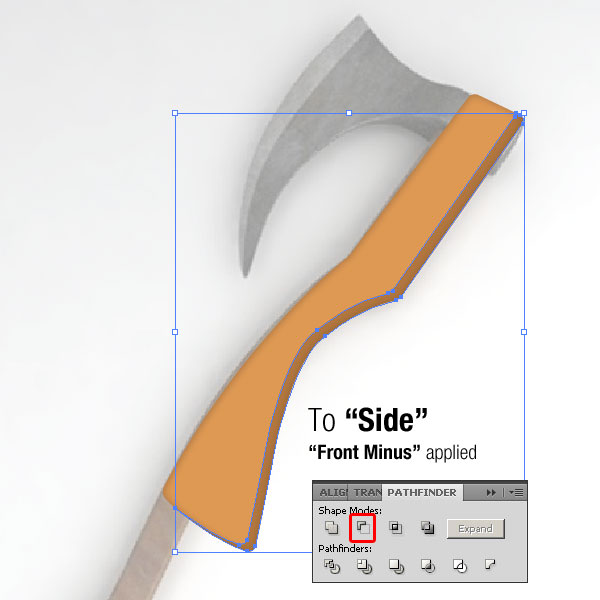
Now copy (Command + C) the “Base” and paste in front (Command + C then Command + F) two times. You’ll have three copies now. Move the top copy to the left and a little up to match the reference. Select the two top copies and trim the middle one with the Pathfinder Minus Front. Name the resulting object “Side.”
To make it look darker I filled it with #603813. This way we not only differentiated it from the base, but we are also making it the depth of the handle. Light strikes the handle from above, so this area gets less light, so they appear a little darker.
The edges of the shape are very hard. We need to make it a little smoother to let it blend easily with the base. Otherwise, the handle will appear too boxy.
Select the trimmed part and apply a Gaussian blur to it. I set it to 5.4. Your values for blur might be different according to your shape.
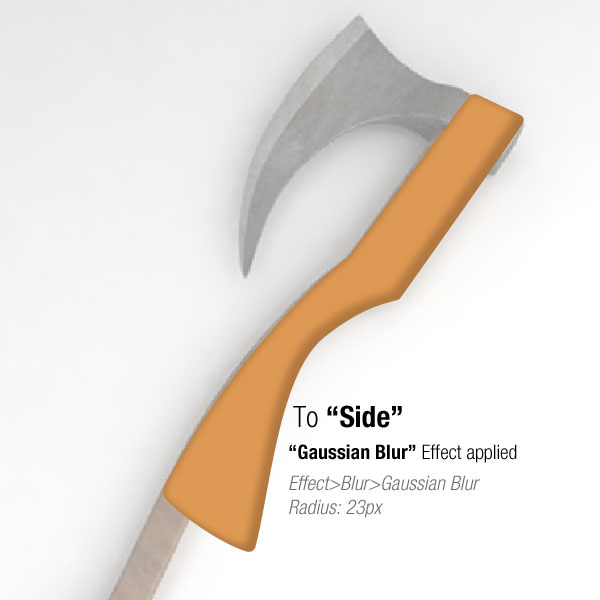
With the Blur Effect applied, our side object is spreading out from the boundaries of the “Base.” We need to limit this.
Copy the “Base” again. Select the Side. Go to the Appearance panel, Click on the Opacity Link, and the Transparency Panel will open. There you will see a thumb of the selected object, in our case the “Side” object. On the right side of thumbnail you will see empty space. Double-click on it. Paste the “Base” here with Command + F. Now click that left thumb to get out of transparency mode.
Step 3: The Highlights on Handle
We are almost done with the 3D look of the handle. Now comes the highlights for handle. While some wood are dull, polished woods shine. Keep in mind these four points when adding reflective light:
- Rough surfaces don’t shine as they do not reflect light on any certain angle but they disperse it at different angles. So all the light hitting the rough surface is lost in the air. The smoother the surface, the smaller the specular. The rougher the surface, the specular will become blurry and large in size.
- Smooth surfaces do shine. The smoother and plane, the more accurate the reflection or specular will be.
- Bright colors reflect and shine MORE.
- Darker colors reflect and shine LESS.
So what we’ll do here is almost the same as that of the previous step.
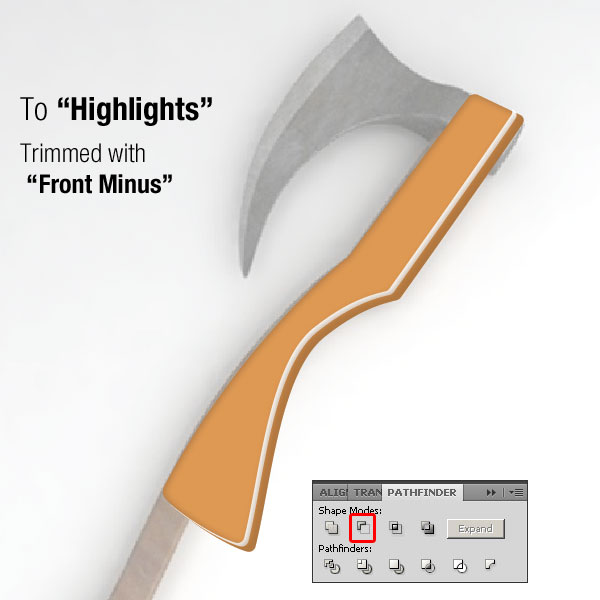
Select the base again and copy it two times in front again. Then select the top-most copy and move it just 1 to 2 pixel up and to the left. Now select the upper two copies and trim them using Minus Front. Name this object “Highlight.”
Now fill the resulting shape with a White color. Set the Opacity at 35% with a blending mode set to Screen.
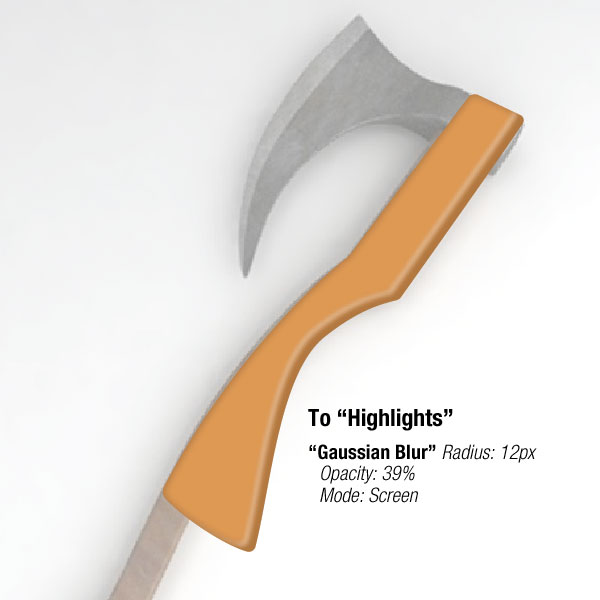
Now we have our light reflections (specular highlights). After review, it still looks a little sharp and hard. Wood material doesn’t don’t shine well. Polished woods do, but even then they don’t shine this much. We need to make it a little diffused and blurry. So again we shall apply a blur to it.
Apply a Gaussian blur set to 2.0. You can set it to whatever number suits you best. Put it above rest of the layers.
Perhaps you notice that just like the “Side” object “Highlight” is also extending out of the boundaries of Base. We have to do the same process as before to fix this.
Step 4: The Wood Texture
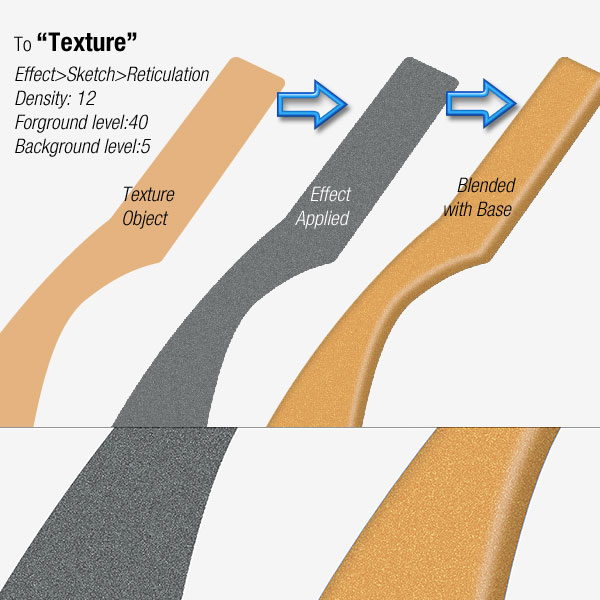
Copy the base again and paste it above all the others. This shape is going to be our texture for the wood. Apply a Reticulation effect (Effects > Sketch > Reticulation) on it. Set the values to Density: 12, Foreground level: 40, and Background level l:5. Set the Opacity to 23% and blending mode to Overlay.
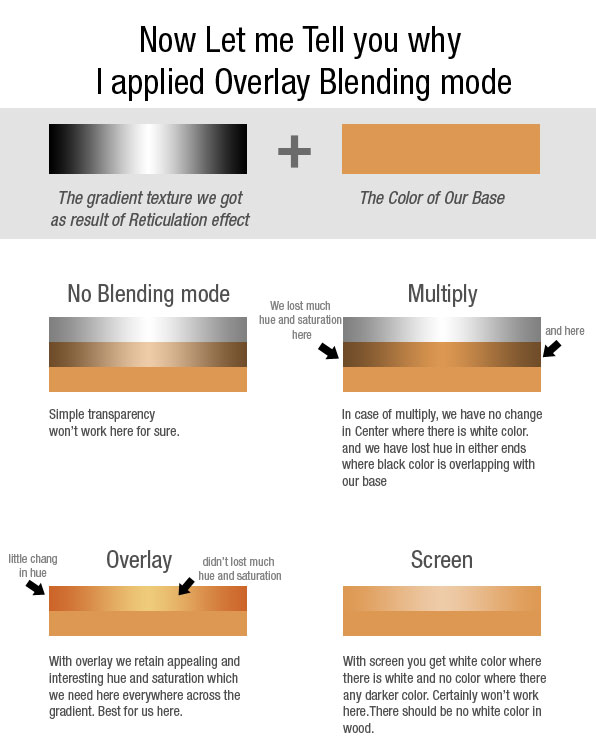
Let me tell you why I applied overlay, rather than any other blending mode. We have many blending options in Illustrator, but we mostly use 3 of them: Multiply, Screen and Overlay. Some of you may use more than that. Simply turning down Opacity with no blending mode won’t work. You can try it yourself. It leaves the black and white colors as is.
With multiply, it retains light and medium tones, while darkening the colors where there is any dark colors. In this case, it makes the black show through, which we certainly don’t want here.
Screen gives us a white color over bright areas, but we don’t want that here either. We want to keep the color of wood.
Overlay, will work here. It gives us a saturated, full hue tint of the base color over bright areas and so it gives saturated shadows over dark areas. No black or white color. With overlay we can retain the colors of the wood.
The edges are a little hard so I need to make it a little softer. Apply a Feather effect (Effect > Stylize > Feather) on the textured object. We are now done with the texture.
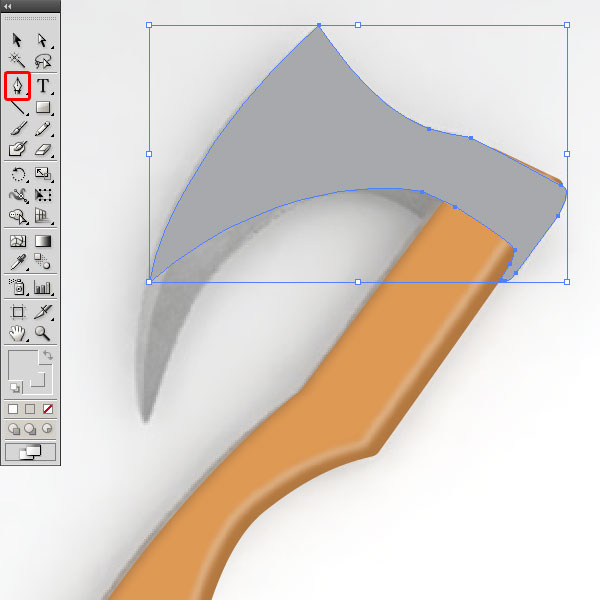
Step 5: The Metal Head Base
Just like we start with the wooden Handle, we shall start the base of the Head part with tracing the metal head using the Pen Tool. Again I am not going to copy the exact same shape. I am going to reduce the exaggeration in the curve to be more normal. Once it’s ready, name it “Metal Base.”
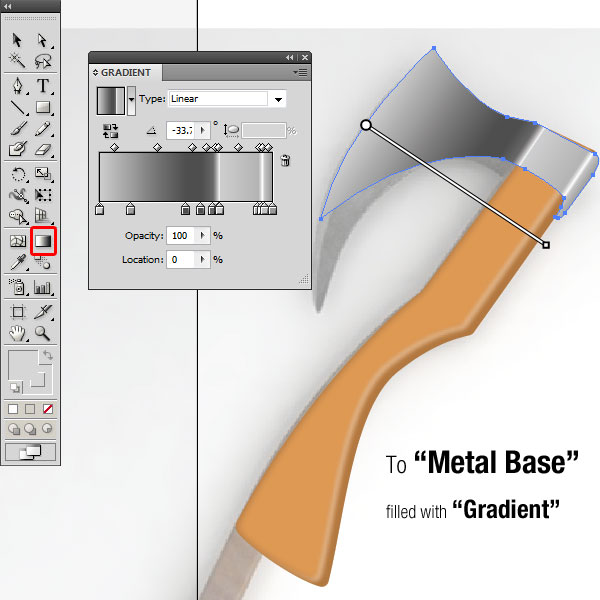
When you are done with drawing the shape, fill it with a gradient as shown in image. Use the Gradient Tool (G) to adjust the angle of the gradient.
Notice that the sharp edges usually gets more light, and will appear brighter, or even white. And as the surface faces away from the light it gets darker. You don’t have to be completely accurate here, just practice and do the best you can, as this is how we learn.
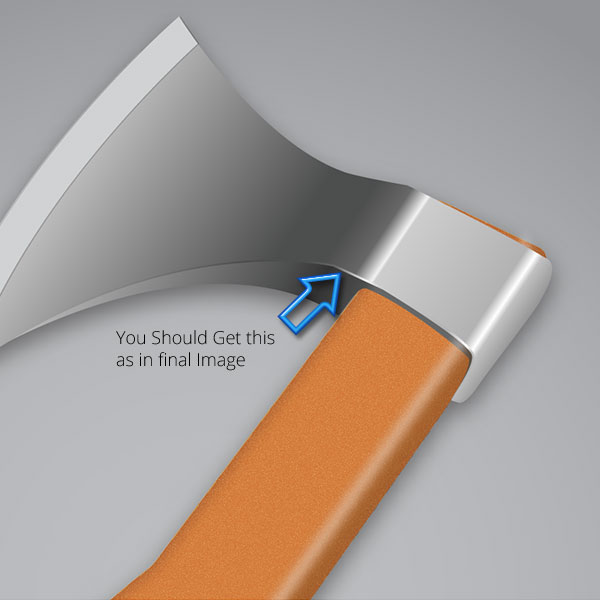
Step 6: Reflective Edge
Copy the “Metal Base” and Paste in Back (Command + B) two times. You have three copies of “Metal Base” now. Select the Bottom-most copy and move it 1 pixel below and 1 pixel left.
Now hold down Shift and select the “Metal Base copy” on top it. With these two copies selected, trim the lower object with Minus Front. Name this object “Reflective Edge”. You must have noticed that when you trimmed it, the gradient moved a little bit, which works well here.
I filled a black color in the Reflective Edge copy to make it easy to see. But you should have gradient colors from its parent filled in.

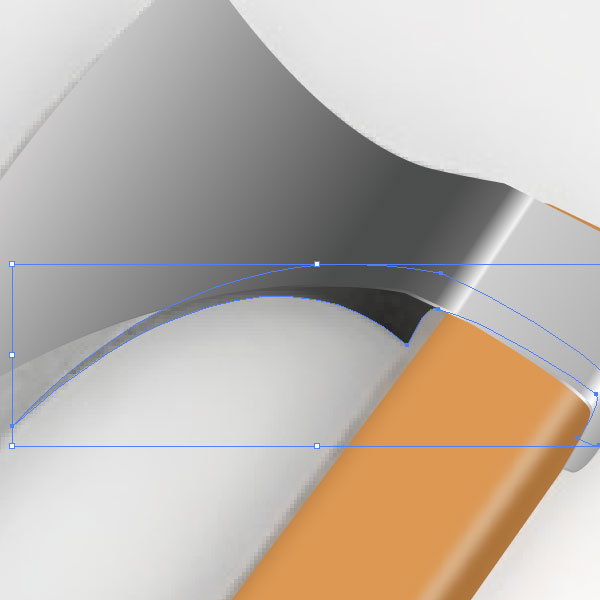
Step 7: Curvy Side
Hide all to begin this step. To do this, first Select All (Command +A) and then Hide Selection (Command + 3). With all the other objects hidden we can draw the curvy side of the Metal Part. Draw the curvy side of metal as shown below as a red shape.
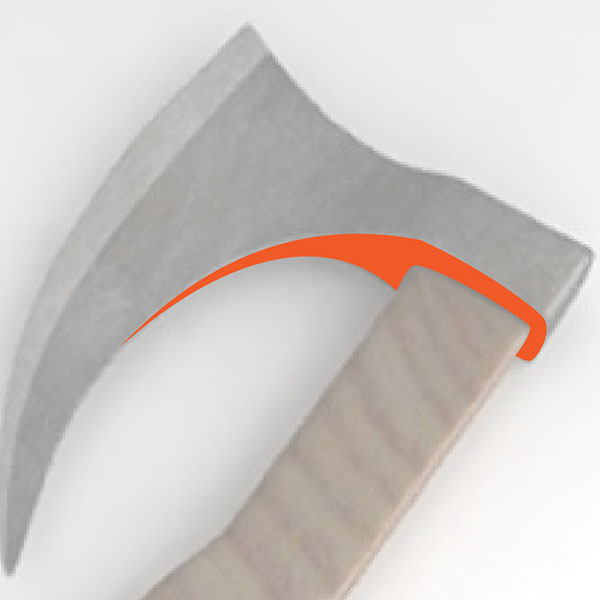
After you have made it, Unhide All (Alt + Command + 3) the other objects you just hid. Now match this shape with the curves and shape of “Metal Base.”
Copy the gradient from “Metal Base” by using the Eye Dropper Tool (I). With Curvy Side selected click on the “Metal Base,” which will copy the gradient. Now adjust the shades and tints in the gradient. Lower every value so there should be no white color in this gradient.
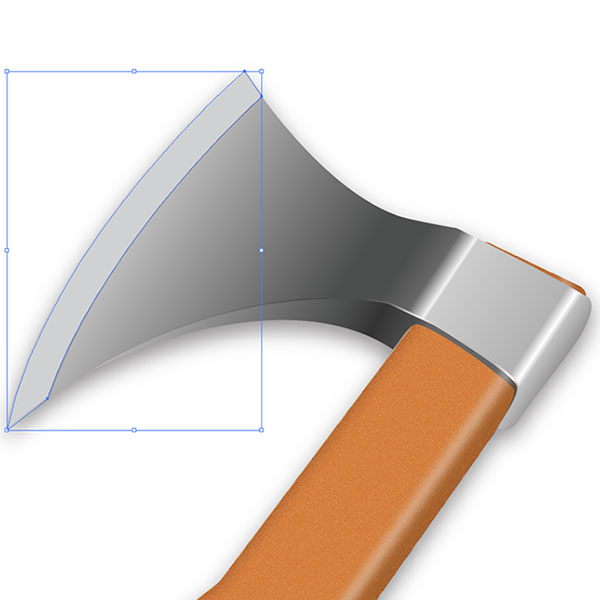
Step 8: The Blade
Copy the “Metal Base” and Paste it in Front two times. Move the top object almost 20px to the left.
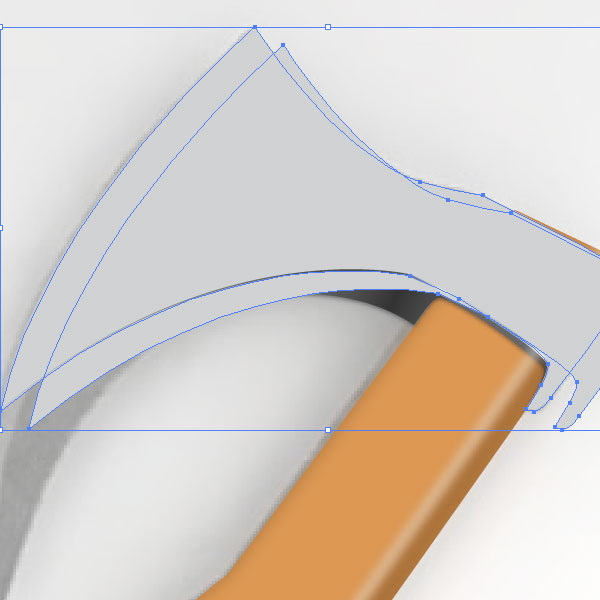
Select the top copy, and select the lower copy, then trim with Minus Front as shown. Ungroup the resulting object and remove extra shapes/patches.
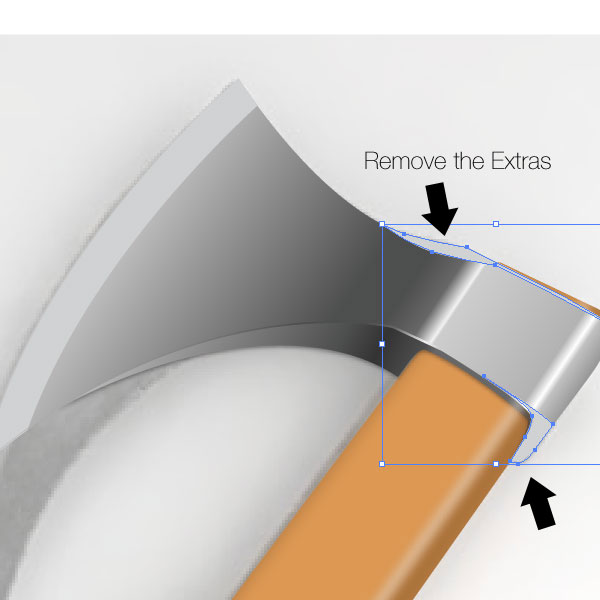
Now name the result “Blade”. Fill it with a light gray shade #D0D2D3. Now add a Drop Shadow effect to it with Multiply, Opacity of 19%, X Offset of 1, Y Offset of 0, Blur of 0, and a Color of Black.
Step 9: The Shadow
When speaking about shadows there are major two types:
- Drop Shadow: is when shadow and shadow casting objects are not touching each other. But this is not always true. But in most cased the light, object and shadow are parallel.
- Cast Shadow: Cast shadow appears when there is a close angle of 90 degree between the shadow and object. And in cast shadow the shadow is mostly touching the feet or base of the shadow casting object.
In this case we are going to make a drop shadow for our axe. To make it look more 3D, drag a selection around all the objects to select them (or Command + A).
Now hold down the Alt key, and drag them all to drag a copy of all objects to a different place. With this copy of the axe selected, go to Pathfinder and press Unite to merge them all together into one shape. Name this object “Shadow”.
Now fill this shape with black. We’ll make our shadow a little soft by applying a Gaussian blur with a Radius of 5. Now set the Opacity to 66%. We have our smooth shadows.
We could apply a feather to the shadow, but feather shrinks the object. It actually contracts the pixel inwards and affects inner pixels only. While Gaussian Blur extends pixel out of the object and also affects pixels inside the object to make it look smooth. If we had applied a feather to the shadow, our shadow would have vanished behind the axe.
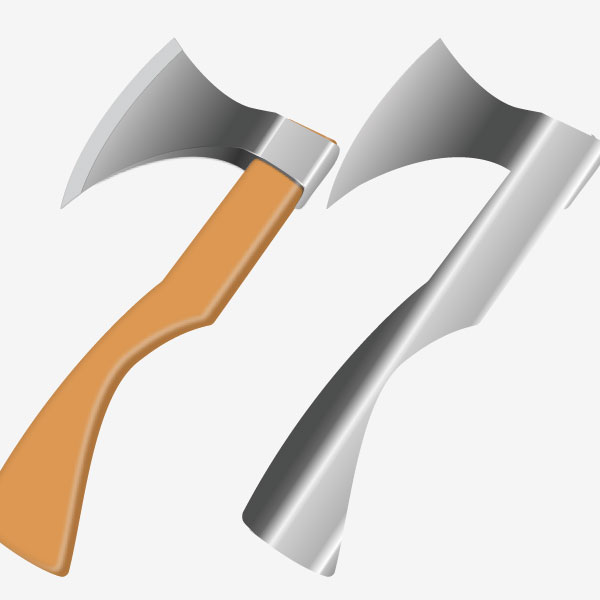
Conclusion: Final Image
And here is what we made. Use the techniques in this tutorial and your imagination to create your own tool or weapon.

{excerpt}
Read More