Read this tutorial and learn how to draw a music folder icon in Illustrator. We’ll use the 3D Revolve tool and Extrude & Bevel effects. They are put into use throughout the entire workflow, starting from shaping a 3D folder using a single path and finishing with all the colorful glossy musical notes. If you want to learn all these vector techniques, then follow me!
Step 1
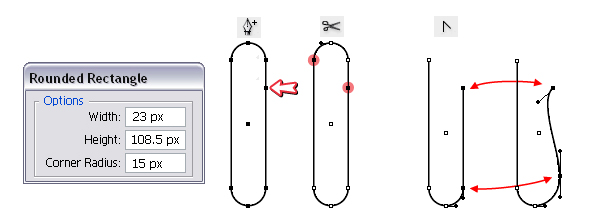
Let’s begin with the path that you need to create the folder. Take the Rounded Rectangle Tool, click on your artboard and enter the values shown, then take the Add Anchor Point Tool (+) and add another point in the place indicated.
Now take the Scissors Tool (C) and click on the two points shown to cut the shape, then delete the top segment because you don’t need it. All that remains to be done is to shape the right side. For that, first you need to take the Convert Anchor Point Tool (Shift + C), click on the two points and drag the handles.
Now, use the Direct Selection Tool (A) to individually move the points and adjust the handles to obtain a path like below.
Step 2
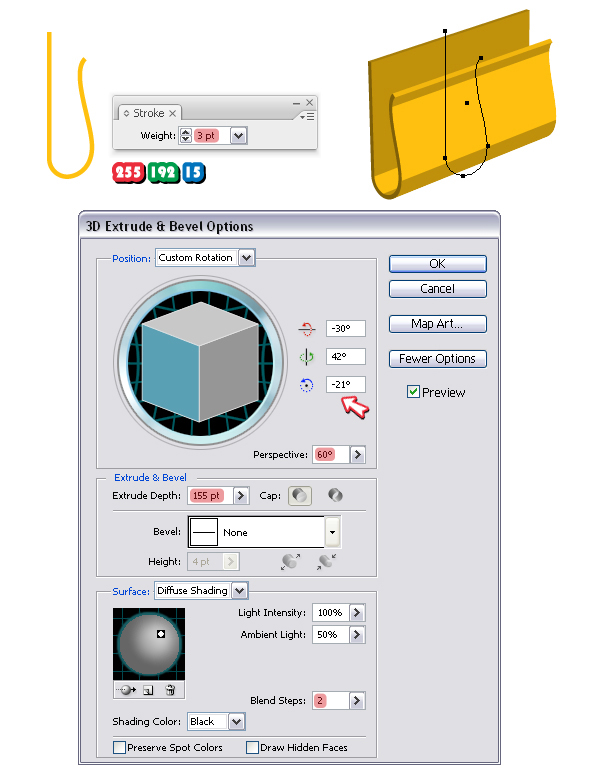
After you’ve obtained the path, give it a 3 pt yellow Stroke, then go to Effect menu > 3D and apply the Extrude & Bevel effect. The settings are shown below. It’s important to select only 2 Blend Steps because after you expand it you will need as few shapes as possible with which to work, otherwise things get complicated.
Step 3
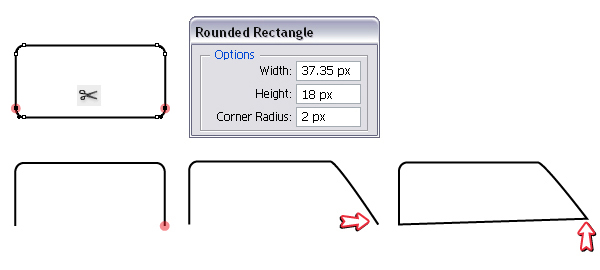
Next, draw a rectangle with the dimensions shown using the Rounded Rectangle Tool. Take the Scissors Tool (C) and click on the two anchor points indicated to cut the shape, then delete the bottom segment.
Select (using the Direct Selection Tool) only the bottom right point, and move it to the right, then select both bottom points and join them (Command + J) to close the path. At the end, also move the bottom right corner point slightly above.
Step 4
Fill the shape obtained in the previous step with yellow, then go to Effect > 3D and apply the Extrude & Bevel effect. Arrange the resulting 3D shape above the folder as shown, and make sure they fit perfectly. If they don’t fit you can use the Direct Selection Tool (A) to slightly move the corner points of this 3D shape until they do.

Step 5
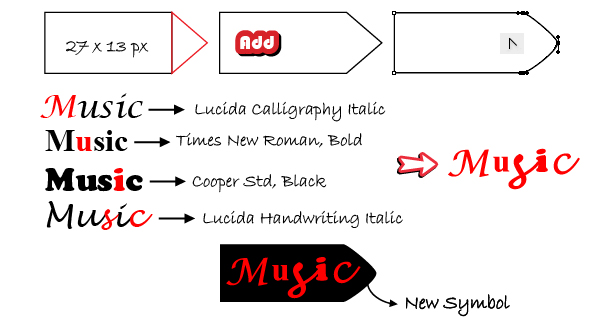
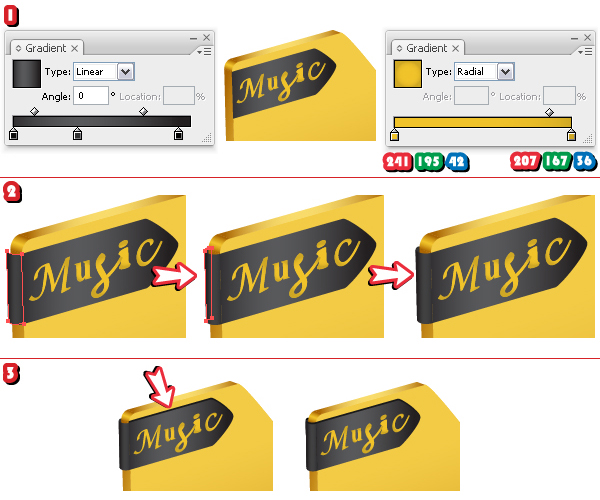
Now draw a 27x 13 px rectangle and then draw a triangle on its right side. Select them both and click Add To Shape Area > Expand from the Pathfinder Panel. Now you have to transform the three points from the right side corner to smooth points. To do that, take the Convert Anchor Point Tool (Shift + C), click on each of them, and drag the handles. Fill the resulting tag with black.
Take the Type Tool (T) and type “Music” using the four fonts indicated, then from the Object menu select Expand and Ungroup. Keep only the red letters and compose with them the new word “Music”. The letter “s” was subsequently enlarged in comparison to the other. Group all the letters and arrange them above the black tag, then drag everything into the Symbols Panel to define a new symbol.
Step 6
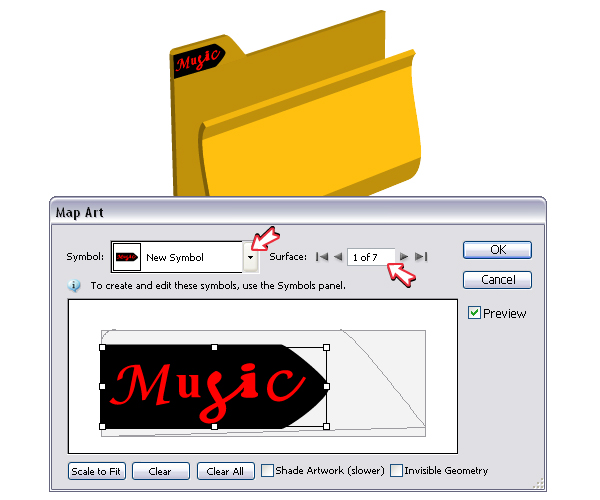
Go back to the 3D shape obtained in step 4 and in the Appearance Panel Double-click on the 3D Extrude & Bevel effect to open the Options window. Now press the Map Art button. Now select the symbol defined earlier from the list and apply it on the front surface as shown.
Step 7
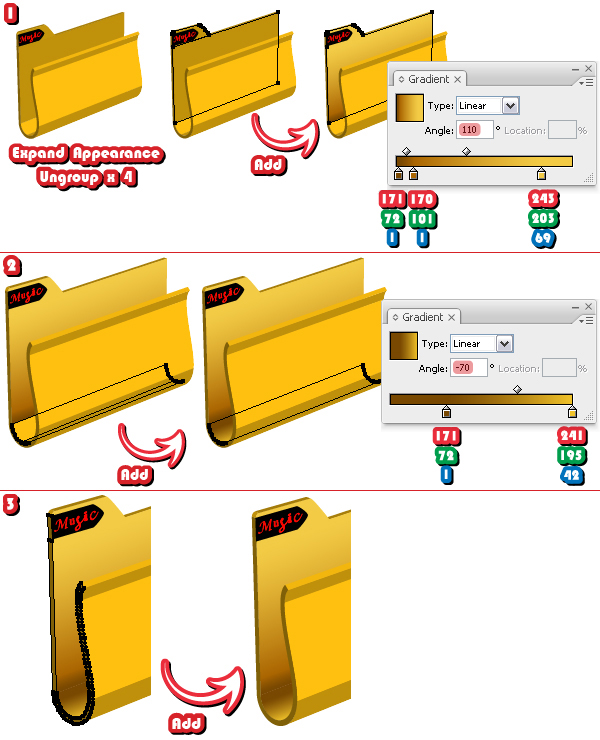
Having the shape that you previously mapped selected, go to the Object menu and choose Expand Appearance, then Ungroup four times. After that, in the Layers Panel open each of the remaining groups and if you see a clipping path there, delete it. Repeat this process for the folder. Make sure that all masks were removed before continuing.
Next, select the back shape of the folder and also the smaller yellow shape above it and click Add To Shape Area > Expand from the Pathfinder Panel to unite them (image 1). Fill the resulting shape with the gradient shown.
At the bottom of the folder you will also find two shapes and you need to unite them. Select them both and click Add to Shape Area > Expand again (image 2). Fill the new bottom shape with the gradient shown. Do the same thing for the two shapes from the side of the folder (image 3).
Step 8
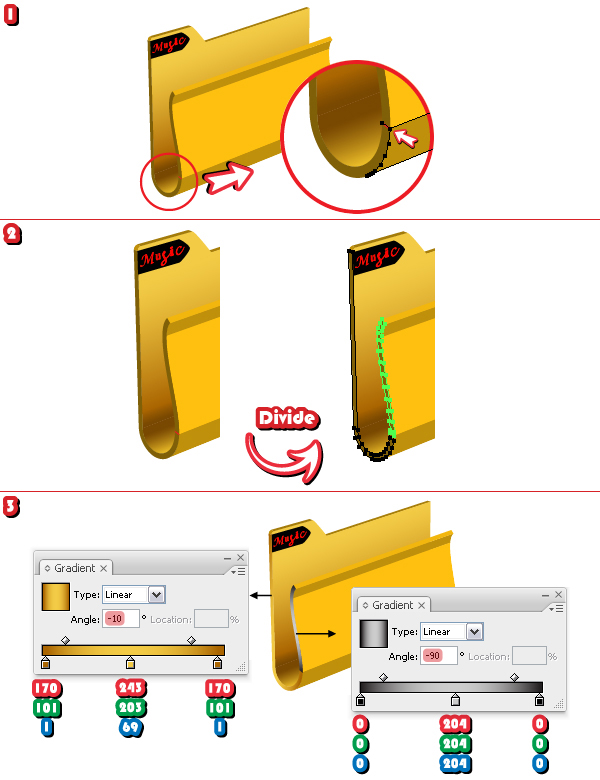
Grab the Pen Tool (P) and draw a small path using as reference the corner point of the bottom front shape of the folder (as shown in the close-up). Select both the narrow shape from the side and this path. Now click Divide from the Pathfinder Panel and Ungroup from the Object menu (2). Fill the two resulting shapes with the gradients shown (3).
Step 9
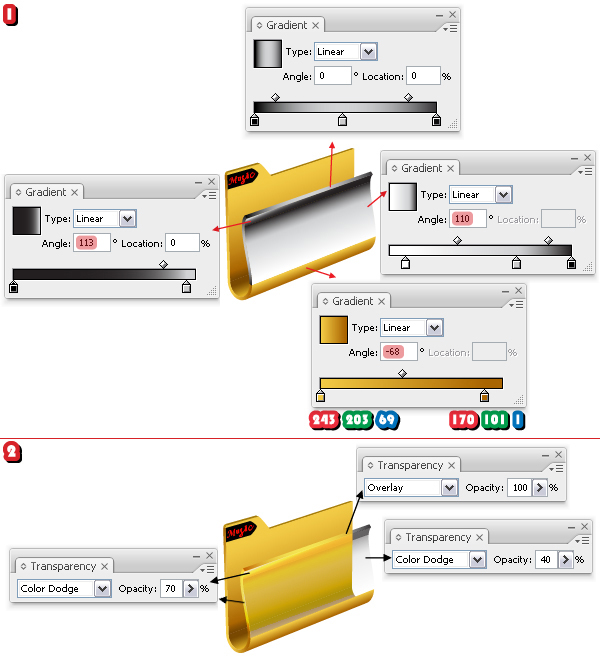
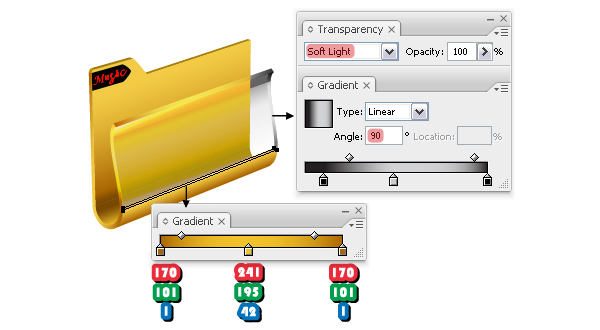
Fill all the shapes that make up the front of the folder with the gradients indicated using white, gray and black (1). Now set the blending modes and the Opacities for each one of them as shown (2).
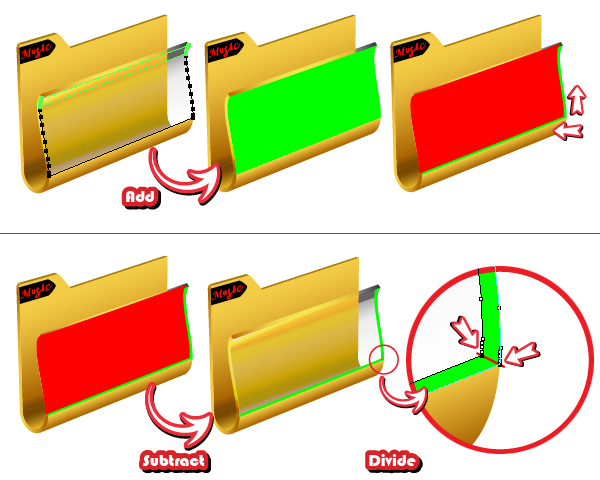
Step 10
Copy and Paste in front the middle and the top shapes from the front of the folder, then click Add To Shape Area > Expand to unite them. Copy and Paste in front the resulting shape and move it a bit up and to the left. With the red and the green shapes selected, click Subtract From Shape Area > Expand from the Pathfinder Panel.
The narrow shape obtained has to be divided in two. To do this, first take the Pen Tool (P) and draw a small path as shown in the close-up using as reference the two corner points indicated. Select both the green shape and this path, then click Divide from the Pathfinder Panel and choose Ungroup from the Object menu.
Step 11
Fill the two shapes obtained in the previous step with the linear gradients shown and move them behind the transparent shapes.
Step 12
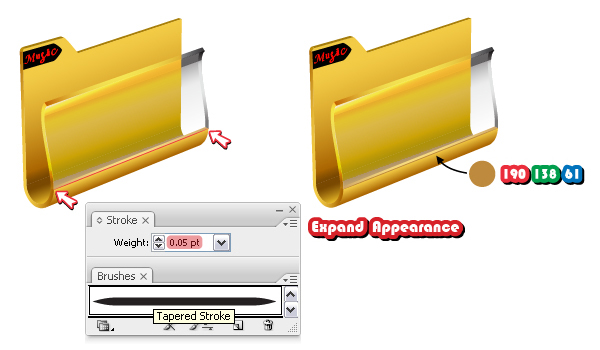
Use the Pen Tool (P) to draw a path from one side of the folder to the other, as in the image below. Go to the Brushes Panel, open the Brush Libraries menu and under Artistic > Artistic_Ink find Tapered Stroke.
Use it to stroke this path and reduce the stroke weight to 0.05 pt. From the Object menu choose Expand Appearance, then fill the resulting shape with light brown.
Step 13
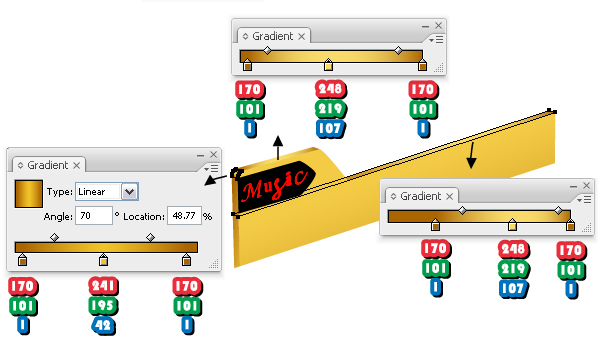
At this step focus on the top of the folder and fill the three shapes with the linear gradients indicated.
Step 14
Let’s continue with the music tag. Replace the existing fill color with a gradient using black and gray, then select the group of letters and fill it with the radial gradient shown (1).
Next, follow the sequence of images (2) and draw with the Pen Tool (P) the shapes shown to finish the left side of the tag. When you are done, Copy and Paste in back the tag, replace the gradient with black and move it a bit up. Do the same thing on the side using the shapes that you just drew.
Step 15
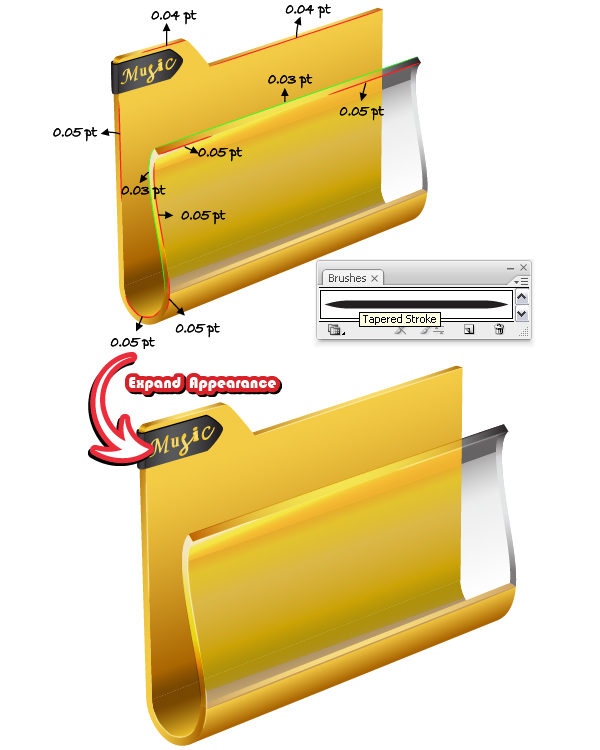
Grab the Pen Tool (P) and draw the paths that you see below following the shapes and the curves of the folder. Stroke them with a Tapered Stroke (using the brush that you used earlier), then change the weight values as indicated for each of them.
When you are done select them all and choose Expand Appearance from the Object menu. The resulting shapes after expanding the green paths are filled with black and all the others with white. Set all of them (both white and black) to Soft Light.
Step 16
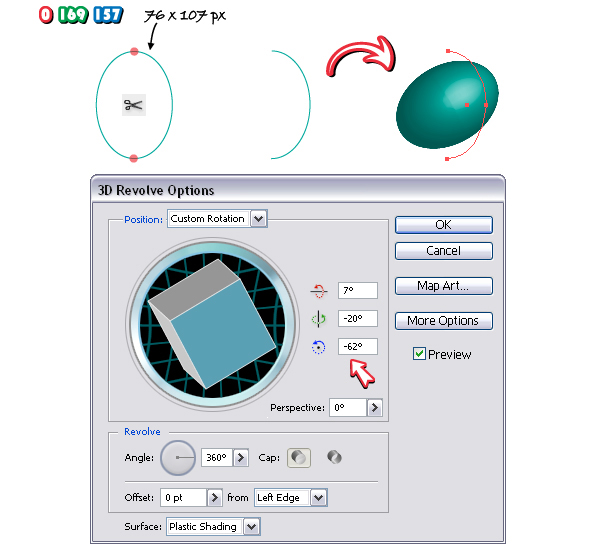
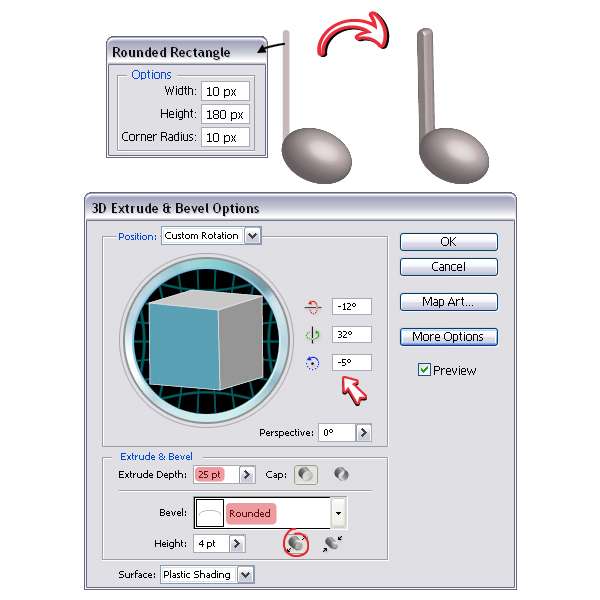
Let’s continue with the musical notes. Take the Ellipse Tool (L) and draw an oval shape, then switch to the Scissors Tool (C), and click on the top and bottom anchor points to cut the shape in half. Keep only the right path, then go to Effect > 3D and apply the Revolve effect.
Step 17
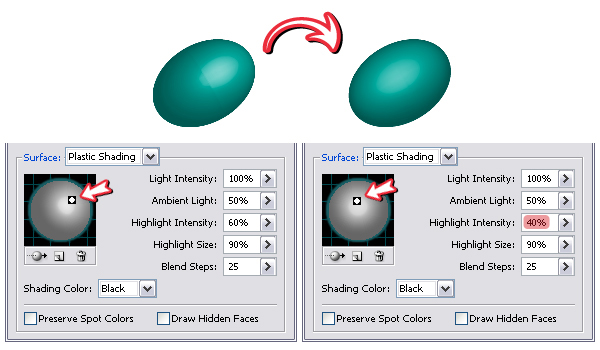
The note head obtained is not really what we want and still requires some adjustments. From the Appearance Panel open again the 3D Revolve Options window and press the More Options button so you can see the entire dialog. Here move the light from the right side to approximately in the middle, and reduce the Highlight Intensity from 60% to 40%.
Step 18
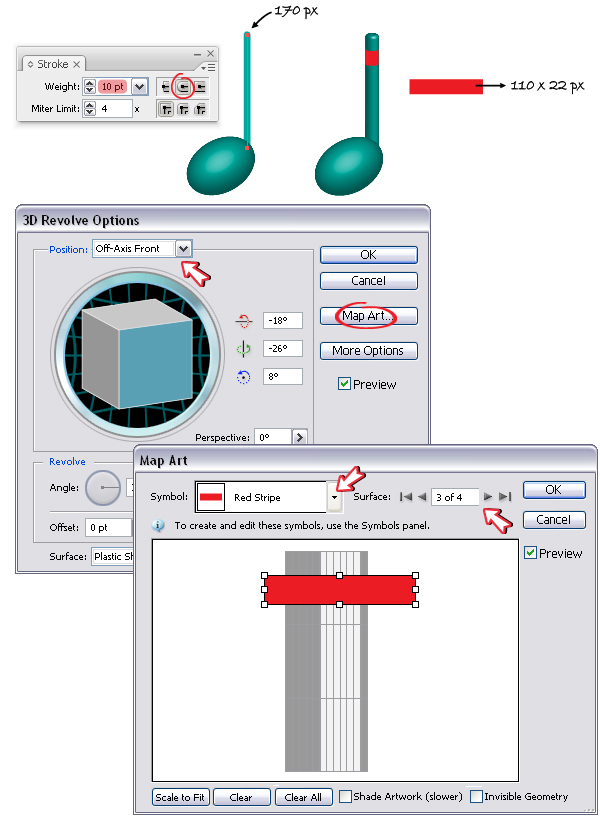
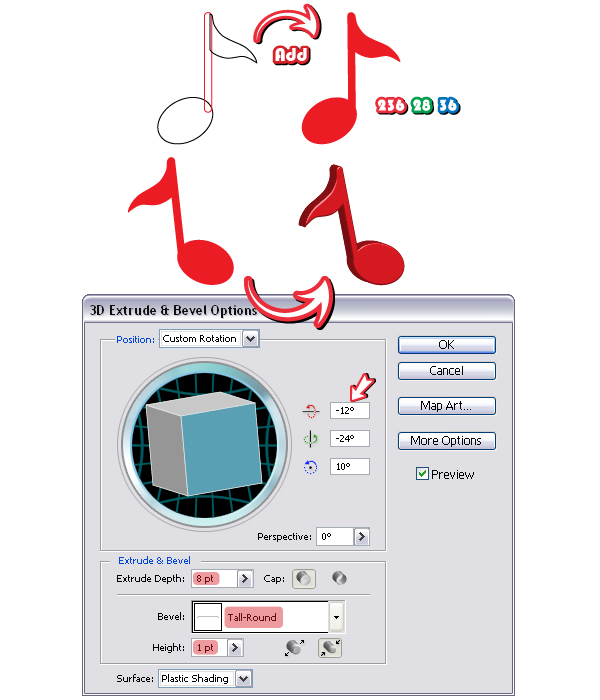
To create the stem, take the Pen Tool (P) or the Line Segment Tool (\) and draw a straight path in back. Give it a 10 pt Stroke using the same green color as for the note head, and also check the Round Cap option in the Stroke Panel.
Now draw a 110×22 px rectangle, give it any fill color, and drag it into the Symbols Panel. With the stem selected, go to Effect > 3D > Revolve, and in the Options window select only the Position. Press the Map Art button, select the red stripe symbol from the list and apply it on the front surface of the stem.
Step 19
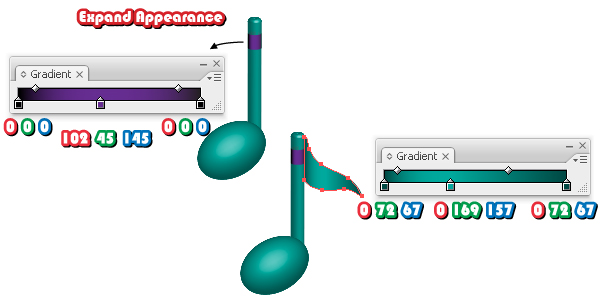
Select the note head and the stem and choose Expand Appearance from the Object menu. Use the Direct Selection Tool (A) to select only the red stripe from the group and fill it with the linear gradient shown. Next, draw a flag shape using the Pen Tool (P) and send it behind the stem.
Step 20
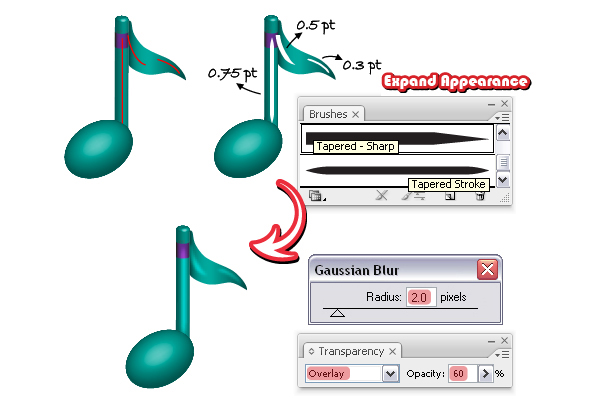
Use the Pen Tool (P) to draw the three red paths that you see below. Stroke the path in the middle with a brush called Tapered-Sharp that you can find in the Brush Libraries menu under Artistic > Artistic_Ink. For the other two I used Tapered Stroke.
Set the weight values as indicated and select Expand Appearance for all three. Go to Effect > Blur and apply a 2 px Gaussian Blur, then change the Blending mode to Overlay and reduce the Opacity to 60% for all of them.
Step 21
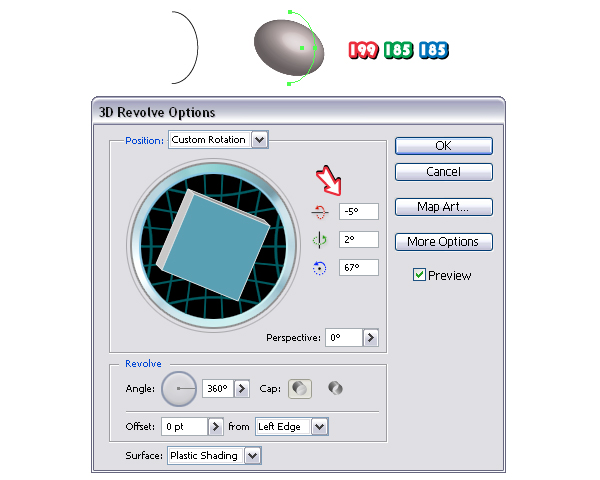
To create the second musical note the process is similar. Use again a half-ellipse and apply the Revolve effect to obtain the note head.
Step 22
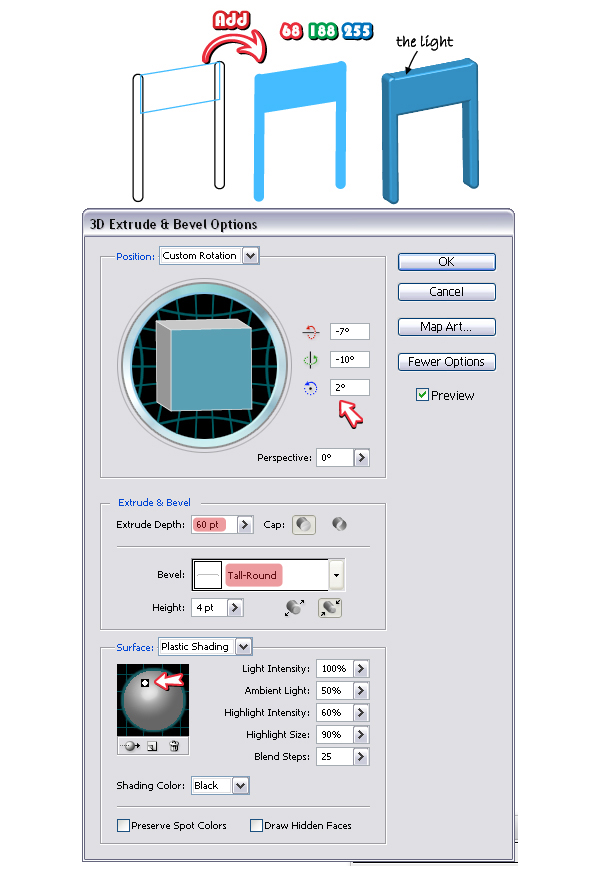
For the stem, draw a thin rectangle using the Rounded Rectangle Tool, send it in back, then go to Effect > 3D and apply the Extrude & Bevel effect. The settings can be seen below. The second musical note is ready therefore you can expand it.
Step 23
For the musical note no.3 you need again an ellipse, a rounded rectangle, and a flag. This time select them all and click Add To Shape Area > Expand from the Pathfinder Panel. Fill the resulting note with red, then go to Effect > 3D and apply the Extrude & Bevel effect. When you are done, choose Expand Appearance from the Object menu.
Step 24
For the musical note no.4, first draw the two thin rounded rectangles, then arrange a rectangle between them as in the image shown. Select all three shapes and click Add To Shape Area > Expand from the Pathfinder Panel to unite them. Now you can apply the 3D Extrude & Bevel effect using the settings shown. Move the light on the left side as you did before.
Step 25
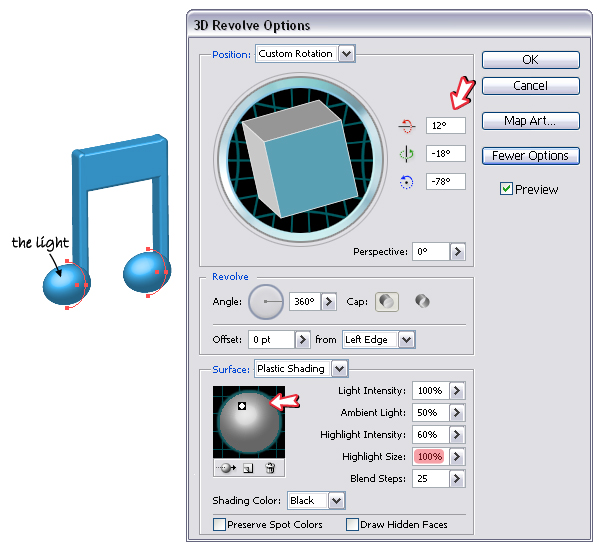
Use two ellipse halves and apply the 3D Revolve effect to create the note heads. Again move the light from the right side to the left and also increase the Highlight Size from 90% to 100% so they look a bit glossier.
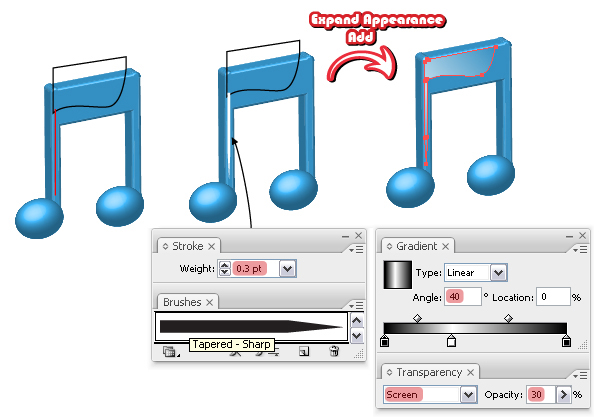
Step 26
Take the Pen Tool (P) and draw a shape and a straight path as shown below. Stroke the path with Tapered-Sharp, set the weight to 0.3 pt then choose Expand Appearance from the Object menu.
Now select the resulting shape and also the black one, then click Add To Shape Area > Expand from the Pathfinder Panel. Fill the shape obtained with a linear gradient using black and white, then change the Blending mode to Screen and lower the Opacity to 30%.
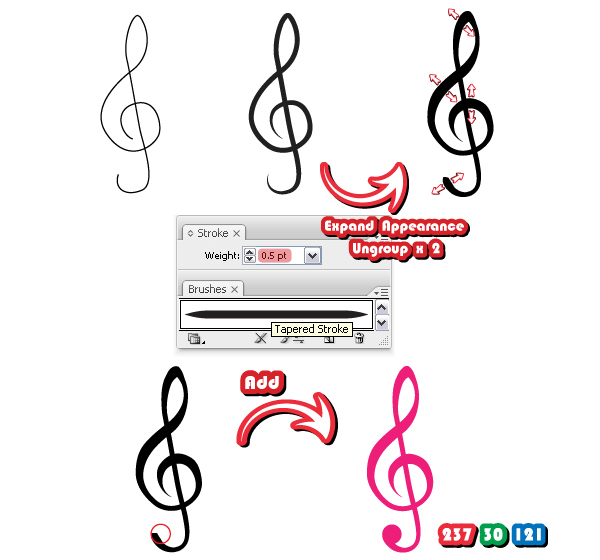
Step 27
The last musical note is the clef. First, you need to take the Pen Tool (P) and draw a path in the shape of the clef, then use Tapered Stroke to stroke it. Set the weight to 0.5 pt, then select Expand Appearance and Ungroup twice from the Object menu.
Use the Direct Selection Tool (A) to move some of the anchor points individually to create thicker areas as indicated. When you are done, draw a circle at the bottom end, then select both shapes and click Add To Shape Area > Expand to unite them. This is the clef that you need.
Step 28
Go to Effect > 3D and apply the Extrude & Bevel effect to the clef obtained, then expand it. Use the Direct Selection Tool (A) to select only the front shape from the group, keep the existing fill color, and also give it a 0.25 pt white Stroke.
Now open the fly-out menu and choose Add New Fill. I used the Zebra pattern that can be found in the Swatch Libraries menu under Patterns > Nature > Nature_Animal Skins. Change the Blending mode to Color Dodge and lower the Opacity to 85%, but only for this second fill.

Step 29
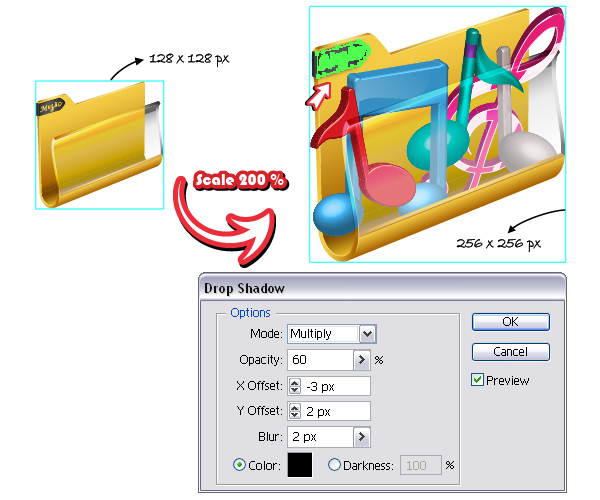
At this point the folder made fits into a 128×128 px square and I scaled it 200% to obtain a bigger icon. The reason is that I wanted to add a few shadows and we all know that the Drop Shadow effect or Blur applied to tiny shapes equals disaster sometimes.
Select the front side of the music tag, go to Effect > Stylize and apply the Drop Shadow effect using the settings shown below. Also, you can now arrange the musical notes inside the folder, behind all the transparent shapes in front. If you want to scale one of the notes, make sure you have expanded each stroke, pattern or effect applied before you do that.
Step 30
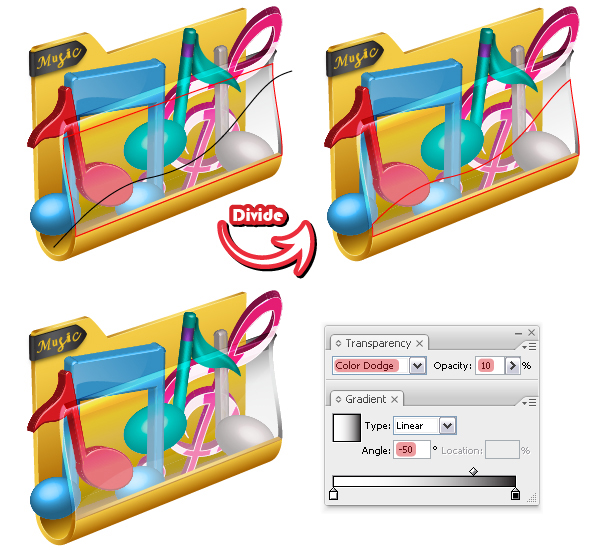
We are almost done. Grab the Pen Tool (P) and draw a wavy path like in the image, then Copy and Paste in front the bigger transparent shape of the folder.
Now select the path and also the pasted shape, then click Divide from the Pathfinder Panel and Ungroup from the Object menu. Keep only the bottom shape, fill it with a linear gradient from white to black, set it to Color Dodge and lower the Opacity to 10%.
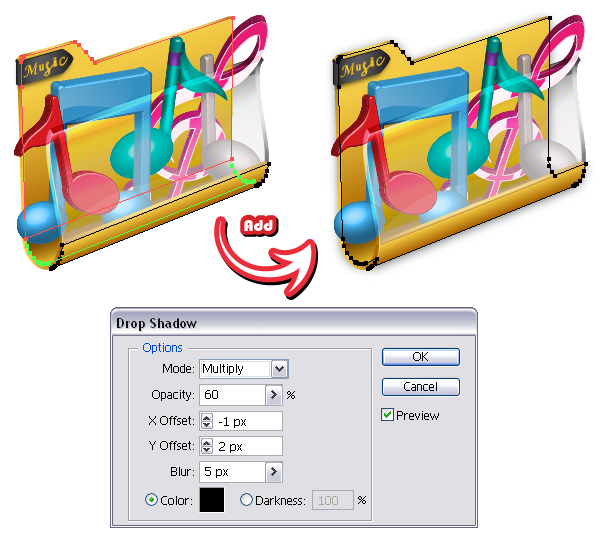
Step 31
Copy and Paste in back each of the shapes selected below, more precisely the back, the bottom, and the bottom front shapes of the folder. Now click Add to shape area > Expand from the Pathfinder Panel. Send the resulting shape in back, then go to Effect > Stylize and apply the Drop Shadow effect.
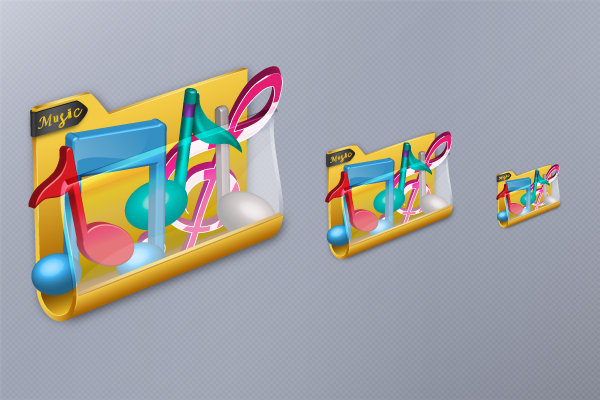
Final Image
The music folder icon is ready and here is the final image. I hope you found this tutorial useful and that you learned new techniques.
{excerpt}
Read More