Adobe Illustrator CS5 features a slew of fantastic new tools and functionality, but the one that jumped out at me and really grabbed my attention was the Variable Width Stroke Tool. The concept was great. And when I actually put it to use – the experience was even greater than my expectations. In part one of this two part series we’ll be creating a tribal design and improving our Illustrator work flow along the way.
Width Point
You know a tool is a winner when you find yourself immediately putting it to use in your daily work flow. It only takes seconds to master the Variable Width Stroke Tool and the results are beautiful!
This tutorial will start by reviewing the basic functionality. Then, I’ve got some wonderful real-world examples of how you can put this tool to use. We’ll be creating tribal designs in today’s tutorial. In the last part of this series, we’ll be making gestural drawings and digital inking with this new tool. I promise that by the time you finish reading this series you’ll have a new best friend: Mr. Variable Width Stroke Tool.
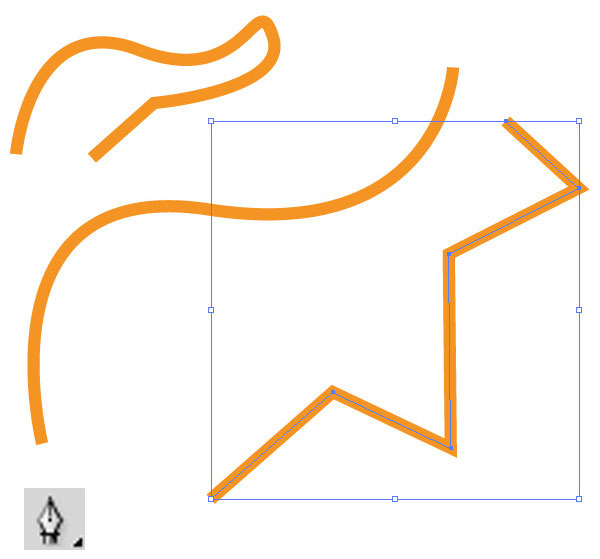
Okay, let’s start with the basics. How do you use this thing? Start by using your normal Pen Tool and just make some lines; curved, straight, whatever. It doesn’t matter.
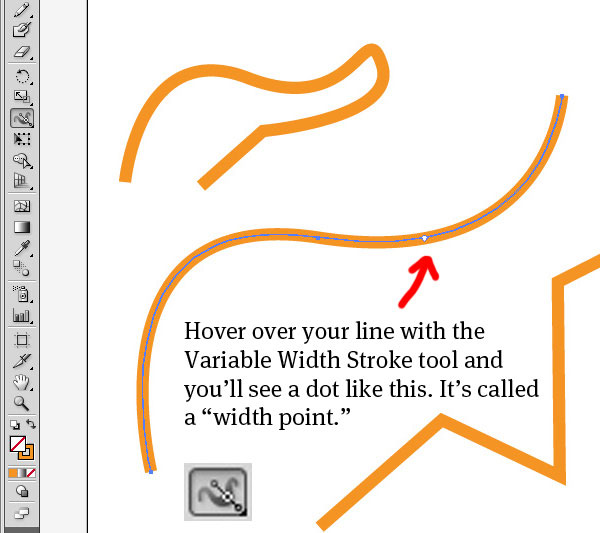
Next, let’s select our Variable Width Stroke Tool. If you simply hover over your line with this tool – you’ll see that it gives you a little dot on the line. This lets you know that it is ready to affect the correct line, and it also lets you know where on the line you’ll be adding (or subtracting) width from your stroke. Adobe refers to these as Width Points.
Let’s dive right in; click-drag your mouse. What happens? The width of your line suddenly grows at the point that you had selected. What an aptly named tool! The Variable Width Stroke Tool adjusts the width of the stroke; brilliant!
Now hover your tool over a different part of the line; click-drag again. What happened this time; the same thing, amazing! In this way you can create and control specific spots on your line and the weight of each.
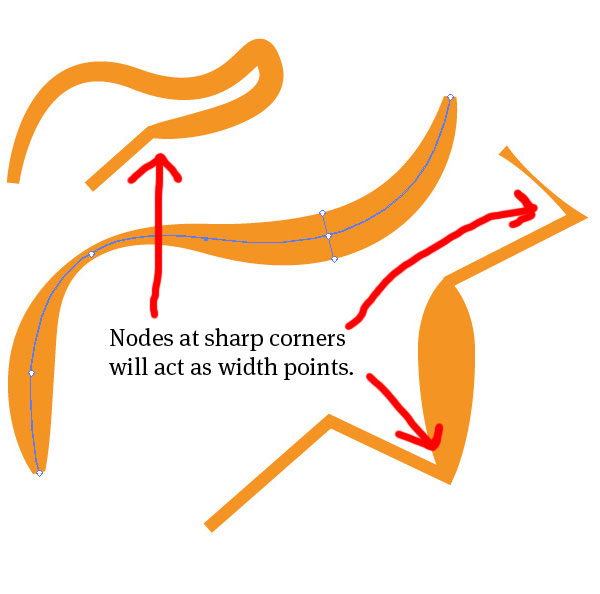
You’ll notice that some nodes will also act as Width Points on your line. Specifically, the nodes at the ends of your line and nodes that represent a sharp corner (nodes without any Bezier handles) will also act as width points. So, you’ll need to not only add width point to your lines, but also adjust the width of your line at each sharp-corner node. You’ll find that the controls are relatively easy to use.
The nodes that are acting as Width Points will all start with their width set to that of the line (typically, 1pt). So, if you want your line to start and end in a perfect point, with no flat tip, you’ll need to use the tool to adjust that. Also, you’ll notice that if your line has no stroke applied, the Variable Width Stroke Tool will not work.
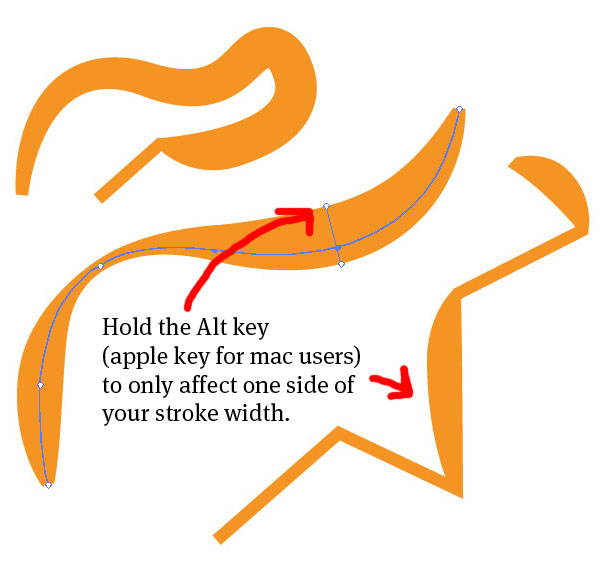
By default, the Variable Width Stroke Tool will expand the width of a stroke equally on either side of your vector path. But they give you control over that too! Just hold down your Alt key, and you will only affect one half of the line’s width. Give this a quick test.
Like I said, it only takes a few moments to master this tool.
One way to take fine control over these width points is to double-click on one. A dialog window will pop up with all the details of your Width Point: Side 1 width, Side 2 width and Total Width. You can make adjustments or simply delete the point if you want to remove it.
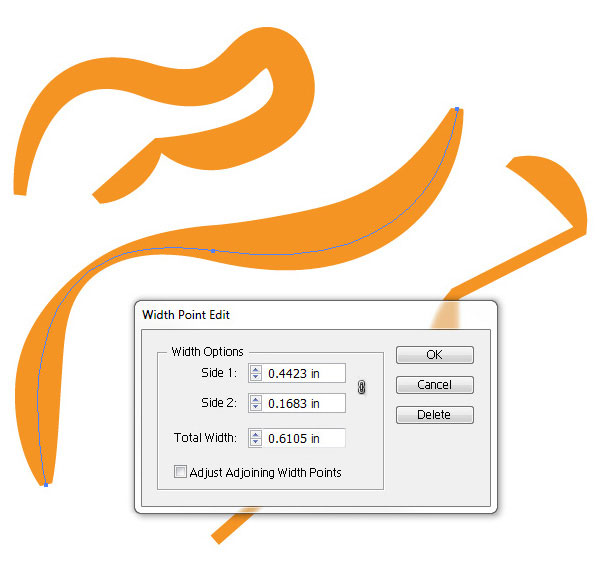
If you want to move a Width Point, it’s no problem. Just hover over a point and click-drag. If you want to delete a Width Point, just hover over one and hit the delete button on your keyboard. Again – these things are really quite simple.
It’s important to note that adding width points does not add nodes to your line. If we switch from our Variable Width Stroke Tool back to our Selection Tool (arrow), you’ll see that your line is still only comprised of the same nodes you originally created it with. This allows you to keep the control of the path simple, although the width of the line may be complex.
Well, those are the basics folks! Now that the boring stuff is finished, let’s learn how to quickly make sweet art with this tool!
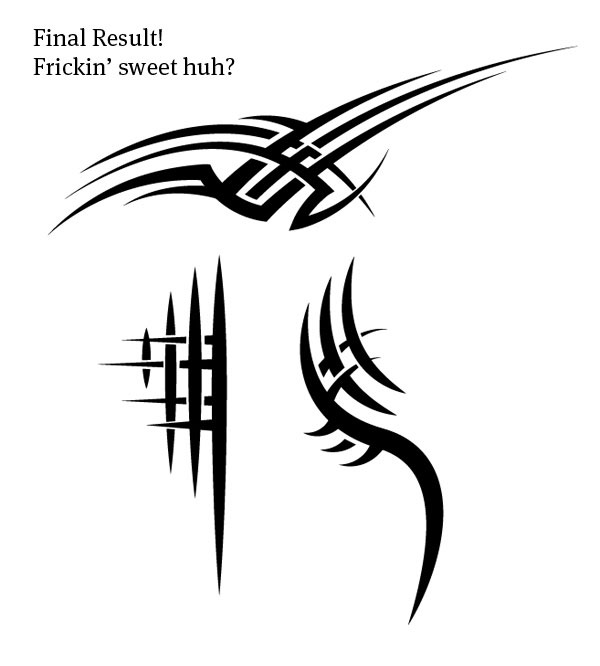
Make Some Sweet Frickin’ Tribal Designs</h2
Now that we’ve gotten the basics of the Variable Width Stroke Tool down, let’s make some sweet frickin’ tribal designs. You’ll be amazed at how quick and easy this is.
Step 1: Create a Base Vector Pattern
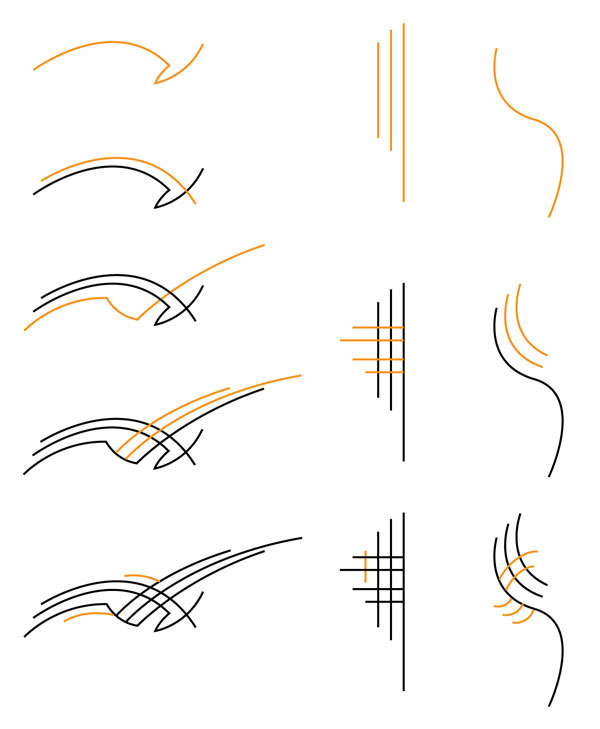
The first step, which admittedly is the most difficult part of the process, is to create your base vector path designs. You can start by just making a grid. Or perhaps you start with Illustrator’s Spiral Tool, and then add some lines extending off the spiral, or you can study other tribal designs and try to make something similar. I’ll admit, there is a fine art to this. So, you may need to study some tribal designs and then practice for some time on this first step.
Here are some samples of a few I made – broken down into steps. This visual will help you understand this first step better, as it shows the process I went through to create the basic design.
Step 2: Use Your Variable Width Stroke Tool to Thicken Your Lines
Here is where you jump in with your Variable Width Stroke Tool. I covered the basics of how to use this tool earlier, which is good to review before jumping into this tribal design. Typically, the paths in a tribal design start at a point, thicken in the center, and end in a point. If there are nodes on my paths, I’ll usually edit the width of those points first. Then, if I need to add more Width Points, I will.
Below are the same base vector shapes with a step-by-step application of the Variable Width Stroke Tool.
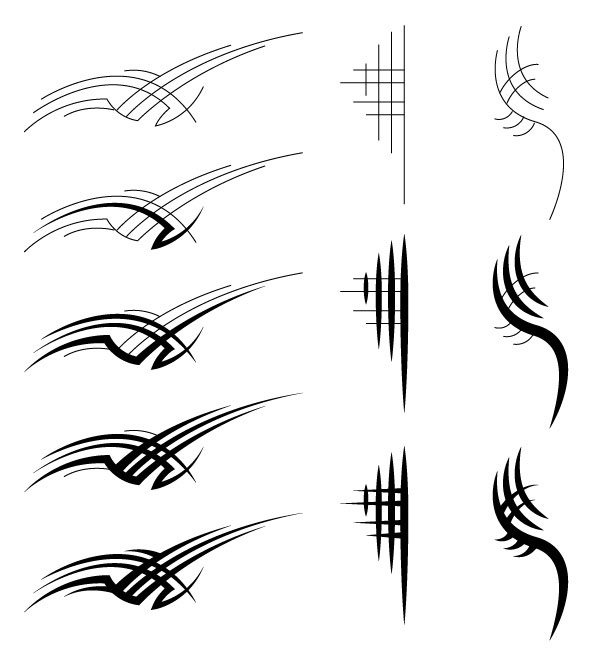
Here are my patterns after I’ve used the Variable Width Stroke Tool. It looks pretty good huh? It doesn’t take much work to make some awesome tribals when you’ve got the Variable Width Tool in your holster.
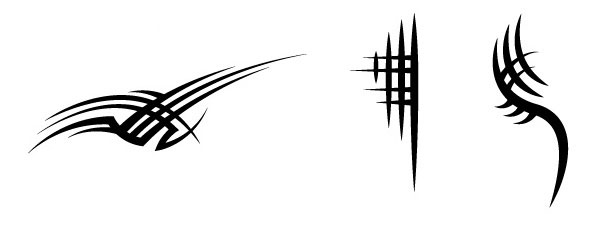
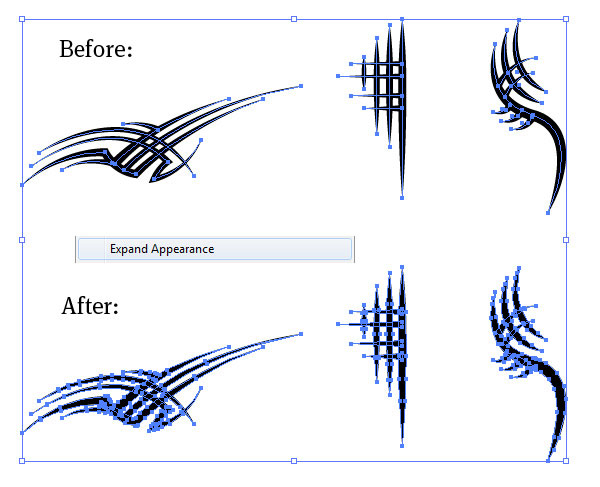
Step 3: Expand Your Strokes to Paths
Next we need to Expand Appearance. This will convert the strokes to shapes. This is simple, just select your tribal pattern and click Edit > Expand Appearance. You’ll see that the simple path has now been converted into a shape. Here is the before and after of this step.
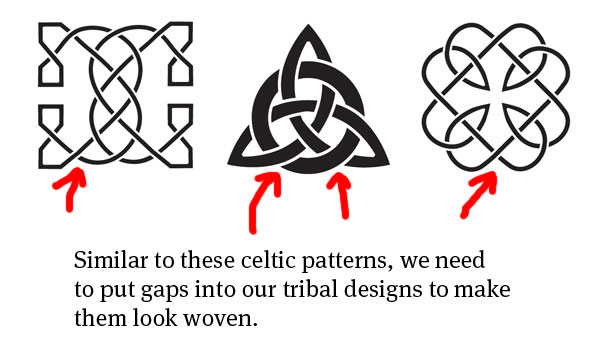
Step 4: Make it Look Woven
If you look at a bunch of tribal designs you’ll notice that there are sections of the shapes that are knocked out. The look that you’re after is similar to basket weaving. Your paths should look woven together. If you look at old Celtic tribal patterns you’ll see they do a wonderful job of this. Here are a few samples.
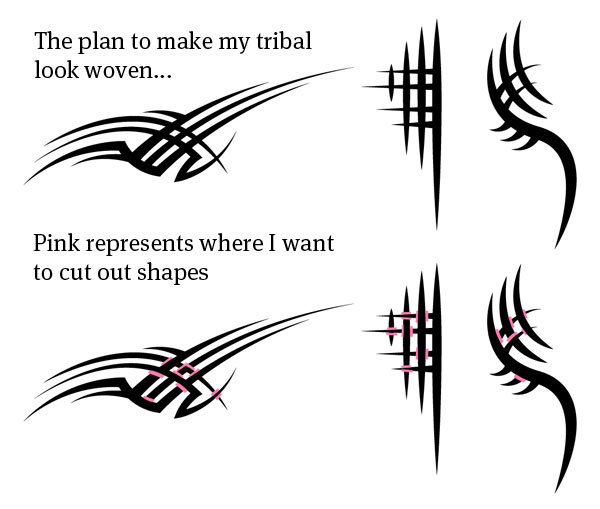
To chop these out, first pick the spots where you want to remove sections of your shapes. I’ll show you my mental plan by making some rough pink shapes, though, normally I just do this in my head.
Now, to chop out these sections of your shapes, you COULD create little shapes – like I did in pink, and then use your Pathfinder > Subtract Tool. But there is a quicker, easier way!
First, use your Selection Tool and while holding down the Alt key, click-drag the shape that is perpendicular to the spot you’re trying to subtract. What you’re accomplishing when you do this is you create a copy of the shape you’ve selected. Move it into position. Then select it, and the shape beneath it and use the Pathfinder > Subtract tool.
I know this is a little confusing, so – here’s a visual:
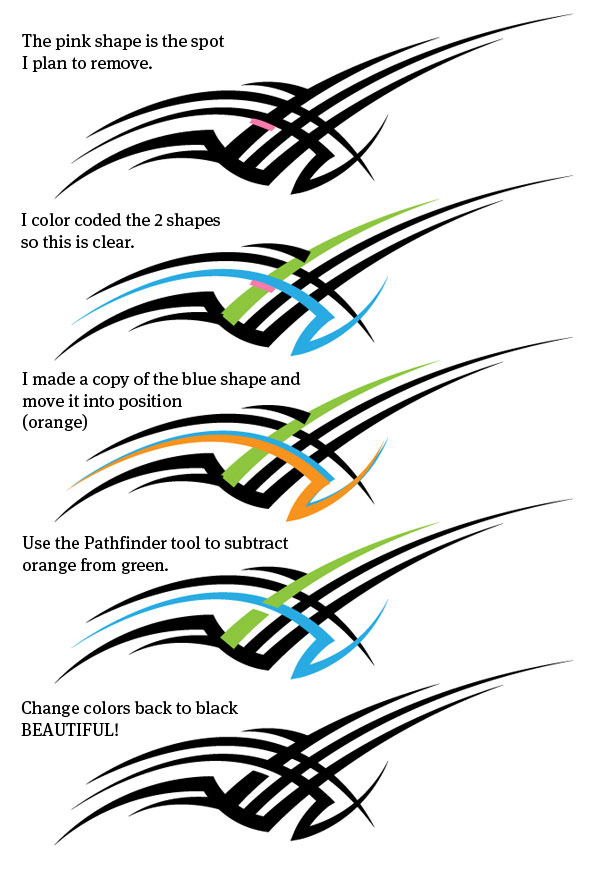
Now, repeat this process as you chop-out segments of each of your shapes. Here are the results after I’ve chopped out all the weaving pieces!
Step 5: Apply a Warp
One easy step you can take to add a bit more character to these paths is to use the Filter > Warp Tool. You can add a bulge, arc, arch, whatever. This works particularly well when you’ve used straight lines to make your tribal design – as I did on the middle pattern. To apply a warp filter to your pattern, select all your paths, group them, Then select Filters > Warp (then select a warp). Play around for a bit with these warp tools and see if anything looks good.
Here is my middle design with warping applied.
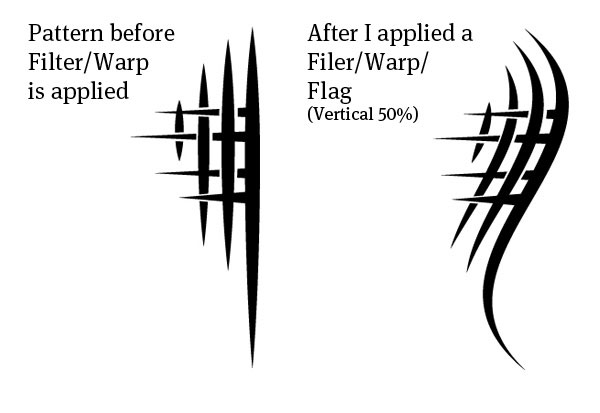
OK, if you’ve applied a warp to your design, you have to Expand Appearance before you proceed. To do this select your pattern, then click Edit > Expand Appearance > Expand Path. That’s it; fun, fast and easy.
Up next: Illustrator CS5 Variable Width Stroke Tool: Gestural Sketches and Digital Inking!
Where to Find GoMedia
This tutorial was written by William A. Beachy, partner at Go Media Inc. Go Media is a creative agency based in Cleveland, Ohio. Besides writing tutorials for the GoMediaZine and Vectortuts+, we also work for clients and sell stock artwork and design files on the Arsenal.
- Portfolio Site: Gomedia.us
- Blog: GoMediaZine
- Resources: Gomedia Arsenal