Please find image of PSD in attached file, Please place bid only who has very much experience in OSC because more work after this.

Freelance Projects, Design and Programming Tutorials
Please find image of PSD in attached file, Please place bid only who has very much experience in OSC because more work after this.
i have a freebie site already installed and configured, members register, pay a fee, selected prize, and start refering people to the site,once referals are met,member get the item,the script is configured to accept third party offers such as blokbuster,netflix,credit repair offers etc, i want the script to accept my offers instead,so, i can add my own prizes, this can be done on a separate area,
Need to integrate alertpay , moneybookers.,
will need help in uploading header and one banner,
i pay $150-or $250 bonus from site profits,depending on site success, plus your bid.
Note:pay only from profits (bonus and bid), if i get paid before (im a freelance writer and designer)ill pay you before
you can check my feedback im not trying to get anything free here,just need some help,so i can start generating some cash,i expect the site to start generating income the same day it launches
job may lead to permanent job as maintenance guy if desired
thanks
you can see the site on attachment
I need a wordpress theme made for this site.. survivalsupplement.com
on the site right now you can see the logo and template we started with.. but we have decided to use wordpress in the site. We need zen cart enabled on the template. We want to use the same logo you see on the site now, and have a changeable banner like in that template.. otherwise it can be different.
We have a current Magento website version 1.4.0.1
Hosted on Media Temple grid service
404 error appears when ‘home’ is clicked.
404 error appears when ‘catalog’ is clicked.
About us link is ok
Our site has 3 store views
Here is the work that we need:
1. we need to fix this bug / issue to get to work as normal.
I need 10 quality Google PR4+ one way permanent links to my site
Must be Content related
NO BLACK HAT OR OTHER UNETHICAL TECHNIQUES! NO SPAM! NO JUNK traffic! NO AUTOMATED SCRIPTS, NO TRAFFIC EXHANGES, NO BOTS!
– Links Building ( high-quality PR4+ one way-non reciprocal relevant permanent links, with various anchor texts from good sites, etc … )
Please provide me with a detailed information on the process of the seo that you will implement.
Do not bid unless you have extensive experience in seo and have multiple positive feedbacks at scriptlance.
Please note that I have enough knowledge in this field so show some real input.
I have a site that I need some work completed small bugs and visual changes for a media portal using vivvo.net PHP based cms * Must have good feedback* * Be able to implement phpBay Pro API contact… (Budget: $250-750, Jobs: AJAX, eBay, PHP, System Admin)
DO NOT BID IF YOU ARE GOING TO PLAGIARIZE FROM WIKIPEDIA AND OTHER INFORMATION SITES. I HAVE HIRED A NUMBER OF WRITERS WHO HAVE DONE THIS. I WILL SEE IT AND I WILL REPRIMAND IT. PLEASE DO NOT WASTE MY TIME IF YOU CANNOT CREATE UNIQUE AND ORIGINAL CONTENT… (Budget: $750-1500, Jobs: Article Rewriting, Articles, Product Descriptions, Reviews, Travel Writing)
Project built completely with ZF; need to update the calendar display to loop through db details for week view, making the monthly and daily view less relevant. (Budget: $30-250, Jobs: CSS, HTML, jQuery / Prototype, PHP, Zend)
Hello, Please READ the info bellow CAREFULLY: I am looking for someone who HAS ALREADY INSTALLED JREVIEW in the past and can SHOW ME EXAMPLE of installation HE DID on other operational website. Most of the my Jreview is already installed, I just need some fine tuning and some date entry… (Budget: $30-250, Jobs: Joomla)
In this video we’re going to take a look on how important performance is. We’ll be talking about what OpenGL is and how the new graphics cards Quadro from Nvidia can increase our performance dramatically.
File size 44.5MB
As you know, each month, we scour the Internet for the best vector content on the web and post it here for you all to enjoy. This month we found some excellent tutorials, freebies, and articles ranging from character design tutorials, free 3D vector iPhone designs, and inspirational articles; featuring all sorts of incredible vector art. Please help support the design community by visiting some of these awesome websites!
We have an iPhone 4 vector illustration available as a freebie for anyone to download. This illustration is created Bo Virkelyst Jensen and is made using Adobe Illustrator’s 3D settings for flexible visualization.
At Audiotuts+ we irregularly put up a reader track for workshopping and critique (find out how to submit a track). This is how it works: you upload your song, and every week or so we’ll publish one here and step away from the podium. The floor is yours to talk about the track and how the artist can fix problems in and improve upon the mix and the song.
This track has been submitted for your friendly, constructive criticism. They have put their track (and their heart and soul) in your hands to learn and get useful feedback.
Artist’s website: thedisconnect.bandcamp.com
Description of the track:
I’ve been writing a song a month since the beginning of the year and this is the first one that came out of it. I’m looking to remix it pretty shortly and would love some constructive criticism.
Download audio file (01Singularity.mp3)
Terms of Use: Users can stream the track for the purposes of giving feedback but cannot download or redistribute it. You can purchase the track from the artist’s website.
Have a listen to the track and offer your constructive criticism for this Workshop in the comments section.
Need constructive criticism on your own tracks? Submit them using this form.
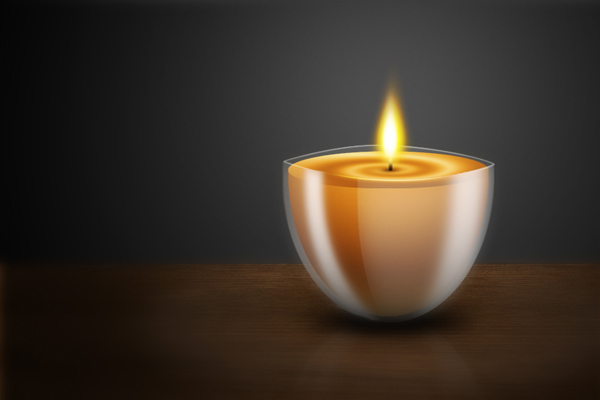
Still life compositions are like photographs in that they portray the details of objects as moments frozen in time. Still life images don’t tell a story, they simply depict the objects themselves. In today’s tutorial we will explore this style of art by creating a still life candle in Photoshop.
The following resources were used during the production of this tutorial:
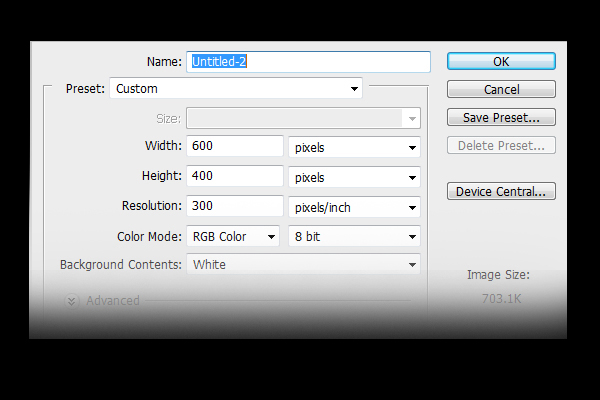
First, create a new file, 900×768 px and with a resolution of 300 ppi. Fill the background layer with a radial gradient as shown below.
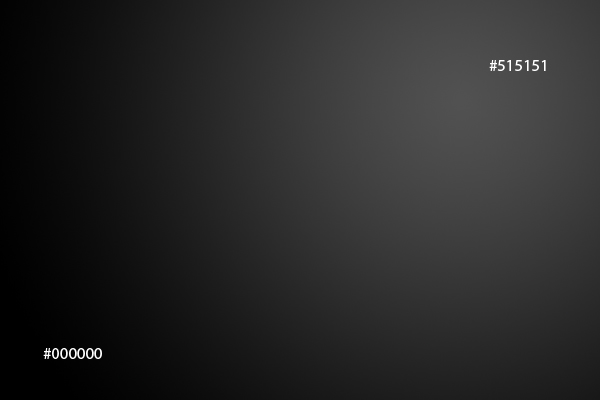
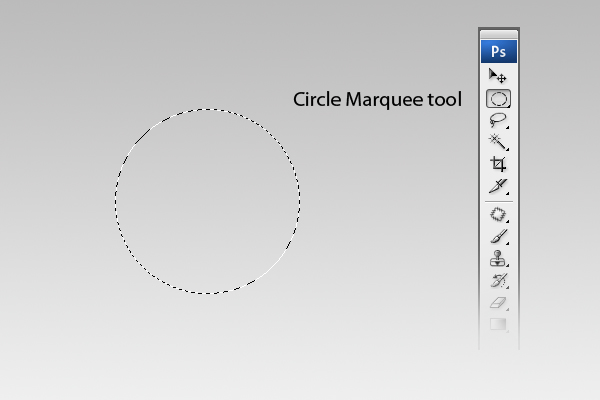
Now make a new layer and name it as "Candle top". Using the Elliptical marquee tool (M), create a perfect circle by holding down the Shift key while dragging.
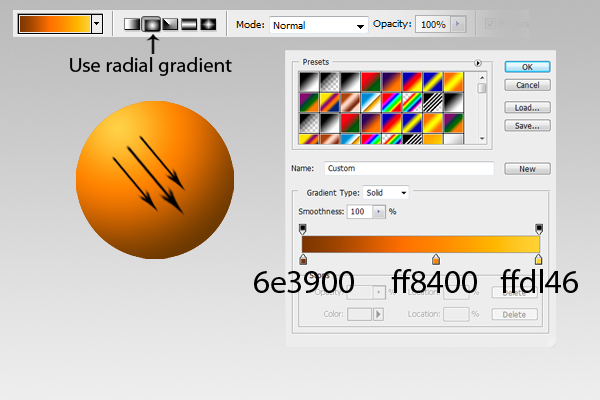
Fill the entire selection with the colors as indicated below using a Radial gradient.
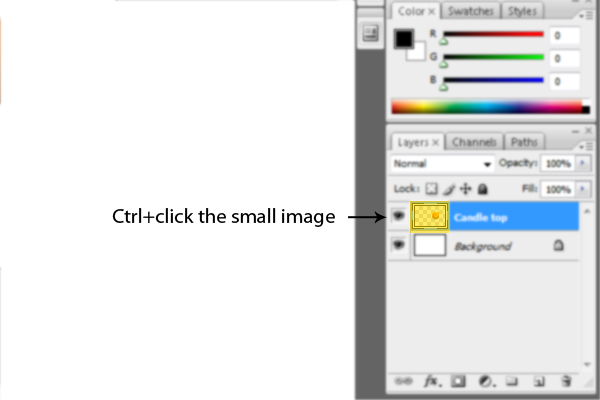
In the "Candle top" layer, select the small thumbnail on the left side of the layer’s name while holding the Cmd key to activate the selection marquee around the circle.
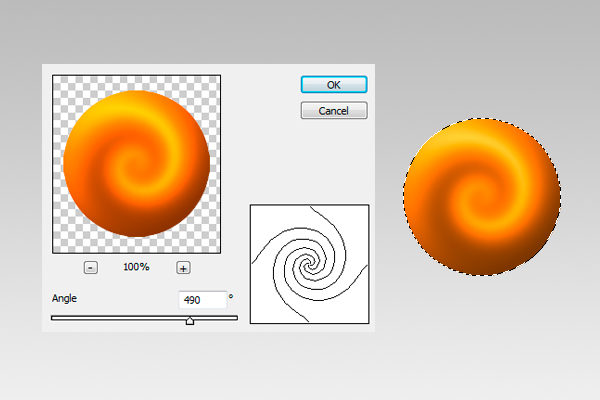
Now go to Filter > Distort > Twirl and change the its value to an angle of 490 degrees.
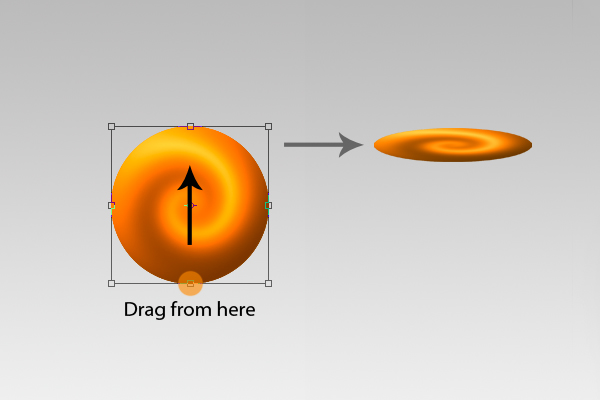
Press Cmd + T to activate the resizing handles, then do what is shown below.
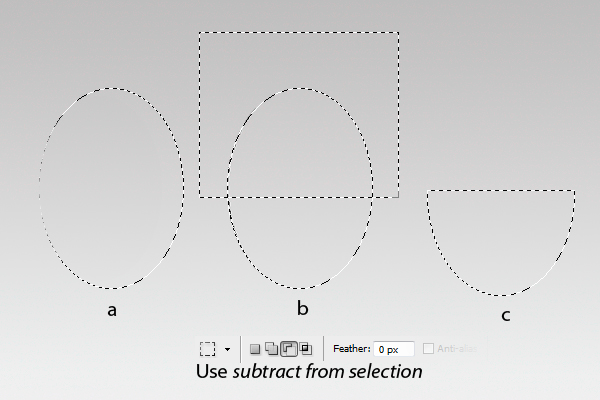
Create a new layer and name it as "Candle body". Using the Elliptical marquee tool (M), make a shape as shown in figure (a). Then using the Rectangle marquee tool (M) set in Subtract from selection mode, do what was done in figure (b) and the final product should look like (c).
Using a Radial Gradient, fill the entire "Candle body" selection with the colors as indicated below.
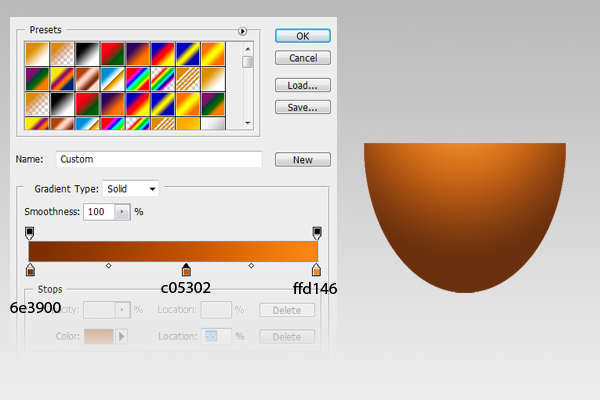
Your image should look similar to the below image.
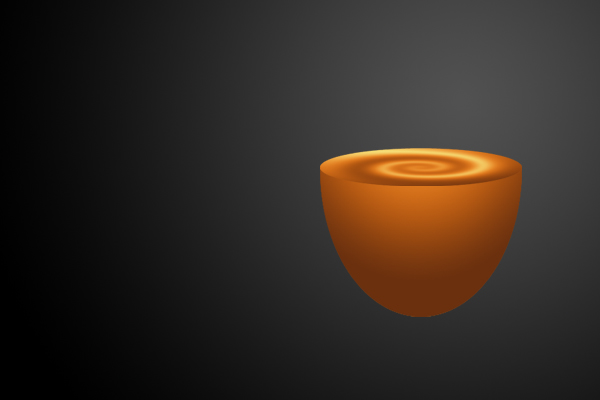
Note: Make sure that the "Candle body" layer is placed below the "Candle top" layer.
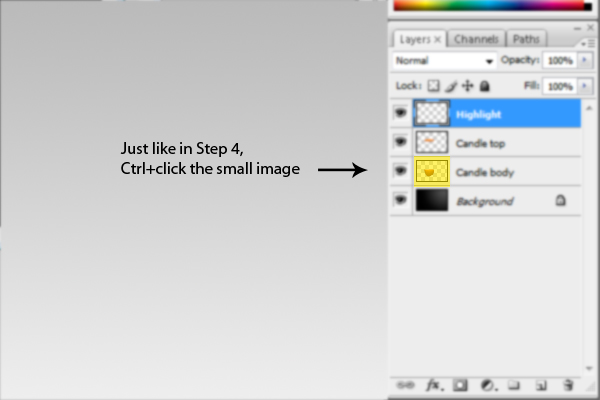
Next add a new layer and name it "Highlights". Now, just as in Step 4, Cmd-click the "Candle body" layer to activate the selection around the shape.
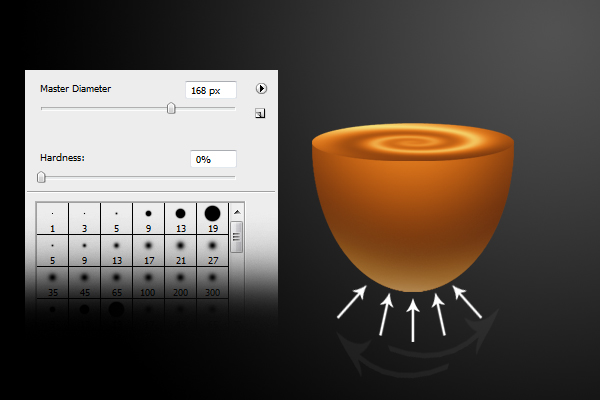
Using the brush tool with a Master diameter of 168px and hardness of 0%, apply a subtle amount of color #985e11 to add a small glow below the body of the candle. This will give an illusion of light passing through the solid translucent body of the candle.
Now make a new layer and name it "Highlights-2." Use the same technique as in Step 9 but use the color #ffffff for the brush with a Master diameter of 168px and hardness of 0%.
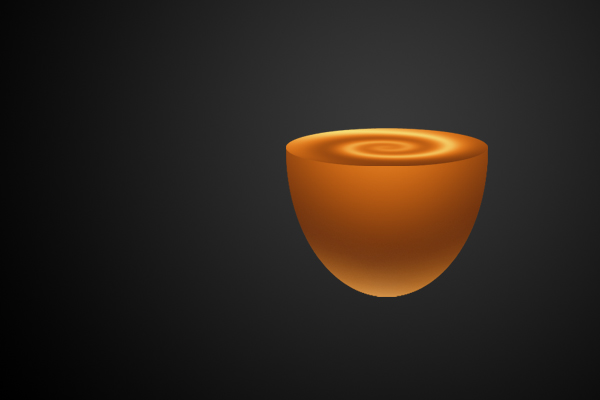
Now add a new layer and name it "glass". Using the Elliptical marquee tool (M) make a shape as shown below.
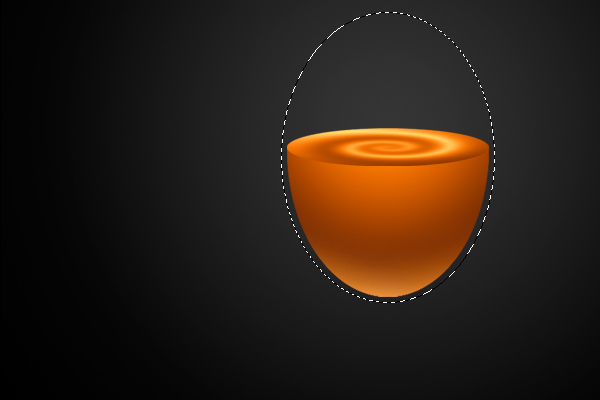
Next use the Pen tool (P) to draw a shape as shown below. Make sure to select Subtract from selection mode from the pen tool panel before plotting the points. After completing the shape, right-click and choose Make Selection. From the Make selection window, configure the feather radius to 0px then click OK.
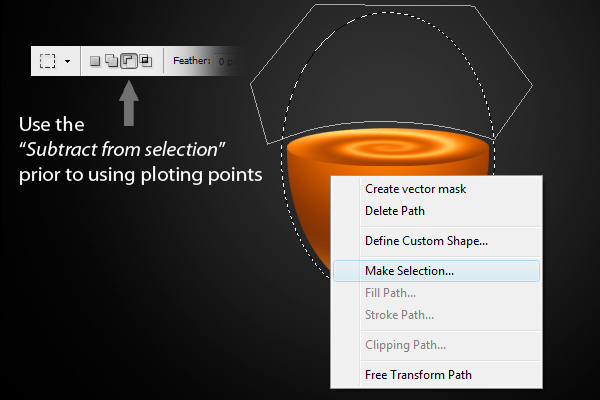

Apply a linear Gradient as shown from top to bottom.
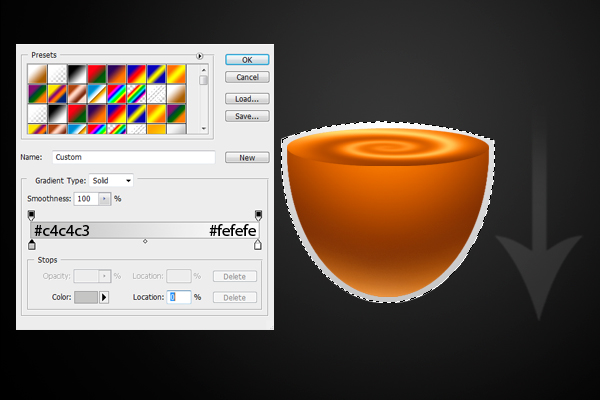
Lastly, change its opacity to 7%.

Now duplicate the "Glass" layer and rename it "Glass highlights" then change its opacity level back to 100%.

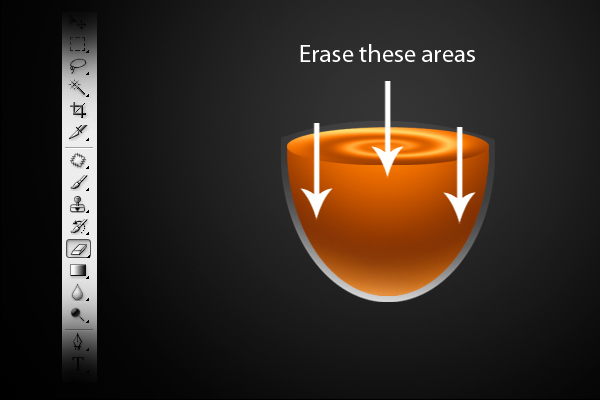
Using the Eraser tool (E), erase the areas as indicated below, leaving a small amount at the bottom.
Next, add a new layer and name it "Glass face". Then, using the Elliptical marquee tool (M), make a shape as shown below.
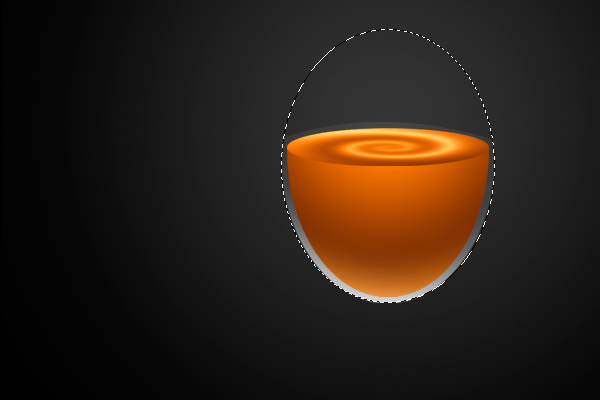
Now using the Pen tool (P), set it to Subtract from selection in the Pen tool panel, then make a shape as shown below. After completing the shape right-click and choose Make selection from the drop down menu. From the Make selection window, adjust its Feather radius to 0px, then hit OK.
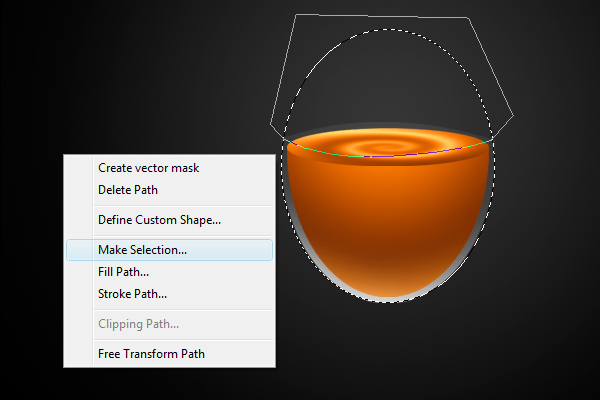

Next use the Pen tool (P) to make a shape as shown below, make sure that the Pen tool (P) is set to Subtract from selection mode from the Pen tool (P) panel. Press right-click and choose Make selection from the drop down menu. From the Make selection window, adjust its Feather radius to 0px, then hit OK.
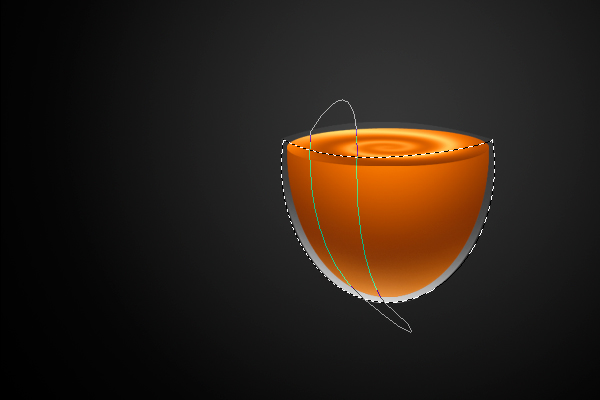

Finally, fill the selection with #ffffff and set its opacity level to 30%.

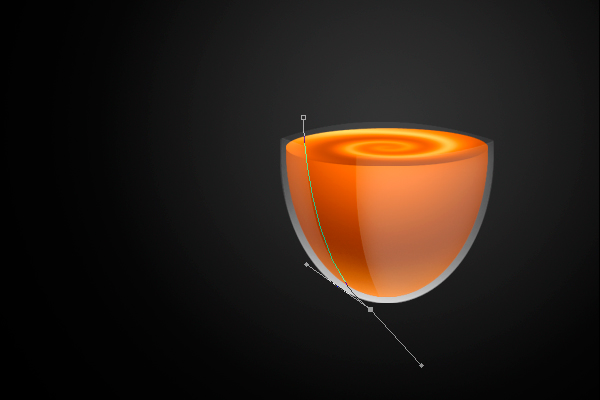
Now add a new layer and name it "Left glow". Then, using the Pen tool (P) draw a line as shown below. Now go to the Brush tool (B) then right-click anywhere in your image to show the brush panel. From the brush panel configure its values with a Master diameter of 20px and hardness of 0%. Then go back to the Pen tool (P), right-click and choose Stroke path from the drop-down menu. From the Stroke path window, define its stroke to use the Brush tool. Hit OK to accept the changes. Then go to Filter > Blur > Gaussian blur and from there, change its radius to 2px then press OK. Lastly, change its opacity level to 80%.

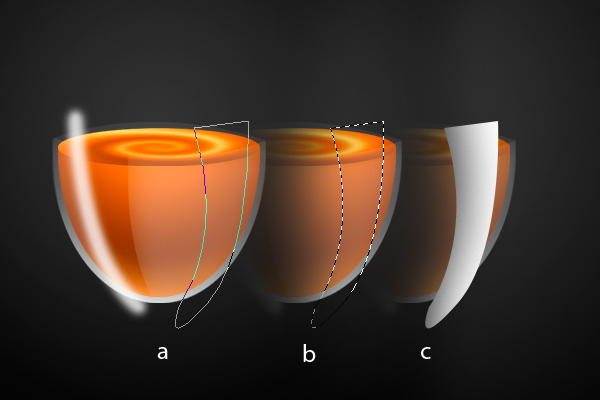
Next add a new layer and name it "Right glow". Now use the Pen tool (P), make a shape as shown in figure (a). Then right-click and select Make selection from the drop-down menu. From the Make selection window, configure its feather radius to 0px then hit OK. The effect should look like figure (b). Fill the selection with #ffffff, as shown in figure (c).
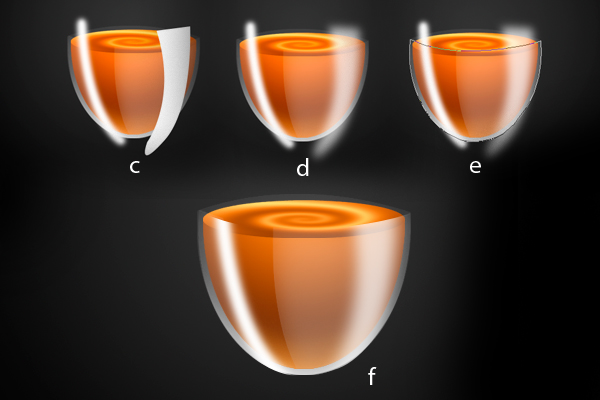
Now from figure (c), go to Filter > Blur > Gaussian blur. From the Gaussian blur window, change its radius to 5px then press OK. Next, change its opacity level to 70%. The effect should look like figure (d). Next use the Pen tool (P) to define a shape as shown in figure (e). Next, right-click and choose Make selection from the drop-down menu. From the Make selection window, change its radius to 0px then hit OK. After that, Cmd + Shift + I to invert the selection then hit delete. The final product should look like figure (f). Lastly, change its opacity level to 70%.
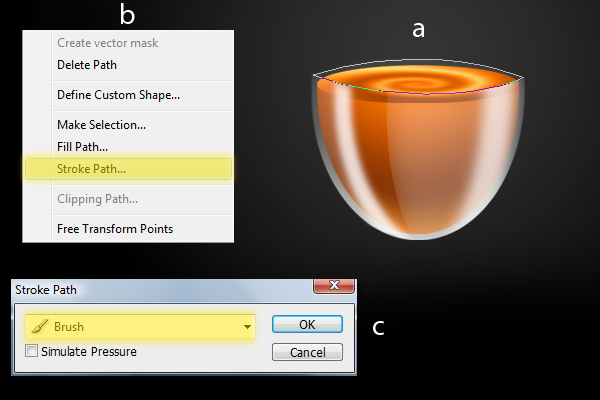
Add a new layer and name it "Rim highlights". Then, using the Pen tool (P), draw a line as in figure (a). Now go to the Brush tool (B) then press right-click anywhere in your image to show the brush panel. From the brush window, configure its values with a Master diameter of 2px and Hardness of 100%. Then go back to the Pen tool (P) then right-click and choose Stroke path from the drop-down menu as in figure (b). From the Stroke path window, define its stroke path to use the Brush tool as shown in figure (c.) Hit OK to accept the changes. Next, change its blend mode to overlay.

Next, add a new layer and name it "Shadow shade". Using the Pen tool (P), make a shape as shown in figure (a). Next right-click and select Make selection from the drop-down menu. From the Make selection window, set the feather radius to 0px. Using the Paint bucket tool (G), fill the entire selection with #000000, as in figure (b). Erase it as shown in figure (c).
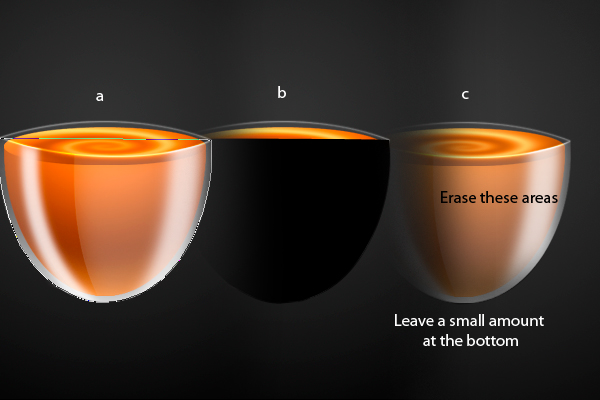
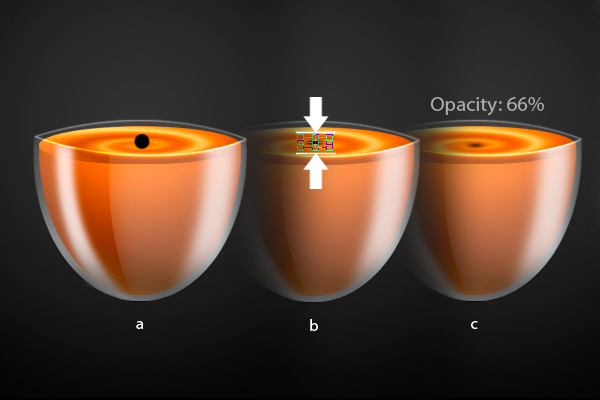
Add a new layer and name it "Wick Shadow". Using the Brush tool (B), set the Master diameter to 20px with a Hardness of 100%. Place a small dot in the center of the twirl on the top portion of the candle as in figure (a). Hit Cmd + T to activate the resizing handles, as in figure (b). Resize the circle vertically, then go to Filter > Blur > Gaussian blur and setting its radius to 32px. Change the layer’s opacity level to 66%.
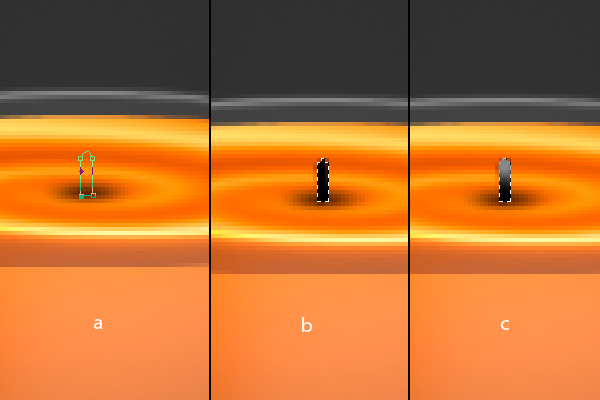
Next, add a new layer and name it "Wick". Using the Pen tool (P) make a shape as in figure (a). Right-click and choose Make selection from the drop-down menu. From there, adjust its feather radius to 0px. Using the Paint bucket tool (G) fill the entire selection with #000000, as shown in figure (b). Using the Brush tool (B), set the Master diameter to 17px with a Hardness of 0%, apply a small amount of #8b8b8b on top of the wick.
Next is to put a gradient "glow" effect on the wick. Add a new layer and name it "Wick burn". Use the colors as indicated below with their corresponding brush size.
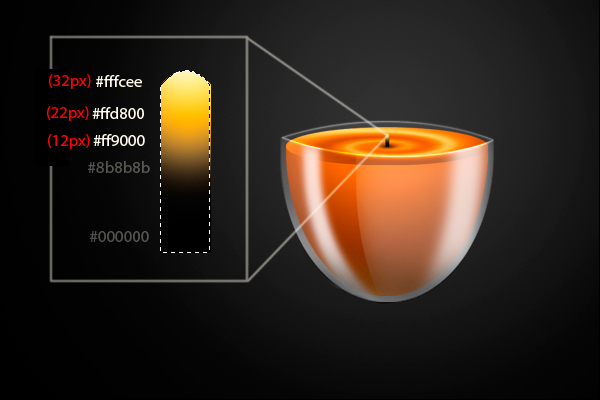
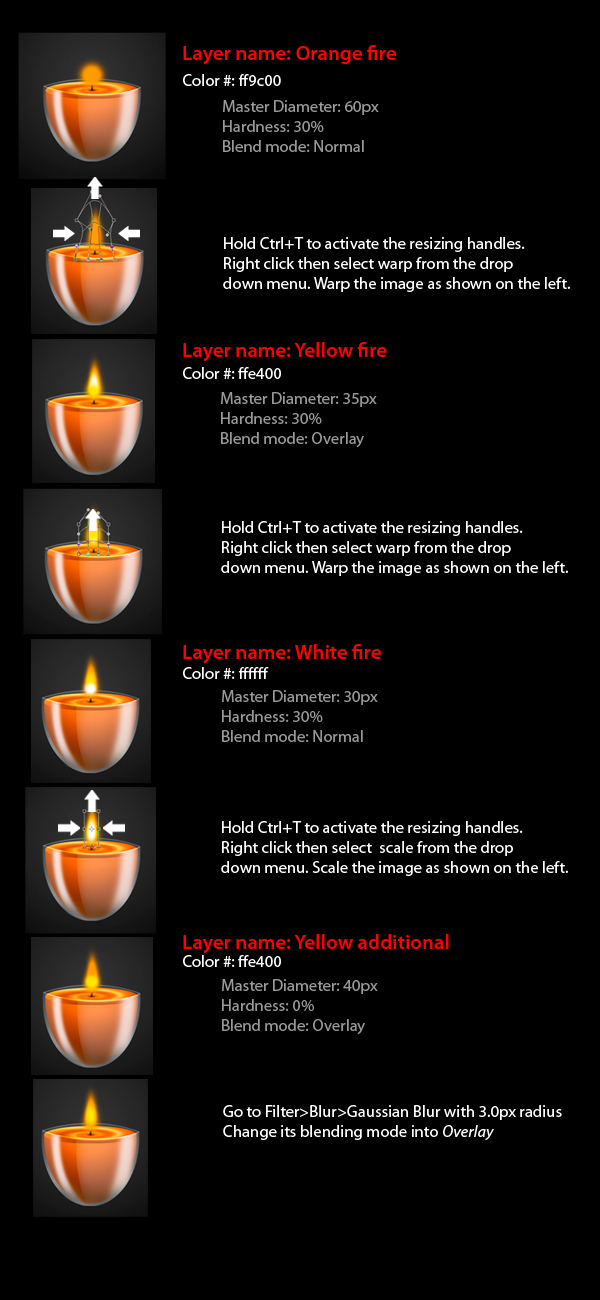
Now we’ll be creating the flame for the candle. For this part instead of creating a new layer, we’ll be creating a new group, named "Fire group". To create the flame, follow the instructions below with its corresponding layer name, color and brush settings.
Note: Make sure that all of these layers are made inside the Fire group to prevent a cluttered layers palette.
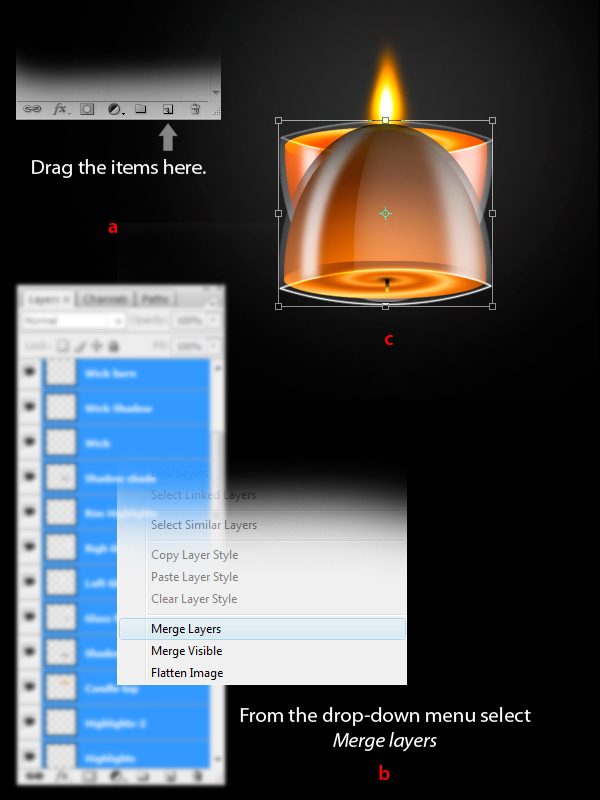
Now we’ll make the reflection for the candle. First, duplicate all of the candle layers. You can do this by Cmd-clicking the layers needed. After you’ve selected all the components drag them to the Create a new layer icon in the layers palette, (a). Next, merge all layers by right-clicking within the layers palette while the blue highlights for all the layers is still active. Next, select Merge Layers from the drop-down menu as in figure (b). Now name this layer "Reflection". Next hold Cmd+T to activate the resizing handles then right-click and select flip vertical from the drop-down menu.
Place the image as shown below.

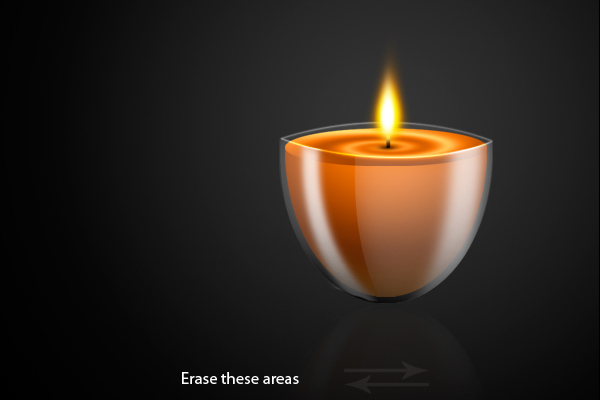
Adjust its opacity level to 6% and erase areas as indicated below using the Eraser tool (E) with a Master Diameter of 257px and Hardness of 0%.
Next, let’s add shadow to our candle. To do this, add a new layer and name it "Shadow 100". Next, using the Elliptical marquee tool (M), make an oval shape as shown below. Fill the entire selection with #000000. Go to Filter > Blur > Gaussian blur and set the radius to 7.2px.
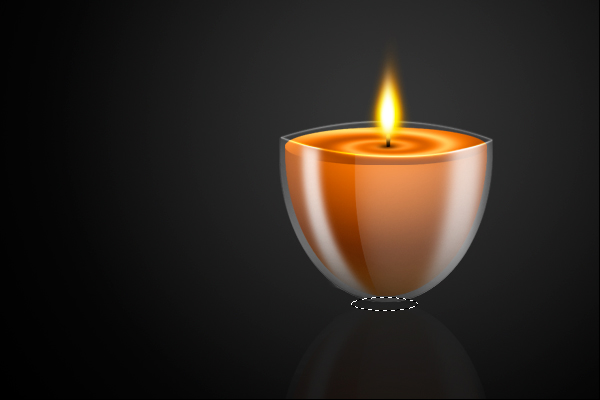
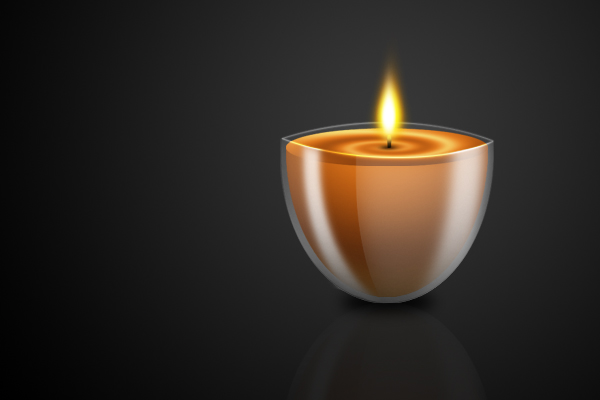
Duplicate the "Shadow 100" layer then hit Cmd + T to activate the resizing handles. Scale the duplicated later as shown below, then lower its opacity to 90%.
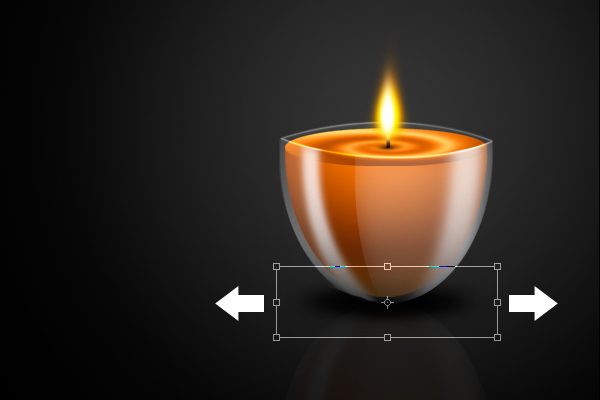
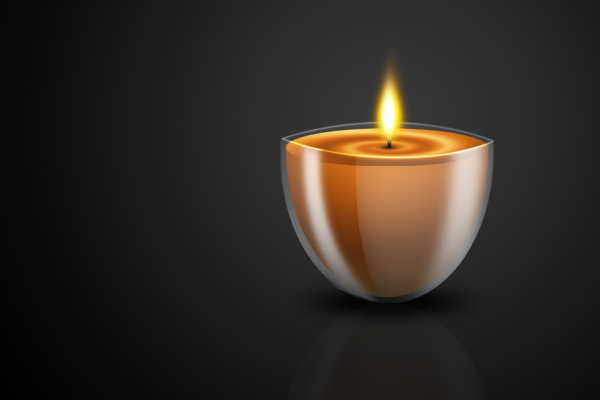
The next step is to add a subtle "Glow" coming from the candle’s flame. To do this, add a new layer and name it "Glow". Use the Brush tool (B) set to Master diameter of 473px and Hardness of 0% with color #ffffff. Follow the indicated position of the brush below.
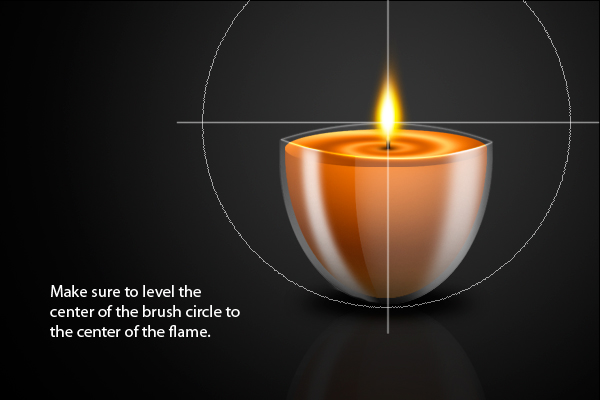
Set the blending mode of this layer to overlay with an opacity of 50%.
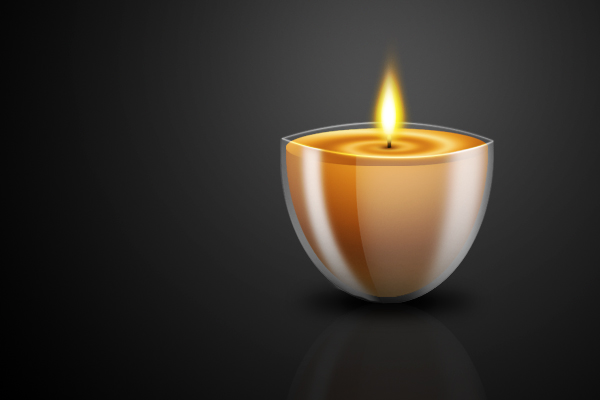
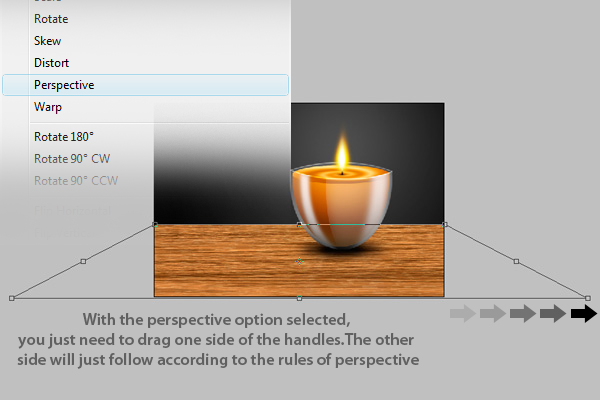
Next is to add the table where the candle will be sitting. Open the file named "Wood.jpg", then hit Cmd + T to activate the resizing handles. Right-click and select perspective from the drop-down menu, then change the Wood’s shape as shown below.
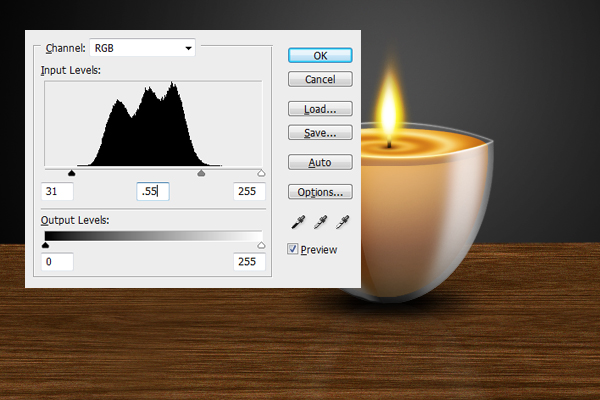
Next press Cmd + L to activate the Levels window, then set the values for the three handles as shown below.
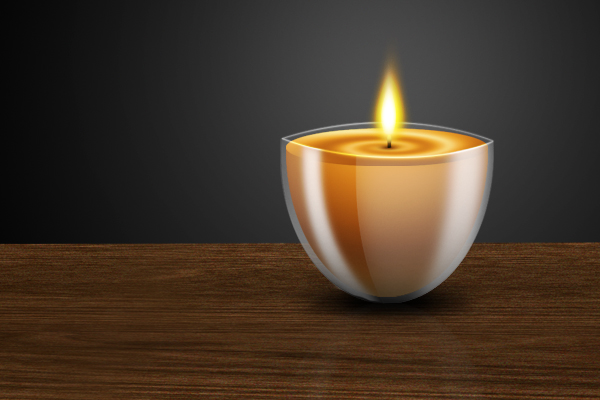
Next add a new layer and name it "Wood shade". Using the Rectangle marquee tool (M) select an area as indicated below.
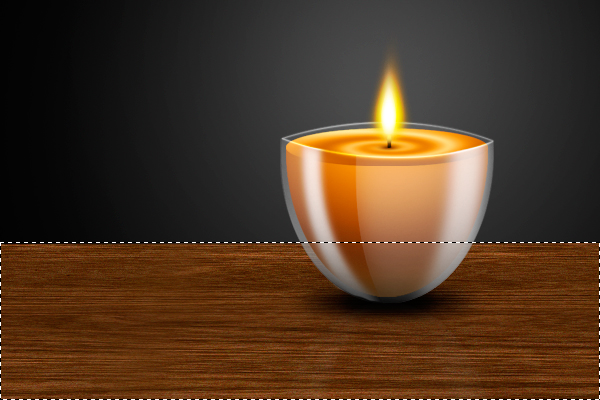
Fill the entire selection with #000000.
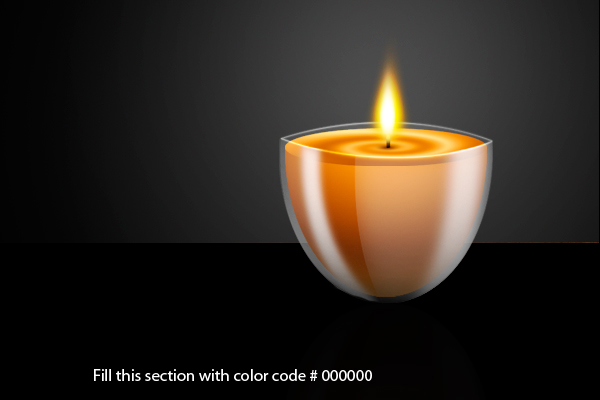
Using the Eraser tool (E) set to Master Diameter 750px and Hardness of 0% erase the area as indicated below.
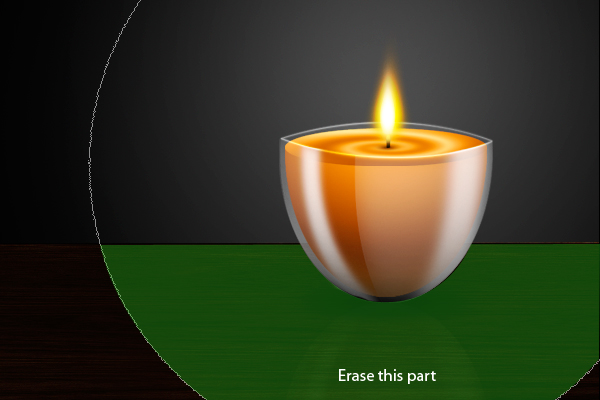
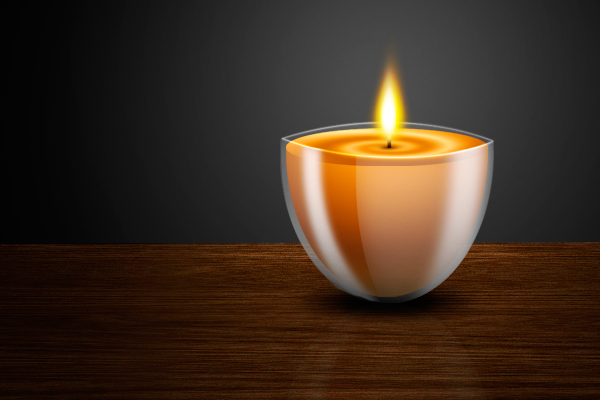
Next add a new layer and name it "Circle light". Using the Elliptical marquee tool (M) make a shape as shown below. Fill the entire selection with #ffffff.
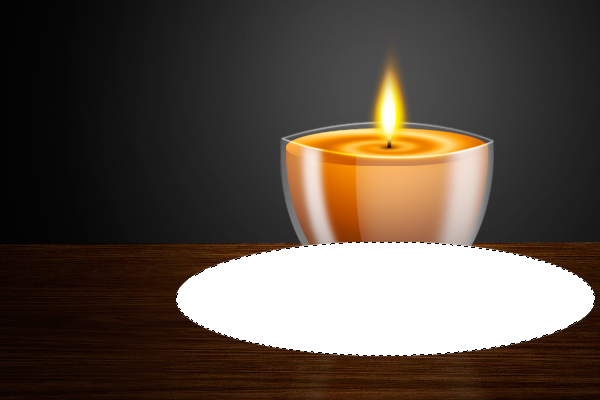
Go back to the Elliptical marquee tool (M) then right-click. Select Transform selection from the drop-down menu, and change the shape of the oval as shown below.
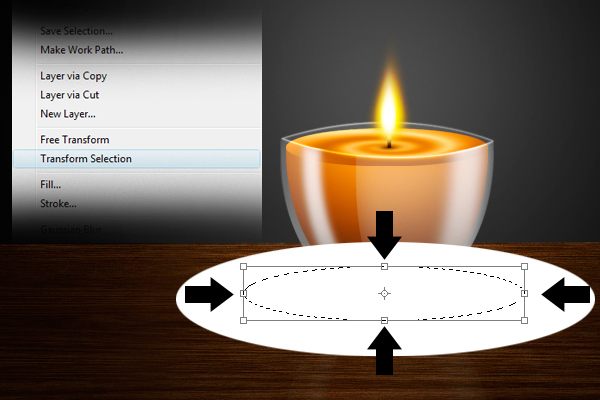
Hit delete.

Next, go to Filter > Blur > Gaussian blur and set its radius to 7.2px then change its opacity level to 4%.
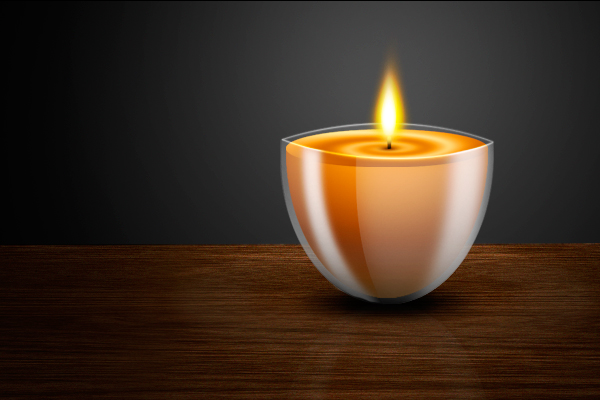
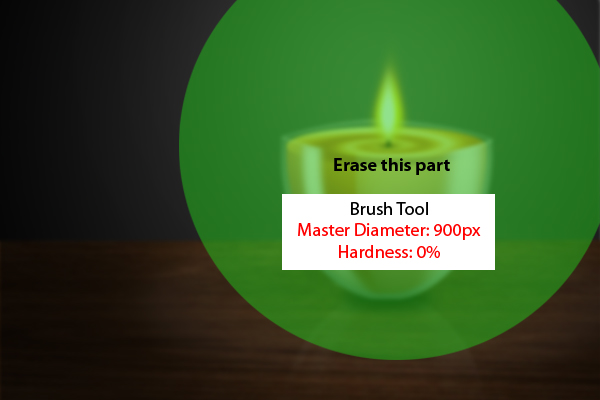
As for the last step, select all the layers and drag them to the Create a New layer icon as shown in figure (a). Next, merge all of them by right-clicking in the layers panel and selecting Merge layer from the drop-down menu as shown in figure (b). Lastly, go to Filter > Blur > Gaussian Blur and set its radius to 5px as shown in figure (c).
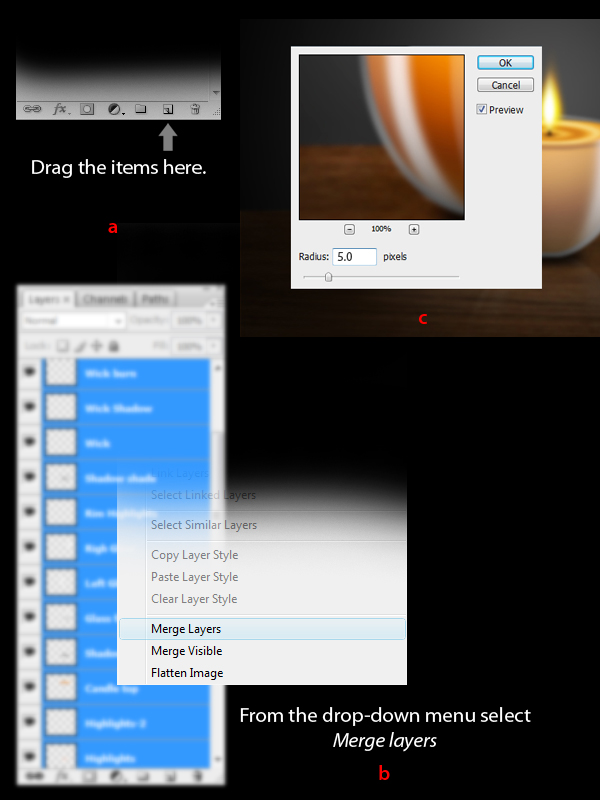
Erase the area as shown below using the indicated settings.
That’s it! Hope you had fun working on this project and learned many things that will help you in the future!
the indicator I use gives me an alert at the close of the candle – I would prefer to have the alert during the current candle, instead of waiting for the candle to close. You would need to decompile the indicator, even though I have it in an EA and also mq4… (Budget: $30-250, Jobs: Metatrader)