Website Logo

Need designer for a website logo. Site in question is a font download and typography-related site.
Logo needs to replace the one at the top, here at www.typenow.net/2009/

Width no more than 400pixel and height no more than 100pixel. Colours: Black/white/gray/and the shade of orange at the site.
Designer is also required to design and provide an image for favicon.
Designer would provide the raster image to be used on the site, and a vector image also for us to use. Image and logo would be our property. We would prefer designer to use freeware fonts, if possible. In any case, designer is required to inform us of the name of the font used in the logo.

Designer is required to provide a sketch of the final design. Selection of bid would be based on the sketch given.

How to Create a Still Life in the Style of Primitive Art


In this tutorial we will review the basic rules of creating still life compositions. The techniques described here will help you to create artworks in the style of primitive art. There is no necessity to create a sketch at the beginning of your work. We will work to reproduce this style with the help of Adobe Illustrator tools. Let’s get started!

Continue reading “How to Create a Still Life in the Style of Primitive Art”

A Guide to Freezing and Bouncing in FL Studio

Freezing. Bouncing. Rendering tracks. Whatever you call it, it is a useful part of music production because it allows you to free up CPU power for more plugins and creates an audio file. While it’s not a one-click solution, bouncing in FL Studio is a process that is easy enough to be straightforward but complicated enough to give the user a lot of control. The first five steps may be all you need to know to get started with freezing tracks in FL Studio, and you can check out the rest of this tutorial to go in-depth with handling special circumstances.

To clarify, freezing a track means rendering that track as an audio file, and then disabling the plugins. This tutorial is about doing this process in a way that does not alter the sound of the track, and that allows you to keep the plugins in the project file in case you decide to “unfreeze” and adjust the plugins.


Example 1

Step 1: Project Data Folder

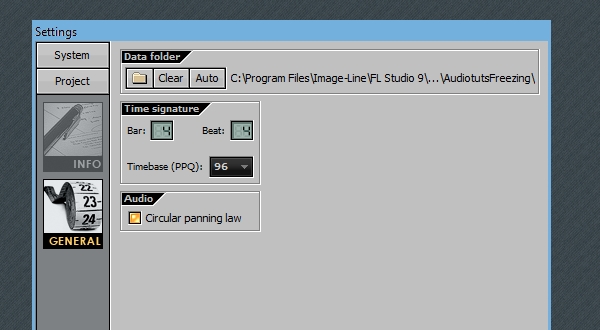
Before we begin, we can specify a folder to hold all our bounced audio material for this project. Use keyboard shortcut F11, and navigate to Project > General Settings, and click on the project Data Folder to do this.

Step 2: Select Timeline

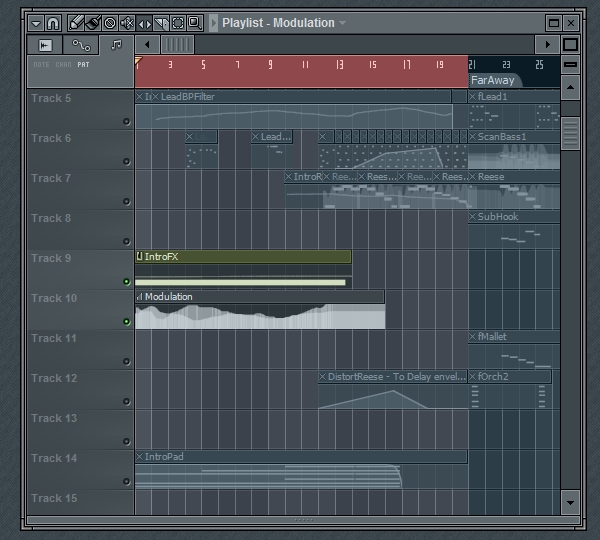
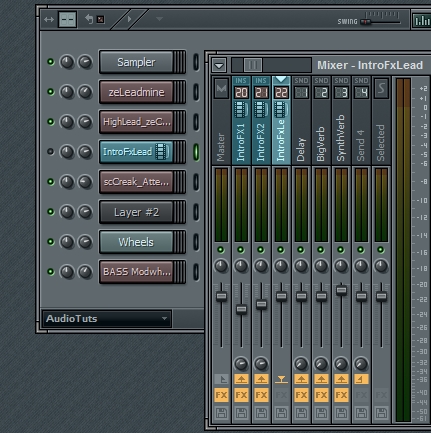
For this first example, I have a synth that is sent to a mixer track, which is then routed to two other mixer tracks where it is being heavily effected and modulated. It’s an intro effects soundscape that is taking quite a bit of CPU. I’ll be using this to give an example of how to bounce a track with effects.

First, navigate to the part of the Playlist where the section you want to freeze is located, which in some cases will be the whole song or most of the song. Regardless of how big it is, select the section, and be sure to give enough space on the end for the sound to fade out. Muting the other tracks is not necessary, but may help with determining where the sound ends.

Step 3: Prepare for Rendering

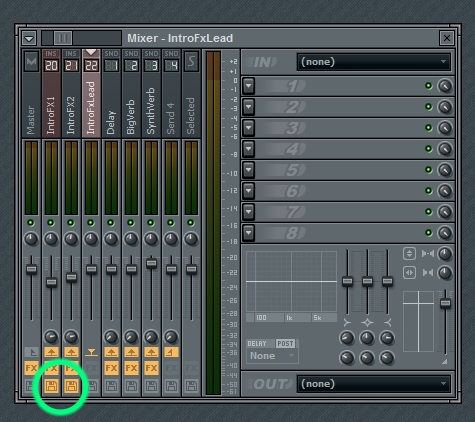
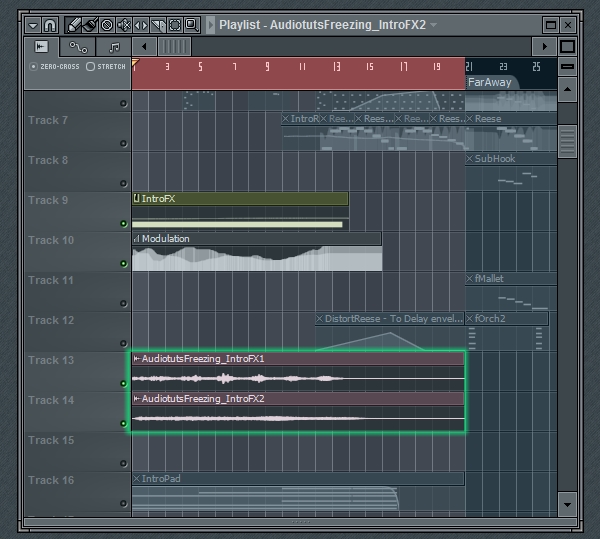
Open the Mixer and click on the Arm Disc Recording button for each track you want to render, which in my case is the two effected tracks. Each time you click this button, a dialog will pop up asking you to give a name for the file. It won’t render the tracks until later, but this will give it a name to have ready.

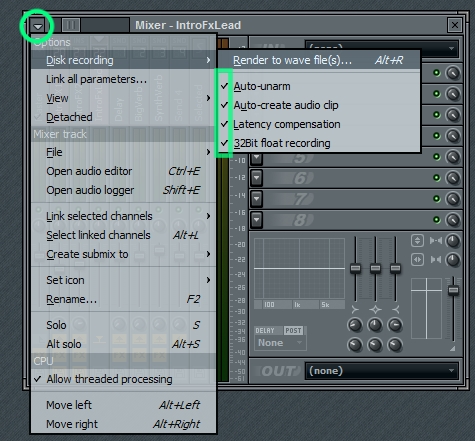
Next, go to the Mixer’s dropdown menu, and select Disk recording > Render to wave files. I recommend having all the options selected.

Now FL Studio will render the files, and automatically save them in the project data folder, with the names we specified. When it’s done, check the Playlist to see the files appear.

Step 4: Disable or Delete Plugins, Save CPU Power

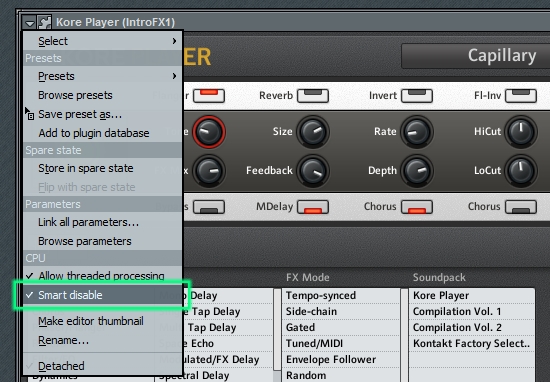
To finish the freezing process, mute the midi and automation clips in the Playlist or mute the plugins, and enable Smart Disable for all the instrument and effects plugins that went into making this sound. This will allow you to turn off the plugins and free up some CPU power, and you could reactivate the plugins later by muting the audio clips and enabling the plugins. Alternatively, you could delete the plugins and erase the clips, but then you would not be able to go back and alter the sound.

Step 5: Optional Finishing Touches

From here, you can choose to route the audio clips to the mixer however you want. Another note is that because I used this technique, I was able to get a separate audio file for both mixer tracks, and I took advantage of this by reusing one or both audio files at different times in the arrangement.

Perhaps you would like to signal that a track is frozen by noting it through a certain color and icon.


Example 2 Pattern freezing, Pre-FX bouncing

In the first example, we rendered a pattern post-fx. But often, you’ll want to freeze an instrument without the effects. At times you may want to render a pattern that repeats itself in the song. We’ll tackle both of these situations in the next example.

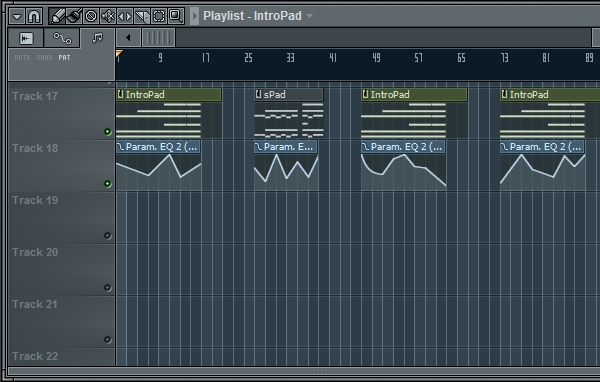
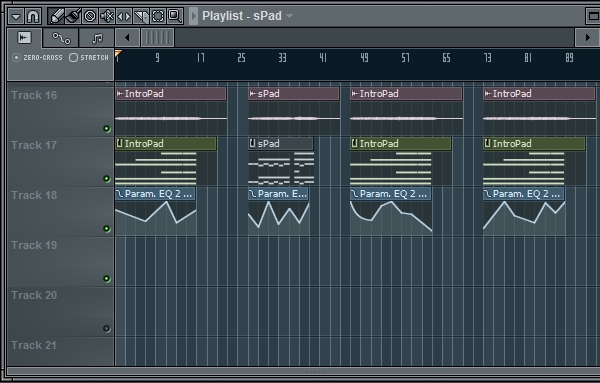
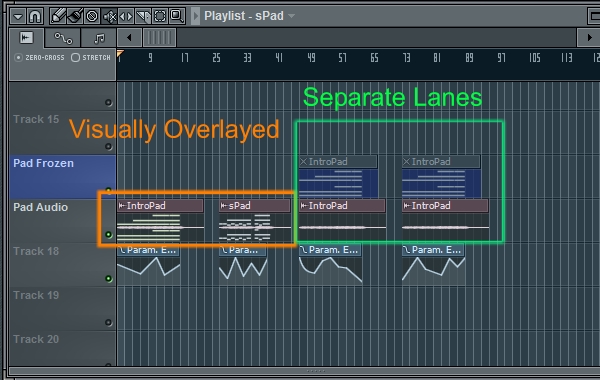
There are two patterns. One of which is called IntroPad, which plays three times, and the other is called sPad which plays once. The easiest way to render this would be to select the whole timeline and render it all, and sometimes the arrangement is so complicated that this is the best route. But this time, we could save some hard drive space by rendering the two patterns and then arranging the audio clips to match the song.

You may have noticed in the image that there is an obstacle preventing us from doing this disc space-saving plan, and that is that each pattern instance has unique automation. This is automating an EQ in the mixer FX. We can render the audio, one clip for each of the two patterns, without the EQ to get the unaffected instrument sound. Then we can reapply the same effects to the audio files and have the same sound.

An easier way to do this, however, is simply to route the instrument to a blank mixer track and render the audio files without any mixer effects or level/pan adjustments. Then, we’ll route the audio files to the mixer track that the instrument was originally linked to. This will freeze the instrument plugin, but our automation and effects settings will remain intact and tweakable.

Step 1: Route to Blank Mixer Track

First, let’s reroute the instrument to a blank mixer track.

Step 2: Select the Timeline

Then, we’ll select the timeline. While you could go into pattern mode, I prefer remaining in song mode and selecting the area in the Playlist, so that I can manually adjust the timing if the sound has long release.

Then following the same process from earlier, select the Arm Disc Recording button, and name the file the same as the pattern.

Step 3: Rendering the Files

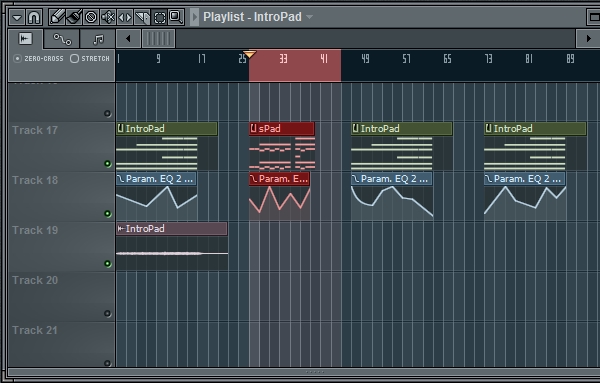
From the Mixer menu, select Disc Recording > Render to Wave Files, and wait for the file to render. Next, let’s select the other pattern and do the same process.

After that, arrange the audio files to match the patterns.

Step 4: Route Back Into the FX Track

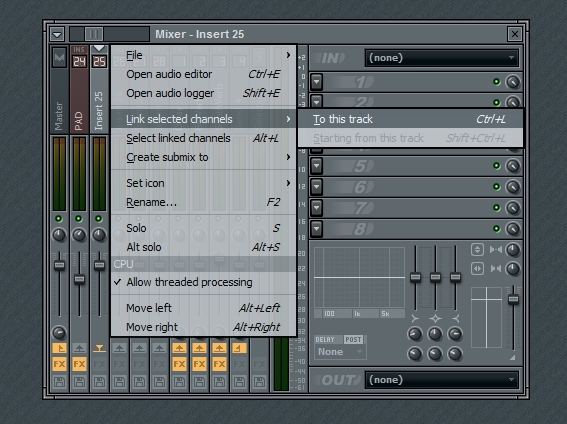
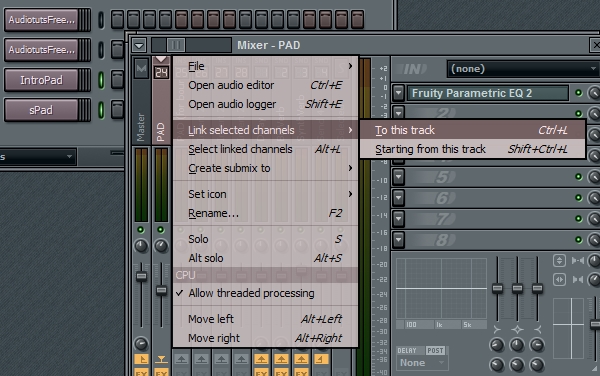
Then select the audio clips and link them to the mixer track that the instrument plugin was originally linked to.

Step 5: Muting and Disabling

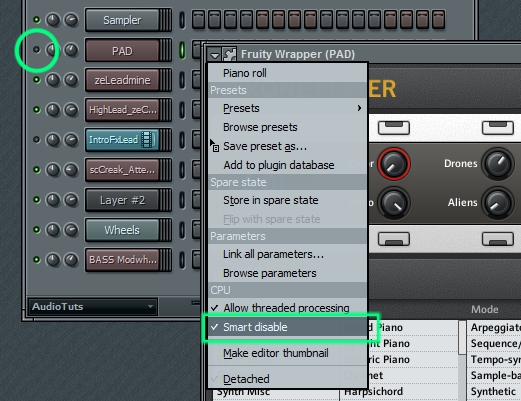
Now that the routing is done, we’ll need to mute the original instrument. We should also select Smart Disable for the instrument in order to save CPU. (sound familiar?)

Step 6: Optional Finishing Touches

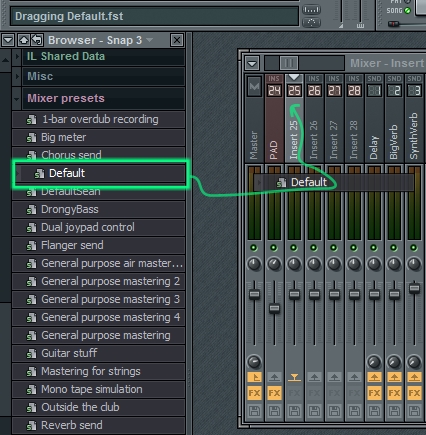
Lastly, let’s return the “blank” mixer track to its original blankness. Making a habit of this will keep the mixer neat and clear. The easiest way to do this is to navigate to the Mixer Presets folder in the Browser, and drag and drop the Default.fst file onto the mixer track.

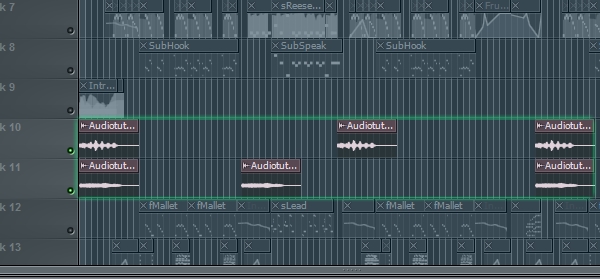
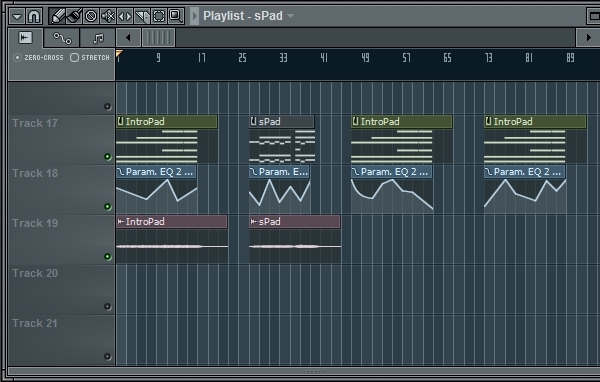
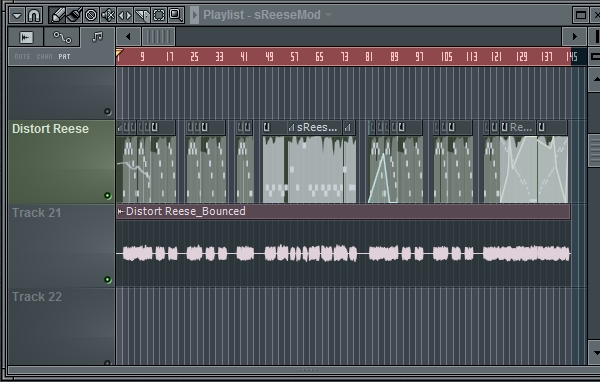
Since we’ve muted the instrument, it doesn’t matter how we handle the midi clips in the Playlist. You could delete the clips if you want, but you might want to stack the midi clips with the audio to have a visual representation of the notes, or you may want to keep the midi on its own track and mute it to visually show that its been frozen. The following image shows what two visual techniques might look like:


Example 3, Partial Freezing

We’ve covered situations when you want to render a track with or without effects, but there is a third option. What about situations when you want to render a track with some of the effects? This is actually quite a common situation. For example, you might want to bounce down a track for which you’re sure about the compression, but still want to be able to tweak the EQ or Reverb. For this next example, I’m going to bounce the instrument and its compression, but not the EQ.

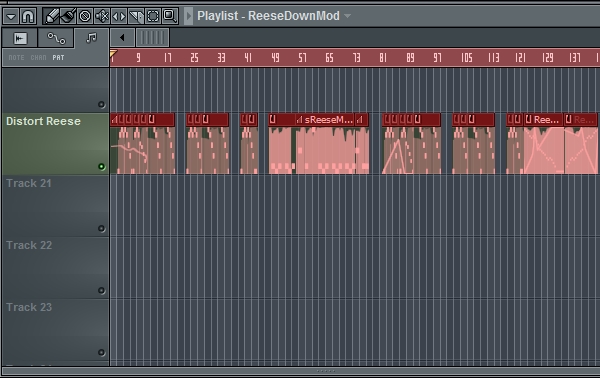
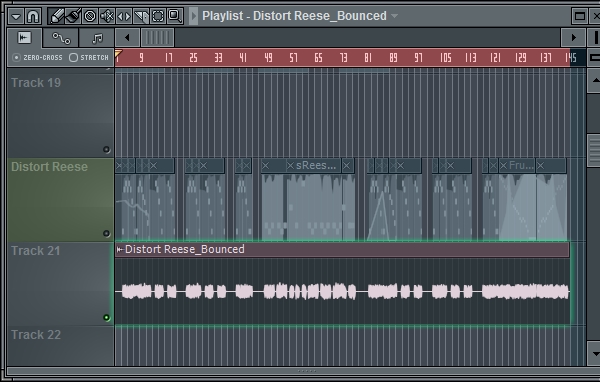
Here is the track in the Playlist.

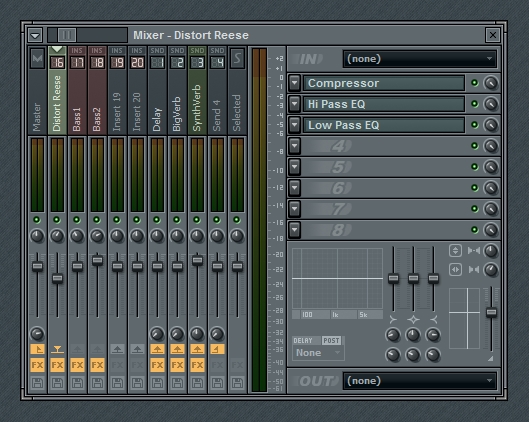
Above is the mixer set up. As you can see, the track I want to freeze, which is the Distort Reese track, has two other tracks routed to it, which are Bass1 and Bass2. This sound is actually made up of two instrument plugins being sent through their own mixer tracks with their own effects, and then they are routed together to the same bus. I stand to save a lot of CPU by bouncing these instruments.

Step 1: Decide How Far

The basic idea is to decide how far into the signal chain to freeze the sound? What should be permanent? What should be adjustable?

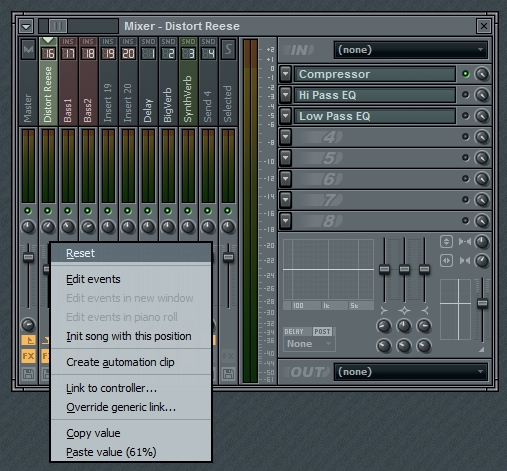
First, mute all the effects plugins you don’t want to freeze, and be sure to note the values of the level and panning of this mixer track. We’ll need to set the panning to center and the level to the default value, so that when we route the audio back to this track it will be received by the EQ plugins the same as it was before the bounce, pre-level and pre-panning.

A note about the level, however, is that if setting the level to the default value causes the audio to clip, then you’ll want to keep the level at the setting it currently is, and then reset the level after bouncing. Resetting the fader makes it transparent, so that it won’t add or take away from the volume of the track.

Step 2: Bounce

Next, Arm disk recording and render the audio file.

Step 3: Mixer Routing, Flip the Plugins On/Off

Link the audio file to the mixer track, and turn on the effects that were turned off for the bouncing. Basically, what was off gets turned on, and what was on gets turned off, and disabled. Also, adjust the panning to its previous location and adjust the level if needed. This will result in having the same sound before we began this process, the only difference being that we save some CPU and we can’t adjust the frozen plugins.

Step 4: A Special Situation

In this situation, much of the automation was recorded to the same patterns as the notes, so we can’t mute the Midi track in the Playlist. You may be concerned about the notes in the track, but they will not cause anything since the instrument is muted.

That’s possibly all there is to know about bouncing in FL Studio. In the first example I covered the basic process for freezing in FL Studio, and in the other two examples I showed how to freeze without effects. Once you get this down, bouncing tracks will take only a minute, and this can be a handy technique to have available when the CPU starts getting overloaded. Thanks to freezing, you can keep loading new plugins as you need them.


Final Words

Aside from freeing CPU, there are other benefits to rendering tracks:

  • It makes the sound permanent. You don’t have to worry about accidentally changing it and it backs up your work for the future.
  • You can render groups/busses in order to make stems for mixers and remixers.
  • You can further edit and manipulate bounced tracks with audio-specific techniques like chopping, scratching,and stretching.


Quick Tip: Create a Pad From Scratch in Cakewalk z3ta

One of my favourite composers is Cliff Martinez, an ex-drummer of Red Hot Chilli Peppers. He is working as a film composer right now, scoring most of Steven Sodenberg’s features. The one thing that inspires me very much about his scores is that he uses a great deal of atmospheric pads, which definitely picture emotions and landscapes. A while ago I wanted to make some ambient-downtempo tracks and I can’t hide that I was greatly inspired by Cliff Martinez.

Then I came to a huge problem – I didn’t have any nice VST instruments around and I only had RgcAudio’s z3ta (which was later bought by Cakewalk). This plugin can be bought for $99 from the online Cakewalk store and in my opinion this is one of the greatest soft synths around. It is good for trance, drum and bass, chill-out and even some distorted industrial tracks.

In this quick tip, I’ll try to explain how to create a nice and unique pad that you can use in your music.


Step 1: Start the Synth Sound from Scratch

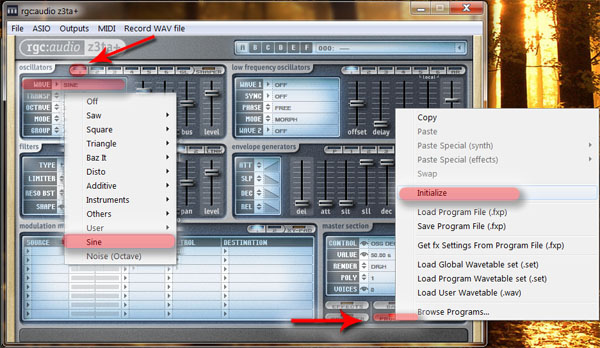
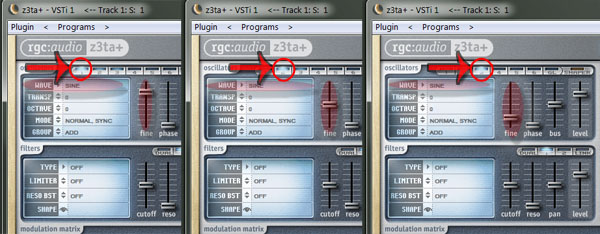
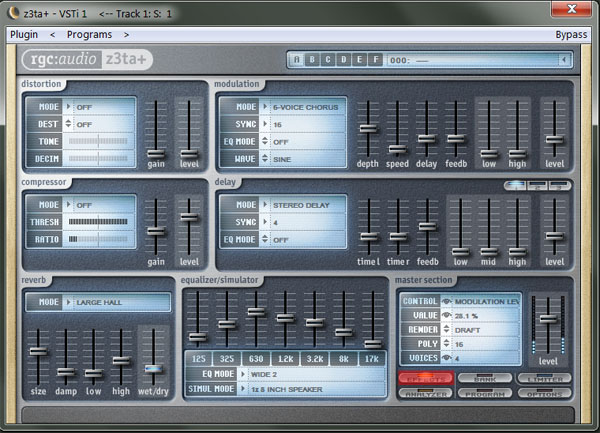
Load z3ta in your DAW (or standalone) and immediately after that create a new instrument. In order to do so, you’ll have to click PROGRAM → INITIALIZE (as in the picture). After that, in the oscillators pane, load a sine wave as our first oscillator. You can do this by clicking on WAVE and then by selecting SINE in the drop-down list.

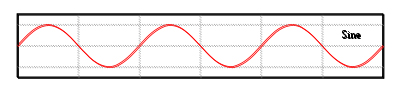
If you don’t know what an oscillatoris, I’ll try to explain it simply. (If you would like to know more about them, perhaps you could try searching Wikipedia). The oscillator is a continuous audio signal, and has a specific form. In our case, we’ll be using a sine oscillator, which means that our audio wave will look like something like this:

Image taken from WikiPedia

You can hear what our single sine wave sounds like:

Download audio file (pad_1_sine.mp3)


Step 2: Load Different Sine Waves

Now, as you can probably hear, our sound is completely boring and mono. Therefore I’ll load two more sine waves and I’ll edit them in order to make the first and the third slightly out of tune. This is achieved with the help of the FINE slider.

As you can see from the picture, I increased the pitch of the first sine wave, the second one is normal, and the third one’s pitch is decreased.

You can hear how our sound has changed in a more sophisticated way:

Download audio file (pad_2_sine.mp3)


Step 3: Load Other Waveforms and Use Filtering

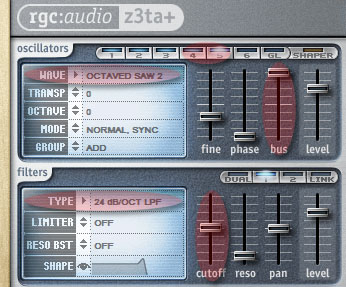
After I’ve done this, I decided to place two other waveforms – in my case two octaved saws. Click on the wave screen, then in the drop-down list select SAW → OCTAVED SAW.

I made them slightly out of tune, again.

You can hear how they sound from here:

Download audio file (pad_3_sine.mp3)

This is not very nice, right? You can hear that the saws have a very robotic feeling, that doesn’t come near to our ambient concept. Hence, I’ll send them to a low-pass filter. You can do this by using the BUS slider (marked in red) and after that by tweaking the cutoff frequency of the filter.

Download audio file (pad_4_sine.mp3)


Step 4: Polyphony

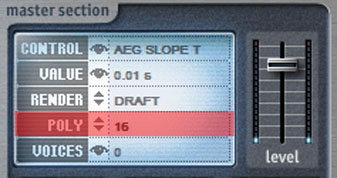
You’ve probably noticed that in our demos you can hear only G – A – G – G. But we’ll definitely want some chords out there. Examine the Master section controls of z3ta in the bottom right corner. You can adjust the POLY settings (marked with red on the image below). I changed the POLY settings to 16 – this means that the plugin will play simultaniously 16 different voices.

And our pad will sound like something like this:

Download audio file (pad_5_sine_chord.mp3)


Step 5: Editing ADSR Envelopes

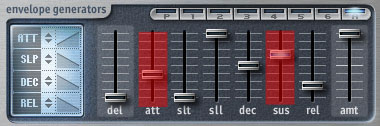
ADSR stands for to Attack/Decay/Sustain/Release, which are the primary characteristics of the envelope of a tone. If you go back to the previous demos, you can hear that we have a very strong and quick attack, and after that the sound gets really low. In order to change this and to create a constant sound, we will tweak the sustain slider. The more we increase the sustain value, the more the sound will hold up with the same amplitude.

Also, we’ll edit the attack slider a bit because we want our sound to be smooth and subtle.


Step 6: LFO and Controllers

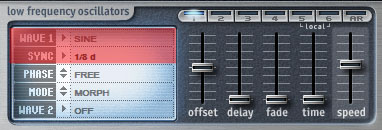
Perhaps some of you are wondering what an LFO is. LFO stands for Low Frequency Oscillator. LFOs are like normal oscillators, except for the fact that they are below 20 Hz. They can be used to create some pulse and in our case – to control different settings.

In the LFO panel, I’ll load three different types of low frequency oscillators, all of them with a sine form. You can see that there is a new button – SYNC. Sync allows us to make the waveform with specific rhythm. For example when you choose

The “1” means one beat. If the host tempo is set to 120 bpm the LFO will produce 120 cycles in this setting.

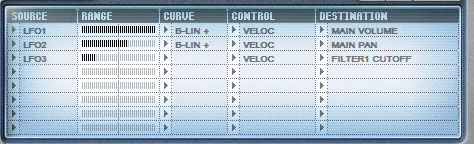
I created three different LFO’s, with different sync settings. After that I’ll connect them with some controllers:

As you can see from the picture, LFO controls main volume, LFO 2 – main pan, LFO 3 – filter cutoff. I’ve ranges in a certain way so that:


  • Volume will go heavily up and down with LFO1′s rhythm.
  • The sound will go from L to R with the rhythm of LFO 2.
  • The cutoff frequency of our filter will go slightly up with LFO3′s rhythm.

Download audio file (pad_7_sine.mp3)


Step 7: Finalizing Our Pad

Even after the last demo, we still have some problems: I personally don’t like the high frequencies (even though we have a filter applied), and even with the panning the pad sounds a bit mono. Now we have a huge arsenal of effect knobs and sliders to add variation and character to our synth sound. I’ll use chorus, delay and reverb to create some stereo effects and depth of the sound. I will also use a equalizer to shape the sound a bit.

Hear the final result:

Download audio file (pad_8_sine.mp3)

Don’t forget to save your file after tweaking!

Always save your patches and create an archive with sounds. In order to save the file, go to PROGRAM → SAVE PROGRAM FILE (.fxp).

And my final demo – a short track with a pad, a beat loop and a piano.

Download audio file (Final_Pad_Demo.mp3)

Good luck!


Creative Sessions: Interface Design Launch


Successful interfaces allow you to use them easily – they should feel seamless with the device you’re accessing with, and the experience you’re having. Successful interface designers have a theoretical foundation in numerous fields, which focus on planning and delivering great user experiences, as well as a strong graphic sensibility which they use to create interfaces that are attractive and fun to interact with. In this session we cover numerous subjects on Interface Design.

There are many fields that have risen in the last few years, such as Experience Design, Interaction Design, Information Architecture, and User-Centered Design that form the backbone of your interface design. We’ll be getting into these subjects in this session to give you a theoretical foundation and some starting points for study. We’ll also bring all this together and discuss interface design workflows of professionals and provide materials to learn Graphic User Interface (GUI) Design to get you on your way to creating professional interfaces.

Head over to our article on Getting Started with Interface Design to get going with a broad overview of interface design.


Participate in this Session’s Group Project

Jump over to this Session’s creative project on Create an Application Icon or Dashboard Widget. Choose the project to participate in that best fits your skill level and interest. This session’s Beginner/Intermediate project the brief is to make an icon for applications, which is great practice for building your GUI skills.

coda

We also have an Advanced project where you design a widget, which is a great way to get some hands on experience with designing interfaces, as they are typically smaller apps with a tight focus. You can post your projects in the comments here and get some feedback from the community.


Download this Session’s Cover Art as a Digital Wallpaper

Jump over to this session introduction to download this session’s wallpapers made by Wojciech Pijecki.


More Creative Sessions

Creative Sessions logo.Every month we’ll be running a two week Session on a creative topic. This Session is on Interface Design, and future Sessions will be on varied topics like, gaming design, and creative freelancing, and more. Unlike regular Tuts+ content, Sessions content is more theoretical, opinion based and will often cross many disciplines.

Create Astonishing Nightclub Themed 3D Typography


3D graphics are often created using several applications. Today, we will use Photoshop, Illustrator, and Cinema 4D to create a stunning nightclub themed 3D composite. Let’s get started!


Step 1

Our first step is to create our text in Illustrator. To do this, just open up Illustrator and type out some words as shown. I used the Clarendon Typeface.Now simply expand the type. Ungroup the Letters, select each word and group using pathfinder tool. Once this is done, lets save out our file as an Illustrator 8 file. This way, Cinema 4D can interpret the illustrator data and convert the text into splines with no work at all.


Step 2

Now import your splines (text) into Cinema 4D. Use the image below as a guide.


Step 3

Now, select the first word using either the selection tool, or via the objects panel. Right click in order to highlight and select Connect + Delete. This will make for easier extrusions so that we can extrude each word (i.e. lights) as apposed to each letter. Do this for every word.

Note: It is always good to rename your hierarchies, because once you have a lot of objects in the scene it makes for easier selection of objects and deformers.


Step 4

Lets Extrude now. Highlight a letter that you want (in this case lights) and then while holding alt click Extrude NURBS found in the NURBS modifiers. Now we will hover to the caps section of the attributes panel and give it a depth of 33, with fillet caps on the back and front, with 3 steps and 3 meters. And for the fillet type, lets change it from convex to half circle. Repeat this for all 3 words.


Step 5

Now let’s finish our text and position it for our final preview. We will now use the Mograph Module to create 3 copies of the text. To do this, click and highlight the extruded text you want, (example: lights) and click the Mograph tab and select Cloner object. Apply this method to all three words. If you only have one, then you are all set.


Step 6

Lets take this opportunity to light and set up our camera in the scene. Use the panning, rotating and zooming tools to get a view you are satisfied with. For this example, I will place it slightly above at an angle, so that we are looking down at the text, for a more dramatic feel. Now you will go to the layers panel, and once you have a position you like, click the target icon right next to the camera. See the picture for reference. This will essentially activate the camera.

Note: Once your camera is active, any zooming, panning or rotating of the viewport will affect the camera’s position. So if you want to rotate the text, simply click the target icon once more to deactivate. And once you want to go back to your final view, activate the camera.

Now we will light the scene! Lets go back up to the panel where we found the camera, and lets take 2 lights. Place one right above the text, and under shadow options choose soft. Now press Cmd/Ctrl + C to copy, then Cmd/Ctrl + V to paste. Now take this light copy and keep it on the same height as the first light and then move it forward on the Z-axis. Turn off shadows for this frontal light.


Step 7

Let’s create a sky object as well as a plane for reflections. We do not, I repeat do not want the sky object to be seen by our camera, so we will right click, the sky object, go to Cinema 4D tags, and click on compositing. Now move down to the attributes panel, and deselect Seen By Camera

Click on the Primitives panel to create a plane, make it real big by dragging the handles or by hovering to the attributes panel and scaling it via the scale parameters. Now place the plane up above the lights. Create a new material for the Panel, and click on the Luminance channel. This will make it 100% white as we will use it like a white card in a studio setup. Just like we did for the Sky object, we will also add a compositing tag to the plane so that the camera will not see it on the final render.

Lets now add a new material to the Sky object so that it can provide reflections for our scene. We will use an HDRI Map on the color channel so that it wraps around the scene once we add it to the sky object. To do so, we will have to take a material and drag it on to the object it corresponds to until we see a downward arrow (this is an indication that the material is being added).

Its actually a good idea for us to check out how our scene looks.


Step 8

I must admit, the picture above does not look anywhere descent at all. But its a start. Let’s begin to make things pretty by applying materials to the scene. Just follow the pictures below. It’s best to just show what is being done.


Step 9

We can now map the materials to the text. Its very important to follow the order presented below. For the Glow material, we need to click it, and under the attribute panel, we need to hover over to selection and type in R1 which will allow the material to ONLY be mapped to the beveled part of the text. For the black/face material, we will do the same but this time type in C1 to map the material to only the face.

Lets do a test render and see what we have so far.

You will notice two things: The picture looks A LOT nicer than before, and of course, the render time has increased, but not by much, maybe a 20 second difference. So we are still good to go.


Step 10

Now let’s add some Pizzazz to the scene. Rather than creating something from scratch, why not use our resources to our advantage. What is neat about Cinema 4D is that it comes with an extensive amount of free content. In this case, we want to import disco balls. To access them, we need to go to Window > Content Browser (or press Shift + F8). Under the preset folder, we will choose Advanced Renderer, then to caustics and open the volume caustic scene. Open it, and click on the disco ball and hit copy. Now File > Close, to bring up our lights out scene again, and past into the scene. Now we will place the disco balls onto a MoGraph Cloner Object as we did with the text. This time we will choose grid array in order to create multiple copies.

With the Cloner Object selected in the Objects Menu (Layers Panel), we will add a Random Effector to the Cloner Object. This will randomize our disco objects around the scene. The Random Effector can be found under the MoGraph Menu. Look at the Settings below in order to randomize the scene.

Let’s perform a test render to see where we are now.

This looks good! Now lets add some Light Rods to the scene. Use the same process that you used while adding Disco balls through the content browser. We will go to our content browser then Presets > Advanced Render > Global Illumination > Quiet Room.c4d

Copy a light rod, and paste it into your scene.

Using the scaling and rotating tools, make multiple copies of the rod and position them around the text as desired. Stay away from the Cloner objects for this one.


Step 11

We are all set with the scene. Now we will texture all the lights, group them, add them to an object buffer, as well as the text and the disco balls, and we will be all set to render and import to Photoshop, where we will do some extensive touch ups to make our final design standout. Follow the Texture channels presented below. Don’t hesitate, to mess around with color variations that appeal most to your eye. With that said, all that needs to be tweaked is the color of the Luminance channel since the lights are self-lit and give off lights.

Experiment with different colors and render.

Now we are ready to render, and make things look pretty in Photoshop. Select all the light rods, and press Alt + G to group them together. Now, add a compositing tag to the group and enable object buffer for alpha channel precision. Do the same for the disco balls and the text. Look at the picture below for reference.


Step 12

We are finally ready to render our image. Follow the settings below and render out. Since everything is pretty simple, the render should not take longer than 5 minutes, depending on your video card and ram equipment of course.

Your final image should look like this.


Step 13

Fire up Photoshop and let’s get it going. To start off, we need to isolate our elements. Let’s hover over to our channels panel next to the layers to select each alpha channel. You want to select each individual one and extract each elements accordingly.


Step 14

Once we have everything isolated, we can rid ourselves from the black background, and add a dark purple one.


Step 15

The piece is missing one quintessential effect; it lacks glossiness and glow. We must select all isolated elements (i.e. the disco balls, text and light rods) and duplicate them. Once this is done, you will need to merge them, desaturate the image by using the Cmd/Ctrl + Shift + U. Now we must go to Image > Adjustments > Brightness/Contrast, to suppress the darks and bring out the highlights.

Now we will apply a Gaussian blur with a diameter of 5.3. Once finished, blending mode needs to be set to screen and 75% opacity.


Step 16

Let’s add some lens Flares. In the source folder accompanied by this tutorial you will see not 1, but 6 lens flares I have rendered out for your use. These are stock photos, and you can use them as you please. For the purpose of this tutorial, lets use the chroma lens.tiff. Import it and lets give the lens and S curve in the curve editor and set its correspondent blending more to screen in order to make the black transparent.

Now lets add more lens flares. Choose which ever ones you see fit and place them on light rods and text edges.


Step 17

Lets add some nebula stocks to spiff the image up a bit more. A good place to look would be Moonchilde Stock whom has great collection of nebula stocks, pre-made in apothesis. Make sure you read and follow her policies and you should be good to go. Your image should look something like this now.


Step 18

Before we finish up, lets add some reflections to the face of our text and add some light streaks. With the magic wand, and with the text layer selected, select the black face of the text (the front). With the keyboard, let’s press Cmd/Ctrl + J to duplicate the selection. Now you have a layer with just the face of the text. Use this layer and a clipping mask for other images to stack on. This way, it looks as if the front of the text is reflecting some objects.

Now we will add light streaks.

Using the polygon selection tool, we will select the outside of the rectangle and feather the selection by 65%.

Now use a soft brush with 45% strength, and erase away any hard edges.

Let’s duplicate our light streak multiple times and then place them accordingly to create a light array.

Cmd/Ctrl + U to colorize the light streaks to an ominous Green, or what ever color you like.

Duplicate your light streak once it’s merged into one, and colorize the duplicate a different shade of purple.

Save your file to what ever format you desire it to be. I will export to a tiff. Then I will bring the tiff file into Photoshop and add a gradient map adjustment layer. Use your own color choice, or follow the one below. What ever the color you choose, make sure the blending mode of the gradient map is set to soft light.

Now lets add a photo filter adjustment layer with a density of 35%. Set the Opacity to 80%

Lastly, we will add a color balance adjustment layer. Use the settings below, or the ones desired by you.

Select all the layers and duplicate them. Now merge the duplicates. Filter > Noise > Add Noise. Set this new layer’s opacity to 35%.

Select the border of the image, feather the selection by 75% and apply a Gaussian blur of 45.0.


Final Image

That’s it! We are finally done with the project. Enjoy the outcome and make sure to play around with your own custom setting to give it more of a personal feel.


Craigslist ad poster needed… Postings in US cities! by topfreelance

Hello- I need a craigslist ad poster who can make daily 10 postings in US top cities (vacation rentals, apartments and sublet section). I will pay for every live postings. You will have to make postings and use your own PVAs to make these postings… (Budget: $30-250, Jobs: Classifieds Posting, Craigslist)


$2 per 400-500 words / Technical writing PROJECT (4) by ExtremeWriting

I need 50-60 articles in 7 days at 450-500 word each Excellent English, with proper grammar, structure and punctuation usage The articles will be on technology, computers, technical terms and technology product reviews etc… (Budget: $30-250, Jobs: Articles, Copywriting, Research, Reviews, Technical Writing)


30 how to articles(2) by ExtremeWriting

More details will be made available to the short listed bidders. But provide me a sample article which should be a how to. These will be submitted at wikiHow and have to be on unique topics. They should be free from plagiarism, grammatical, spelling and punctuational errors… (Budget: $30-250, Jobs: Articles, Copywriting, Proofreading, Technical Writing, WIKI)