30 Incredibly Useful & Fun HTML5 Mobile Apps

With a combined app count that exceeds about 400,000 in the app stores of Apple & Android, why would anyone want to use mobile web apps? Openness and a level playground are the two things that keep web developers going.

It might be in its infancy, but HTML5 is the next 500 pound Guerrilla and much more as far as Internet is concerned. With features like plugin-less video playback, offline storage, geo location etc., HTML5 is on the verge of giving walled gardens like Adobe Flash, Microsoft Silverlight, Cocoa a good run for their money. After the jump, we have compiled a list of HTML5 web apps developed for accessing from your smartphones.

Canvas

Canvas

Canvas

Canvas is a simple drawing application that allows you to quickly sketch ideas and create drawings. The available drawing area will automatically resize to fit whatever screen size of device you are using, making it ideal for Android devices. Though a bit light on the features available, the web app can come handy for drawing a quick flash of idea. The sketches can be saved as image files.

Platform: iOS & Android

Geo Meter

Geo Meter

Geo Meter

Detailed readouts of your location data, including information such as latitude, longitude, altitude, speed, heading and more can be determined using Geo Meter. You can view your current position using Google Maps and also email your current location to another person.

Platform: iOS & Android

Card Flip

Card Flip

Card Flip

The classic card to test the power of your memory is here! Just like in any platform where the game is played, all you have to do is to turn over and match pairs of identical cards to win. Try and beat your fastest time in the least number of turns.

Platform: iOS

Checklist

Checklist

Checklist

Checklist is an easy to use HTML5 web app for creating quick to dos or shopping lists. Checklist keeps a running total of all your items and tells you how many you have remaining as you check them off one by one. You can also email lists of remaining items to another person.

Platform: iOS, Web OS & Android

OpenAppMkt

OpenAppMkt

OpenAppMkt

OpenAppMkt is a marketplace for mobile HTML5 web apps. The service lets you subscribe to free and paid HTML5 web apps and without having to say it is built on the breakout programming language as well. Point your mobile browser to OpenAppMkt.com and add it to your home screen to start browsing & using mobile web apps.

Platform: iOS & Android

Google Voice

Google Voice

Google Voice

Known for the app that forever broke the Apple-Google friendship, Google Voice allows you to manage all your phones from a single Google Voice number. With its impeccable design that rivals that of a native Cocoa app, Google Voice web app lets you use a bunch of great features like voicemail transcription, call blocking, call screening and many more.

Platform: iOS & Android

Google Latitude

Google Latitude

Google Latitude

With this web app, you can see your friends’ locations on a map or in a list. In addition to keeping track of where your buddies are (more like stalking), you can get your location history, set up alerts, publish your location, integrate with your Google Talk status and more.

Platform: iOS & Android

Pie Guy

Pie Guy

Pie Guy

Are you a fan of the legendary Pacman game? Well Pie Guy is a fun arcade game that looks a knock off in the retro style of Pacman.

Platform: iOS

YouTube

YouTube

YouTube

Yes, there is a native YouTube app in a lot of smart phones including the iPhone. It incorporates the features and functionalities like search query suggestions, the options to create playlists,the ability to designate ‘favorite’, ‘like’, or ‘unlike’ videos directly from your device just like the way you do it in your desktop browser.

Platform: iOS & Android

Sudoku Superstar

Sudoku Superstar

Sudoku Superstar

Sudoku is such an additive past time, so is this app. Sudoku Superstar is a beautiful app that loads instantly, works offline and is there to provide endless hours of frustrating fun!

Platform: iOS

Flip Clock

Flip Clock

Flip Clock

Not planning to for those $1.99 flip clock apps? Here is a HTML5 equivalent for you.

Platform: iOS

Color Mail

Color Mail

Color Mail

Color Mail is a fun web app with which you can create a color styled email template and then you can use it directly in your iOS Mail app to send a colorful email to your friends. Plenty of templates are available in multiple categories.

Platform: iOS

Cambrian worm

Cambrian worm

Cambrian worm

Cambrian worm is a drag game where you drag the worm across the screen to eat snails and grow your worm longer. Remember to ensure that the worm never touches itself.

Platform: iOS

Scrabble Helper

Scrabble Helper

Scrabble Helper

Scrabble Helper is a great way t cheat your friends while playing Scrabble. Just enter your titles and you will get all the possible words!

Platform: iOS

Fillit

Fillit

Fillit

Fillit is a simple game to kill time. The objective is to fill up the 50% of the screen with the filler ball. To create a filler ball, tap the screen. It will grow until you release the screen, it hits another filler ball, or a bouncing ball runs into it.

Platform: iOS

KingdomGame

KingdomGame

KingdomGame

A browser based online in a real time ongoing strategy game that pits you against thousands of other players. Build your kingdom & fight wars till you are the ultimate ruler of the world.

Platform: iOS

Blackjack

Blackjack

Blackjack

A simple and straight forward blackjack game with no ads and clutter to distract your attention from the game.

Platform: iOS

MotionFrame Flare

MotionFrame Flare

MotionFrame Flare

MotionFrame Flare is a simple animation application which after installing to the homescreen and launched starts a powerful full- screen motion of a flare which responds to the motion of the finger.

Platform: iOS

Bejeweled

Bejeweled

Bejeweled

I never understood why the entire world goes gaga over this variant of a brick game. Anyway, from the popular game studio Popcap comes this HTML5 game.

Platform: iOS

CARMADILLO

CARMADILLO

CARMADILLO

The premise of the game is simple. You are an armadillo that not only has to avoid cars, trucks & motorcycles but also snakes,wolves and obstacles as well.

Platform: iOS

Stripr

Stripr

Stripr

For comics strip lovers, this web app brings them from hundreds of destinations. The beauty is you can download them when you have access to Internet and read them from the app when you are offline.

Platform: iOS

Meebo

Meebo

Meebo

Meebo is a very familiar name in the Internet chat universe. This fully featured chat app is easy to use and works just like a native app.

Platform: iOS & Android

iFlirt 3

iFlirt 3

iFlirt 3

An application that is for the socially challenged! The app provides hundreds of great pick up lines guaranteed to help you flirt with the ladies. There is also an option to email the lines to help out a friend in need too.

Platform: iOS & Android

Reader

Reader

Reader

This ebook Reader app makes the most of the iPhone screen real estate to read books completely offline. Once you setup an account, sync your books and launch them to read instantly.

Platform: iOS

2B

2B

2B

With a background that mimics that of a ruled note book, 2B lets your iPhone double as an impromptu scribble pad. Using your finger as an imaginary 2B pencil, you can sketch, scribble or jot in portrait or landscape mode.

Platform: iOS

Morse Code Generator

Morse Code Generator

Morse Code Generator

Centuries later, Morse codes till draws the attention of geeks. With this app you can translate any English sentence into dots and dashes.

Platform: iOS & Android

ParkingAssistant

ParkingAssistant

ParkingAssistant

This web app with the help of iPhone’s AGPS shows parking lots in your vicinity. The data of parking lots are collected from the openstreetmap project.

Platform: iOS & Android

PocketMarket

PocketMarket

PocketMarket

PocketMarket web app allows you to keep track of the latest prices for the most common commodities traded on NYMEX. Commodity price charts are also displayed throughout the duration of the current trading day.

Platform: iOS

3GSpeed

3GSpeed

3GSpeed

Highly suspect of you carrier’s data speeds? This handy little app can help you to measure your mobile & wireless Internet connection speeds accurately.

Platform: iOS & Android

Calorie Calculator

Calorie Calculator

Calorie Calculator

Are you a heath nut keeping targets to attain size zero or something? Use the Calorie Calculator to determine your daily calorie intake to help achieve your desired weight.

Platform: iOS

Did we miss a fun HTML5 web app? Please do let us know in the comments section.

Best of AppStorm in July

We’ve collected the top five reviews, roundups and how-to articles from across the AppStorm network in July. Whether you’re interested in Mac, iPhone, or Web apps, there’s bound to be something you didn’t spot over the course of the month.

Now would be a good time to explore a part of the AppStorm Network you’ve never seen before!

Best of iPhone.AppStorm

NotifyMe: Beautiful Push Notification Tasks and To Do’s

Task management has been one of the most explored categories in the App Store. There are tons of to-do list applications that all offer the same basic features and allow users to list and check off tasks as they are done. Taking a departure from this conventional way of thinking, PoweryBase has come up with a great way to manage tasks on the go.

NotifyMe is a simple reminder app for your iPhone. It’s touted as being “simple, yet so very powerful”. With a simple user interface, easy to understand graphics and a speedy experience, NotifyMe takes the task out of…well, creating tasks! Selling for $5.99, the app is a bit more pricy than the conventional to-do app, but it packs in the features to make it worthwhile.

40 More Pixel-Perfect iPhone App Interfaces

In the past, we took a look at some of the best iPhone app interface designs. Since then, more and more applications are coming out that continue to impress us. This certainly isn’t an end all list. There are plenty of gorgeous apps out there and no way to cover them all!

You may even seen some apps we’ve covered in the past, but with the App Store constantly growing and changing, software is constantly being updated and their interfaces improved. Here’s a look at some of the sexiest iPhone apps out there!

How to Listen to Any Radio Station with TuneIn

In the age of MP3s, Pandora, and Grooveshark, it’s easy to forget that the airwaves are still being endlessly pumped with great programming via old school AM/FM radio stations. The last device you would expect to cause you to listen to more radio is an iPhone, but the app below will do just that!

Today we’re going to take a look at TuneIn Radio, an app that is sure to help you reclaim your long lost love for good old fashioned radio.

Meet the TapBots: 3 Useful & Beautiful iPhone Apps

With over 225,000 applications available on the iTunes App Store, there is no shortage of apps that can do just about anything. Many of these pack in the features and over time, become more and more complex.

Enter Tapbots, a team of two guys who became interested in developing easy to use, focused and fun applications for the iPhone. Right now, Tapbots offers three unique apps (or robots, as they like to call them). Here’s a quick look at their fun and friendly robot family.

30 Essential iPad Apps for Designers and Creatives

A fancy new iPad is the perfect travel companion for any designer. The richness of the large multi-touch screen makes for some incredibly useful and fun apps that can really drive your creativity.

Below we’ll look at 30 different apps spanning several categories that can help designers and creatives out with everything from jotting down notes and wireframing to staying on task.

Best of Web.AppStorm

10 [More] Killer Dropbox Tips and Tricks

10 [More] Killer Dropbox Tips and Tricks

We recently rounded up 15 Awesome Dropbox Tips and Tricks, which was accompanied by a giveaway. Entries required a comment with your favorite Dropbox tip, trick or hack you use. From that massive collection of entries we bring you 10 [more] killer Dropbox tips and tricks to make the most of this amazing app.

10 Reasons I’m Switching from TweetDeck to HootSuite

10 Reasons I’m Switching from TweetDeck to HootSuite

TweetDeck is a fantastic app, don’t get me wrong. However, HootSuite offers the candy that’s more satisfying to my taste buds. My Twitter apps are what I call “always-on” because they’re one of the few apps I leave running and visible at all times. So, switching apps isn’t something I take lightly.

With that said, here’s ten reasons I’ve decided to switch from TweetDeck to HootSuite.

15 Web Alternatives to Popular Desktop Software

15 Web Alternatives to Popular Desktop Software

Desktop programs are great and all, but they don’t provide the same benefits as web apps that make use of cloud computing. With most web apps, you only need a browser and an internet connection to access all your data online. That beats having to install annoying programs any day. To give you a better sense of how useful web apps have become, I’ve compiled a list of web tools and apps that can very well replace some desktop programs. I hope you take the time to try them all out. You’ll be surprised how well they work.

35 of the Best Facebook Fan Pages

35 of the Best Facebook Fan Pages

Love it or hate it, Facebook is one great social network for individuals and businesses alike. With more active members (recently reaching 500 million) than the population of some countries, it’s easily one of the best places for marketers and fans.

After taking a look through tons of great Facebook fan pages we compiled 35 of our favorite and most inspiring. Have a look and share yours!

10 Great Sites to Take a Break and Have a Laugh

10 Great Sites to Take a Break and Have a Laugh

Personally, I consider this to be the golden era of hilarity online. Created by amateurs & professionals alike there is no dearth of funny content in every possible niche. After the jump we are featuring a wild mix of hilarious sites that are worth a visit.

Best of Mac.AppStorm

The Ultimate Collection of Productivity & Office Software for Mac

This post is for all you workaholics who use a Mac for your full-time career. From to-do lists and digital clutter organizers to word processors and time trackers, we’ve compiled a list of all the applications you’ll need to stay productive and efficient at work.

Below you’ll find over 100 free and premium applications that will either fit right into your current workflow or revolutionize the way you get things done. Let’s take a look!

Smoking Hot Mac Interface Design: 30 Stunning Apps

Mac applications are known for their superb design, and in the past few years UI designers have really embraced this trend by creating some really remarkable interfaces. They embrace realism, ooze texture, and generally make you stop and stare.

Today we’ll look at 30 pieces of Mac software that really push the limit of great interface design. First we’ll say what the app does, then provide a screenshot followed by a brief statement about what I really love about the interface.

iDefrag: Should You Defrag Your Mac’s Hard Drive?

When you own a PC, you need to pay attention to things like defragmenting your hard-drives, installing and updating antivirus, antivandal and firewall software. If you switch to a Mac, you need worry a lot less about such things. I’m not saying you should be complacent, but things generally just work much more easily and straightforwardly.

Today we’re taking a look at iDefrag, and deciding whether or not you really need to worry about defragging your Mac!

Add Magical Mouse Gestures to Your Mac with Quicksilver

Remember Quicksilver? OS X’s ultimate but long-dormant launcher has quietly been updated to work on OS 10.6 and above. I thought I’d take the opportunity to dredge up an old but useful trick to boost your productivity.

Below I’ll show you how to setup Abracdabra with Quicksilver and add magical mouse gestures to activate any standard QS action. It’s a relatively simple trick, but gives your mouse a power you’ve never known before!

30 Fantastic Geeky Tricks to Get The Most From Your Mac

If you’re one of those Mac users that loves to dig in and play with hidden features and settings, this post is for you.
Below you’ll find 30 tips and tricks to help both seasoned and beginner Mac users to get the most out of their OS X experience. We’ll cover everything from obscure Terminal commands to keyboard shortcuts that every Mac user should know and use. Let’s get started!

Share Your Ideas

Is there something in particular you’d like to see on the site next month? We’d absolutely love to hear your suggestions for articles, topics and giveaways – just let us know in the comments. Thanks for reading AppStorm!

How to rearrange Dock Icons

Post image for How to rearrange Dock Icons

How to rearrange icons on the Dock

The Dock is very customizable, I already showed you guys how to add and remove icons from the Dock so today we’ll rearrange icons on the Dock so we have each icon in the order that we want.

From the Dock “Click, hold and drag” the icon to the spot you’d like and then release the click to drop the icon in place.

Moving icons around on the Dock

The only rule for moving icons around the Dock is applications stay on the left side and files/folders goes on the right side. If you look closely at the Dock you’ll notice a dotted line, this is the divider that keeps apps on one side and folders on the other.

dock-divider

How to remove applications from the Dock

Post image for How to remove applications from the Dock

How to remove applications, files, and folders from the Mac dock.

Find the icon you wish to remove from the Dock.

Click, hold then drag the icon away from the Dock towards the desktop and then release the mouse button. The icon will be deleted with a puff of smoke.

dock-removing-application

Another way to remove an icon from the Dock is to right click (Control+Click) on the application icon and go to “Options” and “Remove from Dock”. You can also get to that menu by clicking and holding the icon for about 2 seconds.

dock-remove-application

*Applications being used cannot be removed from the Dock.

How to add Applications to the Dock

Post image for How to add Applications to the Dock

How to add applications, programs, files or folders to the Dock on the Mac.

Add items you use the most onto the Dock for maximum work efficiency. A general rule of thumb is all your apps/programs on the left hand side and files/folders on the right hand side.

Locate the item you want to add to the Dock. It can be applications, files, or folders from the Desktop or somewhere in your directory of folders.

Click and drag the icon to the Dock.

Click and Drag to the Dock

Another way to add an application to the Dock is when you’re using the program simply right click (or “Control” and click) the icon on the Dock then scroll to “Options” and “Keep in Dock”.

Adding Application to the Dock

6 Free Adobe Photoshop Alternatives for the Mac

Post image for 6 Free Adobe Photoshop Alternatives for the Mac

gimp-logo

Gimp is a free open source image editing program available for just about every platform which includes the Mac, Linux, and Windows. It’s arguably the best free alternative to Photoshop. What makes Gimp so popular is the large user base who are very knowledgeable.

gimpshop-logo

GimpShop
is a version of Gimp which was created to act and feel like Photoshop. If you’re a seasoned Photoshop user then Gimpshop was made for you to feel right at home.

seashore-logo

Seashore is also open source like Gimp but unlike Gimp it’s only available on the Mac. Based on the Mac Cocoa framework this image editor features most things you would expect from a great image editor like textures, gradients, and multiple layer support.

chocoflop-logo

ChocoFlop image editor uses Apple’s CoreImage technology. One of the features of this editor is how lightweight it which makes it super fast even on older Mac hardware.

iphoto

iPhoto is a free basic image editor from Apple available for Mac users. Not really for a power user but its good for basic stuff like adjusting brightness, scaling, cropping, and fixing red-eyes and managing your images on a Mac.

preview-logo

Preview on the Mac is more than just a image viewer, and it’s good for basic image editing. To see what it can do when viewing an image inside Preview go to Help > Preview Help.

How to install screensaver on the Mac

Post image for How to install screensaver on the Mac

How to install a third party screen saver that you downloaded for the Mac.

Found this cool Zombie screensaver so we’ll install it on the Mac.

Downloading Zombie ScreenSaver for the Mac

Open the downloaded file folder and you should see a “.saver” file. There are several ways you can install a screen saver on the Mac.

Zombie .saver file

1. Double click the “.saver” file and it may install itself.

2. Drag the file to the “~/Library/Screen Savers/”. The easy way to get there is by clicking on the Hard Drive icon on your desktop then click “Library” folder then the “Screen Saver” folder.

The last step is to change the our current screensaver to the new one we just installed. Right click on a empty space on the desktop. Select “Change Desktop Background”.

Click “Screen Saver”.

Your new screen saver will probably be listed under “Other”.

Desktop & Screen Saver

Using Ruby on Rails to Create A Twitter-Like Message Form

ruby_on_rails_logo_3This tutorial will show you how to create a twitter message form that counts down the 140 characters and also allows you to input a message within the URL of the webpage as well. What’s cool about Ruby on Rails is instead of writing javascript to recalculate the message length, we’ll use Rails to automatically generate the correct javascript so that each time the field changes, the count is recalculated all through the controller object. Download the project code here.

Firstly, I’ll assume you have ruby on rails installed and have create a new project. You’ll also need a basic knowledge of how Rails works, and how Rails utilizes the principle of Model-View-Controller (MVC). Having said that, create a new project and create a new controller file called message_controller.rb. We’ll first take care of an initial message specified in the URL of the page. Add this code to the file:

class MessageController < ApplicationController

  def index
    if params[:txt]
      @txt = params[:txt]
    else
      @txt = "";
    end
    @count = 140 - @txt.length()
  end

end

The index method first check to see if a message was specified in the URL. If the a message was specified, then it sets the @txt instance variable to the string. If not, then the variable is set to an empty string. The count is also calculated here for the initial web page view.

Now we need to set up the view for the message controller, create a message folder in the views folder and create a new file called index.rhtml in this new folder. Copy this code to the file:

<h1>Message</h1>

<% form_tag :action => 'stuff' do -%>
	<%= text_field_tag :message_field,value=@txt %>
<% end -%>

<div id='count'>
	<%= @count %>
</div>

<%= observe_field(
	:message_field,
	:url =>{:action =>"update_message_length"},
	:frequency=>1,
	:with => 'message',
	:update=>:count ) -%>

The parts to focus on here are the text_field_tag and the observe_filed method. The div count is where the remaining count will be displayed. Looking at the text_field_tag, :message_field is the id of the tag, and the value is set to the @txt that was declared in the Message Controller. The observe_field method will automatically generate the javascript ajax code that will update the count tag. The parameters follow as such:

  1. :message_field – indicates which field is observed
  2. :url – Decides which action is sent to the message controller. (More on that latter)
  3. :frequency – Every time the field changes, make a AJAX request
  4. :with – this will help us get the text in the field
  5. :update – decides where the contents of the AJAX response goes

At this point we need to go ahead and add the “update_message_length” method in the message controller. This function will be called every time the filed value is change as specified by the observe_field method. Append the following function to the controller:

  def update_message_length
    pop = params[:message]
    count = 140 - pop.length()
    render :text =>  count
  end

This function gets the message include in the message parameter, and sends out the new count. One small, but vital part not to forget is to create a layout file that includes the needed javascript framework so this is included. Create a new file in the view/layouts folder called: message.html.erb. Add this code to the file:

<!DOCTYPE html PUBLIC "-//W3C//DTD XHTML 1.0 Transitional//EN"
       "http://www.w3.org/TR/xhtml1/DTD/xhtml1-transitional.dtd">

<html xmlns="http://www.w3.org/1999/xhtml" xml:lang="en" lang="en">
<head>
  <meta http-equiv="content-type" content="text/html;charset=UTF-8" />
  <title>Posts: <%= controller.action_name %></title>
  <%= stylesheet_link_tag 'scaffold' %>
  <%= javascript_include_tag :defaults %>
</head>
<body>

<p style="color: green"><%= flash[:notice] %></p>

<%= yield %>

</body>
</html>

Thats its! Now if you go to the URL http://localhost:3000/message, you’ll get a blank field, or you can include an initial message by http://localhost:3000/message?txt=message+here. Incase you have a flaw in your project, or are lazy, here is a copy of the working project.

Follow Up To Text Image Headers Tutorial

The first tutorial I published on CSS was a “trick” to essential hide the text generated from the HTML file and replace it with an image. Let me clarify what I mean by “trick” because its not meant to decieve anyone. It’s a non-obvious way of achieving two competing goals: displaying graphical representation of text while not compromising the HTML text mainly for Google. If you’re a web designer, you’ll know of the limitations to HTML and CSS and what may make a better user experience isn’t always good for Google. CSS and HTML is not only limited by the font selection, but something like a logo in which specicial types faces are created cannot be created through CSS. Using an image with an alt attribute just doesn’t seem like a good solution for a h1 headline tag either. For something like a screen reader, or viewing plain HTML, using the text is a better solution than the alt attribute of an image.

Now don’t get me wrong, this technique can be used for evil by hiding keywords to try to bolster search engine rankings on Google. I don’t know exactly how Google creates the ranking, but I do know that h1 headline serve as a key part in determining page rank for keywords. So who uses the negative text-indent trick? Google themselves use images for there main logo, but both Apple.com and Digg.com use negative text-indent to hide lot things. Apple hides their top navigation bar, and homepage featured items. Digg hides the h1 tag which states their name. (If you want to see for yourself, I’d recommend checking Apple homepage because you can see the relavent css directly in the source of the webpage. With Digg, you have to navigate your way through the file references.) Google doesn’t seem to penalize either of theses two sites. You might say that these guys are too big to be penalized, well in that case, this website, Tutorial Dog uses the negative text-indent and the site ranks on the first page for the keyword  “javascript image gallery”.

Inadvertent Discovery While checking out Digg.com to see if they use negative text-indent, I discovered that they combine all their images for the site into one large gif image. They then direct the CSS file to specific sections of the image to show different images using the ‘background-position’ attribute. Why would they imbed all images into one document? For a site like Digg, which recieves millions hits daily, by combining the images into one file, their servers receive less of a usage because many image files aren’t requested from the server. Once this large image file is requested and sent, the web browser can reference the file to generate the page. To further illustrate why this is better, think of moving a bunch of boxes. Digg likens the large image file to one large box. In this case, while this box may be bigger and weight more, you only have to move it once to get all of the required materials to the receiver. With a bunch of small images, you will have to move a bunch of boxes one at a time. This technique probably won’t be worth your while to implement for your web designs, because it will take more time for what its worth. Digg, because they deal with large traffic, finds that this technique optimizes their page serving ability.

New Beginnings…

Its been a while folks. Almost a year now. But its time to start to get the wheels moving on this great site, because you need it! Now even though its been almost a year since the last tutorial was published, Tutorial Dog has seen traffic continue to come at a steady rate which makes a comeback all the more necessary. The site also has stayed relevant with many commenters (thanks) giving input on many hot button articles of the site.

Tutorial Dog Traffic Figure 1. Traffic Since May 2008

And I felt the previous design lacked on at making this important enough. This new site focuses on the readability and how to display images in a book-like fashion. Garretdimon.com primarily inspired me to rethink the way to present content, and expanding the design outside of the structure of a box. By creating a gutter of free space on the right side, I can display images and information in an interesting visual way. Like so…

All there is left to do is to publish new material. If you haven’t done so already, subscribe to the RSS feed and stay tuned. I’ve got a lot of ideas, so we’ll have to see what materializes. If there is anything specific you’d like to learn more about, leave a comment below.

Javascript Dock Carousel Using Mootools (Part 2)

This tutorial is the second part of a tutorial that will build a javascript carousel that imitates the Mac OS X dock. In part one, we build a mock up in Photoshop and exported the nessecary images. In this part, we’ll take those images and build it into a HTML & CSS. Then we’ll use javascript to make if interact.

Demo Files

Step 1: The HTML To keep things organized, we’ll seperate the files into there own folders. So we’ll have a “js” folder to keep all the Javascript files, an “images” folder to hold all the webpage images, and a “icons” folder to hold the icon images. What needs to be in the HTML? Well, the links to move the stage left and right, the stage and all the icons and finally the text image. The “wrapper” class you will see later enables the icons on the next slide to hide. The icons are there own list elements.

Javascript applications run better with specialized Java hosting. It ensures smooth, error free work of Java based websites or any Java script for that matter.
<div id="stage-container">
  <img src="images/text.gif" alt="image" width="111" height="24" />
  <a id="moveleft">Left</a>
  <a id="moveright">Right</a>
  <div id="wrapper"><ul id="items">
  <li><a><img src="icons/1.png" alt="image" width="32" /></a></li>
  <li><a><img src="icons/2.png" alt="image" /></a></li>
  <li><a><img src="icons/3.png" alt="image" /></a></li>
  <li><a><img src="icons/4.png" alt="image"/></a></li>
  <li><a><img src="icons/5.png" alt="image" /></a></li>
  <li><a><img src="icons/10.png" alt="image"/></a></li>
  <li><a><img src="icons/6.png"/></a></li>
  <li><a><img src="icons/7.png"/></a></li>
  <li><a><img src="icons/8.png" /></a></li>
  <li><a><img src="icons/9.png" /></a></li>
  </ul></div>
 </div>

Now lets set up the header of the HTML document. We wan’t an XHTML tranistional document so that all the javascript is compliant and works. We need to reference the Mootools library, and the javascript that makes the stage work as well as the css file. We’ll deal with getting those files later.

<script src="js/mootools-12-core.js" type="text/javascript"><!--mce:0--></script> <!-- MOOTOOLS 1.2  -->
<script src="js/mootools-12-more.js" type="text/javascript"><!--mce:1--></script> <!-- MOOTOOLS 1.2  -->
<script src="js/dock.js" type="text/javascript"><!--mce:2--></script> <!--   IMAGE GALLERY   -->

Step 2: The CSS The trickiest part of the CSS is understanding the fact that we’re making the ul extend beyond the ‘div id=”wrapper”‘. The image below explains how the tags appear with the CSS. The ul element extends because the class “items” has a width of 5000px, and the “wrapper” id has an overflow of hidden. The buttons are floated on either side of the stage, and the text is hidden with the text-indent attribute. To get a tag to conform to specified widths and heights, we use the ‘display: block’ attribute.

image
body{
background:#232323;
color:white;
}
#stage-container{
margin: 50px auto;
width: 420px;
}
#stage-container .text{text-align: center;}
#stage-container a{outline: none;}
/* — STAGE — */
#stage-container #wrapper{
overflow:hidden;
margin: 0px auto;
width:352px;
height:55px;
background: url(images/stage2.jpg);
position: relative;
}
#stage-container #items{
margin:0px;
padding:0px 6px;
list-style:none;
width:5000px;
position: relative;
}
#stage-container #items li{
float:left;
list-style:none;
margin-right:5px;
padding: 6px 6px;
margin-top: 5px;
}
/* — BUTTONS — */
#stage-container #moveleft{
float: left;
background: url(images/left.gif);
}
#stage-container #moveright{
background: url(images/right.gif);
float: right;
}
#stage-container #moveright,#moveleft{
height: 20px;
width: 20px;
display: block;
z-index: 10;
text-indent: -3000em;
margin-top: 18px;
}

Step 3: The Javascript First, we’ll be using the newly released Mootools 1.2 for this javascript. Mootools is a “compact, modular, Object-Oriented JavaScript framework designed for the intermediate to advanced JavaScript developer. It allows you to write powerful, flexible, and cross-browser code with its elegant, well documented, and coherent API.” We’ll be utilizing the scroller class and the Fx classes to achieve the entire effects on the icons. Like almost all mootools scripts, we need to enclose the javascript in a dom ready action. What this does is not let the javascript work until all the javascript is completely loaded by the user.

window.addEvent(’domready’, function() {
// Your code here
});

The first part of javascript just deals with moving the stage left and right. We need to tell the javascript where to slide the stage, if it can slide the stage left or right and how much to slide. When a button is clicked it triggers an event to move the slide left or right depending on which is clicked. The slides must figure out though if it can move left or right. We don’t want to move left if there is no icons to the left of the current slide. These issues are what the variables at the top of the javascript deal with.

The image in step 2 will help illustrated how the javascript is working. The unordered list element (ul id=”items”) is being shifted left and right by the javascript (thats why is larger than the stage). The shift is triggered by a hyperlink tag (’a’).

var slides = 2; // CHANGE THIS TO THE NUMBER OF SLIDES
var pos = 0; // default setting, start at the first(0) pixel
var offset = 346; // How many pixels the slider should move to get to the next slide
var currentslide = 1; // first slide is the default slide
var items = $('items'); // items variable for the id 'items' in the html
var fx = items.effects({
duration: 800,
transition: Fx.Transitions.linear
}); // the way the items transition is described here
/* Scroll Object Initialized */
var scroll = new Fx.Scroll('wrapper', {
offset:{'x':0, 'y':0},
transition: Fx.Transitions.Elastic.easeOut
}); // the scroll stage is set up here, and each movement will be 'Elastic'
// other tranistions could be linear, quadratic, ect.
/* Trigger to move the slide left */
//when the #moveleft link is clicked, this tells the scroll to move left
$('moveleft').addEvent('click', function(event) {
event = new Event(event).stop(); // don't go to the actual link described in the href
if(currentslide == 1) return; // can't go more left than the first
currentslide--; // currentslide is one less than before
pos += -(offset); // slide the stage left by the offset's size
/* lower the opactiy, slide, then raise back opacity */
fx.start({
'opacity': .3 // the opacity of the icons will become 30 %
}).chain(function(){
this.start.delay(800, this, { 'opacity': 1 }); // bring the icons back to 100% opacity
scroll.start(pos); // move the stage to the new position
});
});
$('moveright').addEvent('click', function(event) {
event = new Event(event).stop();
if(currentslide >= slides) return;
currentslide++;
pos += offset;
fx.start({
'opacity': .3
}).chain(function(){
this.start.delay(800, this, { 'opacity': 1 });
scroll.start(pos);
});
});
scroll.toLeft(); // We'll initalize the stage to left most position
Javascript Visual of Events

The next part of the Javascript strictly deals with what happens when you move the cursor over an icon. We want to make the icon bigger. When the cursor leaves the icon, we need to readjust the icon to different size settings.

$$('.icon').each(function(item){  // for each icon, apply the follow events
item.addEvent('mouseover', function(event) { // when the icon is moused over, enlarge it
var fx2 = item.effects({
duration: 200,
transition: Fx.Transitions.linear
}); // initialize the icon transition properties
fx2.start({
'width': 40,
'height':40,
'margin-top': '-2',
'margin-left': '-5'
});
});
item.addEvent('mouseleave', function(event) { // when the icon is left by the mouse, reset icon
var fx2 = item.effects({duration: 200, transition: Fx.Transitions.linear });
fx2.start({
'width': 32,
'height':32,
'margin-top': '0',
'margin-left': '0'
});
});
});

Conclusion Thats all that’s need to create a dock carousel. The icons in the demo are kindly provided by Jonas Rask and Devin Ross. I’ve implemented the dock in the resources section of Tutorial Dog were you can download icons that I’ve created.

Javascript Dock Carousel Using Mootools (Part 1)

Follow part 2 of this tutorial here. This tutorial will take you through creating the initial mockup in Photoshop, and creating a usable carousel that imitates the Mac OS X Leapard dock. This tutorial we’ll acquiant you well with creating a slick button, and using the shape tools. We want to deal with shape layers instead of pixel because of the non-destructive nature of shapes. Non-desctructive shapes means you can edit and scale without distortion.

Step 1

Create a photoshop and create a new document 540px x 308px. Fill the background with #232323.

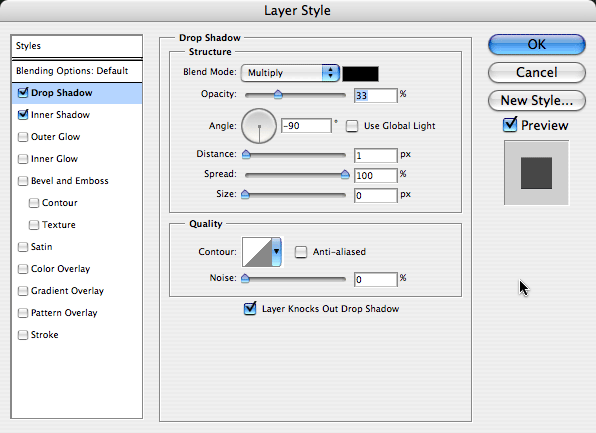
Take the Rounded Rectangle Tool, set it to a 5px radius and create an object that is 350px by 50px. Make the color of this shape layer #303030. Make sure you have the tool set to the “Shape Layers” option instead of the paths option. That way, you are creating non-destructive shapes so you can go back and edit & reference them later without compromising distortion. Next, type out “CAROUSEL” (or whatever you like) at the top of the document with the color #080808. Find a good serif font like “Myriad Pro”. Apply the Inner Shadow below layer style to the text.

image
image

Step 2: Buttons

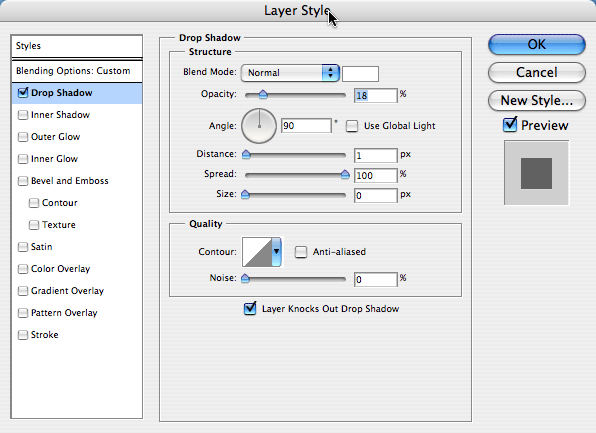
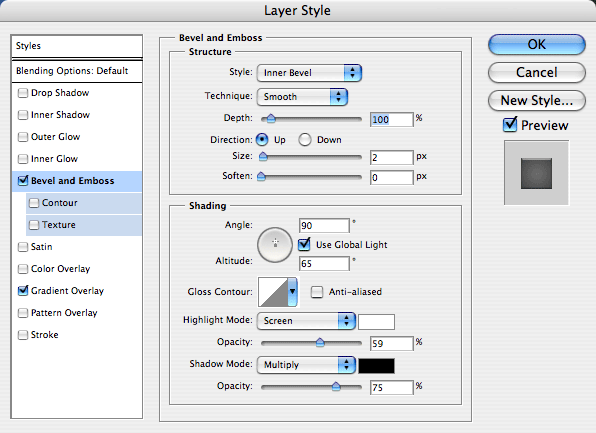
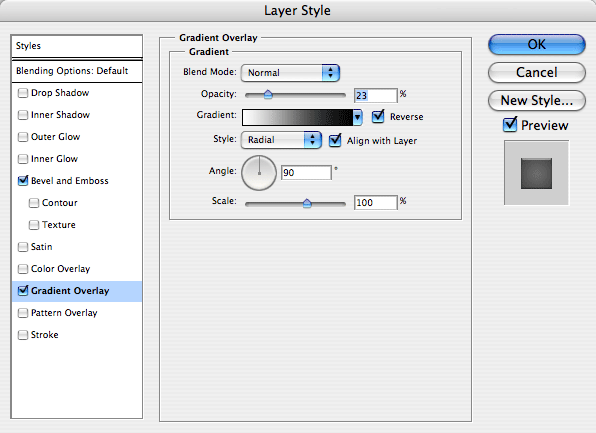
Next, we need to create buttons that will move the carousel from left to right. First, create a 20px circle shape with the color #232323 using the ellipse tool. Apply the following Bevel & Emboss and Gradient Overlay layer styles.

image
image
image

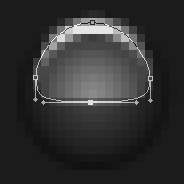
Now create a new white layer for the reflection. Start by creating another circle shape, and use Direct Selection Tool to mend the shape into the shape you see below. Move the handles (the line that is asymptotic to the path) of each point to change the curvature of the path. Set this layer to blending mode Overlay, and an opacity of 82%.

image

Next we need arrows to specify the direction. Take the pencil tool set to a 1px brush, and create a arrow out of pixels ontop of the button. Apply the following Drop Shadow and Inner Shadow to give the look that the arrow is imbedded in the button.

image
image

Finally for this step, group these three layers in a group and duplicate the group. Then with the group selected in the layer palette, Edit >> Transform >> Flip Horizontal. Place the buttons on either side of the stage.

image

Step 3: Stage

image

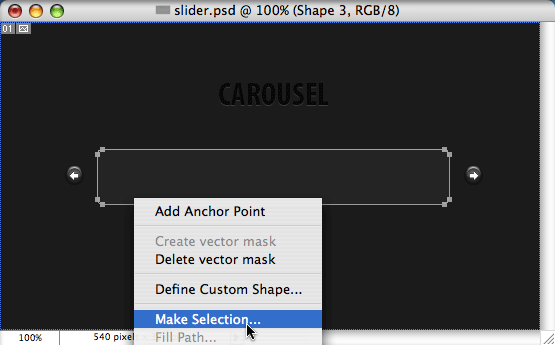
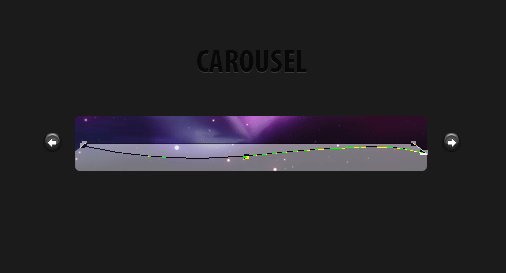
Now we’ll recreate a the Leopard dock. Fist we need the Leopard wallpaper. Place the image inside the Photoshop document, and use the shape made in step one to mask of the wallpaper layer. To do this, select the shape, and right click and pick “Make Selection”. Now with the selection, make a mask on the wallpaper layer. Click the little link connecting the mask to the image, to disassociate the mask with the layer, so you can move the image around without moving the mask around with it. Place the wallpaper in the correct place.

image

The next step is to create the shelf, create a white rectangle shape, and use the Direct Selection Tool to select the corners, and transform the shape to give it the perspective of a shelf. Again, we want to use the path of the original stage layer. This time though copy that path and paste the path into the shelf layer. With both paths selected, click the “Intersect Shapes area” button. Set the opacity of the stage to 51%.

image

Finally, we need to create a swoosh across the stage. Again, we want to create a shape, this time, use the pen tool to create the shape over the stage. Set the opacity of this layer to 14%.

image

Step 4: Icons

This step is more for mocking up the final product which we’ll be finished in Part 2, but drag 32px icons onto the dock. Space them appropriately.

image

When creating the icons for Part 2, we need to make sure that the icons are transparent and that the size of the icons are 40px or greater. To get best looking transparent icon, make sure you use the PNG-24 setting in the Save to Web palette. This will create the best looking transparent icon. If you export with GIF, you tend to get more jagged edges that look bad.

Step 5: Slicing and Exporting for the Web

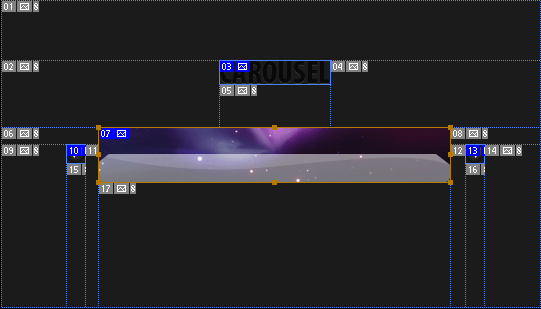
Next we need to slice up the document to get it ready for the web. There should only be 4 slices in this document: the two buttons, the stage and the text. You can name each slice by taking Slice Selection Tool and double clicking on a slice. A panel will pop up with input to rename the slice, that way when you export, it will automatically name the images.

image

Now that you’ve sliced the image, go to File >> Save to Web… You can change the export setting for each slice, but for this particular document leave each slice as a gif. For more info on exporting, check out this article that walks through exporting for the web in Photoshop. When you go to save, make sure you change the option “Slice:” from “All Slices” to “All User Slices” so you don’t have unnecessary slices.

Design Video Round #2

In the Hip-Hop edition of the Design Video Roundup, we’ll be diving deep into the world of hip-hop and design. Also, we dive into more animated typography, and Photoshop tutorials.

Pulp Fiction Typography Video

Another animated typography video, this time it’s done with one of my favorite movies Pulp Fiction. Nothing beats Sam Jackson with a Jheri Curl. I must warn, the contents of the video is a little explicit.

Music Video

This isn’t the most relevant video, but the music video has some cool animation effects with the boom box in the beginning plus the music is pretty good, and the breakdancing animals really are funny.

Design Code Rap

Now you probably think it’s another one stupid video like Ridin Nerdy, but this rap isn’t that wack. It’s pretty informative if ya listen closely.

Add Focus To Your Photo & Grab Attention

This is the video to the photoshop tutorial I wrote a while back.

Create a Leopard OS ‘X’

Statistically the most popular article on Tutorial Dog, garning over 43, 000 pageviews and 6,000+ video views.