Create a Fictional Arctic Snow Frog in Photoshop

Photoshop is a great tool to create scenarios that can’t or don’t exist in real life. In today’s tutorial, we will combine several stock images and effects to create a fictional arctic snow frog in Photoshop. As you can see, some of his unfortunate friends are frozen into the ice behind him and his meal is frozen just out of reach. Let’s get started!


Tutorial Assets

The following assets were used during the production of this tutorial.


Step 1

Open the original ice background image in Photoshop.

Step 2

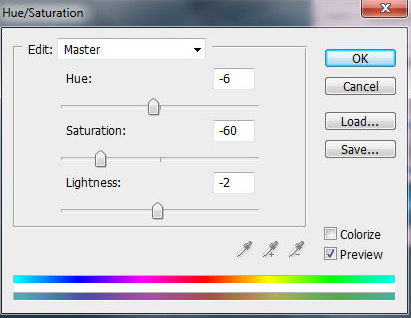
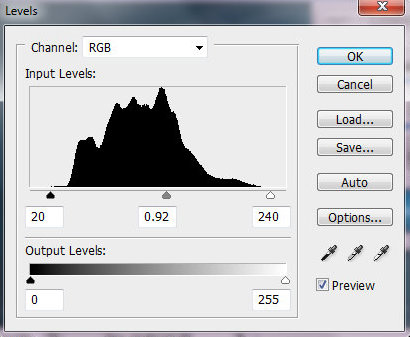
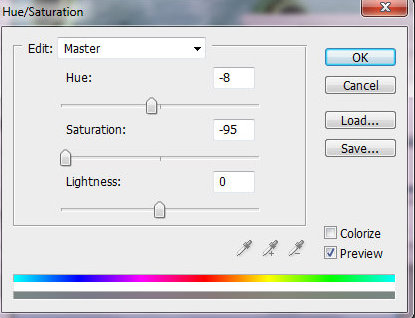
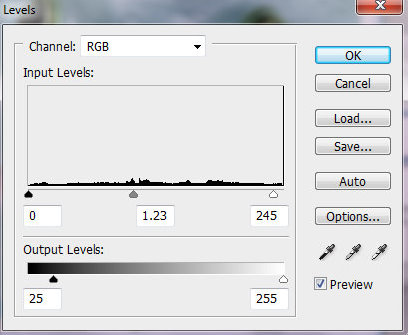
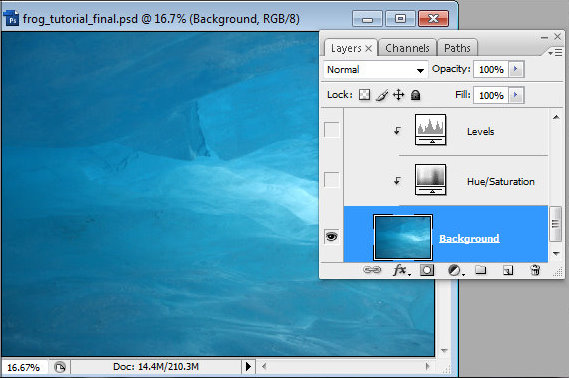
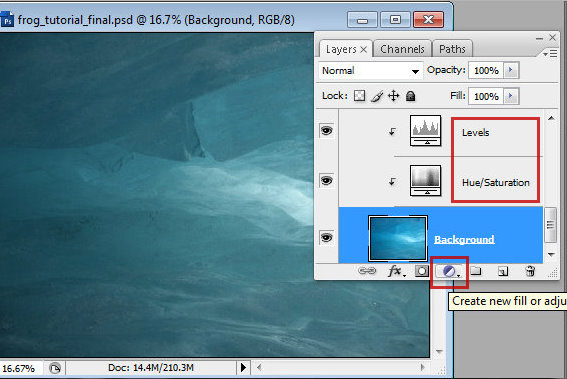
Create adjustment layers for background by clicking  icon in the bottom menu of the Layers Palette and choose Hue/Saturation and Levels. Adjustment layers allow you to correct layer setting non-destructively. In order to apply adjustments only for the base layer (background layer in this case), create clipping masks. Select adjustment layers (make them active), right click > choose "Create Clipping Mask".  Apply setting for each adjustment layer like on the examples below.

Step 3

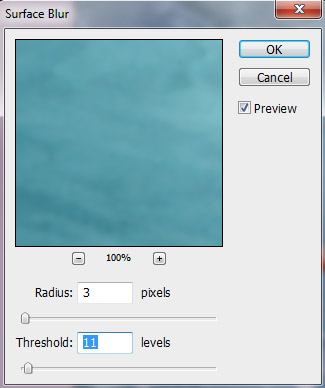
Group background layer with adjustment layers and duplicate the created group. To group several layers, select them and click small "folder"  icon. Merge the duplicated group. Apply Surface filter to the merged layer, go to Filter > Blur > Surface Blur.

Step 4

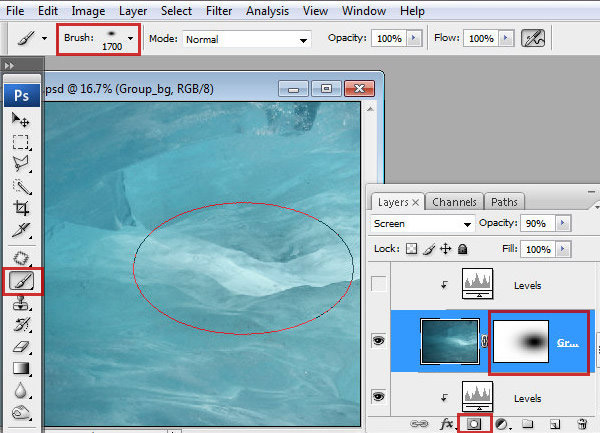
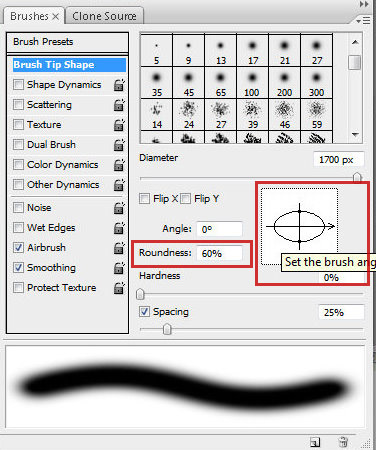
Choose Screen Blending Mode for the blurred layer and Opacity 90%. Add Layer Mask and touch it with large soft brush in the right part of the image. To make ellipse brush, change settings in the Brushes settings palette.
Step 5

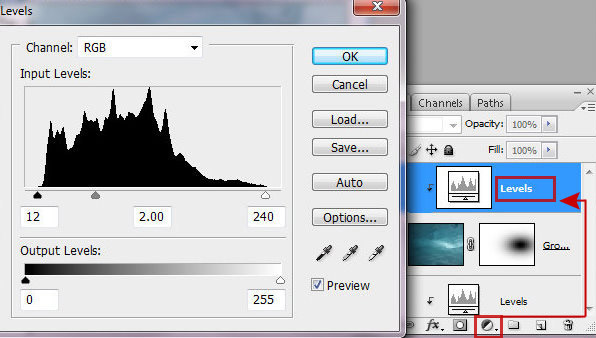
Add Levels adjustment layer, create clipping mask from it and make blurred layer lighter using following settings.

Step 6

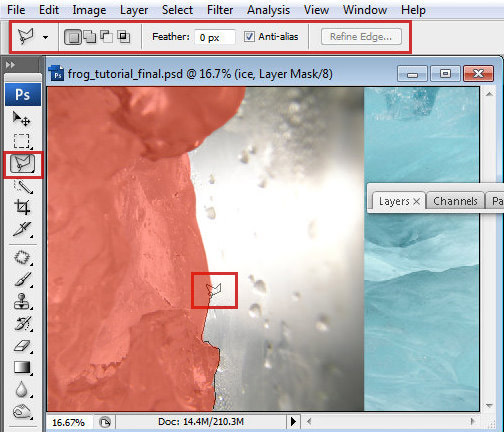
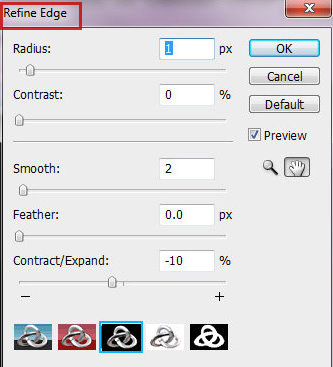
Insert another ice texture Menu > File > Insert. Go to Edit > Transform > Flip Vertical and Flip Horizontal. Choose Polygonal Lasso Tool and click in the ice contour area to set the starting point. Continue clicking around marked red area to set endpoints for subsequent segments. To close the selection border click over the starting point. Find Refine Edge option in the selection tool options bar to improve the quality of a selection’s edges.
Step 8

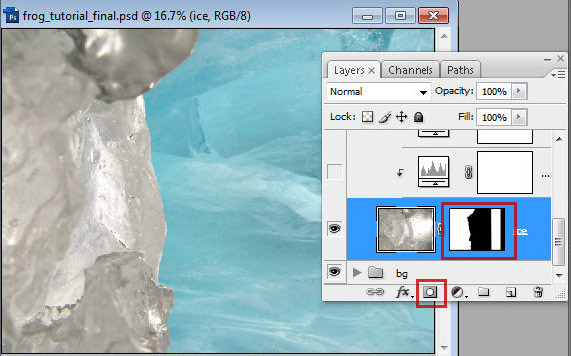
To extract selected ice area click "Add Layer Mask" icon.

Step 9

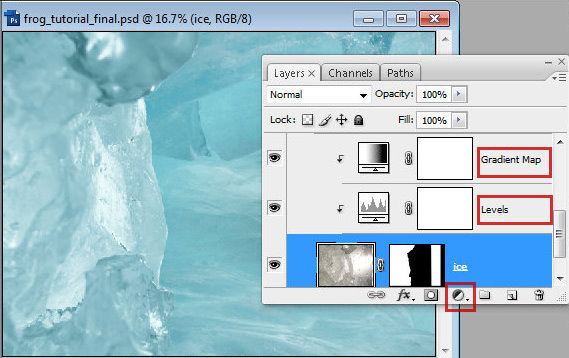
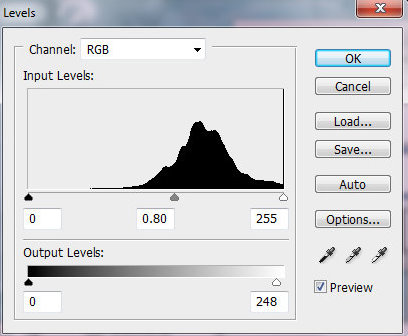
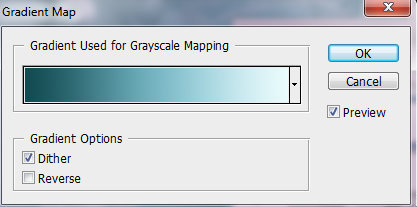
Add adjustment clipping masks to the "Ice" layer – "Gradient Map" and "Levels", use the same way just like in the previous steps with the background layer.
Step 10

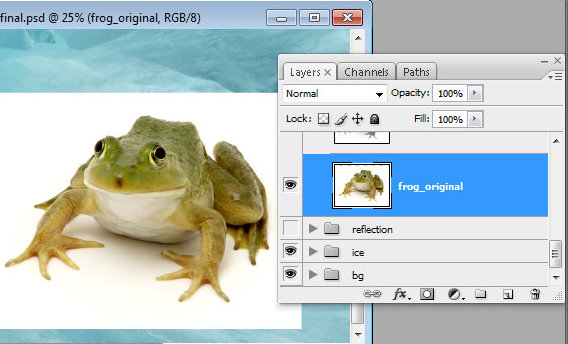
Insert frog image.

Step 11

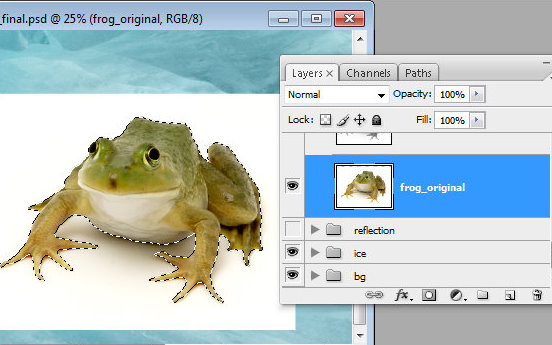
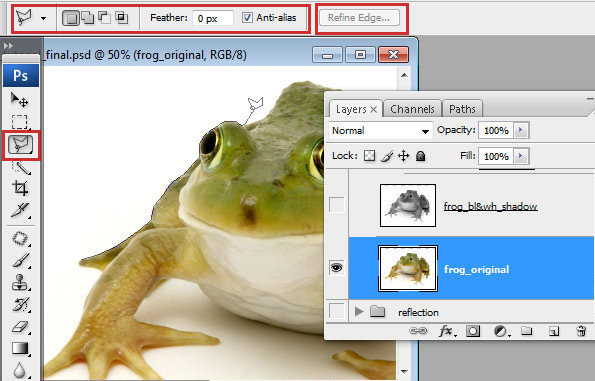
Select frog silhouette with Polygonal Lasso Tool. Correct selection using Refine Edge settings.
<img src="http://d2f8dzk2mhcqts.cloudfront.net/0650_Frog/1-16.jpg" alt="" width="589" height="399" bo
rder=”0″ />

Step 12

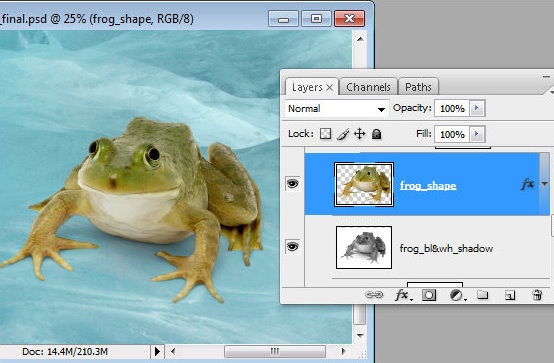
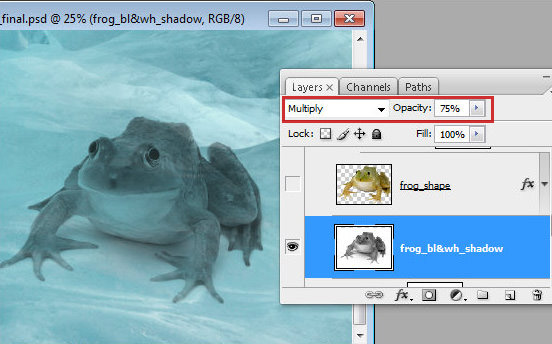
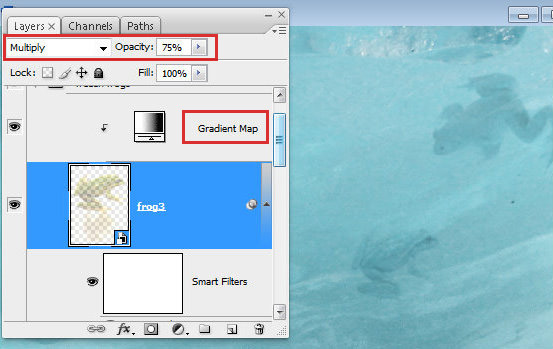
Copy selected frog shape and paste it into a new layer – "frog shape" on the screen shot. Duplicate original frog layer. Make one of the duplicates invisible(original frog layer will be needed in the future steps), and make second one black & white. We will keep black and white layer to save shadow effect from the original image -" frog_bl&wh_shadow" layer on the screen shot. To make layer monochrome, go to Image > Adjustments > Black and White. In order to hide white background, apply Multiply Blending Mode and Opacity 75%.
Step 13

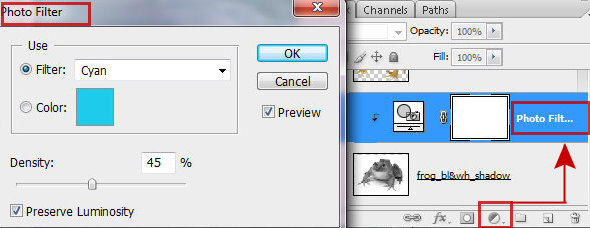
Add Cyan shade to the black & white layer, use Photo Filter Clipping Mask.

Step 14

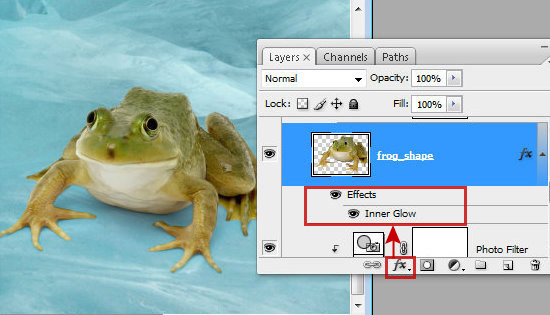
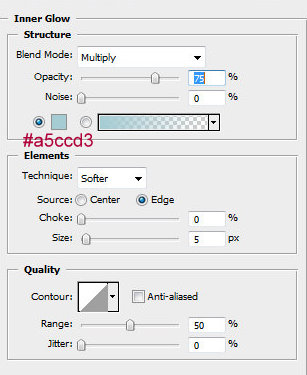
To improve frog’s shape contour and mask small defects add Inner glow effect with following setting.
Step 15

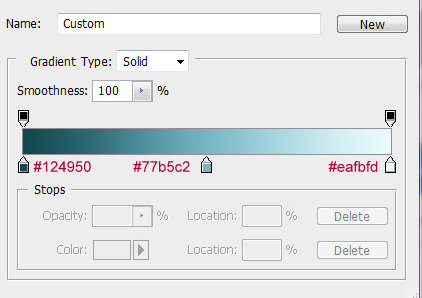
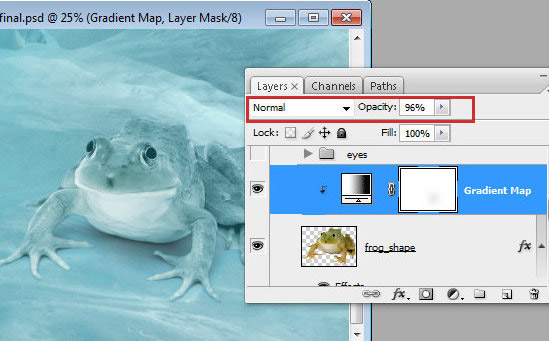
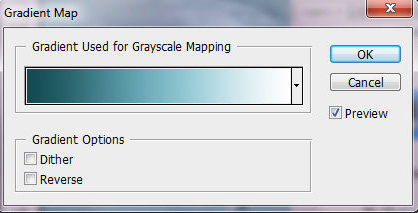
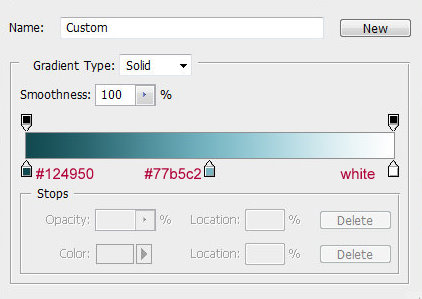
This step is very similar to the "Step 9". In order to create blue skin effect, add "Gradient Map" clipping mask with colors like on the image below. Apply Opacity 96% to the clipping mask.
Step 16

Touch "Gradient Map" Layer Mask with large translucent and soft Brush Tool.
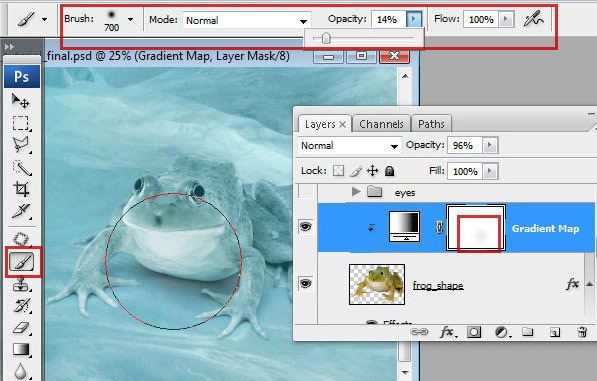

Step 17

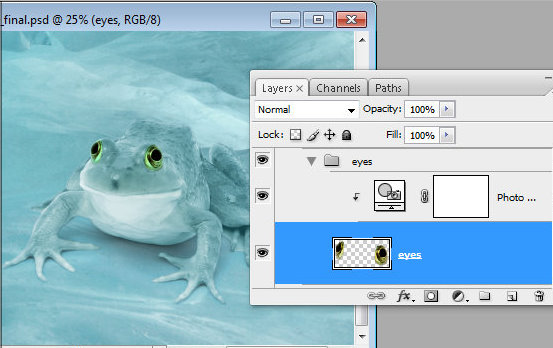
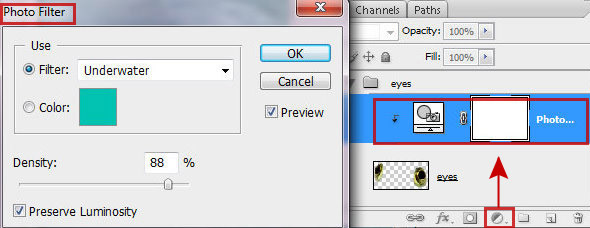
Find the original frog layer, load selection for the eyes area, copy and paste it above blue skin layers. Apply "Underwater" Photo Filter Clipping Mask to the eyes.
Step 18

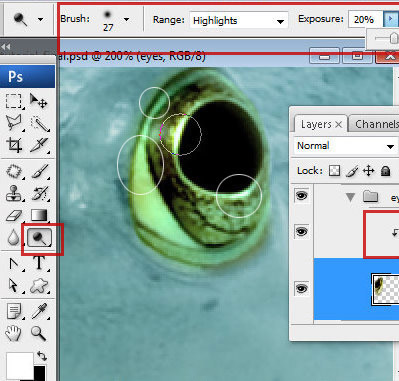
Make eyes shinier in marked areas with Dodge Tool, use soft brush.

Step 19

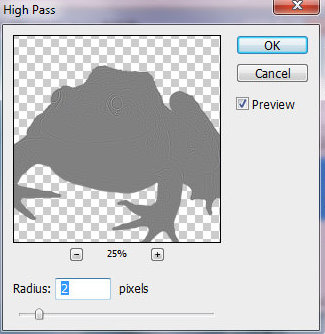
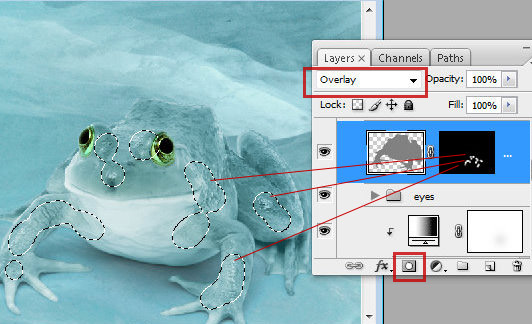
Make frog sharper and glossier. Return to the original frog layer again. Load selection for the frog silhouette. To load selection you may use is already extracted frog shape, just Command/Ctrl + click blue frog layer thumbnail. Copy selected frog shape in the original layer and paste it above of all frog layers. Apply High Pass Filter to this layer. Go to Filter > Other > High Pass. Apply Overlay effect to created layer. Add Layer Mask to the layer by clicking icon. Fill Mask with black color and process marked areas with soft white brush like on the screen shot.
Step 20

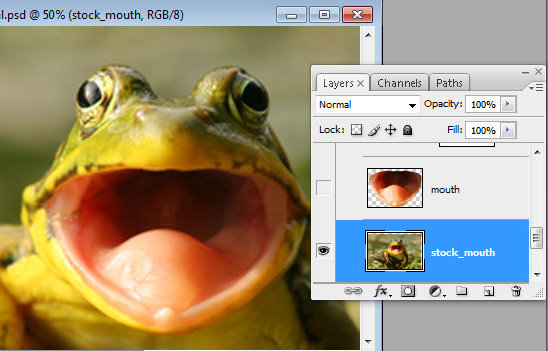
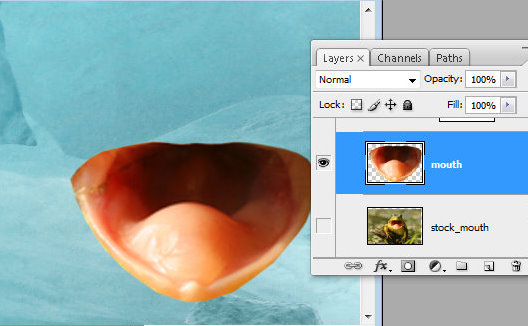
Open frog’s mouth image and erase the background around the mouth. Duplicate mouth shape, we will use one of the copy to create the tongue.
Step 21

Go to Edit > Transform > Rotate, rotate the mouth a bit, then use Free Transformation to stretch it by vertical.
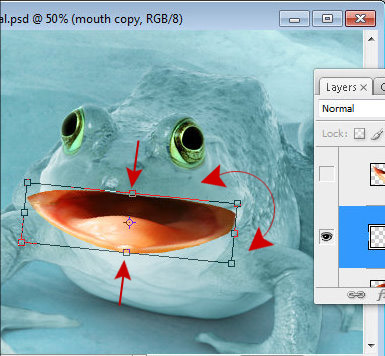

Step 22

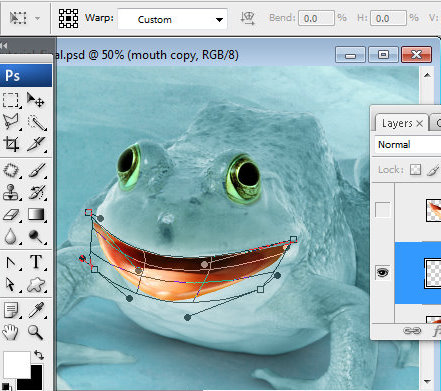
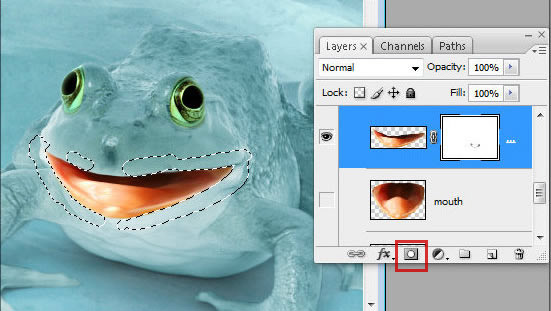
Change the shape of the mouth with Warp Transformation. Edit > Transform > Warp. Correct the mouth contour in the Layer Mask with small brush or just use Eraser Tool.
Step 23.

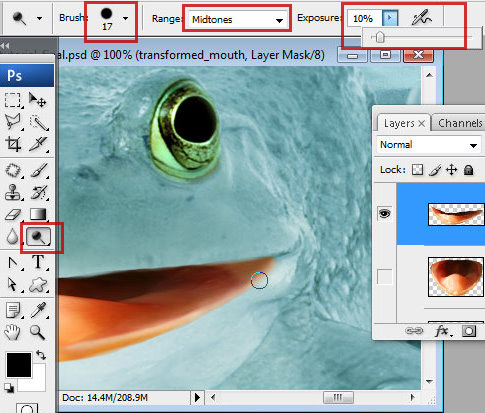
Lighten some areas with Dodge Tool to make good balance between a skin tone and a mouth.

Step 24

Add following adjustment Clipping Masks to the mouth.
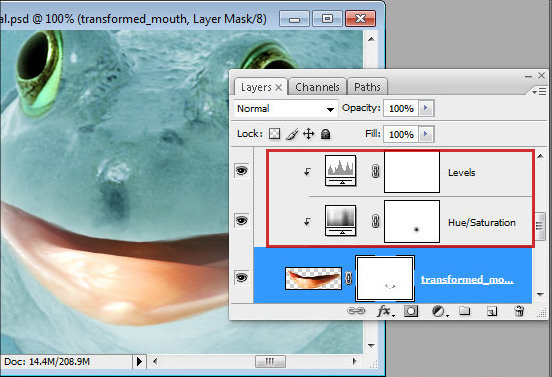

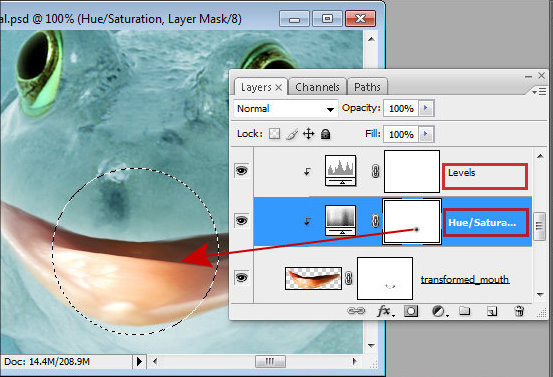
Step 25

In order to leave the mouth pink and create smooth blending effect, touch layer mask of the Hue/Saturation balance with soft black Brush Tool.

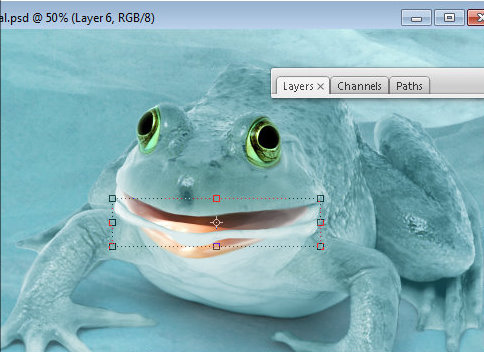
Step 26

Group frog layers except mouth, duplicate the group and merge it. Erase the all area around bottom lip and place it above mouth layer.

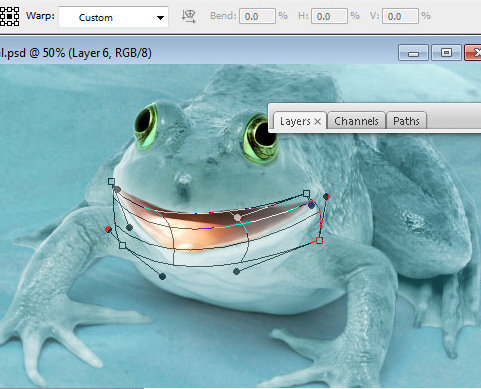
Step 27

Transform a lip using Warp Transformation, use very similar method as for mouth transformation.

Step 28

Erase small defects and outstanding contours.
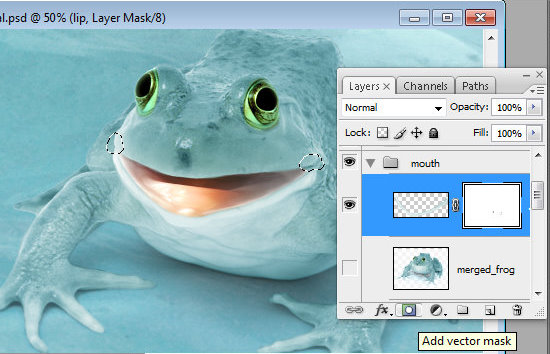

Step 29

Make active original mouth layer. Select the tongue area, copy and paste it into a new layer.
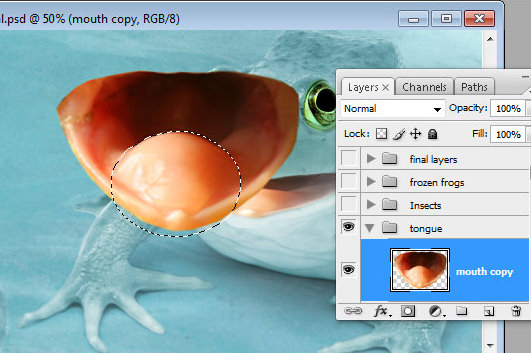

Step 30

Go to Edit > Transform > Flip Horizontal, then transform it like on the screen shot and stretch by length.
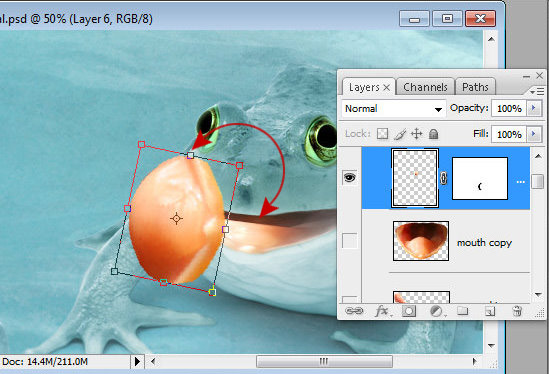
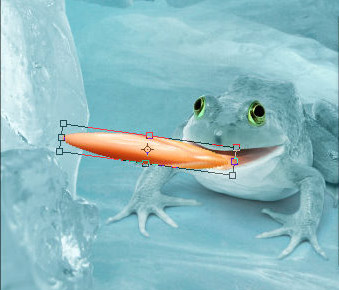
Step 31

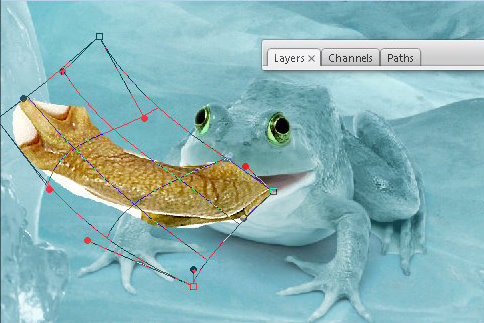
Apply Warp Transformation to the tongue shape.
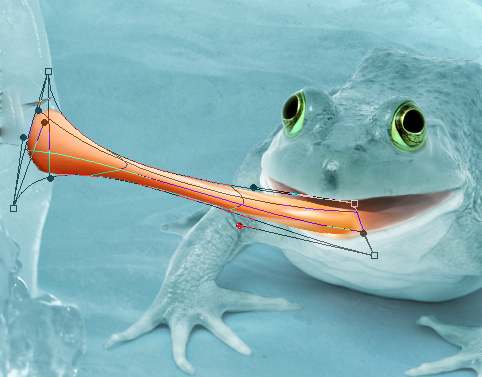

Step 32

Improve tongue silhouette with Liquify Filter. Filter > Liquify. Choose Forward Warp Tool and use different brushes sizes for different parts of the tongue.
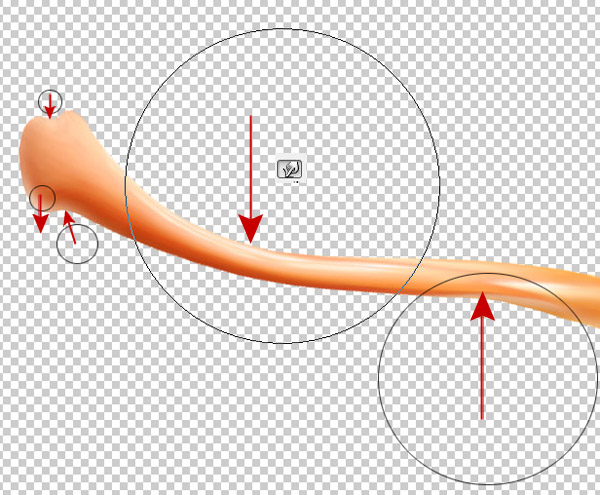

Step 33

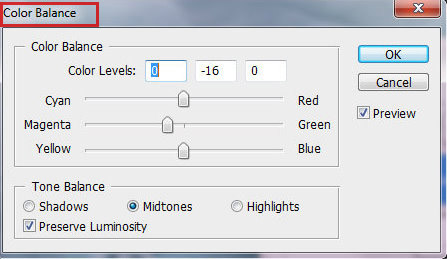
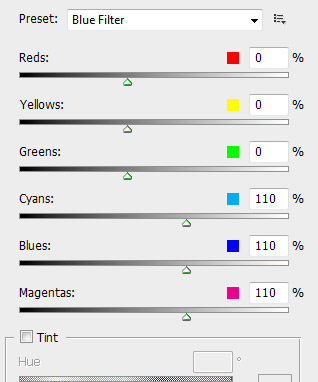
Adjust Color Balance.
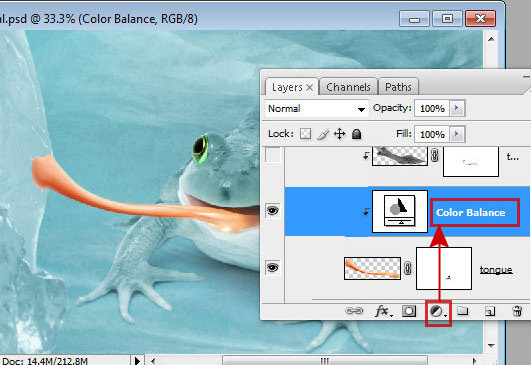

Step 34

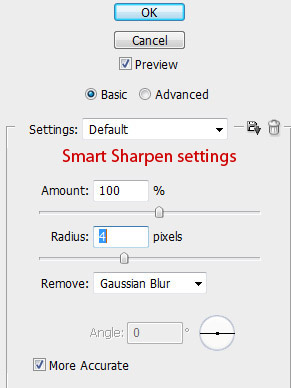
We need to create a texture for the tongue. I used a frog skin texture. Arrange skin over the tongue shape and apply Smart Sharpen Filter – Filter > Sharpen > Smart sharpen.
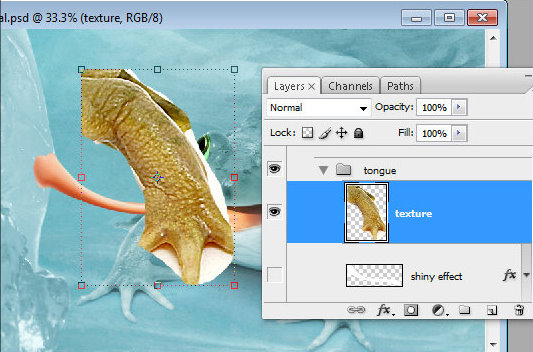
Step 35

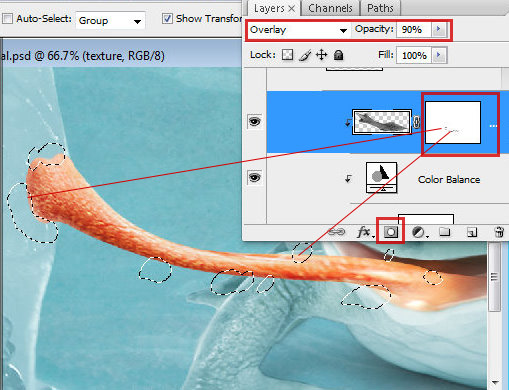
Make texture black and white, Go to Image > Adjustments > Black & White. Create clipping mask from created texture, right click layer thumbnail and choose "Create Clipping Mask". Apply Overlay blending mode and Opacity 90% to the clipping mask. Erase small (selected on the screen shot) areas to make a structure more natural.
Step 36

Load selection for the tongue layer and fill it wit any color in a new layer. Adjust Fill = 0% and apply Bevel and Emboss effect.
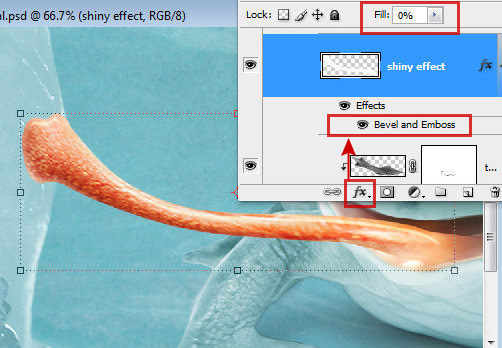
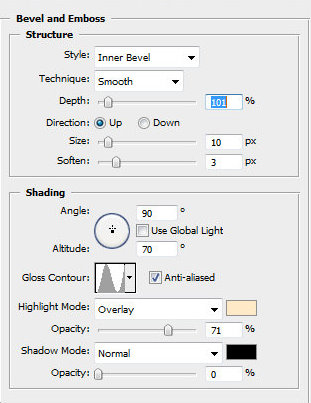
Step 37

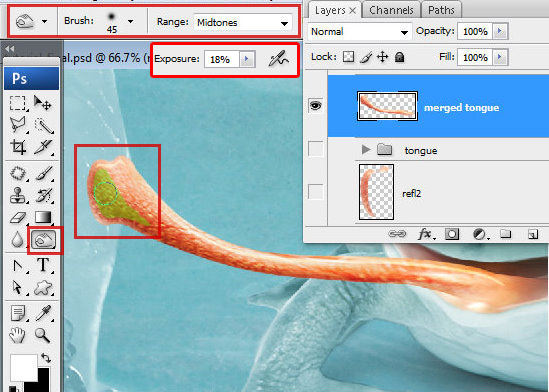
Merge tongue layers and process green marked area on the screen shot with Burn Tool to make shadow effect.

Step 38

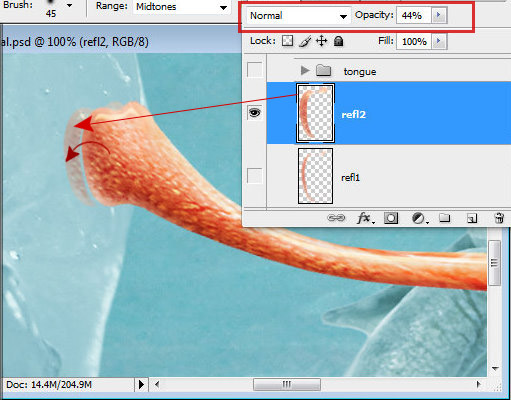
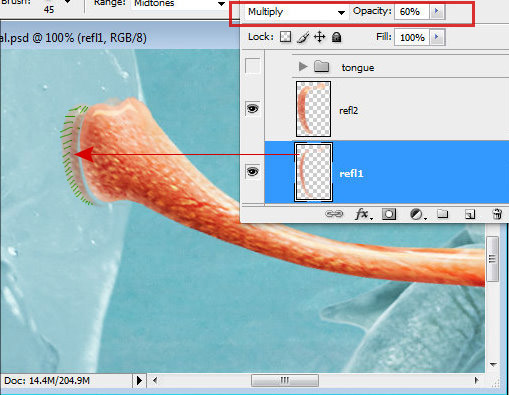
Copy a tip of the tongue and paste it into a new layer, move a little bit left, load selection for the original tongue layer and cut out selected area from the copied tip, move reflection layer again, just leave very small space between tongue and reflection. Apply Opacity 44% to reflection layer. Then repeat the previous actions and create the second reflection layer, but apply Multiply Blending Mode and erase dashed area on the screen shot with smooth brush.
Step 39

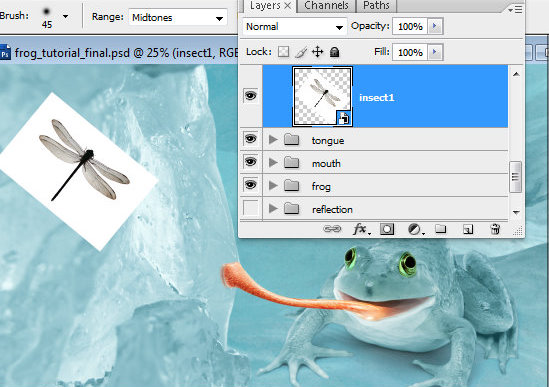
Insert dragonfly image: File > Insert, rotate it.

Step 40

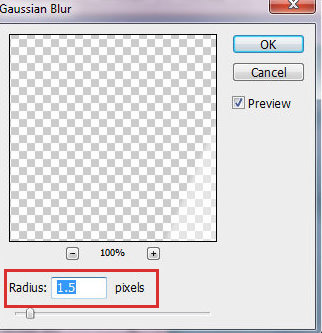
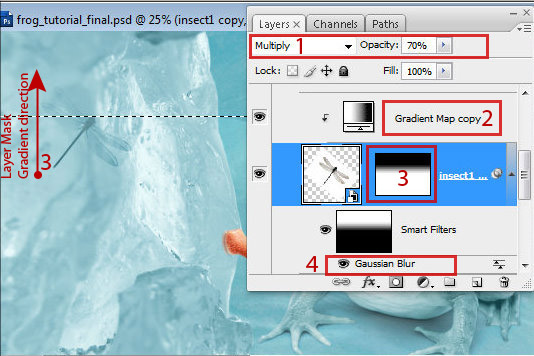
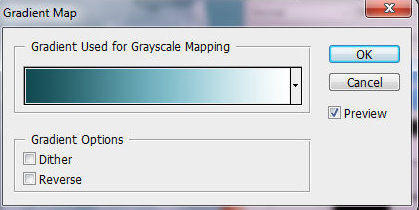
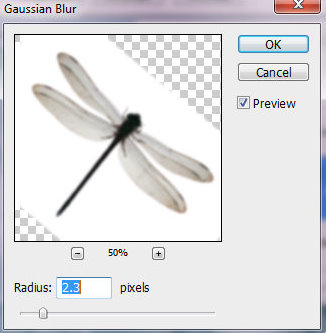
Apply Multiply Blending Mode to this layer and Opacity 70% (1). Add "Gradient Map" clipping mask with the same colors as for the frog’s blue skin (2). Create Layer Mask for the dragonfly layer and fill it with linear black and white gradient (3). Load selection for created Layer Mask – Command/Ctrl + click Mask thumbnail and inverse it, go to Select > Inverse. Keep selection, go to Filter > Blur > Gaussian blur (4) and apply settings like on the screen shot below.
Step 41

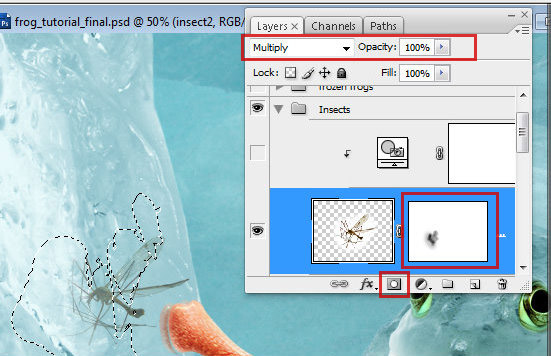
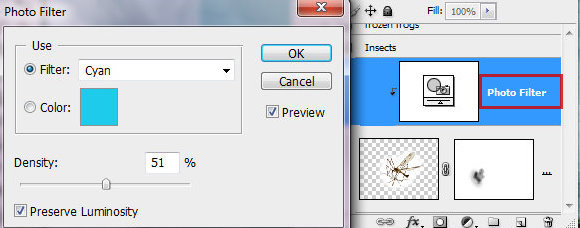
Insert mosquito image, apply Multiply Blending Mode, and add adjustment "Photo Filter" clipping Mask. In order to dip insect to the ice, create layer mask for the mosquito layer and process it with translucent Brush Tool (use brush Opacity around 10 – 15%).
Step 42

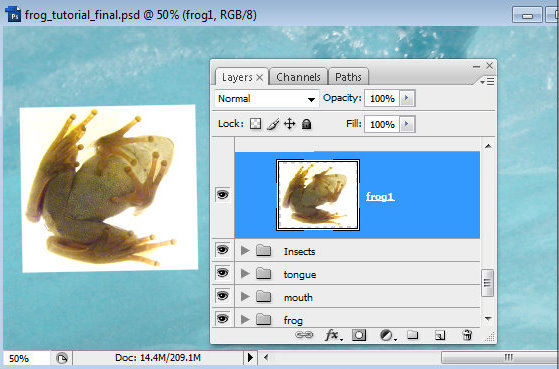
To dip frogs into the ice, use similar method. Insert image, make white background cleaner using Levels adjustments.
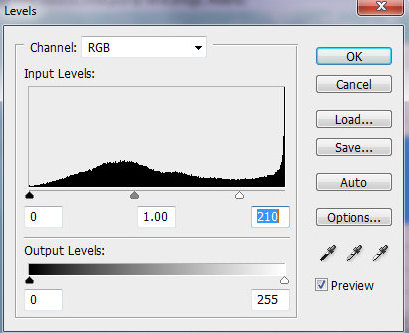
Step 43

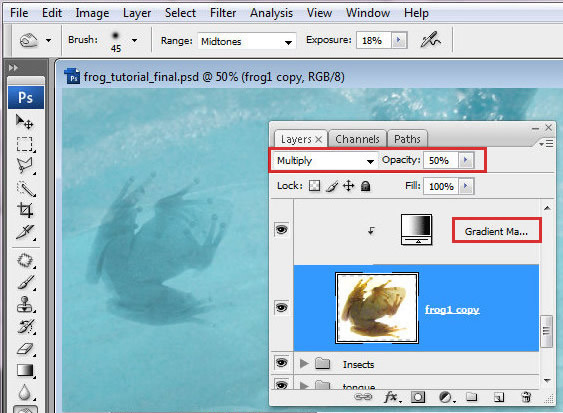
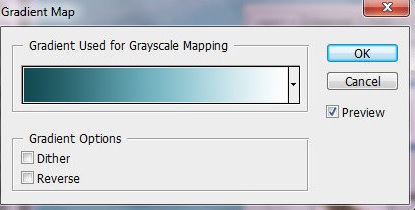
Apply Multiply Blending Mode to hide white background, play with Opacity, change color balance using the same Gradient Map as for blue skin and dragonfly layer.
Step 44

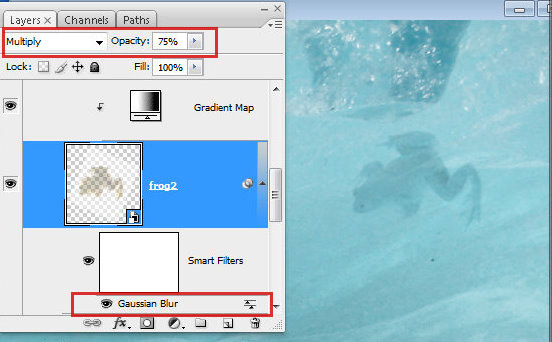
Besides "Gradient map" and Multiply Blending Mode, apply Gaussian blur filter for the far frogs.

Step 45

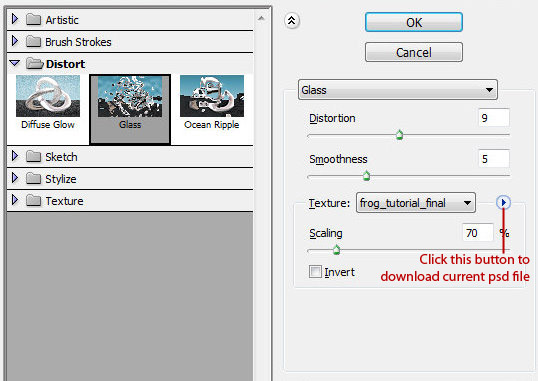
Merge all frog layers except "shadow layer" and duplicate merged layer twice. Place duplicated layers under the original frog layer. Apply Filter > Distort > Glass filter to the both of duplicates, you may find settings in the screen shot below.

Step 46

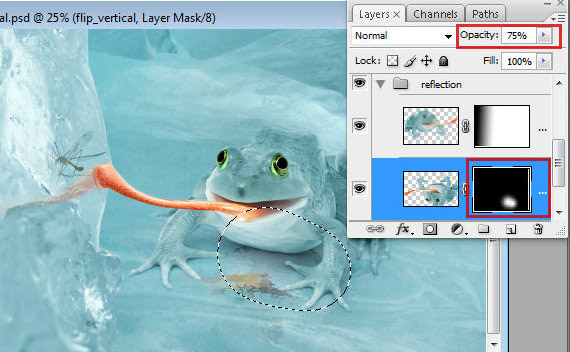
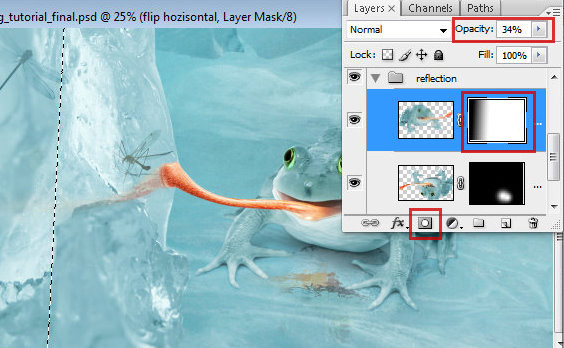
In order to create reflection, move one layer upside down, go to Edit > Transform > Flip Vertical. Move this layer down, add layer mask and fill it with black color. Choose large soft white brush and erase a spot like on the screen shot. Apply Flip Horizontal transformation to the second duplicate and move it left. Try to join tongue tips of the original frog and reflection. Add Layer Mask to this layer too. Fill it with linear black and white gradient like on the example below.
Step 47

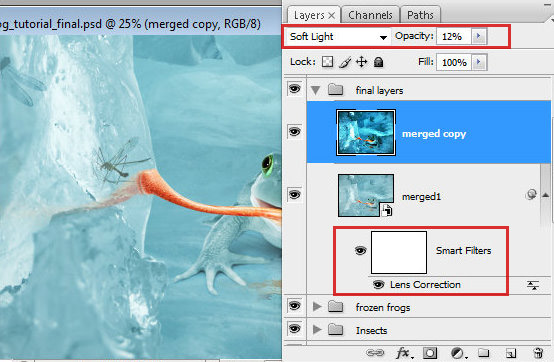
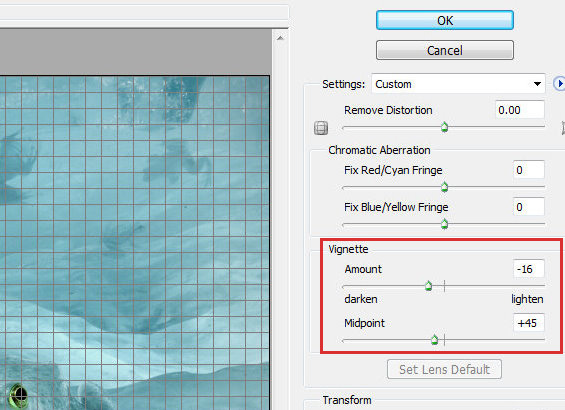
Merge all layers. Go to Filter > Distort > Lens Correction and apply Vignette effect. Duplicate this layer, go Image > Adjustments > Equalize. Apply Soft Light Blending Mode and Opacity 12%.
Final Image

Read More

Aetuts+ Photoshop Contest Halfway Over!

This is simply a post to remind you that the Aetuts+ Photoshop Contest is halfway over. I’ve only gotten 13 submissions thus far and remember that we’ll be giving away prizes to the top 20 entries… As of this moment, all 13 are getting $10 free for the Envato Marketplaces… not to mention the other amazing prizes for the Grand Prize Winners!

Competition Banner

Read More

Interview With Ari Weinkle

Ari Weinkle is a designer that creates some unique abstract works of art. It is this unique style that helped earn Ari a place in the prestigious Depthcore collective as well as many other features and accolades. In this interview Ari discusses why he decided to go to the Rhode Island School of Design and how he benefited from it. He also gives our readers some really fantastic advice. So don’t miss out on this excellent interview.


Q Welcome to Psdtuts+, please introduce yourself. Could you tell us where you’re from and how you got started in the field?

I am from Boston, Massachusetts and have just graduated from the Rhode Island School Design. I have been interested in art and design my whole life, but began working in the digital realm in high school. Currently, I am working at a design and branding firm in Boston.

Q Why did you decide to become a designer? Who or what exactly drew you to the profession?

I have always enjoyed creating things and making artwork. I wanted to be able to work creatively in my day job, and graphic design allows me to do that. I landed specifically on graphic design because it always seemed like one of the most tangible ways to bring art into one’s work. On another level I have been surrounded by art my whole life and was very fortunate to be able to travel a fair amount at a young age. That exposed me to many different cultures and aesthetics, which greatly contributed to my desire to become a designer.

Q What aspect of an illustration do you enjoy working on the most, and why?

To me the best part is that “ah ha” moment that comes after hours and hours of working on a project. Some people call it “flow” or something similar. After lots of errors and setbacks, things finally start to come together. Then the fun part comes where you lose track of time and can enjoy the process of creating. This usually occurs after I’ve settled on a concept and am working on the microscopic details.

Q In your portfolio you write that you have attended the Rhode Island School Of Design, why did you choose to attend opposed to becoming a self taught-designer like some?

That’s an interesting question. I felt that going to art school would expand my thinking and attitude towards art and design. On a practical level, it’s great to have a degree. I also had an opportunity to meet and work with many talented people who pushed me to work harder, and inspired me to think differently.

Q What would you say is one of the more important lessons you learned from going to college for design?

Much of what I was taught at school relates to process. For me, one of the most important things I learned was to enter each project without expectation. Instead, it’s better to work and let the process and act of creating/designing lead your decisions. It’s a very tough thing to incorporate into one’s work, but I think its really important.

Q You recently created 5 illustrations that were inspired by a trip to India, please talk about what exactly inspired you to create them and also which is your favorite?

During my trip, I went to many sacred spots across northern India. Being surrounded by so much devotion, vivid imagery, and unique sensory stimulus made me want to create this series as a response to what I experienced. The series of work was inspired by five of the principle deities in Hinduism. Each piece attempts to reduce the iconography of the particular Deity to something abstract, and not directly related to form. If I had to choose a favorite, it would be the Shiva piece, because it was the final work I created and the one which in which I pushed myself the furthest. The forms were actually generated by igniting charcoal, paper, and handmade Indian paper.

Q Who would you say are your all-time heroes of design? Both traditional and modern, and how have they shaped you as a designer?

In terms of contemporary graphic design studios, some of my favorites are, Grandpeople, Project Projects, and Onlab. Each of those studios is a bit different, but they all have me to think differently about typography. In terms of more traditional artists, some of my favorites are Joan Miro, Hiroshige, Piet Mondrian, and Mark Rothko. Mondrian in particular is someone who I never get tired of. Of course, the whole Depthcore. collective is one of my main sources of inspiration… everyone there is top-notch and have really helped bring my work to a new level.

Q Thanks again for providing Psdtuts+ with this opportunity to interview you. Any final thoughts for our readers?

Thanks for having me… all I can say is to keep creating! The world needs more meaningful art and design.


Where to find Ari on the Web

Read More

Quick Tip: Color Your Artwork Using Actions in Photoshop

Photoshop actions can make lots of tasks easier; from batch processing to handling simple, every day tasks. Actions can seriously improve your workflow. In today’s quick tip we will demonstrate how to use actions to help color your artwork. Let’s get started!


Introduction

I must to tell you, I’m a lazy person and I always want to reduce the amount of extra work I have to do, even if it’s just one more click. I work at an advertising agency and every minute counts, today I’d like to share a quick tip that I learned that really makes my life easier.


Step 1

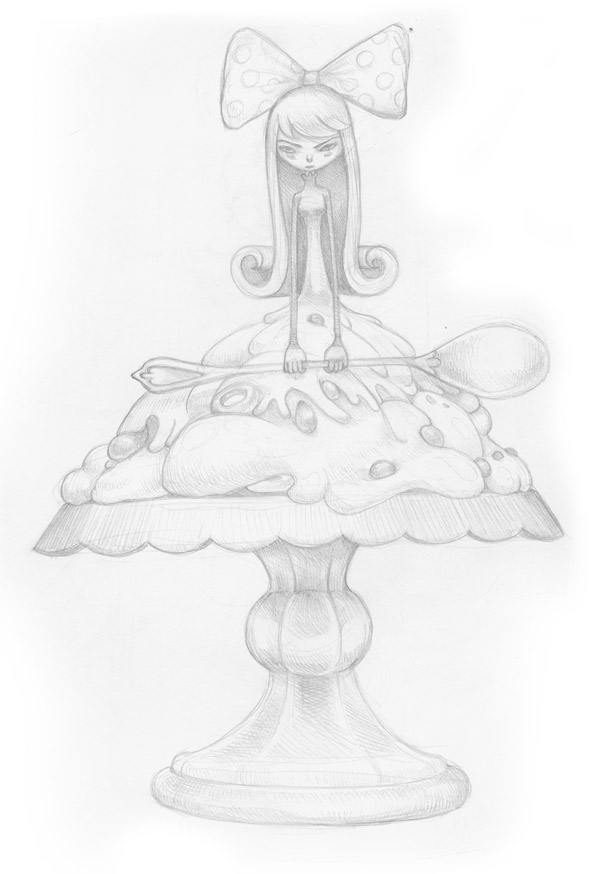
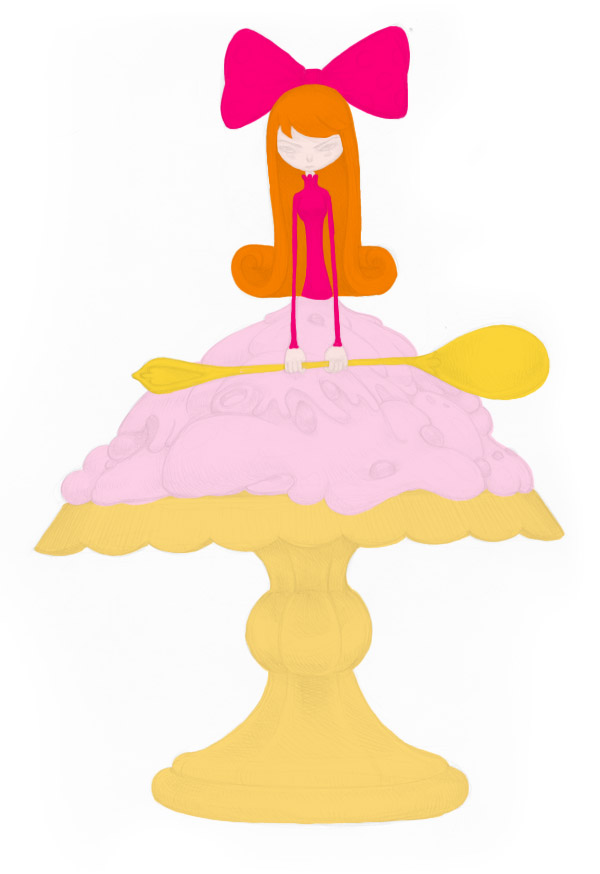
To start things off, I scanned one of my drawings and opened it in Photoshop.

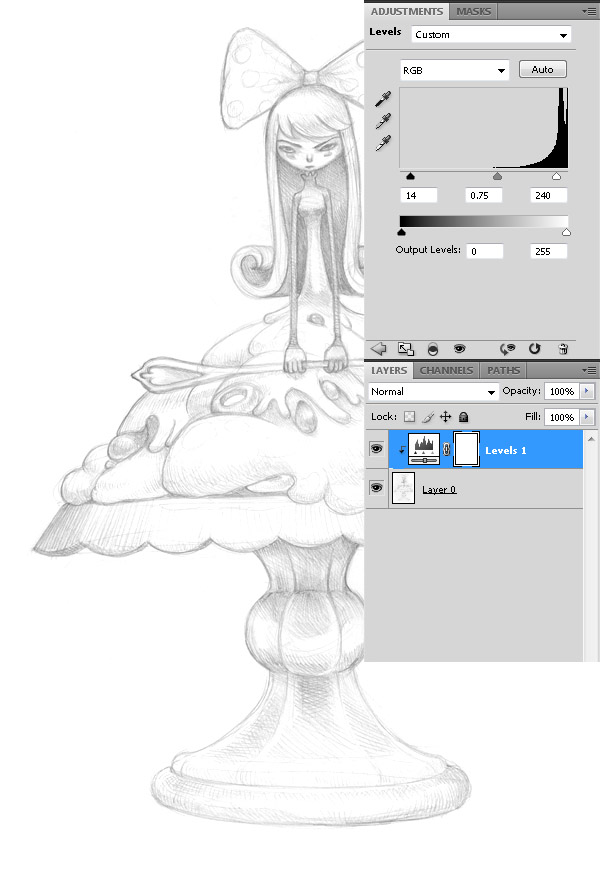
Adjust the image a little with levels to get cleaner lines.

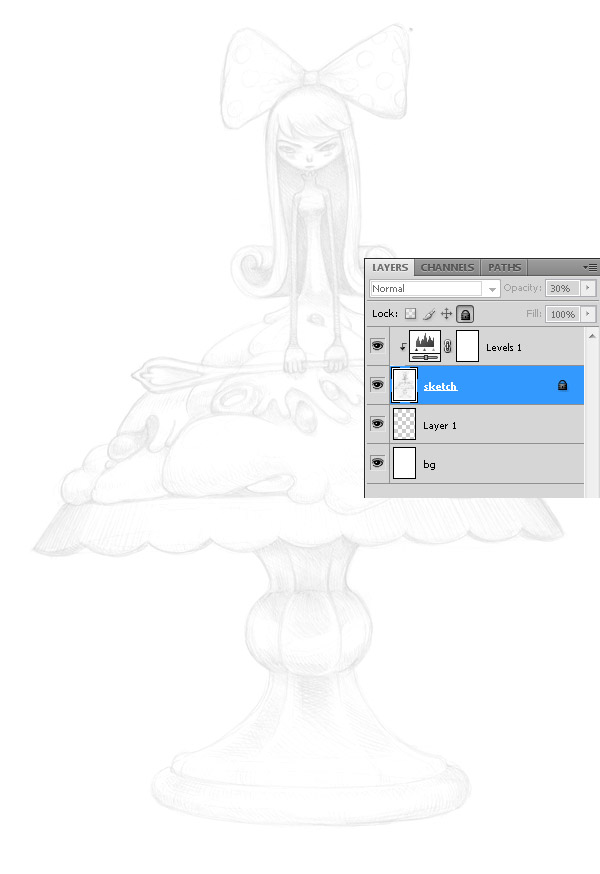
Create two new layers under the sketch layer, fill the lowest layer with white. Set the sketch layer’s blending mode to Multiply and set opacity to 30%.

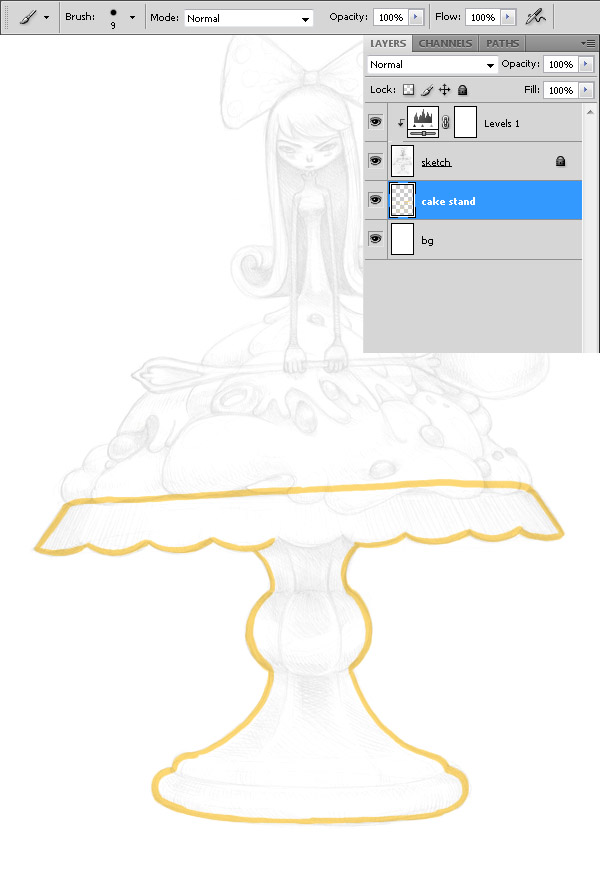
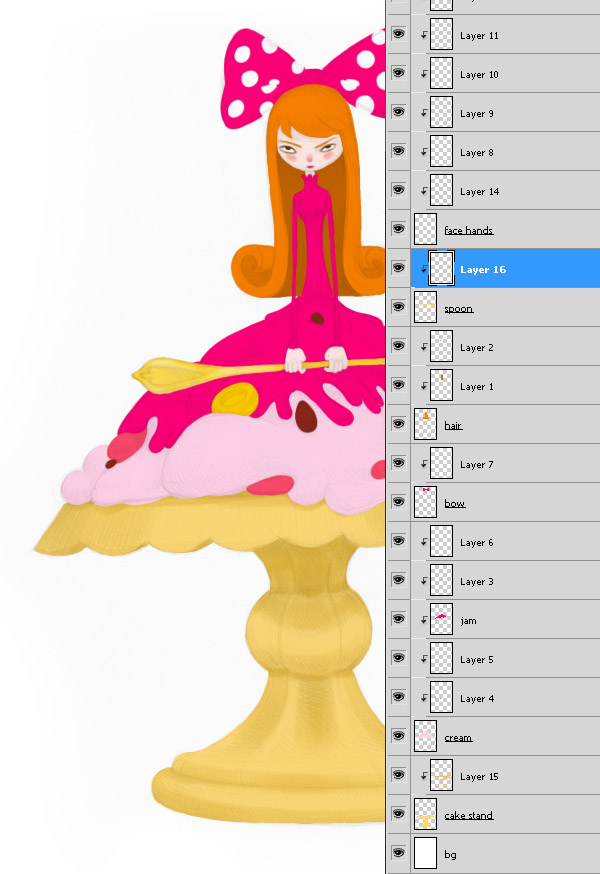
Now fill it with basic colors. I use small hard-edged brush to paint edges of elements. Paint it on transparent layer between white background and sketch. Some people will ask, why don’t you use pen tool to do that? Right, you can use shapes to make basic coloring, but I prefer the hand-drawn look for my drawings, and not perfectly smooth.

­


Step 2

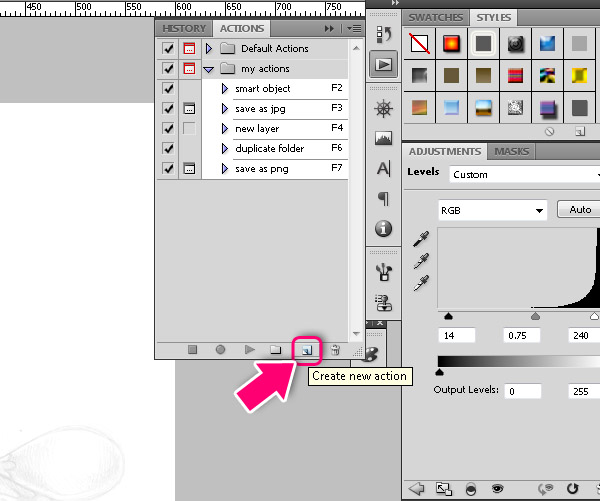
Here comes our first action. Go to Window > Action. Click Create new action icon.

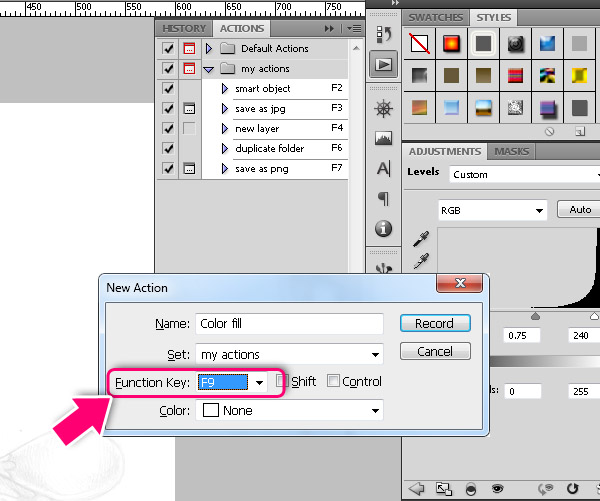
You get new action pop up, now let’s give it a name – Color fill, and most important thing: choose F9 in Function Key drop down. This will be your shortcut for this action. You can use any other F key from the list, just keep in mind what by default F keys bringing some pallets, for example F5 open Brush pallet, so may be you want to keep it. Now click Record.

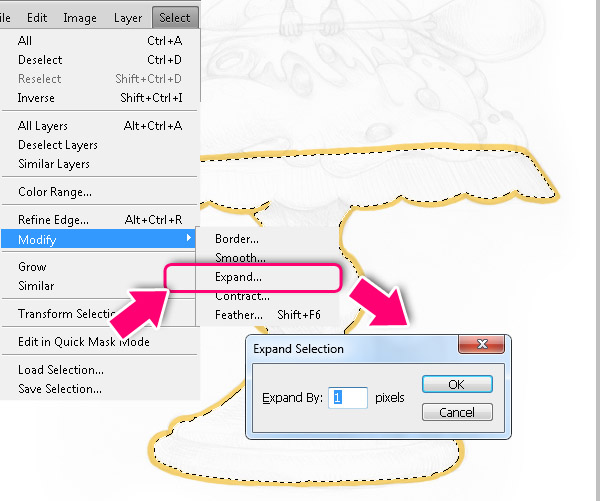
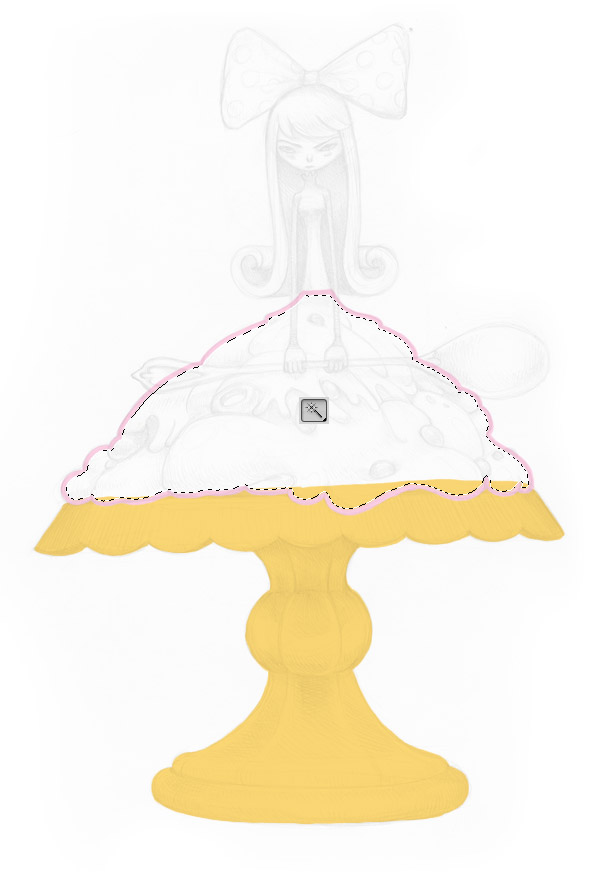
Pick Magic Wand Tool (W) and click to choose empty area inside painted edges. Now go to Select > Modify > Expand, set Expend by 1px and click ok.

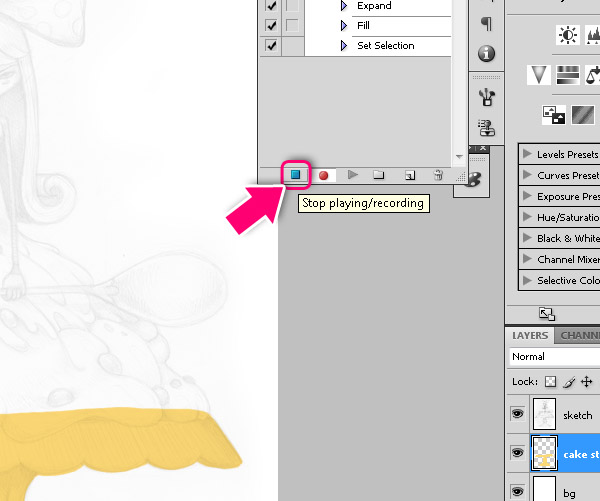
Now press Alt + Backspace/Delete to fill selection with foreground color. And press Command/Ctrl + D to deselect. We finished to record our action, so go to Action pallet and click Stop playing/recording icon.

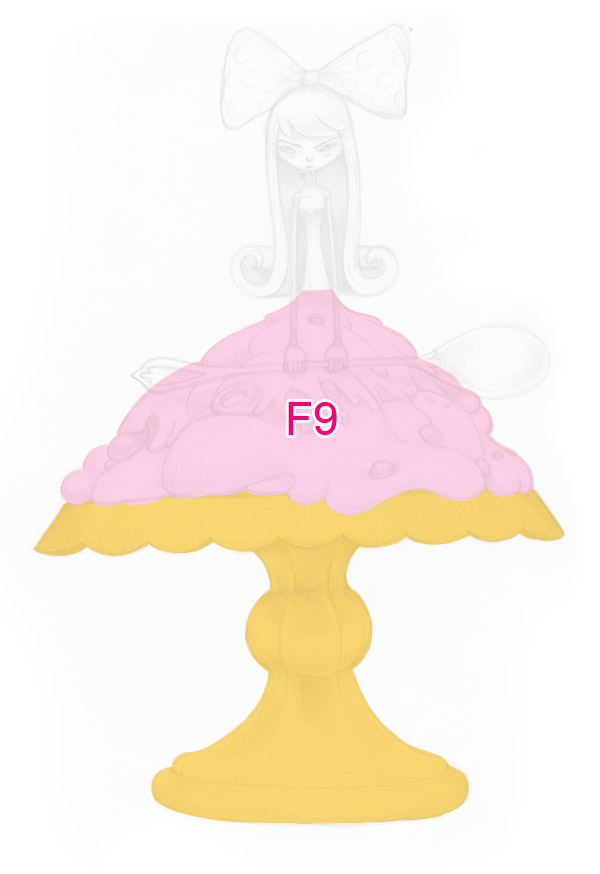
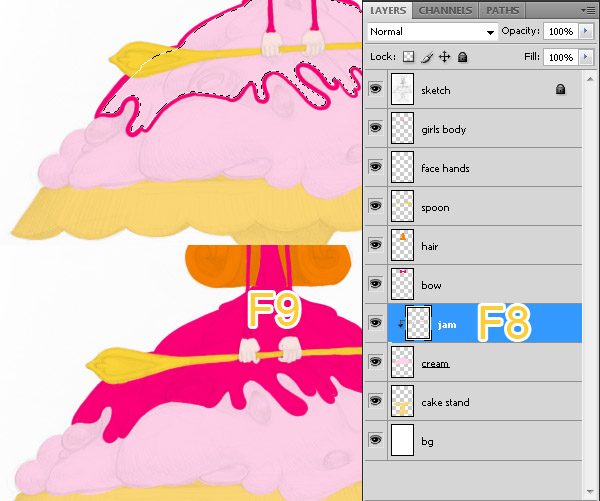
Now when we have our action ready we can continue paint. I draw edges of cream on new layer with light pink. Using Magic Wand Tool (W) select the inside and press F9 to get a nice and clean fill.

I use same technique to fill all parts of image. I don’t have to use it for small parts, like hands, it’s only good for large areas.


Step 3

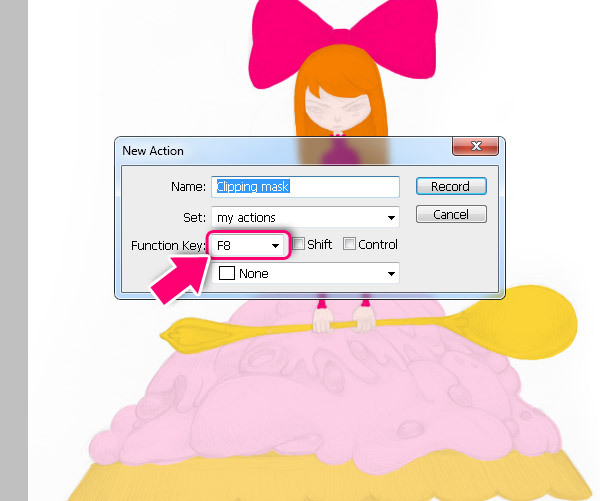
Now draw more details. I will create the action, which make a new layer with clipping masks, this way I can paint inside basic shapes, but each detail on new layer. So, like we done before, create new Action by clicking Create new action icon. Name it Clipping mask, I chose F8 for Function Key, and click Record.

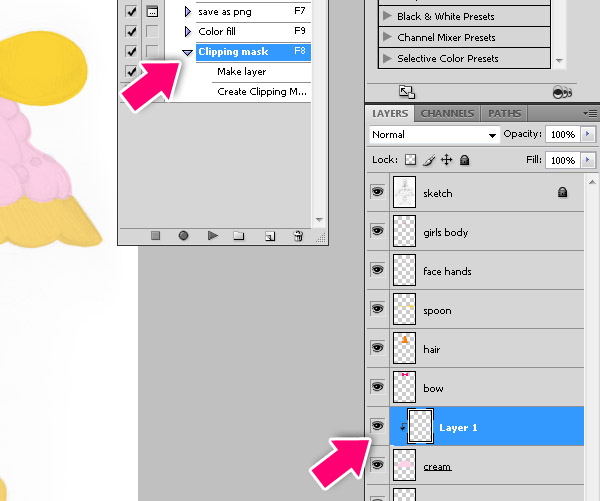
Create a new layer above let’s say the cream layer and make it a clipping mask Command/Ctrl + Alt/Option + G. Then go to the Action pallet and click Stop playing/recording icon. It looks like a really short action, but believe me, its saves tons of time then you use it over and over.

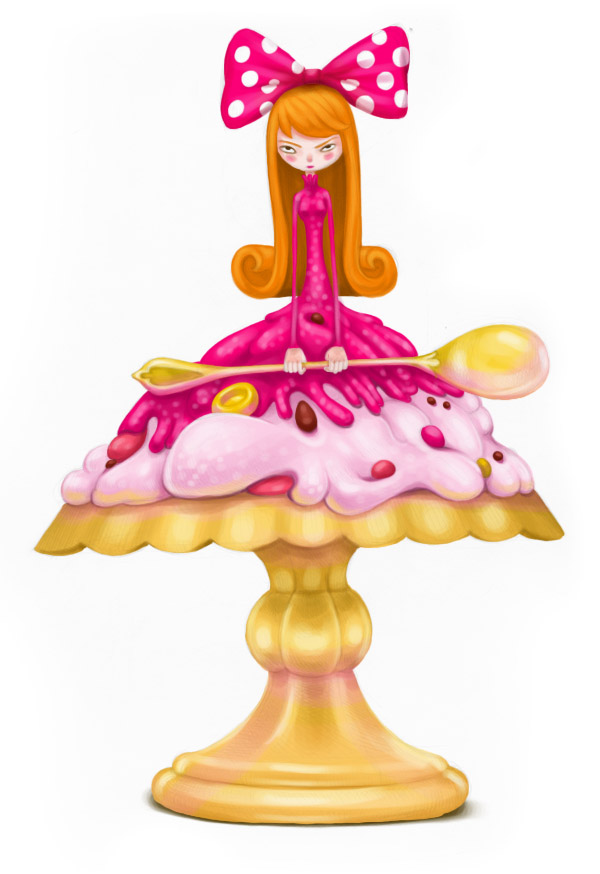
Keep adding details, using the F9 action for fast filling and F8 action to create new clipping masks.


Final Image

Conclusion

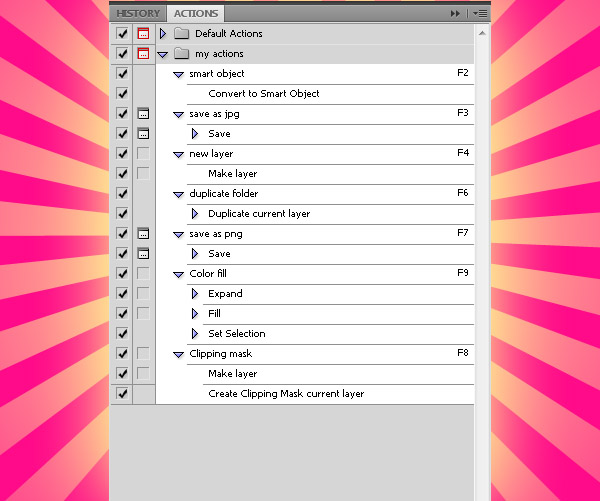
As you can see, actions are great for performing small repetitive tasks. For example, at work, I use F keys actions to convert to smart object, save as jpg, duplicate folders –  all the small things you use hundreds of times per day. Each one of you can create a set of actions you use the most. You can also use Shift and Ctrl/Command keys combination if you don’t have enough F’s. I hope this little trick will help you to work a little bit less.

Read More

Create Typography That’s Going Down the Drain – Psd Premium Tutorial

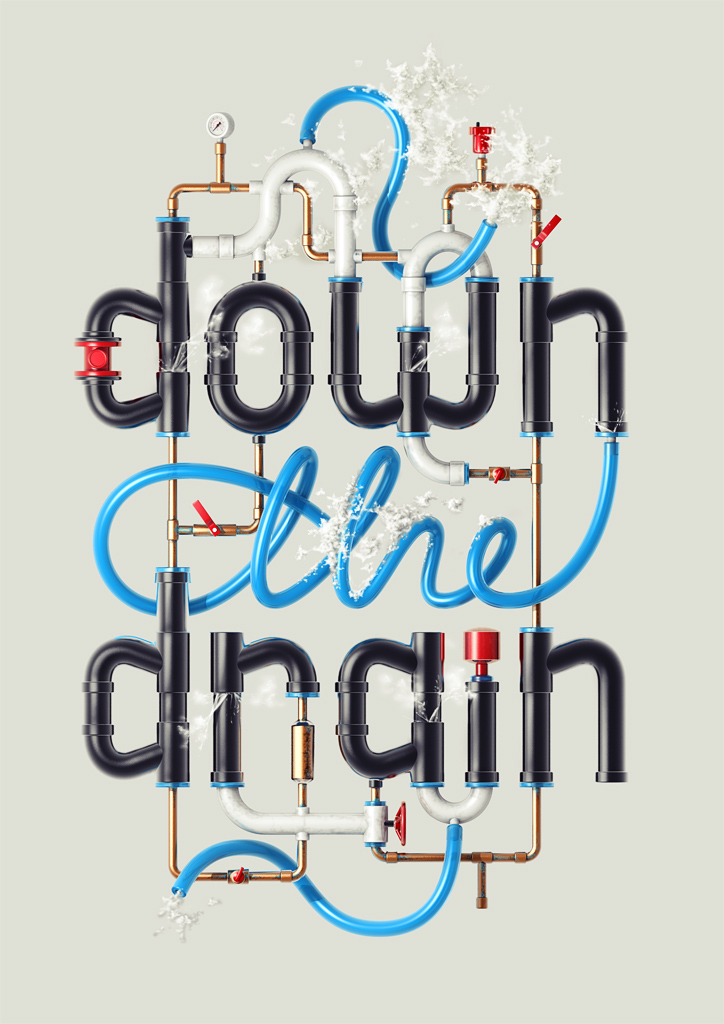
In this Psd Premium tutorial, author Alex Beltechi will demonstrate how to create another typographic treatment from scratch using pipes and hoses for letters. In this tutorial you will learn how to plan paths in Illustrator, model them in Cinema 4D and bring them alive in Photoshop. You’re going to need to know the basics of Cinema 4D for this one, as today’s focus is on Photoshop. This tutorial is available exclusively to Premium Members. If you are looking to take your typography skills to the next level then Log in or Join Now to get started!


Professional and Detailed Instructions Inside

Premium members can Log in and Download! Otherwise, Join Now! Below are some sample images from this tutorial.


Final Image

Psd Premium Membership

As you know, we run a premium membership system here that costs $9 a month (or $22 for 3 months!) which gives members access to the Source files for tutorials as well as periodic extra tutorials, like this one! You’ll also get access to Net Premium and Vector Premium, too. If you’re a Premium member, you can Log in and Download the Tutorial. If you’re not a member, you can of course Join Today!

Read More

Build me a program by dkibel18

We currently need a writing program that includes an article spinner, grammer checker, word counter, and when a topic is typed into the search box it automatically searches for information for that topic and automatically writes an article, saving the skilled article writer time and money… (Budget: min $5000 USD, Jobs: C++ Programming, PHP, Ruby & Ruby on Rails, Software Architecture)


Redirect Script Needed now for Clickbank Product by hirefreelancers

I have a link for a special deal on a clickbank product but the link does not contain my affiliate ID. I need a way to redirect the user through my aff link but also let them use the special link that gives them the special price… (Budget: $30-$250 USD, Jobs: PHP, Software Architecture)


Write and post 160 x 150 word articles to wordpress by southerntulip

Only bid if you are a native english writer. The task is to write 16 x 150 word articles for each website (wordpress blog) provided to you. I will provide you with 10 websites, therefore a total of 160 articles need to be written… (Budget: $250-$750 USD, Jobs: Article Rewriting, Articles, Copywriting, Ghostwriting)


mobile web project for www.scrappfightmag.com by qnect

http://www.scrappfightmag.com/ – We need a rockin mobile / ipad / blackberry / droid / anything design for what you currently see. The app needs to detect the mobile device and offer the same state of the art look we currently have and format to every mobile device out there… (Budget: $250-$750 USD, Jobs: Mobile Phone, PHP)