CMG Hidden Gems: Masking

Chris & Trish Meyer’s series of tips, tricks, gotchas, factoids, and shortcuts has continued with tips on masking in CMG Hidden Gems: Chapter 10 – All About Masking. If you don’t know already, check out the tip on hitting the Arrow keys while drawing Rounded Rect mask or Polygon/Star shapes.

For some handy info, see the sections on creating and working with masks in After Effects Help, and posts tagged mask at AE Portal.


Read More

25 Creative and Challenging Vector Poster Design Tutorials


Jump into this roundup of some of the most creative and challenging vector poster design tutorials on the web. There is a large assortment of styles and approaches here to review, from spacey psychedelic poster design, to geometrically influenced poster design, to robotic stomping power, to retro aesthetics and more. Check out these inspiring poster design tutorials.

Continue reading “25 Creative and Challenging Vector Poster Design Tutorials”

John Maeda on His Journey in Design


Just because you missed that awesome conference, doesn’t mean that you can’t still watch the lectures! This weekend, we feature an inspiring talk that John Maeda (the president of the Rhode Island School of Design) did at TED. He is a tireless experimenter and a witty observer. In this talk he shows some of his experiments, some purely design, others computer based, and many that explore the area where design and computers meet.

Continue reading “John Maeda on His Journey in Design”

Quick Tip: Create a Pretty Bouquet of Flowers with Adobe Illustrator


In this tutorial you will learn how to create a bouquet of pretty flowers, using only Art Brushes and and the Gradient Mesh Tool. You will find that the techniques learnt in this Quick Tip will help you craft a variety of flowers and decorative elements. Let’s get started!

Continue reading “Quick Tip: Create a Pretty Bouquet of Flowers with Adobe Illustrator”

Quick Tip: Using MIDI Effects in Ableton Live – Part 1

This tutorial series is going to show you how to use Ableton Live MIDI devices in order to improve your songwriting skills. Many up and coming producers have difficulties with their songwriting skills because they have an idea in their heads but their hand skills are not good enough to put this idea into an interesting and realistic melody. Sometimes I struggle on my MIDI keyboard because I can’t form the chords correctly and I miss the right combination of the notes over and over again. And this causes me to lose the flown of my idea.

Fortunately Ableton Live has some excellent features to help correct these problems. In the first part of the tutorial I will show you how to use these devices correctly and next one I will give some advice about how to combine them in order to contribute great melodies from it.


Step 1: Create a MIDI Track

First you have to create a MIDI track and apply an instrument to it. I usually use a piano first, and later on when I have an idea about the timbre I usually change it for the correct instrument. So back to the project – I apply a grand hall acoustic piano from the Ableton instrument racks. If you want to hear a sound when you press a key on your MIDI keyboard, you have to turn on “arm session recording” which is located at the first line in the bottom of the mixer.

If you don’t have a MIDI keyboard, use your computer keyboard shortcuts, but in that case the computer keyboard switch must be enabled. You can find it at the top right corner of Ableton’s toolbar represented by a small piano figure.


Step 2: Creating Chords Using One Note

So we have the MIDI channel. If you are hitting the notes you can hear the piano timbre. If you are not, go back to Step 1 and repeat it, or check your connection between your computer and your keyboard.

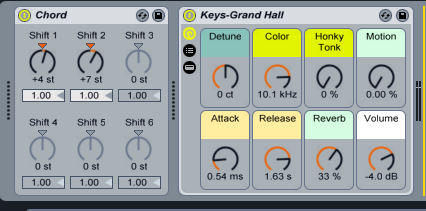
After that, drop the Chord MIDI effect from the Ableton’s browser to your MIDI track. This device helps you to create chords while you holding only one note at a time. As you can see there are six slots available. This effect assembles a chord, as the name implies, from each incoming note and up to six others of user-defined pitch. The Shift 1-6 knobs allow selecting the pitch of the notes that contribute to the chord from a range of +/- 36 semitones relative to the original.

But before we start tweaking this feature, it is essential to know how to form a simple major chord. I’m not going to dig deep in the science fo music anatomy – just a small overview about the chords.

If you want to form a chord first you have to choose a scale – in our case C major. The C major scale is called a major scale because it follows a particular pattern of intervals. What is an interval? It is the gap between two notes. Any kind of music you write will use intervals. Every major or minor scale has 7 notes and each note represented by a number. Example in C Major the first note is C, so the number is 1. D is the second so the number 2 etc.

If you want to form a major chord you have to use the first the third and fifth degree of the scale. These intervals will give you the major chord. In C major for example, the C major will built from C-E-G because the intervals are 1-3-5 on the scale. Using this principle we can form a simple major chord with the chord MIDI device.

Important note: The Chord device based on the chromatic scale not on scale patterns. This means that if you have already set the shift knobs to 1-3-5 it will sound awful because the chord toy only uses semitones. Every octave contains 12 semitone but the major scales build up from seven semitones. Each scales type has a predetermined pattern. If you are curious how these patterns looks like or how to build up check out The Harmonized Major Scale – Part 1.

So we have to count the semitones until we reach the scale third and fifth degree. If you counted correctly the settings are the following Shift 1 to +4 semitones and Shift 2 to +7 semitones yields a major chord in which the incoming note is the root. Now this isn’t a set in stone rule, it’s just a good guideline to start off with.

So now if you hit example a C note it will sound like C major chord. And after you became familiar with the device you can create more complex chords like major 7 chords or diminished chords by using your music knowledge. With this feature you can easily pick up any kind of chords during the production.

C major chord:

Download audio file (C major.mp3)

C minor chord:

Download audio file (C minor.mp3)


Step 3: Using the Scale Effect

This device can be really handy if you are using at the right context. What does this effect do?

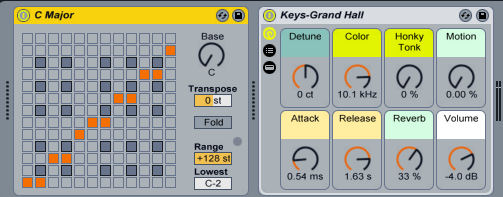
Scale alters incoming note pitch based on a scale mapping. Each incoming note is given an outgoing equivalent on the X-Y scale map of the effect: All incoming Cs, for example, might be converted to outgoing Ds.

Why is this handy? When you are playing notes, for example writing a lead track, you sometimes happen to hit the wrong note which is not part of the scale. In this case it will sound enharmonically according rest of your progression. To prevent this issue use this device. It will transpose that wrong note, flatten or sharpen to the nearest correct note based on the scale. So your work remains in harmonic.

Of course it can be wrong also but you can reduce or eliminate the small misses which are occurs during the performance. And trust me it will happen if you have to be fast on your keyboard.

Ableton gives us various presets of scale patterns like the minor, harmonic minor, melodic minor and major scales. So you don’t have to program it by yourself. Just always to be sure to turn the base knob to the right key and using the right presets. This following example is in the C minor key because it is transposed by the scale effect.


Step 4: The Arpeggiator

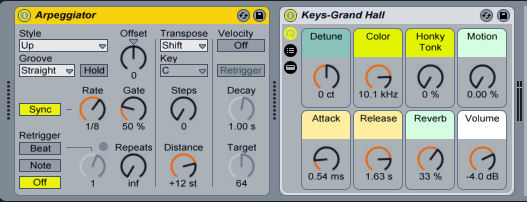
Ableton gives us an excellent arpeggiator. What does it do? Live’s Arpeggiator effect takes the individual MIDI notes from a held chord (or single note), and plays them as a rhythmical pattern. Arpeggiators are a classic element in Eighties synth music. The name originates with the musical concept of the arpeggio, in which the notes comprising a chord are played as a series rather than in unison. Arpeggio is derived from the Italian word arpeggiare, which refers to playing notes on a harp.

I won’t explain this device too deeply because it’s not part of my tutorial. If you are interested in how this device arppegiates each chord you can read the Live manual, where you will find excellent illustrations. I wrote this brief explanation because we are going to use the Arpeggiator in the next steps.


Step 5: The Pitch and the Note Length

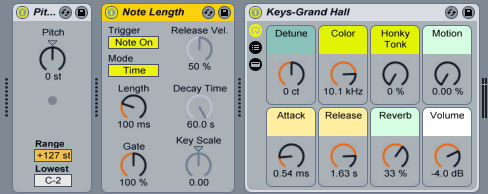
These tools are not as important as the previous ones but they can be quite useful. The Pitch device is a transposition tool that changes the incoming note pitch by +/- 128 semitones. In some situations can be handy when you would like to change an octave between the two instruments quickly. With this effect you don’t have to change or rewriting the MIDI notes. There are other methods of usage like transporting your entire track to different key, or blocking incoming MIDI messages depending on the range of the pitch. This can be really handy when you split your keyboard to play different instruments on different ranges of the piano roll.

You can hear that the pitch is transposed by two semitones with this effect.

The note length is kind of an amplitude envelope reshaper. With this you can determine the length of the notes. It can be quite useful in some situations. For example if you are playing 1/16th notes sometimes happen, that you are holding the notes a bit longer than it is necessary. With this tool no matter how long the notes are held it always sounds like a sixteenth.


Step 6: The Random and Velocity Devices

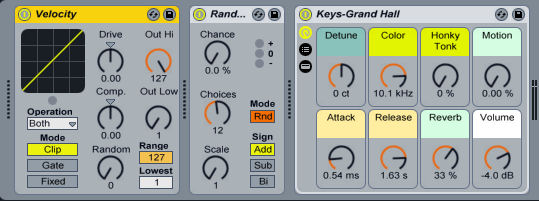
The random and velocity devices are the least useful tools for melody writing in my opinion. Random adds an element of the unknown to the otherwise commonplace pitch parameter. The Chance control defines the likelihood that an incoming note’s pitch will be changed by a random value. I don’t find this tool useful – it just creates a mess. But it is very good, for example, in drum patterns when you want to imitate some kind of chaotic percussion pattern.

Velocity remaps the 127 MIDI note velocity values. It can function on MIDI Note On or Note Off messages, or both, depending on the setting of the Operation chooser. Again it is a complex device so it just confuses us when we are writing melodies. After you have finished the melody, you can apply it to a synth. It will give you better control over the velocities, but in our case it’s just confusing.

Next time I will explain how to combine these devices in various ways. Thanks for reading.


Read More

Workshop #150: The Curse by David Versis

At Audiotuts+ we regularly put up a reader track for workshopping and critique (find out how to submit a track). This is how it works: you upload your song, and every week or so we’ll publish one here and step away from the podium. The floor is yours to talk about the track and how the artist can fix problems in and improve upon the mix and the song.

This track has been submitted for your friendly, constructive criticism. They have put their track (and their heart and soul) in your hands to learn and get useful feedback.

  • Do you enjoy the song or track itself? Does it have potential?
  • Can the arrangement be improved?
  • How did you find the mix? What would you do differently?
  • What do you enjoy about the rhythm track? What can be done to improve it?
  • Is the choice of instruments relevant and effective for the style/song?
  • Are the lyrics (if any) effective? Does the style, arrangement and genre of the song suit them?
  • Can you suggest any specific techniques that might improve the track?
  • Do you have any other constructive feedback?

The Curse by David Versis

Artist’s website: www.davidversis.com

Description of the track:

Produced in FL Studio, using a variety of VSTis and guitar on the hook and outro is played by David Versis. The record was produced by David Versis and J.Richards.

Lyrics are NSFW.

Download audio file (DavidVersisTheCurseLittleBastardprod.byDavidVersisandJ.Richards.mp3)

Terms of Use: Free for download from www.davidversis.com.

Have a listen to the track and offer your constructive criticism for this Workshop in the comments section.


Submit Your Tracks for Workshopping

Need constructive criticism on your own tracks? Submit them using this form.


Read More

AudioJungle Author: DockElektro

Our sister site AudioJungle is a royalty-free stock audio site that helps musicians earn money. In this interview series you’ll learn about those musicians, their gear, and their AudioJungle experiences. Today we feature AudioJungle author DockElektro (João Loff).

1. Tell us a bit about yourself. Where are you from, what do you do for a living?

Hi! I’m from Lisbon, Portugal, born and raised, and I edit video for a living, and sometimes I also do some camera work. As a hobby, I make music.

Some people agree that I have a good singing voice, so I am the lead singer and songwriter on Concierge. Recently I competed in the Portuguese version of Idol, where I placed in the last 27 (out of 15,000!)

I also am an amateur photographer, and a thespian since 1998. I studied at film school, so I directed some short films in my last years. The last one was called “O Ascensorista”, and was shown at MoteLX Film Festival, here in Lisbon.

2. Which marketplaces do you belong to? What types of files do you sell?

My portfolio speaks for itself! I am passionate about all kinds of music, and I also try to make all kinds of music.

AudioJungle turned out to be a great place to share those little instrumental ideas that don’t apply to a songwriting project or even to an electronic live-act persona. I am pleased to know that some people found my songs could fit their projects too. ;)

3. How did you get started? Have you had any formal training?

I’ve played piano by ear since a very tender age. My serious relationship with music started when I discovered Reason. I bought the software and a small MIDI keyboard and started composing various music pieces regularly.

I also started taking piano classes. I have had various music projects and have been making music since 2003.

4. Describe your home workspace.

It’s rather simple! A desktop, a Mac and two studio monitors to keep those juices flowing.
The rooftop ceilings provide the inspiration!

5. Describe your creative process. What steps do you normally follow to create your files?

I go with the flow. Sometimes an idea just pops and I try to accurately translate the sounds in my head to a musical form. Other times I start creating from scratch and it just happens.

6. What is your advice to other authors regarding how to create a successful portfolio?

Put yourself in the place of the people who are going to hear your music, especially if they seek to buy it and use it in some kind of media like corporate videos, websites, etc.

I discovered AudioJungle because I edit mostly corporate videos, so I usually have a custumer’s perspective. On the other hand, don’t lose touch with your own form of expression! Try to make your style stand out the best you can!

7. What do you do to market your files?

I am no that good in marketing myself, I usually leave that to the professionals. :) I usually hope that my music find its target.

8. What are your three favorite files, and why do you like them?

If I had to choose three:

  • I would seriously consider “As Ruas“, which is Portuguese for “The Streets”. It’s my own hommage to the feel of Portugal’s own Fado music.

    Download audio file (preview.mp3)

  • I also like “On the Grass“. I tend to be a bit gloomy when I make music, but sometimes the sun shines upon my keyboards. This was one of those times.

    Download audio file (preview.mp3)

  • “Geo” is one of those tracks that just started out of nothing and kept evolving. I like the distinctive two faces of this piece. [This track is no longer available.]

9. Apart from yourself, who is your favorite marketplace author, and why do you like them?

AudioJungle is filled with great authors!

  • AudioQuattro has a great and highly successful portfolio, with music to suit a wide range of occasions.
  • Musicant has also been a regular presence in the corporate videos I edit due to his amazing, multi-layered music.
  • Mich1s is also a great author, with a wide array of moods and compositions, and the first one I ever listened to at AudioJungle.

10. What do you do in your spare time?

I dedicate myself to my hobbies, which means I am almost constantly at work.

When I am not, I play video games (first person shooters are my specialty), try to run a bit to keep in shape, and also keep close to my significant other.


Read More

5 Simple Ways to Add Punch to Your Drum Parts

In this tutorial we are taking a look at how to add punch, shine and edge to your drum parts. So whether you have a cool drum loop that lacks that certain something or an entire drum group that needs a lift, these simple steps should point you in the right direction.

As with many of my tutorials you can more or less ignore the specific DAW or plug-in I’m using as these techniques are generic in nature. You should be able to easily recreate the results I achieve here by using a similar plug-in your chosen DAW.


Step 1: Simple Gating

One of the most effective ways to add focus to any drum part is the use of a simple gate. I have friends who are producers who literally swear by this production technique. The beauty of using a gate to effect your drums is that it’s super quick and leaves the core characteristics of your drum sound untouched.

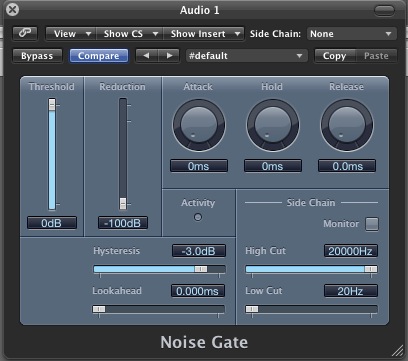
Simply insert a gate plug-in on your drum group or loop channel and move the threshold all the way to zero. At this point you should hear nothing as the gate will be completely shut. This is also a good time to change any attack, hold and release functions to zero.

Download audio file (1.mp3)

The untreated loop.

The initialised gate.

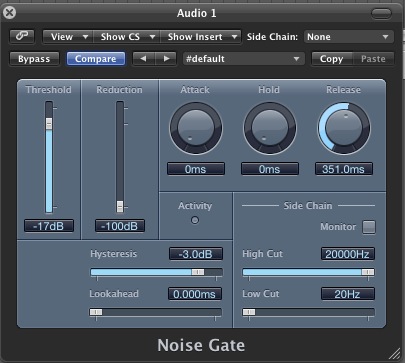
With your gate in this initialised, silent state you are ready to start processing your drums. Slowly bring down the threshold until you hear the peaks of the drum part trigger the gate. Now keep going until the main drum hits are almost completely exposed. You can now alter the release setting to bring the other parts of your loop into focus.

Download audio file (1b.mp3)

The loop through our raw gate.

The threshold and release are finely tuned.

Download audio file (1c.mp3)

The loop with our tuned gate applied.

What this achieves is a basic ‘cleaning’ of your signal. Excess reverb, delay and general noise is reduced and the focus is returned to the main hits. This can be perfect for treating a sampled loop that is perhaps a little busy. Remember you can also use gates to clean up single drum hits that display similar issues.


Step 2: Surgical Equalisation

If your serious about your beats and drum production the humble EQ has to be part of your essential toolkit. Even tiny tweaks here can make the difference between something dull and lacklustre and a full, energetic drum sound. When treating an entire group the real trick is not to go over the top.

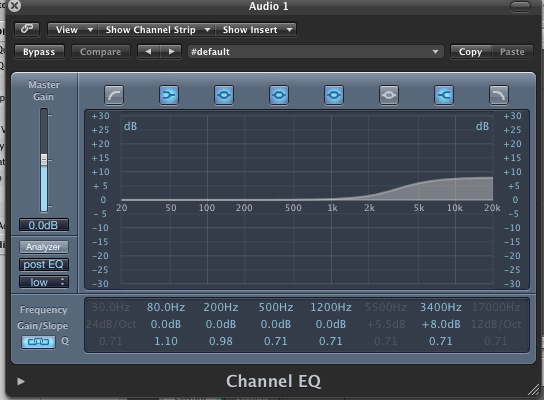
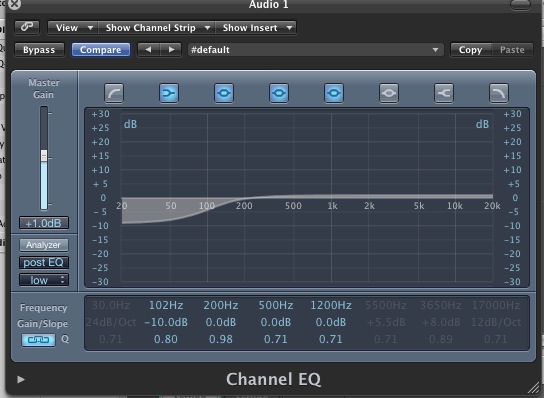
The best approach here is to use something called subtractive equalisation, this basically means you are using the EQ’s filters to take certain frequencies away as opposed to adding them. For instance if you wanted to boost a loops high or low end, you would actually remove the opposite frequency and boost the overall level. This has a similar effect to boosting frequencies except you should end up with a more natural end result using less processing.

An overhyped EQ setting.

Download audio file (2.mp3)

The hyped high end in action.

A more natural subtractive EQ setting.

Download audio file (2b.mp3)

The loop treated with subtractive EQ.

You can also use this approach to remove very small problem areas from your drum parts. With pretty high Q points dialled in you can home right in on a single sound within a loop. Maybe there is too much cowbell ;) or an annoying click within a loop you what to subdue, try this method it can be very effective.

Thinking about your sequences carefully can really help during the mixing process.


Step 3: Easy Compression

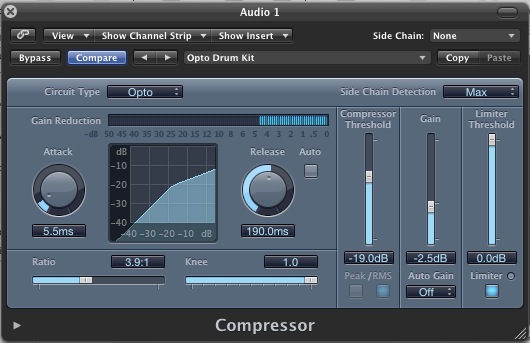
Another great tool for bringing out the nuances of your drum parts is compression. Again, it really pays to go easy here and not overcook things. This is basically buss compression and when you are treating large groups of instruments or entire loops you should always use subtle settings.

A pretty moderate compressor patch is applied to our loop.

Download audio file (3.mp3)

The loop is lightly compressed.

Try strapping a good quality compressor across a complex and dynamic drum loop. Dial in 3-4 dB of gain reduction with reasonably slow attack and release settings. Even this sort of subtle treatment should help bring out the quieter elements of such a loop and reign in any wayward peaks.


Step 4: Transient Design

A quick and simple way to add real punch to your drum sound is to use a transient designer (or shaper). These deceptively simple processors can become your secret weapon when mixing any form of percussion. Quite a few DAWs now feature transient designers but the best plug-ins for the job are currently made by third party companies.

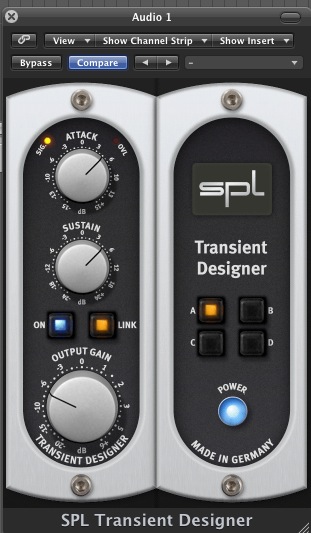
An SPL transient designer adding attack and sustain effects

Download audio file (4.mp3)

The loop is treated to both attack and sustain enhancement.

The undisputed king of the transient designer is SPL and their excellent algorithms are available as both native and DSP driven plug-ins. The two controls can increase (or decrease) both the attack and release phase of a sound, giving a drum part more snap, extra room sound or even a shorter more aggressive tone.

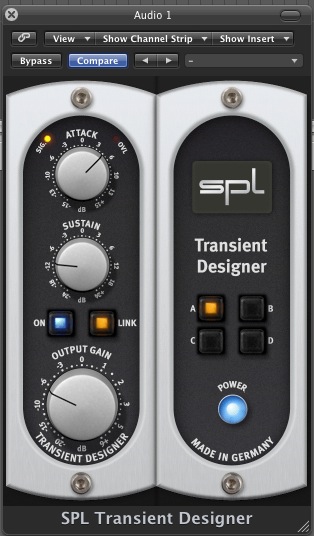
The same SPL removing some sustain from the loop.

Download audio file (4b.mp3)

With the sustain setting reduced we get a similar effect to the gating we saw earlier.


Step 5: Saturation and Distortion

A great way to add instant grit and attitude to your drums is the use of some flavour of distortion. Of course there is a huge range of sounds you can achieve here from warm tube like saturation, to complete sonic destruction and everything in between. I tend to find the former works very well when treating entire drum parts.

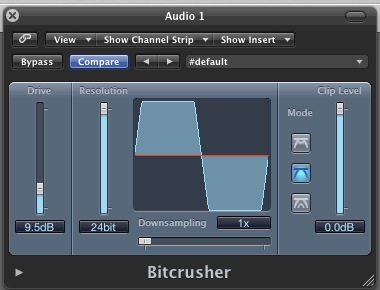
Logic’s Bitcrusher creating a nice saturation effect

Download audio file (5.mp3)

The soft clipping adds warmth and grit to the loop.

Try a tube or tape emulation strapped across your entire drum buss and you might be quite surprised by the energy that can be injected to your sound. This simple treatment can go a long way, while more powerful distortion effects might be btter left for individual sounds and parts.


Read More

How to Quantize Audio in Pro Tools Using Beat Detective and Elastic Audio

Twice a month we revisit some of our reader favorite posts from throughout the history of Audiotuts+. This tutorial was first published in October 2008.

Have you ever wondered how modern rock bands get that really tight sound? The rhythms sometimes sound too perfect for even the best musicians to pull off. With today’s technology it is possible to easily quantize your audio tracks. This tutorial will teach you how to start correcting your timing by using beat detective and elastic audio in Digidesign’s Pro Tools software.

Check out the sample file I recorded for an example of some quantized audio.

Example of quantization


Step 1

To become comfortable with the beat correcting process, it is best to a start off with a guitar track because it has many large transients and peaks within the waveform. If you cannot play guitar or do not have any guitar tracks available, bass and vocal tracks will also work fine. Drums are great too, assuming they are on multiple tracks.

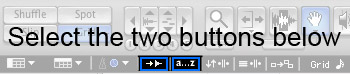
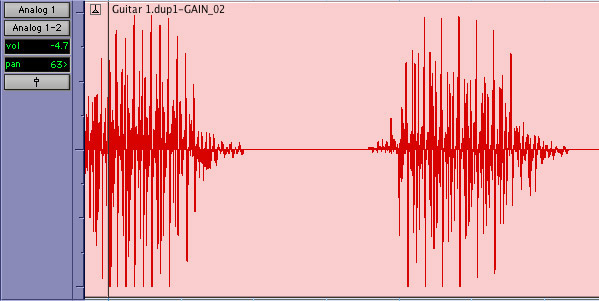
It will also help a good amount if your track has breaks or rests similar to the screenshot below. Start off creating a session as normal, and set up either a click track or a drum machine plug in. It is important to play along with this steady rhythm so that you will hear the effect of beat detecting during playback. Lastly, make sure that the “Tab to Transients” and “Keyboard Focus” buttons are checked. These two functions will be helpful throughout the process.


Step 2

First, we will quantize using beat detective, which is a bit more complex than elastic time. Once you have an audio track ready to be quantized, make sure the timeline is set to “Grid” mode and use the hand or selection tool to pick a part of the region you want to beat detect.

After you have the region selected, press the “E” key on your keyboard to get a zoomed in view of the waveform. You will need to closely watch the timeline marker and beat markers on the transients while beat detecting. Now go to “Event > Beat Detective” in the menu bar.


Step 3

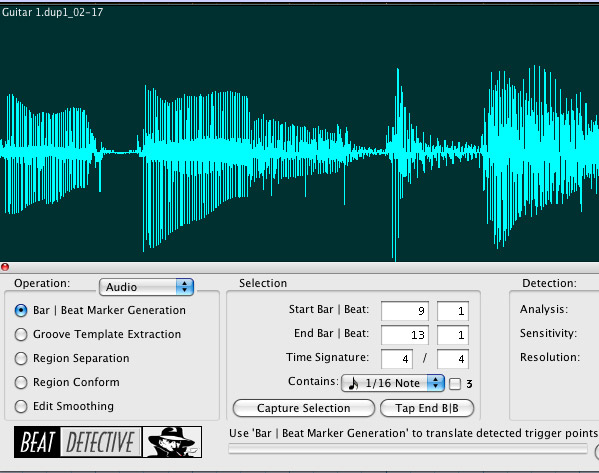
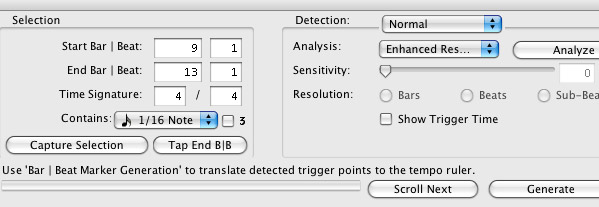
Now we have to create the beat markers so beat detective knows where audio should be on the grid. In the first section of beat detective, check to make sure that the start and end beat matches the area of the region you selected. If it does not you will have to click the “Capture Selection” button or type in the numbers manually.

In the drop down list labeled “Contains,” select the quickest note value that occurs in the region you are quantizing. If there is even one note shorter than the “Contains” settings specify, the beat markers will not pick it up.


Step 4

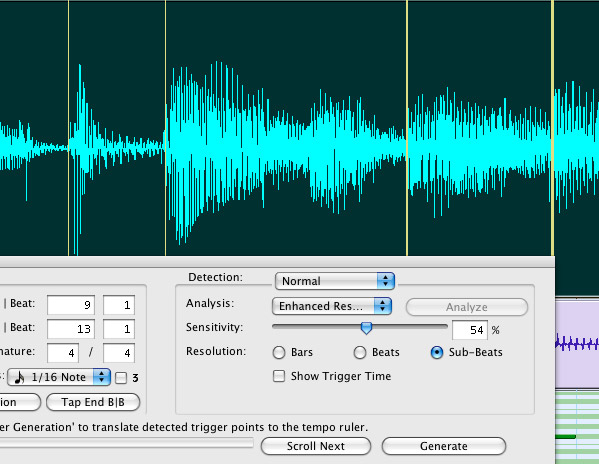
At the end of the window you will see two drop down menus. Depending on what version of Pro Tools you have (M Powered, LE, or HD) you may or may not see the first drop down labeled “Normal” in the screenshot below. The first menu should be left at “Normal” if it exists, and make sure the second menu has “Enhanced Resolution” selected.

Now click “Analyze” and drag the sensitivity slider until you see beat markers placed against all of the notes in the waveform. Check that “Resolution” is set to Sub-Beats. If beat detective makes extra markers in the waveform these can be deleted. You can edit the beat markers by using the hand tool. Double clicking will create a new beat marker, and Option (Alt on a PC) clicking a beat marker will delete it. Also, by clicking and dragging you can move a beat marker, if you feel it is in the wrong place.

Getting the markers right is the most time consuming part of beat detective. Critical listening is required in order to make sure markers are in the right locations. It is sometimes helpful to play the track back at half speed to hear and to see when the timeline hits a spot in the waveform. Half speed playback can be accomplished by holding shift and pressing the spacebar.


Step 5

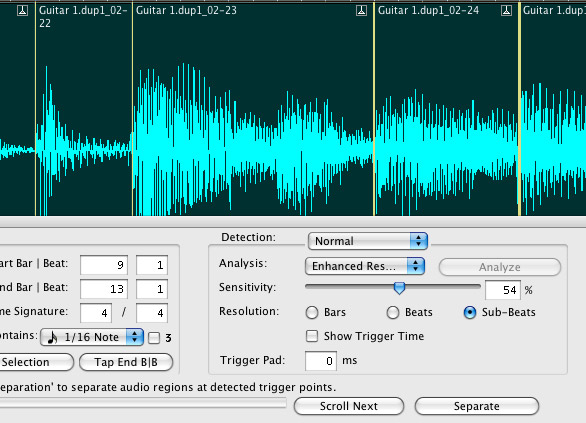
The next section on the left of the beat detective window called Groove Template Extraction is mainly for extracting a groove from an audio track and applying it to midi data. We do not need this for quantizing, so let’s skip to the section after that called Region Separation. All you need to do here is click the button labeled “Separate” at the bottom right hand corner.

This will spilt the region into many parts based on where the beat markers exist. Now go to the next section called Region Conform. To hear the full effect of the quantization check off “Strength” and drag the slider to 100%. “Exclude Within” and “Swing” should be left unchecked, but these settings can be adjusted later in order to get the feel you want.

After this, click “Conform” in the bottom right and you should see the regions move slightly. If they move too far you may want to go back and check your beat markers.


Step 6

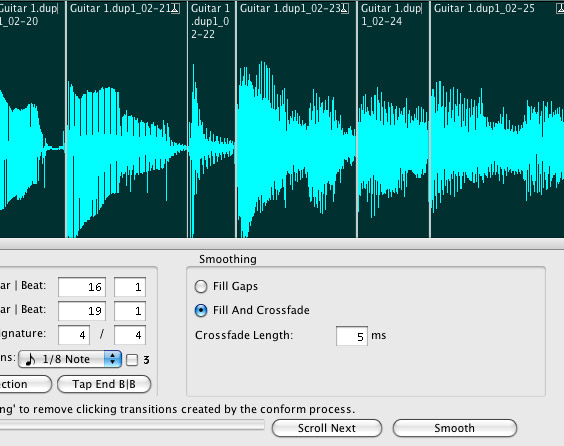
The audio track has now been quantized, but we aren’t done yet. We have to make sure that there are no region gaps (unwanted silent spaces), clicks, or pops in the audio. To prevent these things from happening, go to the last section called Edit Smoothing. In this section there are only two options, Fill Gaps or Fill and Crossfade.

Fill and Crossfade yields the best results for clean audio so select that and leave the Crossfade Length at the default 5ms. After you have it selected, simply click the “Smooth” button at the bottom right. Now it’s time to listen to your fully quantized track!

If everything was done right, the track should have a very tight and possibly, ‘almost too perfect’ sound. Remember that if any part sounds off, just hit undo a few times to get back to before the regions were separated. Then you will be able to edit the beat markers again. Repeat these steps on as many tracks as you wish to correct. Use “Tab to Transients” to assist in selecting within a region, and remember to hit the E key to zoom in on your selection.

Once you go through this process a few times it becomes a very simple and relatively quick way of quantizing audio. Go on to Step 7 to learn a much easier way of quantizing!


Step 7

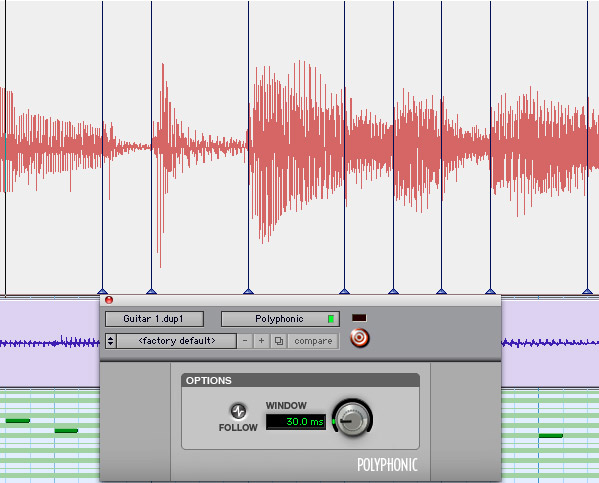
With Pro Tools version 7.4 it is possible to quantize tracks using elastic audio. Elastic audio will generate markers for you without any work. To enable elastic audio click the arrow button at the bottom of the track and select Polyphonic in the list (bottom arrow shown in screenshot). Wait a couple seconds for the warp markers to generate and then click the waveform button and switch it to warp view (top arrow in screenshot).


Step 8

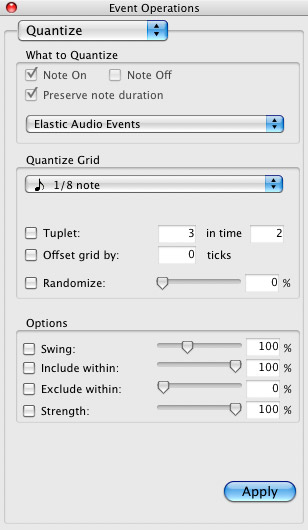
Here comes the cool part. Use the hand tool to select a region in the warped track and go to Event > Event Operations > Quantize. The window that you see below will appear. Set the quantize grid to the note value you need and leave all the other settings alone. Click apply and just like that your track has been quantized!

Ironically elastic audio seems to have a better algorithm for automatically detecting beats. So why not use elastic audio all the time? Well, for one reason: having many warped tracks can eat up cpu cycles, though minimal in comparison to heavy plug-ins. Also, there are some tracks where elastic audio will not be accurate, and it becomes necessary to use beat detective in order to make sure tracks quantize the way you want.

More often than not though, elastic audio is a great way to quickly quantize your audio tracks.


Step 9

You have now fully quantized your track using elastic audio, but if something does not sound right you will need to know how to edit warp markers. Editing warp markers is very similar to editing beat markers in beat detective.

Use the hand tool to click and drag a marker into a new position, and option (alt on a PC) click a marker to delete it. A marker can be unlocked by double clicking with the hand tool. A new marker can be created with a click from the pencil tool. Experiment with these different options to create the effect you are looking for. Now you have learned how to quantize audio using both beat detective and elastic audio. No more recording dozens of takes until you get it right. Have fun quantizing!


Read More

Quick Tip: Enhance your Ableton Live Experience with MIDI Remote Scripting

In this quick tip, I am going to show you a great MIDI remote script which I found that can greatly enhance your Ableton Live experience both during production and live performance. MIDI Scripts are compiled Python scripts that provide custom support for various MIDI controllers by allowing you to map MIDI note, Control Change and channel messages to common parameters in Live.

The script I am going to show you is a configurable MIDI remote script for Live 8.1.3 or later that allows you to define default settings to use for inserted Tracks. Unlike other remote scripts, this one actually doesn’t work with a particular MIDI controller. Instead, it changes default behaviors in Live that apply when you’re using any MIDI controller, a QWERTY or a mouse.


Setting Up

First of all we need to download the script called TrackDefs from the nativeKONTROL website. Make sure Live is not loaded. Extract the TrackDefs folder and place it in Live’s MIDI Remote Script directory. On Windows, this directory is located in: Program Files\Ableton\Live 8.x.x\Resources.

On OS X, to get to this directory:

  1. Go to Applications, find Live.app, right-click and select Show Package Contents.
  2. The directory is located in: Contents\App-Resources.

NOTE: If you have multiple versions of Live installed, you will need to place the TrackDefs folder in the MIDI Remote Script directory of each version of Live you’d like to use TrackDefs with.

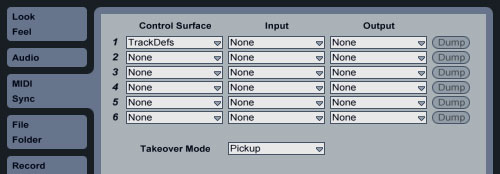
The following settings will be found in Preferences on the MIDI/Sync tab.

  1. Select TrackDefs as a Control Surface.
  2. Leave the Input and Output set to None.

NOTE: It is recommended that you do not use multiple instances of TrackDefs. It should only be selected in one of the six Control Surface slots.


Default Track Settings

TrackDefs allows you define default settings for Audio, MIDI and Instrument Tracks. It currently supports mixer-related settings only (Volume, Pan, Sends, Monitor, In/Out, Crossfader Assign, Mute, Solo and Arm).

You can define your default Track settings by loading up the included TrackDefs Config Set included in the zip file you downloaded in the first step. This set contains 4 Tracks; an Audio Track, MIDI Track, Instrument Track and a Control Track. You should NOT add any Devices or Clips or Tracks to this set. You should also NOT rename, move, remove or Group any of Tracks in the set. You can, however, add additional Return Tracks if you wish.

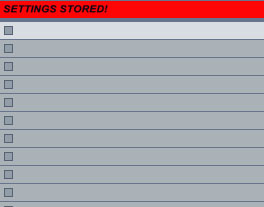
You simply need to apply the settings you want to each Track type and then toggle the Control Track’s Activator switch (turn it off and then on again) to store your settings. The Control Track’s header will indicate whether or not the settings were stored successfully. If you receive a Permissions error message, see Windows Permissions section described in the manual.

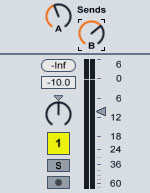
Let’s see an example. Let’s open up the TrackDefs Config Set. Set the volume of the first audio track to -10db. Set the first two Send knobs to a value of your choice.

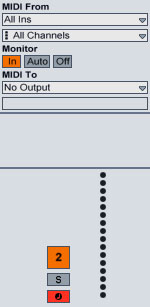
Now, set the default MIDI track’s monitoring to In and record enable the track.

Click the Track Activator Switch for the Track Activator(the last track) to switch it off, then switch it on again. You will momentarily see the “SETTINGS STORED!” text appearing on the track title’s once you switch the track back on.

Now, create a new set and add a new audio track. Notice how the new audio track has its volume set to -10dB with its Send parameters set as we programmed them to be in the default Set! Insert a new MIDI track and notice its monitor and record enable settings. Now, each time you insert an audio or MIDI track those settings will be available as default.

To overwrite your stored settings, reload TrackDefs Config Set, apply new settings and store. To remove your stored settings, delete the file named TrackDefsUserTrackSettings.txt, which you’ll find in the TrackDefs folder.

The default settings you define will only apply to blank Tracks (inserted by their associated shortcut or menu option), not to Tracks dragged in from the browser. The Instrument Track settings will only apply to Tracks created by dragging an instrument onto the Clip/Device Drop Area.


Extra Preferences

TrackDefs also includes some additional preference options that you can configure if you like. To do that, you’ll need to modify the file named TrackDefsUserConfig.py, which you’ll find in the TrackDefs folder. You can modify this file with any text editor (like Notepad or TextEdit). The file itself includes instructions on how to modify the file along with descriptions of all the included options.

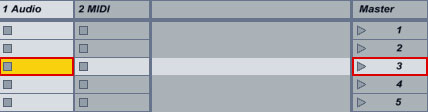
Let’s open up TrackDefsUserConfig.py. Notice the line NAVIGATION_HIGHLIGHT = 0. Replace 0 with 1. While you are at it, find the line EXCLUSIVE_ARM_ON_SELECT = 0 and replace 0 with 1, also. The first line’s value of 1 will display a highlight around the selected Clip. The second line’s value of 1 will record arm any track that is being selected and disarm all other tracks. Restart Live and click on any empty audio or MIDI slots. Notice the red border around each selected clip! The scene name corresponding to a certain clip, also gets highlighted.

Create a couple of MIDI clips. Try selecting any of the MIDI tracks and notice how the arm record for the selected track gets activated while it gets deactivated on unselected ones, a functionality that was not previously possible.

I suggest you experiment with the other settings found both on the TrackDefs Config Set and the TrackDefsUserConfig.py file and create a template which is right for you. Thank you for your time!


Read More