If you’re an Illustrator, you’ll appreciate how critical it is to have a great website where potential clients can easily view your work. This week we’ve been searching for some of the best themes for Illustrators on our sister site ThemeForest to give you a peek at the range of excellent folio themes for creatives. If you’re in need of a house for your immaculate graphic work, then go ahead and check ‘em out!
Continue reading “Top 20 Portfolio Templates to Present Your Illustrations”
Category: Tutorials
Tutorials,freelance,projects,joomla,php,mysql,wordpress,blancer.com
Quick Tip: Basic Page Numbering with InDesign CS5
Most of us have experience using the Adobe Suite, but how much do you know about InDesign? This powerful program has an entire host of features that you wont find in Illustrator or Photoshop, it’s for this reason that it has remained one of the most popular programs for graphic design and typography. The thought of learning InDesign may seem daunting to some, but there’s some really useful functions that are easy to learn and will save you hours of work. In this tutorial you will gain experience working with the page palette and special characters to make a basic page numbering system. You will also learn a few shortcuts that will help you work faster with InDesign.
Continue reading “Quick Tip: Basic Page Numbering with InDesign CS5”
How to Record a Professional Electric Guitar Solo
In this tutorial I am going to show you an easy and great way to record a professional electric guitar solo for your production. The tutorial is geared towards guitarists that already have some experience playing the guitar but are not so technically trained so they can play a fast guitar solo. I am going to be using Ableton Live 8.0.9 but the technique can easily be applied in other DAWs. The technique can also be applied to an acoustic guitar pass or solo.
Step 1: Setting Up
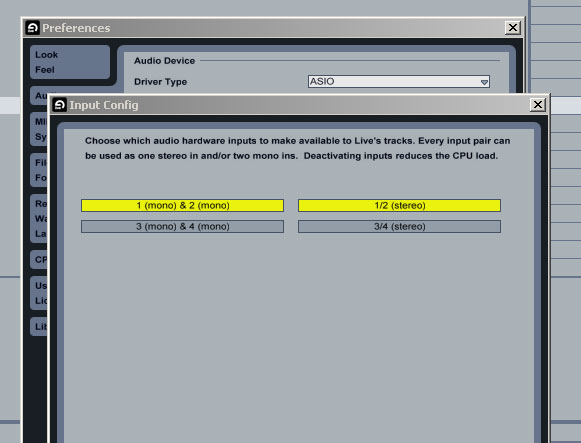
First, we need to setup the Input Configuration of our sound card. In Ableton Live, go to Options->Preferences in the Audio tab. Click on the Input Config button in the Audio Device area. We need at least two separate pairs of mono inputs to be activated so that we can select one of them later on for the guitar input signal.
Of course, you can also select a stereo input signal if you plan to record a stereo instrument. In the screenshot, the stereo input track that I have selected can also be used as two separate mono tracks. Just click the necessary input tracks to activate them. Bear in mind that the more inputs activated the more the CPU load. Finally, plug your guitar into the physical input of your soundcard.
Step 2: Load Up Your Reference Track
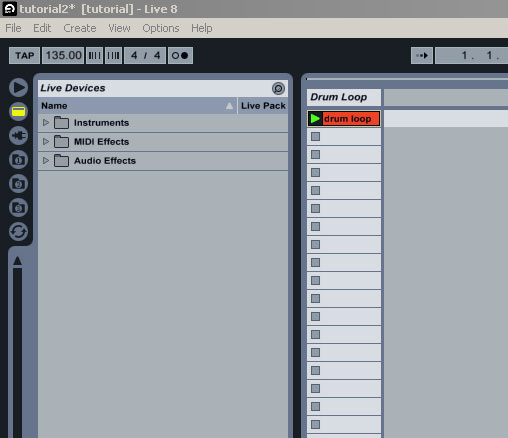
First, we need to load our drumloop into an audio channel as a reference. You can use any loop you want or just have you composition up and running and take it from there. I have created a loop myself. It’s a drum loop with an added baseline. The master tempo is set at 135 bpm and we are currently working at Ableton Live’s session view.
Listen to the drumloop:
Download audio file (drumloop.mp3)
Step 3: Add the Guitar Track
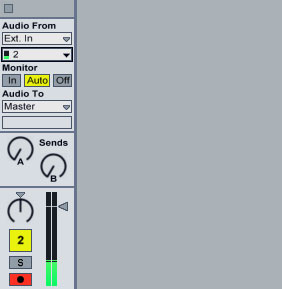
Insert another audio channel, name it Guitar and set the first dropdown box underneath Audio From to Ext. In. Click in the dropdown box underneath to display the available sound card inputs and strum the guitar. You should see a green metering indication appearing to one of the two mono channels available. (Had a stereo pair been selected from Step 1, the indication should also appear for that input channel.)
At this stage, you should adjust your volume levels from your sound card’s hardware or software interface to avoid clipping and distorting the input signal coming from your guitar to the audio interface. Set it so that when you strum the guitar hard, the Guitar’s channel volume metering indication doesn’t go past 0 dB.
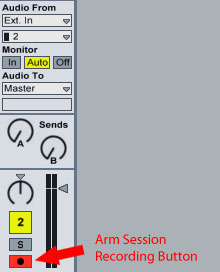
It’s better to be on the safe side, you can adjust the volume gain later on during the mixing stage. Select the mono channel corresponding to your guitar’s input. Finally, arm the track for recording by activating Arm Session Recording button.
Step 4: Add a Guitar Effect
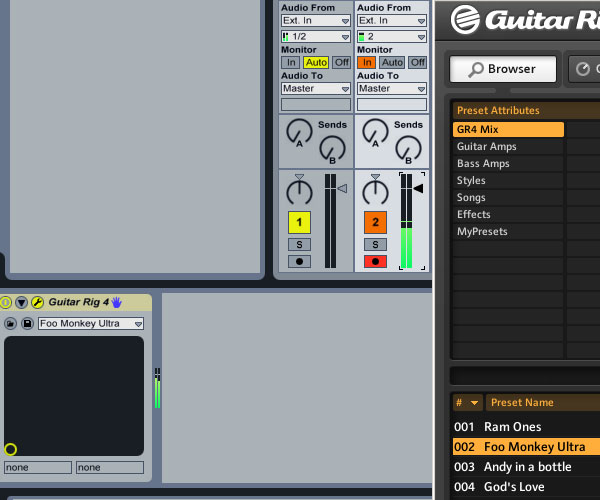
The guitar that I am using is an electric guitar with a clean tone, meaning I haven’t used any external distortion effect. If you have already plugged in an external distortion effect or plan to use external processing, you can skip to the next step. I used Native Instrument’s Guitar Rig 4 with the Foo Monkey Ultra preset to add a nice distorted effect always checking and adjusting my volume metering level so that it won’t clip (go beyond 0 dB) once the distorted effect has been added.
Step 5: Slow the Tempo Down
We are ready for recording. Fire the drum clip in loop mode. The loop plays too fast, doesn’t it? Especially for a beginner guitarist like you!
Set the master tempo to about half of it’s original value, around 70 bpm. The default Beats Warping Mode value that is currently being applied to the drumloop makes it play in half its speed without changing its pitch but it sounds terrible. Just set the Warping Mode to Complex Pro or Complex for best results.
Depending on the composition you use as a reference, you might not need to adjust any Warping Mode settings. The goal here is to make the song play much slower so that we can start experimenting with the guitar.

Step 6: Recording
We are still in Session View. Activate the Arm Session Recording button for the Guitar track if you haven’t done already. By now, you must have an idea of what you want to record. It could be different parts of a solo you have in your mind or various passes that you can consolidate later on.
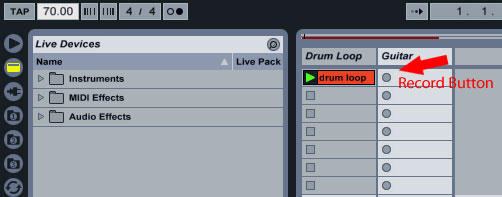
As the playback progresses with half the speed, hit the Record button in one of the slots inside the Guitar channel to start recording. It’s better to start playing something when the drum loop hits a beat of a bar, since that will help you later on when you are editing. Activate the Metronome if it helps.
Play slowly different parts of what could later one be edited into a complete solo. Don’t worry if you make any mistakes. Just start again in sync with the metronome or the drumloop.
Your resulting pass is going to be edited and played back in double the speed. Be aware that for instance any tremolo finger picking effect you execute will have to be performed slower since we will increase the playback speed afterwards.
You can hear my resulting unedited audio clip here:
Download audio file (guitar-edit1.mp3)
Step 7: Preparing the Recording
Leave the guitar track’s Warping Mode to the default (Beats), or set it to Beats if your default Warping Mode is different. At this point, we can further clean up the guitar track if we feel that the signal we recorded is not clean enough by using an external editor.
To set a default external audio editor go to Options->Preferences in the File/Folder tab, click Browse next to the Sample Editor and choose the executable file of your desired audio editor. The way we would go about doing it is to click on the guitar clip, switch to the Sample Editor from the bottom right of the application and click Edit in the Show Sample Display to launch the Sample Editor of our choice thus being able to edit the audio file externally.
After processing the file to an editor of your choice, clicking save will also update the file in Live’s Sample Display window.
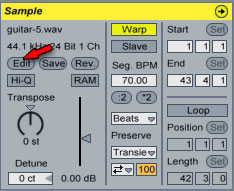
Now, we need to switch to the Arrangement view by hitting tab key on your keyboard. First, though, while in Session view, click and hold the clip you just recorded, then hit tab and drop it to the Guitar audio track in the Arrangement view.
Unless you already use your arrangement as your reference track, do the same thing with the drumloop, move it over the Arrangement view and activate the loop function for that clip if it’s not already activated. Extend the drumloop clip to the right occupying the same length as the guitar track you just recorded.

Step 8: Editing the Recording
Work on the guitar loop. Start chopping and deleting areas that you don’t want to keep or that contain silent areas. With the Guitar track unfolded so you can see the waveform, you can select a portion of the clip then once highlighted drag that portion anywhere you want. Hit Del to delete it or CTRL (or CMD for Mac) + E to split the clip.
Continue as such, chopping the audio clip and moving around the recorded guitar phrazes. You can also individually adjust the volume of each clip you create this way. For instance, I realized that during a legato passage, the volume needed to be increased to match the previous passage.
Since each recording phraze was played at the beginning of a beat, it should be easy to move phrazes around as they would snap to the grid easily. You can also consolidate parts of the main clip by SHIFT selecting the parts and going to Edit->Consolidate or hit CTRL (CMD) + J.
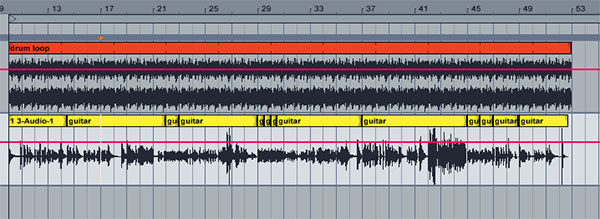
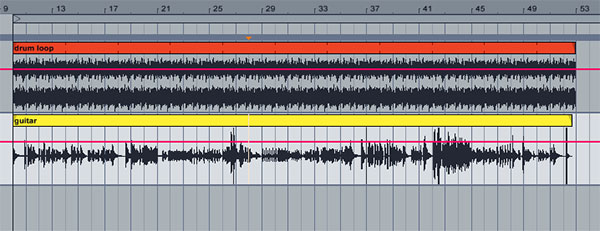
Once you are done editing, select all the chopped up clips by selecting the first, holding SHIFT then selecting the last one. Go to Edit->Consolidate or hit CTRL (CMD) + J. Now all your changes are consolidated into one clip. Rename the resulting clip guitar by right clicking and choosing Rename or alternatively hit CTRL (CMD) + R.
Bear in mind that Consolidating clips in the Arrangement View creates new audio files, which are non-neutral in comparison to the original audio data. Specifically, the new files will be normalized, with their clip volumes adjusted to play back at the same volume as heard prior to consolidation. Also, the new files will be created at the sample rate and bit depth set in Live’s Preferences window, which may differ from those in the original audio files.
Step 9: Warping the Recording
Still in the arrangement window, we may need to quantise parts of the guitar part to correct any timing issues. We may keep some uncorrected parts as is since it’s a good idea to keep the human feeling in the performance but some other parts might need correcting.
Click on the guitar part and go into the Sample Display Editor and create warp markers accordingly to correct any timing issues.
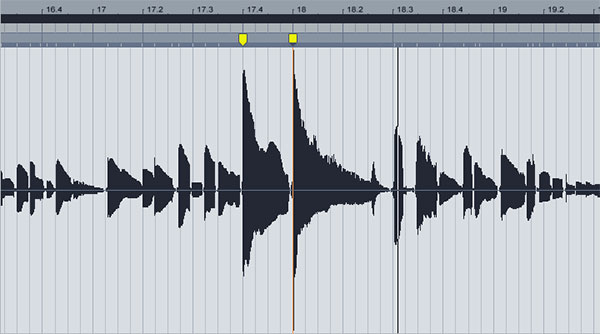
It may be necessary to re-chop parts of the clip and correct timing that way or treat them individually if you want, for instance, to adjust the volume of individual clips. Once you are done, consolidate all clips again and rename the resulting track to guitar.
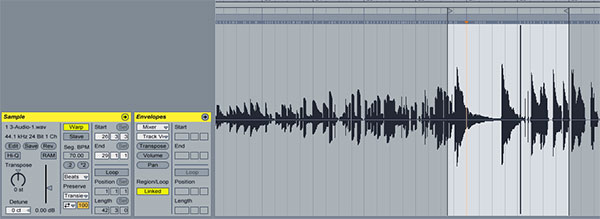
Set the master tempo back to 135 bpm. Set the drumloop’s Warp method to Beats again and listen to your recording.
Here is the file so far.
Download audio file (guitar-edit2.mp3)
Step 10: Control the Dynamics
It’s a good idea to add a compressor to the guitar track to balance the dynamics so that it will be easier to mix in to our arrangement and compress any unnecessary volume spikes. I have added Live’s native Compressor device. Take a look at the setting on the screenshot below. Your setting might differ, though, according to your style of playing.
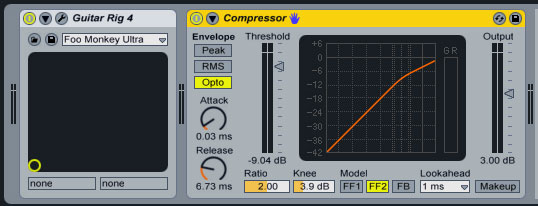
I have also flattened the compressed result and dropped it in a new created audio channel so that I can show you the effect the compressor had on the resulting waveform.

Step 11: Adding Effects
The guitar sounds a bit sterile so I added a native Ping Pong delay device on the guitar track to add a bit more interest and movement. I also dropped a native Reverb device with the default setting to add depth and atmosphere.

Finally, I automated the Ping Pong delay’s Dry/Wet control to create a dreamy and psychedelic effect. I activated the Global Record button, hit play and recorded the automation as the arrangement was playing. Throwing a native Limiter device with the default values in the Master channel can take care of any peaks that might clip our signal.
Listen to the complete file:
Download audio file (drum-guitar-complete.mp3)
I hope this tutorial was clear and that you found it useful. It should give you a basic idea on how you go about recording a guitar solo following some basic steps.
As you can see the key concept here is that we are working in half the tempo so that we will be able to add more control to our performance, edit it as we like then use our DAWs audio warping algorithms to bring the tempo up to it’s original value. You can also extend what we did here by adding more effects or rearrange and recomposing the guitar loop creating more original and unheard sounds.
Thank you for your time and if you have any question, I would be happy to help.
Top 20 Music Players to Embed Your Audio Online
If you’ve ever needed to add some phat beats to your website, you’ll know that a slick and stylish player can make all the difference. Over at our sister site ActiveDen there are a ton of great music players that allow you to embed music with a minimum amount of fuss. This week across the Tuts+ network we’re showcasing great products from our marketplaces and our brilliant community of authors. So without further ado, here is a great selection of MP3 players for you to add to your website!
Dynamic Mp3 Player (xml)
This XML Mp3 player from bobocel supports unlimited number of genres and an unlimited number of mp3 files in each section.
XML MP3 Player with List
And from the same story with the brand new FLV player, here comes the XML driven MP3 player with list!!!
Switch MP3 Player
This simple MP3 Player lets you add music to your movie, without the distracting hassle of extra buttons, volume sliders, and unnecessary equalizer animations. The user will be able to quickly turn the music on or off.
Streaming MP3 Player with drop down playlist
An XML driven streaming MP3 Player with drop down playlist.
Dark Star Mp3 Player Pro
Dark Star XML MP3 Player V1.1..It can play mp3 music files from your XML file. 100% Vectorial elegant design and support for Shuffle Mode.
Premium XML MP3 Player
This is a minimalist style xml driven MP3 player. Event though the design is simple, it’s full of features, and the equalizer visual is a REAL equalizer, not just an animation, it’s reading the sound wave as it plays.
Sleek XML Pill MP3 Player
This is a minimalist style xml driven MP3 pill sized player. The main purpose is a complete minimal design, for one mp3 to be repeatedly played. Perfect for background loops.
Fully Customizable XML MP3 Player
This is a fully customziable mp3 music player, loads in songs through an external xml file.
Play Audio Button
These buttons can play external MP3 files. The sound object, and all of the play, pause, loop, volume, ect., functionality has already been created for you. All you have to do is tell it what MP3 to play.
Decent player
Little player with XML support. You can define song url and description in the XML file. The player plays all tracks in loop and uses fake equalizer with nice reflection effect. Player provides stop, play and next buttons to control the player. It is useful to provide decent background music for your websites without ugly huge players.
2 Mode MP3 Player
Cool Aqua Style Mp3 Player with Normal And Lite Display Mode
music player v1.0
A flash mp3 player, that loads it sound files from an xml document, with a great looking design it is perfect to add streaming music for a website.
Mini Progressive Mp3 Player w/ scrub bar
Ideal for listing multiple MP3s on a page (eg. Podcasts) and allowing the user to play/pause those which are of interest whilst ensuring only one audio file can play at a time.
Background Music Button
This is a Background Music Button. Just copy from my source and put to your project. – Any amout of background music files. – Any amout of music buttons in one project. – Easy editable xml file. – Looping audio support.
MP3 Player Pro
Comes with multi skins. Unlimited playlist capability and streams your external mp3 track.
Streaming MP3 Player
The Streaming MP3 Player allows you to add mp3 files to your projects. You can define the URL of the mp3 file and your desired color in the configuration file. The playing track can be paused and resumed by clicking on the player.
FlashJukebox v3.0
V3 of FlashJukebox has the possibility to have more than one playlist. These playlist will be shown in the menu on the left.
WeLove Mp3
Features include:
- Exclusive “open-albuns” animation
- Customizable XML driven skins (text colours, bgs colours and background image)
- Album cover images
Animated Sound Controller
This animated sound controller is perfect to add sound to any Flash project! Simply drag and drop the animated sound controller movie clip into your Flash site or Flash project. All you need is the sound you would like it to load, “music.mp3”.
RV Compact MP3 Player – Sound Spectrum
RV Compact MP3 Player is a minimal simple compact mp3 player with nice design, rich features and powerful built in sound spectrum visualization. The player provides a wide range of customization especially the sound spectrum.
Got something to sell? Become an Author!
Authors on the Envato Marketplaces earn literally thousands of dollars a month. The absolute highest selling author makes over $25,000 every month. Of course he’s got more talent in his left thumb than most of us can dream of, but even so regular authors can still earn a good income on the side. Best of all it just keeps trickling in, no matter what you are doing, no matter where you are. So if you think you have the skills and know-how to make files like the ones showcased here, or awesome audio tracks as we have on AudioJungle, head over and become an author!
Create a Knife in Photoshop – Screencast
Photoshop is a fantastic app to use to manipulate photos but it is also a great app to use to illustrate still life objects. In today’s tutorial we revisit a written tutorial by Childesign and demonstrate how to create a semi-photo-realistic knife in Photoshop using vector drawing tools, layer styles, textures, and effects.
Here is a link to the written version of the tutorial Create a Knife in Photoshop
Create a Magical Four Piece Stardust Composition – Basix
For whatever reason it is always fun to create composite images that use star fields as a backdrop. Star fields have a unique ability to make a composition look mysterious and even magical. In today’s tutorial we will demonstrate how to create a 4-piece stardust composition using textures and masks. Let’s get started!
Resources
The following resources were used during the production of the tutorial:
- Girl 1
- Girl 2
- Girl 3
- Moonchilde Ries Nebula
- Moonchilde Cosmos Nebula
- Moonchilde Fuego Nebula
- Hameed Nebula
Step 1
Let’s begin by making a 1000×900 document. Place the first image, Girl 1 into your document. We’ll be resizing this photo slightly, so press CMD+T and type in 90% for the width and height. To keep track of our layers (because there will be 4 photos), rename the layer to “Girl 1″.

Step 2
Now take Girl 2 and place it into your document. We’re going to be using this image twice so press CMD+J to duplicate it. Press CMD+T on the newest image and resize that to 60%. Rename the regular sized image “Girl2″ and the newly resized image (the one we just resized to 60%) to “Girl 2 Resized”.

Step 3
For our last picture place Girl 3 into your document. Once again press CMD+T and resize it to 50%. Rename this layer to “Girl 3″.

Step 4
Make sure your pictures are all correctly named, then we’ll begin to assemble them. I like to move pictures around and have a variety of smaller and bigger pictures to balance the blend. Assemble your blend according to the picture below, or if you can think of something better go for it! But if it ends up looking better than mine, let’s just keep that on the downlow ![]()

Step 5
Before we begin fill the background of your document with black.

Step 6
Because we’re using a black background, setting the layers to “Lighten” will help us blend better because they show through. Set all of the image layers to “Lighten”.

Step 7
Select “Girl 3″ and press CMD+T. Then change the angle of the image to -6.4. Once you’re done, move “Girl 2″ a few pixels to the left so it’s closer to all the other images.

Step 8
We’ll now begin the base of this graphic by blending. You can blend in a variety of ways, but the best way to do it is to use masks. This way, if you make a mistake or feel the need to change something in the picture, you can easily do so. Since we used lighten, it’s a bit easier to blend because we can see where everything comes together, but we need to refine some things. So go ahead and make a mask first on "Girl 2" by clicking the Vector Mask button on the bottom of the layer palette.

Step 9
Select the mask, and then you should see your color palette change to black and white. Black erases your photo, and white adds it back on. Go to your brush tool and select a default 200px diameter round brush, 0% hardness. We want a nice soft brush so blend everything in nicely. Begin to erase away the edges of “Girl 2″ so it blends smoothly with the rest (use black). I’ve marked the places in red you should erase. Erase the areas marked in red.


Step 10
Now repeat this step for the rest of the images until they’ve been blended together well. On "Girl 1" create a mask once again, and then erase the areas shown.


Step 11
On "Girl 2 Resized" create a mask once again, and then erase the areas shown.


Step 12
On "Girl 3" create a mask once again, and then erase the areas shown.


Step 13
Now we’ll make some revisions. Go back to the “Girl 1″ mask and delete the bottom part of the picture as marked. It’s good to go back and make sure everything blends well, sometimes you might miss things!

Step 14
Now we’ll make our final revisions. Go back to "Girl 1" and delete the bottom part of the picture as marked. In addition to this, select layer "Girl 1", press CMD+T and rotate the image at -13.6.


Step 15
I just noticed that “Girl 2 Revised” now has a sharp edge because we rotated the photo, so go back to your mask and erase that part so it’s blended.

Step 16
Now that the base of the blend is finished, we can now begin adding textures to it. Now in these steps you can make masks and erase that way, but I’m just going to go ahead and erase with the eraser tool. Take this Moonchilde Ries Nebula and place it onto your document. Press CMD+T and resize the image to 50% and rotate it at -33.0.

Step 17
Set this nebula layer to Lighten, and then using a 200px 0% hardness round brush (in your defaults) erase away the highlighted red areas.


Step 18
Place this Moonchilde Nebula Stock 2 onto your document. Set the layer to Lighten and begin erasing around the edges and the areas highlighted.


Step 19
Place this Moonchilde CosNebula Stock 2 onto your document. Set the layer to Lighten and begin erasing around the edges and the areas highlighted.


Step 20
Place this Hameed Nebula onto your document. Set the layer to Lighten and move it around to your liking.

Step 21
Place this Moonchilde Fuego Nebula onto your document. Set the layer to Lighten and erase the highlighted areas with your round brush.


Step 22
Now we will need to adjust the color and brightness/contrast levels. The way you colorize your graphic can make a huge difference in the final result. There are quite a few colorizing layers in this, but all of them are necessary for the final outcome – so let’s begin! Go to Layer > New Adjustment Layer > Gradient Map and select a black to white gradient. Then set that to Soft Light at 100%.

Step 23
After this, go to Layer > New Adjustment Layer > Levels. Match your settings to mine.

Step 24
Now, go to Layer > New Adjustment Layer > Channel Mixer. Match your settings to mine, and then once you’re done change this layer setting to Lighten at 51%.


Step 25
Almost there! Now we’re going to add a nice color scheme to this. I like to use gradient maps because they’re good for just that. Go to Layer > New Adjustment Layer > Gradient Map. Create a gradient going from colors #d11c72 to #dd4e1a. Once you’re done change this layer setting to Hue.

Step 26
Nearly done (I really mean it this time!) Go to Layer > New Adjustment Layer > Channel Mixer. Match your settings to mine, and then once you’re done change this layer setting to Overlay at 41%.


Step 27
Now Go to Layer > New Adjustment Layer > Hue/Saturation and simply change the Saturation to +18.

Step 28
To further enhance your image (this step is optional) you may flatten your image, duplicate the layer (CMD+J) and then go to Filter > Other > High pass. Set the High Pass at 1.2 (you can play with this number) and then set that layer to Overlay and it should be nicely sharpened ![]()

Final Image
Your final image should look similar to the one below.
Top 50 Layer Styles, Elements and Templates for Quick Graphic Jobs
While some jobs need absolute, total custom design, there are also plenty of jobs where you need to get something done in a hurry. And that’s why our sister site GraphicRiver exists! Since we launched a year and a half ago, the site has grown to a massive library of graphic files that can dramatically speed up the time it takes to make some graphic awesomeness! Today across Tuts+ we’re rounding up and showcasing the great work our marketplace authors have on sale in a blatant bit of cross marketing designed to entice our readers over to buy, buy, buy! So without further ado, here’s our selection of great Layer Styles, Design Elements and Templates!
1. Design Elements
Mixed Web Elements
Mixed Web Elements. Buttons, fields, icons, boxes ribbons and more! All are made with smart shapes 1 PSD Layered, organized in groups. Easy to modify and change colors, you can resize at any size.
Rating Elements
This file includes a fully layered Photoshop PSD with all layers and shape layers.
New Pricing Tables with Bonus Elements
New and fresh web 2.0 style pricing table, very useful for designers and developers.
Clean Notification Boxes
5 notification messages in 4 different designs. Perfect for blog, admin skin, cms etc. Would fit any website and background.
Web Elements – Ultra Shiny, Ultra Sexy
A mega pack of stylish web elements for use in your projects – all fully editable and clearly labeled in folders.
Black&White WEB Elements
This pack include clean web 2.0 elements at 2 styles: Black and White, all layers named and organized in groups. Special for clean lovers)
Modern and Stylish Web Elements
This is a set of stylish web elements for you to use in your projects. It’s layered, properly named and organized in groups for your convenience.
RGB Colorizor Top Web Elements Collection
This is a RGB – Red Green and Blue color web elements collection. Each color set contains a pricing table, web banners and download now buttons. All the web elements are made to a modern glassy theme that will guarantee to catch your audiences eye.
Web Form Elements v1.0 by VO
Easy to use and customize. All shapes are done in Photoshop and fully editable in size, color, style and everything else that you need to adjust it for your own needs / website.
Slick Horizontal Navigation Bar
The navigation has hover and active states as well as a hover-over sub-navigation. The whole thing is styled in blue, but the colour comes entirely from the style on each layer and all elements are fully customisable shapes, so experiment with whatever colours suit your needs.
24 Clean Download Buttons
Quickly and easily edit the colors of the buttons via Layer Styles in Photoshop – Set comes with 3 sets of 8 buttons. Blue, Red, and Yellow themed – Comprehensive neatly arranged Layers for easy navigation – Fonts used are Helevtica Neue Regular, and Helvetica Neue Bold Condensed.
Clean Buy & Download buttons
Useful asorted buttons, clean look and well aranged layers. Easy to change color and customise.
Golden Header and Menu
This is ideal design [header and menu] to be used for a personal or a company website.
Search Box Set
12 Search Box & Bonus: 1 Magnifier Icon
Pastel Color Web Buckets
Very Clean Pastel color web buckets. useful for business, women and children themes.
2. Design Templates
Flyer / Postcard Template
The files are easy to customise and I have set up files so that you can change color easy.
Black Business Card
This business card is print ready, CMYK , 300DPI with bleed lines and guides included and enabled. To switch the guides on and off just hit ctrl+; (MAC: command+; ). The card is a soft textured dark business card designed with function in mind.
4 Page Corporate Brochure A4
4 page corporate brochure, press ready, CMYK with trims and bleed. Paragraph styles and layers used. Size is A4 (210mm wide x 297mm high) flat size is (420mm wide x 297mm high).
Impact Business Card
Impact Business Card, a simple and nice design. Strong contrasting colours, and modern style. It’s an eye-catching design especially for a design studio or any type of business.
Design Studio Business Card V2
Business cards, especially for a design studio or for any other type of business easy to modify.
Resume Booklet (8 pages)
Want to impress with your resume? This very clean and creative booklet-style resume is the right choice. Drop in your own text and pictures and you’re ready to go. With just a bit more effort you could turn it into a template with any other purpose.
6 Page Modern Brochure
Brochure, modern, 6 page, cmyk, press-ready, bleed and trims. Brochure designed in CS3 indesign, special icon also supplied (created in photoshop) all elements are easily editable, layers used.
Leather Style Business Card
These business cards are print ready, CMYK , 300DPI and are designed by very cool background style with very realistic titles.
Blackish Business Card
2 Sided Blackish business card, excellent for any type of business or personal usage.
Identity System
High quality print ready identity system. Add your own business name and text and you can be ready to go to print with this professionally designed suite of materials.
Typography Flyer/Poster
Bold, Vibrant, Colorful & Fun, can be used and applied for just about any purpose!
Gray Blue A5 Flyer
This flyer is indicated for all kind of business. You can customize the layout flyer and fill with your personal informations.
Simple Newsletter Design
A simple newsletter design created in Adobe Photoshop CS3 . The file size 2550×3300 pixels or 8.5×11 document size. The resolution is 300 dpi in CMYK . All layers are intact and are fully editable by groups that are named.
Newspaper
Want to impress with your next newsletter? Try this stylish black/white newsletter A4’s!
Elegant Spa Newsletter
Keep your clients updated with a newsletter! This design is created in Adobe Photoshop CS3.
Moderna Magazine
This magazine is built on a fictive subject – the wilderness and all about it, but can be used for any purposes, subjects or businesses. It can also be easily adapted to make it a newsletter.
Daydreamer Twitter Background
A fun casual Twitter background in Photoshop with sticker styled clouds and soft fluffy grass. Profile pic fits into a curved pocket ‘freshly cut’ from the sky.
High quality Print Ready Corporate Identity 7 pack
A clean, High quality print ready corporate identity Stationery package templates.
Stylish Brushed Metal Business Card Template
Here’s a set of business card templates that’s simple, professional but stylish. It’s got your name looking like it’s engraved on brushed metal! All graphical elements are vectorized and effects are in re-usable layer styles.
CIRCLES – Business Card
This sleek and stylist design is perfect for any company or person with plenty of room to add a company logo. 4 different colors included.
3. Layer Styles
Elegant Glass Text Effects & Styles
8 Transparent Layer Styles & 3 Elegant Glass Text effects created by using them in combination. Works great for Icons and Buttons too!
Pressed – Letterpress Photoshop Styles
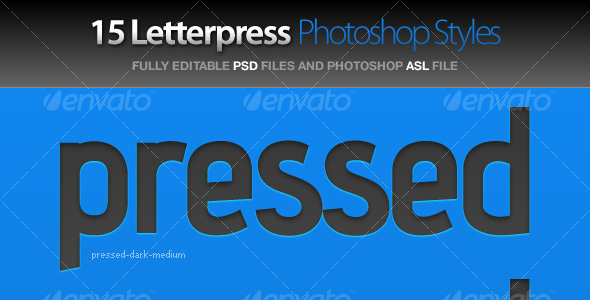
Save time by using pre-built great looking styles in Photoshop! This is a set of 5 letterpress Photoshop styles – they will make your text look as though it’s been pressed into any color background
16 Quality Styles (Gold, Chrome, Glass and more)
This is a pack of 16 quality styles for Photoshop. Use the gold, chrome, stone, copper, metal styles and all the others for your web or print work!
Glowing Light Text Effect and Styles
9 glowing light layer styles combined to create the three glowing text effects you see in the preview. Many of the styles look great alone though and there are many other nice combinations you can easily create.
Premium Text Styles
6 high detailed text styles – clear glass #1, #2, metal, gold, tin and chrome. Works with thin and bold fonts. Some text effects used two piled up layers.
Window Styles I
A pack of three layer styles that can be applied to any shape or object to give it an application window appearance. Includes HUD , Glass, and Textured window styles.
16 Premium Photoshop Styles
This set includes 16 premium photoshop text styles for your projects! Use them however you like to give your projects a professional look and feel!
30 Clean Gradient Photoshop Styles
This ASL file contains 30 Layer Styles created to use with buttons, forms, text, logos, icons and windows. These styles will help you create good compositions with dark and light color backgrounds with just one click.
10 Quality Texture Text Styles
This is a pack of 8 quality styles for Photoshop (stone styles, dinosaurs style, wood texture styles, marble style, bursted metal style and rusted metal style ).
Metal Grille Styles
Layer Style Set with 36 variations.
1 Pixel Menu Styles
Save time designing menu bars or buttons with these 12 Photoshop layer styles which give your text or shapes a letterpressed or embossed look with a single click.
8 Amazing Layer Styles
8 Photoshop Styles to enhance your text.
Automobile Layer Styles 2
A set of 42 Photoshop layer styles based on materials found on cars and motorcycles. Including metal grilles, textured plastic, leather, tyres, lights and paintwork.
Lighting Effect Kit
The Lighting Effect Kit is a collection of 5 styles that are applied to duplicate layers to add Light, Glitter and Glow to your text.
Superhero Text Effect
Here are 5 text layer styles. Best works with bold fonts. All Text layers and layer styles are editable.
Got something to sell? Become an Author!
Authors on the Envato Marketplaces earn literally thousands of dollars a month. The absolute highest selling author makes over $25,000 every month. Of course he’s got more talent in his left thumb than most of us can dream of, but even so regular authors can still earn a good income on the side. Best of all it just keeps trickling in, no matter what you are doing, no matter where you are. So if you think you have the skills and know-how to make files like the ones showcased here, head over and become an author!
Quick Tip: Google Fonts API: You’re Going to Love This
Google have made two huge announcements today. One of those concerned the Google Fonts API. Simply by linking to a particular font script, stored on Google’s servers (save on bandwidth + caching benefits), we now have access to a wide array of fonts. Quite literally, you can integrate these fonts into your project in about 20 seconds. It’s as simple as that. Further, due to the operations being performed behind the scenes when you link to these scripts, these custom fonts will even be recognized back to Internet Explorer 6. I, for one, and am extremely excited about the possibilities, and the font catalog is surely to continue expanding over the coming years.
One Step Only
To take advantage of the Google Fonts API, you only need to link to your desired font, and reference it within font-family. That’s it! When you find yourself integrating a custom font in less than 15 seconds, you’ll laugh with joy! For example:
<!DOCTYPE html>

<html lang="en">
<head>
	<meta charset="utf-8">
	<title>untitled</title>
<link href='http://fonts.googleapis.com/css?family=Yanone+Kaffeesatz' rel='stylesheet' type='text/css'>
	<style>
	body { font-family: 'Yanone Kaffeesatz', serif; font-size: 100px; }
	</style>
</head>
<body>
     Hello World
</body>
</html>

Crazy, isn’t it! You can refer here for the current list of available fonts. So what do you think?
ASP.NET from Scratch: Master Pages
This latest lesson in our ASP.NET from Scratch series delves into Master Pages – ASP.NET’s built-in templating engine. You’ll learn what Master Pages are, and how to use Master and Content pages to provide a consistent look and feel to your web application.
The Complete Series
- Lesson 1: Getting Started
- Lesson 2: Improving an Email Form
- Lesson 3: Class Inheritance
- Lesson 4: SQL Server
- Lesson 5: Master Pages
Lesson 5: Master Pages
Sell ASP.NET Components on CodeCanyon
Did you know that you can sell your ASP.NET scripts and components on CodeCanyon? Simply sign-up for a free author account, and start selling!
- Follow us on Twitter, or subscribe to the Nettuts+ RSS Feed for the best web development tutorials on the web.
What Can You Do In Two Minutes?
Two minutes might not seem like much, but appearances can be deceiving. There’s actually quite a lot you can accomplish in a two-minute window if you develop the habit if asking yourself if something takes two minutes or less. This habit was codified by consultant Dean Acheson (not the deceased U.S. senator), and later David Allen, as the Two Minute Rule.
The Logic of the Two Minute Rule
According to the Two Minute Rule, if something occurs to you that you determine can be done in two minutes or less, do it immediately, even if it’s a low priority item. Putting it off means spending more time thinking about the something than doing it, since you’ll either have to mentally remind yourself about it, or enter it on a last, review it, and reevaluate whether or not to do it.
Cluttering your to do list with two minute actions increases the size of your list with each line item. That might seem trivially obvious, but consider that if half of the items on your to do list are two-minute tasks, your perceived workload when scanning your list appears twice as large, despite a vast disparity in time commitments. Items like “Complete April sales report” and “Confirm dinner with Amy” are given equal psychic weight, even though there’s probably a 10-20x difference in time to completion.
Does It Matter a Little or Matter at All?
I’ve seen plenty of critics resist the Two Minute Rule based on untested assumptions, the most common of which goes something like this: “If I spend all of my time doing two-minute items, when will I ever have time to get to the important items?” This question is loaded with two assumptions: (1) that there’s an infinite supply of two-minute tasks to be done, and (2) that short tasks are unimportant.
Completing an under-two-minute action (lest we forget that many will be 30-second or one-minute actions) either leads to another one or a longer task. If the subsequent task is longer, you can put it on your to do list and evaluate it against all of the other items you’ve written down. If, in fact, the subsequent action does take less than two minutes, then you’ve spend a maximum of four minutes completing two items that would have otherwise lingered. Even in the unlikely event that you would have five of these in a row, that would consume a whopping 10 minutes out of your work day.
The notion that short tasks are unimportant is a curious one. Paying a bill online takes less than two minutes, but the consequences of not doing it can be quite serious. Yet many people will sit on a bill the moment it arrives, even when they know they have sufficient funds, because they inflate the task in their head. Sending a “thank you” email may not be serious, but if you’re going to send it at all, it would have more impact if you sent it the moment you thought of it than sending it four days later when you feel mentally pressured to do so.
The real question isn’t whether or not a short task is important enough to do now, but whether or not it should be done at all. If it should be done at all, and it takes essentially no time at all, do it now.
Does It Really Take Two Minutes?
One slightly less untested assumption is that many tasks end up taking longer than assumed. This is actually true, which highlights an important semantic distinction: we’re asking, not assuming. The object is not to assume that a relatively short task will take less than two minutes, then leap into indiscriminate action, but to consciously ask ourselves if it will, and actually think about whether or not it’s likely.
“Will this take two minutes or less?” is a disruptive question, designed not only to get you handle short actions immediately, but to prevent you from getting lured into potentially longer actions. Think of how many people check email without spending enough time to actually answer the messages they get. What’s the point in looking for email that can’t be answered? Why look at messages now that you’ll have to reexamine later? If it takes longer than two minutes, either schedule email processing for an appropriate block of time, or put it on your list.
Two minutes is actually arbitrary. When Acheson coached his early clients, he had them ask themselves, “Is it a short action?” After finding that “short” was too relative for some clients, he changed it to two minutes for clarity’s sake, but don’t get hung up on the length. The point is to discriminate between actions that are too short to put on a list and ones that are too long to start without becoming sidetracked from higher priorities.
During a busy weekday, the two-minute norm is probably ideal. If you happen to have more time — for instance, if you’ve come into the office on a Saturday, you might decide to immediately do anything that takes less than 10 minutes instead of two. The point of the rule is not to follow it blindly, but to make consciously question whether or not you actually have enough time. There’s usually more time available to do things than people assume.
Build an Online Photobooth and Stunning 3d Photowall – Active Premium
Today, we have another Active Premium tutorial exclusively available to Premium members. If you want to take your ActionScript skills to the next level, then we have a super 3D tutorial for you, this time from Gerb Sterrenburg.
This Premium Tutorial is Filled with Creative Tips
In this Premium tutorial we will build a online photobooth and a 3d photowall. This application will let you take a photo using your webcam after which it is sent to a server where it will be stored in a database. Finally, your photo will be viewable in a 3d photo carousel.
We’ll cover a wide range of techniques like flash remoting, AMFPHP, mySQL databases, PHP and the new Away3D lite engine.
Professional and Detailed Instructions Inside
Premium members can Log in and Download! Otherwise, Join Now! Below are some sample images from this tutorial.


Active Premium Membership
We run a Premium membership system which costs $9 a month (or $22 for 3 months!) which periodically gives members access to extra tutorials, like this one! You’ll also get access to Psd Premium, Vector Premium, Audio Premium, Net Premium, Ae Premium and Cg Premium too. If you’re a Premium member, you can log in and download the tutorial. If you’re not a member, you can of course join today!
Also, don’t forget to follow @activetuts on twitter and grab the Activetuts+ RSS Feed to stay up to date with the latest tutorials and articles.
Adobe Camera RAW for Beginners: The Detail Tool
In this video tutorial we will look at the Detail Tool and put it to work. The Detail Tool is broken down into two different tabs. The sharpening area allows you to add detail and overall sharpening to the photo, while the Noise Reduction area takes out some of the luminance patterns and color sparkles that can crop up in photos.
Watch the Video
Video Details
Picture 1
In this picture, photographer Dusan Simonovic had to use a high ISO of 1600 to capture the shot under low light conditions. Due to the high ISO, a lot of noise shows up. Here’s where the luminance and color sliders can be used to reduce the noise pattern.


Picture 2
In this photo by Jarel Remick we use the sharpening sliders to add some more detail to picture. I also added a bit more punch using the Basic adjustment sliders (not shown in the screencast).


A word of reminder – while every photo can probably use a little sharpening, don’t go crazy and introduce fringing and halos to your edges. Always start your sharpening in 100% view and move in as needed.
Top 42 Creative Flash Site Templates
Unless you’re Steve Jobs, chances are you will find time in your day to enjoy the benefits of Flash! After all it’s a great dynamic format for showcasing creative work, and certainly one that we, at Envato, support and will continue to support for years to come! Today across Tuts+ we’re showcasing the fine work our authors are selling on our marketplaces and for your discerning tastes we’ve put together a list of forty-two of the most creative Flash site templates from ActiveDen, some of which are so good they might even tempt ol’ Steve!
MD PortfolioSite v2
This template is ideal for photographers wanting to show multiple portfolios. Complete with a php contact form and an XML -driven portfolio which you can now navigate using your arrow keys, the template is a great upgrade from the first version! Still easy to configure and with a number of code optimizations (including more robust error handling and file download management).
MD Gallery Advanced
A simple yet elegant gallery site to showcase your work in a compelling manner. MD Gallery Advanced was designed with the goal to let your work speak for itself. The thumbnails are arranged in an elegant (and customizable) grid and allow each thumbnail to display a larger version of your image for more impact. The motion is smooth and you can add as many image and video “libraries” as you wish (space permitting of course).
Ultimate Creative Template
This template is designed from the ground up to be easy to update, customize and understand. Each section has its own external xml config file so you can access over 300 options without opening Flash!
XML Portfolio Template V3
Latest version from abenson. This version has a great deal of upgrades and added features. XML Portfolio Template v3 is a full Flash website completely managed by XML files that use modules to control content.
Designer’s Portfolio
Designer’s portfolio features a unique fullscreen xml website template with great motion, a clean design and deeplinking support. This template comes with over 65 predefined settings in config.xml, total freedom in the setup of your pages and a user manual counting 40 pages.
Full XML Website V3
Full XML Website V3” is an application that enables anyone to create a flash website without much knowledge of flash programming.
Elite Xml Website
The ELITE Template allows you to define some basic settings by default like the webpage standard color, the fullscreen mode option, inclusion of background(s), among others. It also allows you to define all the links, contents and modules you wish it to have. Easy to manage, you can replace the existing logos by your owns using basic xml.
Full XML Template
This package comes with everything that you need in order to build yourself a great portfolio or site or whatever.
Creative Portfolio Template
A nice template fully animated using AS2 . All text/images/videos are editable via xml.
XML Clean White Portfolio Template
This template was designed with the idea in mind to produce something clean and simple, spiced up with powerful and vibrant images to get your idea across.
Fullscreen Flash Advanced
A Fullscreen Flash file by Richardson, features content that centres with a ease and resizable scrollbar and works in all browsers.
Slick Full Website Template with CMS and 2 Skins
A complete solution that is modular, easy to implement, modify and administrate.
Elegant Photography Template
A simple and elegant template to showcase your portfolio. Features support for images and flv files and includes source files, font and help documentation.
Multimask Portfolio Reloaded
Multimask Portfolio is a stylish horizontal portfolio that enables to present you and your works in a smart and original way. New features have been added and new 7 modules.
Multi-Photo Gallery (xml based)
This is a XML driven Multi category Photo Gallery, with a nice ease left & right scroll effect.
mySlideShowSitePro (V2)
A simple, slick & professional looking XML based slide show site.
Green Star Template
A web site template without any use of XML data. It is all done with tweening and a bit of ActionScript. Note that it is only 151kb in size. All the images and text are changed easily.
ll XML Website V2
Full XML Website V2 is an application that enables anyone to create a flash website without much knowledge of flash programming. This is one of the first products we are publishing and soon we will have more applications of this kind.
Cool Urban / Street template
It’s very easy to be modified, just change the coordinates inside AS of menu’s button. This template use mc_tween2.as that is a component (mc_tween_2_28_29.mxp) that you have to install before editing fla’s file.
Ultimate Portfolio Template with Admin and 2 Skin
With all the included modules, the two different skins, deep linking and most of all the included Advanced PHP Content Management System (admin) this is amazing value for money, don’t miss out.
Photography Suite CMS Deeplinking Template
This template is the ultimate solution for creating, editing and launching your website in Adobe Flash even if you do not know anything about the actionscript language, and you do not have a copy of the software.
Minimal Website + Image Slide
A minimal Website with a great image viewer in the main movie. This website include, the main fla, an example of section, all the prototypes files you need, an HTML page with Flash Detection and fullinstaller of flash plugin in case of need.
Wildwise Ultimate Creative Portfolio v1
The content of this portfolio is completely and easily customizable and editable via XML files
One Page Portfolio Pro XML Website Template AS3
One page portfolios are an increasingly popular way of displaying the work of creative professionals. They represent a straight to the point approach for presenting personal work, requiring little effort from the viewer, which translates into longer times spent on the site and more of your work reaching more of your visitors.
Portfolio Website [modular]
Full XML website – this is a template that supports modules.
RetroStyle
This a retro-looking presentation with a nice “zoom-in-and-move-on” effect. I made this one for a friend of mine and he accepted the other version i made for him. Just wanted to know what you think about it. All objects are vectors making it easy for you to play around with them.
Multimedia Database Template
A nice template with SWF Address support, created in such a way to always have an overview of the portfolio. You can personalize all the data via xml.
Smooth Portfolio
A very smooth and clean animated Horizontal Portfolio with Externally loaded About us text and a PHP based Contact form.
Flash Creative Pro Template
Includes a 27 page illustrated pdf help manual, with detailed step by step instructions, and screen grabs of the timeline and code so you can quickly and efficiently get your website up and running.
Creative Studios Portfolio
It is a complete xml supported website for individuals, creative studios etc. for presenting portfolios in a nice and professional way.
XML Photo / Design Gallery 1.0
This is a fully XML driven template created to show off photography or design work. Everything from the menu system, to the title, to all the images is all completely XML driven. This website can be completely customized without even owning flash.
Colour Sliding Website
This snazzy little number is perfect for a portfolio website. It looks and performs well.
XML_Creative_Portfolio
This is a FULL FLASH XML site greate for portfolio viewer, easy XML manage of showing pictures.
MD PortfolioSite
This feature-packed site template is ideal for photographers wanting to show a concise (up to 20) portfolio of their work. Complete with a php contact form and an XML -driven portfolio, the template is easy to configure and even easier to deploy!
Premium Flash Template
The Premium Flash Template is a fully configurable and easy to use web template with a lot of great features. You can create attractive functional pages just with a few mouse clicks. The Premium Flash Template supports deep linking, which means that you can link to any specific part of the website. Deep linking also lets you use the browser’s back and forward buttons.
Portfolio Website
A clean, simple design to let your artwork do the talking. All images and text are updated using xml files. No flash required!
This is an template where you can drag the content around to get a free feeling, it is easy and fast to use.
It is fully xml driven, you can change it fast and get as soon as posible your site online.
Premium Photography and Portfolio Website
The Premium Photography and Portfolio Website is a fully configurable and easy to use web template with a lot of great features. You can create a professional looking website just with a few mouse clicks. You don’t need to know Flash or ActionScript to use the Premium Photography and Portfolio Website
Vertical Portfolio (by quickyboy)
Take a look at this one! Simple, classic, clean, easy to navigate, XML driven, AS2 , in a word: a perfect Vertical Portfolio Template.
Ry-Guy Gallery
Simple gallery page with vertical thumbnail panel. Users can adjust the color of the text, background, and side panel.
Horizontal Creative Portfolio
This is a fully XML driven horizontal portfolio website, which you could readily use with little knowledge in Flash. What you need to do is change some parameters (mentioned in the help file) and you are done with your website.
Black & White Deeplinking Template
The Black & White template is a fullscreen xml Flash template with deeplinking. Deeplinking enables you to target specific sections of your website, send links via email or instant messenger, find specific content with the major search engines, Utilize browser history, reload buttons and bookmark in a browser.
3D Product Gallery
This is my product/photo viewer with 3D navigation driven by XML . You can add any number of photos/products with all parameters costumizable by xml: Thumbs, big photo, descriptions, links, price, caption, etc…
Got something to sell? Become an Author!
Authors on the Envato Marketplaces earn literally thousands of dollars a month. The absolute highest selling author makes over $25,000 every month. Of course he’s got more talent in his left thumb than most of us can dream of, but even so regular authors can still earn a good income on the side. Best of all it just keeps trickling in, no matter what you are doing, no matter where you are. So if you think you have the skills and know-how to make files like the ones showcased here, head over and become an author!
Top 20 Essential Skies, Textures and Shaders
Over on our sister site 3DOcean, we’ve been noticing a bit of a trend. It seems 3D authors are always in need of stuff to make their models look awesome. Whether it’s textures, shaders or our most popular category, skies, these items are always in demand. This week across the Tuts+ network we’re showcasing great products from our marketplaces and our brilliant community of authors. So without further ado, here are a whole bunch of useful premium digital goods for you to throw money at!
1. Textures
In addition to our specialized CG Textures category on 3DOcean, don’t forget we also have even more textures over on GraphicRiver’s Textures category. Here are 5 of the best from 3DOcean.
Grass Lawn Hi-Res Texture
A large scale hi-res grass texture, created using 16 separate 12 megapixel photographs and carefully edited for perfect tiling. And you can add a highly realistic grass surface using the accompanying bump and specular maps!
Asphalt Road Texture
A perfectly tileable, high quality asphalt texture so you can get your roads rocking! Comes in 512×512 pixels, JPG and PSD formats.
Wood Texture
High Quality wood texture, perfectly tileable, 1024×1024 pixels.
Portuguese Sidewalk Texture
A texture from the typical Portuguese sidewalk. Perfectly tileable with high resolution (2048×2048).
Ground Cover
This large scale hi-res ground cover texture has been created using 10 separate 12 megapixel photographs, which have been carefully edited and combined into a single perfectly tiling, 100% seamless image.
2. Skies
Thanks to talented 3D artist Peter Guthrie the HDR Images category on 3DOcean has been super popular, and for good reason! Next time you are rendering an outdoor scene, be sure to grab one of these HDRi skies to finish it off.
HDRi – 2118 Moon
HDRi skydome panorama in .exr format for use as a spherical environment in 3d scenes. 2118 refers to the time of day it was taken.
HDRi – 0707 Dawn Sun
HDRi skydome panorama in .exr format for use as a spherical environment in 3d scenes. 0707 refers to the time of day it was taken.
HDRi – 0743 Cloudy Morning Sun
HDRi skydome panorama in .exr format for use as a spherical environment in 3d scenes. 0743 refers to the time of day it was taken.
HDRi – 1222 Sun Clouds
HDRi skydome panorama in .exr format for use as a spherical environment in 3d scenes. 1222 refers to the time of day it was taken.
HDRi – 1725 Sun Clouds
HDRi skydome panorama in .exr format for use as a spherical environment in 3d scenes. 1725 refers to the time of day it was taken.
HDRi – 1928 Dusk Sun
HDRi skydome panorama in .exr format for use as a spherical environment in 3d scenes. 1928 refers to the time of day it was taken.
PureLIGHT HDRi 001 – Mid Sun Clouds
PureLIGHT HDRi skydome panorama in .hdr format for use as a spherical environment in 3d scenes. This is skydome was virtually rendered to have a very high dynamic range for great looking realistic shadows from the sun!
PureLIGHT HDRi 007 – Low Sun Clouds
PureLIGHT HDRi skydome panorama in .hdr format for use as a spherical environment in 3d scenes. This is skydome was virtually rendered to have a very high dynamic range for great looking realistic shadows from the sun!
3. Materials and Shaders
And to finish off our roundup, we’ve got a selection of some great materials and shaders!
24 Metal Shaders for CINEMA 4D
This pack 24 realistic Metal Shaders for MAXON CINEMA 4D , including 8 types of metal.
Plywood Sheets
Five 2440×1220mm plywood sheets. High resolution diffuse and reflection bitmaps at 4000×2000 pixels.
Car Paint
This pack 24 realistic Metal Shaders for MAXON CINEMA 4D , including 8 types of metal
Glass Material
This pack 24 realistic Metal Shaders for MAXON CINEMA 4D , including 8 types of metal
Human Skin
This Human Skin Shaders Pack For CINEMA4D (C4D) contains 8 human skin color shaders from pale to black. All shaders are made from multiple layers so they aren’t just a plain color shaders, but rather high detailed realistic shaders.
Office Furniture Wood Materials
WildeMedia has created 5 new materials for his office furniture set including the one used in the files. These work great with any office furniture sets.
Perforated Metal
A set of 5 Perforated Metal Textures that are easy to use in any 3D program. Simply apply the tileable texture to the opacity map slot.
Got something to sell? Become an Author!
Authors on the Envato Marketplaces earn literally thousands of dollars a month. The absolute highest selling author makes over $25,000 every month. Of course he’s got more talent in his left thumb than most of us can dream of, but even so regular authors can still earn a good income on the side. Best of all it just keeps trickling in, no matter what you are doing, no matter where you are. So if you think you have the skills and know-how to make files like the ones showcased here, head over and become an author!
20 WordPress Portfolio Themes for Photographers
These days it’s imperative for photographers to maintain an online portfolio to showcase your work. This used to be quite difficult to do, but thanks to the magic of WordPress has gotten a whole lot easier. Setting up WordPress just requires a suitable web host, a bit of web knowledge and a great Portfolio Theme. This week, we’re showing off some amazing files from our marketplaces, so I’ve put together some of the best WordPress themes for photographers from ThemeForest for your use!
Fotofolio
Fotofolio is a unique custom designed photography portfolio template created for photographers that require a high impact web presence but can be used for any type of artist’s portfolio ( webdesigner, graphic artist, painter etc).
Photoworks
Photoworks is a modern web 2.0 style html template for photography or portfolio website. The color of this theme is black/dark.
Sanfolio
Sanfolio – A Simple and Clean Template photographer’s to show case there portfolio.
ISO Photography Portfolio
ISO is a complete, modern looking portfolio theme designed for photographers to showcase their galleries online, while providing all the details your customers need to get to know you and your work.
Studio Ansel Theme
Studio Ansel is a premium WordPress theme for photographers and artists. It prominently displays images in a large, jQuery slideshow – focusing on the images instead of text. This theme is perfect for photoblogs, portfolio sites, and other creative arts.
Minimo – A minimal one page portfolio theme
A simple and attractive one page portfolio showcase theme.
Photo Nexus WordPress gallery
This theme is great for those who need a convenient way to publish and showcase a self managed Gallery of Photos, Artworks or Designs.
Gallerific – Photography WordPress Theme
This WordPress theme is really two themes in one, Dark and Light. Featuring fully layered and detailed PSDs and logo template PSDs to easily create your logo graphic.
Gateway Studios for WordPress
Gateway Studios, Simplicity Overhaul features a simple yet beautiful design, that will impress your visitors with its delicate form. The theme comes with many great features that just work out of the box, without the need for plugins, making Gateway a very smart decision with everything Integrated.
W-PhotoStudio
WordPress as CMS for Photostudios, Photographers or anyone who’d like to showcase his photo albums/gallery sets.
Magnifolio – The Gallery/Blog WordPress Theme
WordPress theme with over 30 custom options and settings, including color changes, drag & drop navigation and slider setup, and two category styles (Blog and Gallery)
Centizero (WordPress Edition)
This theme has some really awesome features such as a cool slider for you’re featured work and a theme admin panel where you can add your services, contact widget, front page items, slogans for different sections and portfolio editing.
Synthetik WordPress Theme
Synthetik is a theme for WordPress. The theme design was developed for users who appreciate visual browsing and a minimal layout. The theme can been used to create everything from e-commerce sites, portfolio sites, and everything in between.
Synergy Premium Portfolio and Blog
Synergy is a powerful yet easy to use Premium WordPress theme for business or personal use. It can showcase products, services, or anything you like. The front page slideshow comes in 3 styles. The blog is fully featured with everything one would expect and a lot more.
WordPress HUD
WordPress HUD let’s you choose the exact colors or patterns you want! Also, free updates for life!
Flex for WordPress – A Portfolio & Blog Theme
Flex is a premium WordPress portfolio theme that’s designed specifically for photographers, designers, motion artists, and all creatives to display their work in a slick, grid-based interface.
Bitwork
Bitwork is clean web 2.0 style wordpress theme suitable for portfolio and business company sites. There are five color version for this template (reb, blue, orange, blue, silver).
Morpheus
Morpheus is a beautiful and fun solution for portfolios, designers, photographers, business sites, and anyone needing a quick and easy solution to get a beautiful website at a minimal cost. Although Morpheus is intended to be for the designer or small business, Morpheus can also work as a simple and clean blog theme as well.
Revoltz – Premium WordPress Theme
Revoltz features a Top of the Line WordPress Framework, created from scratch to be fast and reliable even for big sites. The theme comes bundled with lots of useful features that will make your life a whole lot easier when publishing your content.
Creative Zodiac – Portfolio & Blog
CreativeZodiac is mainly a Portfolio and Blog theme. It’s suitable for all creatives and bloggers out there, but I can also imagine it as a stylish virtual business card. The possibilities are endless, it all depends on your imagination and interest. Plus the whole theme is so simple and easy to use thanks to extensive theme options panel and custom write panels which makes everything quick and breeze!
Got something to sell? Become an Author!
Authors on the Envato Marketplaces earn literally thousands of dollars a month. The absolute highest selling author makes over $25,000 every month. Of course he’s got more talent in his left thumb than most of us can dream of, but even so regular authors can still earn a good income on the side. Best of all it just keeps trickling in, no matter what you are doing, no matter where you are. So if you think you have the skills and know-how to make files like the ones showcased here, or like the Isolated Photo Objects on GraphicRiver, head over and become an author!


