Introduction to Digital Photography: Part 2

Today we’re continuing our three-part video introduction to the fundamentals of photography. This second instalment will be taking a look at metering and exposure from the perspective of a complete beginner.


Video Outline

Here’s a quick look at what to expect in the second instalment of this series. If you’re relatively new to photography, or just want to hone your basic skills once again, it should offer a brilliant place to start.

We’ll be exploring the basic idea of exposure and metering modes, why these sometimes give the wrong information, and explaining how to correctly read and interpret a histogram.

  • Exposure Metering Modes Explained
  • Exposure Adjustment Explained
  • Exposure Compensation Explained
  • The Meter Is A Moron – How Meters Work And Why They Sometimes Give Wrong Info
  • Demo Of What Fools The Meter
  • How To Read Your Histogram And Demonstrated
  • Best Exposure A Rule Of Thumb

Watch the Video

Composite A Live Action Jet Flyby – CG Part

In this 2 Part, 45 minute tutorial we’ll go over the process involved with compositing a jet, helicopter, or even a UFO into your live actions scenes. You can watch Part One here in CGtut+ then head over to AEtuts+ to Watch Part Two.

Want access to the full CG project files and assets for every tutorial on CGtuts+, including this one? Join CG Premium for just $9/month.


Video 1

Download

Note: click the ‘Monitor’ icon to view tutorial in full-screen HD.


Don’t miss more CG tutorials and guides, published daily – subscribe to Cgtuts+ by RSS.

Project Workflow: Creating a Next-Gen Sci-Fi Prop – Day 2

In this series, aimed at already advanced artists, you will be able see the next-gen game art workflow of another artist, and learn some new tricks that will help you to push your own art even further.

This second video in the series will cover the methods used to create the low poly mesh using the existing high poly mesh, unwrap it, and bake the normal and ambient occlusion map. I will also be importing it into the popular Marmoset Toolbag model viewer by 8monkey Labs and prepping it for texturing.

Full Video

Download

Note: click the ‘Monitor’ icon to view tutorial in full-screen HD.

Don’t miss more CG tutorials and guides, published daily – subscribe to Cgtuts+ by RSS.

Ace Hotel Wall Murals


As a designer, I feel it’s always a good idea to take on new and challenging projects when the opportunities present themselves. The way you solve problems and adapt to different situations is a big part of what defines you as a designer. For example, when I was approached by Ace Hotel in NYC to do a series of murals that would cover multiple walls of some of their hotel rooms, I jumped at the chance… even though at the time I had no earthly idea how I was going to do it. I figured out a way though and now I use some of the techniques I developed for this project in other design projects, especially when I need to create hand made or illustrated typography.

Continue reading “Ace Hotel Wall Murals”

Quick Tips: 3 Mixing Tips

Here are some of the best things I’ve learnt since I started mixing.


Tip 1: Rest Your Ears

If you’re mixing for a long amount of time you may be thinking your mix is going well when in reality it’s not. This can be a problem for people who refuse to stop until they are 100% happy with their results. I do this sometimes myself.

But your ears will eventually begin to get tired and you start hearing things that aren’t really there. That awesome guitar you’ve spent hours mixing will end up sound like crap the next morning when you listen back to it.

Your ears can neglect certain frequencies when your ears get tired and you pay too much attention to specific frequency ranges you lose sight of the bigger picture.


Tip 2: Mix At Lower Levels

This is very important. I think most of us know that loud music always sounds better because it allows the frequencies to spread out more.

Our ears are most sensitive to mid frequencies, but by playing music louder it evens everything out making high and low frequencies stand out more.

This is why loud music is more appealing. Why do you think venues play music so loud? It’s not always so everyone can hear. They sometimes keep the master volume down 5 dB until the last song then put it up, so the last song sounds better making the audience leave with a more positive opinion on the show.

So which is the best level to mix? You should usually check your mix in different levels to make sure it sounds fairly level-proof. A multi-band compressor on the master track can also help compensate for this. Usually mix at about conversation level – if you mix sounds well at a quiet level it should sound amazing at a high level.


Tip 3: Mono Listening

Checking a mix in mono is very important to make sure everything is sounding balanced. You may notice holes in a mono mix that you might not hear in stereo.

This may seem pointless as most things are now stereo but a lot of places still use mono. AM radio stations broadcast in mono. Cheap TV’s with 1 speaker and so on.

If you hear very little difference between switching from stereo and mono you might want to consider more panning.


Quick Tip: Capture Cloud Photos With a Difference

The humble cloud. Probably one of the most-photographed subjects (with almost five million images on Flickr), they somehow still manage to captivate us time and time again. Today we’ll be suggesting a few tips for taking more interesting cloud photos that stand out from the crowd.


Look For Interesting Shapes

If you just decide to look up and snap off a cloud photo for no real reason, it’s likely to look like every other cloud image out there. Wait, be patient, and hold out for something that’s particularly interesting. Maybe it represents something in particular, or just has a particularly atmospheric feel.

Here’s an example of finding a shape between the clouds (certainly not the most beautiful image ever, but it illustrates the type of pattern you could look for):


Don’t Just Look Up

Rather than pointing your camera straight up into the air, consider looking for a reflection of the sky. This could be in a window, lake, or anything else shiny! This gives you a chance to incorporate a new element into the photograph, or tell a story involving an extra subject.

These two examples combine the natural atmosphere with reflective man-made structures. They make for an interesting mix of textures and ideas. It’s highlights how you can use cloud to enhance your existing composition, rather than it being the sole subject in a photograph:


Shoot From Above

Next time you’re travelling by plane, make the most of an opportunity to shoot the sky from a completely different angle. Granted, airplane windows aren’t the easiest medium to photography through, but get your camera as close as you can to the perspex and wait for an interesting composition.

Sunsets shot from above can be mesmerising, and a welcome change from the traditional images we tend to see. The air is completely free from shadow cast by cloud, so you’ll be far more likely to see a stunning sunset when you’re flying above them.


Experiment in Photoshop

Clouds are a blank canvas. They’re neutral in colour, and a perfect subject to experiment with in Photoshop. You could try adding a striking colour manipulation, increasing the contrast, and producing something that looks incredibly atmospheric:


Look for Silhouettes

In a similar vein, the simplicity of cloud means that it can be used as a wonderful background to silhouette an object. Here, the photographer has used it to show the interesting pattern created by a flock of birds taking off into the sky:


Share Your Cloud Photos

I’m sure you have a few interesting cloud images sitting in your Flickr account, so why not post a link to one below? It would be great to see a few extra examples and understand how/why you approached a particular shot as you did!

Interview with Ma. Luisa Gonzaga


Luisa Gonzaga is a freelance artist from the Philippines. With a love for illustration that started as a child, Luisa is a multi-talented artist who specializes in kid-friendly and fashion illustration styles. In this interview she shares with us her experience with Micro-stock sites, her love of vector, and the secret to drawing a great character illustration.

Continue reading “Interview with Ma. Luisa Gonzaga”

All the Music Apps for Google’s Android You Could Need

The HTC Dream Android phone (elsewhere known as the G1) arrived in Australia recently, and I’ve had mine for about a month now. I have been an enthusiastic user of palmtops, organizers, PDAs and smartphones since the late 80s, and this one is very nice, though the battery could last a little longer, and it sometimes feels more sluggish than it should.

This article was previously published on the AudioJungle blog, which has moved on to a new format in 2010. We’ll be bringing you an article from the AudioJungle archives each week.

The iPhone broke exciting new ground in the smartphone space, and Android – an operating system developed by Google – follows strongly in that tradition. At this stage, in terms of both hardware and software, the iPhone unquestionably comes out on top. But it is Android’s philosophy of openness that interests me most, and could open up very interesting possibilities in the future.

Some time ago Joel Falconer reviewed six applications for musicians on the iPhone. How does Android compare as a gadget for musicians?


Media Players

For me, the best use of a device this size for a musician is as a media player. And this area clearly demonstrates the difference between the iPhone and Android philosophies.

The iPhone comes with iTunes preinstalled, and will not allow any other media player to be released for the iPhone. Android comes with a music player called “Music”, but quite a few alternatives are available in the Android Market.

iPhone fans may ask whether any of the alternatives are as good as iTunes. At this stage I think they make a good point. Apple really are at the top of the music game.

Music is Android’s native media player. It plays audio, but not video. You can select your music by artist, album, song or playlist, or just shuffle through your entire collection. As you would expect from Google, the search feature is fast, and quite good.

Once you are viewing a list of music, you can scroll through it by sliding your finger, similar to the iPhone. While listening to a song, you can set it as your phone’s ringtone from a simple menu entry. The player supports album art, but only if it’s inside the MP3s id3 tag.

I understand that in the United States that Music includes access to Amazon’s music store, but there is no sign of that on the Australian phone. If you’ve used it, please let us know how smooth and useful the experience was.

Scrobble Droid. I’m a big fan of the Last.fm social music site, and especially of “scrobbling” my music – having my media players automatically add the music I’m listening to to Last.fm’s database. Scrobble Droid adds that functionality to my Dream, but only when I play music through the preinstalled Music app. Another app, aLastFM Player gives me direct access to streaming music from Last.fm from my Android device, including radio stations for artists, friends and recommended songs, and my playlists.

TuneWiki is an alternative media player that displays the songs lyrics while it is playing. Within a few seconds, song lyrics and album art are automatically downloaded from the TuneWiki’s database in real time, and in most cases, the lyrics sync with the song, making it easy to sing along. Users can add lyrics to the database if the words to your favorite song are missing.

TuneWiki isn’t just a novelty program. Most of the features you need in a media player are present, and it could easily become my music player of choice.

Hang on a minute, I haven’t noticed this before. It looks like TuneWiki may be becoming ad-supported. Under the lyrics of the song I’m listening to was an ad in all caps letting me know I can “GET BABES NOW”. Now it’s advertising ring tones, and now it isn’t. Now it’s asking if I “Want2 flirt”. The ads seem to come and go, but they give me second thoughts about using this app too regularly.

Dog Catcher (Beta) is an excellent pod catcher for Android. I’m a fan of podcasts, and probably spend more time in this program than any other.

I love that I can set it only to download podcasts when the device is plugged in to power (to save battery life) and connected to wireless (to save money on data costs). The program keeps track of where I am up to with each podcast, so that if I stop listening to one podcast to listen to another, it continues on from where I was up to when I return.

Other useful media apps are the preinstalled YouTube app, vTap, which searches several video providers on the Web, LukLuk, which can play audio and video files either from your microSD card or their own online network, and Video Player, which does basically what it says.

Useful for both Android and iPhone is the Shazam music discovery engine, which can identify a song when it hears it, and tell you where you can hear or purchase the song online. MixZing is a different type of music discovery solution. It’s a full-featured MP3 player, and recommends songs from its database as you are listening to your music. It sounds similar to the service provided by Last.fm, though I assume Last.fm’s recommendations are more accurate due to its larger user base.


Audio Recording

I can’t imagine recording anything serious on my HTC Dream, but it is a useful device for listening back to a practice session, or capturing lyrics and arrangement ideas when I don’t have time to jot them down. Here are some useful recording apps for Android.

DroidRecord is about as simple as it gets. Run the app, and you have a list of previous recordings, and two big buttons: a red one labeled “Record”, and a green one labeled “Play”.

Livo Recorder describes itself as “a recorder or a Tivo-style ‘monitor’ to keep an audio history that is ready to capture or extend any time.” Unfortunately the demo had expired long before I started writing this article, and I only seem to be able to access the free apps in the Google Market at this time.

Rehearsal Assistant allows you to record your rehearsal, and then record your spoken thoughts and observations about it later. You can stop and start recording many times through the session. Once finished, you can email the session to others.

Note Everything is a handy notebook program. You can create three types of notes: text, paint and voice. Voice notes come with record, play and stop buttons.


Music Tools

Musical Lite contains a metronome, pitch pipe, scrolling three-octave piano, and two-octave full-screen keyboard. The quality of the app seems very high, although playback on the keyboards feels a little laggy (probably the fault of the device, not the app), and you can play only one note at a time. The full version of the app adds a tuner, 128 instrument sounds, and more. Unfortunately I am unable to test it at this time.

Guitar Chordz is a handy guitar chord program, and contains diagrams for major, minor, seventh, and major seventh chords. The “More shapes” button is useful, and shows alternate ways of playing the chord as you move up the neck.

The chord charts are color-coded, with the colors representing which finger to use. When you tap the chord diagram, the chord is played for you. The program also contains a simple guitar tuner, playing the tone for each note in standard guitar tuning.

RockOut is the most fun Android app to play music with. The application contains two guitars (one mellow and one distorted). You strum the strings with your finger, and hear a realistic guitar sound played. The screen is divided into three sections, one for each available chord. The app feels very responsive, and each chord is sampled twice so that you can play upstrokes and downstrokes. The pro app promises a lot more features, but I’m unable to try it at this time.

Hit It! Lite lets you play the drums on your Android device either by tapping the little pads for each drum (including kick, snares, toms and cymbals), or by shaking the device. The app is fun, but the timing is not particularly accurate, perhaps because the Dream needs a beefier processor.

HS Tempo and Tube Tempo BPM both measure tempo in beats per minute as you tap the Android device’s screen.

And that brings us to the review of the music apps available for Google Android devices. In summary, the third party application market for Android is still quite young and immature, and there is no doubt that these apps will improve, and more are on their way. But at this stage, the iPhone’s couterparts offer better value . . . assuming you own an iPhone!


Diving into the Twitter Stream


Hey iCoders. As I posted earlier I recently made an iPad app called TweetMapper. I just put out a new release of the app with a big new feature. The app now has a scrolling timeline of the tweets it is seeing as they come in. In order to make this app I took advantage of the Twitter Stream API that is provided by twitter. This API creates a persistent connection between the Twitter servers and your application. We will essentially start a stream of incoming NSData object to an NSURLConnection that you create querying the stream. We will look into the different search parameters which can be passed into the request, the way in which our code responds to authentication requests from Twitter, and the logic we must use to ensure that the data we have received is a complete XML element and not chopped off. There are three major steps to taking advantage of this in your app.

  1. Create an NSURLConnection to request an XML response from the Stream.
  2. Create a parameter string for the HTTP Body.
  3. Respond to the authentication challenge with user credentials.
  4. Append the data as it comes in and when a complete element is received parse the Tweets.

So lets dive in.

Creating the Class

The first thing that we need to do is establish a connection with the Twitter stream. I will not be creating a Twitter client class that can be plugged into any application you choose. You will be able to find the class as a download at the end of the post. We will call the class TwitterStreamClient. Lets first define the header file of the class.

#import
#import "TouchXML.h"
#import "Tweet.h"
 
@interface TwitterClient : NSObject {
 
	NSString *searchString;
	NSString *locationString;
	NSMutableString *holderString;
	id mapController;
	NSURLConnection *connection;
	NSMutableURLRequest *request;
}
 
@property (nonatomic, assign) id mapController;
 
-(void)startStreamingTweets;
-(void)makeMyRequest;
-(void)searchByLocation;
-(void)searchByTerm;
-(void)searchByUser;
-(void)parseXMLString:(NSString*)xmlString;
-(NSString*)locationStringForLongitude:(double)_long Latitude:(double)_lat;
 
@end

You will need to have TouchXML installed for this class to work. You can find installation instructions here. Let move onto the .m file of the TwitterStreamClient. First thing to do is create the initializer. Ours will look like this:

-init {
	if([self = [super init]) {
		holderString = [[NSMutableString alloc] init];
	}
 
	return self;
}

This holder string is what we are going to use to synchronize our incoming NSData from the service. We will see the reason for this in the next step.

Connect to Service

The Twitter stream provides many different parameters for users to pass into their request. You can see the full list here, but we will be focusing on user specific stream, keyword specific stream and location specific stream. We are going to be hardcoding what these will be searching for but in use you can pass in whatever values you like. We will create an NSMutableURLRequest and fill in its HTTP body with the appropriate request. First we will make a method to create the stream request.

-(void)makeMyRequest {
 
	request = [[NSMutableURLRequest alloc] initWithURL:[NSURL URLWithString:@"http://stream.twitter.com/1/statuses/filter.xml"]];
	[request setHTTPMethod:@"POST"];
}

With this done we will create three different methods that can be called. One that bases its search on keywords, another based on users and a final one based on location.

Request by keyword

-(void)searchByTerm {
 
	searchString = @"track=Love,Hate,Want,Need";
 
	NSString *httpBody = searchString;
	[request setHTTPBody:[httpBody dataUsingEncoding:NSUTF8StringEncoding]];
	connection = [[NSURLConnection alloc] initWithRequest:request delegate:self startImmediately:YES];
	[request release];
}

Request by User ID

-(void)searchByUser {
 
	searchString = @"follow=14402149,29089557,807095,19058681";
 
	NSString *httpBody = searchString;
	[request setHTTPBody:[httpBody dataUsingEncoding:NSUTF8StringEncoding]];
	connection = [[NSURLConnection alloc] initWithRequest:request delegate:self startImmediately:YES];
	[request release];
}

The final method will create a location string. The twitter stream requires passing in 4 coordinates, 2 coordinate pairs. This will define the southwest most point and northeast most point. The square that the coordinates define has a maximum of 1 degree length for any side of the defined box. My helper method takes in a longitude and latitude as a center points and creates as large an area as possible around it and returns the 4 coordinates as a string. Paste in the following code to search with center points on Tempe, AZ and New York, NY.

-(NSString*)locationStringForLongitude:(double)_long Latitude:(double)_lat {
 
	NSString *returnString = [NSString stringWithFormat:@"%f,%f,%f,%f",(_long-.5),(_lat-.5),(_long+.5),(_lat+.5)];
 
	return returnString;
}
 
-(void)searchByLocation {
 
	searchString = [NSString stringWithFormat:@"locations=%@,%@",
					  [self locationStringForLongitude:-111.932898 Latitude:33.419265],
					  [self locationStringForLongitude:-74.0 Latitude:40.7]];
 
	NSString *httpBody = searchString;
	[request setHTTPBody:[httpBody dataUsingEncoding:NSUTF8StringEncoding]];
	connection = [[NSURLConnection alloc] initWithRequest:request delegate:self startImmediately:YES];
	[request release];
}

Answering Authentication

The NSURLConnection will connect to the Twitter stream and then Twitter will ask for a username and password for the request. With the NSURLConnection’s delegate set to self we will implement the following method to answer the TwitterRequest.

- (void)connection:(NSURLConnection *)connection didReceiveAuthenticationChallenge:(NSURLAuthenticationChallenge *)challenge {
 
	NSURLCredential *cred = [[NSURLCredential alloc] initWithUser:@"tweetmapperAPI" password:@"w0_0tSp1" persistence:NSURLCredentialPersistencePermanent];
	[[challenge sender] useCredential:cred forAuthenticationChallenge:challenge];
	NSLog(@"Received Challenge");
	[cred release];
}

This should satisfy the authentication challenge and the stream should start sending you data.

Receiving Data

Now the stream will start sending you data, it will coming into another NSURLConnection delegate method. The stream will send NSData into this method. The NSData can be parsed into a string and if you print it you will see output like this:

2010-05-21 14:05:17.491 TweetMapper[72280:207] Recieved Data from Stream:
 2010-05-21 14:05:17.919 TweetMapper[72280:207] Recieved Data from Stream: <?xml version="1.0" encoding="UTF-8"?>
<status>
  <created_at>Fri May 21 21:05:17 +0000 2010</created_at>
  <id>14452520592</id>
  <text>Need some followers yo I jus got this twitter its pretty str8</text>
  <source>&lt;a href=&quot;http://mobile.twitter.com&quot; rel=&quot;nofollow&quot;&gt;Twitter for Android&lt;/a&gt;</source>
  <truncated>false</truncated>
  <in_reply_to_status_id></in_reply_to_status_id>
  <in_reply_to_user_id></in_reply_to_user_id>
  <favorited>false</favorited>
  <in_reply_to_screen_name></in_reply_to_screen_name>
  <user>
    <id>144901351</id>
    <name>David Powell</name>
    <screen_name>Ballaholic3223</screen_name>
    <location></location>
    <description>I'm a chill dude that love to play ball, hang out,  and uhhhh chillax...holla at me and we can be cool</description>
    <profile_image_url>http://a1.twimg.com/profile_images/907668616/VDG61D80_normal</profile_image_url>
    <url></url>
    <protected>false</protected>
    <followers_count>1</followers_count>
    <profile_background_color>9ae4e8</profile_background_color>
    <profile_text_color>000000</profile_text_color>
    <profile_link_color>0000ff</profile_link_color>
    <profile_sidebar_fill_color>e0ff92</profile_sidebar_fill_color>
    <profile_sidebar_border_color>87bc44</profile_sidebar_border_color>
    <friends_count>0</friends_count>
    <created_at>Mon May 17 16:17:15 +0000 2010</created_at>
    <favourites_count>0</favouri
2010-05-21 14:05:23.073 TweetMapper[72280:207] Recieved Data from Stream: e_background_color>
    <profile_text_color>666666</profile_text_color>
    <profile_link_color>2FC2EF</profile_link_color>
    <profile_sidebar_fill_color>252429</profile_sidebar_fill_color>
    <profile_sidebar_border_color>181A1E</profile_sidebar_border_color>
    <friends_count>5</friends_count>
    <created_at>Fri Aug 01 08:10:36 +0000 2008</created_at>
    <favourites_count>0</favourites_count>
    <utc_offset>-28800</utc_offset>
    <time_zone>Pacific Time (US &amp; Canada)</time_zone>
    <profile_background_image_url>http://s.twimg.com/a/1274144130/images/themes/theme9/bg.gif</profile_background_image_url>
    <profile_background_tile>false</profile_background_tile>
    <notifications></notifications>
    <geo_enabled>false</geo_enabled>
    <verified>false</verified>
    <following></following>
    <statuses_count>44</statuses_count>
    <lang>en</lang>
    <contributors_enabled>false</contributors_enabled>
  </user>
  <geo/>
  <coordinates/>
  <place/>
  <contributors/>
</status>

A response from the Twitter stream comes in as XML. An entire XML element that represents a single is a element. The status element seen here took two different calls to the didRecieveData method. Because of this we need to build in logic to recognize when a complete Tweet XML object is received and pass that onto our parsing method. This is what we use the NSMutableSting holderString for. You can see the completed method below.

- (void)connection:(NSURLConnection *)connection didReceiveData:(NSData *)data {
 
	NSString *dataString = [[NSString alloc] initWithData:data encoding:NSUTF8StringEncoding];
 
	[holderString appendString:dataString];
	[dataString release];
 
	if([holderString rangeOfString:@""].location != NSNotFound &amp;&amp; [holderString rangeOfString:@""].location != NSNotFound) {
 
		if([holderString rangeOfString:@""].location &lt; [holderString rangeOfString:@""].location) {
			NSRange start = [holderString rangeOfString:@""];
			NSRange end = [holderString rangeOfString:@""];
 
			NSRange range;
			range.location = start.location;
			range.length = (end.location+end.length)-start.location;
 
			NSString *xmlString = [holderString substringWithRange:range];
 
			[self parseXMLString:xmlString];
 
			[holderString deleteCharactersInRange:range];
		}
	}
}

Here we receive data and append it to our holder string. We then check that both an opening and closing element tag is seen. If both tags are seen and the opening tag occurs before the closing tag, we create a substring in that range, pass the completed element to a method called parseXMLString and delete the characters from the holder string.

Parsing Data

Now that we have completed elements being grabbed out of the data we receive we need to parse out what we find as important. For the sake of extensibility I created a helper object called Tweet. A Tweet takes in tweet text, an author name, the authors Twitter URL, a timestamp, an image URL and a coordinate. This is the header for the class

#import
#import 
 
@interface Tweet : NSObject {
 
	NSString *tweet;
	NSString *author;
	NSURL *authorURL;
	NSString *timeStamp;
	NSURL *authorImageURL;
	CLLocationCoordinate2D coord;
}
@property (nonatomic, retain) NSString *tweet;
@property (nonatomic, retain) NSURL *authorImageURL;
@property (nonatomic, retain) NSString *author;
@property (nonatomic, retain) NSURL *authorURL;
@property (nonatomic, retain) NSString *timeStamp;
@property (nonatomic, assign) CLLocationCoordinate2D coord;
 
-(UIImage*)authorPhoto;
-(NSURL*)tweetLink;
 
@end

I implement the class like this. I include a method called TweetLink which will return an NSURL of any url within the tweet text.

#import "Tweet.h"
 
@implementation Tweet
 
@synthesize tweet;
@synthesize authorImageURL;
@synthesize author;
@synthesize authorURL;
@synthesize timeStamp;
@synthesize coord;
 
-init {
 
	if([super init]) {
 
	}
 
	return self;
}
 
-(NSURL*)tweetLink {
	NSRange httpRange = [[self tweet] rangeOfString:@"http://"];
 
	if(httpRange.location == NSNotFound) {
		return nil;
	}
 
	else {
		httpRange.length = [[self tweet] length] - httpRange.location;
		NSString *customString = [[self tweet] substringWithRange:httpRange];
		httpRange = [customString rangeOfString:@" "];
 
		if(httpRange.location == NSNotFound) {
 
			httpRange.location = 0;
			httpRange.length = [customString length];
		}
 
		else {
			httpRange.length = httpRange.location;
			httpRange.location = 0;
		}
 
		NSLog(@"URL I am returning: %@", [customString substringWithRange:httpRange]);
 
		return [NSURL URLWithString:[customString substringWithRange:httpRange]];
	}
}
 
-(UIImage*)authorPhoto {
 
	return [[UIImage alloc] initWithData:[NSData dataWithContentsOfURL:authorURL]];
}
 
-(NSString*)description {
 
	return [NSString stringWithFormat:@"Tweet:%@\nAuthor:%@\nAuthor URL:%@\nPublished:%@\nLongitude:%f\nLatitude:%f\nAuthor Image URL:%@", tweet, author, authorURL, timeStamp,coord.longitude,coord.latitude, authorImageURL];
}
@end

I will use this class to create a single object holding all of the data I parse out of the XML elements I am looking at. All that is left to do is finish my parse method to get create these Tweet objects. This is my parse method that takes advantage of Touch XML and its awesome XML parsing methods.

-(void)parseXMLString:(NSString*)xmlString {
 
	CXMLDocument *document = [[CXMLDocument alloc] initWithXMLString:xmlString options:0 error:nil];
 
	if([[[[document rootElement] elementsForName:@"geo"] objectAtIndex:0] childCount] &gt; 0) {
 
		Tweet *tweet = [[Tweet alloc] init];
 
		[tweet setTweet:[[[[document rootElement] elementsForName:@"text"] objectAtIndex:0] stringValue]];
		[tweet setAuthor:[NSString stringWithFormat:@"@%@", [[[[[[document rootElement] elementsForName:@"user"] objectAtIndex:0] elementsForName:@"screen_name"] objectAtIndex:0] stringValue]]];
		[tweet setAuthorURL:[NSURL URLWithString:[[[[[[document rootElement] elementsForName:@"user"] objectAtIndex:0] elementsForName:@"url"] objectAtIndex:0] stringValue]]];
		[tweet setAuthorImageURL:[NSURL URLWithString:[[[[[[document rootElement] elementsForName:@"user"] objectAtIndex:0] elementsForName:@"profile_image_url"] objectAtIndex:0] stringValue]]];
 
		NSString *coordinateString = [[[[[[document rootElement] elementsForName:@"geo"] objectAtIndex:0] elementsForName:@"point"] objectAtIndex:0] stringValue];
		NSRange range = [coordinateString rangeOfString:@" "];
		NSRange lon;
		lon.location = 0;
		lon.length = range.location;
		NSRange lat;
		lat.location = range.location+range.length;
		lat.length = [coordinateString length] - lat.location;
 
		double longit = [[coordinateString substringWithRange:lon] doubleValue];
		double latit = [[coordinateString substringWithRange:lat] doubleValue];
 
		CLLocationCoordinate2D coord;
		coord.longitude = latit;
		coord.latitude = longit;
 
		[tweet setCoord:coord];
 
		//PASS TWEET ONTO WHATEVER CLASS WILL USE IT
 
		[tweet release];
	}
}

Usage

Make sure that you install Touch XML and import the MapKit framework when using this class. Customize the terms, users and coordinates for the stream method to fit what you need it for. All that will be required to use the class is the following to create and begin parsing:

TwitterClient *client = [[TwitterClient alloc] init];
[client makeMyRequest];
 
[client searchByTerm];
 
OR
 
[client searchByLocation];
 
OR
 
[client searchByUser];

Fillin the very end of the parsing method to send the tweets off to whatever part of the application you want to use them in. I hope this introduction will help you guys add live twitter streams into your apps. Happy coding!

Source Downloads

TwitterStream

How to Create Organic Ambient Instruments in Ableton Live

In this tutorial we are going to use Ableton Live’s “Sampler” and some of its built-in audio effects to produce wide, organic, ambient textures and pads, originating from a single one-note instrument sample. It’s a great way to create MIDI-playable ambient pads with a warm and evolving character, and most of all to be able to use our own original and custom ambient sounds, without having to scroll through hundreds of synth presets to find the right one, which usually leads to losing patience and inspiration.

Download audio file (ambpad1_fin.mp3)

This is what we’re going for in this tutorial.

Step 1: Choosing the Sample

The most suitable samples for this simple technique are probably mallet-type or plucked string-type instruments, such as piano, vibes, music box, glockenspiel, classical/acoustic guitar, etc. The tail of the sound will be our main source, but their fast attack will be quite useful in creating nice transitions and reversed-string sounds. During this tutorial we will be using a one note sample of a Guzheng (traditional Chinese instrument), but more examples have been included in the Ableton Live project available for download below.

Keep in mind that our sample needs to be on C3, or at least needs to be transposed suitably if the original tonality is different, since we’re going to be playing whole chords and melodies with the final Sampler instrument.

Download audio file (ambpad2_Guhzeng_one_note.mp3)

The original sample we chose, a sustained C3 note of a Guzheng instrument.

Step 2: Tweaking the Sample

Drag and drop the sample in the Sampler “Sample” section.

The sample is being dropped inside Sampler.

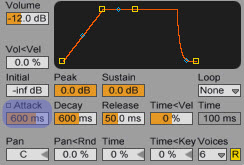
Enable the Reverse option, as well the Loop function on Sustain Mode. Edit the “Loop Start” and “Loop End” values suitably to avoid the silent parts of the sample, and focus on the tail of our sample. Remember, we have the Reverse function on, so the sample will start from where the Loop End value indicates. Increase the Crossfade value, to avoid clicks and pops while our sample loops. (It’s also needed for Step 5.).

Reversed and Looped sample.

Finally, let’s smoothen the attack a bit. Go over to “Filter/Global” and increase the Attack’s microseconds.

Smoothening the Attack.

It still doesn’t sound that interesting, but we’re getting closer.

Download audio file (ambpad3.mp3)

Step 3: Adding FX

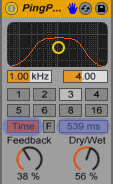
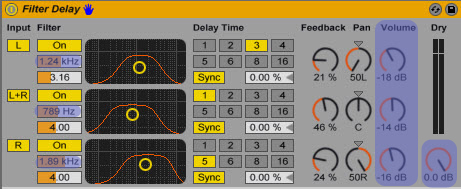
As with most ambient sounds, we’ll obviously use some delay and reverb FX. Let’s begin by adding a PingPongDelay and a subtle Filter Delay. Try not to overdo it with the delays, or else your sound will probably end up a bit muddy.

PingPong Delay.

Notice the quite lowered values on the delayed signals.

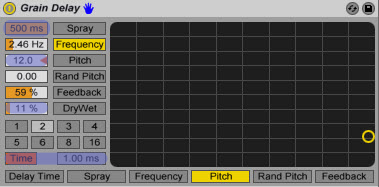
What can also be handy is a GrainDelay, with heavy “Spray” and a +12.0 “Pitch” Value, keeping the Dry/Wet signal low though. You’ll notice some higher frequencies being added on top of our sound, making it more spacy.

Grain Delay.

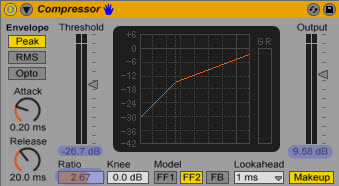
A compressor is quite needed to even out the levels, especially after completing Step 5.

Compressor.

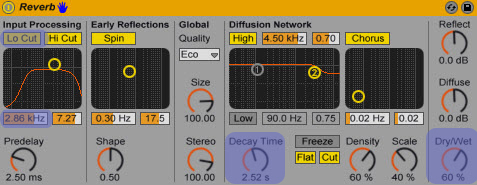
Last, but not least, the most obvious and probably most significant effect for this sound, a reverb with high Decay Time, and 60% Dry/Wet signal.

Reverb.

Download audio file (ambpad4.mp3)

Our sample, after the above effects have been applied.

Step 4: Return Channels

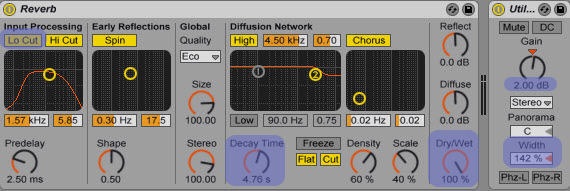
If we want more depth and ambience to our sound, we could use a return channel with some additional Reverb, 100% Wet, and a Utility plug-in to widen the sound a little.

Increase the “A Send” knob all the way. You can try more FX of course, multiple return channels, etc.

Step 5: Controlling Parameters Via MIDI

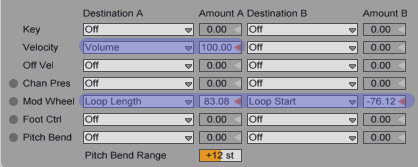
Different volume, panning, and sample offset values can keep a sound quite more interesting. What’s really handy in our situation is controlling the fast attacking “string” sound of the sample via modwheel or velocity. Live’s Sampler gives us that option. Click on the “MIDI” tab, and notice the several parameters that can be changed via different levels of velocity, mod wheel, pitch bend, and more. This makes our sound more alive, and more suitable to be played with a MIDI keyboard. In the following preview, to make the effect more obvious, the modwheel is being triggered during the second note.

Download audio file (ambpad5.mp3)

Even if you don’t have a keyboard and mod-wheel, you can just draw the automation in the MIDI clip.

Step 6: Controlling Parameters with Macro Controls

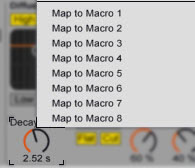
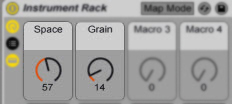
We can further control elements of the sound, such as space (reverb, delay) via Macro Controls. I grouped everything on the track together as an instrument rack (Shift-Click all the racks on the channel, then Ctrl-G), and connected some MapControls to the reverb’s Decay Time, the GrainDelay’s Frequency value and the Dry/Wet signal value.

You can map as many knobs you like to one Macro.

Another way to do that.

My final very simple Macro set-up.

Step 7: Trying Out More Samples

Here’s the same technique applied to different instruments’ one-note samples.

Download audio file (ambpad6_piano.mp3)

Piano.

Download audio file (ambpad6_vibes.mp3)

Vibes.

Download audio file (ambpad6_marimba.mp3)

Marimba.

Download audio file (ambpad6_mbox.mp3)

MusicBox.

Download audio file (ambpad6_acGuitar.mp3)

Acoustic Guitar.

We can also experiment with stacking up different sampler-instruments we’ve made. For example, here’s an instance of some of the above sounds put together in a new instrument rack. Later we can map different Macro Controls again. Our options are truly limitless.

Download audio file (ambpad7.mp3)

Instrument Rack.

And here’s an example of those sounds used in the intro of a track.

Download audio file (ambpad8_snip.mp3)

Conclusion

So there you have it. A quite simple but entertaining technique. Keep experimenting with more one-note samples and have some fun with it! All the non-Ableton folks out there could try this out with Kontakt or EXS24 of course. For any questions or suggestions/requests, don’t be afraid to drop a line in the comment section. Thanks for reading!

Download the Play Pack for this tutorial (2.3 MB)

Contents

  • Ableton Live Source Files


How to Create a Social Media UFO Icon


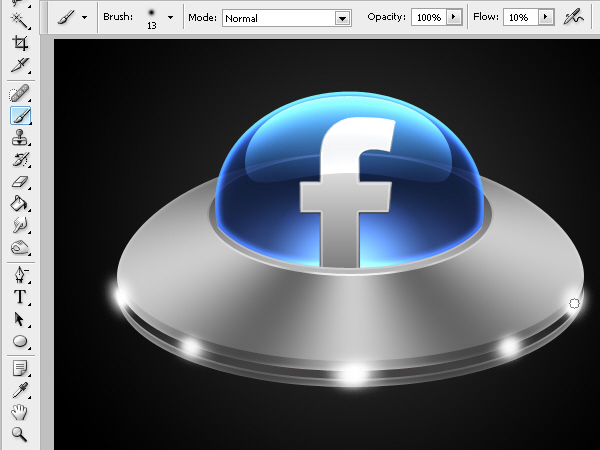
When we design websites or user interfaces, often times we need to create unique and creative icons. Most websites these days have some sort of social media presence; with a link to their Facebook or Twitter pages prominently displayed on their front pages. With so many sites linking to their social media profiles, it’s not surprising that many sites are simple regurgitating the same icons. In today’s tutorial we will demonstrate how to create a completely unique UFO inspired social media icon based on a theme. Let’s get started!


Resources

The following resources were used during the production of this tutorial:


Step 1

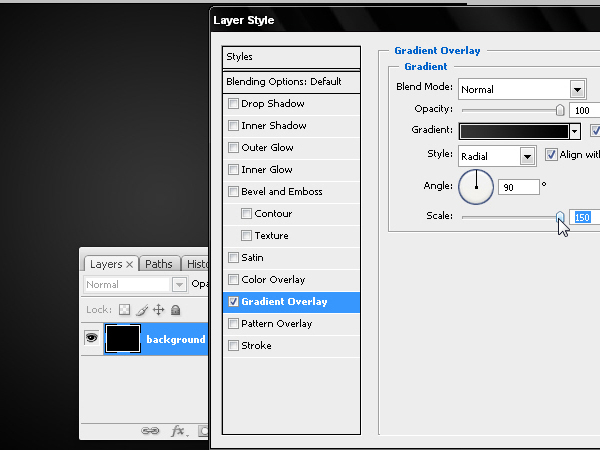
Create a new file 600 x 450 pixels and fill the background with black. Then apply a radial gradient using a layer style with the center color #353535 and the edges black #000000.


Step 2

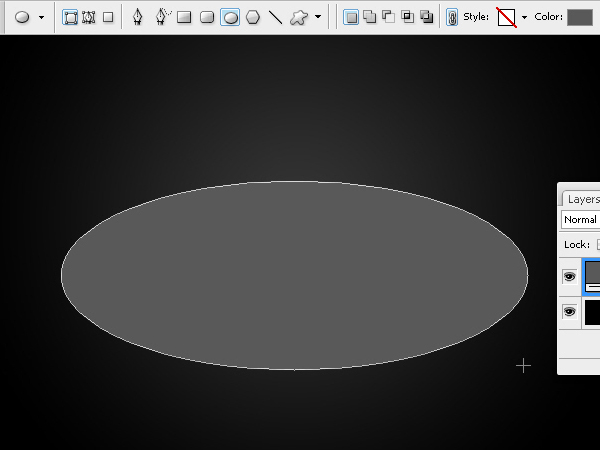
Create an oval shape layer that will become the base of our UFO.


Step 3

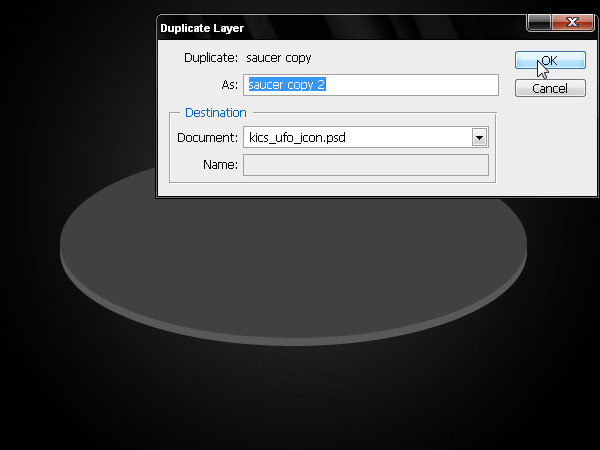
Go to Layer > Duplicate Layer and duplicate the oval but make this one a darker gray color.


Step 4

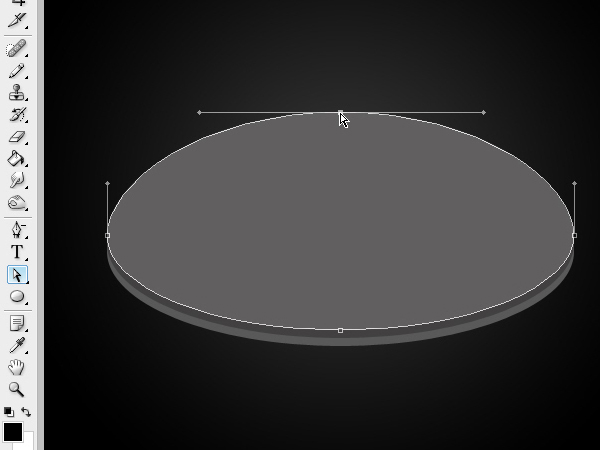
Now duplicate the layer again but distort its upper area as shown below.


Step 5

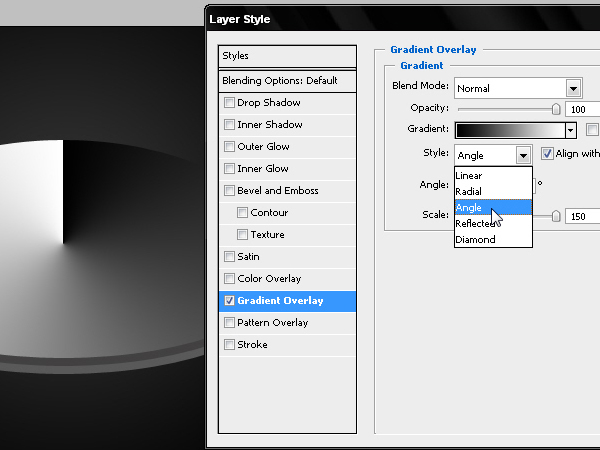
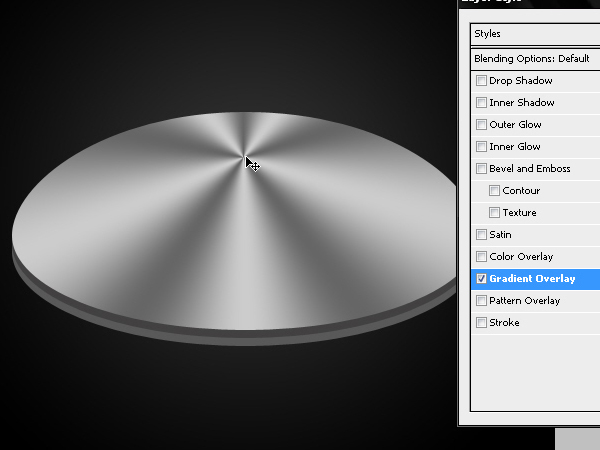
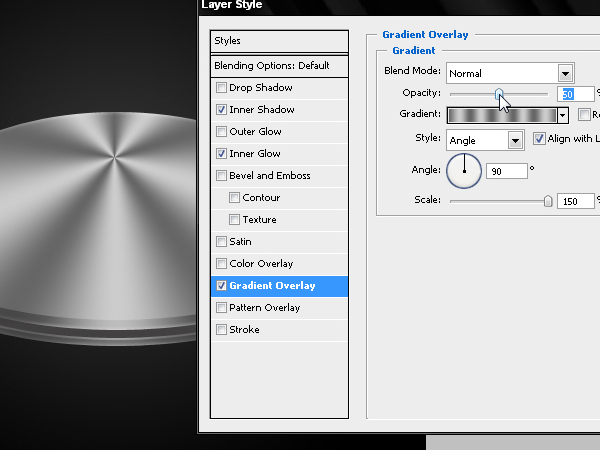
To create a polished metallic texture use an Angle and scale it up to 150%. Double click the gradient bar and open the Gradient Editor window.


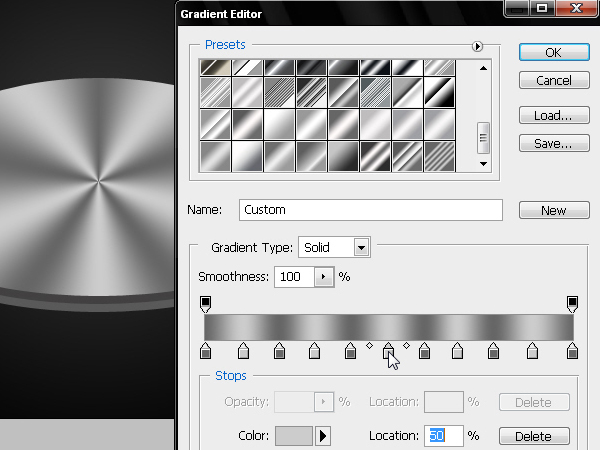
Step 6

Use 2 tones of gray; #CCCCCC and #666666.


Step 7

Place the center of the gradient towards the top of the shape to reinforce the conic shape of the object.


Step 8

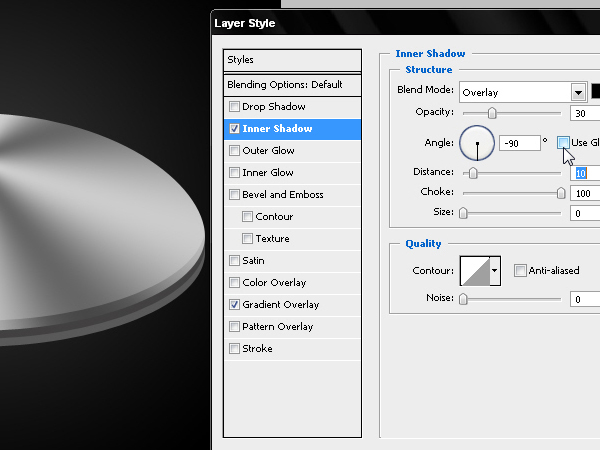
To create a 3D extrusion of the upper oval, use an inverted Inner Shadow (this means a –90º angle) with a black color and an Overlay blend. Drag the Choke to 100 and reduce the Size to zero.


Step 9

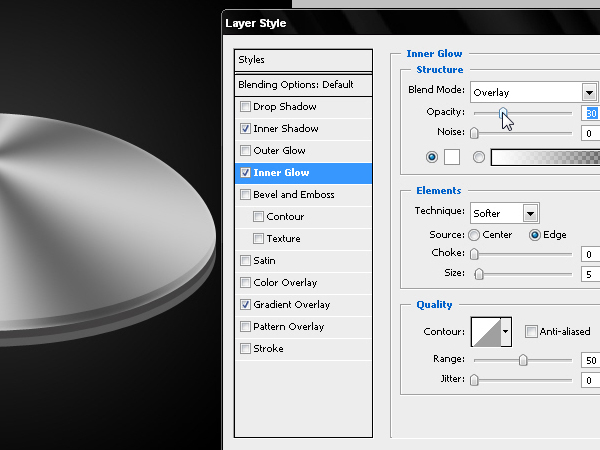
Include a thin Inner Glow that will allow the upper oval to receive the light reflected on its inner edge.


Step 10

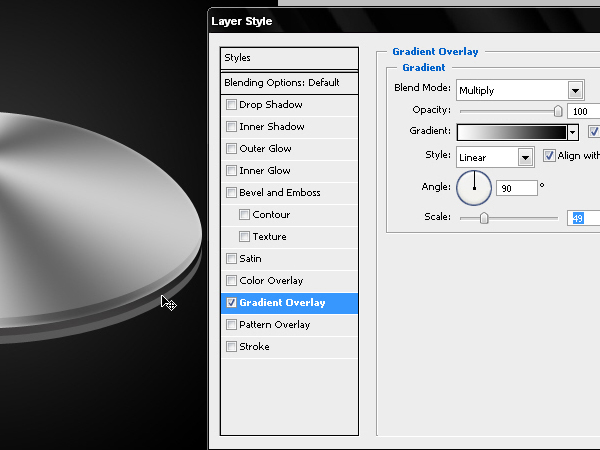
Now let’s work on the central oval. Add a Gradient Overlay using the settings below and place the gradient just below the center of the shape.


Step 11

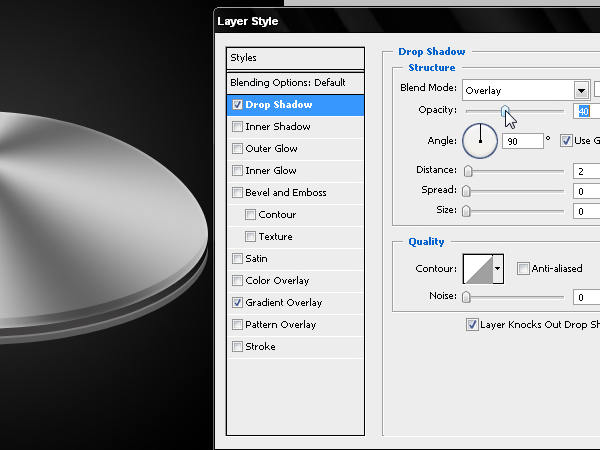
Use a white Drop Shadow to simulate a glow over the bottom oval.


Step 12

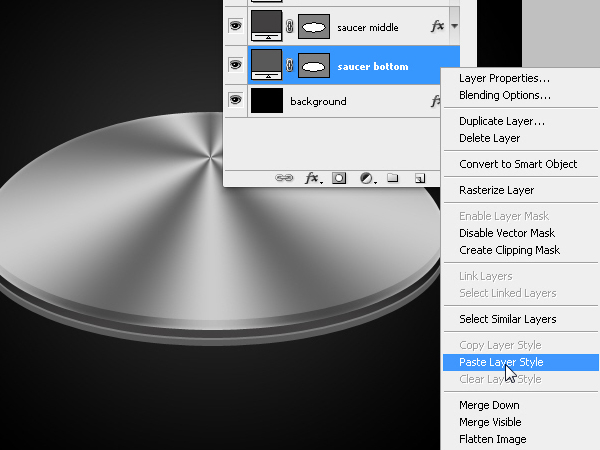
Apply the same layer style to the bottom saucer by copying and pasting the layer style.


Step 13

Reduce the opacity of the bottom layer’s gradient.


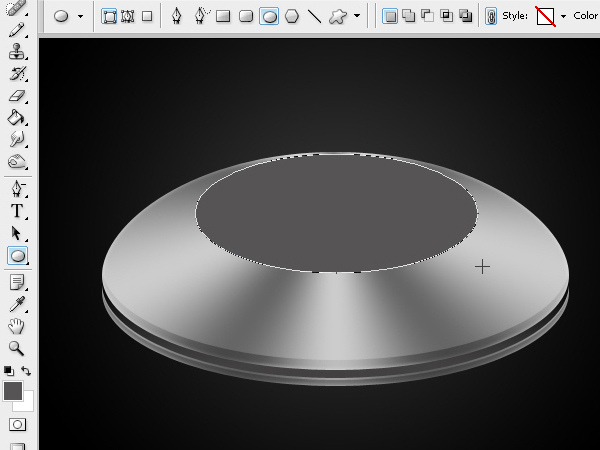
Step 14

Now we need to create an insert over the upper oval.


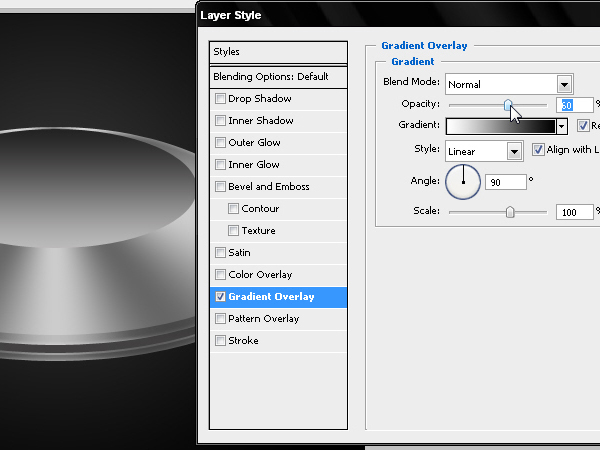
Step 15

Apply a gradient to this layer as shown below.


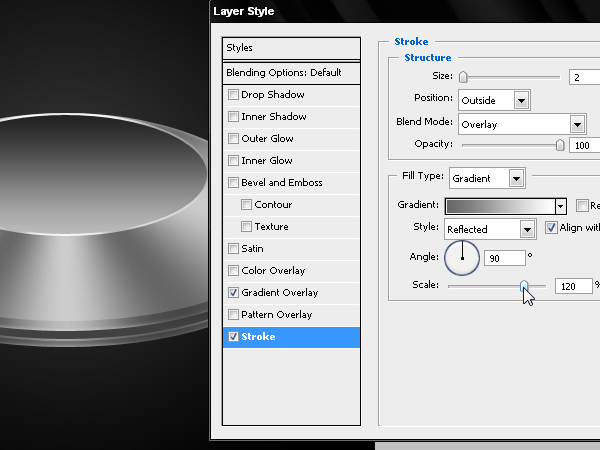
Step 16

Also add a stroke in gradient mode, using colors white #FFFFFF and grey #CCCCCC.


Step 17

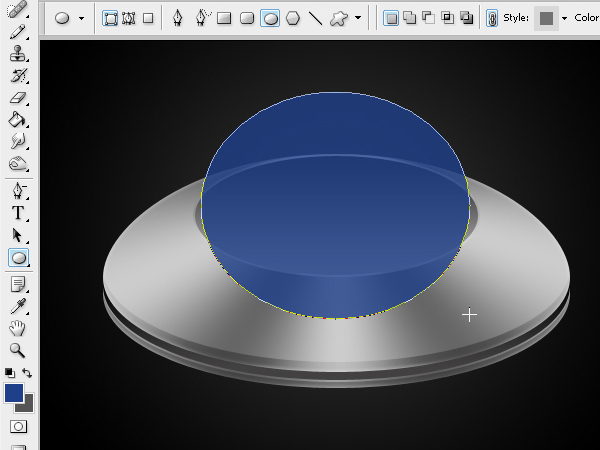
Now it’s time to create a glass dome of our UFO. To do this draw a shape as shown below. Use a blue #1D408A color.


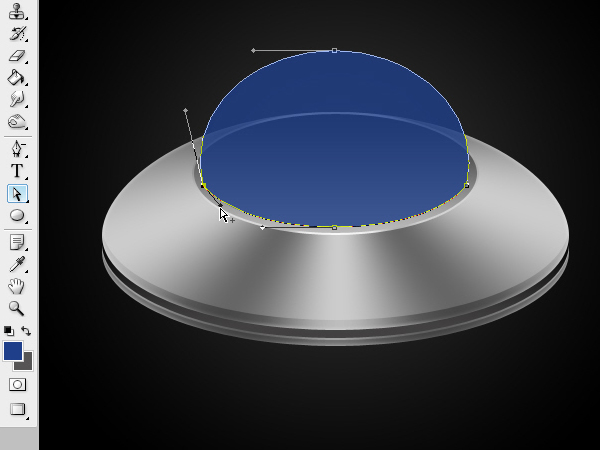
Step 18

Edit the anchor points as shown below. By pressing the Alt key (Windows) you can separate the anchor points and transform each segment of the oval independently.


Step 19

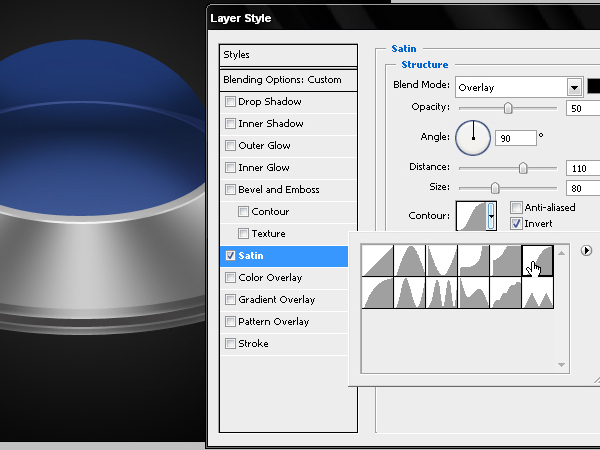
Let’s add some layer styles. First, a Satin effect with the values shown below.


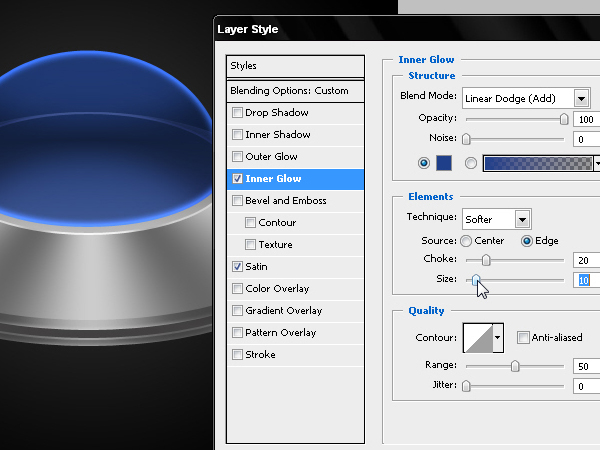
Step 20

Now apply an inner glow using #1D408A.


Step 21

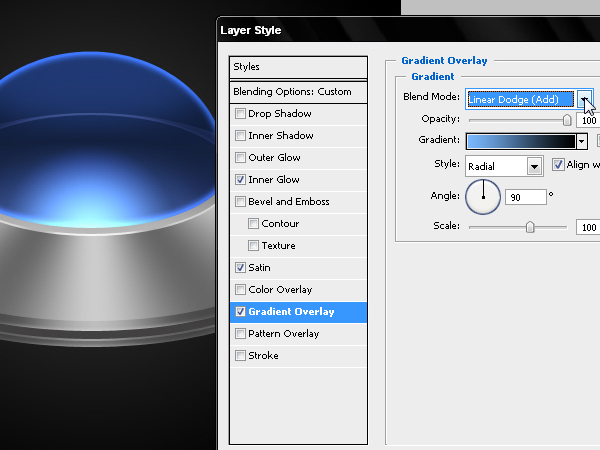
Add a radial gradient color #000000 and #76B9FD using Linear Dodge (Add).


Step 22

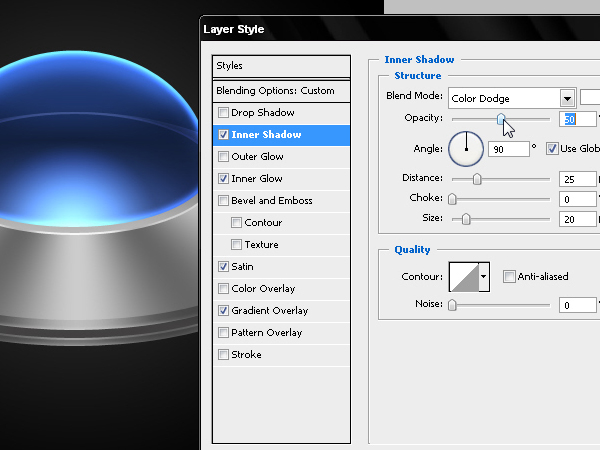
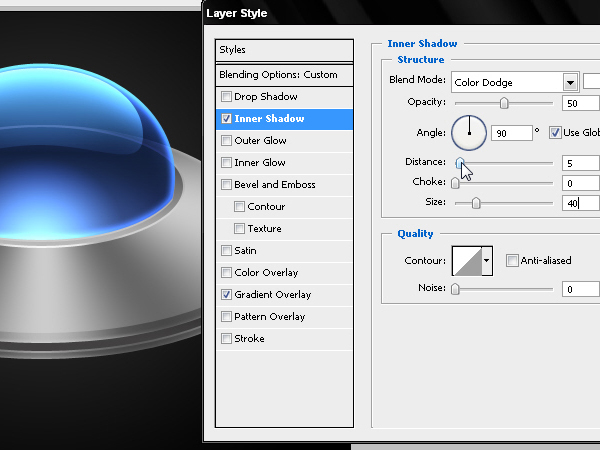
Then add an inner shadow but used as a light over the dome. Use the values as shown below.


Step 23

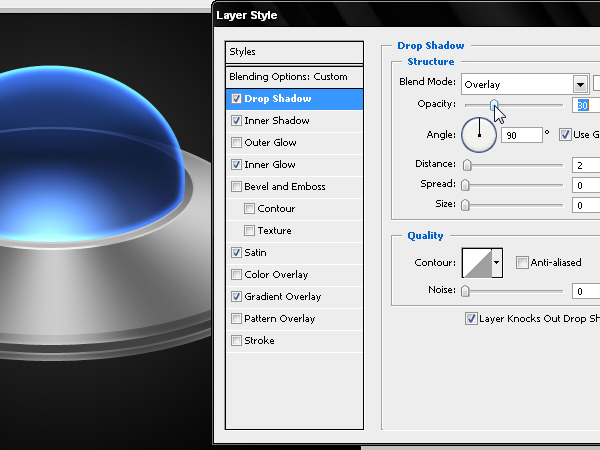
Finally add a Drop shadow to lighten up the bottom edge of the dome.


Step 24

Now let’s add a reflection to the sphere. Use a smaller oval and edit the anchor points as shown below.


Step 25

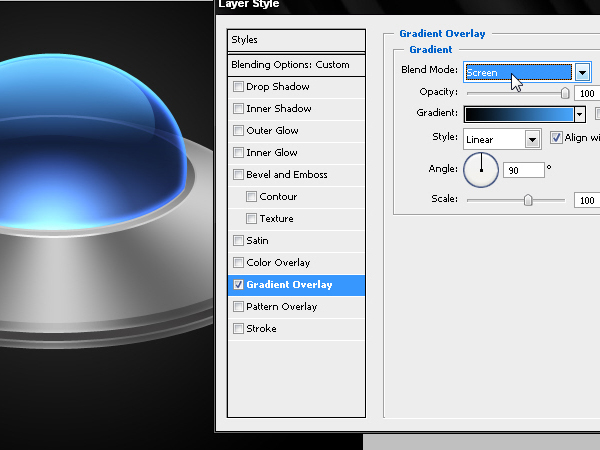
Apply a layer style to the reflection and add a gradient that starts from #44A9FE and ends with black. Set the Blending Mode to Screen as shown below.


Step 26

Add an inner shadow using the values shown below.


Step 27

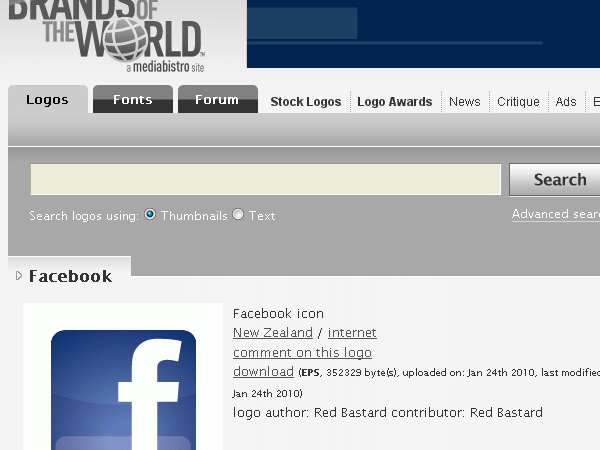
Download the Facebook Logo in EPS or, if you prefer Twitter, you can download it from here as well.


Step 28

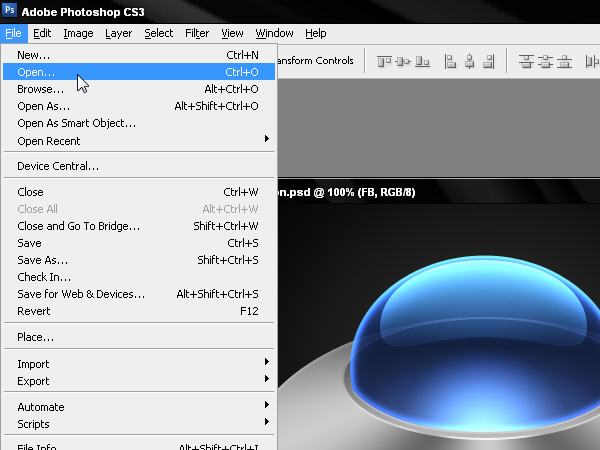
Open the vector logo directly into Photoshop. This will open a raster.


Step 29

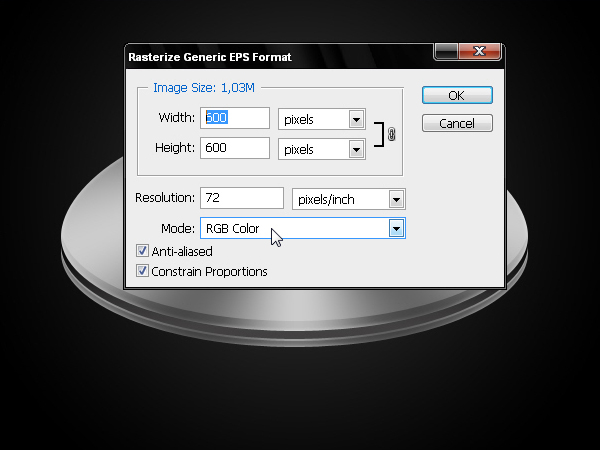
Use the settings below to set the logo to a larger size.


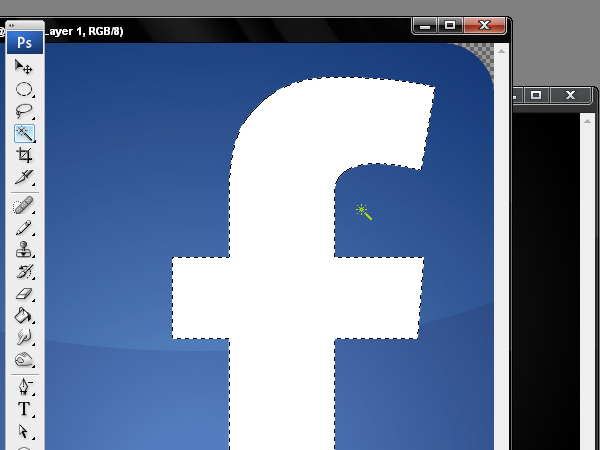
Step 30

Make a selection of the letter "f." Once it is selected go to Edit > Copy o Cmd + C.


Step 31

Paste the letter "f" onto the canvas and reduce its size to fit within the sphere.


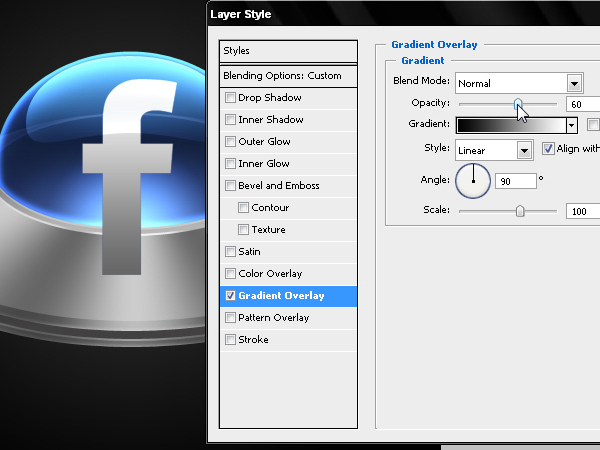
Step 32

Apply a gradient as shown below.


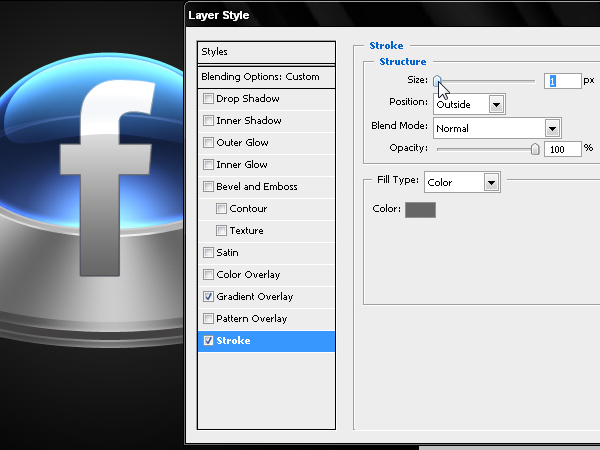
Step 33

Create an illusion of 3D by adding a small stroke as shown below.


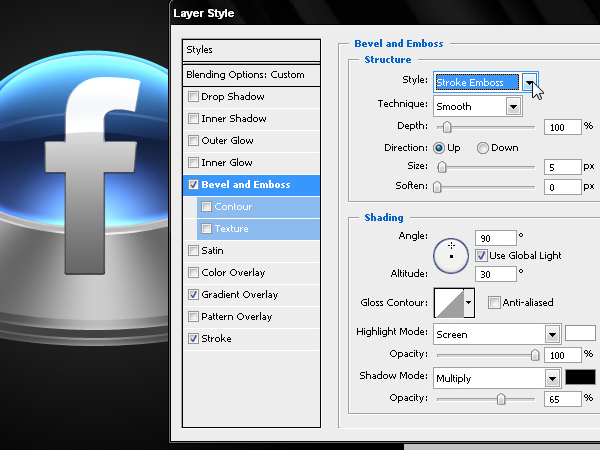
Step 34

Intensify the stroke using Bevel & Emboss.


Step 35

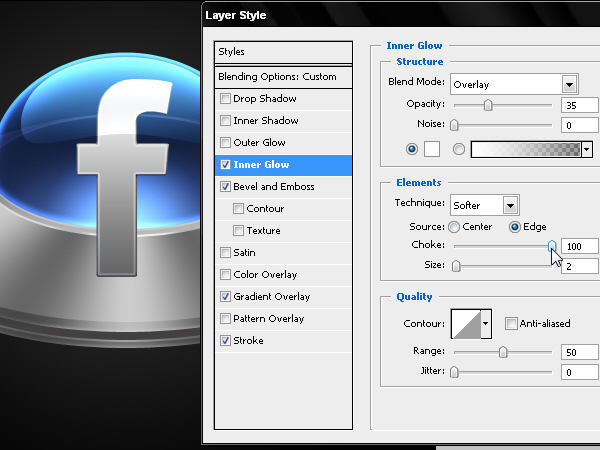
Apply an inner glow using to the "f" as shown below.


Step 36

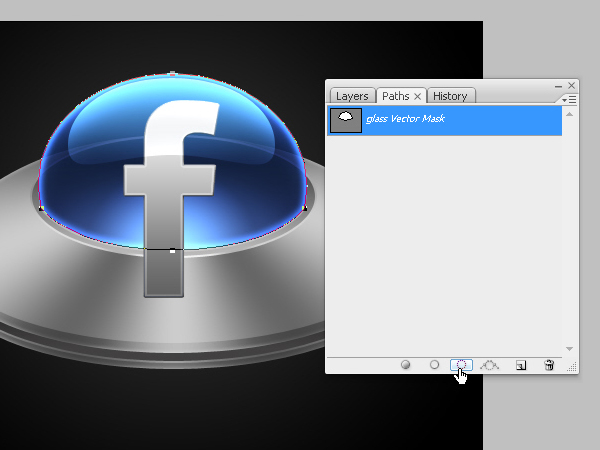
Use the dome to hide part of the "f" by selecting the path and by converting it into a selection.


Step 37

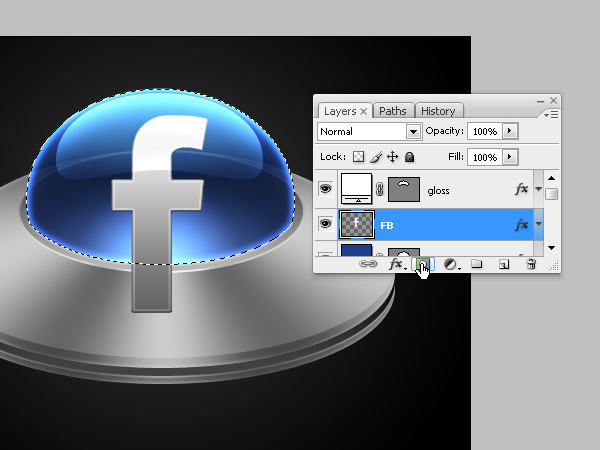
Return to the Layers palette and mask the letter.


Step 38

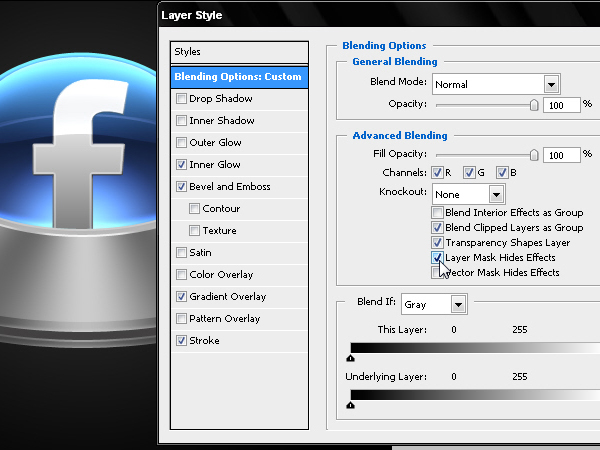
Hide all the effects inside the mask by clicking the “Layer Mask Hides Effects” in the layer styles dialog box.


Step 39

Use different brushes to paint the perimeter lights depending on their distance. Try to make them as symmetrical as possible.


Step 40

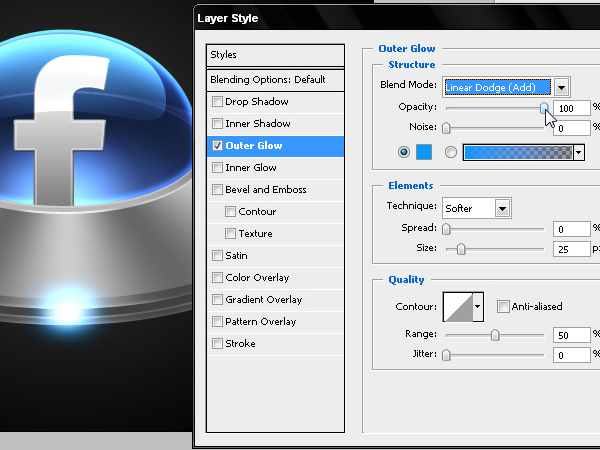
Add an Outer Glow using #0099FF.


Step 41

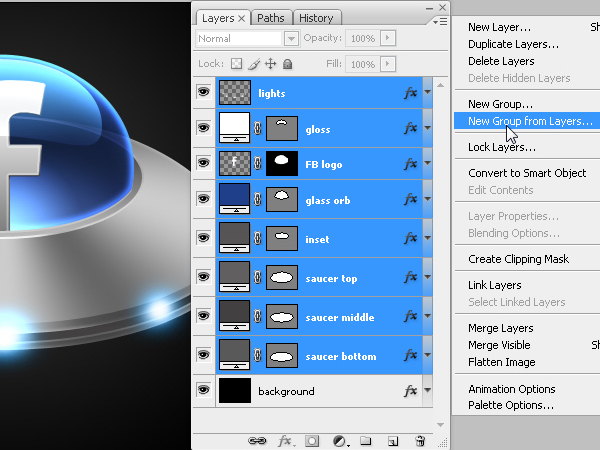
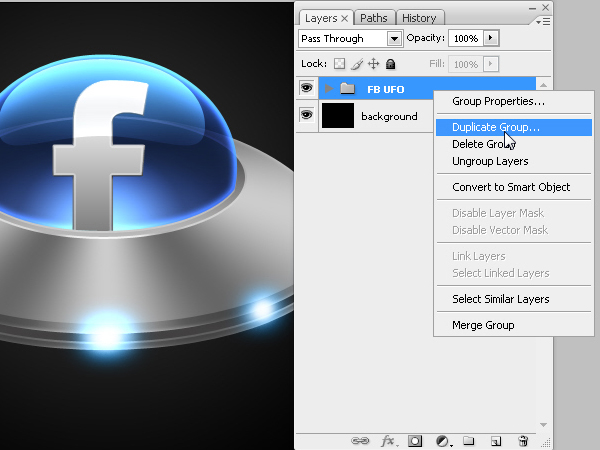
Group all the layers in a folder.


Step 42

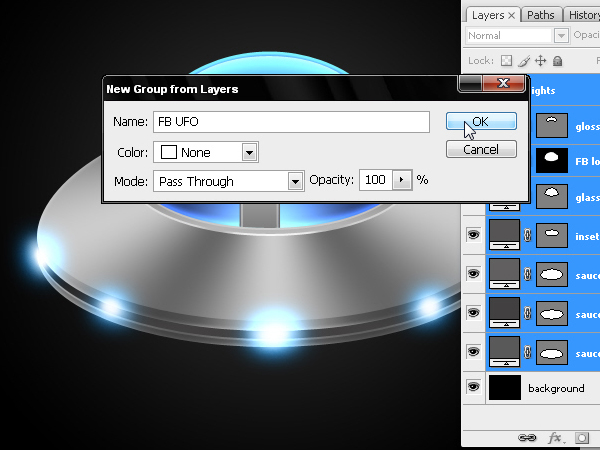
Name the folder.


Step 43

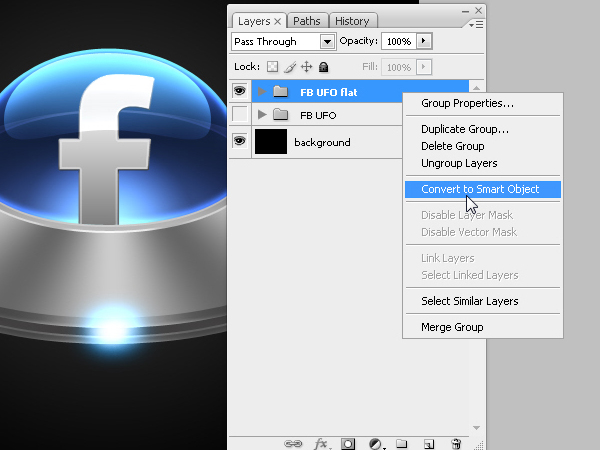
Duplicate the folder to keep a safe copy of your work.


Step 44

Convert the group into a Smart Object or select the option Merge Groups. The aim is to have the whole UFO on one layer so we can reduce the size without affecting the proportion of the layer styles.


Step 45

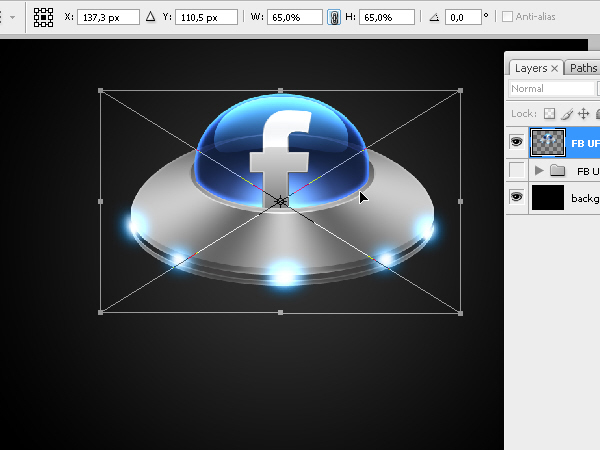
Reduce the UFO to 65% of its original size and place it as shown below.


Step 46

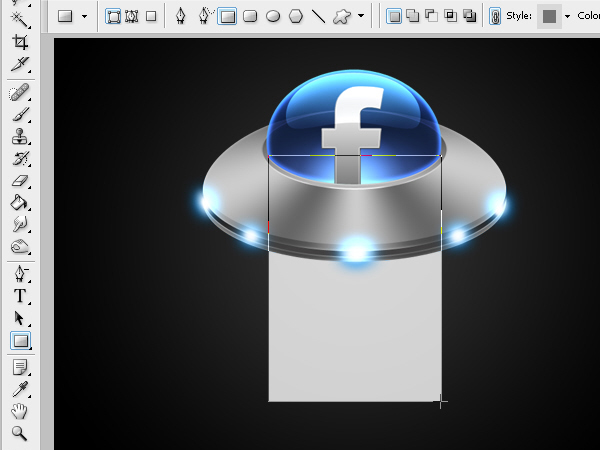
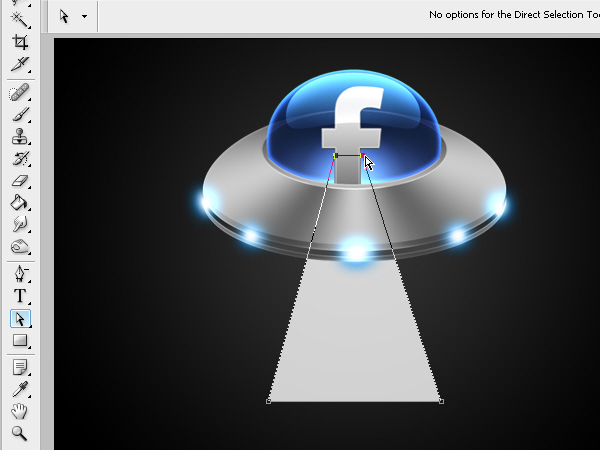
Now create the ray of light that the UFO will project onto the floor. To do this, draw a rectangular shape layer with the same width as the dome.


Step 47

Edit the anchor points of the shape layer as shown below.


Step 48

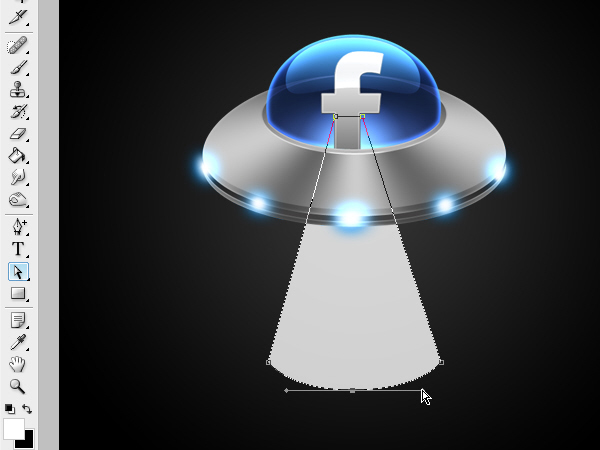
Add an anchor point to make a curve as shown below.


Step 49

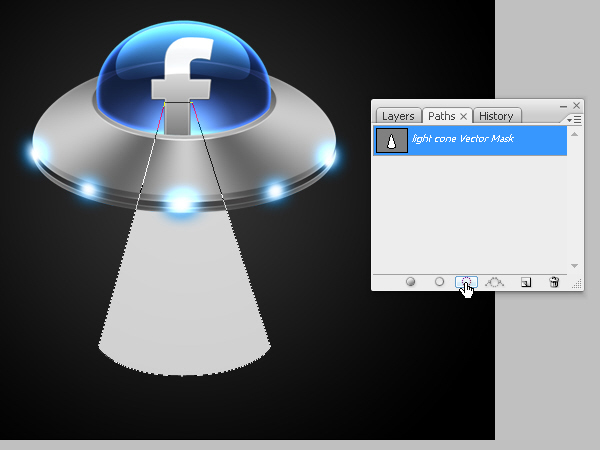
Convert the vector into a selection using the Paths Palette.


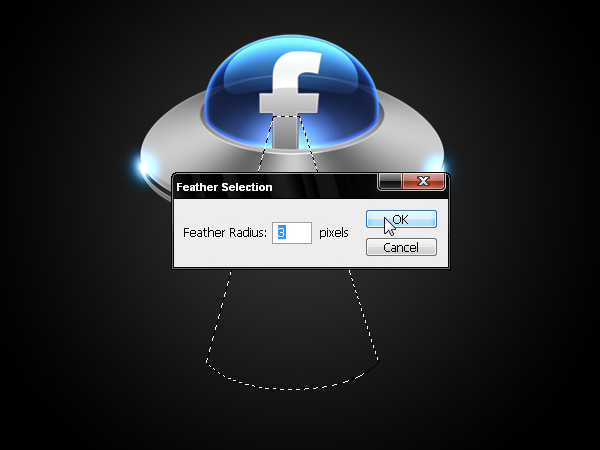
Step 50

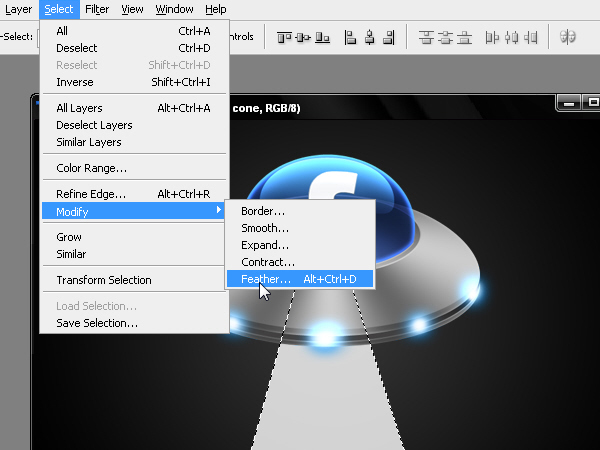
Soften the selection by going to Select > Modify > Feather.


Step 51

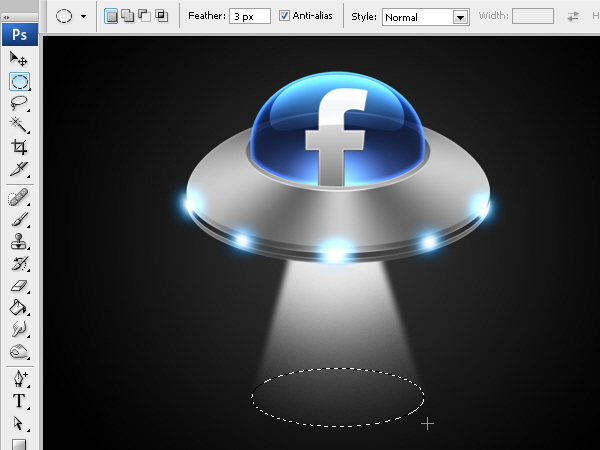
Set the Feathering to 3 px.


Step 52

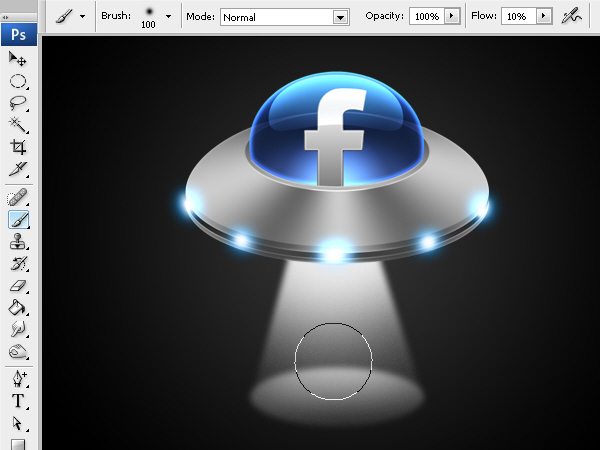
Paint inside the selection with more intensity near the source of light (the UFO). And with the same softened selection technique, paint the floor of the scene.


Step 53

Now add light to the floor.


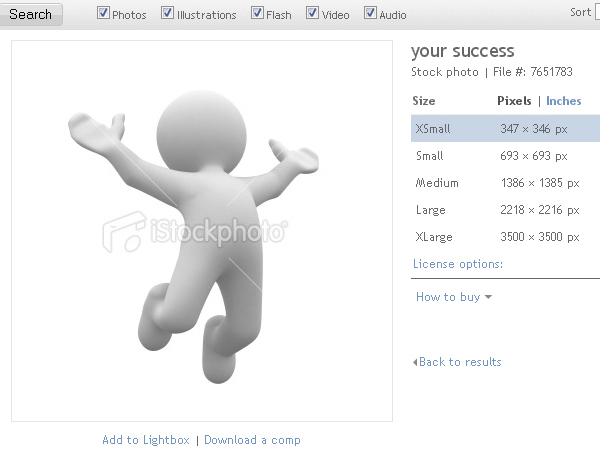
Step 54

Add the following image to our artwork. Or find another one that you feel appropriate.


Step 55

Cut it out from its background and reduce its size as shown below.


Step 56

Create a shadow of the character by duplicating, inverting, blurring, and distorting it as shown below.


Step 57

Download this font and include it in our composition.


Conclusion

For some finishing touches, apply a drop shadow to our text with the color set to #0099FF and its blending mode set to screen. Then add an Outer Glow with its Blending Mode set to Linear Dodge. For the Background, paint a blue glow to give the icon more visual appeal.

Wearable Letterform: a Typographic Form for Ephemeral Messages

Say it loud: How to publicly display messages in a highly visible way, without doing anything illegal? Say it fast: Messages evolve in a perpetual flux. If you take the example of a poster or a title in a newspaper, their context is permanently shifting: who the audience is, where it is read from, what the weather is like, what the buzz of the precise moment is. A static printed message cannot adapt to a changing situation and is bound to obsoleteness. How can we display a physical message while keeping it flexible enough so that it can reflect on its context? Interested, read on!


Message as Flux

This work followed a series on ephemeral letterform: lettering that spelled words becoming less and less relevant as they faded.

The idea this time wasn’t anymore to devise ephemeral letterform, but letterform for the ephemeral. This question of embedding the notion of temporariness in the form of the message soon became an exploration of possible typographic forms for impermanent messages.

It had to be flexible enough to keep the message relevant and up to date as its context changed, while having the visual presence of a giant billboard. The idea was to find a way to publicly display messages in a highly visible way, a bit like graffiti that could be updated, while remaining within the frame of legality.


Research: Human as a Medium

This work started with fascinating research on cases of letterform created in the immediacy of a specific space and time, while having to be highly visible. This lead my exploration to the immediate form of message-making of demonstration graphics.

The origins of this project was my encounter with a photograph taken in Nanterre, a campus near Paris, during the May 68 protests. It shows Citroën workers and students wearing huge cardboard boxes over their bodies, displaying one huge capital letter each. As they’re holding hands they form the words Nanterre and Citroën, they become the message and have to stay together for it to exist.

1

Students in Nanterre, from Massin’s Book “Letter and Image”

Individual capital letters painted directly on bodies in order to spell out giant messages as people stand next to each other is also something that has been recently seen in football stadiums. The body is the letter and therefore a fraction of the message (usually the name of a football club) in this almost tribal identification ritual.

2

At the beginning of the 20th Century, Arthur Mole (1889–1983), already used humans as graphic elements of messages in his mass photographic spectacles, sometimes using thousands of military troops to form patriotic symbols visible from a bird’s eye perspective, such as the Statue of Liberty or a portrait of President Wilson, which he then photographed. Beyond the actual performance, the idea was to parry isolationist tendencies, in particular during World War One, as each human became a dot in a grand drawing glorifying the group.

3arthur_mole

Arthur Mole, “Living Portrait of President Woodrow Wilson,” 1918.

The dissolving of individuality into unity is also the metaphor behind North Korean arranges, mass games featuring 100,000 performers who together form giant Kim Jong Il portraits and patriotic typographic messages covering entire stadiums by holding pieces of colored cards above their heads like human pixels.

4

AFP Picture

In a sort of word-based arrangement, artist Shelley Jackson “publishes” her 2095-word story one word at a time: volunteers tattoo a word that she assigns to them on their body. While a permanent tattoo is usually a celebration of individuality, these ones only make sense when put next to each other.

5Shelley_jackson

Shelley Jackson, Skin Project

This reminded me of a photograph I had seen years before at Palais de Tokyo in Paris. Equally using tattoo as a denial of individuality, but also humanity, Spanish artist Santiago Sierra paid six unemployed young Cubans thirty dollars to take part in his installation titled “250 cm line tattooed on six paid people.” While this installation points out the imperialist power of money, it also uses the indelible mark of tattoo as a metaphor for social determinism in poor countries.

The use of people’s body as a display medium in exchange for money has been a fairly common vision in the streets of London for almost two hundred years. Using the human body as a message display facility is a way of evading a tax on advertising by making it mobile, but also by using the humanity of the subject and its “freedom of speech” as a legal argument.

7

Sketches by George Scharf. Article by u75 editor, Sept 2004 and Sandwich Man

The flexibility of this casual form of communication, combined with the performative potential of togetherness, provided the right components to start thinking of a malleable letterforms expressing the ephemeral message.

10

Jesus YMCA


Wearable Typography

This lead me to experiment with wearable typography. I first worked on a series of three day-glow and black tee shirts, each with a slightly different pattern that displays different highly visible letters when seen from a distance, providing that the wearer places his arms in a specific way.

11Amandine_Alessandra

Amandine Alessandra, sketch

The three patterns were instigated by the three categories of shapes I found in the Latin alphabet (at least when using both capital and non capital letters): letters that could be drawn by shoulders and arms (A, B, C, D, E, G, I, J, K, O, R, S, Z), the ones that needed more lines than the limbs could provide (F, H, M, T), and finally the ones that only needed the shape of the arms (K, N, U, V, W, X, Y).

Amandine_Alessandra

Amandine Alessandra, sketch

13Amandine_Alessandra

Amandine Alessandra, photo

The idea was that when wearing these t-shirts, a group of people could form and display a word or a statement. But what was really special about this mode of communication was that because a single person could mimic a whole set of letters, the message could change, from one movement to another. Off course at this stage this flexibility was slightly jeopardized by the fact that one single t-shirt couldn’t be used to make every letter.

14Amandine_Alessandra

Amandine Alessandra: “Wearable Letterform Alphabet”

15Amandine_Alessandra

Amandine Alessandra, “Type should move”

I finally managed to make to gain in flexibility by replacing the t-shirt with a bolero: a pair of day-glow sleeves attached together by a strip of fabric that could be worn across the front or the back of the wearer.

This new pattern allowed the wearer to become any letter or number in a small move, and to comment on situations as they happened. As such, a group of individuals standing in a public place would be able to spell out a series of comments by becoming different letters, one word at the time, a bit like an analogic form of tweet (as in Twitter) that would involve a group of people rather than an expression of individuality.

As the motive for this research was to find ways of displaying highly visible messages in public places, the malleability of this letterform encouraged me to use it as a tool for typographic performances.


Writing the Ephemeral

17Amandine_Alessandra

Amandine Alessandra, photo

This experiment took place in a busy train station in London during rush hour, in order to reflect the flow characteristic of the place. It involved eight people mimicking a digital clock in real time with their arms and shoulders. Standing in line side by side in the middle of the station, two of them acted as the hours units, two for the minutes, and another two for the seconds. The two other performers were acting as the colons separating each unit of time. A digital re-creation of this project is visible on this address: letterform for the ephemeral.

The wearable letterform, with its specific flexibility, allowed the message (in this case time) to change from one second to the other, following more or less accurately the ticking of the station’s clock.

The numbers each of the performers enacted were enhanced by the day-glow long-sleeved boleros, which besides making them visible, also echoed the yellow of the train schedule boards above them.

Used in this specific context and by using people as a medium, this temporary letterform confronts the economic value of time (as in time is money) with the individual perception of it.

The final outcome of this experiment is its recording, in the form of a set of photographs fixing the message in the time, space and audience (commuters in a rush) it was addressed to. The letterform was contextual at the actual moment it was mimicked. What is left is a trace of it, as the message displayed (the time the photograph was taken) will not be accurate anymore when looking at the photograph. What was achieved with this latest experiment of wearable type was a letterform to express the here and now. Although I’ve produced a series of alphabets by having people performing in front of the camera, resulting in quite strong images, I do believe that the wearable letterform finds its raison d’être when used in real time.


Conclusion

Despite not using the most legible letterform, the experiment at Liverpool Street Station did interrupt the crowd flow and raised curiosity, as people tried to understand what we were trying to sell or protest against.

Although this letterform was devised as a rather conceptual research, an attempt to write the unwritable, time flow, I soon became aware that this approach of typography as a malleable and adaptive mean could easily be used as a commercial or critical medium, or, in other words, in advertising and protests, as guerilla interventions.

Besides its eye-catching form, this kind of message display requires an effort to be deciphered. The relative freedom of interpretation left to the audience reinforces the impact of the message: it establishes a dynamic relationship with its receivers by psychologically engaging them, instead of limiting it to one single passive understanding.


The Photographer’s Guide to Hong Kong

Today, Phototuts+ will serve as your complimentary location scouting guide. We’ll travel to Hong Kong and learn a little about its culture and history as we explore both beautiful and forlorn areas through photography.

flickr photo

Understanding the Country

Before we dive into example images and suggest a few places to shoot, it’s good to start with some information about the country itself. It might seem that some of this doesn’t really relate to your camera, but don’t be so quick to dismiss it’s importance. Understanding a country’s demographic, economy and culture is an important first step.

You’ll be a more enlightened photographer if you’re able to appreciate the wider picture – not just what you can see through your lens.


Location and Population

Hong Kong is a 426 square mile land mass nestled on the southern coast of China. Roughly six times the size of Washington, DC, Hong Kong contains 733 km of coastline and is a quite mountainous region with lowlands in the north.

flickr photo

Hong Kong is home to well over 7,000,000 inhabitants, 75% of which are between 15-64 years old with a roughly equal distribution of males to females and an average life expectancy of over 80 years.

The population is 95% Chinese, 1.6% filipino, 1.3% Indonesian and 2.1% everything else. The literacy rate in Hong Kong is fairly high and sits above 96% with education comprising 3.9% of its overall GDP.

The literacy rate is slightly higher among men that women, likely due to the fact that Hong Kong is still a fairly male-dominant society. By the late 90s, less than 5% of working women were in administrative and managerial jobs (source).

flickr photo

Economy

Hong Kong has a rapidly growing free market economy that was hit heavily by the global recession but is recovering quickly with the help of increased operations with China. It remains one of the world’s leading international financial centers.

Hong Kong is one of the most densely populated locations on the planet, but its GDP per capita is only slightly lower than that of the United States ($42,700 vs. $46,400) and its unemployment rate was actually lower as of 2009 (5.3% vs. 9.3% in the U.S.).

Many argue that overpopulation and poverty are not as directly related as you might think. Hong Kong, Singapore and Taiwan are all quite densely populated and yet are highly prosperous and sit among the richest nations in Asia (source).

Others claim that despite having a fairly high GDP per capita, Hong Kong’s income disparity is much higher than many developing countries, which results in a thriving upper class but destitute lower class.

flickr photo

The primary economic driver in Hong Kong is its bustling service industry (hotels, restaurants, etc.) which accounted for over 90% of its GDP in 2009. Other important sectors include the financial industry (21.4% of the labor force) and community and social services (19.7% of the labor force).

flickr photo

(All stats above from CIA World Factbook)


Culture

Hong Kong’s inhabitants participate in an interesting mix of modern business practices and ancient Chinese concepts such as feng shui. Both intellectual professionalism and reverent spirituality are taken very seriously and play equally vital roles in their culture.

flickr photo

The area is very much a major center for entertainment and performing arts and boasts world renowned museums, art collections, parks, and performance halls.

flickr photo

Great Shooting Locations

Now that we’ve learned a bit about Hong Kong’s people and economy, let’s explore why you would want to travel there as a photographer.

The diverse landscape and towering skylines offer infinite possibilities for amazing shooting locations. Below we’ll take a brief look at some of Hong Kong’s hottest tourist spots that top the lists of many photographers who visit the area.

Victoria Harbour

flickr photo

Shown above, Victoria Harbour is situated near the center of Hong Kong’s densest urban areas and offers one of the most beautiful views of the city.

The breathtaking site is home to various light shows, fireworks displays and television broadcasts every year.

Ocean Park

flickr photo

Ocean Park is a major theme park with roller coasters, ferris wheels, and more than 4,000 kinds of tropical fish. The park received over 15,000,000 visitors in 2007/2008 making it the 15th most visited theme park in the world.

Tung Choi Street

flickr photo

Tung Choi Street (aka Ladies’ Street) is home to one of the most famous street markets in Hong Kong. Products of all kinds are for sale and haggling is encouraged. This is a prime location for snagging some perfect lifestyle shots.
Stanley

flickr photo

Stanley is a peninsula on the southeastern part of Hong Kong Island. It has a well-known open air market and plenty of bars and restaurants along the coast. As you can see in the pic above there are some excellent natural locations perfect for a beach-side shoot.


25 Amazing Shots from Hong Kong

Now that you know a little about Hong Kong and have a good start on a list of places to shoot. Here are twenty-five more reasons to book your flight.

Hong Kong Panoramic

flickr photo

Chanel Mobile Art Hong Kong

flickr photo

Hong Kong Orange

flickr photo

Beautiful Hong Kong

flickr photo

Hong Kong #33 prescan

flickr photo

Hong Kong from the peak on a summer’s night

flickr photo

Hong Kong Skyline

flickr photo

Bamboo scaffolding in Hong Kong

flickr photo

Two International Financial Centre

flickr photo

The Glass Jungle in Hong Kong

flickr photo

Alone in hong kong (On top of the Metropark Hotel)

flickr photo

Hong Kong Taxi – Tilt-Shift

flickr photo

Autonomiczny region Chin

flickr photo

Hong Kong B & W

flickr photo

Life in Hong Kong never stops

flickr photo

Hong Kong Botanical Garden, Marie-Félicité w/Bigsis, about 1912

flickr photo

Young Mother Carrying A Child On Her Back In The Market, Hong Kong Island [c1946]

flickr photo

Hong Kong Facade

flickr photo

Hong-Kong, human hive

flickr photo

Anyone Need A Ride?

flickr photo

toyway bay, hong kong

flickr photo

K_iwi

flickr photo

HSBC Foyer HDR [Explored]

flickr photo

live in square #2

flickr photo

Living in circle

flickr photo

Share Yours!

To wrap up, Hong Kong is an amazing and nearly unbeatable place to take a photography expedition. From busy cities to beautiful landscapes, smiling faces to exotic animals, this magical place has almost every different kind of great photo shoot opportunity you could ask for. So stop buying a equipment for a while and start saving for an unforgettable journey.

Have you ever been to Hong Kong? If so, post some of your best pics below so we can all take a look. Be sure to let us know where you took them and how you liked your trip.

63 Handwritten Fonts

You never know when an instance might pop up when you need to use some handwritten fonts in your productions… maybe a note Mocha-tracked to a fridge? Or possibly replacing the chalk text on a chalkboard? All of them are free to download so go nuts!

Kraboudja

Caitlyn

Scribulous Scrawlin’

Aleia

Skinny Black

Tommy’s First Alphabet

Oilhand

People Are People

Nymphont

Hans Hand

Big Mister C

Sexy Sara

As I Lay Dying

Scratch Kit

Love Moi

Lovitz

Salamander

Acki Preschool

Gorillaz

Note This!

Like Giselle?

Kids First Print Font

Mskitokilla

Cat’s Awesomely Awesome Font

Simpsons

Luna

J.D. Handcrafted

Ah the monster is comming

Julies

Eltops

Honey I Stole Your Jumper

Harrison

Joe Hand

Ma Sexy

Promised Freedom

Hannahs Messy Handwriting

Jules Hand

Curly Joe

Ashley

Ammy’s Handwriting

Popstar Autograph

Cutie Pop

Burst My Bubble

Christopher Hand

Two Turtle Doves

Designer Notes

Dali

Journal

Sketch Rockwell

Jellyka – Estrya’s Handwriting

Sweetie Pie

Imitation

Hand of Sean

Aerofoil

Rickman Script

Brook 23

Penciledinh

Sgt. Portfolio

Analgesics

Later On

Soylent Black

Arthritical

le Grand Saut

If you enjoyed this post, please give it a vote on Digg or a stumble to say thanks!


From Paula Scher to Wilco: Illustrative Lettering as Cultural Storytelling


Illustrative lettering, by definition, lives at the beautiful intersection of typography and illustration. It blends the aesthetic sensibility of the type designer with the creative edge of the artist and the narrative magic of the storyteller. This latter property is incredibly important, particularly in understanding the broader cultural and social relevance of illustrative lettering as a tool of self-expression and a storytelling medium.

Continue reading “From Paula Scher to Wilco: Illustrative Lettering as Cultural Storytelling”