Creative Illustrative Lettering Challenge – Part 1


This session we proposed a challenge to two illustrators. We asked each of them to take our own “tuts+” brand name and illustrate it with a creative lettering solution. Learn how each of them went about solving this, and the concepts they worked with to bring about the final work. In this Part 1 of this challenge, we’ll look at Wojciech Pijecki’s solution and how he combines expressive and abstract concepts, with lots of colorful elements, transforming this brief into a vibrant work of art.


About this Challenge

Inspiration for doing this challenge came from the awesome “tuts+” solution presented in the post PsdTuts+ Presents: Exclusive Wallpapers By Tim and Bram Vanhaeren. We decided to give two illustrators a creative illustrative lettering challenge that involved illustrating the “tuts+” name.

Let’s take a closer look at the brief and then look at the solution from Wojciech Pijecki here on Psdtuts+. In part two we’ll look at how Jacob Bian solved the same brief with a more 3D feel over on Cgtuts+.


Creative Brief for this Challenge

For this challenge, we kept the brief simple, which would allow for the illustrators to really go in a creative direction that inspires them:

Take the name “tuts+” and illustrate it creatively with an illustrative lettering solution. For the theme we’d like to show creativity being released or realized.

We also sent along some basic formatting requirements as well: “For format it should be made reasonably large scale, but display well at 600px wide. We’ll then link to the larger version for viewers to see. Also, please include a written description of how you solved the creative brief and present your solution.”


Wojciech Pijecki’s Solution

tutsplus_final

Wojciech’s Description of His Creative Solution

I wanted to create expressive abstraction, combining simple type treatment with lots of various elements. The first step to solve the brief was proper preparation. Before anything started, I took the theme and searched for the best resources. As it says “lettering,” I decided that the font must be pretty neat and mixable with some abstract elements. Also, as the topic says “illustrative,” there must be something eye-catching besides the lettering. So here was the preparation solved: good brushes, textures and font.

It’s worth remembering, when speaking about a creative solution, one thing is sure: the design has to be noticeable, eye-catching and spectacular.

It’s never easy to get the idea “how should it look like.” Sometimes it just hits your head right after reading the brief and design theme. But anyway, everything goes around experimenting with different elements, shapes, positions, etc. until you get the right feeling that it is it. In this particular project I started by typing the name “tuts+,” positioning it and discovering a good background. It’s way easier in the first stages of creating a project, when you at least can create your background halfway, as then you can see how the letters are working in the illustration.

As said, in the beginning I set my direction that this design will be something expressive and abstract, so this means lots of elements and some vibrant colors. It’s very hard to maintain mass elements without hurting the lettering. So either you make the letters filled with abstraction and the rest of design remains calm, or you leave the lettering very simple and the rest of design is massive.

I’ve gone a little beyond this, as I created a mass of swirly shapes, combined them with letters and gave the text also a little bit of a swirly touch. For this particular case I mixed lettering with drawing and some photo manipulation. And to make the lettering stand out just a little bit, I gave it a “lighter” feeling than all the abstract surrounding elements, using less colors, less shapes and less saturation. So, though the lettering is nicely blended with the swirls, it’s still visible, and everything remains massive.

Beside text and swirls I spread lots of small elements all over the project illustration for more balance. It’s very important not to overload your project, so this should be a careful process. All the elements including lettering were positioned obliquely to make it feel more dynamic. I also used a non-centered composition (the lettering moved more to the side) to give some variety to the composition.

So this way the brief was solved and executed. It’s worth remembering, when speaking about a creative solution, one thing is sure: the design has to be noticeable, eye-catching and spectacular.


Memories Competition Winner

After several thousand votes, we’ve narrowed down a few hundred entries to one winner! Read on to find out who will be receiving the prize, and how you can help us ensure our next competition is even better.


The Winner

Congratulations are in order to our winner, Alireza Yaghoubi, with the following image. We’ll be in touch soon with details on how to claim your prize!

Shells thrown into the sea travel far to the horizons and after years, I still come back every evening, in hope of finding the shell I have thrown into the sea , so to revive the old memories of mine!


POLL: How should winners be chosen in future?

For our first major competition, we decided that running a user vote would be the fairest way to decide upon the best images. This has had it’s pros and cons, and there are a couple of other options we’re exploring for future competitions.

I’d love to hear your thoughts on this, so we’ve put together a quick poll that you can vote on here:

How should we judge the next Phototuts+ competition?Market Research

If you’d like to send us any feedback on the competition (or advice for future ones), I’d love to hear it. Just send an email to [email protected]!


Thanks for Entering!

Once again, a big thank you to everyone who took the time to enter the competition. I really enjoyed looking through all the entries, and we really do have a community of exceptional photographers!

2 New Premium Tutorials: Refinery and Modernizr


This week, we have two excellent new Net Premium tutorials for our members. First, Glenn Goodrich will teach you how to work with Refinery – a Rails CMS. Next, I’ll teach you how to detect CSS3 and HTML5 support in browsers, by using the wonderful Modernizr library. Help give back to Nettuts+ by signing up for a Premium membership.


Getting Started with Refinery: A Rails CMS

Refinery is an open-source, Rails-based CMS that really attempts to use “the Rails Way” for content management. Anyone familiar with Rails will be able to pick up Refinery and be productive almost instantly. The folks over at Resolve Digital created Refinery to scratch their own itch, and then were kind enough to release it on GitHub (MIT License). Refinery has a growing set of users and developers, making it ideal if you’re just starting out with Rails-base content management systems. I’ll teach you how to get started with it!


A Video Crash-Course in Modernizr

It’s a common misconception that the JavaScript library, Modernizr, miraculously upgrades all browsers to allow for HTML5 and CSS3 support. Unfortunately, this isn’t the case. However, instead, it detects support, which provides us with a lot of power! I’ll show you how to get started today!


Join Net Premium

NETTUTS+ Screencasts and Bonus Tutorials

For those unfamiliar, the family of TUTS sites runs a premium membership service. For $9 per month, you gain access to exclusive premium tutorials, screencasts, and freebies from Nettuts+, Psdtuts+, Aetuts+, Audiotuts+, and Vectortuts+! For the price of a pizza, you’ll learn from some of the best minds in the business. Join today!

Is Facebook Productive?

With today’s privacy “simplification” announcement over at Facebook which rolls out to all users over the next few weeks (unless you’ve recently quit…or you may not see if you are going to) , it rekindled an old argument: Is there is any productive merit to the web service?

A lot of users use the site to promote their blogs (WorkAwesome included) as well as to keep touch and regain contact with old friends.  This can result in new opportunities and can be effective in keeping communication easy and centralized.  Certainly birthday greetings have become simpler to send (and remember)!

Do you still use Facebook?  If so, for what?  Is it a productivity “suck” or tool?

What Productivity Software Do You Use?

This week we’ve already looked at what methods you use to get yourself on the pathway to productivity – whether it be paper, software or web-based in nature.  As mentioned, no matter which way you go the options seem endless.  (Yes, even those who use paper have a variety of options to choose from…)

Let’s say you use a software solution.  The website Priacta has listed a ton – an exhaustive list – of productivity software solutions (and another list of web-based solutions as well) to choose from.

So, WorkAwesome readers, which one (if any) do you use…or have you used?

Why you Should be using PHP’s PDO for Database Access


Many PHP programmers learned how to access databases by using either the mysql or mysqli extensions. Since PHP 5.1, there’s been a better way. PHP Data Objects (PDO) provide methods for prepared statements and working with objects that will make you far more productive!


PDO Introduction

“PDO – PHP Data Objects – is a database access layer providing a uniform method of access to multiple databases.”

It doesn’t account for database-specific syntax, but can allow for the process of switching databases and platforms to be fairly painless, simply by switching the connection string in many instances.

PDO - db abstraction layer

This tutorial isn’t meant to be a complete how-to on SQL. Its written primarily for people currently using the mysql or mysqli extension to help them make the jump to the more portable and powerful PDO.

Database Support

The extension can support any database that a PDO driver has been written for. At the time of this writing, the following database drivers are available:

  • PDO_DBLIB ( FreeTDS / Microsoft SQL Server / Sybase )
  • PDO_FIREBIRD ( Firebird/Interbase 6 )
  • PDO_IBM ( IBM DB2 )
  • PDO_INFORMIX ( IBM Informix Dynamic Server )
  • PDO_MYSQL ( MySQL 3.x/4.x/5.x )
  • PDO_OCI ( Oracle Call Interface )
  • PDO_ODBC ( ODBC v3 (IBM DB2, unixODBC and win32 ODBC) )
  • PDO_PGSQL ( PostgreSQL )
  • PDO_SQLITE ( SQLite 3 and SQLite 2 )
  • PDO_4D ( 4D )

All of these drivers are not necessarily available on your system; here’s a quick way to find out which drivers you have:

print_r(PDO::getAvailableDrivers());

Connecting

Different databases may have slightly different connection methods. Below, the method to connect to some of the most popular databases are shown. You’ll notice that the first three are identical, other then the database type – and then SQLite has its own syntax.

Connection String
try {
  # MS SQL Server and Sybase with PDO_DBLIB
  $DBH = new PDO("mssql:host=$host;dbname=$dbname, $user, $pass");
  $DBH = new PDO("sybase:host=$host;dbname=$dbname, $user, $pass");

  # MySQL with PDO_MYSQL
  $DBH = new PDO("mysql:host=$host;dbname=$dbname", $user, $pass);

  # SQLite Database
  $DBH = new PDO("sqlite:my/database/path/database.db");
}
catch(PDOException $e) {
    echo $e->getMessage();
}

Please take note of the try/catch block – you should always wrap your PDO operations in a try/catch, and use the exception mechanism – more on this shortly. Typically you’re only going to make a single connection – there are several listed to show you the syntax. $DBH stands for ‘database handle’ and will be used throughout this tutorial.

You can close any connection by setting the handle to null.

# close the connection
$DBH = null;

You can get more information on database specific options and/or connection strings for other databases from PHP.net.


Exceptions and PDO

PDO can use exceptions to handle errors, which means anything you do with PDO should be wrapped in a try/catch block. You can force PDO into one of three error modes by setting the error mode attribute on your newly created database handle. Here’s the syntax:

$DBH->setAttribute( PDO::ATTR_ERRMODE, PDO::ERRMODE_SILENT );
$DBH->setAttribute( PDO::ATTR_ERRMODE, PDO::ERRMODE_WARNING );
$DBH->setAttribute( PDO::ATTR_ERRMODE, PDO::ERRMODE_EXCEPTION );

No matter what error mode you set, an error connecting will always produce an exception, and creating a connection should always be contained in a try/catch block.

PDO::ERRMODE_SLIENT

This is the default error mode. If you leave it in this mode, you’ll have to check for errors in the way you’re probably used to if you used the mysql or mysqli extensions. The other two methods are more ideal for DRY programming.

PDO::ERRMODE_WARNING

This mode will issue a standard PHP warning, and allow the program to continue execution. Its useful for debugging.

PDO::ERRMODE_EXCEPTION

This is the mode you should want in most situations. It fires an exception allowing you to handle errors gracefully and hide data that might help someone exploit your system. Here’s an example of taking advantage of exceptions:

# connect to the database
try {
  $DBH = new PDO("mysql:host=$host;dbname=$dbname", $user, $pass);
  $DBH->setAttribute( PDO::ATTR_ERRMODE, PDO::ERRMODE_EXCEPTION );

  # UH-OH! Typed DELECT instead of SELECT!
  $DBH->prepare('DELECT name FROM people');
}
catch(PDOException $e) {
    echo "I'm sorry, Dave. I'm afraid I can't do that.";
    file_put_contents('PDOErrors.txt', $e->getMessage(), FILE_APPEND);
}

There’s an intentional error in the select statement; this will cause an exception. The exception sends the details of the error to a log file, and shows a friendly (or not so friendly) message to the user.


Insert and Update

Inserting new data, or updating existing data is one of the more common database operations. Using PDO, this is normally a two-step process. Everything covered in this section applies equally to both UPDATE and INSERT operations.

2 to 3 step insert and update

Here’s an example of the most basic type of insert:

# STH means "Statement Handle"
$STH = $DBH->prepare("INSERT INTO folks ( first_name ) values ( 'Cathy' )");
$STH->execute();

You could also accomplish the same thing by using the exec() method, with one less call. In most situations you’re going to use the longer method so you can take advantage of prepared statements. Even if you’re only going to use it once, using prepared statements will help protect you from SQL injection attacks.

Prepared Statements

Using prepared statements will help protect you from SQL injection.

A prepared statement is a precompiled SQL statement that can be executed multiple times by sending just the data to the server. It has the added advantage of automatically making the data used in the placeholders safe from SQL injection attacks.

You use a prepared statement by including placeholders in your SQL. Here’s three examples, one without placeholders, one with unnamed placeholders, and one with named placeholders.

# no placeholders - ripe for SQL Injection!
$STH = $DBH->("INSERT INTO folks (name, addr, city) values ($name, $addr, $city)");

# unnamed placeholders
$STH = $DBH->("INSERT INTO folks (name, addr, city) values (?, ?, ?);

# named placeholders
$STH = $DBH->("INSERT INTO folks (name, addr, city) value (:name, :addr, :city)");

You want to avoid the first method – its here for comparison. The choice of using named or unnamed placeholders will affect how you set data for those statements.

Unnamed Placeholders

# assign variables to each place holder, indexed 1-3
$STH->bindParam(1, $name);
$STH->bindParam(2, $addr);
$STH->bindParam(3, $city);

# insert one row
$name = "Daniel"
$addr = "1 Wicked Way";
$city = "Arlington Heights";
$STH->execute();

# insert another row with different values
$name = "Steve"
$addr = "5 Circle Drive";
$city = "Schaumburg";
$STH->execute();

There are two steps here. First, we assign variables to the various placeholders (lines 2-4), then we assign values to those placeholders and execute the statement. To send another set of data, just change the values of those variables and execute the statement again.

Does this seem a bit unwieldy for statements with a lot of parameters? It is. However, if your data is stored in an array, there’s an easy shortcut:

# the data we want to insert
$data = array('Cathy', '9 Dark and Twisty Road', 'Cardiff');

$STH = $DBH->("INSERT INTO folks (name, addr, city) values (?, ?, ?);
$STH->execute($data);

That’s easy!

The data in array applies to the placeholders in order. $data[0] goes into the first placeholder, $data[1] the second, etc. However, if your array indexes are not in order, this won’t work properly and you’ll need to re-index the array first.

Named Placeholders

You could probably guess the syntax, but here’s an example:

# the first argument is the named placeholder name - notice named
# placeholders always start with a colon.
$STH->bindParam(':name', $name);

You can use a shortcut here as well, but it works with associative arrays. Here’s an example:

# the data we want to insert
$data = array( 'name' => 'Cathy', 'addr' => '9 Dark and Twisty', 'city' => 'Cardiff' );

# the shortcut!
$STH = $DBH->("INSERT INTO folks (name, addr, city) value (:name, :addr, :city)");
$STH->execute($data);

The keys of your array do not need to start with a colon, but otherwise need to match the named placeholders. If you have an array of arrays you can iterate over them and simply call the execute with each array of data.

Another nice feature of named placeholders is the ability to insert objects directly into your database, assuming the properties match the named fields. Here’s an example object, and how you’d perform your insert:

# a simple object
class person {
    public $name;
    public $addr;
    public $city;

    function __construct($n,$a,$c) {
        $this->name = $n;
        $this->addr = $a;
        $this->city = $c;
    }
    # etc ...
}

$cathy = new person('Cathy','9 Dark and Twisty','Cardiff');

# here's the fun part:
$STH = $DBH->("INSERT INTO folks (name, addr, city) value (:name, :addr, :city)");
$STH->execute((array)$cathy);

By casting the object to an array in the execute, the properties are treated as array keys.


Selecting Data

Fetch data into arrays or objects

Data is obtained via ->fetch(), a method of your statement handle. Before calling fetch, its best to tell PDO how you’d like the data to be fetched. You have the following options:

  • PDO::FETCH_ASSOC: returns an array indexed by column name
  • PDO::FETCH_BOTH (default): returns an array indexed by both column name and number
  • PDO::FETCH_BOUND: Assigns the values of your columns to the variables set with the ->bindColumn() method
  • PDO::FETCH_CLASS: Assigns the values of your columns to properties of the named class. It will create the properties if matching properties do not exist
  • PDO::FETCH_INTO: Updates an existing instance of the named class
  • PDO::FETCH_LAZY: Combines PDO::FETCH_BOTH/PDO::FETCH_OBJ, creating the object variable names as they are used
  • PDO::FETCH_NUM: returns an array indexed by column number
  • PDO::FETCH_OBJ: returns an anonymous object with property names that correspond to the column names

In reality there are 3 that will cover most situations: FETCH_ASSOC, FETCH_CLASS, and FETCH_OBJ. In order to set the fetch method, the following syntax is used:

$STH->setFetchMode(PDO::FETCH_ASSOC);

You can also set the fetch type directly within the ->fetch() method call.

FETCH_ASSOC

This fetch type creates an associative array indexed by column name. This should be very familiar to anyone who has used the mysql/mysqli extensions. Here’s an example of selecting data with this method:

# using the shortcut ->query() method here since there are no variable
# values in the select statement.
$STH = $DBH->query('SELECT name, addr, city from folks');

# setting the fetch mode
$STH->setFetchMode(PDO::FETCH_ASSOC);

while($row = $STH->fetch()) {
    echo $row['name'] . "\n";
    echo $row['addr'] . "\n";
    echo $row['city'] . "\n";
}

The while loop will continue to go through the result set one row at a time until complete.

FETCH_OBJ

This fetch type creates an object of std class for each row of fetched data. Here’s an example:

# creating the statement
$STH = $DBH->query('SELECT name, addr, city from folks');

# setting the fetch mode
$STH->setFetchMode(PDO::FETCH_OBJ);

# showing the results
while($row = $STH->fetch()) {
    echo $row->name . "\n";
    echo $row->addr . "\n";
    echo $row->city . "\n";
}

FETCH_CLASS

The properties of your object are set BEFORE the constructor is called. This is important.

This fetch method allows you to fetch data directly into a class of your choosing. When you use FETCH_CLASS, the properties of your object are set BEFORE the constructor is called. Read that again, its important. If properties matching the column names don’t exist, those properties will be created (as public) for you.

This means if your data needs any transformation after it comes out of the database, it can be done automatically by your object as each object is created.

As an example, imagine a situation where the address needs to be partially obscured for each record. We could do this by operating on that property in the constructor. Here’s an example:

class secret_person {
    public $name;
    public $addr;
    public $city;
    public $other_data;

    function __construct($other = '') {
        $this->address = preg_replace('/[a-z]/', 'x', $this->address);
        $this->other_data = $other;
    }
}

As data is fetched into this class, the address has all its lowercase a-z letters replaced by the letter x. Now using the class and having that data transform occur is completely transparent:

$STH = $DBH->query('SELECT name, addr, city from folks');
$STH->setFetchMode(PDO::FETCH_CLASS, 'secret_person');

while($obj = $STH->fetch()) {
    echo $obj->addr;
}

If the address was ‘5 Rosebud’ you’d see ‘5 Rxxxxxx’ as your output. Of course there may be situations where you want the constructor called before the data is assigned. PDO has you covered for this, too.

$STH->setFetchMode(PDO::FETCH_CLASS | PDO::FETCH_PROPS_LATE, 'secret_person');

Now, when you repeat the previous example with this fetch mode (PDO::FETCH_PROPS_LATE) the address will NOT be obscured, since the constructor was called and the properties were assigned.

Finally, if you really need to, you can pass arguments to the constructor when fetching data into objects with PDO:

$STH->setFetchMode(PDO::FETCH_CLASS, 'secret_person', array('stuff'));

If you need to pass different data to the constructor for each object, you can set the fetch mode inside the fetch method:

$i = 0;
while($rowObj =  $STH->fetch(PDO::FETCH_CLASS, 'secret_person', array($i))) {
    // do stuff
    $i++
}

Some Other Helpful Methods

While this isn’t meant to cover everything in PDO (its a huge extension!) there are a few more methods you’ll want to know in order to do basic things with PDO.

$DBH->lastInsertId();

The ->lastInsertId() method is always called on the database handle, not statement handle, and will return the auto incremented id of the last inserted row by that connection.

$DBH->exec('DELETE FROM folks WHERE 1');
$DBH->exec("SET time_zone = '-8:00'");

The ->exec() method is used for operations that can not return data other then the affected rows. The above are two examples of using the exec method.

$safe = $DBH->quote($unsafe);

The ->quote() method quotes strings so they are safe to use in queries. This is your fallback if you’re not using prepared statements.

$rows_affected = $STH->rowCount();

The ->rowCount() method returns an integer indicating the number of rows affected by an update, insert or delete – it does not work with select. To get the number of rows from a select you’d have to do the following:

$sql = "SELECT COUNT(*) FROM folks";
if ($STH = $DBH->query($sql)) {
    # check the row count
    if ($STH->fetchColumn() > 0) {

    # issue a real select here, because there's data!
    }
    else {
        echo "No rows matched the query.";
    }
}

Conclusion

I hope this helps some of you migrate away from the mysql and mysqli extensions. What do you think? Are there any of you out there who might make the switch?

Open for Business: Google Wave

Last week, Google announced that its real-time collaborative service Google Wave would now be available to all.  No more waiting for invites.

The question is: Was anyone really waiting for an invite anymore?

Is Google Wave all that it’s cracked up to be?  Is it a productivity “suck” or a productivity enhancer?  If you use Google Wave, what do you use it for?  Will it replace email?  We’d love to hear your feedback on this once highly-touted service.

Create a Snappy Snapshot App with Flash Builder 4

There are many sites where you can choose your profile image by taking a picture with your webcam, instead of uploading one. This tutorial will teach you how to take a picture and do whatever you want with it, using Flash Builder 4 with Ruby on Rails or PHP.


Final Result Preview

Click on the demo link above, but bear in mind that you won’t be able to use the ‘Save’ function unless you run it yourself on a server which supports PHP. You can “Right click > View source” to see the application source.


Step 1: Flash Builder 4 Considerations

In order to take full advantage of this tutorial, it’s recommended that you already know some of the new features of Flash Builder 4, like the new namespaces and components. Also, you’ll need Flash Builder 4 to run the source code without having to change anything.

Flex 3 users: don’t worry, you can still follow this tutorial. You’ll need to change all the “fx” and “s” namespaces to “mx”, example: “<s:Button>” becomes “<mx:Button>”. The “Declaration” tag does not exist (write what’s inside it, outside). “Group” and “BorderContainer” will be “Canvas”. “VGroup” will be “VBox”. “HGroup” will be “HBox”. And there is no “chromeColor” (you will need to style the button differently).


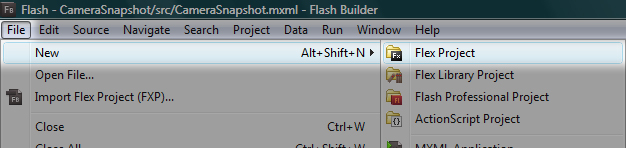
Step 2: Create a New Flex Project

First of all, we need to create a new Flex Project. Open Flash Builder 4 and click “File > New > Flex Project”.

Run the application

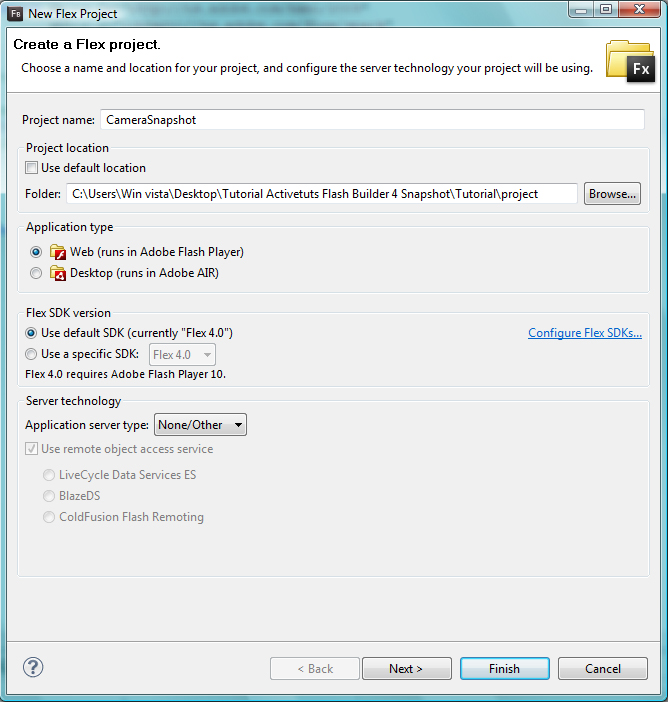
The following dialog will open:

Run the application

Choose a “Project Name”: in our case it will be “CameraSnapshot” but you can use whatever you want. You can also set the "Project location" to anywhere you want. As it will run in the browser, we will leave “Web” checked. We will use the default SDK version and we won’t choose any server technology.

Hit Next.

Run the application

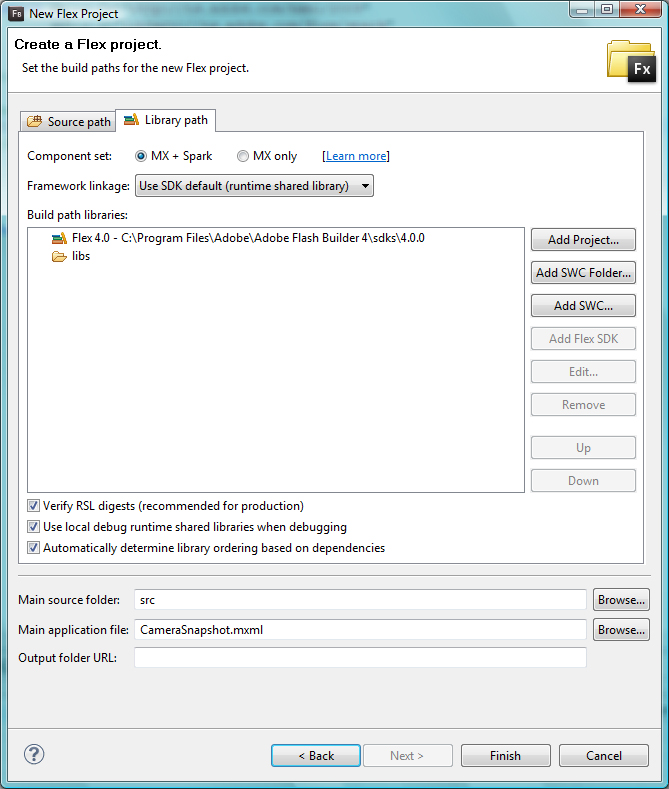
We won’t change anything here, hit Next.

In this following step we will also use the default settings, so click Finish:

Run the application

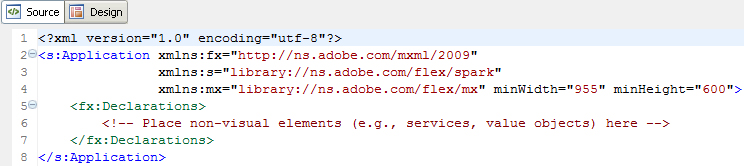
Our project has been created. This is a fresh new Flash Builder 4 app!

Run the application

Step 3: Create an ActionScript File

We will have an external ActionScript file that will perform all the logic for us.

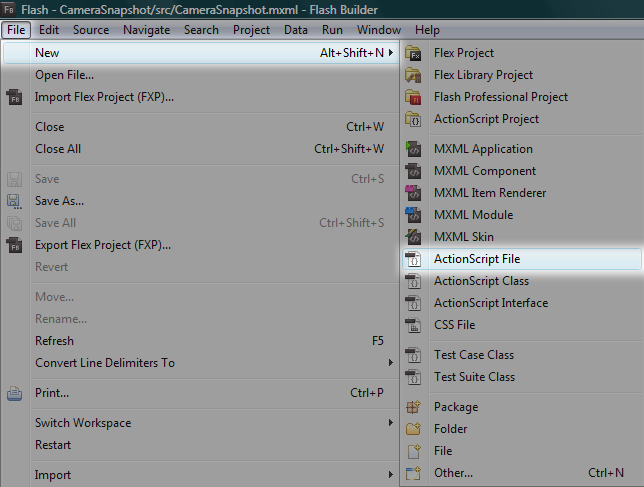
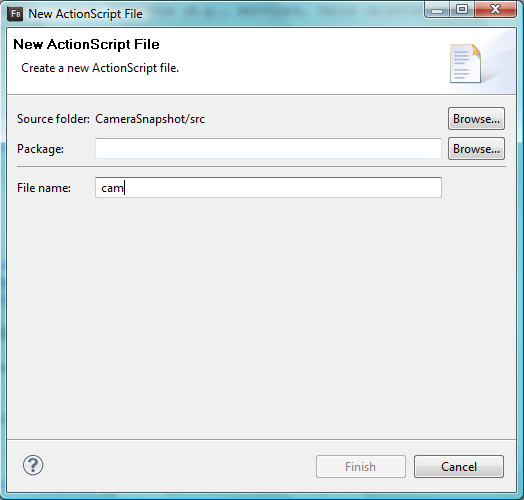
Create a new ActionScript file: File > New > ActionScript File

Run the application

Give it a name, we’ll choose: "cam" but again, it can be whatever you want:

Run the application

You can leave the “Package” blank. Hit Finish. Now let’s start coding!


Step 4: Camera Placeholder

Now that our project has been created, we’ll need a place to display our camera. Lets add a VideoDisplay to our CameraSnapshot.mxml file, after the "Declarations" tag:

<mx:VideoDisplay id="theCam" width="533" height="400"/>

The id is important because that’s how we refer to this specific VideoDisplay.

You may change the width and height of the VideoDisplay to anything you want, but remember to keep a 4:3 aspect ratio to avoid image distortion. Unless you are dealing with a specific case.

Also, notice that we’ve used the “mx” namespace prefix instead of “s”. If we use the “s” namespace prefix here, Flash Builder will throw an error when we try to use the method “attachCamera”. We will see this method in the next step.


Step 5: Getting the Camera

Now that we have place to display the user’s camera, let’s get it! Create a new function inside the file cam.as:

private function getCam():void
{
	if (Camera.getCamera())
	{
		// assign the user's default camera to a variable
		var camera:Camera = Camera.getCamera();

		// set the camera quality to be the highest as possible
		camera.setQuality(0, 100);	

		// set the width, height, frames per second
		camera.setMode(theCam.width, theCam.height, 30);	

		// attach the camera to our "theCam" VideoDisplay
		theCam.attachCamera(camera);
	}	

    else
	{
		//add your own method to tell the user his problem
	}	

}

Notice that we have a conditional: we will only move on if we can get at least one camera from the user. Next, we called it “camera” for convenient purposes and configured it in the next few lines.

In camera.setMode, you should understand “theCam.width” as “the width of our VideoDisplay”. In Flex, this is called Data Binding. In plain english: “the width and height of the ‘camera’ will always and automatically be the same width and height of the ‘theCam’”. So, if you decide to change the size of the VideoDisplay later, the camera’s size will change automatically.

After getting and configuring our camera, we attach it to our “theCam”. It tells our VideoDisplay what to display.


Step 6: Displaying the Camera

Lets import our cam.as to our CameraSnapshot.mxml file, otherwise we won’t have access to the function we just made:

<fx:Script source="cam.as"/>

If you saved your “cam.as” in a different folder, just add the folder name before “cam.as”, for instance: “different_folder/cam.as”

Now we need to tell our application to actually run this function. We’ll add a “creationComplete” method calling “getCam();” inside the opening “Application” tag. It means that our camera will be displayed as soon as the application is completely created:

  <s:Application xmlns:fx="http://ns.adobe.com/mxml/2009" 
                    xmlns:s="library://ns.adobe.com/flex/spark" 
                    xmlns:mx="library://ns.adobe.com/flex/mx" minWidth="955" minHeight="600"
               creationComplete="getCam();">
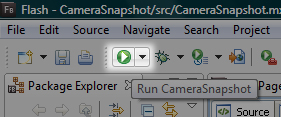
Step 7: First Run

So far, so good. Now, run the application and see yourself inside it before we move to the next step :)

Run the application

Notice: a few users, specially on a Mac, may have to change the default camera that Flash Player is getting. Inside the running app: Right click (or cmd + click) > Configurations … > Click the “webcam icon” tab below > Change it to your “real” cam.


Step 8: Layout and Positioning

In this step we’ll wrap our “VideoDisplay” tag with a “VGroup” to layout the elements that we’ll add, vertically. You’ll see it yourself later.

<s:VGroup horizontalCenter="0" verticalCenter="0">
		<mx:VideoDisplay id="theCam" width="533" height="400"/>
	</s:VGroup>

Notice the “horizontalCenter” and “verticalCenter” properties set to “0″. This means that the “VGroup” will be 0 pixels away from the center of the parent container, in our case, the whole application.

You can run the application again: resize your browser’s window and notice that you are always in the middle.


Step 9: Capture Button

In order to add our “Take a picture” button, we’ll need to wrap our “VideoDisplay” with a “Group” tag where the layout is absolute and everything is placed on top of each other (unless you position them with X and Y or place them some pixels away from the top, right, bottom or left).

Your code should look like this:

	<s:VGroup horizontalCenter="0" verticalCenter="0">
		<s:Group id="videoArea">
			<mx:VideoDisplay id="theCam" width="533" height="400"/>
		</s:Group>
	</s:VGroup>

Notice that we’ve just added the “Group” tag. It’s inside our recently added “VGroup” and wraps our well known “VideoDisplay”

Now we add the “Take a picture” button. It will appear inside a nice semi-transparent “BorderContainer” that we’ll write below our “VideoDisplay”, take a look:

			<mx:VideoDisplay id="theCam" width="533" height="400"/>

			<s:BorderContainer
				bottom="0"
				width="100%"
				backgroundColor="black"
				backgroundAlpha="0.4"
				borderColor="black"
				height="55">

				<s:Button
					id="trigger"
					horizontalCenter="0"
					verticalCenter="0"
                    label="Take a picture!"
					height="35"/>

			</s:BorderContainer>

Notice that our button area is “0″ pixels away from the bottom and it has a black semi-transparent (backgroundAlpha) background. We also added our capture button called “trigger”. It is placed right in the middle of our “BorderContainer”.


Step 10: Button Style

Add “chromeColor” and “color” to our “trigger” button and our code should look like this:

				<s:Button
					id="trigger"
					horizontalCenter="0"
					verticalCenter="0"
					height="35"
					label="Take a picture!"
					chromeColor="#33abe9"
					color="#ffffff"/>

You can run the app again and see how we’re doing.


Step 11: Picture Preview Placeholder

Now we’ll add a placeholder where we can preview the picture that we’ll take later. Write it below our “VideoDisplay” and above our “BorderContainer”.

			<s:Group id="previewBox" visible="false">
				<mx:Image id="preview" width="100%" height="100%"/>
			</s:Group>

We’ve added a “Group” called “previewBox” that wraps an “Image” called “preview”.


Step 12: Preparing for the Snapshot

Add the following code at the top of our “cam.as” file.

// ActionScript file

import flash.display.BitmapData;

import mx.graphics.codec.JPEGEncoder;
import mx.rpc.http.HTTPService;
import mx.utils.Base64Encoder;

private var bm:BitmapData;

Here we’ve just imported everything that we’ll need in order to take and send the picture to the server.


Step 13: Take a Picture!

Now it’s time to take a picture. Let’s add a function that will do it:


public function takePicture():void {       	

	//if we are not previewing any picture, we'll take one :)
	if (!previewBox.visible) {	

		//create a BitmapData variable called picture that has theCam's size
		var picture:BitmapData = new BitmapData(theCam.width, theCam.height);

		//the BitmapData draws our theCam
		picture.draw(theCam);		

		//Our preview's source is a new Bitmap made of picture's BitmapData
		preview.source = new Bitmap(picture); 

       //stores this BitmapData into another BitmapData (outside this function)
		bm = picture;			

		//makes the previewBox visible, so we can see our picture
		previewBox.visible = true;

		//change our trigger label, so the user will be able to try again
		trigger.label = "Take another picture...";

		//changes the color of the button
		trigger.setStyle('chromeColor', '#ff0000');

	}

	//if we are previewing a picture...
	else { 

		//makes the previewBox invisible
		previewBox.visible = false;		

		//changes the label
		trigger.label = 'Take a picture!'; 	

       //changes the color of the button
		trigger.setStyle('chromeColor', '#33abe9');

	}        	

}

The comments above “// (…)” will tell you what’s going on.

Now, add a “click” property inside our “trigger” button (CameraSnapshot.mxml) to call our recently created “takePicture” function:

				<s:Button
					id="trigger"
					horizontalCenter="0"
					verticalCenter="0"
					height="35"
                    label="Take a picture!"
                    chromeColor="#33abe9"
					color="#ffffff"
					click="takePicture();"/>

Run the app and Take a picture!


Step 14: Adding Cool Effects

Now we add some cool effects: when we take a picture, we’ll see a flash light. When we discard a picture, it will go away. Change the “Declarations” tag, by adding the following code:

	<fx:Declarations>
		<!-- Place non-visual elements (e.g., services, value objects) here -->		

		<mx:Fade id="flashFX" duration="550" /> 

		<s:Parallel id="discardPhoto">
			<s:children>
				<mx:Zoom
					duration="350"
					zoomWidthFrom="1.0"
					zoomWidthTo="0.01"
					zoomHeightFrom="1.0"
					zoomHeightTo="0.01"
					target="{previewBox}"/>
				<mx:Fade duration="350"/>
			</s:children>
		</s:Parallel>		

	</fx:Declarations>

The “Fade” tag will make the flash light disappear realistically. The “Parallel” tag will run the “Zoom” and “Fade” at the same time, discarding our photo with style.


Step 15: The Flash Effect

Let’s add our flash light below the “preview” Image:

				<mx:Image id="preview" width="100%" height="100%"/>

                <s:BorderContainer
					id="flashLight"
					width="100%"
					height="100%"
					hideEffect="{flashFX}"
					backgroundColor="white"
					backgroundAlpha="0.8"/>

Notice the “hideEffect” set to “{flashFX}”: when the “flashLight” becomes invisible, this effect will be triggered. Also, the “backgroundAlpha” is set to “0.8″ so our flash light is not that bright. Our flash light is just a white BorderContainer that shows up and then quickly goes away, creating the “flash” effect.

Now we just need to set the “flashLight” visible property to “true” and “false” (activating the flash effect) inside our “takePicture” function that will now look like this:

public function takePicture():void {       	

	//if we are not previewing any picture, we'll take one :)
	if (!previewBox.visible) {	

		//create a BitmapData variable called picture that has theCam's size
		var picture:BitmapData = new BitmapData(theCam.width, theCam.height);

		//the BitmapData draws our theCam
		picture.draw(theCam);		

		//Our preview's source is a new Bitmap made of picture's BitmapData
		preview.source = new Bitmap(picture);

		//stores this BitmapData into another BitmapData (outside this function)
		bm = picture;	

		//makes the previewBox visible, so we can see our picture
		previewBox.visible = true;

		//displays the flashLight
		flashLight.visible = true;

		//makes the flashLight go way
		flashLight.visible = false;

		//change our trigger label, so the user will be able to try again
		trigger.label = "Take another picture...";				

        //changes the color of the button
		trigger.setStyle('chromeColor', '#ff0000');

	}

		//if we are previewing a picture...
	else { 

		//makes the previewBox invisible
		previewBox.visible = false;		

		//changes the label
		trigger.label = 'Take a picture!'; 	

        //changes the color of the button
		trigger.setStyle('chromeColor', '#33abe9');

	}        	

}

Step 16: Discard Picture Effect

Change the "Group" called “previewBox” (CameraSnapshot.mxml) so it uses the “discardPhoto” effect:

			<s:Group id="previewBox" visible="false" hideEffect="{discardPhoto}">

Notice the “hideEffect” again. Run the app, take a picture, take another and see the effects!


Step 17: Save Button

Lets add a Save and Cancel button right below the closing tag of our “Group” called “videoArea” and above the “VGroup” closing tag:

		<s:HGroup verticalAlign="middle" horizontalAlign="right" width="100%">
			<mx:LinkButton label="Cancel"/>
			<s:Button
				id="savePic"
				label="Save picture"
				height="30"
				enabled="false"
				toolTip="Make it your profile image!"/>
		</s:HGroup>

We wrapped the “Cancel” and “Save a picture” buttons inside an “HGroup” tag (which will display them horizontally). We’ve set the “verticalAlign” property to “middle” so the “Cancel” button is placed in the middle of the “savePic” height. We also set the “width” to “100%” and “horizontalAlign” to “right”.

Notice that the “Save picture” button is disabled. We will enable it when the user is previewing a picture and disable when not. You can make the Cancel button go to the previous page, close the pop-in that wraps the SWF, etc… It’s your call.

Inside the “cam.as” file, after some changes, our “takePicture” function will now be looking like this:

public function takePicture():void {       	

	//if we are not previewing any picture, we'll take one :)
	if (!previewBox.visible) {	

		//create a BitmapData variable called picture that has theCam's size
		var picture:BitmapData = new BitmapData(theCam.width, theCam.height);

		//the BitmapData draws our theCam
		picture.draw(theCam);		

		//Our preview's source is a new Bitmap made of picture's BitmapData
		preview.source = new Bitmap(picture); 

        //stores this BitmapData into another BitmapData (outside this function)
		bm = picture;			

		//makes the previewBox visible, so we can see our picture
		previewBox.visible = true;

        //displays the flashLight
		flashLight.visible = true;

		//makes the flashLight go way
		flashLight.visible = false;

		//change our trigger label, so the user will be able to try again
		trigger.label = "Take another picture...";

		//enables the savePic button
		savePic.enabled = true;

        //changes the color of the button
		trigger.setStyle('chromeColor', '#ff0000');

	}

	//if we are previewing a picture...
	else { 

		//makes the previewBox invisible
		previewBox.visible = false;		

		//changes the label
		trigger.label = 'Take a picture!'; 

		//disables the savePic button
		savePic.enabled = false;

        //changes the color of the button
		trigger.setStyle('chromeColor', '#33abe9');

	}        	

}

Above, we’ve just added 2 lines of code to enable and disable the Save button.


Step 18: Saving the Picture

Now we’ll look at one of the many things that you can do with your picture: sending it to the server. In doing so, you can assign it as a user’s profile picture, a new album photo, etc…

Let’s create a function that sends our picture to the server when we click “Save a picture”:

public function savePicture():void {           	

	//change the savePic button label so the user knows as soon as possible
	//that we are saving his picture
	savePic.label = "Saving..."

	//disables the button so the user don't click it twice
	savePic.enabled = false;

	//the trigger button displays a nice message
	trigger.label = "That's a nice picture :) "

	//disables the "trigger" button, now is too late to take another picture!
	trigger.enabled = false;	

	//creates a new JPEGEncoder called "je"
	//sets the quality to 100 (maximum)
	var je:JPEGEncoder = new JPEGEncoder(100);     

	//creates a new ByteArray called "ba"
	//JPEGEnconder encodes our "bm" Bitmap data: our "picture"
	var ba:ByteArray = je.encode(bm);
	//this ByteArray is now an encoded JPEG

	//creates a new Base64Encoder called "be"
	var be:Base64Encoder = new Base64Encoder();

	//encodes our "ba" ByteArray (wich is our JPEG encoded picture) with base64Encoder
	be.encodeBytes(ba);

	//Now we have our "encodedData" string to send to the server
	var encodedData:String = be.flush();

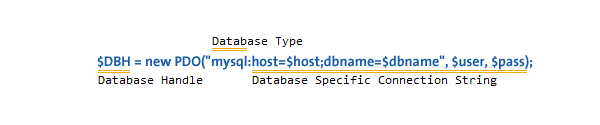
	//this is the HTTPService that we will use to send our data to the server
	var handleService:HTTPService = new HTTPService();	

	//now we set what URL we want... Set the URL of your server-side page/action
	//this is a typical Ruby on Rails URL. Controller: users_controller, Action: handlepicture
	handleService.url = "http://localhost:3000/users/camerasnap";	

	//another example of URL:
	//appUrl.url = "http://www.example.com/handlePicture.php";

	//or, a relative path:
	//appUrl.url = "/handlePicture.php"

	//we choose POST as our method
	handleService.method = "POST";

	//here we show the busy cursor for better visual feedback
	handleService.showBusyCursor = true;

	//Finally, we send our "encodedData" as a "content" variable
	handleService.send({content: encodedData});	

	// 1 - in your server-side code you can handle the "param" or "post" variable called "content"
	// 2 - use a base64 decoder
	// 3 - write it to disc (now you have a real image saved in your server)
	// 4 - make this image the user's profile picture or anything you want

}

In this function we do three things: change some labels and disable some buttons, encode our picture to JPEG and, finally, send the encoded data (Base64 string) to the server.

Again, the comments above “// (…)” can tell you how we did that.

Now our “Save picture” button needs to trigger the “savePicture” function. Add a "click" method:

			<s:Button
				id="savePic"
				label="Save picture"
				height="30"
				enabled="false"
				toolTip="Make it your profile image!"
				click="savePicture();"
				/>

Step 19: Server-side Handling

In the following steps, I wrote only the necessary code so you can do anything you want with the saved picture file. You’ll have to write the code to make “example_name.jpg” the user’s profile picture (for example). Unfortunately, I cannot cover how you can accomplish that as it changes a lot depending on your current solution. Room for another tutorial I guess..

The following example shows how to save the picture into your server using Ruby on Rails or PHP, it’s pretty simple!


Step 20: Server-side Handling Ruby on Rails

  require "base64"

  def camerasnap

    #associate the param sent by Flex (content) to a variable
    file_data = params[:content]      

    #Decodes our Base64 string sent from Flex
    img_data = Base64.decode64(file_data)

    #Set an image filename, with .jpg extension
    img_filename = "example_name.jpg"

    #Opens the "example_name.jpg" and populates it with "img_data" (our decoded Base64 send from Flex)
    img_file = File.open(img_filename, "wb") { |f| f.write(img_data) }    

    #now we have a real JPEG image in our server, do anything you want with it!
    #Write what's necessary to make it a profile picture, an album photo, etc...

  end

Step 21: Server-side Handling PHP


<?php

	//associate the param sent by Flex (content) to a variable
	$file_data = $_POST['content'];

	//Decodes our Base64 string sent from Flex
	$img_data = base64_decode($file_data);

	//Set an image filename, with .jpg extension
	$img_filename = "example_name.jpg"; 

	//Opens the "example_name.jpg"
	$fp = fopen ($img_filename, "w"); 

	//populates it with "img_data" (our decoded Base64 send from Flex)
	fwrite ($fp, $img_data);

	//closing the file pointer
	fclose ($fp);  

    //now we have a real JPEG image in our server, do anything you want with it!
    //Write what's necessary to make it a profile picture, an album photo, etc...

?>

These two examples above (Rails and PHP) are as simple and clear as possible. You can write them in just 1 line of code (Rails) and 2 lines (PHP) if you want.


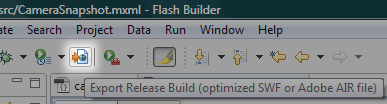
Step 22: Exporting Release Build

Before uploading the SWF to your site, it’s recommended that you export it as an optimized SWF (release build):

Export Release Build

After exporting, you will have to upload everything that’s inside the “bin-release” folder (located inside your project folder).

Conclusion

I hope you’ve liked this tutorial! There are many things that you can do with this “real-time picture”, I’m already using it in production so my users can quickly change their profile picture. Tell us what you think would be a creative or innovative use of this feature in the comments below. Thanks!

A Poor Man’s Guide to Budget Macro Photography

Macro photography can be an absolutely stunning way to view the world as you’ve never seen it before. However, high equipment costs represent a formidable barrier to entry in this particular field, leaving anyone without a large lens budget left out. Today we’ll discuss how to bypass these costs with some cheap and crafty tricks for getting up close and personal with your subjects.


Don’t Break Your Camera

The methods and devices discussed in this article are exactly what the introduction claims: cheap. Using these will most likely get you decent results, not amazingly professional photographs (though it’s definitely possible to get stunning results!).

Some of the methods below, if implemented poorly, could even result in damage to your lens or camera. For this reason we recommend that you proceed with caution and avoid anything that you think could harm your equipment.

Ultimately, the best way to get great results is to purchase a nice macro lens. If you want high quality professional shots, there’s simply no substitute. However, if you’re just looking to get started in macro and want to have some fun, check out the options below.


Reverse Mounting

This method is by far the most bizarre. It turns out one of the easiest ways to get a lens to shoot close-up is to flip it around backwards! There are plenty of high-level technical explanations for why and how this works, but unless you’ve got a strong grasp of the math behind focal lengths and diopters, it’s enough to make your head spin.

What you need to know is that reverse mounting can yield high magnification. It’s actually a fairly popular technique and can be accomplished in a variety of ways.

DIY Reverse Mounting

As you can see in the picture below, DIY reverse mounting can get pretty crazy.

This method actually uses an extension (which we’ll discuss below) and a reverse mount. What you’ll need to do is to take the lens hole cover that came with your camera and cut a big hole in it to give you a fitting that will attach to your camera’s body. Then insert a PVC pipe securely into that fitting and place a rubber coupling over the pipe.

Finally, flip your lens around backwards and stuff it into the rubber coupling. Make sure everything is nice and snug so that nothing falls out and smashes to pieces on the ground.

Additional optional steps include sanding everything down and painting it black so that it doesn’t look like you’ve got a giant PVC pipe sticking out of your camera.

For a more detailed set of instructions, check out this step-by-step guide: DIY Macro Lens Reverse Mount Extension Tube

Of course, if you really want to mess up your equipment, you can forgo all that complicated coupling stuff and just use a ton of tape:

Reverse Mounting Adapters

An easier and much safer way to go is to just pick up reverse mount adapter, also known as macro coupler.

These handy rings contain two male ends: one that screws into the tiny threads on the front of your lens and one that screws into your camera’s body. This makes it easy and relatively safe to reverse mount your lens without fear of it falling off.

Reverse mount adapters are actually really cheap; you can usually pick one up on Amazon for less than $15.

Rather than reverse mounting a lens directly onto the camera body, you can combine it with another lens using a similar adapter. The rig below uses a Canon EF 50mm f/1.4 lens mounted onto a Canon EF 100mm f/2.8 macro lens.

Reverse Mounting Example Shots

So you can get a true feel for the quality of results that reverse mounting can provide, here are some shots taken with various reverse mount rigs.

Reverse Lens Macro 001 – Edge of a Canadian Quarter!

My Eye: Take 2

The Cozy Eatery

Your basic US penny

Crawling Around

Wheat Husk

Water Drop


Extension Tubes

Extension tubes, which can be used alone or in conjunction with reverse mounting, essentially serve to extend the length of your lens. Normally, your SLR won’t allow you to take a picture if you’re too close to your subject due to focusing issues. By using an extension tube you can get the lens a lot closer to what you’re shooting while maintaining focus.

Extension tubes are generally sold as a set with varying tube sizes. The longer the extension tube is, the closer the lens will be able to focus. A typical set might contain a 12 mm, 20 mm, and 36 mm tube.

Extension tube sets are a lot pricier than reverse rings but still plenty cheaper than a nice macro lens. Most good tube sets will run between $100-200. Here are some links to a few sample tube sets:

And of course, you can just build one yourself with some PVC pipe and a few couplers. Here’s a good breakdown of the process: Diy Macro Extension Tube With Pictures And Instructions

Extension Tube Example Shots

Again, so you can get a sense of the magnification quality, here are some example shots taken with extension tubes. Remember that results will vary drastically depending on the setup and equipment.

Canon with extension tubes

Macro test shot with Extension tube

Extension Tube Experiment

Testing the hacked extension tube

Day 12 – Extension Tube

Face of a Southern Yellowjacket Queen


Bellows

Bellows are bizarre devices that look like they came from the 1950s. Bellows use the same exact principle as an extension tube: by extending the length of your lens they allow you to get closer to whatever you’re shooting while remaining focused.

However, bellows are different in that they have an accordion-like body that allows for a highly controllable range of lengths. Modern bellows allow a great amount of control and very minute adjustments for precise focusing. Further, bellows allow you to reach a longer extension without having to worry about bending your tubes or breaking your camera mounts.

It looks like you can grab a decent bellows for around $50, whether you’re shooting Canon or Nikon.

Bellows seem to have a fairly wide range of prices and quality, so be sure to shop around and decide whether your goals and budget are better suited by a basic or expensive set to really ensure you’ll be satisfied with the product.

Bellows Example Shots

Finally, here are some photos taken with bellows.

bellows-macro-experiment

Stamen, Zeiss Flektagon 35mm f2.4 + Macro Bellows

Anterior Median and Anterior Lateral Eyes of a Phidippus princeps Jumping Spider

Close Encounter

Celtic Knot Macro

RIB

Salticidae


Pros and Cons

The techniques and devices above provide photographers with some of the cheapest ways possible to take decent macro shots. Reverse mounting is a crude but effective may to increase your magnification and extension tubes and bellows allow you to overcome focusing problems when trying to get physically close to your subject. You can even mix and match these techniques to really push the limits of what you can achieve.

However, there are definitely downsides. As stated before, all of these methods represent a compromise in quality when compared to an actual macro lens. Further, the DIY procedures can and will fail you if you aren’t careful and confident in your ability to create a solid finished product. Finally, many of these devices, especially the DIY versions, will eliminate any of the automatic functions of your lens. Focusing and adjusting your lens settings can therefore be quite tricky (especially with reverse mounting). To add to focusing issues, your DOF can become very shallow at high magnifications and close ranges, making it hard to get a crisp shot. You’ll also want to be sure to invest in a good tripod as macro photography tends to require long exposures.

Beyond these global limitations, each method has it’s own pros and cons. The reverse mount is simple enough with a converter and can provide great magnification, but you’re leaving the inside of your lens exposed to all kinds of dust and foreign debris that can quickly reduce or ruin its functionality. Be sure to keep the lens cover screwed on at all times when you are not shooting to help prevent this.

Extension tubes are easy to install and don’t expose your lens to dust but provide extra length and weight that could possibly lead to damage on the mounts of your camera’s body. Bellows can be safer and lighter but are considerably more bulky and awkward.


Conclusion

The key takeaway here is that you don’t have to possess a large equipment budget to try your hand at macro photography. The solutions above might not result in the highest quality photos, but they get the job done and can be a great point of entry.

Let us know in the comments below which of these solutions you’ve tried and what you thought of the results. Also be sure to drop in any links you have to example shots you’ve taken with reverse mounts, extension tubes or bellows.

Quick Tip: Colouring Tracks – More Than Just Pretty

Colour-coding your tracks can be an extremely useful tool when it comes to mixing. It enables you to quickly acknowledge what you’re listening to and jump to it without hesitation.

This can be particularly helpful when you’re attempting to glue together 15 or more tracks. Now, you’re probably thinking that colouring tracks isn’t very ground-breaking when it comes to mixing techniques? Possibly. But Logic has deeper functionality that enables you to take track colouring further.


Step 1

Take three separate groups of tracks. For this example, I’m going to use Drums, Guitars and Vocals.


Step 2

Open up the Colour Palette <OPTION C>


Step 3

Colour the Drums BLUE
Colour the Vocals RED
Colour the Guitars GREEN


Step 4

It starts to get interesting now…

Select just ONE region of the Vocals.

The one that is selected is partially black.

Now hit <SHIFT C>

As you will notice, all of the Vocal tracks are selected in one go. You’ve just used the ‘Select Equal Colours’ command.


Step 5

This can be a very powerful tool. With groups of tracks selected at once, you can instantly take control over the arrange page and speed up your work flow.

Hit ‘S’ and everything in the group is soloed

Hit ‘M’ and (you guessed it) they’re all muted.

All of this came simply from selecting one region after colouring. It works in piano roll too.

So, as you can see, colouring tracks isn’t just to make your session look pretty – although it does that too – but it aids with your visual recognition of tracks and, more importantly, allows you to take more control.

Get colouring!


How to Create a 303 Synth Sound in FL Studio

In this tutorial we are going to create our very own 303 synthesizer sound using the TS404 Bassline Synthesizer plugin in FL Studio. As you might know, there are already five 303 presets that come with Sytrus and a whole lot more with the TS404, so why would I want to make my own sound? Well, I’ve never been a big fan of presets and as Image-Line put it themselves, the 303 presets are “303ish”.


Step 1: Setting up our Project

Start of by opening up a new project, right click on kick and replace it with a TS404 bassline synthesizer. As we won’t need the Clap, Hat and Snare it’s probably best if we delete these from the step sequencer to avoid any kind of confusion. I’ve also set the tempo of this project to 130 bpm.


Step 2: Piano Roll Sequence

Now we’re set up we need to create a melody in the piano roll to give us something to work with. To do this, right click on TS404 in the step sequencer and select piano roll. OK, it’s now time to create our bassline. You can use the image below to copy my pattern, download the score file from below or you can create your own. If you’re creating your own pattern try to use a variety of notes, it’s good to see how our 303 will sound if we change from C4 to D#4 in the piano roll.

Score File

If you’ve used my pattern you should have something that sounds like this.

Download audio file (audioclip1.mp3)


Step 3: TS404 Channel Settings

Now we are ready to start tweaking our TS404. So, let’s bring the Step Sequencer back up, click on TS404 and we’ll start. The first thing we need to do is to turn the Mix Dial all the way down. By doing this we’re now only using 1 Oscillator. Our Oscillator uses a Sawtooth shape. (The Mix Dial is the top right dial underneath OSC 1+2.)


Step 4: TS404 Envelope and Filter Setting

Under the Envelope settings we need to turn our Attack completely off. To do this, turn the ATT dial all the way down. If we had Attack on, it would take our note longer to reach its peak. If you turn the ATT dial up about half way you’ll see what I mean. Next we need to do the same for the release, turn it off by turning the REL dial all the way down. The amount of release we have on determines how long it takes our note to reach nil or finish. Once again experiment by turning the dial up and down.

For our filter settings we need to move our CUT dial to left middle and we also need to make sure we have LP24 selected.

LP12 short for Low Pass 12, LP24 short for Low Pass 24, HP short for High Pass and BP short for Band Pass are different types of filters. Once we’ve finished this tutorial, have a play around with each filter remembering to play around with the CUT dial too. It’s all about experimenting


Step 5: TS404 Function Setting

We now need to click the FUNC tab inside our TS404 Channel Settings. All we need to do inside this section is adjust the Gate. So, if we look towards the bottom of the FUNC area we will see the Time section. We will now turn the GAT Dial all the way up.

Download audio file (audioclip2.mp3)


Step 6: Saving Our Progress

Now we’ve finished configuring our TS404 synthesizer settings we are going to add some effects to really get things going. But, before we do this, it might be a good idea for us to now save our TS404 settings as a new preset. To do this we click the little arrow in the top left hand corner, select save channel state as, type our desired name and then click save.


Step 7: Fruity Blood Overdrive

We will now send our TS404 to a free mixer track. To do this we click the arrow in the top left hand corner of our TS404 settings panel and then select assign free mixer track. Next we click the arrow on slot 1 and add Fruity Blood Overdrive which is used as a distortion effect. Now to configure our Overdrive, use the settings from the image below.


Step 8: Fruity Fast Dist

On our next effects slot we will add Fruity Fast Dist. Like Overdrive, Fast Dist is a distortion effect which I’m using to give our 303 a nice gritty feel. Again, use the following settings from the image below.

Download audio file (audioclip3.mp3)


Step 9: Reverb and Delay

In my opinion, the sound is a little too dry. To get around this we can add some Reverb and Delay to effects slots 3 and 4. These will give our sound more character. The image below shows us the settings I decided on using but I’d recommend you having a little play too. I find these types of effects are best left to personal preference. Some people like dry sounds, others like echoed, ping pong delay effects. So, see if you can create your own settings. You can get some great results by messing around with these two effects.

Download audio file (audioclip4.mp3)


Step 10: Does It Work

Although the Roland TB-303 sound has been around for some some time now, it still sounds great, especially in harder types of dance music. Below I’ve created a small loop with a kick drum, snare, hats and a pad to show you how our 303 sounds within a track. There have been a few changes though. I’ve made our original melody less complicated, side-chained it to the kick drum and I’ve automated a fruity free filter to it so it slowly builds up.

I hope you enjoyed the tutorial.

Download audio file (audioclip5.mp3)


60 Spectacular Examples of Photoshop Design and Art


Today we’re launching a redesign and refresh of our popular Creattica gallery of inspirational work. The site features almost six thousand items, many of which are just mind-bogglingly amazing. Anyone can submit work for inclusion to the gallery, and we pick the best of the best for showcasing. Plus the latest work gets shown right here on the Psdtuts+ sidebar.

This post is a taste of some of the exceptional Photoshop work you can find in the Creattica Photoshop Gallery. Scroll down to check it out, and jump to the end of the article to learn about the redesign and some of the new features now available on Creattica.


Creattica Photoshop
Creattica Photoshop
Creattica Photoshop
Creattica Photoshop
Creattica Photoshop
Creattica Photoshop
Creattica Photoshop
Creattica Photoshop
Creattica Photoshop
Creattica Photoshop
Creattica Photoshop
Creattica Photoshop
Creattica Photoshop
Creattica Photoshop
Creattica Photoshop
Creattica Photoshop
Creattica Photoshop
Creattica Photoshop
Creattica Photoshop
Creattica Photoshop
Creattica Photoshop
Creattica Photoshop
Creattica Photoshop
Creattica Photoshop
Creattica Photoshop
Creattica Photoshop
Creattica Photoshop
Creattica Photoshop
Creattica Photoshop
Creattica Photoshop

Creattica Photoshop
Creattica Photoshop
Creattica Photoshop
Creattica Photoshop
Creattica Photoshop
Creattica Photoshop
Creattica Photoshop
Creattica Photoshop
Creattica Photoshop
Creattica Photoshop
Creattica Photoshop
Creattica Photoshop
Creattica Photoshop
Creattica Photoshop
Creattica Photoshop
Creattica Photoshop
Creattica Photoshop
Creattica Photoshop
Creattica Photoshop
Creattica Photoshop
Creattica Photoshop
Creattica Photoshop
Creattica Photoshop
Creattica Photoshop
Creattica Photoshop
Creattica Photoshop
Creattica Photoshop
Creattica Photoshop
Creattica Photoshop
Creattica Photoshop


Creattica Design Refresh

A year ago we migrated our small Faveup gallery to its new home at Creattica and the site has been growing quickly ever since. The new design was an improvement, but it’s been showing its age recently, and it had an awful lot of bright red for a site supposed to be aimed at showcasing work. So we’ve given the logo a refresh, toned back the design so it’s more about the work and generally cleaned up the site.

Old Creattica Design
The Old
New Creattica Design
The New!

Showcasing … Everything!

Today we showcase 3D, Advertising, Posters, as well as our old favourites: Business Cards, Logos and Websites. And with our redesign we’re adding a whole lot of new categories for Email Design, Mobile Design, Vector Graphics, Photo Retouching, Icon Design, Brochures, Book Covers, Tshirt Designs, Skate & Snowboard Art, and Desktop, iPad and iPhone Wallpapers.

If you’re interested in submitting to the new categories, be sure to check out our competition where you’ll be in the running to win $1000 in cash!

New Features

Of course a new design is not complete without lots of new features! So we’ve built in a lot of great new functionality, particularly focused around finding great creatives to work with:

  1. Search, Follow and Contact Creatives
    The biggest update to the new site is the ability to search creatives who have been featured in the gallery. Creatives can specify their country, budget and profession as well as provide a website and contact details. We hope this will give designers and artists one more avenue to get freelance work!

  2. Tagging and Colour Tagging
    The new site now provides the ability to tag items with a set of preset keywords and colours. This will mean more ways to browse the gallery – once we’ve got some stuff tagged that is!

  3. Extras – Badges + WordPress Plugin + Random Browse
    And there are lots of little extras we’ve added including badges to show that you’ve been featured, a WordPress plugin to add creative inspiration to your blog’s sidebar and a feature to browse the gallery a little more randomly!


We hope you enjoy the new Creattica and get a wealth of inspiration from the amazing work of talented creatives around the world. If you have any feedback about the new site, the new design, the new categories, or pretty much anything else then Fill in the Feedback Form or leave a comment!

Win $1000 by submitting work to Creattica!


Today we’ve launched our refreshed inspiration gallery Creattica and, along with the updated design and new features for finding and contacting creatives for hire, we’ve also added some new categories! To help get the new sections off the ground, we’re giving away $1000 in cold, hard cash to one Creattica user. Read on to learn how you can win all those moneys!

Win $1000

So we’ve got ten new categories of inspiration now up on Creattica: Email Design, Mobile Design, Vector Graphics, Photo Retouching, Icon Design, Brochures, Book Covers, Tshirt Designs, Skate & Snowboard Art, and Desktop, iPad and iPhone Wallpapers. All you have to do is submit your work to one of these twelve categories before June 1st. We’ll run our usual review process and any items showcased in the new categories will be an eligible entry! One approved item will be selected at random and the lucky winner will get US$1000 in cash, paid to a PayPal account.

How to Enter

Submitting your work is super easy:

  1. Create an account on Creattica or log in to your existing account
  2. Submit an item to one of the ten eligible categories (written above) before June 1st
  3. If your work gets approved for inclusion to Creattica, then check back on this post on July 1st when we’ll be announcing the winner! We’ll also contact the winner via the email on their Creattica account – so make sure your details are correct!

Terms & Conditions

  1. Whether an item is included in the Creattica gallery is entirely up to the discretion of the Creattica review staff. Their decision is final.
  2. You upload as many entries as you wish, and any that are approved will be counted as valid entries.
  3. Work you submit must be entirely your own work and you must be the copyright holder (don’t submit other people’s work!) If its discovered you’ve uploaded someone else’s work we’ll throw out all your entries.
  4. Your items must be submitted by June 1st 11:59pm Pacific Standard Time to be eligible, but approval into the gallery may happen after that date.
  5. There will only be one winner and they will be selected by means of a random selection algorithm between all items approved in the twelve eligible categories. Each item showcased in one of those categories will count as one entry.
  6. The selected item’s creator will be contacted via the email address given in their account to claim their prize. If the creator does not reply with their PayPal address within 14 days, a new winner will be selected randomly and contacted in the same way.

Good Luck!

Quick Tip: Create a Carbon Mesh Background in Photoshop


In this quick tip tutorial, we will demonstrate how to create a cool ‘carbon cut-out’ effect using mesh and carbon textures made from scratch. Let’s get started!


Step 1: Creating the Mesh Pattern

Create a new document, 50×50px and name it "Holes". Fill the background in with #FCFCFC.


Step 2: Alignment

Now we need to make a grid to help us layout the holes for the mesh pattern, so we need to create precise guides by going to: View > New Guide. And make the following separate guides:

  • Vertical: 12px, 25px and 38px
  • Horizontal: 9px, 17px, 25px, 33px and 41px

Step 3: Adding the Holes

Using the Elliptical Marquee tool (M), set the selection style to "Fixed Size" and enter 14px for width and height. Cmd + Click on the cross sections highlighted on the image below. This should create a perfectly centered eclipse around the cross in which we will fill in black (#000000). Repeat for the remaining points.

Should look something like this:


Step 4: Adding Detail

Add the following layer styles: (Inner Shadow: Black, with Distance set to 1 and Size set to 3.

Pattern Overlay: Pattern selected from Photoshop’s default ‘Artist Surface Pack’ called ‘Oil Pastel on Canvas’ , set opacity to 36%.


Step 5: Saving the Pattern

Using the Rectangle Marquee tool (M) select the inner rectangle (as seen in the image). With it selected go to: Edit > Define Pattern (You may need to expand the menu, by clicking on "Show All Menu Items"). Call it "Mesh" and press Ok.


Step 6: Creating the Carbon Pattern

Create a new document, 100×100px in size. Create a new layer (Cmd + Shift + N) and call it "Vertical Tile." Using the Rectangle Marquee tool (M) set the selection style to "Fixed Size" Using 25px for width and 50px for height. Make a selection in the very upper left hand corner and fill it in black (#000000) for the vertical tiles.

Add the following layer styles: Color Overlay: with the color set to: #252627.

Stroke: with the color set to: #121213, size on 1 and position set to: Center.


Step 7: Horizontal Tiles

We need to now create the template for the horizontal tiles, so create a new layer (Cmd + Shift + N) and call it "Horizontal Tile". Using the Rectangle Marquee tool (M) change the "Fixed Size" to 50px for width and 25px for height. Click right next to the vertical and make the selection flush in the upper right hand corner (as seen in the image below). Fill it in with black.

Add the following layer styles: Color Overlay: with the color set to: #1a1b1c.

Stroke: with the color set to: #121213, size on 1 and position set to: Center.


Step 8: Repeating the Pattern

We have the templates for both the horizontal and verticals tiles; by duplicating the layers (Select layer > Cmd + J to duplicate) we now have copies in which we can arrange in a pattern (Pattern template below) Making sure they are flush and not leave gaps (As this will affect the final outcome of the image). Repeat duplicating and ordering the layers to get the finish pattern (as seen below).


Step 9: Saving the Pattern

Again using the Rectangle Marquee tool (M) select the whole document (or Cmd + A). With it selected go to: Edit > Define Pattern (You may need to expand the menu, by clicking on "Show All Menu Items"). Call it "Carbon" and press Ok.


Step 10: Putting it All Together

Create a new document to what size suits you (I will use 1000×700px for demonstration purposes). Create a new layer (Cmd + Shift + N) and call it "Mesh", fill it in with black (#000000). Apply the Mesh pattern we made previously via layer styles (as seen below).

Pattern Overlay: The patterns we made are saved in the last pack you selected, so in our case the Artist Surface was our last. Select the Mesh pattern from the pack.

Create a new layer (Cmd + Shift + N) on top and call it "Carbon" and fill it in with black (#000000), apply the Carbon pattern we made previously via layer styles (as seen below).

Pattern Overlay: Select the carbon pattern in the same folder, and drop the scale down to 25%.

Gradient Overlay: Starting color #000000 to #2e3033, drop opacity down to 65%.


Step 11: “Cutting out” the carbon

Select the Carbon layer and again using the Elliptical Marquee tool (M); making sure the selection style is back to "Normal" make a rough oval selection from the middle most bottom of the document to the centre right portion. Press delete to remove that portion to reveal the mesh layer beneath, deselect the selection (Cmd + D).


Step 12: Adding Highlights and Shadows

Create a new layer (Cmd + Shift + N) between the Carbon and Mesh layer and call it "Carbon Shadow." Using a large soft brush (200-300px) with its hardness turned down to 0, opacity to 50% and color set to black (#000000), start to draw along the "cut-out". Use a technique of overlapping brush strokes to build up the shadow under the lip of the carbon, and to fade out towards the center of the uncovered mesh.

To add extra detail we can create a very slight highlight on top of the carbon to give it the effect of catching the light source. Create a new layer (Cmd + Shift + N) on top of the Carbon layer and call it "Carbon Highlight" Using the same brush but using white (#FFFFFF) instead of black, Cmd + Click the Carbon layer, to load the selection and keep our highlight in. Now start to paint across the lip very softly to create that soft highlight, turn down the opacity down to 25%.


Final Image

You’re Finished, I hope you enjoyed the tutorial!

The Benefits of Working from Home

Going to work in an office can be stressful and costly for both employee and employer.  Thanks to technology many people have the option of working from home (or off-site at that warm beach somewhere!).  For consultants and freelancers there are obvious reasons why you should work from home (you might not have another choice anyway!) but for full-time employees there are financial and personal advantages to working at least a couple days per week from home.  Not every profession allows for this flexibility but if yours is one of the many that do, here are some benefits to look into for both employer and employee.

Lower Costs for Employers

Reduced office costs
Fewer people in the office results in lower office bills: less coffee to provide, fewer paper clips to stock, fewer phone calls to pay for, less toilet paper to buy and so on.

Managers may plan to have a certain number of employees working from home at any given time and may even choose to have smaller offices where employees rotate among desks.  These days so much is done by email that an employee might not even need his or her own number at work but should he or she really need it, technology may permit call forwarding, calls over the internet and whatever else is possible.

(If you’re an employee and you’re terrified of not having your own desk with your own stacks of documents, check out this 14 minute video about Semco, a company in Brazil in which employees in fact are not allowed to use the same desk all the time.  But be warned: after learning about Semco you might never see work the same way again!)

Reduced health insurance costs
Employees who have more flexibility in their schedules tend to be happier people because they may arrange their schedule to include running errands, taking care of their children and getting enough rest and exercise.  Happier employees = healthier employees = lower health insurance costs.  You may read about the “link between psychological health and overall health” here. http://www.apa.org/monitor/dec03/awards.aspx).

Lower Costs for Workers

Less fuel and other car expenses
In 2009 Cisco released the results of their survey of nearly 2,000 of their telecommuter employees around the world.  On average each employee saved approximately US$5,000 in 2008 in fuel expenses alone by telecommuting (the total for all surveyed was US$10.3 million).  Working from home you’ll also be putting fewer miles on your car and reducing gas emissions.

Lower child care expenses
Although working from home you’ll still need to dedicate the same amount of time to work, you can still be the person who will drop off and pick up your children after school, take them to the doctor or even watch out after your toddler for half of the day.  But most importantly, the time you spend with your children is priceless, which brings us to the next section.

Personal Reasons To Work from Home

Spending time with your children
Thirty five hours per week at work (40+ for Americans) plus commuting time all adds up to time not spent with your children.  Both you and your children will be happier if you spend more time with them.  But you can always ask your children what they think.

In my own experience, I feel very lucky I had my dad around when I was a child.  Due to his working schedule, Dad spent half days at home and it was just awesome to see him around!  He could just be taking care of our dog or taking a nap before his next shift but there was a very warm feeling in knowing that Dad was around to take care of me if I needed him.

More time for oneself
You may put the time you spend commuting towards your hobby, favorite sport, studying or other experience more enriching than attacks of road rage and smelling the armpits of that guy in the metro who’s never heard of deodorant.

Increased productivity
When employees have more time to be with their families or to do things for themselves, they’re happier people.  Happier people are less stressed out and are less likely to make mistakes.  Happier people are more productive, which leads to more work done and more money saved.  This I learned from Dr. Foo, my neurologist in NYC (great guy, by the way!), but in reading an article at CNN some supervisors see the productivity value in flexibility as well.  One supervisor mentions that employees are more committed to a company that allows them to have flexible schedules.  Another manager explains that having employees with flexible schedules is an advantage to her because that way her company may expand its working hours to better cater to the 24/7 business cycle in which it works.

If you’ve never thought of working from home but your company offers this option, you might be interested in finding out how such arrangement works out for you.  If your company doesn’t have a work-from-home program, you may be in a position to ask your boss about this arrangement.