How to Time Your Tasks

You’ve likely heard about The Two Minute Rulewe’ve even discussed it here at WorkAwesome recently.  Keeping track of how long it takes to do tasks is important, as is keeping tabs on your time so you don’t spend too much time on anything that doesn’t require it.

How do you keep tabs on your time?  Here’s some helpful links to get you started:

Use an iPhone/Mobile App

There’s plenty to choose from and you’ll have your timer with you wherever you go.  You can even use the built-in Clock app if you feel a little miserly when it comes to buying apps…

Use an Online Timer

Sites like Tick Tock Timer keep you on task and on track while you work on your computer – which is where most of your work is likely to take place.

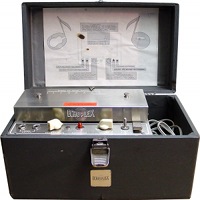
Use an Actual Timer

Get an egg timer.  They’re inexpensive and effective.  If you prefer style over substance, get an hourglass.  They’ll do the trick as well – but not in two minute increments.  Best use it for projects or to use when going through huge tasks.

A suggestion would be to track your overall time with an hourglass and use a two minute timer to get through the quick stuff.  When the hourglass runs out, take a break!

How to Create a Distinguished Personal Diary Icon


In this tutorial we are going to create a stylish personal diary icon using Illustrator CS4. Gradient is at the core of this tutorial and we will be taking look at it in close detail. You will also learn how to use the opacity mask to create drop reflections and shadows.

Continue reading “How to Create a Distinguished Personal Diary Icon”

How to Mix Two Kick Sounds Together

Sampling two kick drums together is common practice in audio production. You can layer kick samples for your electronic beats together, or you can drum replace rock songs with a few kick drum samples that compliment each other. But what if you need to use your recorded kick drum sounds, and can’t layer with samples? How can you mix together two kick drum microphones in order to bring out the character of each one.

In the example below we have a kick drum that was recorded with two different microphones. The first was an AKG D112 positioned in the front hole of the kick. The latter is a Sennheiser PZM microphone positioned inside the drum, by the beater. This was done in order to get “best of both worlds”, i.e. the thump of the kick as well as the snap of the beater. Having two separate kick drum microphones can then give you a fair amount of versatility when mixing since you can draw out different characteristics from each mic.

Outside kick drum:

Download audio file (kick1.mp3)

Inside kick drum:

Download audio file (kick2.mp3)

Together they don’t sound that bad:

Download audio file (kickdry.mp3)

But let’s see what we can do with some examples.


Step 1: Outside Kick Compression

Let’s use the first kick drum as a basis for a thick low end thump. By using compression we can decide which part of the kick we accent. By using a fast release on our compressor we clamp down on the kick drum immediately, compressing the transient from the beater and softening the sound. Don’t worry, we’ll accent the beater later. Just know that if you want a tight kick you should have a slower attack and faster release, but if you want a thumpier kick that’s devoid of attack you should have the attack fast but the release a little slower.

I’m using a fast attack on the VCA compressor setting in Logic. The compressor is compressing around -6 to -8dB on the peaks. But the fast attack and slow release coupled with a nice warm compression setting gives us that boomy kick thump.


Step 2: Heavy Filtering

Now, since we are only going to be accenting the thick low end on this microphone, it’s time to cut our losses and get rid of some high end. Let’s insert an EQ plug-in and just filter out all the high end.

Looks like a scary EQ curve, but since we know we have another microphone that can handle all that’s missing, we’re not so worried. The low end got a little out of hand with all that cutting, due to the subjective nature of cutting out all the highs it feels like we are boosting the lows. So I leveled the low-end off a little bit and got rid of some of the boxiness that’s all too familiar in our kick drum sounds.

Download audio file (kick1eq.mp3)

Almost sounds like a electronic kick sample. But in reality, the song being recorded is actually a 12-bar blues shuffle!


Step 3: Inside Kick Snap

Now let’s divert our focus to the inside microphone. Since we already have the thick creamy thump from the outside mic, let’s find a way to get the crisp snap of the kick from this mic instead. Since we didn’t want any attack from the beater on the first microphone, having the fast attack eat every inch of our beater and ultimately EQing out the high frequencies where the beater resides, we want to draw out the snap with some compression.

By having a medium attack this time the sound of the beater gets through before the compressor clamps down on it. This track is not compressed as hard, but as usual some experimentation with both compressors can give you different results. Since this is not a compression tutorial per se, I won’t go into all the details of fine tuning the compressor.

Listen to the compressor here, and notice that there is plenty of snap present in the example.

Download audio file (kick2comp.mp3)


Step 4: Bringing out the Beater

Since we don’t have any beater present on the other microphone, it’s time to accent it on this one. We’re going to do almost the opposite of what we did with the first microphone. Instead of cutting highs and raising the lows we’re going to boost the high mids where the beater resides as well as cutting the lows. And like earlier, we’re getting rid of the boxy middle frequencies.

Although this microphone might have plenty of low end to share, we’re going to take it out for demonstration purposes. The first microphone supplies the low, the second provides the highs.

Download audio file (kick2eq.mp3)


Step 5: Mixing the Kicks Together

Now we have a low end thump and a high end snap that we can mix together. Having a fader for both elements of the bass drum gives us added versatility for mixing purposes. We could continue to process these two tracks, trying to get an even better sound from both tracks. But it’s clear that by processing both so differently we have created a different sound that wouldn’t have been otherwise possible if we only had a single microphone capturing the bass drum.

Here is how the final result sounds. It might sound a little unnatural, but I think that’s more due to the light blues playing of the drummer rather than the mixing technique itself. If you were going for this trick I would actually rather recommend you do it for harder genres such as rock and metal, where a heavy hitting drummer is manning the drum kit.

Download audio file (kickwet.mp3)


Conclusion

It’s amazing how much you can do to change your recorded sounds during mix-down. We’re almost to the point where we have so much control over our sounds with all these effect processors, dynamic controllers and EQ that we can fix everything in a mix. However, knowing the amount you can change during mixing is no excuse for not taking the time to get great source sounds at the tracking stage. These samples above were recorded with great mics through a great desk so although I’ve decided to take such a drastic approach to mixing them, they were still meticulously recorded in the first place.


Quick Tip: Choosing the Right Audio Interface for Recording, Mixing and Mastering

Basically all audio interfaces can be used for recording, mixing and mastering. But other things must be considered when choosing an audio interface for these tasks.

An audio interface is a piece of hardware that acts as an intermediary between the analog world of your mics and instruments, and the digital world of your computer. Whether you are a professional or just a home recording guy, you should have a good audio interface. Having good quality audio interface is very important for recording, mixing and mastering.

There are many audio interfaces choices in the market. And if you’re confused choosing the right audio interface, this article is very good and can help you to choose the right audio interface. Always make sure your audio interface has a high quality bit depth and high sample rate. The higher the bit depth and sample rate, the more satisfying the result you achieve.

In this article I will give tips on how to choose the right audio interface for recording, mixing or mastering.


For Recording

If your audio interface is mainly used for recording, you need many inputs. This depends on your needs for recording instruments.

If you record drums, you need a lot of inputs. You should have at least eight inputs – for kick, snare, hihat, tom 1, tom 2, tom 3/floor, overhead L and overhead R. If you need multiple inputs for some of the instruments, you should have even more inputs.

Next you need a preamp. A good preamp. How many preamps are needed? It depends on you. If you record a drum with eight inputs then you should have eight preamps too. Always make sure the preamp quality is good because this will impact on the quality of your recording.

Finally, you need a good quality ADC (analog to digital converter) with a high dynamic range. A high dynamic range for the DAC (digital to analog converter) isn’t needed, because the audio interface is only used for recording.


For Mixing

Which audio interface is good for mixing? First, you need a good quality DAC (digital to analog converter). Look for a high dynamic range output.

Why this is necessary? You want the result of your mixing to sound the same as when you recorded it. And a good mixing quality will help with mastering the songs later.

The second thing that you need for mixing is the correct number of inputs and outputs. If you need hardware such as an equalizer and compressor for mixing, you need at least two inputs and outputs.

The audio interface for mixing doesn’t need a high dynamic range of ADC (analog to digital converter).


For Mastering

Audio interfaces that are mainly used for mastering need a high dynamic range DAC (digital to analog converter). If you want to use external hardware for mastering, like limiters or linear phase, make sure it has enough inputs and outputs. The number is depends on your needs.

You will need a high dynamic range DAC (digital to analog converter). Audio interfaces for mixing and mastering are very similar, so you can use one audio interface to do both jobs.


Conclusion

How do you determine the correct number of decibels of dynamic range? The minimum ADC dynamic range you should be 96 dB, while the minimum DAC dynamic range should be 110 dB. And more than this is better!

Is there a “super” audio interface that can meet all these needs? So far there is no audio interface like that.

If you are choosing an audio interface for one of the three functions above, how can you maximize its usefulness for the other functions as well? Use an external ADC/DAC via digital I/O, plus outboard preamps according to your need. This of course requires a lot of money.

Finally, recording, mixing and mastering doesn’t only depend on the audio interface. There are many other factors that can influence the outcome. This quick tip should help you choose the tool that will produce the best sound for you. I hope you have enjoyed it!


Create a Full Screen, Scalable Flash Website: Part 1

In this tutorial you’ll learn how to create Flash sites that intelligently fill all the available space in the viewport, moving or resizing certain assets to make the best use of the space.


Final Result Preview

Open the preview in a new window and resize the browser to see how the site scales.


Section 1: Navigation

Don’t like ads? Download the screencast.


Section 2: Header

Don’t like ads? Download the screencast.


Section 3: Main Content

Don’t like ads? Download the screencast.

Tune in again for Part 2, where we’ll be adding interactivity to our scalable website. Thanks for watching!

Friday Photo Critique #34

Friday Photo Critique is our weekly community project, where we publish a photograph submitted by one of our wonderful readers, then ask you all to offer constructive feedback on the image. It’s a great way to learn more about photography, express your viewpoint, and have your own image critiqued!


Quick Ground Rules

  1. Play nice! We’ve deliberately chosen photographs that aren’t perfect, so please be constructive with any criticism.
  2. Feel free to offer any type of advice – composition, lighting, post-processing etc.
  3. You can also link to photographs that you feel offer a great example of this type of image shot exceptionally well.

Without further ado, here is this week’s candidate for Friday Photo Critique!


The Photograph

Photo Critique

Photographer: Andrew Turner

Please let us know what you think in the comments – how would you have approached the scene or taken the photo differently? A massive thank you to everyone who commented last week.

The most constructive and helpful comments will be featured on the site, and you’ll also be given priority to feature your own work in a future Friday Photo Critique!.

PechaKucha: Your Unofficial Exhibit

I only recently learned about PechaKucha, a non-profit organization in Japan that started as a way to give voice to designers and which has turned into the everyday person’s outlet to present, well, anything.  On a PechaKucha Night, as one of their presentation gatherings is called, a few presenters will show anything from their first grade art project to their latest high tech web design work and the only presentation rule is the 20×20 format: 20 slides of 20 seconds each.

The idea of public slide presentations is not new.  In fact the gatherings remind me of TED (despite the statement on the PechaKucha website that they’re nothing like it) though unlike TED presenters PechaKucha presenters can be anyone of any age without requirements of expertise.  The Nights take place in cities around the world and they are arranged by local organizers.

What reasons do we have to care?

Finally, your gallery exhibit!  What’s really good to fathom is that one of these gatherings could be your outlet to show the work you’re passionate about.  You can finally show your paintings to a live audience and talk about what inspired you to make each piece or you can show your latest website design and tell the audience about the challenges involved.  You can even share your photos from that amazing trip your friends keep asking you to stop talking about no matter how cool you keep telling them it was.

It can be very rewarding to show others the work to which you dedicate so much of yourself but also it may be that someone in the audience really likes your cake decorations and decides to hire you to do their wedding cake.  The same could happen with your design work or flower arrangements or anything else you do.  In a way the presentation could lead to self-promotion although that is not the intention behind the gatherings.

On a different note, the 20×20 format cuts down the length of presentations – anyone who’s ever had to sit through a slide show knows that shorter is better.  Often presenters go on and on and turn a potentially interesting presentation into torture, squeezing full pages of information on slides and reading straight off the slides for what feels like a whole day.  When restricted to the 20×20 format presenters must better organize their presentations and in the worst case scenario audience and presenter only have to go through 6 minutes and 40 seconds of a bad presentation.

Then there is the social element.  One line that caught my attention on the site was “there’s nothing social about social networks.”  So true.  Instead of sitting alone at home with their computers, putting up their presentations on Facebook, people can get out to show their presentations to a live audience and to talk about their projects after they speak as they mingle with the audience.  They might even find people who are actually interested in their projects and want to know more, as opposed to virtual “friends” who are probably more interested in seeing their own updates about their trips to the refrigerator.  The gatherings take place anywhere the city organizers choose such as a bar, a restaurant, someone’s house or yard and so forth, and though the site doesn’t specify this, there might be an entrance fee to events depending on where they’re held (I found out by clicking on events’ links).

The PechaKucha format’s not all that special but…

Anyone could have come up with the 20×20 format.  In fact Ignite, another gathering for slide show presentations, has a 20 slide x 15 second format and there are other slide presentation gatherings with their own formats.  Guy Kawasaki, a venture capitalist who’s sat through hundreds of slide presentations, suggests using 10 slides x 20 seconds x 30 point font.  You could come up with your own 10×10 or 8×12 or whatever format.  What’s important is that some format be established to push presenters toward shorter and (hopefully) more interesting presentations in a professional or informal setting.

What is interesting about PechaKucha is that they went as far as to set up an organization and brand their gatherings, which seems to be one reason why they are becoming increasingly popular.  There’s no fee to use their trademark but to hold an event under their name an organizer must sign an agreement.  In this way the organization can limit the number of Nights in a given city to one and keep some sort of control over the types of events their name is used for; they certainly wouldn’t want to be associated with illegal activity for example.

It is definitely good news that this outlet is available to us all but I’ll have to wait for a presentation near me so I can find out first hand what it’s like.  If you’ve been to one of their “nights”, please let us know what you thought about it!

50 Gorgeous Geology Photographs

The field of geology encompasses study of the composition, structure, properties, and history of the planet’s physical material, and the processes by which it is formed, moved, and changed. It’s a beautiful, captivating natural subject, and today we’ve collected 50 gorgeous geology photos for your inspiration.

Upper Antelope Canyon by AaronPlotkinPhoto

Crystal Cave by JessDismont

Who wants to Climb the Hill by karil

CoalCape by jozefm

Antelope Canyon IV by tykee

Sunshine Corpse by Frightened-Lollipop

The Spirit Pool by LethArt

Twilight Footprints by Inebriantia

music in the stone by bigcbigc

ice cave by karil

Cave by sergemeeus

The Velvet View by Inebriantia

Lava Visions by Inebriantia

tyrannosaurus rex by karil

Capo d’Orso by colpewole

The Subway by coulombic

Magical Light by Babyc8kes

The Antelope’s Eye by stream-reflections

fine art lava flow 10 by extremeimageology

Midway Geyser 2 by jayshree

Grand Canyon – Mather Point by Karl-B

The Wave by Sommersonnenstrahl

Sandstone Waves by La-Vita-a-Bella

Sandstone geology by Marc de Ridder

Aerial Geology-1 by rynoceras

Pokhara Underground by M3tzger

Light changes all by Dhar-Leth

CLOSE UP OF RAMPARTS by CorazondeDios

Fins of Arches by josephhawk

Red Flute Cave by FrozenWhisperx

The Door by kongvmax

On The Terrace by Scubaozgirl

Spiral Pools by Snakeskii

Hoodoos of the Silent City by EvaMcDermott

Wave Rock 1 by fwscharpf

Grand Canyon from Above by porbital

Merrick Butte by Karl-B

Apex by heeeeman

North Cape 2 by rebelx

rocks and road by pauljavor

Wave by sarcasticseth

Communion by Villanelle

Geology gone mad: White Pocket by Chief Bwana

Red, White Pocket, and Blue Sky by Chief Bwana

White Pocket smile by Chief Bwana

Antelope Canyon by tykee

Thor’s Hammer HDR by biological

Grand Canyon 01 by DianaCretu

Horsheshoe Canyon Arizona by photoboy1002001


Share Your Geology Shots!

Geology can be dramatic, awe-inspiring, colourful, and absolutely mesmerising. I hope you’ve enjoyed the images above, and do use the comment section below to leave a link to your own shots!

5 Really Productive People

This is a list of the top 5 productivity pundits, in no particular order.  When you’re not reading up on it here, you can either check them out at their respective websites (or just read here and we’ll cite them when applicable).

  1. David Allen – Creator of Getting Things Done.
  2. Merlin Mann43Folders founder.  Mind you, his focus is now on creating stuff as opposed to advising on ways to do just that.
  3. Seth Godin – He ships, ready or not.
  4. Leo Babauta – Simply and effectively – with a certain amount of zen – he gets things to done.
  5. Scott Belsky – CEO of Behance and founder of The 99% Conference…he’s penned a book on Making Ideas Happen.

I’d be doing a disservice if I didn’t mention that there are oodles of other really productive people – and they help others do the same.  We’re here to help to help you be awesomely productive as well – and we’re going to continue to do it in the most awesome way we can.

Enter A 3D Samurai Chamber – Day 2

In this tutorial, we will build an entire 3D samurai chamber entirely within After Effects. From there we’ll animate a camera to fly through it as we light the whole scene. Finally, we take a look at depth of field. So there is a lot to cover!


Preview

Want access to the full AE project files and assets for every tutorial on Aetuts+, including this one? Join Ae Premium for just $9/month. You can view the final effect preview video below.

Tutorial

Download Tutorial .flv

File size 331MB


Premium Vector Pack – Eighties Music


We have a new set of vector illustrations available exclusively for Vector Premium members. Crafted by the group over at Designious, there are numerous retro style, rad, vector illustrations in this set. You can use them in your next project to give an 80s inspired feel where needed. Learn more at the jump!

Continue reading “Premium Vector Pack – Eighties Music”

26 Tuts to Jump-start Your Home Recording – Basix

Most tutorials here on Audiotuts are aimed at an intermediate and advanced levels. But there is definitely room for beginners here too, so each month we publish 2-3 Basix tuts. Here are 26 tuts to jump-start your home recording.

Basix tutorials don’t make assumptions about what you know. They start from the beginning, and explain all terminology. They are a way that beginners can train themselves up to the level where they can begin to tackle the other tutorials on the site. You can access all of our Basix tuts by clicking “Basix” on the top navigation bar of the site.

There’s a lot to learn when starting off in audio. These tutorials cover: setting yourself up for home recording; choosing and learning a DAW; best practices for recording and mixing; enhancing your sound with effects and EQ; creating new sounds with synthesisers; capturing the outside world with microphones; composing music and writing songs.

But we’re not finished yet. We’ll continue bringing you 2-3 Basix tutorials each month. What topics would you like to see covered? Let us know in the comments.


Setting Yourself Up for Home Recording

There is a lot to consider when setting up a home recording studio: computer hardware and software, musical instruments, MIDI controllers, audio interfaces. These tuts will get you started. Is there something we haven’t covered yet? Let us know in the comments.

  • A Beginner's Introduction to Home Recording

    1. A Beginner’s Introduction to Home Recording

    Home recording technology seems to get better and cost less every year. It puts power in the hands of ordinary people. Most of our tutorials here at Audiotuts are at the intermediate or advanced level, but we do have some more basic tutorials and articles aimed at the beginner. This article will refer to many of them, and hopefully give you an overview of what’s involved in getting into home recording.

    Visit Article

  • A Basic Guide to Acoustic Treatment

    2. A Basic Guide to Acoustic Treatment

    After touching on the critical subject of acoustics and room treatment in a few recent tutorials, I felt it was fitting to create a basic guide to acoustically treating your work space. Of course this is an extremely technical subject and this tutorial in no way claims to be the definitive guide to acoustic treatment, but these tips and guidelines should get beginners up and running and generally help to clarify the whole subject of room acoustics.

    Visit Article

  • How to Manage & Minimize Latency in Your Audio Projects

    3. How to Manage & Minimize Latency in Your Audio Projects

    Whatever genre you are working in and whatever DAW you use to produce your music, it is likely you have suffered from latency issues at some point. Whether you are aware of it or not latency can be a real problem in the modern digital studio and can really effect your workflow. To help you tackle this tricky subject I’ll break it down into easy segments, starting with what latency actually is and following onto subjects such as optimizing your system and how to tackle latency throughout your workflow.

    Visit Article

  • How to Configure Your Axiom Control Surface with Logic Pro 9

    4. How to Configure Your Axiom Control Surface with Logic Pro 9

    MIDI controllers with control surfaces are quite common and affordable these days. They can control just about any aspect of your DAW, but their strength is in allowing you to control the DAW while at the keyboard as opposed to being used for a mixing session after tracking is finished. Since the Axiom doesn’t come with any Logic presets, let’s take a look at how to configure all those buttons, faders and knobs from withing Logic.

    Visit Article


Choosing and Learning a DAW

One of your major decisions will be the choosing your DAW – the digital audio workstation software that will be the center of your audio universe. If you’re on a Mac and budget conscious, you may opt to begin with GarageBand, and move on to Logic Pro when you feel you’re ready. The tuts below will help. If your computer is running Windows, you might want to start with these articles: 7 Free Digital Recording Apps for Windows, 8 Free, Cross-Platform Apps for Musicians. If you’re familiar with Linux, check out Why Linux Could Be Your Next Digital Recording Studio and 29 Music-making Apps for Linux.

  • How to Compose Song Demos in GarageBand, Part 1

    5. How to Compose Song Demos in GarageBand, Part 1

    GarageBand is easy to use, feature rich and affordable, making it a perfect compositional tool for aspiring songwriters. In this three part tutorial, I’d like to show you how to develop your guitar riffs and chord progressions into fully fledged song demos using GarageBand’s built in tools. In this first part, we’ll cover some basic orientation and get started on developing some ideas.

    Visit Article

  • How to Compose Song Demos in GarageBand, Part 2

    6. How to Compose Song Demos in GarageBand, Part 2

    This is the second of a series of tutorials covering the basics of song demo production in Apple’s GarageBand. The aim of these tutorials is to show you the basics of recording your own song demos, covering the elements of the creative process as well as how to use the software.

    Visit Article

  • How to Give Life To GarageBand Tunes With Automation

    7. How to Give Life To GarageBand Tunes With Automation

    GarageBand is a powerful all-in-one DAW and can be used for simple podcast creation to full-blown song production. While its interface is significantly different than its older siblings (Logic Express and Logic Pro), it still packs a number of powerful features that might otherwise escape the average user.

    Visit Article

  • Understanding Logic Pro's Environment

    8. Understanding Logic Pro’s Environment

    The Environment is the core of Logic. It can be the cause of a lot of confusion (and even fear!) for new and even more experienced Logic users. In the first of three tutorials that focus on the Environment I’m going to explain exactly what the Environment is and why it makes Logic the most flexible and advanced MIDI sequencing package on the market.

    Visit Article


Best Practices for Recording and Mixing

Recording requires as much technique as it does taste. You’ll get much better results if you record the right way. Find out how in these tutorials from the experts. What else would you like to learn about recording and mixing techniques? Let us know in the comments.

  • How to Use the Sound Cube to Plan Your Recording

    9. How to Use the Sound Cube to Plan Your Recording

    If you don’t lay down plans before you get into the studio, you’re asking for trouble. If you don’t, the sounds are going to end up clashing for attention and the song is going to sound like it was thrown together unless you figure out what you’re doing in advance and plan accordingly. Which instruments will be up close, in your face, in the mix? Which ones will be far back? Which instruments will dominate the high frequency spectrum and which ones belong in the bottom? These are just a few opening thoughts, and by no means the whole shebang.

    Visit Article

  • How to Record Vocals in a Bedroom

    10. How to Record Vocals in a Bedroom

    Recording vocals can be one of the more challenging tracking phase processes you may run into. If it wasn’t enough of a tough cookie in the studio, you can be sure it’s a daunting task in a bedroom (or a home office or any other room you’ve set aside for recording fun that wasn’t purpose-built for it). The sad truth is that you can’t get pro quality vocals happening at home. But you can improve the sound by a mile if you’re armed with a few tricks and tips, and that’s what I intend to give you.

    Visit Article

  • How to Record the Acoustic Guitar

    11. How to Record the Acoustic Guitar

    Recording acoustic instruments can be scary for beginners. In this day and age many people just plug in and play their instruments, electric guitars, basses and synths, never needing to record an instrument except the odd vocal track. True as it may be that we get better sounds out our guitar plug-ins and software synths with every update, we must not forget how to record a ‚Äúproper” instrument, in the real world.

    Visit Article

  • How to Mix the Bass Guitar

    12. How to Mix the Bass Guitar

    The bass guitar, along with the drums is the foundation of the rhythm section. It needs to sound deep and punchy without overpowering other elements in the mix. We need the bass guitar to groove and supply us with a steady rhythm as well as defining the melodic and chordal structure of the song.

    Visit Article


Enhancing Your Sound With Effects and EQ

Effects and EQ are there to enhance the sounds you’ve already recorded, but if you use them the wrong way you’ll achieve the exact opposite. The following three tuts will get you started with EQ, delay and compression. There’s so much more to learn. What would you like us to cover next?

  • 8 Easy Steps To Better EQ

    13. 8 Easy Steps To Better EQ

    Knowing how to use an equalizer is a fundamental skill for anyone working with audio, yet it is one of the most abused. Here are some tips and tricks for using your EQ more effectively. You’ll notice there are more don’ts than dos on this list; that’s because EQ is best when used in moderation.

    Visit Article

  • Getting to Grips with Digital Delay

    14. Getting to Grips with Digital Delay

    Sometimes it is good to go back to basics, and I thought it would be helpful if I were to cover the essential building blocks of music production. Digital delay is an effect that is used time and time again in mixes and it can create all sorts of useful results.

    Visit Article

  • The Beginner's Guide to Compression

    15. The Beginner’s Guide to Compression

    Compression is one of those studio processes that is all too often taken for granted and not used to its full potential. Today’s producers think nothing of inserting compressors on every single channel of their DAW when mixing, but old school engineers had to learn to make the most of only a few units of compression‚Äîand this made us learn them inside out.

    Visit Article


Creating New Sounds With Synthesizers

When I got my first synthesiser in the 80s, I felt there was no sound I couldn’t make. I spent hours creating new patches, and experimenting with knobs and sliders. But there are so many parameters to tweak and concepts to learn that it can seem overwhelming. Here are three tuts to get you started.

  • A Basic Guide to Subtractive Synthesis (Part 1)

    16. A Basic Guide to Subtractive Synthesis (Part 1)

    This screencast is the first tutorial in a series on synthesis. This first installment shows a basic guided tour of Subtractor in Reason and covers oscillators, filters and envelopes.

    Visit Article

  • A Basic Guide to Subtractive Synthesis (Part 2)

    17. A Basic Guide to Subtractive Synthesis (Part 2)

    This is the second part in a series of screencasts about subtractive synthesis. In this part we take a close look at modulators, LFOs and external controllers. Hope fully these two tutorials will give you a basic all round knowledge of a standard subtractive synthesiser.

    Visit Article

  • Your Guide to Getting Started with Synthesis in Reason

    18. Your Guide to Getting Started with Synthesis in Reason

    A synthesizer is an electronic instrument that reproduces a variety of sounds by generating and combining signals of different frequencies and waveforms. Propellerhead’s Reason features various forms of synthesis, and it’s often difficult for the user to decide which synthesizer to use. In this tutorial, we’re going to explore the art and the science of synthesis, as well as discuss how Reason’s synthesizers can be used, and in which situations you should use them.

    Visit Article


Capturing Sound With Microphones

Make the right start by buying the right mic, and using it the right way. These tuts will get you started.

  • The Beginner's Guide to Microphones

    19. The Beginner’s Guide to Microphones

    We’ve published a few lists of microphones for those in the market before, but we’ve never given you a proper introduction to microphones before today. Microphones are generally not well understood and one of those key elements that gives away a home recording is the wrong microphone used for the job. It’s actually quite easy to make microphone decisions if you know the basics, whether you need to pick one out or place it properly.

    Visit Article

  • Making Your Microphone Placement Work

    20. Making Your Microphone Placement Work

    Miking up an instrument isn’t an easy thing. It’s not like a digital camera where you point towards what you want to capture and then click. Super cool vacation photo! You might not end up with a great photo, but you can certainly make it better afterwards. Not to offend photographers, but in audio, if you have a lousy source sound from the beginning, you are going to end up with a lousy mixed sound in the end.

    Visit Article

  • 10 Best Affordable Microphones for the Home Studio

    21. 10 Best Affordable Microphones for the Home Studio

    Making music is perhaps one of the most expensive hobbies in the world‚Äîthat is, aside from tasting truffles. When you’re looking to set up a decent home studio, it’s hard to find a way to stay within budget without ending up with a terrible sound. Here are ten options to minimize expenditure while still getting a decent sound out of your system at the end of the day, by buying smart when it comes to one of the most important types of studio equipment: microphones.

    Visit Article


Composing Music and Writing Songs

Are you hoping to write your own songs? Understanding some music theory will help you write better music. Understanding the process of songwriting will help you write better songs. While you’ll need to come up with your own inspiration, these tuts will help you with the “perspiration” part of the equation.

  • Beginner's Guide To Songwriting - Part 1

    22. Beginner’s Guide To Songwriting – Part 1

    This tutorial is the first in a series focused on showing complete beginners how to write a simple song. This series will focus predominantly on the process of writing a song, rather than the specific software and hardware techniques, skills and applications you might need in the recording, mixing, and mastering of that song.

    Visit Article

  • Beginner's Guide To Songwriting - Part 2

    23. Beginner’s Guide To Songwriting – Part 2

    This BASIX tutorial is the second in a series focused on showing complete beginners how to write a simple song. This series will focus predominantly on the process of writing a song, rather than the specific software and hardware techniques, skills and applications you might need in the recording, mixing, and mastering of that song.

    Visit Article

  • Beginner's Guide To Songwriting - Part 3

    24. Beginner’s Guide To Songwriting – Part 3

    This is the third tutorial in a series focused on showing complete beginners how to write a simple song. This series will focus predominantly on the process of writing a song, rather than the specific software and hardware techniques, skills and applications you might need in the recording, mixing, and mastering of that song.

    Visit Article

  • The Basic Functions of Harmony

    25. The Basic Functions of Harmony

    “All you need is three chords and the truth.” At it’s core, all music can be considered an interplay of tension and release. The degree of tension can come from dissonance vs. consonance, orchestration, dynamics, or a hundred other musical elements. The key to using tension and release is balance. One reason great chord progressions sound good is because they are well balanced in their use of tension and release. In this tutorial we’ll examine the very basic steps of harmonic progressions to understand how this balance works.

    Visit Article

  • Using Pedal Points

    26. Using Pedal Points

    The pedal point is a common compositional device with a range of useful purposes. In this tutorial we’ll learn what a pedal point is and how it can be used for a variety of functions.

    Visit Article


Quick Tip: Create Your Own Leather Texture Using Filters


In today’s quick tip tutorial we will demonstrate how to create a leather texture from scratch using Photoshop filters.


Step 1

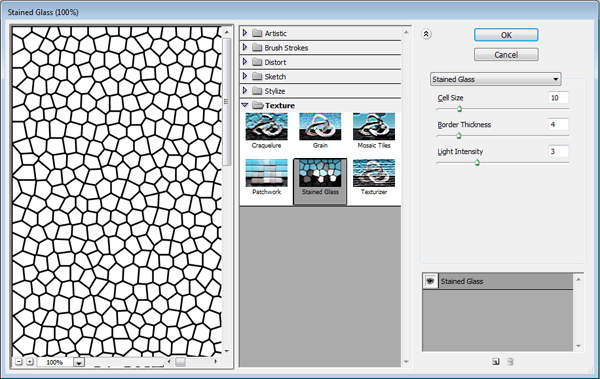
Create a new file with a white background. Set the foreground and background color to black and white by pressing D. Click Filter > Texture > Stained Glass.


Step 2

Create new layer and fill it with white. Change its opacity to 50%. Repeat previous filter by pressing Cmd + F. If you want tweak the setting use Cmd + Alt + F.


Step 3

Press Cmd + E to merge both layers. Click Filter > Noise > Add Noise.


Step 4

Press Cmd + A then Cmd + C to copy all to clipboard. Open Channels panel and create new channel. Then Paste (Cmd + V).


Step 5

Click RGB channel to return to Background layer. Click Edit > Fill, choose Use: Color and pick your color. You can use any color you want, just make sure it’s dark enough for the next filter.


Step 6

Click Filter > Render > Light Effects. In Texture Channel choose Alpha 1.


Step 7

The default light is too dark. You need to add more light sources by dragging the lamp icon to the preview box. Set its type to Omni.


Step 8

Click OK and the result should look something like below.


Step 9

Change the background and foreground color to white and black by pressing D then X. Activate the Gradient Tool, choose radial with white to transparent. Create a new layer and draw a gradient.


Step 10

Change opacity to 4%. This will add subtle lighting to the leather.


Step 11

The Lighting Effects filter will add a small border to the image (just a few pixels). To remove it, click Image > Canvas Size and reduce the size of the image.


Step 12 (Optional)

You can change the color by adding an adjustment layer Hue/Saturation. Check colorize and move sliders until you satisfied with the result.


Final Image

That’s it. I hope you like the final result and have learned some new techniques from this short quick tip tutorial.

How to Blend Images Together Using Adjustment Layers – Psd Premium Tutorial


Today, we have another Psd Premium tutorial exclusively available to Premium members. If you want to take your photo manipulation skills to the next level, then we have an awesome tutorial for you. Learn more after the jump!


This Premium Tutorial is Filled with Creative Tips

In today’s tutorial you will learn how to blend different images together using adjustment layers and create simple but effective photo realistic illustrations.


Professional and Detailed Instructions Inside

Premium members can Log in and Download! Otherwise, Join Now! Below are some sample images from this tutorial.


Psd Premium Membership

As you know, we run a premium membership system here that costs $9 a month (or $22 for 3 months!) which gives members access to the Source files for tutorials as well as periodic extra tutorials, like this one! You’ll also get access to Net Premium and Vector Premium, too. If you’re a Premium member, you can log in and download the tutorial. If you’re not a member, you can of course join today!