Create a Detailed, Vector-based iPhone Illustration, Part 2


In ‘Create a Detailed, Vector-based iPhone Illustration, Part 1‘, we made our iPhone and the first five icons. Now we will finish the remainder of the icons and add the final touches to the iPhone. You will learn many useful tips and tricks for icon design and how to create a realistic iPhone complete with side view and stylistic drop reflection.

Continue reading “Create a Detailed, Vector-based iPhone Illustration, Part 2”

Exploring Digital Audio Workstations

Creating music can be fun, frustrating, rewarding and time-consuming. Computer technology is a great leveler, bringing the fun and frustration to just about anyone. It’s “affordable”, not cheap, but musicians have always been willing to spend money on quality.

This article was previously published on the AudioJungle blog, which has moved on to a new format in 2010. We’ll be bringing you an article from the AudioJungle archives each week.

Over the next months we will be running a series of articles on digital audio workstations (DAWs), which allow musicians to record, edit and play back their music. The first time I heard the term “digital audio workstation” was in the mid-80s in an article that described Roland’s new D20, a multitimbral keyboard with a built-in sequencer, allowing you to create and record music on one device.

Today, while some DAWs are integrated devices (see this article for some inexpensive options), the most popular (and most powerful) are computer solutions using specialized hardware and software. This article will introduce you to them. Continue reading “Exploring Digital Audio Workstations”

Group Interview: Client Based Photo Manipulation Process


It’s not possible to imagine advertisements, and designs, without photo manipulation – but in most cases, the work done by a designer isn’t even mentioned. However, you all know that it’s highly challenging and often difficult to do client based design and illustration work, such as photo manipulation. We’ve asked eight highly-skilled and well-known photo manipulators about their process and workflow for solving their client’s briefs. They have illustrated their answers with a specific example from their work as well.

The Group Interview

James White, Signalnoise

My first step when doing a client based photo manipulation is to ask what the goal of the piece will be, where it will live, and what the art piece will be used to promote. Under normal circumstances, the client has a general idea of what they want incorporated, whether that is a logo, photo, slogan or whatever, so it’s very important for me to get this information before going anywhere near my sketchbook. I try to find out why the client is excited about this given project, and use that information to form the majority of the concept.

After I have an idea of what the client is expecting, and what message the piece will enforce, I then move onto sketching out several variations and directions that might work for the final.

The client never sees my sketchbook because, to anyone other than me, the thumbnails resemble crude hieroglyphs drawn by a simpleton.

I always start with the sketchbook. The best way for me to work through the initial conceptual stage is to get away from the computer, grab a few of my art and design books for inspiration, and head to my local watering hole to start drawing. I will sometimes create 30 or 40 thumbnails exploring visual ideas, type treatments, composition, etc. until I land on (or near) an idea that might work.

The client never sees my sketchbook because, to anyone other than me, the thumbnails resemble crude hieroglyphs drawn by a simpleton. But to get around this I will create a few vector mock-ups in Illustrator to show the client. This version of the thumbnail allows me to quickly explore color treatments using basic shapes and typography, and makes things easier to visualize onscreen. I will typically send the client a few vector versions of my best thumbnails.

Once the client has a general idea of the concept and direction, and approves. I will then move to building the final illustration in hi-res. Since my final illustrations are very complicated with many elements, layers and effects, I try to keep the client in the loop as much as possible by sending them in progress versions in case they can offer any feedback along the way.

I chose to send you this poster design, entitled “Elle.” This isn’t a client piece in the conventional sense, but it presented a very unique challenge. Earlier this year I was asked by Getty Images to attend a meeting for a new platform they were launching called Thinkstock, an online stock imagery source. I was given the option to create a piece of unique artwork inspired by their images, where we could use any of their vast library to create. There were no limitations, which brought with it an infinite number of directions I could go visually. Daunting, to say the least.

I started looking through their library for anything to jump out at me and landed on a photograph of a lovely lady. After a few days of knocking ideas around and creating many sketches along the way, I landed an the concept I wanted to pursue. I assembled a pile of many images from their photographs and proceeded to piece them together in Photoshop based on my initial concept. The client was happy with the piece, so much so that it was featured in Creative Review magazine as promotion for Thinkstock.

elle work by james white

Saad Moosajee, SaadArt

My first step is to decide what sort of manipulation I will be doing, which is accomplished by thoroughly reading the brief. After I have done this I will usually run 1-2 images of the style I am planning to use by the client to make sure it is exactly what they are looking for, and then begin the manipulation.

Sometimes I can get a good idea just from a brief, but this also depends on whether or not you have an art director for the project.

It really depends how I come up with conceptual solutions for clients. Sometimes I can get a good idea just from a brief, but this also depends on whether or not you have an art director for the project.

This project was completed for 361 degrees China, one of the biggest sports company in the entire country. The brief was initially provided by The KDU, which involved a simplistic and graphic illustration of the logo with as much detailed as possible packed within the logo.

The color scheme was supposed to be fairly monotonous using orange. The client really wanted a powerful illustration that grabbed the viewers attention which could also be converted to a T-shirt Graphic later on. This was my final result, which was composited using Cinema 4D, and Photoshop CS4. The image was used in the KDU’s presentation towards 361 and will also as a T-Shirt later on in the campaign.

361 degrees work by saad moosaajee

Mike Campau, SeventhStreet

How I go about solving a client brief depends on what the client supplies. Sometimes they have a flushed out idea and they provide a comp or rough skinny line.

In this case I would just start researching the details of the design, looking for textures, props, elements, and any parts and pieces that will help me build the final concept. In other cases, a client can just give me a verbal or written concept with no visuals and it is up to me to start pulling together reference and images to build a concept around. This involves surfing the net, rummaging through my collection of stock, or going out on location and shooting reference. I find this tends to spark my creative concepts more than sketching does, as I can get inspiration from something unexpected or from the experience of a location and not relying on what preconceived vision is in my head.

In this digital age we live, it might seem strange, but sometimes a meeting with a real person or an actual conversation is needed to better explain the direction of the project or to get better insight from the client.

I usually do all my concepts visually using photoshop. I will take all the elements and images that I came up with from my research and start roughing them together. More big picture stuff, not worrying about details, masks or perspectives. Just to get an idea of size and composition. This process is obviously very fluid and is constantly evolving, sometimes the finished piece looks nothing like what I started with.

During my projects, I will keep the client up to date on progress with WIP jpegs that they can mark up with comments and input. In this digital age we live, it might seem strange, but sometimes a meeting with a real person or an actual conversation is needed to better explain the direction of the project or to get better insight from the client. This process usually happens 3-4 times during a project and sometimes even more depending on the complexity.

This was an image I did for Campbell-Ewald and their client Chevrolet. It is being used for their fishing simulator that is traveling around the country on the FLW Outdoor fishing tour, and of course under a tight timeline.

For this project, I was supplied a rough comp, some stock photo assets and a hard drive filled with a location shoot for the truck, background and talent. This was a challenging project as they wanted the illusion of the camera being placed right at the water line, but they didn’t shoot any underwater shots. So, everything had to be created in Photoshop, using elements I shot myself and a few of my own tricks. In the end this image was composited from 51 separate shots… but that wasn’t it.

Once the image was finally pieced together, I had to give the image an overall lighting effect that created a more modern feel. This project also included a separate image for the back of the trailer that was also pieced together from multiple photos. All in all, the project took one week to complete, with client reviews and feedback just about everyday along the way.

chevrolet work by mike campau

Ferdi Rizkyanto alias Pepey

For a client based work, usually my first step is to understand the client’s brief and identify the core message that they want to deliver to their target audience.

It’s always helpful to take time to do all the necessary research. I found that the more I explored, the easier it was for me to come out with a few ideas in how to communicate the messages.

It’s always helpful to take time to do all the necessary research. I found that the more I explored, the easier it was for me to come out with a few ideas in how to communicate the messages. The ideas themselves could be something familiar but presented in a different and unique manner (something new which they haven’t seen before or something that will attract attention). Of course, some of these ideas are not always easy to implement, I need to keep sharpening my creativity skills by trying to learn new things and push myself to pay more attention to details in every execution to get the desired visual results.

I sent this project in for the Hugocreate competition. Hugocreate wants to spread the message that for every HUGO Man or HUGO Element bottle sold during the “One Fragrance, One Tree” campaign, HUGO Fragrances will plant a tree in the Amazonian rain forest.

After exploring the issue, I came up with a few ideas, and one of them is the forest with the river as the main visual because of it’s familiarity with the Amazon rain forest and to help create the feeling of being a part of something big. Next I created a fast rough draft to see if it will have the desired result. After I’m sure about it, the next step is to execute and finalize it.

hugocreate work by ferdi rizkyanto

Wojciech Pijecki, Zerobound

Basically many clients ask for feedback often. Before you even start to work, sometimes you need to show a sketch or explain the way you plan to do the illustration.

If I wasn’t provided with any work samples or sketches from then client, I simply settle all the details and expectations. Then I’m ready to start working on the very basic form of the design. The very first steps are based on experimenting with lots of unextracted pictures and mixing them into something that makes sense. But you have to strictly follow client expectations.

There is no gold conceptual solution for clients. It’s obvious that each case needs a different approach.

There is no gold conceptual solution for clients. It’s obvious that each case needs a different approach. Definitely you always need to fit to clients needs and tastes. It’s very hard to fully force your concept, as every client will rip open your illustration and change it into something way different than you planned to do.

About finalizing works: First I set my rate for a project, then I always take some prepayment, as many clients like to just vanish with their offers and promises. Concerning the payment: If it’s international, the quickest solution for me is Paypal. If it goes within my country, then we use regular bank transfers.

This project was created on behalf of Brainnovative company for a Polish sport clothing store. I was responsible for the background illustration and Brainnovative created the rest web design including the coding.

I was provided some work examples of how this should look. Although we had a clear point on everything, the task was pretty hard. The final product couldn’t be overloaded and distracting but had to remain as a nice, dynamic, connected illustration which points to sport. Beside that, there were some other expectations – for example to combine a basketball player into the illustration, etc.

As usual, photo searching/exchanging process was very tiring. Also the final approval took some time as there are always some details to touch up. In the end, we’ve gone radically to a horizontal flip of the whole design, but this kind of worked out very well. I came up with the final design pretty fast and I was very surprised that there were no more expectations and pressure from client. So this project was really executed with pleasure.

web design photo manipulation work by wojciech pijecki

Marcel Pirosca, studioul

The first step I do is read the brief. Then I personally spend some time disconnected. I try to visualize the message in various ways. Although you practice this consciously, sometimes nothing comes up. An idea could pop up at anytime when you’re not thinking consciously about it. It happens to me a lot in my sleep.

An idea could pop up at anytime when you’re not thinking consciously about it. It happens to me a lot in my sleep.

That’s why I take a break before starting. The moment I got something going, I build on it, twisting and turning that idea until I finally have a concept in my head. This process can involve sketches/doodles or just plain thinking. After that a lot of planning follows on how to obtain each visual element. Do I need to take some pictures? Can I find some stock? Can I compensate here and there with 3D? When I got an answer to these question and have something which is technically achievable, I can start working.

I imagine coming up with conceptual solutions in a way that is achievable with the tools at hand. Fortunately for me, I have a small photo studio which I can always use to enhance my pictures. If needed, I take pictures of people, objects, whatever fits in that room, and blend them all together in Photoshop. Once you have the basic idea, you know what you go after.

I often take shots of the same subject from different/similar perspectives, so I have plenty of variations to choose from. Sometimes I replace parts of them from two similar shots. It is generally easy to do that as long as you have the same lighting. The Photoshop work complements this stage, by allowing you to create collages and basically putting all these images into context. It is sometimes hard to see if your image conveys the right message, that’s when you need to take a break and come back with a fresh eye.

This whole image began from a photograph I took, which I thought had a pretty impressive perspective. I kept looking at it and wondered how I could use it. First thing you notice is that the guy’s looking like a surfer. I tried to develop on that and thought about the kind of elements I could add to make it even more interesting.

The next thought came to mind. Wouldn’t it be cool if he actually rode on a music volume stretching out to infinity? Easier said than done. To add a bit of dynamic movement the composition stretches over the diagonal fading away in the distance with elements moving both in the foreground and background. I never wanted to use blur to give that impression, since it would’ve only taken away from the details I worked so hard to create. All in all, from conception to execution, this image had taken about five days to create, stretched over a few weekends.

I did a whole tutorial on the technical side of things, which can be found here: Create a Funky Perspective of a Model Riding Digital Volume.

digital surfer by marcel pirosca

Bram Vanhaeren, into1

After going through the brief a few times, I write down some keywords, the main keywords like, "Fresh", "Young", "Colorful but Playful". Then I quickly go through some galleries to find a matching stock to work with. Once I found some good stock I make a ’sketch’ in Photoshop with it, few elements to create the mood and show it for the first time to the client to hear if the stock image is correct, so I can order it and finish the artwork. Very important in this business is to keep an eye open for your deadlines. What you don’t want, is to finish 5 artworks on the same day. So when you get a brief, this is where you start and try to finish the project as soon as possible. If the client has no deadline, that’s a lie. They will always pick a date a little bit later. So try to start on it right away, after the briefing. So it’s fresh in your memories.

Somehow, every time I’m looking for a concept, I find it in the most bizarre places.

My job is a graphic designer, so most of the time the clients come to me with a concept and all solutions. Then it’s my job to translate their wishes into an image. Of course I will give it some twists, but then again the director have to agree with it. In my case it’s my brother most of the time. So it’s not a big deal. I do have some tricks to come up with solutions, for example, research on the wrong places. Somehow, every time I’m looking for a concept, I find it in the most bizarre places.

I will use the work Passion as an example. To be honest, I started on this project with no budget and no plans. All I wanted to do is to help the community DesignersCouch as a friend and create a wallpaper for their website. But the wallpaper received more exposure then I thought and it turned into their flyer, which was handed out at the Phoenix Design Week 2009.

I spoke with the director of DesignersCouch about my artwork and he told me it should be creative on many levels and targeted to students and young professionals. But creative was the most important keyword, because it is a creative network. Then I started to think about a concept that matches every keyword and I came up with the idea. Dancers are perfect examples of artists. They’re passionate, they work hard, they’re creative in their choreography and you can perfectly mix music and art. So the concept and idea was chosen and all I had to do is mix it up and work it out.

I found a lovely stock image of a dancer, she has a powerful look and she shines passion and hard work. So it was the perfect stock to work with for this concept. Then I drew some elements in illustrator such as the piano, the brush, and the clock. Finally, I added some movements and stuck to the color theme of DesignersCouch and finished the artwork.

In the end the director was really surprised and happy to see this wallpaper and offered me some jobs. So don’t be afraid to start something to support a group or event, there is always a chance they will contact you and offer you some amazing opportunities!

passion by bram vanhaeren

Alex Varnese, alexvaranese.com

My method is somewhat unique in that where others might use photo manipulation to solve a given problem, I create my assets from scratch in 3D. As a result, I have the ability to deliver visuals to a client that are, within reason, custom-made forms to fit their concept exactly.

There are trade-offs, of course, such as the sheer volume of additional labor required, as well as the fact that unless I’ve got a generous schedule and budget to work with, true photorealism usually isn’t feasible. But at the end of the day, there’s something very satisfying about being able to create something truly new; a visual idea that didn’t exist before the project began.

I don’t think there’s any definitive answer to the question of how one comes up with a concept, but most of my clients approach me with a piece of my existing work already in mind as a reference. I try not to pimp out my personal art as a menu for commissioned design projects too much, but there are certainly times when it comes in handy to do so. As a general rule, the more you’re known for your work as an individual, the more likely it is that you’ll get receptive, engaged clients who want you to be yourself instead of acting like a hired gun who will solve their problems in an faceless, interchangeable way.

Once I’ve got an idea in mind, I tend to make things digital pretty quickly. I’ve found that blocking something out in 3D — or even 2D with a program like Illustrator — gets the point across to a client much more easily than sketches. Hand-drawn comps are great when you’re trying to convey a very specific detail like a shape or a layout, but when it comes to hitting the client with a complete visual idea for the first time, the digital route makes it much easier to faithfully approximate the color, mood, texture and general vibe.

The real beauty of the result, however, was that it differed so much from my first visualizations of the idea.

One of the best examples of my process is Elektrotrash, a "found art typeface" I designed by cobbling an assortment of parts together into letterforms. I knew I wanted to create lettering that looked like a random collection of discarded, real-world items like broken audio cassettes, circuit boards and the like, as well as abstract elements to flesh out the shapes, but I didn’t have a very clear sense of the big picture. It’s not uncommon for me to jump right into production without a lot of planning beforehand, but the complexity of the compositions and the depth of detail prevented me from doing so in this case. This was a situation where sketching was the most appropriate route; I knew what kinds of elements I wanted to work with, but I needed a quick way to visualize how they might live together.

Once I’d drawn a general idea for each glyph, production was fairly straightforward. I created the individual parts; first, then arranged them into the desired shapes based on the sketches. Some trial and error remained, of course, and numerous details changed between the original sketches and the finished product, but that’s to be expected.

The real beauty of the result, however, was that it differed so much from my first visualizations of the idea. Despite the planning and attention to detail that went into the process, I still managed to end up with something that was worlds apart from what I initially had in mind when the concept came to me. Whenever possible, I try to embrace that uncertainty and appreciate the fact that the outcome may surprise me. In the end, all that matters is ending up with something worthwhile.

elektrotrash by alex varanese

Quick Tip: 3 Unique Techniques for Group Photos

Taking group photographs can always be a challenge. Not only do you need to perfect your camera technique, you also need to manage the pose, behaviour and interaction between a large number of people! Today we’ll be looking at three tips that can help you achieve unique and interesting group photos.


1. Get High

For large groups, a wonderful technique can be to find a high vantage point and shoot down towards them. This makes it easier to get everyone in the shot, and helps avoid the problem of some people being taller than others.

Looking up is often the most flattering pose for portrait photography, so everyone will thank you for capturing their good side and avoiding any double-chins!

If you don’t have anything that makes a perfect vantage point, try to find a ladder that you can climb up to reach a better height. You don’t need to be fifty feet up in the air – just a slight elevation will work wonders.


2. Centre of Attention

When you have a group photo where one or two people are the main focus of attention (the bride and groom at a wedding, for instance), an interesting technique can be to have the other subjects look at the couple, rather than the camera.

This makes the viewer feel that they are joining in with the process of appreciating the couple, along with everyone else in the photo! Always be sure to take another photo with everyone looking at the camera as well, just in case the client prefers a more traditional composition.


3. Take Several Shots

With any group photo, taking multiple shots is absolutely key. You’ll help to minimise the chances of someone blinking at an unfortunate second, and ensure that everyone is looking in the right direction.

That said, don’t strive for perfection too much. Some of the most natural, candid shots can occur when everyone isn’t perfectly posed. It’s often worth letting people laugh, joke and interact while you capture the action as a bystander.

Be sure to experiment with zoom/distance as you keep pressing the shutter. Get close for a few head and shoulder shots, and step right back to fit everyone in.

It’s also worth trying different apertures to bring certain member of the group into focus more than others (as seen above). This can be a great way to emphasise one particular person’s activity or pose.


Share Your Techniques

Do you have any of your own techniques and suggestions for great group images? Feel free to share them in the comments!

Paying Your Dues As An Entry-Level Employee

“Entry-level” work often consists of the mundane, tedious tasks that managers and veterans just won’t do anymore. The term itself makes it quite clear that entry-level positions are at the bottom of the office rankings. Being the “new guy” or the “rookie” at work can seem like a raw deal, but the right outlook can help you pay your dues as painlessly as possible. It’s a rite of passage that almost every one of your co-workers survived at the start of their career. If you do your entry-level work right the first time, you’ll never have to revisit the bottom of the totem pole. But, if you approach it with a poor attitude and a shaky work ethic, you might find yourself a permanent position in entry-level limbo.

No Credit, No Blame

While entry-level employees don’t get a pat on the back or a raise when a large project succeeds, they also don’t get blamed or fired when one fails. Upper management makes the crucial decisions that steer the company’s efforts, and as a result they carry the accountability (and the liability) for those decisions.

This is a double-edged sword for greenhorn workers: Credit for your efforts is the catalyst for a promotion out of entry-level status. You need it more than anything else, and unfortunately it’s very hard to obtain from a low position in the rankings. Blame, on the other hand, is something you don’t need at all. After all, you’re on the bottom rung of the company ladder, and getting blamed for a company failure could land you at the next position down – “Former Employee.”

So, while that elusive credit is in short supply, so is the blame that could severely damage your standing at work. Thus, the lack of both credit and blame could be seen as a perk of entry-level employment. The managers and executives have to ride a shaky roller-coaster of brilliant successes and dismal failures, but you get to enjoy a steadier, smoother ride with much less weighty responsibility and additional pressure.

“I Don’t Do Coffee… Do I?”

As an entry-level employee, you still haven’t shed those intern-like tasks. You might have been told in your interview that you will need to “wear many hats” or be a “Jack (or Jill) of all trades.” Managers and veterans might have “an exciting, dynamic, multi-faceted role in a fast-paced work environment,” but those words mean something totally different on an entry-level job description. For the greenhorn, those terms are just workspeak for saying that you might end up doing some mundane, menial tasks that don’t exactly further your experience or skill set. While the veterans are attending business trips, product launches and conferences, you might be stuck with whatever day-to-day work remains undone, which can include some pretty boring, unpleasant tasks. In fact, the most “dynamic” and “fast-paced” part of your schedule might be your 5pm pack-up.

Don’t take the menial work as a bruise to the ego. Your boss and your coworkers most likely had to do the same thing. You just didn’t get to witness them delivering a package, unjamming the copier or grabbing lunch and coffee for their boss. There will always be some less-than-enjoyable parts to any job. Even rock stars, astronauts and race car drivers have some grunt work to deal with. You’ll never be rid of it entirely, but it will get smaller every time you prove your worth.

Some of these entry-level tasks can work out surprisingly well. You might get to step outside to deliver a package. You might be excluded from mind-numbing management meetings fraught with buzzwords and boredom. Later in your career, you’ll be dying for a reason to get out of a meeting, or to get out of the office altogether.

Pay Your Dues One Step at a Time

If you find yourself frustrated or resentful of the strange grab-bag of entry-level tasks, remember that your outlook and attitude can be your best friend or your worst enemy.  Unless you have a graduate degree from a top college, you won’t be soaring to the top of the food chain in one big leap. If you’re like the rest of us, you’ll have to do it one step at a time. This is just one of those many steps, and you’re one step farther than you were when you wrote endless cover letters and took on unpaid internships. Be patient with your career.

Do it right the first time. If you perform well at your entry-level job, you’ll have several great recommendations and an extensive list of accomplishments for your resume. That way, you’ll have paid your dues for good, and you’ll have a very positive record of it.

Then, you can shoot for that dream job…

21 Motion Graphics and Visual Effects User Groups and Meetups

    This is probably going to be an incomplete list, and I will say right up front that this can just be the beginning! There are groups everywhere discussing our favorite programs, places where we can geek out on animations, software, and technique, but a lot of us don’t know about them even if they are right in our backyard. Today I am going to identify some of the user groups and meetups that I know about personally, as well as leave the comments open for you to add your own links to the groups I might not have mentioned!


    • After Effects New York

      Run by Aharon Rabinowitz, Jim Geduldick and Dennis Radeke, This is probably one of the more popular AE user groups out there and usually have some big name speakers, an awesome turnout, and some killer giveaways!

      Location: New York City, New York

      Next Meeting: June 24th

      Visit Website

    • Digital Media Artists Los Angeles

      DMALA is a huge user group specializing in all kinds of stuff including 3D, compositing apps, as well as After Effects. They usually hold meetings on the third Tuesday of the month, so mark it on your calendars!

      Location: Los Angeles, California

      Next Meeting: June 15th

      Visit Website

    • Chicago Motion Artists Group

      Now, this group is still in its infancy, and doesn’t really have its own site yet, so I linked it over to Mike Petrik’s page on The Motion Exchange. He seems to be the one in charge. If you want to participate, join the group, and help get some stuff going!

      Location: Chicago, Illinois

      Next Meeting: TBA

      Visit Website

    • Dallas After Effects User Group

      With meetings held on every fourth Thursday of the month, this seems like the place to be if you are an AE user. They have been around for a while, so make sure you check them out!

      Location: Dallas, Texas

      Next Meeting: June 24th

      Visit Website

    • AE/EC – After Effects Ecuador

      Now, I hate that I can’t tell you any more than this is an AE Group based in Ecuador. The site is in Spanish… so check it out and hit it up when there are some new events! Sorry for the language barrier guys…

      Location: Ecuador, South America

      Next Meeting: TBA

      Visit Website

    • After Effects Abuser Group

      This is a group of pros that love visual effects, that focus mainly on AE, Photoshop and Premiere. More VFX than anything, check it out.. they have a meeting coming up on the 22nd!

      Location: Anaheim, California

      Next Meeting: June 22nd

      Visit Website

    • AETO After Effects Toronto

      The only Canada group we have on here, they have a ton of sponsors and have had four meetings so far with some great speakers! Make sure to sign up for their mailing list to find out when the next meeting is!

      Location: Toronto, Canada

      Next Meeting: TBA

      Visit Website

    • Creative Crew Singapore

      Based around Photoshop and After Effects, this group just had a meeting in March, but doesn’t have anything new planned yet. Make sure to stay tuned though for when something else is scheduled!

      Location: Singapore

      Next Meeting: TBA

      Visit Website

    • NYC Motion Graphics

      This is a cool group of mograph artists that get together every once in a while, have some drinks and talk shop. Mainly made as a social event it is a cool event to hang out at in NY.

      Location: New York City, New York

      Next Meeting: June 8th

      Visit Website

    • CAVEMODE

      CAVEMODE stands for Charlotte Animation Visual Effects Motion Design. I don’t think I could have thought a better name. These guys are the only group I have found in NC, and they deal with everything, not just After Effects.

      Location: Charlotte, North Carolina

      Next Meeting: TBA July Sometime

      Visit Website

    • MNAEUG Minnesota After Effects

      Good ol’ Minnesota dontcha know? Haha… they have a cool out of the norm type of meetup going on… a rush competition, and the best animations win prizes… very cool stuff.

      Location: Minneapolis, Minnesota

      Next Meeting: June 8th

      Visit Website

    • AEPDX After Effects Portland

      This is getting to be a popular group in Portland… they have some great sponsors, and some really good speakers. I think we can expect big things from AEPDX.

      Location: Portland, Oregon

      Next Meeting: June 9th

      Visit Website

    • Orange County Digital Arts

      This is another all around user group… from AE all the way to InDesign… you might not be getting just motion graphics or visual effects, but you will get a lot of information on digital arts as a whole.

      Location: Anaheim, California

      Next Meeting: June 9th

      Visit Website

    • Orange County Multimedia Association

      Yet another multi-faceted group, you get a little bit of everything here. Make sure you check the site to make sure you are going to the event for what you want to learn though.

      Location: Varies but in Orange County, California

      Next Meeting: TBA

      Visit Website

    • Houston After Effects and 3D

      If you are looking to mix a little 3D into your AE life, and live close to Houston, well its a match made in heaven. Learn how to use both platform to create some amazing work!

      Location: Houston, Texas

      Next Meeting: TBA

      Visit Website

    • Motion North

      Ahh… a UK Group! I am sorry, being on the west coast of the US in Seattle, its hard for me to know of much across the pond. This group though is all about connecting motion designers, animators, filmmakers and vfx artists in the region together!

      Location: Manchester, United Kingdom

      Next Meeting: TBA

      Visit Website

    • Online Media Gurus

      More based in learning about producing video for the web, there is probably some great information at these meetings about marketing, web apps, and you can always share info and knowledge on creating that content! Great networking event!

      Location: Virginia Beach, Virginia

      Next Meeting: TBA

      Visit Website

    • MGPHX Motion Graphics Phoenix

      A buddy of mine, Justin Katz that I met at NAB started up MGPHX. It is another still in its infancy, but if you are in Phoenix, make sure you start following the group and help build it up!

      Location: Phoenix, Arizona

      Next Meeting: TBA

      Visit Website

    • AESeattle After Effects Seattle

      Now, AESeattle is a project I have been kind of working on for the past couple years with Chad Perkins from Lynda.com. We had our first meeting right after NAB with the AE crew, and we had probably 60 people! We are shooting for a July meetup (making it quarterly right now) and possibly doing some video conferencing with other user groups across the country in between those events!

      Location: Seattle, Washington

      Next Meeting: July sometime

      Visit Website

    • Tri-State After Effects User Group

      If you are around New Jersey, here is a great group to network with AE artists, share some knowledge and get to know your fellow creatives in the area.

      Location: East Rutherford, New Jersey

      Next Meeting: TBA

      Visit Website

    • San Diego Motion Graphic Artists

      Don’t let the logo fool you, this group is all about integrating any application to create some killer motion graphics, come to the next meeting and share your knowledge!

      Location: San Diego, California

      Next Meeting: TBA

      Visit Website

    • If you know of another group in your city, or a city close to you, ANYWHERE in the world, post it in the comments below… and if you enjoyed this post, please give it a vote on Digg or a stumble to say thanks!


Create a Detailed, Vector-based iPhone Illustration, Part 1


In this tutorial you will learn how to create a photo-realistic iPhone illustration and every single icon you can find on the iPhone touch screen. That’s 18 icons! With so many fantastic tips and tricks we’ve broken the tutorial into two parts, in part two you will learn how to make the remainder of the icons and finish your illustration. Let’s get started!

Continue reading “Create a Detailed, Vector-based iPhone Illustration, Part 1”

Workshop #79: Wherever I Go by Cody Bennet

At Audiotuts+ we irregularly put up a reader track for workshopping and critique (find out how to submit a track). This is how it works: you upload your song, and every week or so we’ll publish one here and step away from the podium. The floor is yours to talk about the track and how the artist can fix problems in and improve upon the mix and the song.

This track has been submitted for your friendly, constructive criticism. They have put their track (and their heart and soul) in your hands to learn and get useful feedback.

  • Do you enjoy the song or track itself? Does it have potential?
  • Can the arrangement be improved?
  • How did you find the mix? What would you do differently?
  • What do you enjoy about the rhythm track? What can be done to improve it?
  • Is the choice of instruments relevant and effective for the style/song?
  • Are the lyrics (if any) effective? Does the style, arrangement and genre of the song suit them?
  • Can you suggest any specific techniques that might improve the track?
  • Do you have any other constructive feedback?

Wherever I Go by Cody Bennet

Description of the track:

I wrote the lyrics and the melody and recorded the song within one week. It’s the first time I wrote a song for that genre. I wanted it to be some kind of party song. What do you think? How do you like the melody? I don’t really know how to record and mix a song right. If you have got some tips that would be great. ;)

Download audio file (WhereverIGo.mp3)

Terms of Use: Users can stream the track for the purposes of giving feedback but cannot download or redistribute it.

Have a listen to the track and offer your constructive criticism for this Workshop in the comments section.


Submit Your Tracks for Workshopping

Need constructive criticism on your own tracks? Submit them using this form.


Effects Chain Order

No guitar setup is complete without some toys… you know, effects! When you listen to bands like The Mars Volta, Sonic Youth, or maybe Radiohead, perhaps you say, “Wow, awesome sound. It must require a lot of effects to make a sound like that!” You probably ask yourself, “How can I get a guitar sound like that?”

You don’t need a lot of money. You need to understand effects. Here’s the info you need to get started.

d

Guitar effects are an interesting phenomenon. No matter how much you spend for guitar effects, you’ll get a good sound when you learn how to chain these guitar effects to work together. And how you set up your effects can help you achieve your dream tone. In this tutorial I will explain more about effect chain order.


Step 1: Basic Effects Chain Order

e

Guitar —> Pre-gain effects —> Gain-related effects —> Post-gain effects —> Amplifiers.

Perhaps you’re confused when look at the picture above. What does it mean?

This is a map of the basic effects chain order. In the next step I will explain more about how the chain works, and give an explanation of each category and effect. Sound samples are included, which first play the clean sound, followed by the sound with the effect.


Step 2: Pre-Gain Effects

a

Pre-gain effects are the effects you place first – effects that clip the signal. These include: utility effects (such as tuner pedals and metronomes), filters (such as wah-wah, envelope filters, other filters and sequential), dynamic controllers (or compressors), and intelligent processors (like harmonizers, pitch shifter or whammy).

Utility Effects

Utillity effects are the tuner pedal, metronome and noise gate.

For example, noise gates are, in their simplest form, merely a switch which gets rid of the noise you hear during quieter parts of a signal by muting (switching off) the sound. This effectively reduces the perceived level of noise in the signal.

Filters

Filters are the process of boosting or attenuating parts of the frequency spectrum. It is one of the most powerful ways to shape your sound. This includes wah-wah, envelope filters, filters and sequential.

For example, wah-wah is a resonator that can have its center frequency moved up or down by moving a pedal. The “wah” name comes from the way it mimics the moving resonance of the human vocal tract in speech as the sound “wah” is made.

Download audio file (wahwah.mp3)

Wah-wah sound sample

Dynamic Controllers

Usually a compressor or limiter is the first effect used. This helps to boost the signal level, which helps reduce the amount of noise generated by subsequent effects. However, they are sometimes used after effects which reduce or boost the volume level significantly, like modulation effects and wah-wah.

Intelligent Processors

Intelligent processors include harmonizers, pitch shifters and whammy. Intelligent processors work by changing the pitch or adding extra ‘voices’ which are harmonically related to the original sound.

For example, pitch shifter is an effect which enables a user to transpose the pitch of the input signal. The simplest pitch shift effects can add octaves above or below the input pitch. More sophisticated pitch shifters can add fourths or fifths.

Understanding Step 2 can help you order pre-gain effects on your pedalboard effectively.


Step 3: Gain-Related Effects

b

In an effects setup there is usually gain-related effects which produce sounds by clipping. These effects range from overdrive, fuzz, and distortion.

Overdrive

Overdrive boosts the clean signal so the sound is a bit distorted. You may have produced overdrive by putting too large a signal into the input of an amp, causing the signal to be distorted at the speaker. You were “overdriving” the inputs.

Download audio file (overdrive.mp3)

Distortion

Distortion is produced by cutting, strengthening and destroying a clean signal to the extreme to produce a broken and distorted sound “Distortion” is the more generic term, and started when folks noticed that you could get a distorted sound from a little solid state amp that was very nonlinear.

Download audio file (distortion.mp3)

Fuzz

Fuzz boosts and clips the signal sufficiently to turn a standard sine wave input into a waveform that is much closer to a square wave output. Fuzz sounds also tend to have lower mid-frequencies than other distortion types.

Pretty much everyone involved agrees that fuzz is a harder, harsher, and buzzier distortion than overdrive, and is usually considered harder and harsher than distortion by itself. There are no real boundaries to all this – it’s just which words you want to use, and not strict definitions.

Download audio file (fuzz.mp3)


Step 4: Post-Gain Effects

c

Post-gain effects include time-based modulation (chorus, flanger, phaser, tremolo and many others) and pure time-based modulation (delay, reverb).

Time-Based Modulation

Modulation effects are usually placed after gain-related effects and before time-based effects. They can also be placed before distortion, which gives a much more subtle effect. This is kind of hard to explain, and will be easier to understand when you hear it yourself.

Modulation provides a unique sound, especially when placed at the beginning or end of the effect chain. So start experimenting with many types of modulation effects, and get the ideal sound! Meet the family.

Chorus

Perhaps the most widely used modulation effect, is so called because it makes your guitar sound like more than one – it sounds thicker and usually a bit “sweeter” sounding. This is done by electronically “cloning” your original guitar sound and adding delay or “modulation” (which is shortening or lengthening the delay) to your cloned signal. Then this is mixed back in with your original signal. Although it can be used as a solo sound this effect is generally used for a clean rhythm sound.

Download audio file (chorus.mp3)

Phaser

This effect is a filter response generated by using long phase delays and mixing with the original signal to cause a number of deep notches and/or peaks in the overal filter response. This mimics the larger number of notches and peaks caused by true time delayed flanging. Most simple phasers do this by generating two notches, although some pedals make four notches. Flangers may make many notches. Phasers may also incorporate feedback to sharpen up the effect of the notches.

Flanger

As with the chorus effect, here the signal is split or cloned and a short delay is simply added to the cloned signal, then again mixed back in with your original signal. This delay has several repeats with the time of the repeats being lengthened and shortened at a steady adjustable rate. The resulting sound is usually much thicker than the chorus effect. Its sounds like a jet plane.

Download audio file (flanger.mp3)

Tremolo

Tremolo produces a periodic variation in the amplitude (volume) of the note or chord, which creates a “shuddering” effect. A sine wave applied as input to a voltage-controlled amplifier produces this effect. Tremolo effects normally have a “rate” knob which allows a performer to change the speed of the variation.

Download audio file (tremolo.mp3)

Pure Time-Based Modulation

Pure time-based effects such as delay and reverb usually come last in the signal chain. There is one exception – when you are using a delay to split a signal for parallel processing. Included in this family are delay and reverb.

Echo delay is long. Imagine yelling at a hill or cliff – this would lead to recurrent re-echo.

Reverb is more like a collection of barely audible short delays that create an echo effect in the room. Imagine singing in the bathroom – there are a short echoes. We may call that type “Bathroom Reverb”.

Download audio file (delay.mp3)

Delay

Download audio file (reverb.mp3)

Reverb


Step 5: Full Map

f

Guitar — > Utility effects —> Filters —> Intellegent processor —> Dynamic controllers —> Gain-related effects—> Time based modulation —> Pure time based modulation —> Amplifiers.

This is the final map, which will help you to chain guitar effects.

Please note: While this is a guideline to chaining effects, there’s no “right” way to do it. It’s all a matter of taste and your personal tone. Let your ears be the final arbiter.

Ring modulators, volume pedals, equalizers, phasers, splitters, or the clean gain booster can be positioned pre-gain or post-gain. They still work well in any position.

If you think another effect position will be more interesting, try it. Why not experiment? For example, try placing the whammy pedal after the gain, and feel how fat a sound is produced. Or place spring reverb before the gain effects to produce a vintage sound.

Also, take care in where you physically place the effects on your board. Don’t line them up so your board becomes too elongated. Use the most efficient position to your liking, and experiment!.


Step 6: Start Experimenting!

Compressor Before Gain Effects

Guitar —> Compressor —> Gain effects —> Amplifiers.

This gives a “smoother” distortion sound because the signal level the distortion gets has less variation – the compressor wipes off more of the signal changes, so the distortion works mostly at one level, and the tone quality of the distortion changes less as the note decays.

Gain Effects Before Compressor

Guitar —> Gain effects —>Compressor —> Amplifiers.

The compressor adds little but hiss, because the distortion already sets up a fairly fixed output level. The tone quality changes as the distortion would without the compressor.

Gain Effects Before Time Delay

Guitar —> Gain effects —>Time delay —> Amplifiers.

The subtleties of the time-delay, chorus, flanger, etc. are generated after the distortion’s harmonic hash, so the nuances of the delay can be heard.

Time Delay Before Gain Effects

Guitar —> Time delay —>Gain effects —> Amplifiers.

The distortion’s harmonic generation tends to fill in the response notches the time delay created, and usually sounds less acceptable.


Give a Medieval Game Logo a Rough Stone Look – Basix


Designers are often asked to take a pre-existing one or two-color logo and give it dimension. In today’s tutorial we will take a black and white logo and give it a rough stone look in just a few short steps using textures and layer styles. Let’s get started!


Resources

The following resources were used during the production of this tutorial.


Step 1

Create a new document that is 1200×750 px and download the Caribbean font. Then, type out the title of the game as shown.

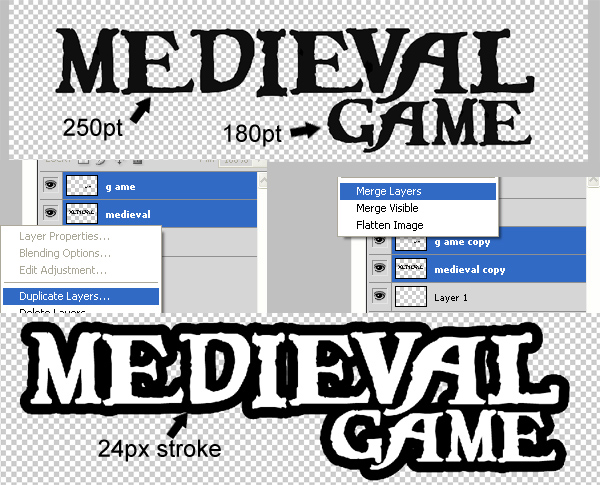
Once you are done, rasterize both layers and duplicate them. Take those two layers and merge them together. Finally, duplicate that layer, send it to the back and add a 24 px stroke to it using a layer style.


Step 2

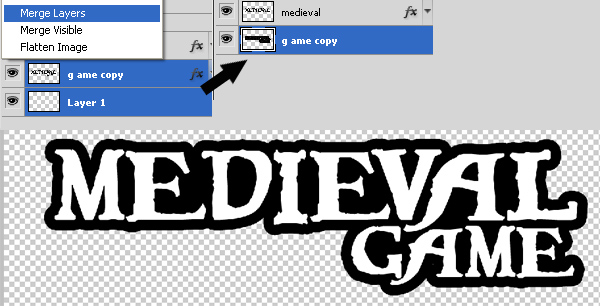
Now merge the layer with the stroke with an empty layer to rasterize the stroke and get rid of the layer style. Then use the Paint Bucket to fill in the gaps between the letters.


Step 3

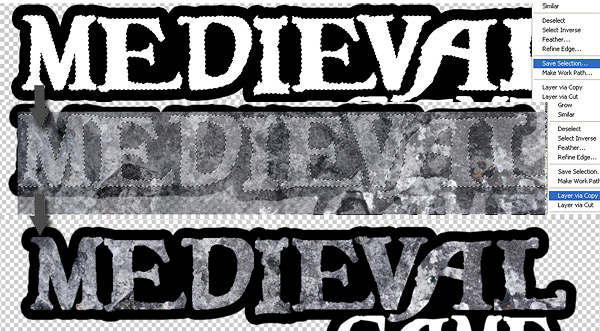
To add texture to the word “medieval.” place the Stained Concrete texture over the text. Then use the magic want tool to obtain a selection of the word "medieval." Now select the texture layer and select Cmd + J to create a new layer using the selection.


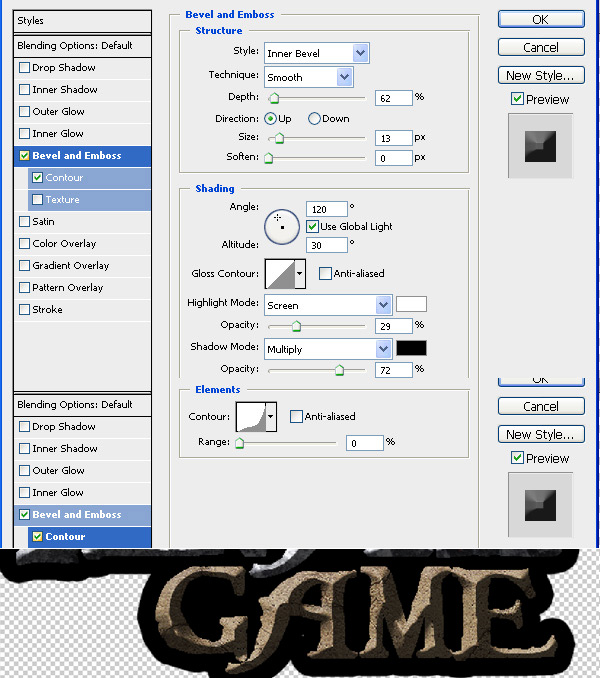
Step 4

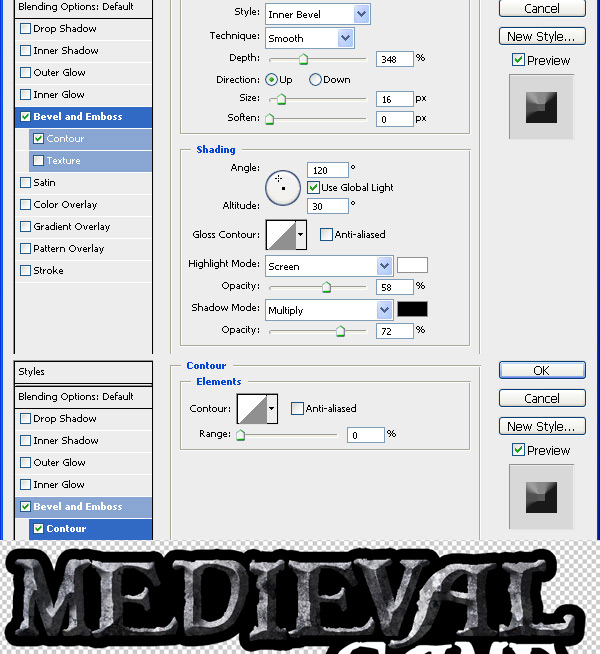
Select the new texture Medieval layer and go to layer style then check "bevel and emboss" and enter the values like its shown below.


Step 5

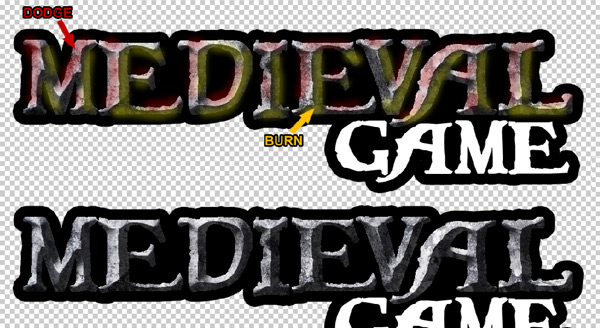
To make the bevel effect more prominent, dodge and burn it as shown below. The red brushes are "dodge" and the yellow brushes are "burn".


Step 6

Use this Concrete Texture to add to the word “game.” Repeat Step 3 to achieve a similar result as below.


Step 7

Now select the new textured game layer and go to layer style, then check "bevel and emboss" and enter the values like its shown below.


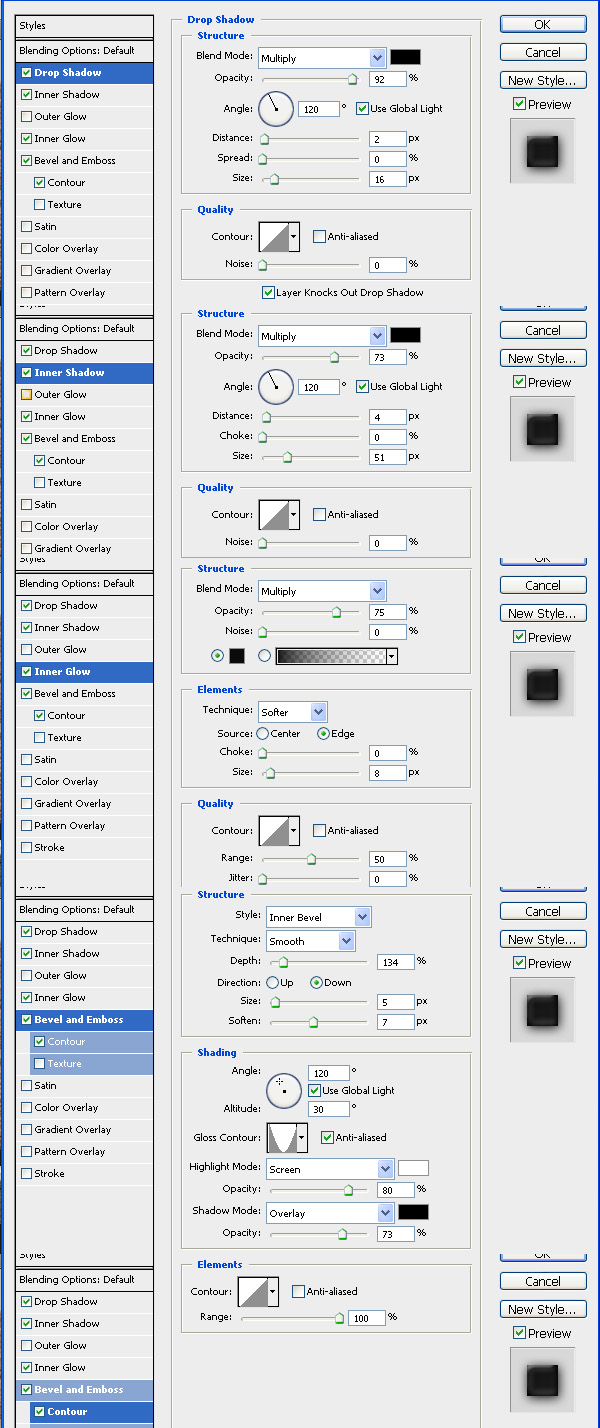
Step 8

Choose the black stroke layer and go to "bevel and emboss" and enter the values as shown below.


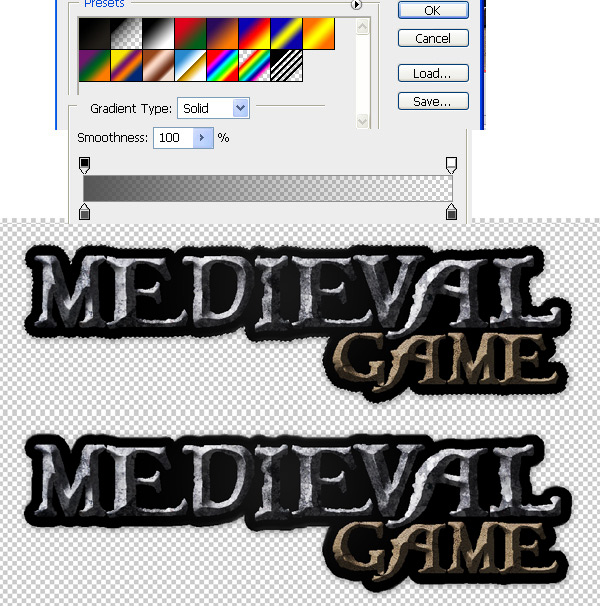
Step 9

Now choose the black stroke layer and apply a gradient like the one shown below.


Step 10

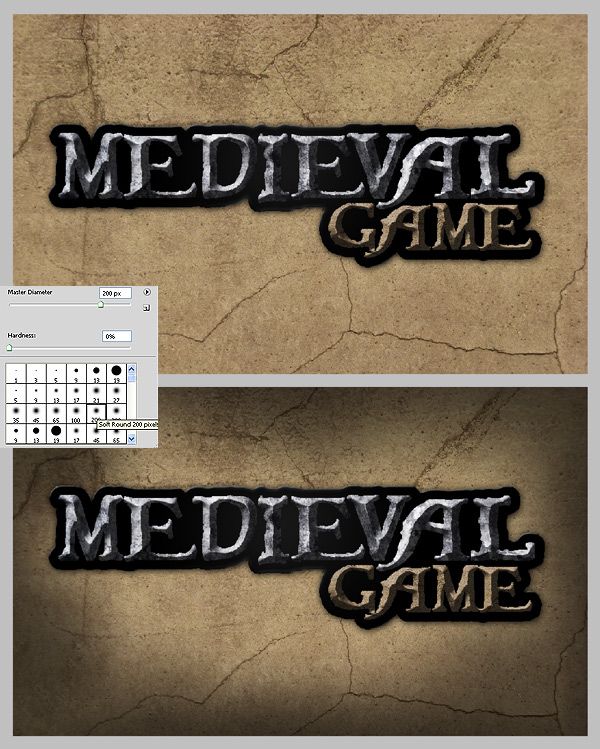
Use this Concrete Texture as a background, after you add it, make a duplicate, go to filter > sharpen > sharpen and lower the opacity of the duplicated layer to about 60%. Now select the brush tool and chose a nice rounded brush around 200 pt, and select black color and set the opacity to about 60%, add a new layer above the texture and start drawing on the edges of the canvas, to get something like below.


Step 11

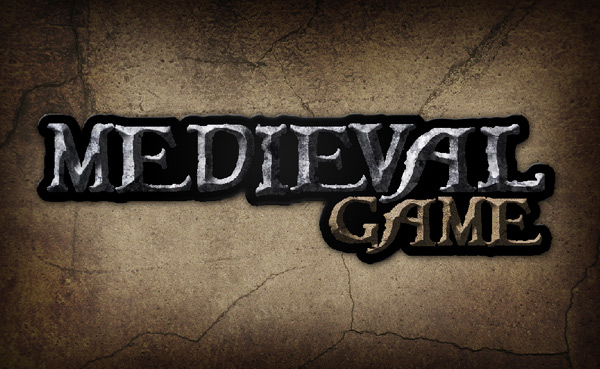
Now duplicate the layer with the black brush on the edges and set the first layer to "overlay" and the second to "normal."


Step 12

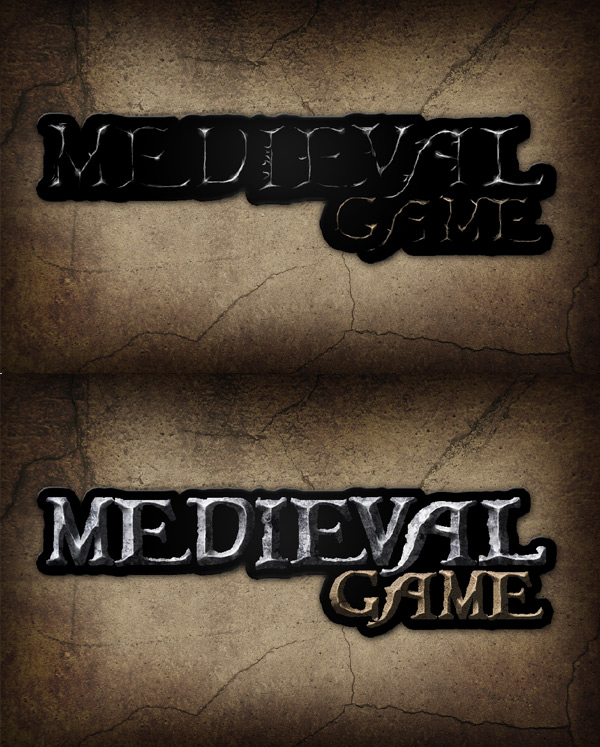
On top of all layers make a new layer to add some highlight/reflections. On the text choose a 1pt brush and set color to white, and the opacity to 70% and start drawing on the edges of the text, to make the edges more polished and shiny, this will make the logo look more detailed and realistic. See the image below for details.


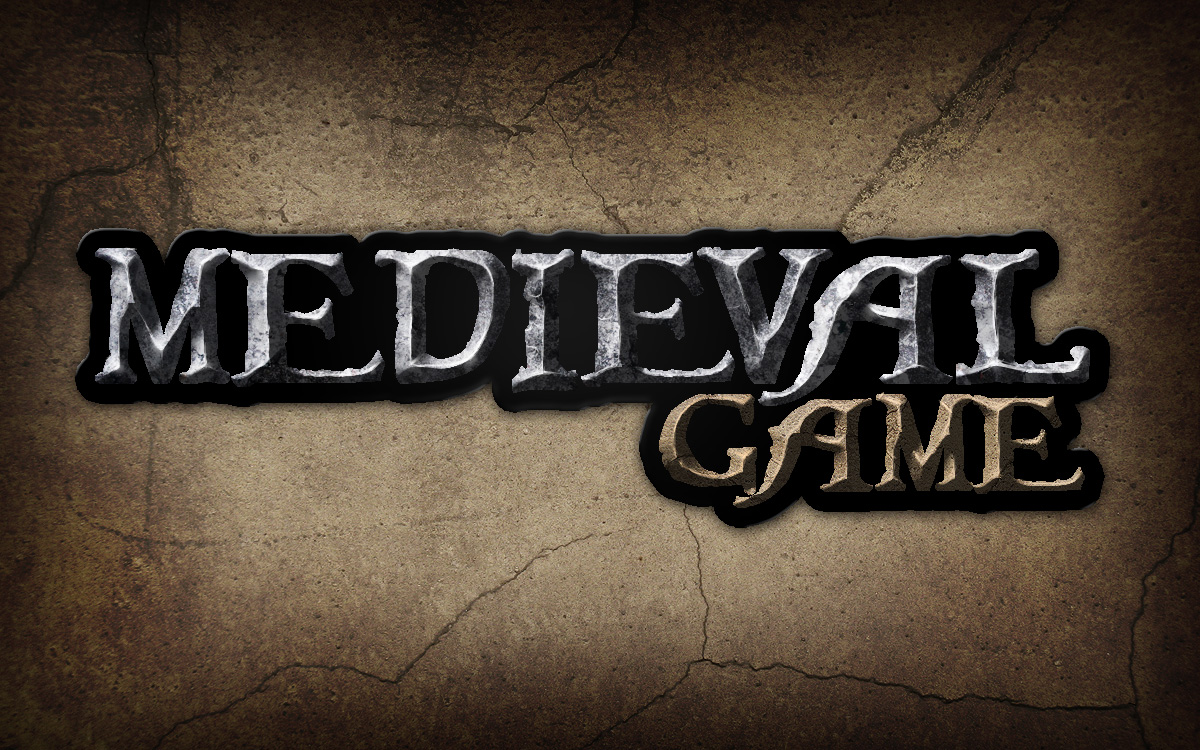
Final Image

Well, that’s it! The final image is below. I hope you’ve learned something and please let me know if you have any questions.

5 Efficient Ways to Share Files

As working from home and from the office is crossing over more and more these days, it’s becoming increasingly important to manage your computer files on multiple platforms.  There are several ways to do this that will keep you moving forward and more productive as a result.

1. The “Cloud”

Using software such as Dropbox allows you to sync across several computers – some even allow one to be a Mac, Linux or PC.  This is great for those documents that have ubiquitous file extensions (.rtf, .doc, .xls) that need to be worked both at the office and elsewhere.  Certain files can be kept private, while others can be shared with the colleagues of your choosing.

2. Email

Email is still a really popular way to share smaller files between access points.  Even though file sizes than can be emailed is increasing, it’s not going to work so well for large image, audio or video files.  But if you compress or “zip” the files, it’s still a handy way to send files back forth between colleagues.

3. Web services

Not ready for something that works in the cloud and sending files that are tad to big for your email client to handle?  Services like YouSendIt are a good fit if that’s the case.  You can send larger files for free (and larger ones if you’re willing to pony up some dough) and you get the convenience of using your email along with the knowledge that your files are going to get through.

4. Google Wave

Still in its relative infancy, Google Wave is a great collaborative tool once you take the time needed to wrap your head around it. You can communicate with anyone else on the service – and now it’s open to everyone – and send files that sit on “waves” that are accessible by whomever is invited to be part of it.  This is especially handy if you want to keep files associated with certain contexts or projects.

5. USB Flash Drive

The trusty USB flash drive is not going away anytime soon.  It’s a tangible object that you can hold and know that you’ve got your files with you.  Not quite as efficient as going entirely over the web in some capacity, but it’s always good to have a backup of whatever you’re working on.  With capacities of these drives getting larger and larger, you can pretty much be sure that you can fit anything you’ll need to share on it.

What do you use to share files with yourself – and with colleagues?  Let us know in the comments.

Create a Cool Looking Ink Effect using FumeFX, 3ds Max, and After Effects

In this tutorial you will learn how to use particles systems with FumeFX and Krakatoa to create a very cool looking Ink dispersion effect inside of 3ds Max. Then, once the effect has been created and rendered, you will also learn a couple of neat compositing tricks to create the final video in After Effects.


Video 1

Download

Note: click the ‘Monitor’ icon to view tutorial in full-screen HD.


Don’t miss more CG tutorials and guides, published daily – subscribe to Cgtuts+ by RSS.

10 Compelling Reasons to Use Zend Framework


Trying to decide which framework to use for your new project? In this article, we’ll go in-depth about why Zend Framework should absolutely be your PHP framework of choice.


Introduction

Whether you’re starting a new project or improving an existing one, in this article, I’ve provided 10 reasons why you should use Zend Framework for your next project, and hopefully, it helps you in making an informed decision.


Reason 1. Extend classes like there’s no tomorrow

Zend Framework is a fully object-oriented framework, and as such, it utilizes a lot of object-oriented (OO) concepts like inheritance and interfaces. This makes most, if not all, of ZF’s components extendable to some point. It allows developers to implement their own special variations of individual components without having to hack into the ZF codebase itself. Being able to customize ZF this way allows you to create functionality that is unique to your project, but because of its object-oriented nature, you’ll be able to use this functionality in other projects as well.

Example

Zend Framework has a very extensive Validation component, which you can use to validate data coming from forms. In ZF, forms are treated as objects as well, and are represented by the Zend_Form component.

Let’s assume that you want to create a custom URL validator to restrict URL input from the user. The quickest way to do this would be to just validate the input using something like:

$isValid = filter_var($submitted_url, FILTER_VALIDATE_URL);

But this won’t adhere to the OO nature of form objects, since it’s not used within the context of the form. To solve this, we can create a new Zend_Validator class by extending the Zend_Validate_Abstract class:

<?php
class Zend_Validate_Url extends Zend_Validate_Abstract
{
	const INVALID_URL = 'invalidUrl';

	protected $_messageTemplates = array(
		self::INVALID_URL   => "'%value%' is not a valid URL.",
	);

	public function isValid($value)
	{
		$valueString = (string) $value;
		$this->_setValue($valueString);

		if (!Zend_Uri::check($value)) {
			$this->_error(self::INVALID_URL);
			return false;
		}
		return true;
	}
}

This actually uses the Zend_Uri class, which already has a URL checking method we can use. But since it doesn’t extend the Zend_Validate_Abstract class, we implemented a wrapping class which does implement the needed abstract class. This lets us use the Zend_Uri URL checking function in our Zend_Form objects like so:

<?php
class Form_Site extends Zend_Form
{
	public function init()
	{
		$this->setMethod('POST');
		$this->setAction('/index');

		$site= $this->createElement('text', 'siteurl');
		$site->setLabel('Site URL');
		$site->setRequired(true);

		//  Adding the custom validator here!
		$site->addValidator(new Zend_Validate_Url());
		$this->addElement($site);
		$this->addElement('submit', 'sitesubmit', array('label' => 'Submit'));
	}

}

If we wanted to check that our URLs are valid YouTube video URLs, we could do something like this:

<?php
class Zend_Validate_YouTubeUrl extends Zend_Validate_Abstract
{
	const INVALID_URL = 'invalidUrl';

	protected $_messageTemplates = array(
		self::INVALID_URL   => "'%value%' is not a valid URL.",
	);

	public function isValid($value)
	{
		$valueString = (string) $value;
		$this->_setValue($valueString);

		if (strpos($value, "http://www.youtube.com/watch?v=") !== 0) {
			$this->_error(self::INVALID_URL);
			return false;
		}
		return true;
	}
}

If we added this to our site form object as a validator, it would ensure that all URLs submitted begin with the correct YouTube video URL prefix.


Reason 2. Object-oriented Goodness


Image courtesy of http://www.developer.com

In Zend Framework, everything is an object, as proven by our example above. This poses its own disadvantages, such as making things more complicated to code. Its main advantage, though, is the ability to make code reusable, and since nobody likes to repeat themselves, this is a very good thing.

Example

We already have our Zend_Validate_Url and Form_Site class from our example above, so let’s reuse them in this example.

<?php

class IndexController extends Zend_Controller_Action
{

    public function indexAction()
    {
		$siteform = new Form_Site();

		if( $this->_request->isPost() && $siteform->isValid($this->_request->getPost()) ) {
			//stuff to do if the input is correct
			$this->_redirect("/index/correct");
		}
		$this->view->siteform = $siteform;
    }

    public function correctAction()
    {
		// Yay, we're re-using our Form_Site object!
		$this->view->siteform = new Form_Site();
    }
}

Here’s what it would look like on a browser:

If you tried to submit an invalid URL, you can see our URL validator at work:

Here, you can see what would happen if you did input a valid URL:

As you can see, we’ve never had to repeat our form object code.

“Zend_Validate classes can be used in other ways as well, not only within the context of Zend_Form classes. You simply instantiate a Zend_Validate class and call the isValid($parameter) method, passing it the value you want to validate.”


Reason 3. Use What you Need, Forget Everything Else

Image courtesy of http://dev.juokaz.com

By design, Zend Framework is simply a collection of classes. Normally, you’ll use Zend MVC components to create a fully-functional ZF project, but in any other case, you can just load the components you need. ZF is very decoupled, which means we can take advantage of the components as individual libraries, instead of the framework as a whole.

If you’ve been looking at other framework articles, you’ve probably heard of the term glue framework. ZF, by default, is a glue framework. Its decoupled nature makes it easy to use as “glue” to your already existing application.

There’s a debate between using glue frameworks vs. full-stack frameworks. Full-stack frameworks are those that provide you everything you need to create your project, like ORM implementations, code-generation, or scaffolding. Full-stack frameworks require the least amount of effort to create a project, but fall short in terms of flexibility, since it imposes strict conventions on your project.

Example

Let’s say you need a way to retrieve information about a specific video on YouTube. Zend_Gdata_Youtube is a ZF component which allows you to access data from YouTube via the GData API. Retrieving the video information is as simple as:

//Make sure you load the Zend_Gdata_Youtube class, this assume ZF is in your PHP's include_path
include_once "Zend/Gdata/Youtube.php";

$yt = new Zend_Gdata_YouTube();
// getVideoEntry takes in the YouTube video ID, which is usually the letters at the end
// of a YouTube URL e.g. http://www.youtube.com/watch?v=usJhvgWqJY4
$videoEntry = $yt->getVideoEntry('usJhvgWqJY4');
echo 'Video: ' . $videoEntry->getVideoTitle() . "<br />";
echo 'Video ID: ' . $videoEntry->getVideoId() . "<br />";
echo 'Updated: ' . $videoEntry->getUpdated() . "<br />";
echo 'Description: ' . $videoEntry->getVideoDescription() . "<br />";
echo 'Category: ' . $videoEntry->getVideoCategory() . "<br />";
echo 'Tags: ' . implode(", ", $videoEntry->getVideoTags()) . "<br />";
echo 'Watch page: ' . $videoEntry->getVideoWatchPageUrl() . "<br />";
echo 'Flash Player Url: ' . $videoEntry->getFlashPlayerUrl() . "<br />";
echo 'Duration: ' . $videoEntry->getVideoDuration() . "<br />";
echo 'View count: ' . $videoEntry->getVideoViewCount() . "<br />";

Code sample courtesy of Google Developer’s Guide

This code would output:

One thing to note here: this Zend Framework component (GData) is the official PHP library endorsed by Google to access its API. The framework’s decoupled nature allows us to use the component in any project, regardless of the framework we used to build it.


Reason 4. It lets you do a Lot of Things!

One of the things I love most about Zend Framework is that it has A LOT of components. Need a way to authenticate a user? Use Zend_Auth. Need to control access to your resources? Look up Zend_Acl. Need to create some forms? We have Zend_Form. Need to read an RSS feed? You can use Zend_Feed for that. It’s basically the Swiss Army knife of PHP classes!

Zend actually comes with some demos that show how to use its different components:

To view these, the best way is to simply download the Full Package Version of Zend Framework and test them out on your machine.

For a complete list of all the components, you can check out the Zend Framework Manual.


Reason 5. No Model Implementation – Choose your Own Adventure!

Image courtesy of http://www.vintagecomputing.com

This is actually one of the reasons most developers don’t use Zend Framework – it has no Model implementation on its own. For those who don’t know what a Model is, it’s the M in MVC, which stands for “Model-View-Controller”, a programming architecture that’s used by most PHP Frameworks.

Does that mean that Zend Framework is only a “VC” Framework?

Yes, and no.

Yes, it’s a VC framework because it doesn’t have its own Model implementation. This makes it hard for some people to use ZF, especially if they’re coming from a framework which does have a Model implementation (like CakePHP, Symfony, or even Ruby on Rails).

On the other hand, no, it’s an MVC framework as well, since apart from providing the generic ways to access the database (using Zend_Db), it actually still relies on some sort of Model implementation. What it does differently is that it leaves this kind of implementation up to the developer ñ which some say should be the case since models are actually where the business logic of the application resides, and therefore, they’re not something which can be developed as a generic component. Zend Framework Philosophy states that model implementations are unique to the projectóit’s impossible to create an abstract implementation of it since they don’t really know what you need. They believe that models should be implemented by the developers themselves.

How is this a good thing?

Not having a Model implementation means that the developer is free to use whatever means he has to implement it, or even just integrate existing implementations. Being free of predefined restraints, the developer is then allowed to create more complex implementations, rather than just simple representations of tables, which is how usual Model implementations are created. Models contain your business logic. They should not be restrained by your database tables; rather, they should dictate the connections of these tables to one another. This lets you put most of your programming code in your Models, therefore satisfying the “Thin Controllers, Fat Models” paradigm of MVC.

So how will I use Zend Framework if I have no idea how to create my own models?

For beginners, the Zend Framework Quickstart tutorial shows us a good way to implement models. In the tutorial, they implement an ORM approach to the models, wherein you would create three filesóthe actual Model, which is an abstract representation of your object; a Mapper, which maps data from the database to your Model; and a Database Table object, which is used by the mapper to get the data. You can check out the code in the ZF Quickstart tutorial, where they used this approach to implement the model of a simple Guestbook application.

For those asking “Why do I have to code this myself while other frameworks do the work for me?”, this is a perfect segue to my next reason…


Reason 6. Integrate with Whatever you Want!

Zend Framework’s decoupled nature makes it very easy to integrate other libraries that you want to use. Let’s say you want to use Smarty as your templating system. It can be done by simply creating a wrapping class for Zend_View_Abstract, which uses a Smarty instance to render the view.

This works both ways, as you can integrate ZF into other libraries as well. For example, you can integrate ZF into Symfony. They’re planning to do this with Symfony 2, using the Zend_Cache and Zend_Log components from ZF.

Example

For our example, we’ll try using Doctrine to implement our Model. Continuing from our site example above, say you’ve already implemented your DB table like so:

CREATE TABLE  `site` (
  `id` int(10) unsigned NOT NULL AUTO_INCREMENT,
  `url` varchar(100) CHARACTER SET latin1 NOT NULL,
  PRIMARY KEY (`id`)
);

To integrate Doctrine into ZF, we’ll have to make sure that the proper settings are defined. I’ve followed this tutorial from dev.juokaz.com about using Doctrine with ZF.

Assuming everything works out, you’ll just have to generate your model files by running the doctrine-cli.php php file from the tutorial like so:

php doctrine-cli.php generate-models-db

You should see this success message:

Afterwards, you can check the folder which you set as the place to store the generate Model classes.

Then in our controller class, we can simply use our site model class.

<?php

class IndexController extends Zend_Controller_Action
{

    public function indexAction()
    {
		$siteform = new Form_Site();

		if( $this->_request->isPost() && $siteform->isValid($this->_request->getPost()) ) {
			//stuff to do if the input is correct
			$site = new Model_Site();
			$site->url = $this->_request->getParam('siteurl');
			$site->save();
			//redirect to our success page
			$this->_redirect("/index/correct");
		}
		$this->view->siteform = $siteform;
    }

    public function correctAction()
    {
		// Yay, we're re-using our Form_Site object!
		$this->view->siteform = new Form_Site();
    }
}

If we check our sites table, we’ll see that our records is there

Now, every time we submit a site, our controller will use our Doctrine model implementation to save to our database. Isn’t that nice and easy? Setup may be a bit complicated, but on the plus side, our project is now able to take advantage of a tool which has been developed specifically for Model implementation. Our project now has the power of two very developed technologies behind it.


Reason 7. Guidelines and Standards

Zend Framework is developed in conjunction with a very extensive Contributor Guide, which basically states that:

  1. Every contributor for both documentation and/or code, at any level (either a few lines of code, a patch, or even a new component) must sign a Contribute License Agreement (CLA).
  2. Code MUST be tested and covered by a unit test using PHPUnit. And…
  3. Code must adhere to strict Coding Standards

These strict guidelines ensure that you only use readable, high-quality code that has been tested thoroughly.


Reason 8. All Code is Guilty Until Proven Innocent (aka Test-Driven Development)

Image courtesy of http://www.codesmack.com/

Test-driven development is a programming technique that requires a developer to write tests for the function he is supposed to code before writing code for the function itself. By writing the tests first, it ensures that the programmer:

  1. Thinks of the possible use-cases of his code
  2. Creates a whitelist of input and output
  3. Makes it easier to refactor his code
  4. Makes it easier to pass code from one person to another

The test-driven development Cycle
Image courtesy of Wikipedia

Zend Framework makes it easy to do TDD via Zend_Test, which uses PHPUnit, a popular unit testing framework. PHPUnit lets you test not only your Controllers, but also your library and model functions. To add to this, Zend_Tool, which is Zend Framework’s scaffolding utility, already makes provisions for PHPUnit when you use it to create your project.

Integrating PHPUnit and Zend Framework

Setting up Zend Framework and PHPUnit is not that difficult. Basically, once you’re done with it, you’ll be able to use the same setup for your future projects. Just as a side note, the following steps assume that you’ve used Zend_Tool to scaffold your project structure and files, but it should be relatively simple to change for other setups.

First, we need to install PHPUnit. The best way is to install it via PEAR:

pear channel-discover pear.phpunit.de
pear install phpunit/PHPUnit

Afterward, we’ll open our phpunit.xml, an XML file generated by Zend_Tool. You’ll find it inside the tests folder in the root directory of your project. Add the following lines:

<phpunit bootstrap="./TestHelper.php" colors="true">
    <testsuite name="Zend Framework Unit Testing">
        <directory>.</directory>
    </testsuite>

    <filter>
        <whitelist>
            <directory suffix=".php">../library</directory>
            <directory suffix=".php">../application</directory>
            <exclude>
                <directory suffix=".phtml">../application</directory>
            </exclude>
        </whitelist>
    </filter>
</phpunit>

After saving phpunit.xml, create a new file inside the same folder as phpunit.xml called TestHelper.php. This PHP file will help us setup the environment for our tests.

<?php
// start output buffering
ob_start();

// set our app paths and environments
define('BASE_PATH', realpath(dirname(__FILE__) . '/../'));
define('APPLICATION_PATH', BASE_PATH . '/application');
define('APPLICATION_ENV', 'testing');

// Include path
set_include_path(
    '.'
    . PATH_SEPARATOR . BASE_PATH . '/library'
    . PATH_SEPARATOR . get_include_path()
);

// We wanna catch all errors en strict warnings
error_reporting(E_ALL|E_STRICT);

require_once 'ControllerTestCase.php';

We then create our parent Controller Test Case class, which all of our Controllers will extend. This will help implement methods which would usually be the same throughout all of the Controller test classes.

<?php
require_once 'Zend/Application.php';
require_once 'Zend/Test/PHPUnit/ControllerTestCase.php';

abstract class ControllerTestCase extends Zend_Test_PHPUnit_ControllerTestCase
{
    public $application;

    public function setUp()
    {
        $this->application = new Zend_Application(
            APPLICATION_ENV,
            APPLICATION_PATH . '/configs/application.ini'
        );

        $this->bootstrap = $this->application;
        parent::setUp();
    }

    public function tearDown()
    {
        $this->resetRequest();
        $this->resetResponse();
        parent::tearDown();
    }
}

Lastly, we create a controller test class:

<?php
require_once realpath(dirname(__FILE__) . '/../../ControllerTestCase.php');

class IndexControllerTest extends ControllerTestCase
{
    public function testCallingRootTriggersIndex()
    {
        $this->dispatch('/');
        $this->assertController('index');
        $this->assertAction('index');
    }

    public function testCallingBogusTriggersError()
    {
        $this->dispatch('/bogus');
        $this->assertController('error');
        $this->assertAction('error');
        $this->assertResponseCode(404);
    }
}

All that’s left is to run our test. Open your command prompt and go to the tests folder and type:

phpunit

Your command line should output the following:


PHPUnit and Zend Framework setup tutorial and code courtesy of http://www.dragonbe.com

Reason 9. Community and Documentation

Due to its multiple components, complexity, and fully object-oriented approach, Zend Framework has a very steep learning curve. It becomes easier to learn due to the comprehensiveness of its documentation and its thriving community. First of all, the Zend Framework Programmer’s Reference Guide boasts a complete guide to all ZF components, with examples, code, and usage theories.

Aside from this, there are a lot of blogs out there that share Zend Framework tips and tricks. For example, Phly, boy, phly, the blog of Matthew Weier O’Phinney, a Core Contributor to Zend Framework, provides a lot of insights, clever uses, and component explanations for Zend Framework. Zend also has a site called Zend Developer Zone, which aside from publishing tutorials for Zend Framework, has stuff like Zend Framework Webinars, podcasts, and articles about PHP in general. Another site, called Zend Casts, offers a lot of useful video tutorials on different Zend Framework components as well. Last but not least, there’s a free online book called Zend Framework: Surviving the Deep End” written by P·draic Brady, another Zend Framework contributor.

As you can see, there is no lack of support from the community, the documentation, and the developers. If you have any questions or need any clarifications, a quick search with the right keywords should almost always give you relevant results. If not, there’s still the Zend Framework Mailing Lists, the official Zend Framework Forums, the unofficial Zend Framework Forums or the unofficial Zend Framework IRC channel


Reason 10. Certifications Ahoy!

If you’re still unconvinced about learning and using Zend Framework, this reason is actually the one that I feel most distinguishes Zend Framework from all the others. Zend not only offers Zend Framework Certification, but PHP Certification as well. By offering certifications, Zend helps you use your expertise in PHP and Zend Framework to boost your portfolio or CV. The Zend Certification site lists a number of reasons to get certified, some of which are:

  1. Differentiate yourself from competitors when looking for a new job
  2. Get your resume/CV noticed
  3. Have your profile displayed in Zend’s Yellow Pages for PHP Professionals
  4. Be part of the Linkedin Group Exclusively for ZCE’s
  5. Get special discounts on Zend PHP conferences worldwide

Addendum

Just to keep things balanced, here’s a quick list of reasons why you might not want to use Zend Framework:

  1. VERY steep learning curve. It’s not very hard for advanced PHP users, but for beginners, there’s a lot to learn!
  2. Big footprint. Since Zend Framework has a lot of components, it’s total size is relatively higher than other Frameworks. For example, CodeIgniter’s system folder has a 1.5MB footprint compared to Zend Framework’s 28MB footprint.
  3. No solid scaffolding tool. Although Zend_Tool offers some functionality, it’s not much compared with the scaffolding utilities of full-stack frameworks like CakePHP or Symfony.
  4. Not shared webhosting friendly. The folder structure generated by Zend_Tool suggests that the public folder be the only directory accessible via http ó which assumes that a user is able to create a virtual host for the project. This is something you aren’t able to do in most shared web hosting environments.
  5. Too gluey. Since everything is in separate classes, it’s sometimes hard to envision how everything works. This wouldn’t be a problem with full-stack frameworks, since they mostly take care of everything for you. Without Zend_Tool, it would be extremely difficult to set up a working project structure

Conclusion

A lot of advancements have been made in the world of PHP Frameworks in the past few years. I’ll be honest, there’s a whole lot of fish in the sea. There are frameworks like Codeigniter, CakePHPand Symfony which are also good to use. Some of you might be thinking, “Why did this guy focus on Zend Framework? Why didn’t he run performance tests to compare the different frameworks?” To that, I reply with this quote from a very entertaining article entitled “PHP Framework Benchmarks: Entertaining But Ultimately Useless” by P·draic Brady:

To create a positive benchmark, you need to understand that all frameworks were born as festering piles of unoptimised stinking crap. They were all born bad and get worse with age. This sounds quite sad, but actually it’s an inevitable compromise between performance and features. It’s also a compromise between performance and ease-of-use. So you see, performance is unfairly faced by two opponents: features and ease-of-use. All performance is sacrificed in the name of serving the needs of rapid development, flexibility, prototyping, and making your source code look prettier than the other guy’s. As if.

What happens if you move away from the enemies of performance and do some propping up behind the scenes? You get…wait for it…oodles of extra performance!

When it comes down to it, which framework you choose to use really depends on how comfortable you are with it. None of these frameworks would be of help to you if you aren’t able to take full advantage of their features. You can spend weeks or even months using a specific framework, only to trash it in the end because you just aren’t as comfortable using it as you were with some other framework.

So I invite you to at least try out Zend. If it works for you, that’s great! It does for me. But if it’s not a good fit, go ahead and try out the others. Soon enough, you’ll find the framework that’s just right for your needs.

3 Great Job Interview Articles

In today’s job market, people are not only changing workplaces more than ever; they are altering their career paths as well. Being confident going into a job interview – either for a better position within your current place of employment or for a new employer altogether – can be a real challenge.  Being prepared, however, is easy if you’ve been keeping tabs on where you are at in your career and where you’d like to be.  It’s all about being proactive even when there may not be an immediate need.

Here are three articles that give you practical advice on how (and how not to) land that next job.

Advanced Character Customization for Flash Games

In this tutorial, we’ll delve into Flash game character customization. The result can be used to provide players with the ability to create a unique character, beyond the basic dress-up options of most games.

We found this awesome author thanks to FlashGameLicense.com, the place to buy and sell Flash games!

In this part, we’ll learn how to let the user add custom colors to different parts of our character, how to add hand-drawn designs to the character’s clothing, and how to modify a basic walking animation that uses the player’s changes.


Final Result Preview

This is what you’ll have built by the end of the tutorial:

Fill the areas of the character’s clothing with solid colors, add detail with the pencil, then hit “play” and press left and right to see him walk!


Step 1: Setting Up Our Flash Movie

Create a new AS3 Flash Document. Go into the properties panel and make sure that all of the settings are the same as the image below:


Step 2: Setting Up Our Main Class

Next create a new .as file called CustomCharacter.as inside the directory of our project. This will be our main class. Enter CustomCharacter into the Publish settings as the “Main Class”.
Make sure that your CustomCharacter class is as below.

package
{
	import flash.display.Sprite;
	import flash.display.BitmapData
	import flash.net.FileReference
	import flash.display.Loader
	import flash.display.Bitmap
	import flash.display.MovieClip
	import fl.controls.ColorPicker
	import flash.events.Event
	import flash.events.MouseEvent

	public class  CustomCharacter extends Sprite
	{

		public function CustomCharacter():void {

		}

	}

}

(Check out this quick introduction to the document class if you’re not sure what we’re doing in this step.)


Step 3: Creating Our Main Character

Now we will begin by drawing our main character. In this tutorial, it is important that we make sure we have every body part in a separate MovieClip. By doing this, we can base our walking animation on Tweens which will speed up the animation process. Our character will be made up of the following objects: a head, hair, a shirt, two legs, and two arms. You can find the main character used in this tutorial in the source FLA (download link is at the top of the tutorial).

For now, to encourage the player to customize the character, we’ll limit the colors of the body parts of the character to grey with black outlines. Select the entire body, push F8 to turn it into a single MovieClip and call it Player. Make sure that you set the registration point of each body part to the upper left corner. Now click on the new Player movieclip on the stage and set the instance name to player.

There you have it, we’ve just created our Player character!


Step 4: Creating a ColorPicker

To begin, we need to add the ColorPicker component to our library. Go into the components panel by going to Window > Components. Find the ColorPicker class and drag it into the library panel.

Next we need to do all of the ActionScript work. Here is what our CustomCharacter class will look like after our new changes.

package
{
	import flash.display.Sprite;
	import flash.display.BitmapData
	import flash.events.Event;
	import flash.net.FileReference
	import flash.display.Loader
	import flash.display.Bitmap
	import flash.display.MovieClip
	import fl.controls.ColorPicker
	import flash.events.MouseEvent

	public class  CustomCharacter extends Sprite
	{
		var myColorPicker:ColorPicker = new ColorPicker();

		public function CustomCharacter():void {

		myColorPicker.editable = true;
		myColorPicker.visible = false;
		addChild(myColorPicker);

		player.addEventListener(MouseEvent.CLICK, showPicker)
		myColorPicker.addEventListener(Event.CHANGE, colorChanged)

		}

		private function colorChanged(e:Event):void
		{
			myColorPicker.visible = false;
		}

		private function showPicker(e:MouseEvent):void
		{
			myColorPicker.visible = !myColorPicker.visible
			myColorPicker.move(stage.mouseX,stage.mouseY)

		}

	}

}

Let’s go through this step by step, starting with the constructor function. First, we are creating a new var called myColorPicker. We are then telling it that it is an instance of the ColorPicker class by calling = new ColorPicker(). Next we are telling our ColorPicker to be changeable and invisible, so we can make it show up when we click on the player. Then, we add the ColorPicker class to the stage, although it isn’t visible.

We also add two event listeners. One for when you click on the player, which toggles the visibility of the ColorPicker and moves it to the mouse location upon click, and the second one to check to see when the user has selected a new color, so that we can make the ColorPicker invisible again!


Step 5: Distinguishing Between Body Parts

Unfortunately, we can’t just use the ColorPicker and make it change an object’s color. First, we need for the ColorPicker to distinguish which object you are clicking on, so that it can determine which object to change. This requires using one of AS3’s powerful MouseEvent features.

Inside the showPicker function, we can just use e.target to target the MovieClip that is really being clicked on. We can bring the alpha of the clicked object down to confirm which object we are dealing with. Just add the code below to the showPicker() function.

e.target.alpha -= .5

Step 6: Preparing for Color!

We’re almost ready to color our objects. Before we start, we need to make sure that we can keep the outlines on our body parts. To do this, we need to identify the area that needs a color change. We are going to have to go inside the MovieClip for every body part, and select the gray fill area inside the outline.

Next, push F8 to create a new MovieClip of this gray fill and call it “_____Color” (so for the arm movieclip we will call it ArmColor). Finally, set the instance name of each of these ____Color objects to color. Now every body part should have a color MovieClip inside it.


Step 7: Los Colores (The Colors)

We are finally adding coloring to our application. Here is what your project should look like at the end of this step:

package
{
	import flash.display.Sprite;
	import flash.display.BitmapData
	import flash.events.Event;
	import flash.geom.ColorTransform;
	import flash.net.FileReference
	import flash.display.Loader
	import flash.display.Bitmap
	import flash.display.MovieClip
	import fl.controls.ColorPicker
	import flash.events.MouseEvent

	public class CustomCharacter extends Sprite
	{
		var myColorPicker:ColorPicker = new ColorPicker();
		var myChangedObject:MovieClip;

		public function CustomCharacter():void {

		myColorPicker.editable = true;
		myColorPicker.visible = false;
		addChild(myColorPicker);

		player.addEventListener(MouseEvent.CLICK, showPicker)
		myColorPicker.addEventListener(Event.CHANGE, colorChanged)

		}

		private function colorChanged(e:Event):void
		{
			myColorPicker.visible = false;
			var myChange:ColorTransform = new ColorTransform();
			myChange.color = new uint("0x" + e.target.hexValue)
			myChangedObject.transform.colorTransform = myChange
		}

		private function showPicker(e:MouseEvent):void
		{
			if (e.target.name == "color") {
				myColorPicker.visible = !myColorPicker.visible
				myColorPicker.move(stage.mouseX, stage.mouseY)
				myChangedObject = MovieClip(e.target)
				myColorPicker.selectedColor = uint(myChangedObject.transform.colorTransform.color)
			}

		}

	}

}

Application Screenshot

Alright! Let’s go through this step by step. To begin with, we are creating a new MovieClip variable, myChangedObject, to be accessed by our program. This is so our showPicker() function can tell our colorChanged() function which MovieClip was last clicked on.

Seeing as that’s out of the way, let’s look at our showPicker() function. As you can see, we added a little checker to see if the clicked on object’s name is “color”. This is just a check to see whether the user has actually clicked on the player’s outline, shoes, or anything else that isn’t meant to be changed.

Next we are changing our new myChangedObject variable to be equal to the clicked-on object, e.target, so that our colorChanged() function can make the final changes. Finally, we are telling our ColorPicker (myColorPicker)
to have the previously selected color preselected. If there is none, then it will default to black.

myColorPicker.selectedColor = uint(myChangedObject.transform.colorTransform.color)

Lets analyze this little bit of code. First of all, it is important to know that to have a preselected color, the ColorPicker class has a .selectedColor variable. This is a number that can receive a 6-digit int (0xRRGGBB). In the second part, we are converting the data in the parentheses to a uint to be passed onto the ColorPicker.

Here’s the key, we are essentially going inside our selected MovieClip myChangedObject, going into its transform section (where our data is stored), going into the colorTransform data of the transform data, and pulling out the color variable which holds our RGB code (which we then pass as the selected color of the color picker). Think about it like a directory:

myChangedObject/Transform Data/Color Transform Data/Color Data (RGB)

We’re still not done yet! Next let’s look at our colorChanged() function. Here, we are creating a new instance of the ColorTransform class. We are then setting the color variable inside the ColorTransform class to the color that the user has selected with the color picker.

However, we need to add a “0x” to the ColorPicker’s chosen color (e.target.hexValue) to form the complete variable that we can pass on to our ColorTransform. That’s because hexValue gives colors in “RRGGBB” string format, and we need them in 0xRRGGBB integer format. Like before, we are converting all of the added data to a new uint() that the ColorTransform can recognize.

FINALLY, we are going back into: myChangedObject.transform.colorTransform except this time, we are ACTUALLY changing the colorTransform variable to the new ColorTransform variable we have just created.

Whew, that was confusing but now that that part is over, we can start adding new features to our program.


Step 8: Switching Between Pencil and Paint Bucket

Now that we have a functional coloring app, let’s move on to add some more functionality.

Next, we are going to try to make the program draw directly onto the player’s body parts, so that the user can draw some cool designs for his character. As you can see above, I’ve put together a panel with two tools. Firstly, we have a drawing pencil and next we a paint bucket tool. The purpose of this tutorial is not to put together the UI, but I HAVE included them in the source. You can dissect the graphics if you want to learn how they were made.

Also, this is sort of an extension from this tutorial by Carlos Yanez, which does a great job of explaining how to create a drawing application.

Just as in that tutorial, I have a interface that consists of two paint bucket and two pencil images. One is gray and the other is in color. The gray one will make the colorful image visible to show that the tool has been activated.

Once one tool is activated, the other will be disabled. In this step, we are only working on switching between the tools. During the following steps, we will cover how to get the pencil tool to work. Here is what our code should look like:

package
{
	import flash.display.Sprite;
	import flash.display.BitmapData
	import flash.events.Event;
	import flash.geom.ColorTransform;
	import flash.net.FileReference
	import flash.display.Loader
	import flash.display.Bitmap
	import flash.display.MovieClip
	import fl.controls.ColorPicker
	import flash.events.MouseEvent

	public class  CustomCharacter extends Sprite
	{
		var myColorPicker:ColorPicker = new ColorPicker();
		var myChangedObject:MovieClip;

		public function CustomCharacter():void {

		myColorPicker.editable = true;
		myColorPicker.visible = false;
		addChild(myColorPicker);

		tools.bucket.visible = false;
		tools.pencil.visible = false;

		tools.bucket_btn.addEventListener(MouseEvent.CLICK,enableBucket)
		tools.pencil_btn.addEventListener(MouseEvent.CLICK, enablePencil)

		}

		private function enablePencil(e:MouseEvent):void
		{

		tools.bucket.visible = false;
		tools.pencil.visible = true;
		player.removeEventListener(MouseEvent.CLICK, showPicker)
		myColorPicker.removeEventListener(Event.CHANGE, colorChanged)

		}

		private function enableBucket(e:MouseEvent):void
		{

		tools.bucket.visible = true;
		tools.pencil.visible = false;
		player.addEventListener(MouseEvent.CLICK, showPicker)
		myColorPicker.addEventListener(Event.CHANGE, colorChanged)

		}

		private function colorChanged(e:Event):void
		{
			myColorPicker.visible = false;
			var myChange:ColorTransform = new ColorTransform();
			myChange.color = new uint("0x" + e.target.hexValue)
			myChangedObject.transform.colorTransform = myChange
		}

		private function showPicker(e:MouseEvent):void
		{
			if (e.target.name == "color") {
				myColorPicker.visible = !myColorPicker.visible
				myColorPicker.move(stage.mouseX, stage.mouseY)
				myChangedObject = MovieClip(e.target)
				myColorPicker.selectedColor = uint(myChangedObject.transform.colorTransform.color)

			}

		}

	}

}

First, you can see that we have taken out the showPicker and colorChanged event listeners, and they are now only to be
added when we choose the paint bucket options. Instead, we have added two event listeners for each button, which link to two functions that activate the tool we have clicked on. The functions add their own event listeners and remove the event listeners from the other tool. They also make the right interface items visible and invisible.

Our new application


Step 9: Using a Color Picker For Pencil

We have setup the interface, but a question remains. How can we choose what color to draw with for the pencil tool? The answer is simple. We can just reposition our color picker to be next to the pencil tool. It’s quite simple too. Just add this to the end of the enablePencil() function:

	myColorPicker.visible = true
	myColorPicker.move(515, 20);	//or whatever coordinates suit your layout

Just to make sure that the player doesn’t use the ColorPicker when selecting the bucket tool, we can just add this to the enableBucket() function:

	myColorPicker.visible = false

Step 10: An Array of Body Parts

We are getting closer to being able to draw onto our character, but we still have some work to do. Soon, we are going to start masking our drawings to movie clips inside the character, so that they stay within the outline of the character. To do this, first we need to create a list of objects that need to be masked. We can do this in the form of an array.

Unlike before, we are going to have to give each body part an instance name, so go back into the player movie clip, and select each object one by one. Give each object a name (“arm1″, “leg2″, “hair”, etc.). When you have finished that, create an array in the CustomCharacter() constructor, like so:

	var drawableParts:Array = [player.arm1,player.arm2,player.leg1,player.leg2,player.head,player.shirt,player.hair];

Sadly, that doesn’t work as planned.

TypeError: Error #1009: Cannot access a property or method of a null object reference.
	at CustomCharacter()

This is because we are trying to reference the player movieclip before it is constructed. To solve this, we need to reference it in the constructor, too.

Basically, we are splitting up the variable into two parts. The first part is before the constructor when we create the array, so that it’ll be accessible throughout the class. The second is INSIDE the constructor when we can assign it a value.

Here is a snippet of our class:

public class  CustomCharacter extends Sprite
{
	var myColorPicker:ColorPicker = new ColorPicker();
	var myChangedObject:MovieClip;
	var bucket:Boolean = false
	var drawableParts:Array 

	public function CustomCharacter():void {

		drawableParts = [player.arm1,player.arm2,player.leg1,player.leg2,player.head,player.shirt,player.hair]

		myColorPicker.editable = true;
		myColorPicker.visible = false;
		addChild(myColorPicker);

		tools.bucket.visible = false;
		tools.pencil.visible = false;

		tools.bucket_btn.addEventListener(MouseEvent.CLICK,enableBucket)
		tools.pencil_btn.addEventListener(MouseEvent.CLICK, enablePencil)
	}

Step 11: Creating a Canvas to Draw On

To be able to draw into an object, we need to use the Shape class. First, add the import statement to the other ones
at the beginning of our Main class.

	import flash.display.Shape;

This is what you need to add to the bottom of your CustomCharacter() constructor function:

for (var i:int = 0; i < drawableParts.length;i++ ) {
	var myShape:Shape = new Shape()

	myShape.graphics.lineStyle(1,0x330000);
	myShape.graphics.beginFill(0x3312FF,0.5);
	myShape.graphics.drawRect(0,0,drawableParts[i].width * 3,drawableParts[i].height * 3);
	myShape.graphics.endFill();

	myShape.name = "shapes"

	drawableParts[i].addChild(myShape)
}

Here’s a quick explanation of what we are doing. We are basically creating a for loop that triggers once for each of the items in our array. In the loop, we create a new instance of the Shape class.

The next four lines are just for debug testing, sort of like Box2D debug draw. Basically it is displaying purple boxes around the character’s body parts. The only thing to keep in mind is that we are multiplying the width and height of each body part by 3 to get the width and height of our purple testing box, so that we know each of these “canvases” will be big enough to draw on. Next we assign the name “shapes” to each Shape created, and add it into the current item of the drawableParts array.


Step 11: Masking our Shapes

To start off, we will need to give our shapes a surface to be masked too. We can’t just link them to our body part MovieClip, because then those will turn invisible. This is what we can do instead.

Go into the hair MovieClip. Right-click on our color MovieClip and click “Copy”. Next, right-click on some empty space inside our hair MovieClip and click “Paste in Place”. Now go into the properties of our new MovieClip and set the instance name to maskclip. Now go back to our player MovieClip and repeat this for every object.

Next we can add this code to the end of our for loop:

	myShape.mask = drawableParts[i].maskclip

Test the Movie again and just like magic, our player turns purple, because only the area of the player that is shaded in is showing our debug boxes. This means that our drawings will stay on the surface that we are drawing on.


Step 12: Accessing Our Canvas

Now the comes question: “How do I access the canvas myShape of each body part?” Unfortunately, the answer is not so simple. However, I can walk you through it step by step. This snippet will link us directly back to our myShape if we insert it in a MouseEvent. Why? Well just keep on reading..

e.target.parent.getChildByName("shapes")

Let’s go through this step by step. This process is kind of like a mouse (yes a real one) trying to find his cheese (our canvas) because
we need to go through a bunch of twists and turns to find what we are looking for.

  • First, we are going to the target of the MouseEvent. This can be the object that the mouse clicked, released, moved over, etc.
  • Next we are going to the parent of that object. This is bound to be a body part MovieClip (such as the arm) because the only clickable objects are either the outline or the filling of the Player (we will make sure it is the filling later).
  • Now that we are at the body part MovieClip, we can use getChildByName(“Object Name Here”) to access the object with the given name.

Because we previously named all of our Shape objects as shapes, calling getChildByName(“shapes”) will give us access to them.


Step 13: Black and White Coloring

Now we can start to actually draw on the player in black and white.

This is what our Main class should look like at the end of the tutorial. I’ve added comments to all of the changes I’ve made.

package
{
	import flash.display.Shape;
	import flash.display.Sprite;
	import flash.display.BitmapData
	import flash.events.Event;
	import flash.geom.ColorTransform;
	import flash.net.FileReference
	import flash.display.Loader
	import flash.display.Bitmap
	import flash.display.MovieClip
	import fl.controls.ColorPicker
	import flash.events.MouseEvent

	public class  CustomCharacter extends Sprite
	{
		var myColorPicker:ColorPicker = new ColorPicker();
		var myChangedObject:MovieClip;
		var bucket:Boolean = false
		var drawableParts:Array 

		//A boolean to check to see if the mouse is drawing
		var drawing:Boolean = false

		public function CustomCharacter():void {
			drawableParts = [player.arm1,player.arm2,player.leg1,player.leg2,player.head,player.shirt,player.hair]
			myColorPicker.editable = true;
			myColorPicker.visible = false;
			addChild(myColorPicker);

			tools.bucket.visible = false;
			tools.pencil.visible = false;

			tools.bucket_btn.addEventListener(MouseEvent.CLICK,enableBucket)
			tools.pencil_btn.addEventListener(MouseEvent.CLICK, enablePencil)
			for (var i:int = 0; i < drawableParts.length;i++ ) {
				var myShape:Shape = new Shape()

				myShape.name = "shapes"

				drawableParts[i].addChild(myShape)
				myShape.mask = drawableParts[i].maskclip
			}
		}

		private function enablePencil(e:MouseEvent):void
		{
			tools.bucket.visible = false;
			tools.pencil.visible = true;
			player.removeEventListener(MouseEvent.CLICK, showPicker)

			//Removing eventListener placed by our bucket tool
			myColorPicker.removeEventListener(Event.CHANGE, colorChanged)

			//Checks to see when our ColorPicker changes color while Pencil is selected
			myColorPicker.addEventListener(Event.CHANGE, colorChangedPencil)

			//Checks to see if the mouse is down, up, or moving
			player.addEventListener(MouseEvent.MOUSE_DOWN, drawOnPlayer)
			player.addEventListener(MouseEvent.MOUSE_UP, dontDrawOnPlayer)
			player.addEventListener(MouseEvent.MOUSE_MOVE, moveDrawOnPlayer)

			myColorPicker.visible = true
			myColorPicker.move(515, 20);
		}

		//Function to check for movement of the mouse, while drawing
		private function moveDrawOnPlayer(e:MouseEvent):void
		{
			//If our mouse is hovering over the filling of the player and if we are indeed drawing
			if (e.target.name == "color" && drawing) {
					//Draw a line from the graphical section of our shape movieclip to the location of the mouse
					//We need to use ourCanvas.mouseX or mouseY because that gives us local coordinates of the mouse that our canvas can use
					e.target.parent.getChildByName("shapes").graphics.lineTo(e.target.parent.getChildByName("shapes").mouseX,e.target.parent.getChildByName("shapes").mouseY);
			}

		}

		private function dontDrawOnPlayer(e:MouseEvent):void
		{
			//When you release the mouse, stop drawing
			drawing = false;

		}

		//new function
		private function drawOnPlayer(e:MouseEvent):void
		{
			//When you click, start drawing
			drawing = true;

			//If you are clicking on a "color" MovieClip
			if (e.target.name == "color" ) {
			//Set the size of the line to 10 and make it black (0x000000)
			e.target.parent.getChildByName("shapes").graphics.lineStyle(10, "0x000000")
			//Move drawing point to where the mouse is at (see moveDrawOnPlayer() for more depth)
			e.target.parent.getChildByName("shapes").graphics.moveTo(e.target.parent.getChildByName("shapes").mouseX,e.target.parent.getChildByName("shapes").mouseY);

			}

		}

		private function enableBucket(e:MouseEvent):void
		{
			tools.bucket.visible = true;
			tools.pencil.visible = false;
			myColorPicker.visible = false

			//Remove bucket event listeners
			player.removeEventListener(MouseEvent.MOUSE_DOWN, drawOnPlayer)
			player.removeEventListener(MouseEvent.MOUSE_UP, dontDrawOnPlayer)
			myColorPicker.removeEventListener(Event.CHANGE, colorChangedPencil)

			player.addEventListener(MouseEvent.CLICK, showPicker)

			//See if our color has changed
			myColorPicker.addEventListener(Event.CHANGE, colorChanged)

			//Remove old event listeners
			player.removeEventListener(MouseEvent.MOUSE_DOWN, drawOnPlayer)
			player.removeEventListener(MouseEvent.MOUSE_UP, dontDrawOnPlayer)
			player.removeEventListener(MouseEvent.MOUSE_MOVE, moveDrawOnPlayer)
		}

		//Placeholder function for when our ColorPicker has chosen a new pencil color
		private function colorChangedPencil(e:Event):void
		{

		}

		private function colorChanged(e:Event):void
		{
			myColorPicker.visible = false;
			var myChange:ColorTransform = new ColorTransform();
			myChange.color = new uint("0x" + e.target.hexValue)
			myChangedObject.transform.colorTransform = myChange
		}

		private function showPicker(e:MouseEvent):void
		{
			if (e.target.name == "color") {
				myColorPicker.visible = !myColorPicker.visible
				myColorPicker.move(stage.mouseX, stage.mouseY)
				myChangedObject = MovieClip(e.target)
				myColorPicker.selectedColor = uint(myChangedObject.transform.colorTransform.color)
			}

		}

	}

}

The purpose of this tutorial is not to cover drawing on Shape objects. That is fully covered by Carlos’s tutorial. Right now, we are only learning the techniques for drawing onto the correct object. If you are confused on how we are accessing the right shape object, please re-read Step 12 for the full explanation.


Step 14: Drawing With Color

Now we can move on to drawing with a color selected from the ColorPicker. This is quite similar to the process that we used on the bucket tool.

Let’s begin by adding a new variable outside all of the functions, but inside the class. This is what our program will use to store the current color of the pencil.

	var pencilColor:String = "000000";

Now let’s move down to our drawOnPlayer() function.Focus your attention on the line that sets the lineStyle() of the shape we are drawing on. The second parameter in the function should be “0x000000”. Change ONLY that parameter to:

	uint("0x"+pencilColor)

This is basically telling it to draw use the RBG code of our ColorPicker while adding the “0x” necessary to complete the color.

Here is what the line of code should look like now:

	e.target.parent.getChildByName("shapes").graphics.lineStyle(10, uint("0x"+pencilColor))

Finally, we need to complete the colorChangedPencil() function, which is called when a new pencil color is selected. Go down to it and add this line of code:

	pencilColor = e.target.hexValue

This is simply assigning the hexValue or RBG code of our ColorPicker to our pencilColor variable.


Step 15: Extending the Buttons Panel

In the next step, we are going to work on adding a new feature to our game. Unfortunately, we can’t just leave a lot of placeholder room inside the panel in case we might happen to add another feature. You can use this as a quick and dirty way to extend the panel to make more room for other buttons and tools for our application.

Step 1: Select

Select all objects inside our Options MovieClip.

Step 2: Shift

Hold down the Shift key and press the Left key to slide the MovieClip to the left.

Step 3: Stretch

Use the mouse tool and stretch the corners of our panel filling (the gray color) as well as our outlines across the screen.

Step 4: ReAdjust

Make sure to modify any coordinate based objects. For example, we now need to change the location of the pencil’s ColorPicker because our Pencil Tool button moved.

	myColorPicker.move(440, 20);

Step 16: Resetting our Data

Like any good drawing program, we need to give the player a way to restart his project. What better than a restart button for those users who can’t make perfect drawing decisions? Let’s begin by creating a new Button called Restart and adding it to our tools panel.

I’ll be using this button (It’s in the FLA):

Place one on the tools movie clip and give it an instance name of “reset”. Next add the following event listener to our constructor function:

	tools.reset.addEventListener(MouseEvent.CLICK,resetEverything)

Now add this event handler function to our class:

private function resetEverything(e:MouseEvent):void
{
	//Looping through all of the objects in our drawableParts array (all of our drawable objects)
	for (var i:int = 0; i < drawableParts.length; i++ ) {

		//Finding and removing our old shapes object
		drawableParts[i].removeChild(drawableParts[i].getChildByName("shapes"));

		//Creating a new shape object
		var myShape:Shape = new Shape()

		//Giving our new canvas a name
		myShape.name = "shapes"

		//Adding our object
		drawableParts[i].addChild(myShape)

		//Masking our canvas to the object we are drawing on
		myShape.mask = drawableParts[i].maskclip

		//Finding the "color" MovieClip's colorTransform property and resetting it to a new ColorTransform object
		drawableParts[i].getChildByName("color").transform.colorTransform = new ColorTransform()

	}
}

Read the comments in the function for a step by step explanation of what we are doing


Step 17: Integrating Animation

If you remember from the beginning of the tutorial, the goal of this tutorial was not to create a dress up game, but to create an advanced dress up component to be used in games. So far we’ve added a dynamic dress up component to the otherwise static character. Next, our goal is to integrate a simple walking animation with our player customization.

This is just a demo to show you how easily you can use these customizations in a real game.

To begin, I’ve created a simple animation with tweens. I’ve basically tweened the body part MovieClips to make the player seem like he is walking. You can view the animation below. Remember that the purpose of this tutorial is not to design the actual animation, but to learn how to integrate it with the application that we’ve already built. However, just like the other elements of the app, the animation is included in the source code.

Here you can see the timeline of the player MovieClip.

Now test the movie! The player should be animated. You can try to draw on the player’s legs, and if you’ve been following the instructions properly, then when you draw, the drawing should stick onto the player’s legs and animate with them. I will explain why in detail a little bit later.


Step 18: Draw > Animation Workflow

If you tried to draw on the player earlier, you might have had some difficulty drawing on the moving parts (DUH!). This is because we haven’t implemented any real workflow or interface yet. In this step we will do all of that to make our application fully useable.

To start, let’s add a line of code to our constructor to stop the player’s animation:

	player.stop()

Next we need to extend our panel again. Just follow Step 15 and make the panel a bit longer

Now we need to add a “play animation” button. Just like the other UI elements, my button is like a switch. When you click on it, it toggles the visibility of another MovieClip to give the button the appearance of lighting up. The button’s instance name is playgame while the lighting up MovieClip‘s instance name is playing. Check out the FLA or the preview SWF to see how these fit together.

Here is the code that we need to add to make this work… First add this to our constructor to disable the lighting up effect:

	tools.playing.visible = false;

Next add this EventListener to our constructor:

	tools.playgame.addEventListener(MouseEvent.CLICK,enableGame)

Finally, let’s create this function in our class. At the moment, this is doing only two things. Firstly, it toggles our playing MovieClip’s visibility. Then, it checks to see if the MovieClip is visible. If so, it starts our player’s animation. Otherwise, it stops the animation at its first frame.

private function enableGame(e:MouseEvent):void
{
	tools.playing.visible = !tools.playing.visible

	if (tools.playing.visible) {

		player.play()
	}
	else {

		player.gotoAndStop(1)

	}
}

Congratulations, you have now implemented a basic animation engine into our customizing program.


Step 19: Some Simple Game Logic

Everything is looking good, but what fun is a game without user interactivity? In this step we are going to add some simple interactivity to our game. To begin, download Senocular’s KeyObject class here . This will make our logic much easier to write.

We are going to have to make a quick change to the class. Open it up. On the first line replace the:

	package com.senocular.utils {

with:

	package{

Now we can start by importing the class. Remember to put it in the directory of our Main class. Add this import statement next to the other ones:

	import KeyObject

To set up the KeyObject class. Just create a new variable key like so:

	var key:KeyObject;

And assign it to a new instance of the KeyObject class while adding in the Stage property, like so:

	key = new KeyObject(stage);

Either put that line of code in the constructor, or, if that doesn’t work, add this line to the constructor:

	addEventListener(Event.ADDED_TO_STAGE, onAddToStage);

…and then add a new function to handle that event:

private function onAddToStage(e:Event):void
{
	removeEventListener(Event.ADDED_TO_STAGE, onAddToStage);
	key = new KeyObject(stage);
}

If you don’t do this, it’s possible that stage will not refer to anything at the point when you need to use it.

Next we need to create an ENTER_FRAME event listener. However, we should remove it when we are done. Add this code to your enableGame() function:

private function enableGame(e:MouseEvent):void
{
	tools.playing.visible = !tools.playing.visible

	if (tools.playing.visible) {

		player.play()
		addEventListener(Event.ENTER_FRAME, enterFrame);	//new line

	}
	else {

		player.gotoAndStop(1)
		removeEventListener(Event.ENTER_FRAME, enterFrame);	//new line

	}
}

The meaning of this code should be pretty clear for you, so there is no real need to explain.

Now here’s our enterFrame() function:

private function enterFrame(e:Event):void
{
	//Checks with our key variable to check if the LEFT key is down
	//and that the character hasn't gone off of the screen
	if (key.isDown(key.LEFT) && player.x > 0) { 

		//Moves the player a bit
		player.x -= 5;

		//Flips the player backwards
		player.scaleX = -1

	}
	//Checks if the RIGHT key is down and the player hasn't gone off the other side
	if (key.isDown(key.RIGHT) && player.x < 640) {
		//Moves the player a bit
		player.x += 5

		//Flips the player to normal
		player.scaleX = 1
	}
}

Test your SWF, pressing the left and right arrow keys.


Step 20: Fixing ColorPicker Popups!

As you may have noticed, if we have the pencil tool active and we are making the player move, our ColorPicker keeps on opening up. Here is a quick and dirty fix for that! Simply make the commented changes to your enableGame() function:

private function enableGame(e:MouseEvent):void
{
	tools.playing.visible = !tools.playing.visible

	if (tools.playing.visible) {

		player.play()
		addEventListener(Event.ENTER_FRAME, enterFrame);

		//New code: Moving the ColorPicker WAAAYYYY to the right
		myColorPicker.x = 10000;
	}
	else {

		player.gotoAndStop(1)
		removeEventListener(Event.ENTER_FRAME, enterFrame);

		//New code: Checks to see if the pencil tool is active...
		if (tools.pencil.visible) {
			//Moves the ColorPicker back to where it used to be
			myColorPicker.x = 440
		}

	}
}

We don’t have to do anything with the bucket tool because it already moves the ColorPicker over to the location of the Mouse.


Conclusion

As you can see, creating a unique customization experience is not that hard. In fact, it is a very good way to let the player make his avatar or character “his”. Truly, we have just skimmed the surface of the customization options available in flash. In the next part of this tutorial, we will dig deeper into how we can extend the character customization of this application.