Leadership 101

There are two basic types of leaders; those in a leadership position, and those who lead.  One is called a leader because their title or level of seniority (or authority) says so, while one has a calling to be a leader.

It’s important to be able to tell the difference between the two.

The person in the leadership position is there because they were either promoted to the position since they excelled in their previous role (some might refer to this situation as the Peter Principle – promoted to their highest level of incompetence – like this example), or they were promoted to the position out of friendship, favoritism, or an ability (and desire) to “lay down the law” as required.  This person will get your company results, but they often aren’t able to trust that their team can perform without them.  “By the Book,” “My way or the highway,” and “Because I said so” are frequent justifications for their leadership decisions.

On the other hand, a leader is the person that makes you want to follow them.  There is something about them that draws you to them, whether it’s the way they encourage you to do the best you can, the way they train you to do things right, or it’s just the way they demonstrate their respect for being part of the team.  A leader will allow you to grow as a person and as a coworker.   They understand their success comes from your success; when you do well, they do well.

What is a leader?

  • A great leader will get more out of you than the strictest supervisor ever will.  A leader doesn’t manipulate you or try to trick you into doing extra work when they need it.
  • A leader listens before they make a decision.  They will talk with their bosses to find out what needs to be done, and to their team to find out how to do it.
  • A leader understands the job can’t be done without you.  A leader doesn’t see you as a tool they need to use to get the job done.

“The best executive is the one who has sense enough to pick good men to do what he wants done, and self-restraint to keep from meddling with them while they do it.”

– Theodore Roosevelt

Is a leader always in a leadership role?  Nope.  It might be the newest member on the team that does the true leading.  Think back to some of the projects that you were in charge of.  Were you the one leading the team, or were you just the one giving the orders?

“Management is doing things right; leadership is doing the right things.”

– Peter F. Drucker

Even if you see yourself in the first category, there’s still hope.  You can choose to be a leader by working with your team.

Here are five easy steps to help you become a great leader.

1. Tell your team what you need

If you want to make things happen, let your team know what needs to be done.  If you’ve done your job right, they are already experts.  They know how to do their job, all they need is for you to get out of the way.  Tell them what you need, and let them come up with the plan on how to get there.

“Don’t tell people how to do things, tell them what to do and let them surprise you with their results.”

– George S. Patton

2. Give them the tools, time, and training they require

If you prepare your team properly, they’ll be able to handle just about anything in your business.  Well, even if you don’t prepare them, they’ll figure a way to make it happen, but it’s much better for you if you invest the time and energy into a structured training program that helps them develop their skills.

3. Ask your team what they need

Once you’ve told your team what you need, ask them what they need to make it happen.  This can be difficult for some managers, as they think the team is going to make outrageous demands.  If you’re being open and honest with your team, chances are they’ll be open and honest with you about their needs.  I’ll bet you dollars to donuts they won’t ask for as much as you think they would.  This helps create realistic expectations on timelines and budgets, which you can share with your bosses.

4. Encourage your team as they work

Regular communication is key.  Don’t wait until the day of the deadline to check in with them.  Find out as they go along how the project is faring.  This way you can help them overcome barriers if they need it, or praise them if they are on or ahead of schedule.

5. Thank them for being on the team, share the reward with them

Appreciate your people.  If they do a good job, show them that you are grateful.  This doesn’t mean throw  a big party every time you finish a quarter, but it does mean you should genuinely thank them for a successful project.  If your team helps you get your bonus, it makes sense to pass some of it along to them.  If you have a bonus structure, make sure they benefit from it too – 70% of something is much better than 100% of nothing.

“I must follow the people. Am I not their leader?”

– Benjamin Disraeli

Are you a manager or a leader?  If you are a leader, which style do you use to get the job done?

Procedural Modeling with MEL Scripts in Maya – Day 2

This tutorial is an introduction to using external MEL files and procedures, functions, loops, and scripted interaction within the Maya workspace. We’ll be going over basic coding practices, and putting together a nifty geometric object that would be very difficult to create without scripting.

Creating Procedures

In this tutorial, we will be creating an external script file with four “procedures” – self-contained scripts that are meant to achieve specific goals. The first procedure will take any number of objects selected in the Maya viewport and create a chained hierarchy for easy double-transformations. The second script will un-parent selected objects, and the third will move the pivot points of selected objects to the world-space origin. These three scripts will allow you to easily create some interesting effects with multiple objects. The fourth procedure will combine all of the first three to create a ‘Fermat’s Spiral’, similar to the complex whorl found on sunflower heads.
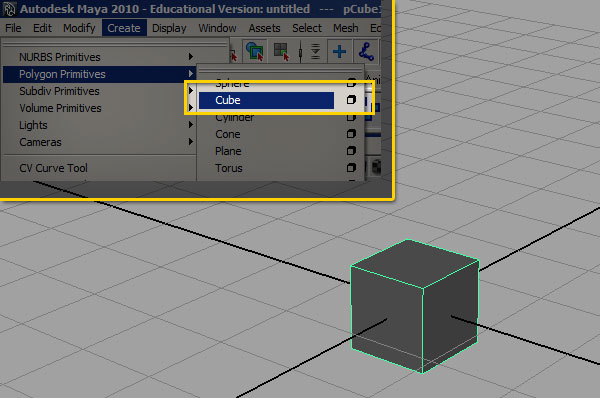

Step 1

Open Maya. For the course of this tutorial, I’ll be using Maya 2010, but the same commands should work for most versions of Maya. Start by creating a cube in the center of the viewport.
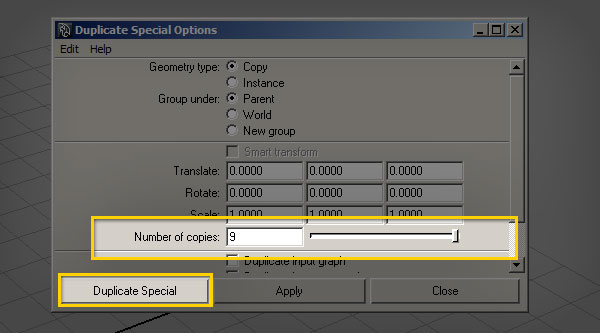

Step 2

Go to ‘Edit > Duplicate Special’ and click the option box to bring up this dialog. Create nine copies.
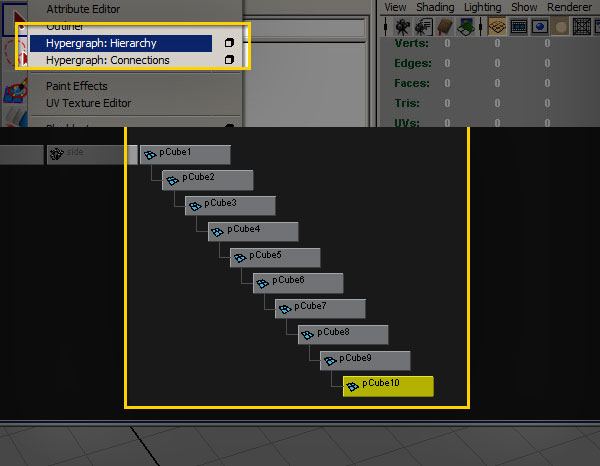

Step 3

Go to ‘Window > Hypergraph Hierarchy’. We now need to parent the cubes together to create a “chain”. To do this, first click ‘pCube2′ then shift click ‘pCube1′, and hit ‘p’ on your keyboard. This parents the first selected object (pCube2) to the second selected (pCube1).

Continue this process (selecting the child, then the parent and then hitting ‘p’ to chain them together,) for each of our cubes. Once complete, each object in the middle of the hierarchy should have one parent and one child cube, and the overall hierarchy should look like this:


Step 4

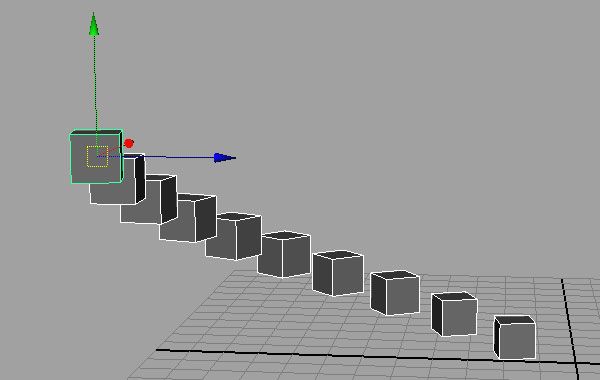
Close the ‘Hypergraph Hierarchy’ window. Select all of the objects by marquee-dragging over the cubes in the middle of the viewport. Then, keeping all of the cubes selected, try moving and rotating them.

Because each cube’s transformations are now relative to the cube one step above in the chain, the resulting double-transformation allows you to move the cubes in a very unique way – small translations quickly become large changes.


Step 5

With all of the cubes still selected, hit ‘Shift-P’ on your keyboard to un-parent the cubes. We’ve now walked through all of the major steps that we want to automate with our script. So start a new Maya file, and open up a text editor. My personal favorite is Notepad++, which even has a MEL language plugin available. Feel free to use whatever text editor you prefer, but for now I’ll use good old Microsoft Notepad. Notepad is simple, but it gets the job done.


Step 6

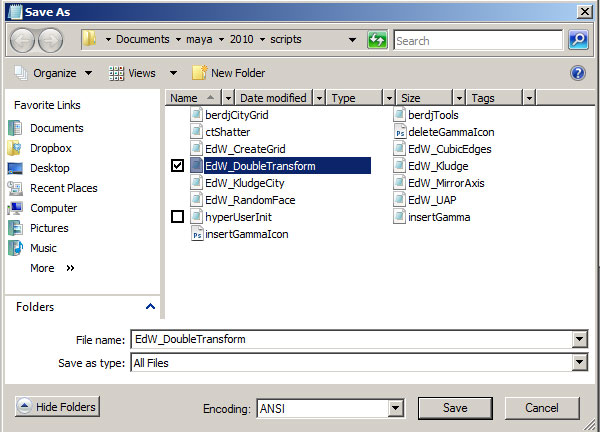
Go ahead and save your file. When saving a MEL document, make sure to choose “All Files” under "save as type”. Save your document as a .mel file in your Maya scripts directory. I’ll be using EdW_DoubleTransform.mel as my file name.


Step 7

In order to create a procedure, you have to know a couple of things beforehand. First, you must define a “scope” for the procedure. Scope establishes where a procedure can be accessed from. A “local” scope means that the code is only accessible to other procedures inside the same .mel file. “Global” means that the procedure is available to other script files and the user, and is also loaded into memory. In general, I use a lot of global procedures. This is not the absolute best coding practice, but I like to have my procedures available across multiple scripts. Second, you must choose a name for your procedure. In general, try to pick something unique and descriptive – if the procedure is global, you don’t want the name to conflict with any other procedure in any other script. I usually work some kind of initials into the name, and because the script we’re writing is called “DoubleTransform”, I’ll go with “dt” in this case. At it’s most basic, this is the procedure we’re building:

global proc dt_makeParentChain(){
//actions of the script
};

Step 8

The first thing we’ll do with our procedure is define a variable that will eventually house a list of object names. In MEL, variables are denoted by a dollar-sign ($) before the variable name. There are several different kinds of data that a variable can contain – strings of text, whole-numbers called integers, floating-point decimal numbers, vector values, etc. The syntax for declaring a variable is this:

dataType $variableName;

For now, we’ll make an empty string variable:

string $selectedObjects;

If we want, we can also assign data to the variable in the same line of code. Double-quotes are used to define strings of text.

string $selectedObjects = "this is a string of text";

a single equals-sign means “set the variable to”. A double equals-sign means “is equal to”, and is used when comparing variables.


Step 9

In order to test our new variable, we need to add a print command. This will output a string to the Script Editor when the script is run. In this case, we are simply printing the contents of the variable ‘$selectedObjects’.

print $selectedObjects;

Step 10

Add a comment to your new procedure. I tend to add a comment before each procedure, so that I can quickly find them later. Some of my scripts have dozens of procedures, and comments make the process of debugging and changing code much easier. The full code should now look like this:

// Make Parent Chain
global proc dt_makeParentChain(){
string $selectedObjects = "this is a string of text";
print $selectedObjects;
};

Step 11

Save the file and go back to Maya. Whenever Maya first starts up, it scans the scripts directory and loads a list of all the files there. If you’ve added a script to the directory while Maya is already open, then the system doesn’t know that the file exists. In this case you have two options, either restart Maya, or you can use the “rehash” command to force Maya to update that list of files. We’ll use the second method, so go to ‘Window > General Editors > Script Editor’, type the following :

rehash;

Now hit ‘Ctrl-Enter’ to run the command.


Step 12

To test out your script, you’ll need to “initialize” it in Maya. The “rehash” command tells maya that the file exists, and the “source” command tells Maya to load the script into memory. Type the following into the script editor:

source EdW_DoubleTransform.mel;

Then, type the command for the procedure we created inside the script:
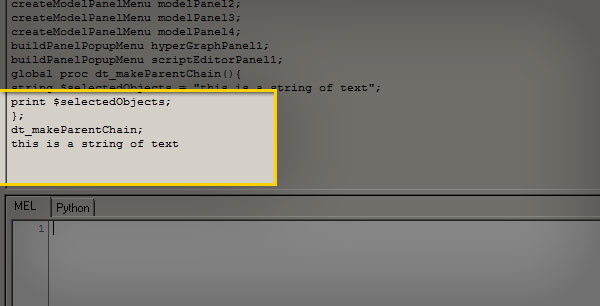
dt_makeParentChain;

This is what you should get in the script editor after executing the procedure:


Step 13

Now that we’ve put together a functioning procedure, let’s figure out the pseudocode for what we want that procedure to do in our final script:

  • write a list of selected objects to a variable
  • get the number of selected objects
  • parent each object to the previous one in the list

Step 14

In order to get a list of the objects that are selected in the Maya viewport, use the list command, “ls”. List is usually used with a flag that tells the command to grab whatever is currently selected in the maya viewport, -sl. Try selecting some objects in the maya viewport, and type the full command (shown below) in the script editor, remember to hit ‘Ctrl-Enter’ to run the command.

ls -sl;

Step 15

The list command outputs a bunch of strings that represent the full list of selected objects. In order to make this information useful to us, we need to write the result of the “list” command to a variable. To do this, wrap the list command in tick-marks (Note, the tick-mark, also called a backquote, is usually located above the tab key on the keyboard… be sure not to use the single-quote-mark next to the enter key). Wrapping a command in tick-marks translates as “the output of”. Our command should now look like this:

string $selectedObjects = `ls -sl`;

Step 16

The variable $selectedObjects is a single string of text. What we really need is something called a string array — an ordered list of strings that are contained in a single variable. To make our string into a string array, use square brackets when declaring the variable:

string $selectedObjects[] = `ls -sl`;

Now, whenever we refer to the variable, we can use either the entire array:

$selectedObjects //all the strings in the array

… Or an individual string inside the array, by supplying an index – the position of the string we want within the array itself. The index values in MEL always start at zero as shown below :

print $selectedObjects[0]; // returns the first string in the array
print $selectedObjects[2]; // returns the third string in the array

Step 17

We will also need a way to figure out how many objects are in the array. You can use the “size” command to do just that. Let’s create a new variable to store this information. A whole number is represented by an integer, which is always refered to in MEL as an “int”:

int $numSelectedObjects = `size($selectedObjects)`;

Step 18

Now we need a way to parent each object according to its place in the array. There are a handful of ways to do this, but for now we’ll use a basic “for” loop. For-loops are common in programming as a way to do an action a number of times. The syntax of a for-loop that runs ten times is this:

for (int $i = 0; $i < 9; $i++){ //action to be done };

The loop structure has three parts. $i = 0 defines an integer variable, $i < 9 defines where the loop should end (in this case, so long as $i is less than 9, the loop executes). The third part, $i++ is shorthand for "add one to the variable". Our for-loop will look like this:

for($i = 0; $i < $numSelectedObjects; $i++) {
//action to be performed
};

Step 19

We now need to use a ‘parent’ command to create the hierarchy chain. The syntax for this command is as follows :

parent childObject parentObject;

So in our case, the parent command would be :

for($i = 1; $i < $numSelectedObjects; $i++) {
parent $selectedObjects[(i-1)] $selectedObjects[i];
};

Step 20

With our loop completed, we now need to deselect the last object in the selection, using the “select” command with the “deselect” flag. To calculate the index of the last object selected, we take the total number of objects, and then, because the index of any array in Maya begins at 0, subtract 1.

select -deselect $selectedObjects[($numSelectedObjects - 1)];

Step 21

And with that, our first procedure is now complete:

//Make Parent Chain
global proc dt_makeParentChain(){
string $selectedObjects[] = `ls -sl`;
int $numSelectedObjects = `size($selectedObjects)`;
	for($i = 1; $i < $numSelectedObjects; $i++) {
	parent $selectedObjects[($i - 1)] $selectedObjects[$i];
	};
select -deselect $selectedObjects[($numSelectedObjects - 1)];
};

Step 22

Underneath ‘dt_makeParentChain’, create a new procedure to unparent the selected objects. The code below parents the selected objects to the world, which is the same as un-parenting them.

global proc dt_unParentSelected(){
parent -w;
};

Step 23

Our third procedure will automate the process of moving an object’s pivot point to the origin. Just like before, we start by creating the procedure outline:

global proc dt_pivotToOrigin(){
//procedure actions
};

Step 24

We then use the same technique as in the first procedure to write a list of the selected objects to a variable:

string $selectedObjects[] = `ls -sl`;

Step 25

We now need to add in a loop. Whilst we could use the same kind of for-loop as in the first script, let’s use a for-each loop instead. A “for-each” loop is a specialized version of the for-loop that executes once for each value in an array. It also lets you write a variable that represents the current index’s value. The syntax looks like this:

for( $each in $arrayVariable ){
//do this action with $each
};

The $each variable contains the value of the current index of the array. For our script, this is what the code should look like:

for($thisObj in $selectedObjects){
//move the pivot of $thisObj
};

This same technique can be used to automate any maya command for any number of selected objects.


Step 26

Using the $thisObj variable we can now select the object currently being looked-at by the loop:

select -r $thisObj;

Step 27

In order to move the pivot to the origin, we can use the “xform” command and reset the -rp (rotatePivot) and -sp (scalePivot) flags to 0 on the X, Y and Z axis:

xform -ws -rp 0 0 0 -sp 0 0 0;

Step 28

The major components of the script are now finished, and your code, containing all three procedures, should look like this:

//Make Parent Chain
global proc dt_makeParentChain(){
string $selectedObjects[] = `ls -sl`;
int $numSelectedObjects = `size($selectedObjects)`;
	for($i = 1; $i < $numSelectedObjects; $i++) {
	parent $selectedObjects[($i - 1)] $selectedObjects[$i];
	};
select -deselect $selectedObjects[($numSelectedObjects - 1)];
};

// Un-Parent Objects
global proc dt_unParentSelected(){
parent -w;
};

// Move Pivot to Origin
global proc dt_pivotToOrigin(){
string $selectedObjects[] = `ls -sl`;
	for($thisObj in $selectedObjects){
	select -r $thisObj;
	xform -ws -rp 0 0 0 -sp 0 0 0;
	};
};

Step 29

We’re now going to create a fourth procedure that will use the previous three to create an interesting geometric progression called “Fermat’s Spiral”, which based on the angular relationship of the Golden Ratio, phi. It’s a shape that is commonly found in nature, and it follows all kinds of interesting geometric rules. Let’s start out by writing out the pseudocode:

  • create a sphere
  • create 1,000 copies
  • parent-chain all the spheres
  • move the objects in the x-axis
  • move all sphere’s pivot points to the origin
  • rotate the spheres in Y 137.5 degrees (the Golden Angle)

Step 30

So, to begin with let’s create a new procedure outline:

global proc dt_fermatSpiral(){ 

}

Step 31

Now we’re going to create a sphere with 8 radial and 8 height divisions, and write the resulting transform and shape nodes to a string array so that we can keep track of them. Most commands that create geometry output two strings – the name of the transform node, and the name of the shape node. For the most part, you want to work with the transform node string, which will be stored in the [0] index in the $seedSphere array variable created below:

string $seedSphere[] = `polySphere -sx 8 -sy 8`;

Step 32

We’re now going to create an empty string array variable:

string $allSpheres[];

Step 33

Then open a for-loop that runs 1,000 times:

for ($i=1; $i<1000; $i++){

Step 34

We now need to duplicate our newly created sphere, and write the resulting transform and shape nodes to a variable:

string $duplicatedSphere[] = `duplicate`;

Step 35

Here, we append the name of our duplicated transform node to the end of the $allSpheres array. You can use the “size” command to determine how many objects are already in the array, and use the result as the index for our new value.

$allSpheres[size($allSpheres)] = $duplicatedSphere[0];

Step 36

Here we select all of the created spheres and run the parent chain command we previously created:

select -r $allSpheres;
dt_makeParentChain;

Step 37

After parenting the spheres together, we select them again and move them all .05 in X using the “move” command:

select -r $allSpheres;
move 0.05 0 0;

Step 38

After resetting the origin position using our previously created “pivotToOrigin” procedure, we select the spheres one final time, and rotate them 137.5 degrees in Y. With that done, run our unparent script:

dt_pivotToOrigin;
select -r $allSpheres;
rotate 0 137.5 0;
dt_unParentSelected;

Step 39

And that completes our final procedure. So, our full script should look like this:

//Make Parent Chain
global proc dt_makeParentChain(){
string $selectedObjects[] = `ls -sl`;
int $numSelectedObjects = `size($selectedObjects)`;
	for($i = 1; $i < $numSelectedObjects; $i++) {
	parent $selectedObjects[($i - 1)] $selectedObjects[$i];
	};
select -deselect $selectedObjects[($numSelectedObjects - 1)];
};

// Un-Parent Objects
global proc dt_unParentSelected(){
parent -w;
};

// Move Pivot to Origin
global proc dt_pivotToOrigin(){
string $selectedObjects[] = `ls -sl`;
	for($thisObj in $selectedObjects){
	select -r $thisObj;
	xform -ws -rotatePivot 0 0 0 -scalePivot 0 0 0;
	};
};

//Create Fermat's Spiral of Spheres
global proc dt_fermatSpiral(){
string $seedSphere[] = `polySphere -sx 8 -sy 8`;
string $allSpheres[];
	for ($i=1; $i<1000; $i++){
	string $duplicatedSphere[] = `duplicate`;
	$allSpheres[size($allSpheres)] = $duplicatedSphere[0];
	};
select -r $allSpheres;
dt_makeParentChain;
select -r $allSpheres;
move 0.05 0 0;
dt_pivotToOrigin;
select -r $allSpheres;
rotate 0 137.5 0;
dt_unParentSelected;
};

Step 40

And with that we’re done! Save the script, and re-run the ‘rehash’/’source’ process as detailed above. Then enter the following command into Maya’s script editor, hit ‘Ctrl-Enter’ and wait a few seconds:

dt_fermatSpiral();

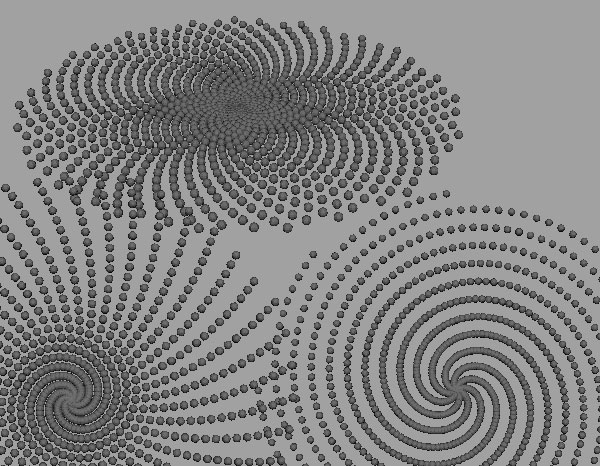
And there you have Fermat’s Spiral, constructed entirely using MEL. Try playing with different angles, shapes and transformations in the final procedure – you can get all kinds of interesting patterns!


This tutorial is Day 2 in a series – Go to Day 1.


Don’t miss more CG tutorials and guides, published daily – subscribe to Cgtuts+ by RSS.

How to automatically create a custom field when a post is published

Paste the code below into your functions.php file. The only thing you have to do is to edit the cutsom field name on line 6.

add_action('publish_page', 'add_custom_field_automatically');
add_action('publish_post', 'add_custom_field_automatically');
function add_custom_field_automatically($post_ID) {
	global $wpdb;
	if(!wp_is_post_revision($post_ID)) {
		add_post_meta($post_ID, 'field-name', 'custom value', true);
	}
}

Thanks to wpCanyon for this cool tip!

Looking for WordPress hosting? Try WP Web Host. Prices starts at $5/month and you can try it for free!

How to automatically create a custom field when a post is published

What’s Your Favorite Work-Themed Movie?

One of the things I like to do in my spare time is catch up on movies. In an art-imitates-life fashion, there are oodles of office-themed movies in case you haven’t gotten your fix of life in the workplace.

The classic workplace comedy is, of course, Office Space – which has a huge cult following. But Nine to Five is one of my personal faves (anyone who’s ever had a toxic boss will laugh hysterically at the “kill your boss” fantasy sequence). Then there’s Working Girl, Wall Street, and Clockwatchers.

What are your favorite workplace movies? Anything else I should add to my NetFlix queue?

Software Assisted Illustration in the Form of Information Visualization


Thinking about illustration inevitably calls to mind images of pencils and sketchpads and an analog, old-school creative process. There’s a certain charm to hand-drawn images, an intimate bridge between artist and page. But the digital age has brought its own magnetism to the illustrative process, liberating artists to do more than they ever could before and offering an entirely new platform for self-expression.

Continue reading “Software Assisted Illustration in the Form of Information Visualization”

Inspiration: 75 Superb Examples of Bottle Packaging


Packaging design is a specialized area of graphic design, one that carries its own guidelines and best practices. The goal of a package is to make the product stand out among its competition, and better compete in the marketplace. Package design projects might consist of something as basic as a label to a complete packaging solution, with custom materials.

Continue reading “Inspiration: 75 Superb Examples of Bottle Packaging”

Quick Tip: Generating Random Patches With The ES2 In Logic

The ES2 is a great workhorse synth. It’s also capable of creating some of the strangest sounds ever using the ‘Randomize’ feature.

Sometimes the best things that happen in a studio are by mistake. You press the wrong button or trip over your lead and smash your guitar and a magical sound is born! The ES2 ‘Randomize’ feature is just like this but it’s cheaper than having your guitars neck glued back together! Here’s a quick tip on how it works.

Step 1 – Create An ES2

Start a new project (I think we’ve covered this!) with a Software Instrument track. Load in an ES2 synth.

step1


Step 2 – Initiate the Synth

In the presets list go to Tutorial Settings and load in the ‘Saw Wave Init’ patch. This is just a blank canvas and is usually a good place to start new sounds from.

step2


Step 3 – The ‘Randomizer’ Section.

Just below the filter section you’ll find a set of controls for randomizing parameters on the ES2.

step3


Step 4 – Select Parameters

On the far right you’ll see a drop down that says ‘All’. Click on the menu and you’ll see a list of parameters you can target for randomization. If for instance you only wanted to randomize the filter section you’d choose ‘Filters’. All other setting would remain intact. We’re going to choose ‘All’ of course!

step4


Step 5 – Randomize Amount

The middle slider is the Randomization amount. If you only want some subtle changes choose a low value. Set the slider around half way for now.

step5


Step 6 – Randomize That Patch!

The final setting is the actual Randomize button which is marked ‘RND’. Go on, Press it!

step6

Here’s the initial sound we started with. It’s just a saw wave.

Download audio file (saw.mp3)

Here it is after the randomization.

Download audio file (First.mp3)

Not too far off the initial saw wave. Your version will sound totally different as it is after all ‘Random’.


Step 7 – Randomize it Some More!

Pressing the Random button again will give you another variation based on the current setting. You may want to keep hitting it till you find something you like. Here’s the sound after a few randomizations.

Download audio file (Second.mp3)

We’ve now got some crazy sci-fi effect happening.


Step 8 – Now Really Randomize It!

If you want to go really crazy turn the slider up to 100%.

step8

Now we get something totally crazy! Keep on going with this and see what you get!

Download audio file (Third.mp3)

A word of warning. Some of the sounds that the ES2 comes up with are pretty fierce! It may be a good idea to lower the channels volume to avoid any hearing loss!


Conclusion

The shear number of weird and wonderful sounds that can be made by this are unlimited. As a creative tool this can be used for all manner of things from FX and Transitions to samples that form the bases for other instruments, like in an EXS24 maybe.

Make sure you save any sound you like in the presets list. It’s possible to build quite an enormous library of sounds you could never actually stumble upon otherwise. You can start from scratch or use a preexisting sound from the Library as a starting point.

There are a couple of other synths that use this feature as well. Most notably is Native Instruments ‘Absynth 5′. The ‘Mutate’ function is a great way to generate randomization’s in patches.

absynth

It even goes one step further by allowing you to choose what kind of sound you would like it to mutate into by choosing characteristics from the browser library. Pretty smart!

absynth2

Till the next time!


Making the Most of Match EQ

In this week’s Audio Premium content, Ryan Leach teaches you how to quickly improve the sound of your tracks with Match EQ. While the screenshots for this tutorial are taken in Logic Pro, the content is not Logic-centric and is equally useful and valuable in any software that deals with sequenced music.

To learn more about what you get as part of Audio Premium, read this.

One of the more interesting plugins that comes pre-packaged with Logic Pro is Match EQ. Match EQ lets you “copy” the frequency spectrum, or fingerprint, of a source track and apply that spectrum to a target track. It essentially compares what your song sounds like to the source and compensates for the difference, hence the name “match”. The most common and practical use of Match EQ is for mastering a final mix, but it can also be an extremely useful tool for bringing out individual instruments and even for new or special effects. In this tutorial we’ll discuss how to get started using Match EQ and look at a few different ways you can use the basic features to put it to use.

Table of Contents

  • Why Use Match EQ?
  • Some Basic Guidelines
  • Source
  • Current Track
  • Adjusting Settings
  • For Mastering
  • Using a Source Track
  • Default Settings
  • For Single Instruments and Sections
  • For Effects
  • Conclusion

Existing Premium members can log-in and download. Not a Plus member? Join now.


Quick Tip: Colorize a Comic Strip With Photoshop


Converting a rough sketch into a polished piece of digital art might not be as hard as you think. In today’s quick tip tutorial we will demonstrate how to import a sketch into Photoshop and color it! Let’s get started!


Step 1

The first step is to sketch out your idea. You can sketch your idea to paper or you can draw directly in Photoshop.


Step 2

Once you have completed your sketch, you now need to ink your drawing. In this step you will need to trace over your lines with a nice black or dark blue pen and erase your pencil lines. You want to do this so you have clean lines that you can use to color your artwork later on.


Step 3

Now scan your artwork into Photoshop. Scan it in at 300 dpi, RGB, TIFF or JPG in grayscale if possible.


Step 4

Once you have imported your sketch into Photoshop, crop it (if necessary), desaturate it (Image > Adjustments > Desaturate) and open the Levels panel (Image > Adjustments > Levels) and adjust it as shown. The key here is to increase the amount of contrast and remove any unnecessary artifacts. You may also need to zoom in and erase any dust or specs left over from the scan. This is also a great place to clean up any of the line work. Use a black brush to do this.  

Now let’s organize our layers. What we will do in this step is place the scanned artwork at the top of our layer stack, lock it, and set its blending mode to multiply. This will allow us to color the layers below it without having to extract it from the white background. Finally, organize your layers as shown below. Your layer stack may not look identical. The key here it to organize your layers so you can find them later on.


Step 5

Now we can start to add color to our artwork. Select a hard brush and zoom in to a comfortable magnification. Start brushing in color where necessary but be careful not to color outside of the lines. Keep your keyboard handy so you can quickly flip between the Brush (B), Eraser (E), and Hand Tools (Space Bar). A tablet will seriously help you color your artwork; so if you have one, use it.

Feel free to use the magic wand tool to select and fill large areas. To do this, select the Magic Wand Tool (W) in Continuous Mode, Tolerance set to 100, with the Sample All Layers selected. Click inside the area you want to fill and then click Select >  Modify > Expand and choose 1, 2 or 3 pixels, depending on the thickness of the pen you used. Now select Edit > Fill and choose the color you want. The image below shows the selection in mask mode (in red).

Note : don’t use Fill in mask mode, because it will select the whole picture instead of colorizing the selection.


Step 6

Now add some text to your artwork if necessary. Feel free to draw in some nice speech balloons. I used the Manuscript Font below.


Step 7

You can add some shadows and highlights to your artwork in this step. Shadows and Highlights can be tough to master so feel free to experiment here. There are several ways to produce shadows and highlights. The Pen Tool may be useful if you want to produce a hard shadow or highlight. A Soft brush on the other hand will produce a nice soft lighting. Use clipping masks with their blending modes set to multiply or screen to produce a nice, non-destructive effect.


Final Image

Take a look at the final image below.


Time Saving Techniques

You can save time by using some of the shortcuts listed below.

  • (B) : Brush
  • (E) : Eraser
  • (I) : Eyedropper Tool
  • (X) : Invert background and foreground color.
  • (Q) : Mask Mode
  • (H) : Hand
  • (W) : Wand Tool
  • (Cmd/Ctrl + D) : Deselect
  • (Alt + Right Click + Mouse Up or Down) : Increase or Decrease the Brush Hardness
  • (Alt + Right Click + Mouse Left or Right) : Increase or Decrease the Brush size

Enhance The Workspace

Keeping the swatches palette open while you color is always useful. Especially if you are coloring a series of comics and want to have some standard colors for the skin and clothing.

The navigation panel is also helpful, as it will allow you to adjust the magnification and pan throughout your artwork on the fly.

Use Actions

Actions are also quite helpful if you find yourself repeating the same processes over and over again. Plus Members will find a set of actions included in their download as an example. Descriptions of these actions are below.

The Colorize Converter Action

This action will expand a selection by 1 pixel, fill it with the foreground color and deselect it. To perform this action, simply select an area to fill and press play.

The Drawing Converter Action

This action will clean up your artwork as demonstrated in Step 4 and also automatically produce your color layers. All you need to do is import your artwork into Photoshop and activate the action.

The Create Specular Action

Specular light is the reflection of the light by an object. In colorization, it means that this is the brightness point of the object. Because I don’t put a Specular Light Layer on every layer, I created an action that allows that. Just by pressing the F3 key, this Action creates a new Specular layer, makes it a Clipping Mask, and put it in Overlay Mode. Then, you can just take a white brush to draw your specular lights.


Conclusion

Coloring artwork can be easy and fun. I hope you learned something new in this tutorial and I look forward to writing some more. If you want some more tips about preparing line work for color check out this great tutorial Preparing Line Drawings for Coloring in Photoshop.

From the Silver Screen to Your Computer: Movie Fan Art to Inspire You


Movies, as we all know, are a huge part of almost everyone’s life. Whether you hate them or love them, movie posters, cover art, and trailers can be found just about everywhere. As designers, we take frequently take inspiration from the movies we see. Today we have a wonderful collection of eighty superb pieces of movie fan-art. We’d love to know which are your favorites. Let us know in the comments!


A Clockwork Orange

A Clockwork Orange

A Clockwork Tattoo

A Clockwork Orange Closeup


Alien

Alien Queen

Alien Front

Alien Queen


Avatar

Avatar

Avatar

Avatar

Avatar


Batman

Batman

Batman

Batman


Dawn of the Dead

Dawn of the Dead

Dawn of the Dead


Donnie Darko

Donnie Darko

Donnie Darko: Colegio

Donnie Darko


Gladiator

Gladiator

Gladiator

Gladiator


The Godfather

Godfather

The Godfather

The Godfather


The Green Mile

The Green Mile

The Green Mile

Mr Jingles


Harry Potter

Harry Potter: Nostalgia

Harry Potter

Harry Potter: Hermione

Harry Potter


Kill Bill

Kill Bill

A Bill To Kill

Kill Bill: Gogo Yubari

Kill Bill: The Bride


King Kong

King Kong

King Kong vs. Spinosuchosaurus

King Kong


Lord of the Rings

Lord of the Rings: The King

Lord of the Rings

The Lord of the Rings

Lord of the Rings: Ringwar


The Matrix

The Matrix

Matrix

The Matrix Reloaded


Pirates of the Caribbean

At Worlds End

Pirates of the Caribbean

Pirates of the Caribbean

Pirates of the Caribbean


Predator

Predator

Predator

Predator


Pulp Fiction

Pulp Fiction

Pulp Fiction

Pulp Fiction


Saw

Saw

Saw

Jigsaw Puppet


Shaun of the Dead

Shaun of the Dead

Shaun of the Dead

Shaun of the Dead


The Shawshank Redemption

Shawshank Redemption

The Shawshank Redemption

Red and Andy


Sin City

Sin City

Sin City

Sin City


Spiderman

Spiderman 2

Spiderman

Spiderman


Star Wars

Star Wars Saga

Star Wars Insider Cover

Star Wars: Happy 30th


The Terminator

Terminator

Terminator

Terminator T700


Twilight

Twilight

Twilight

Twilight

Why You Shouldn’t Underpromise and Overdeliver

“Underpromise and overdeliver.”

Have you ever heard this brief bit of business philosophy at work? It has to do with consciously managing the expectations of your clients and customers. The idea is that you set a comfortable scope and timeline for your service, and then “wow” them by delivering the results ahead of time and under budget.

The question is: Is it a good way to build relationships with your customers?

While the sort-term results of “underpromising and overdelivering” look great, your clients might come to always expect super-fast, super-cheap work from you. Suddenly, the whole “managing expectations” idea backfires completely; your client has learned to set them very high, and raise them each time you exceed your own self-set expectations.  You’re caught up in a mess that you created.

It’s not such a good idea to underpromise, overpromise, or – perhaps – make promises at all. To use another common work expression; maybe “honesty is the best policy.”

What do you think?

Inspiration: Character Illustrations in Website Design


The use of character illustration in web design is a great and easy way to increase the amount of visual appeal your website has. Not only does it brighten things up and make your site a bit more captivating, but it also, if pulled off well, helps your visitors remember your design (and therefore your website). Although your website’s content is extremely important, a beautiful and engaging design helps to bring everything together.

Below, we have a beautiful selection of web designs that make use of character illustration – from design blogs, to agencies, search engines, to internet applications, and even candy brand websites, to food nutrition repositories.


DesignGiveaways

DesignGiveaways uses a hand-drawn style vector illustration of the website’s masters to jazz up their minimalistic design and add a splash of color. It adds a personal touch to the overall site, and makes it more welcoming to new visitors.


Ewout Van Lambalgen


Silverback

Silverback uses a detailed and quite adorable vector graphic of a gorilla to spice up their website aesthetics, and uses the character as a mascot, making it incredibly easy for users to link the character to the application and website.


SR28


Krolikov

The three-dimensional approach to the Krolikov web design is brough to life with a cheeky and full-of-life rabbit illustration in the top left of the design. Like Silverback (above), the character is used like a mascot.


Moshi Monsters


Foxtie

Another design that uses a character illustration not only to brighten up their design and to make it more appealing, but to also act as an easily recognizable mascot for their website/product.


Adelacreative


Kung Fu Productora

This minimalistic and simplistic design is simply brought to life by using a character illustration; although the character itself is very minimal, too. It adds color, brings the best out of the headings, and is just cute!


Ignaty Nikulin


Sixonefive

Sixonefive uses a character illustration to back-up its tagline “Madness, Chaos & Creation” by using a mad-looking scientist with blue hair. The character is also used next to the website’s header/logo, helping the character to represent the site.


Joseph Payton


The Color Cure

The Color Cure is a highly-illustrated design, using vector-style images in the background, and a colorful palette to represent different services that they offer. The illustrations top the design off, filling some empty space and allowing a good way to ask possible clients to send them an email by the use of a speech bubble.


Siringa


Sean Halpin

Sean Halpin is a colorful but fairly simplistic design that makes use of a simple character illustration to engage with new visitors as a way to introduce whose portfolio they are looking at.


eAnka


PSD Rockstar

PSD Rockstar is highly textured and quite a “grungy” design. Using a clean-cut character illustration in the header spreads things out a little and makes the site more appealing and friendly.


Stoodeo


Fatburgr

Fatburgr is one of my favorites in this showcase, mainly because its mascot-style character illustration suggests what the site is about, puts a smile on your face and automatically makes for a friendly and calm environment.


Creamscoop


Think Orange

As well as being hilarious, the two simple but equally mind-blowing character illustrations on Think Orange’s minimal design fill the white space, and set a good standard for the rest of the site.


Moourl


Cyclops

When it comes to character illustration, aliens and monsters are a big hit, although we don’t see as much of them as most of us would like to when it comes to web design. Cyclops pulls off this monster illustration tremendously well and, as well as brightening up the site, acts as a great mascot.


Elitist Snob


Mail Chimp

The Mail Chimp character mascot illustration is one most of you have probably seen before, whether you use their service, have seen their site in other showcases, or have seen the adorable chimp illustration plastered on advertisements all over the web. It’s perfect, and is enough to make anyone smile!


M&M’s China


Old Loft

Old Loft uses various character illustrations, and helps represent their slogan “let’s work together”; after all it isn’t every day we see an elephant, crocodile, rabbit, lion, bear and eagle working together to place a “WWW” flag in the ground!


Branded07


You Might Also Like…

Musical Motivation

“I love rock ‘n roll” – Joan Jett

I hear you, Joan.

Not everyone loves rock ‘n roll, but I do.  Actually, my musical tastes range from jazz to rock to classical and several genres in between.  It all depends on the mood.  If I’m driving down the highway, I’ll pull out a great rock tune and if I’m curled up with a good book I’ll throw on some light jazz or classical.  My tastes seem to have me covered.

When I’m trying to get stuff done, I need the same kind of motivational kickstart.  Rock will do it sometimes, ska might do it another time.  Sometimes silence is my muse’s best friend.  Music can play an integral part in how my day goes.

What about you?  Does music get you moving? What kind of music?  What artists?  Let us know in the comments.