The Black Sheep: Free iPhone Apps Snoop Contacts

Blackhat has started and not surprisingly, there is quite a bit of information coming out of Las Vegas that relates to the iPhone. Lookout revealed some results from its App Genome project, which analyzed about 300,000 apps that are available for the iPhone and Android. Sometimes you get what you pay for and that may be true in the case of iPhone apps as well, in a rather negative way.

Lookout said that one third of free applications for the iPhone can potentially access a user’s location. 14% can access a user’s contacts and 23 of iPhone apps contain third party code. According to the company, new vulnerabilities will be unveiled at Blackhat, including mobile data leakage, which, however, seems to affect Android more than the iPhone.

Lookout noted that App developers need to “be more aware of best practices for accessing, transmitting and storing users’ personal data. In addition, consumers need to be aware of the permissions that mobile applications request and how that personal data is being used in the application.“

Sounds reasonable to us. Given its exposure, the iPhone has become a very attractive target platform for malicious intent. And boy, opening up the platform to all apps, whether they are App Store certified or not, may create an entirely different dimension of software threats.

iPhone Programming Tutorial – Local Notifications

Way back when, when everyone was still complaining about Apple’s lack of support for (3rd party) multitasking, there was a simple solution put in place. This solution was known as push notifications.

Push notifications solved many of the issues associated with background processing.  For example, when quitting the AIM application, the server could keep you logged in and send you a push notification when a new message arrived.  You could then tap on a View button that would launch the app.

This solution is great and all, but it still requires that you have an active internet connection.  As of iOS4, Apple has introduced a new type of notification that can be scheduled to fire within the device itself.  It requires no complicated server programming, or additional configuration with iTunes.  I am talking about Local Notifications.

Local notifications can be scheduled on the user’s iDevice to fire at any given time; you can even set them to be recurring.  Today, we will explore these notifications and I will provide you with a simple example of how to schedule, view, and handle local notifications.  Here is a quick screenshot of the project that we are going to create (note I am using the iPhone 4  simulator).

The project will allow a user to schedule a location notification to fire off at a given date.  Using the text field, they are also able to specify some text for the notification.  The table view below displays a list of all of the currently scheduled location notifications within the application.

So, by now (if you are an avid iCodeBlog reader), you are already a killer iPhone dev and I can rush through the stuff that is not related to the notifications.  I will try to provide links to tutorials about sections that I rush through as well.

1. Create a View-Based Application

We will be using this as our starting point.  Check out this tutorial if you are unfamiliar with doing this.  Name the project Notifier.

2. Create All Properties and Dummy IBActions

This is usually a good first step when tackling an application like this.  Let’s get everything set up in the .h and .m files so we only have to visit Interface Builder Once.  Here is what our NotifierViewController.h file looks like.

@interface NotifierViewController : UIViewController<UITableViewDelegate,UITableViewDataSource> {
	IBOutlet UITableView *tableview;
	IBOutlet UIDatePicker *datePicker;
	IBOutlet UITextField *eventText;
}
 
@property (nonatomic, retain) IBOutlet UITableView *tableview;
@property (nonatomic, retain) IBOutlet UIDatePicker *datePicker;
@property (nonatomic, retain) IBOutlet UITextField *eventText;
 
- (IBAction) scheduleAlarm:(id) sender;
 
@end

Seems clear enough.  We have 3 UI elements that we care about and one action.  One thing to note is, your class should implement the UITableViewDelegate and UITableViewDataSource protocols.  This is because we will be displaying a tableview containing all of the scheduled alarms.

Now, do all of the necessary steps in your .m file.  This includes memory management for the IBOutlets and creating a dummy method for the scheduleAlarm IBAction.  Your .m file should look something like this. Note: I have omitted import statements because my syntax highlighter wasn’t digging them.

@implementation NotifierViewController
 
@synthesize datePicker,tableview, eventText;
 
- (IBAction) scheduleAlarm:(id) sender {
 
}
 
- (void)didReceiveMemoryWarning {
    [super didReceiveMemoryWarning];
}
 
- (void)viewDidUnload {
	datePicker = nil;
	tableview = nil;
	eventText = nil;
}
 
- (void)dealloc {
    [super dealloc];
}
 
@end

Now it’s time to build our interface.  Open Interface builder and construct an interface like this.

If you want my super sweet green button image, here it is:

After creating the interface, make sure you hook up all of the UI components to their corresponding IBOutlets and hook up the touchUpInside: method of the button the your scheduleAlarm: IBAction.  For more info on hooking up IBOutlets, check out this tutorial.

3. Implement UITableViewDelegate and UITableViewDataSource Delegate methods to List Currently Scheduled Local Notifications

It may seem weird to implement the code to display the notifications before the code that creates them, however I like this approach better.  This way, once we schedule the notifications, they automagically appear in our table.  Add the following code to your .m file.

- (NSInteger)numberOfSectionsInTableView:(UITableView *)tableView {
    // We only have one section
    return 1;
}
 
- (NSInteger)tableView:(UITableView *)tableView numberOfRowsInSection:(NSInteger)section {
    // Return the number of notifications
    return [[[UIApplication sharedApplication] scheduledLocalNotifications] count];
}
 
- (UITableViewCell *)tableView:(UITableView *)tableView cellForRowAtIndexPath:(NSIndexPath *)indexPath {
 
    static NSString *CellIdentifier = @"Cell";
 
    UITableViewCell *cell = [tableView dequeueReusableCellWithIdentifier:CellIdentifier];
    if (cell == nil) {
        cell = [[[UITableViewCell alloc] initWithStyle:UITableViewCellStyleSubtitle reuseIdentifier:CellIdentifier] autorelease];
    }
 
    // Get list of local notifications
    NSArray *notificationArray = [[UIApplication sharedApplication] scheduledLocalNotifications];
    UILocalNotification *notif = [notificationArray objectAtIndex:indexPath.row];
 
    // Display notification info
    [cell.textLabel setText:notif.alertBody];
    [cell.detailTextLabel setText:[notif.fireDate description]];
 
    return cell;
}

OK, finally some “real” code.  Most of this code should seem pretty straight forward.  If not, check out this tutorial on UITableViews.

So, the new code here is dealing with retrieving a list of scheduled notifications.  Calling the scheduledLocalNotifications method of UIApplication will return an NSArray of all notifications scheduled by the current app.  We just index into this array and grab each notification.

Finally, we are displaying the alertBody (text that displays when the notification fires) and the fireDate (date and time when the notification will display) in the tableview cell.

4. Scheduling Notifications

And now for the moment you’ve been waiting for… OK, probably not, but definitely the most exciting (least boring) part of this tutorial.  Let’s implement that scheduleAlarm: IBAction that you framed out earlier.  Update your .m file to contain the following code.

- (IBAction) scheduleAlarm:(id) sender {
    [eventText resignFirstResponder];
 
    NSCalendar *calendar = [NSCalendar autoupdatingCurrentCalendar];
 
    // Get the current date
    NSDate *pickerDate = [self.datePicker date];
 
    // Break the date up into components
    NSDateComponents *dateComponents = [calendar components:( NSYearCalendarUnit | NSMonthCalendarUnit |  NSDayCalendarUnit )
												   fromDate:pickerDate];
    NSDateComponents *timeComponents = [calendar components:( NSHourCalendarUnit | NSMinuteCalendarUnit | NSSecondCalendarUnit )
												   fromDate:pickerDate];
    // Set up the fire time
    NSDateComponents *dateComps = [[NSDateComponents alloc] init];
    [dateComps setDay:[dateComponents day]];
    [dateComps setMonth:[dateComponents month]];
    [dateComps setYear:[dateComponents year]];
    [dateComps setHour:[timeComponents hour]];
	// Notification will fire in one minute
    [dateComps setMinute:[timeComponents minute]];
	[dateComps setSecond:[timeComponents second]];
    NSDate *itemDate = [calendar dateFromComponents:dateComps];
    [dateComps release];
 
    UILocalNotification *localNotif = [[UILocalNotification alloc] init];
    if (localNotif == nil)
        return;
    localNotif.fireDate = itemDate;
    localNotif.timeZone = [NSTimeZone defaultTimeZone];
 
	// Notification details
    localNotif.alertBody = [eventText text];
	// Set the action button
    localNotif.alertAction = @"View";
 
    localNotif.soundName = UILocalNotificationDefaultSoundName;
    localNotif.applicationIconBadgeNumber = 1;
 
	// Specify custom data for the notification
    NSDictionary *infoDict = [NSDictionary dictionaryWithObject:@"someValue" forKey:@"someKey"];
    localNotif.userInfo = infoDict;
 
	// Schedule the notification
    [[UIApplication sharedApplication] scheduleLocalNotification:localNotif];
    [localNotif release];
 
	[self.tableview reloadData];
}

So, most of the explanation is in the comments.  I’ll talk you through some of the less obvious stuff.  The first tricky area is dealing with the NSCalendar.  We just use the NSCalendar object to break up the date into components.  Note: This demo does not require that we break the date up into components.  You could have just as easily fed the date from the date picker into the notification fireDate.  The reason that I’m showing you how to break it down is, you may have some sort of custom date logic to work with and this makes things much easier in the future.

Another important bit of code is where we set the alertBody or the notification.  In this example we set it to the text that the user entered into the text field.  You can set this to whatever you like.

The other thing I want to mention is the infoDict in the code.  This dictionary is your chance to associate some additional information with the alert.  For example, if you are using this alert in a game like We Rule to notify you when a crop is ready.  You might want to set a key and value that contains the id of the crop that has completed.  For now, we just set some arbitrary values and you can ignore them if you like.

After actually scheduling the notification, we just reload the tableview to get it to display immediately.

5. Handling Notifications After They Fire

The last piece of this puzzle is determining what to do when a notification fires.  Fortunately, this step is very easy and handled inside of the appDelegate.  When a notification fires, there are one of two situations. 1. The app is running and 2. The app is not running (or running in the “background”) .

Open up your app delegate .m file and add the following code.

- (BOOL)application:(UIApplication *)application didFinishLaunchingWithOptions:(NSDictionary *)launchOptions {    
 
    // Override point for customization after application launch.
 
    // Add the view controller's view to the window and display.
    [window addSubview:viewController.view];
    [window makeKeyAndVisible];
 
    application.applicationIconBadgeNumber = 0;
 
    // Handle launching from a notification
    UILocalNotification *localNotif =
    [launchOptions objectForKey:UIApplicationLaunchOptionsLocalNotificationKey];
    if (localNotif) {
        NSLog(@"Recieved Notification %@",localNotif);
    }
 
    return YES;
}
 
- (void)application:(UIApplication *)app didReceiveLocalNotification:(UILocalNotification *)notif {
    // Handle the notificaton when the app is running
    NSLog(@"Recieved Notification %@",notif);
}

The first thing we see here is the application badge number is getting set to 0.  Whenever a notification fires, it will increase the badge count on the application.  Next, we handle the case when the application launches from a notification.   This happens when the user presses the view button on the notification.  For now, we just NSLog the data, but you should handle the notification how you see fit for your app.

Finally, we implement the didReceiveLocalNotification method.  This method is required if you want to handle notifications at all in your app.  You will see this method fire when the app is running and you receive a local notification.  When the app is running, you will not see the UIAlertView show up with the notification data.

And there you have it!  The complete lifecycle of a local notification.  You may download the source for this tutorial below.  If you have any questions, feel free to post them in the comments section or write them to me on Twitter.

Notifier Source Code

Create A Gas Giant Planet Scene In After Effects

In this tutorial you’ll learn how to create a Gas Giant planet, moons, sun and starfield totally in After Effects. This tutorial makes extensive use of Fractal Noise which can be used to create a whole host of visuals, and some expressions to link the light direction on the different elements we create.


Tutorial

Step 1

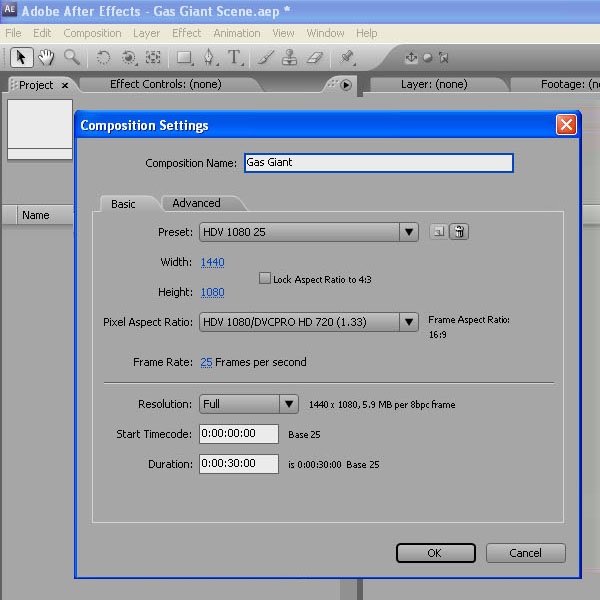
Start a new project and save it as ‘Gas Giant Scene’.

Create a new HDV 1080 25 Composition and make it 30 seconds long.

Save this as ‘Gas Giant ’.

Step 2

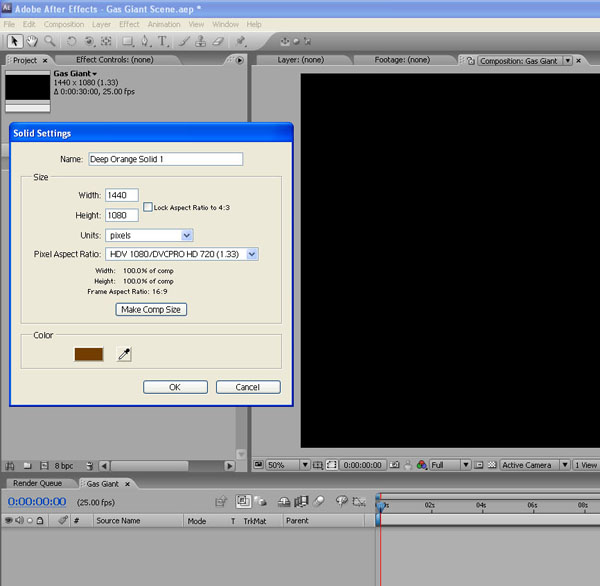
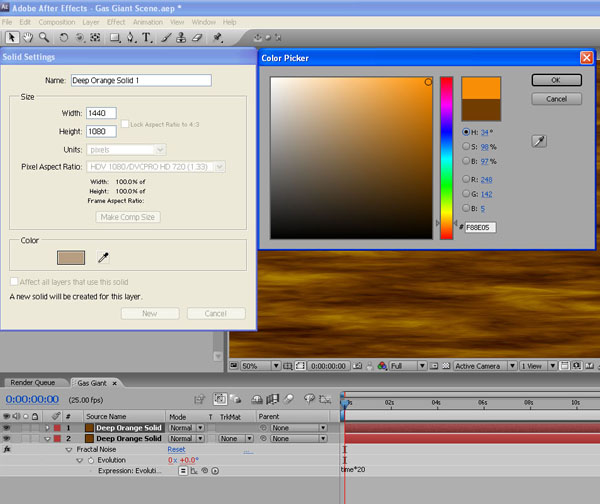
Create a new Solid (Layer / New / Solid) and choose a deep orange colour.

Click ‘Make Comp Size’ then click ‘OK’.

Step 3

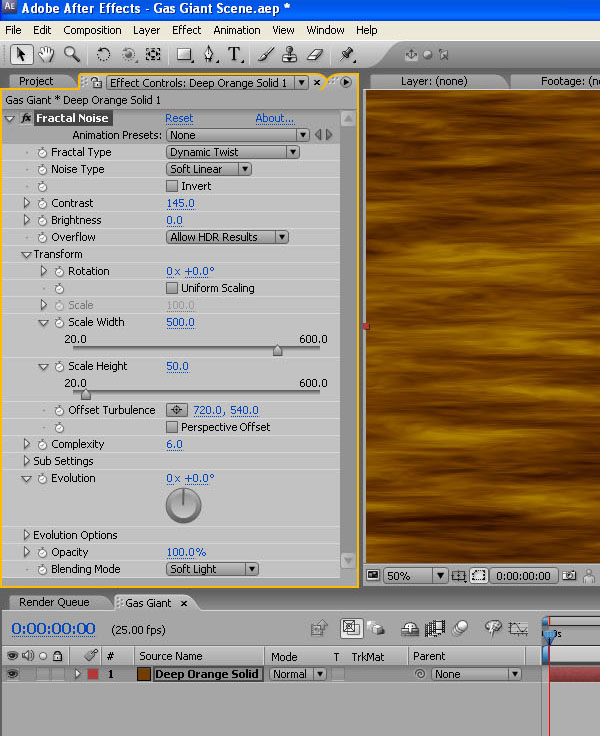
In the timeline, click on this layer, then go to Effect / Noise & Grain / Fractal Noise.

The Fractal Noise effect is a great way to create clouds, random patterns and textures.

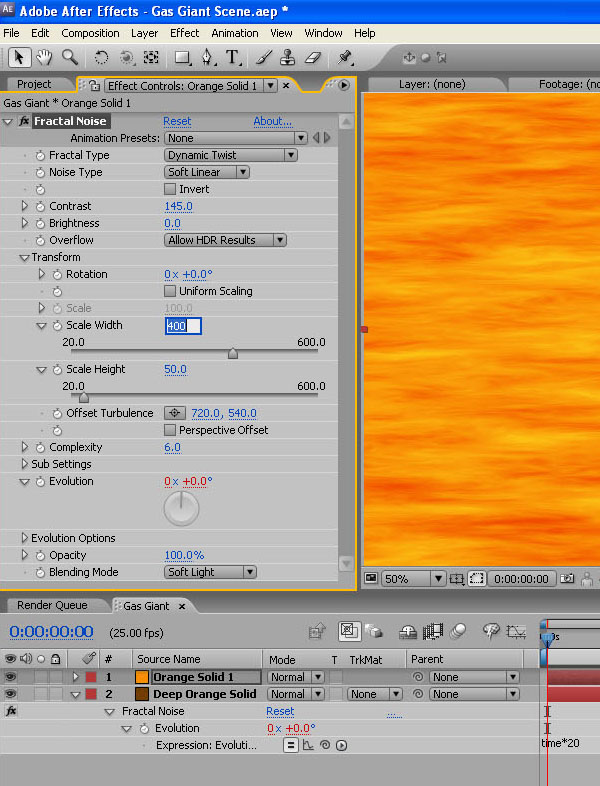
Set Fractal Type to Dynamic Twist and boost the contrast to around 145 to add some definition to the clouds.

Twirl down the Transform property and uncheck the Uniform Scaling checkbox. Set the Scale Width to around 500 to stretch out the clouds, and the Scale Height to 50 to compress them.

Then at the bottom of the Effects Panel, set the Blending Mode to Soft Light.

Step 4

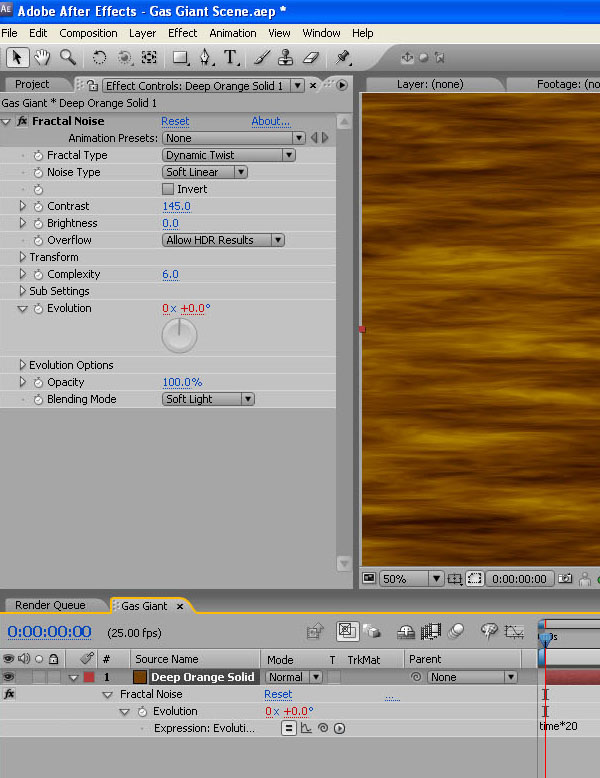
Now to add a simple expression to animate the cloud movement.

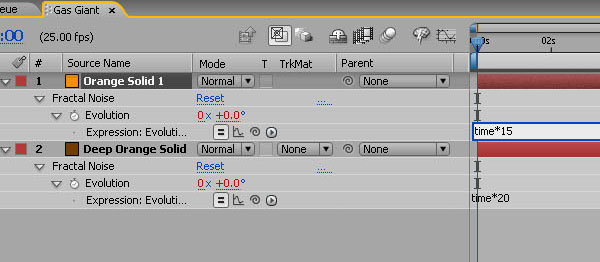
Staying in the Effect Controls panel, Alt-Click the Stopwatch icon next to Evolution to open an expressions field in the timeline widow below.

In here type: time*20.

This will sample the current time and multiply it by 20 and then apply this to the Evolution setting of the clouds.

Do a quick RAM Preview to see how this looks.

Step 5

Duplicate this layer (Edit / Duplicate).

Now go into the Solid Settings (Layer / Solid Settings) and change the colour to a lighter orange tone.

Step 6

Open up the Effects Panel and in the Fractal Noise Transform settings, change the Scale Width to 400, just to add variation from the first layer.

Step 7

With the top layer selected, hit ‘U’ to bring up the expression, and change it to Time*15 – again to add some variety of animation.

Step 8

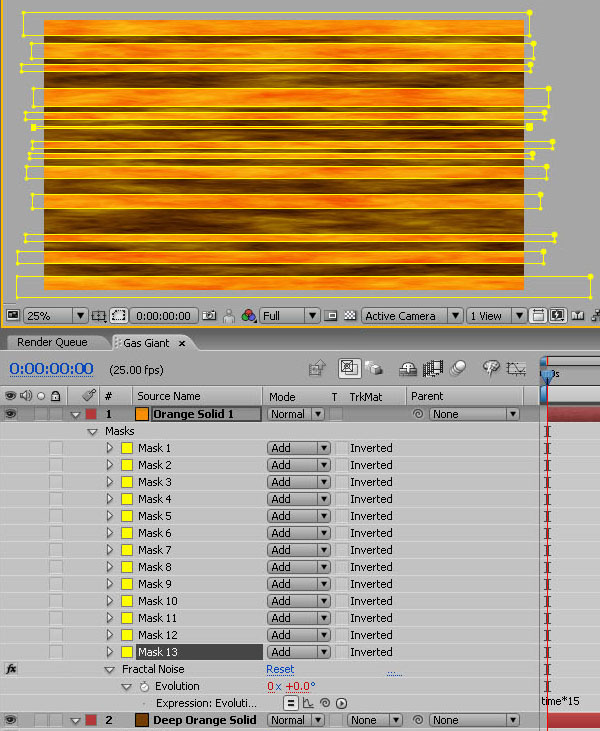
We’ll create the bands of cloud seen on Gas Giants by masking out sections of the top layer.

With the top layer selected, and using the mask tool, draw a series of horizontal rectangle masks , varying the height and position. Don’t do too many and be aware that the ones in the middle will appear thicker when applied to the sphere later.

Step 9

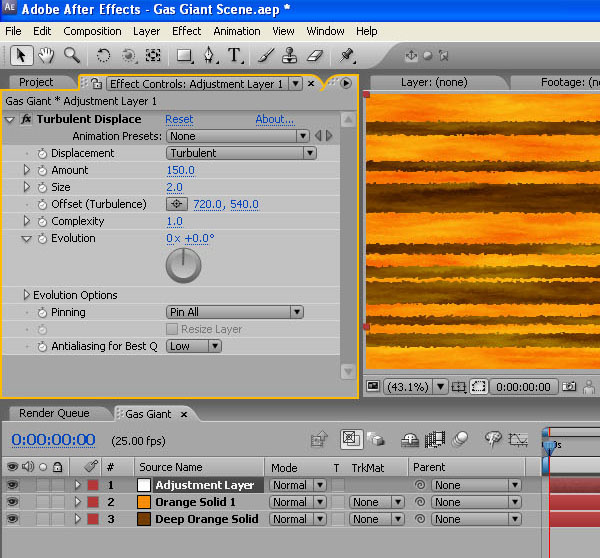
Create a new adjustment layer (Layer / New / Adjustment Layer) and add Effect / Distort / Turbulent Displace.

In the Turbulent Displace Effect Controls panel, set the Amount to 150 and the Size to 2.

Step 10

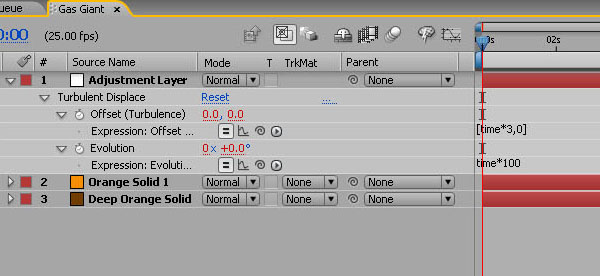
Now to create a couple more expressions to drive the cloud turbulence.

In the Turbulent Displace Effect Controls panel, Alt-Click the Stopwatch icon next to Offset (Turbulence). In the layer’s expression field type: [time*3,0]. This will animate only the horizontal offset and leave the vertical untouched.

Now Alt-Click the Stopwatch icon next to Evolution and in the expression field, type: time*100.

Step 11

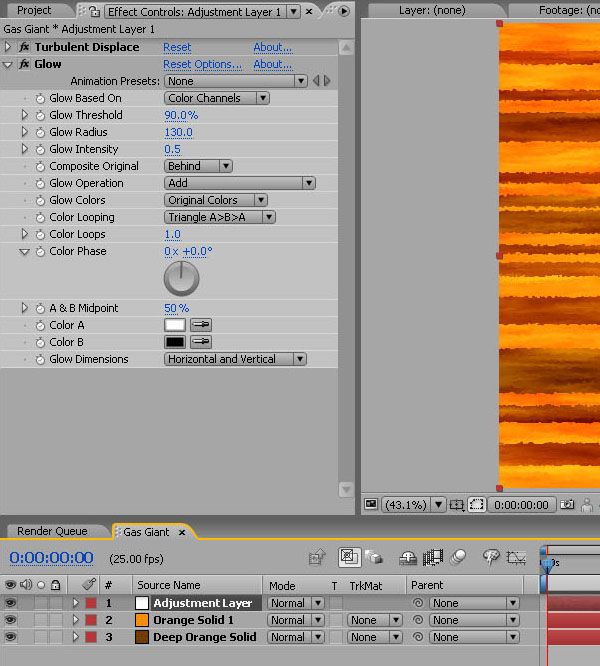
With the Adjustment Layer selected, choose Effects / Stylize / Glow and apply these settings: Glow Threshold 90%; Glow Radius 130; Glow Intensity 0.5.

Step 12

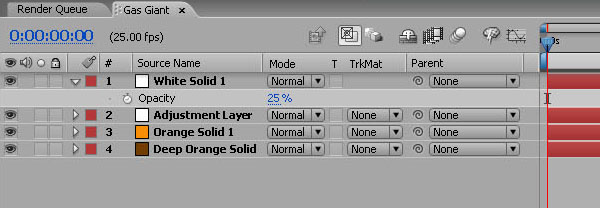
Create a new White Solid (Layer / New / Solid) and set the opacity of this to 25% to add a hazy atmosphere feel.

Step 13

Next we’ll create the planet’s rings.

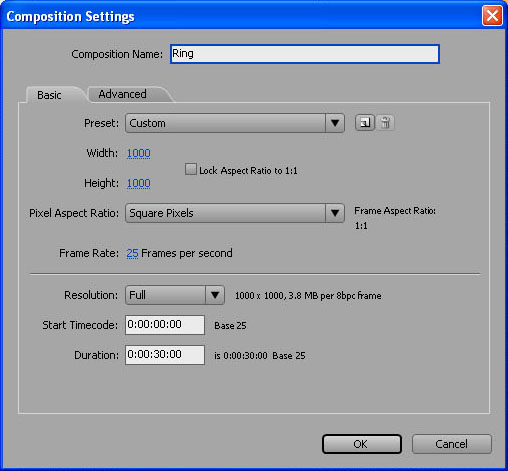
Create a new Composition called ‘Ring’. Make it 1000×1000 pixels and change the ‘Pixel Aspect Ratio’ to ‘Square Pixels’.

Step 14

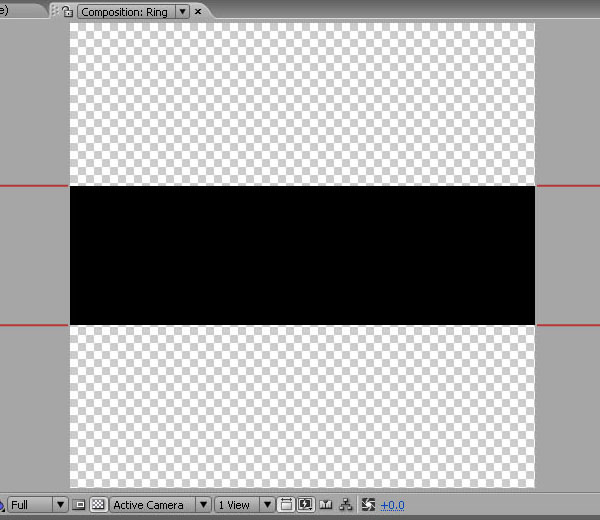
Create a new Black Solid, 3 pixels wide and 300 high.

Change its scale properties to 100,000% wide (click the chain icon to disconnect the horizontal and vertical scale) and 100% high.

Don’t worry – it will make sense in a second!

Step 15

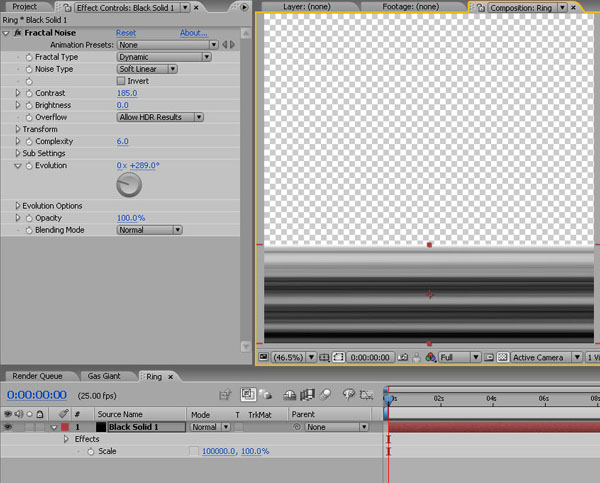
Now add Fractal Noise to the layer, changing the ‘Fractal Type’ to ‘Dynamic’. This should create a series of lines stretched across the layer.

Increase the contrast to 185 then play around with the Fractal Noise Evolution until you get an effect you like.

Move the layer down so it sits on the bottom of the frame.

Step 16

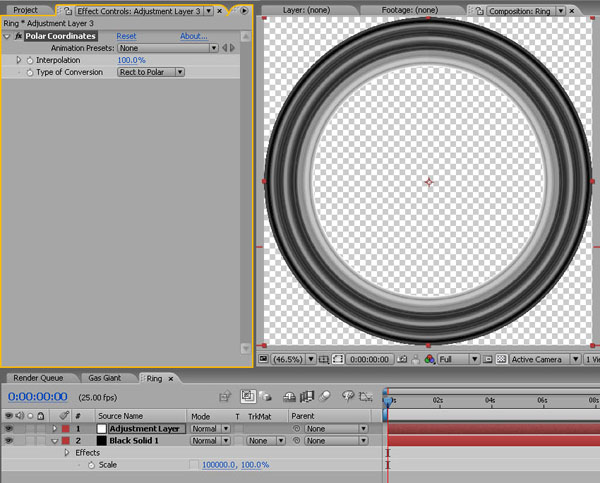
Add an adjustment layer and choose Effect / Distort / Polar Coordinates.

Push the Interpolation up to 100% and change the Type of Conversion to ‘Rect to Polar’.

And there you are – a nice, fractal based ring system.

Step 17

Before we put the planet together, we’ll make a couple of moons using Fractal Noise in a slightly different way.

Create a new HDV 1080 25 composition called ‘Moon 01′. Make it 30 seconds long.

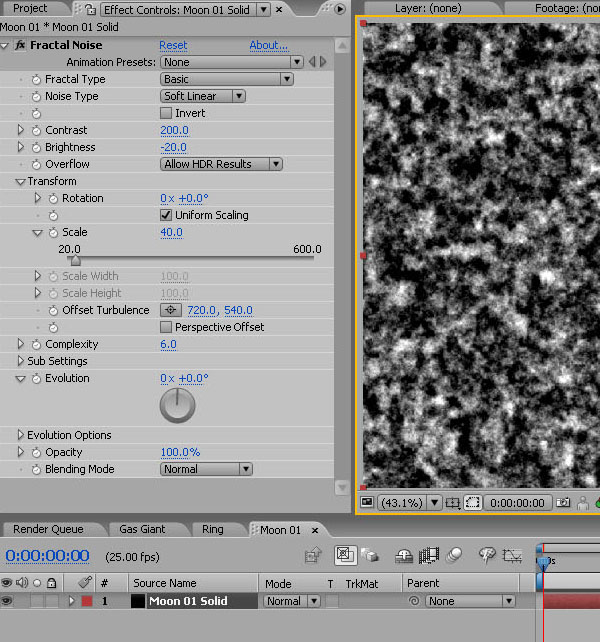
Add a new Black Solid, call it ‘Moon 01 Texture’ and make it Comp Size. Then go to Effect / Noise and Grain / Fractal Noise.

Increase the Contrast to 200, drop the Brightness to -20, and twirl down the Transform button and take the Scale down to 40.

Step 18

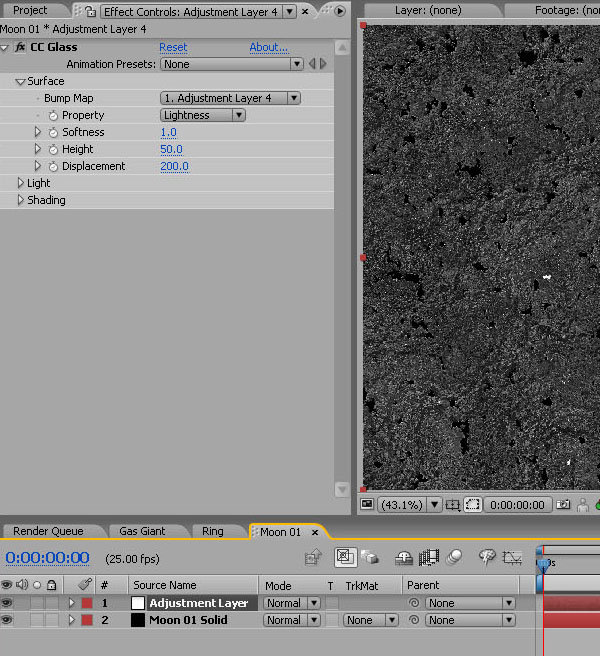
Create a new adjustment layer and choose Effect / Stylize / CC Glass.

Input these settings in the ‘Surface’ properties: Softness 1; Height 50; Displacement 200.

Step 19

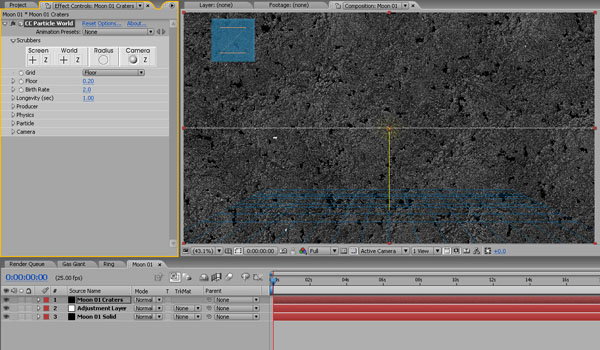
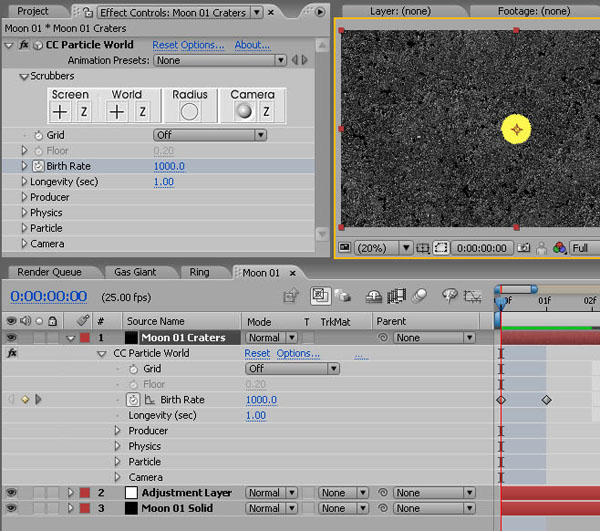
Next we’ll add some craters. Create a new Black Solid (Layer / New / Solid), call it ‘Moon 01 Craters’ and add Effect / Simulation / CC Particle World.

Step 20

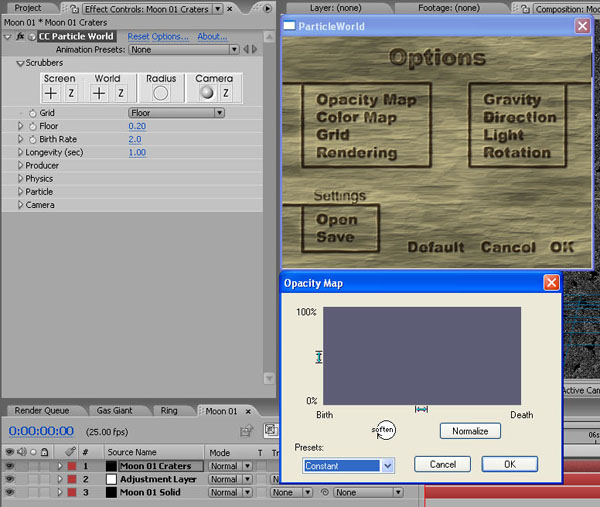
Click the Options at the top of the Effects window. Then go into Opacity Map and in the Presets drop-down choose ‘Constant’. OK that and the options window.

Step 21

Switch the Grid from Floor to Off.

Make sure you are at the start of the composition, set the Birth Rate to 1000 and click the stopwatch.

Move forward one frame (press Page Down once) and set the Birth Rate back to 0.

Step 22

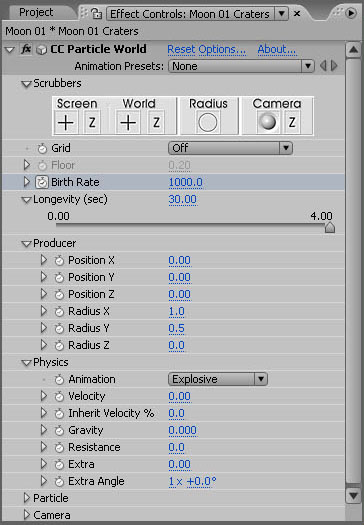
Set Longevity to 30 seconds. This will create a bunch of particles at the first frame which will last for the whole of the composition.

Now make them more spread out by twirling down the Producer options and set Radius X as 1, and Radius Y as 0.5.

Twirl down Physics and set the velocity to 0 – freezing the particles in one place.

Take the Gravity and Extra down to 0 too.

Step 23

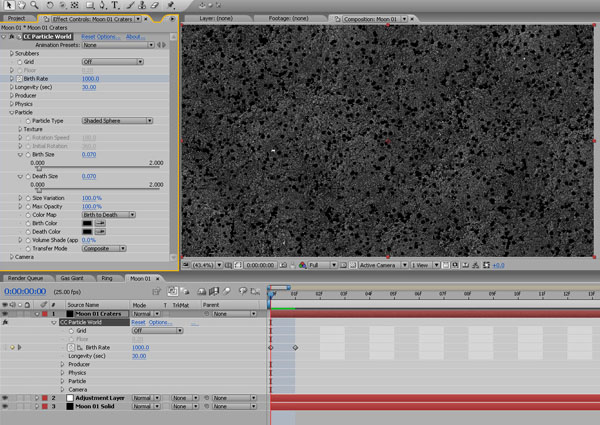
Twirl down the Particle options and set the Particle Type to Shaded Sphere.

Set the Birth and Death Sizes to 0.07, and the Size Variation and Max Opacity to 100%.

Set the Birth Color and Death Color to Black and you’ve created a nice rocky moon texture map.

Step 24

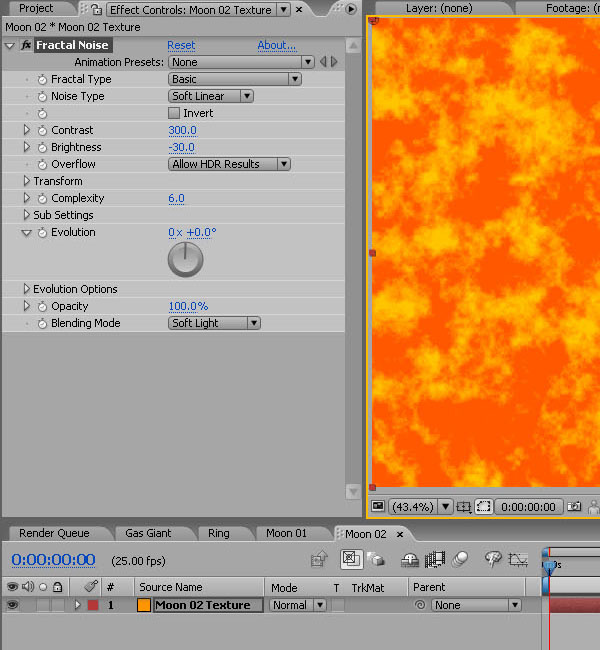
Let’s make another moon – this time a volcanic one.

Create a new composition and call it ‘Moon 02′. Add a new Orange Solid, call it ‘Moon 02 Texture’, then choose Effect / Noise and Grain / Fractal Noise.

Set the Contrast to 300, the Brightness to -30, and the Blending Mode to Soft Light.
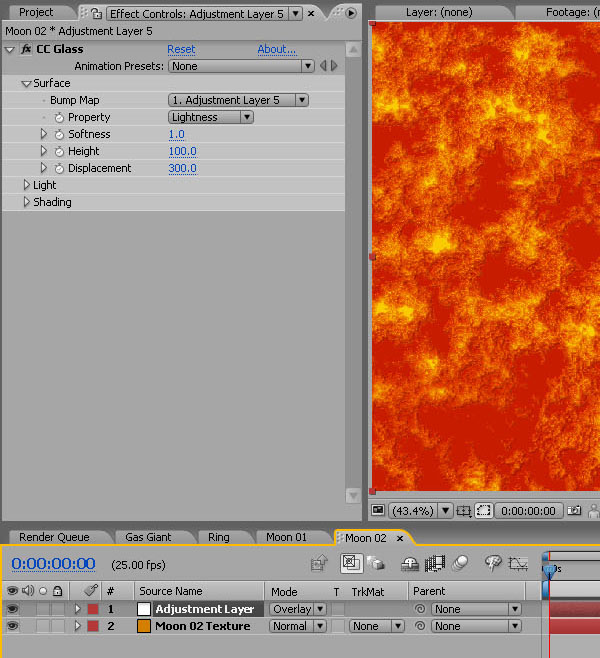
Step 25

Create a new Adjustment Layer and add Effects / Stylize / CC Glass. Set this layer’s blending mode to Overlay.

Under the Surface properties, set the Softness to 1, Height to 100 and Displacement to 300.

If you are getting bright yellow patches coming through, knock down the Fractal Noise contrast until they disappear.

And that is your Volcanic Moon texture map. Okay – let’s put all these elements together in the final composition!

Step 26

Create a new HDV 1080 25 composition and label it ‘Scene Composed’, 30 secs long.

We’ll make a starfield background first.

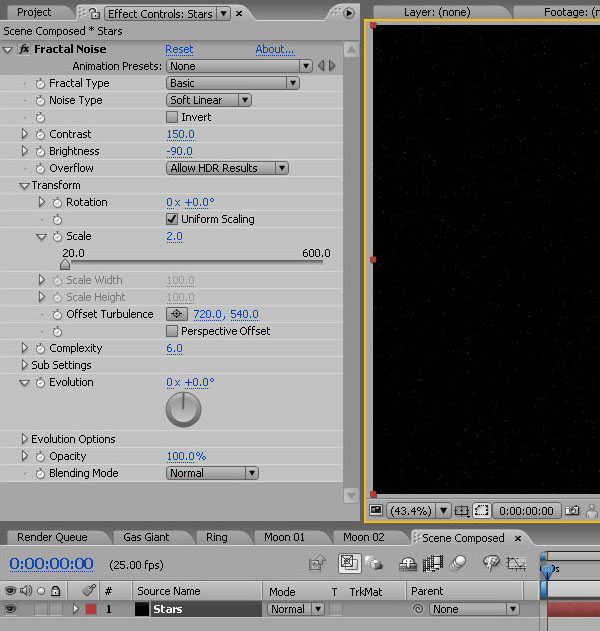
Create a new Black Solid, call it ‘Stars’, and add Effect / Noise and Grain / Fractal noise (again!).

Set the Contrast to 150, Brightness to -90, and in the Transform properties, the Scale to 2.

For more or fewer stars, just adjust the brightness.

Step 27

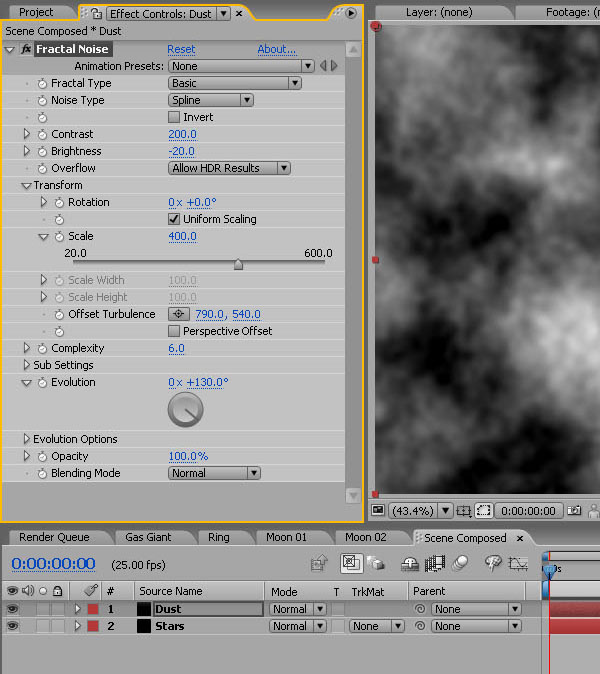
Create a new Black Solid called ‘Dust’.

Add Fractal noise with Noise Type set to ‘Spline’, Contrast at 200, Brightness at -20, and Scale at 400. You can play about with the Evolution settings to adjust the feel of the clouds, and change the Offset Turbulence to move them about until you are happy.

Step 28

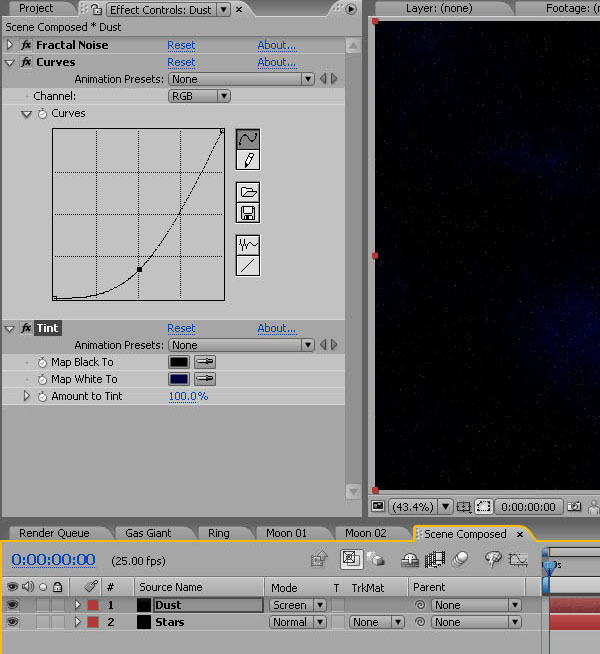
Next add Effect / Color Correction / Curves. Create a steep curve, crushing the blacks.

Then add Effect / Color Correction / Tint. Use the colour picker to ‘Map White To’ a deep blue.

Set this layer to Screen over the stars layer.

Step 29

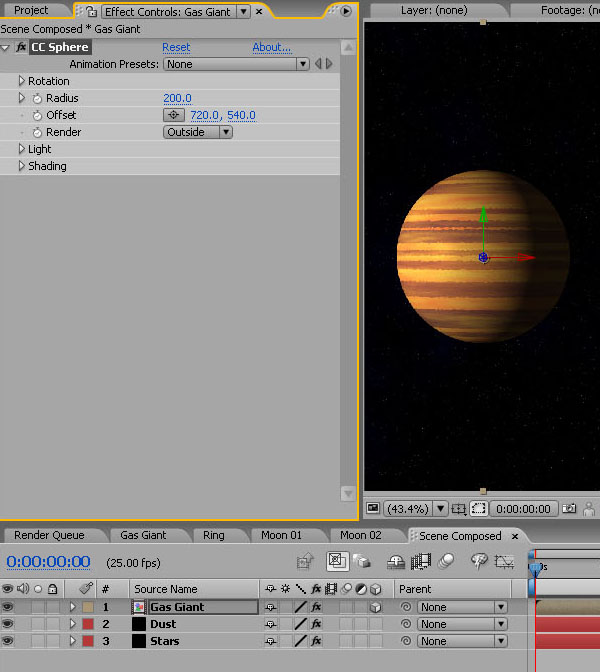
From the Project Window, drag the ‘Gas Giant ‘ composition onto the timeline. Make this layer 3d by ticking the 3D layer checkbox.

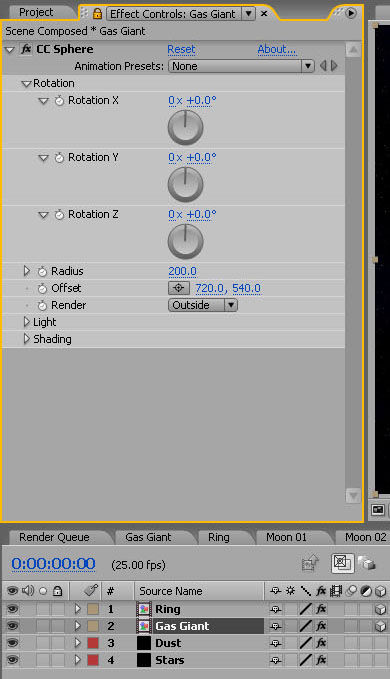
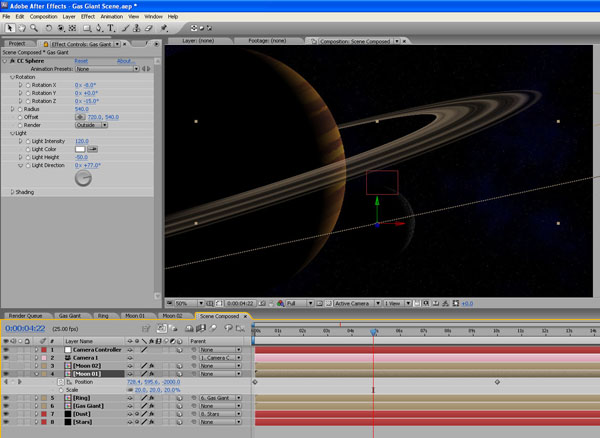
Go to Effect / Perspective / CC Sphere and apply it to the layer. In the Effect Controls / CC Sphere options, set the Render dropdown to ‘Outside’. This will speed up render time a little by only drawing the outside of the sphere.

Step 30

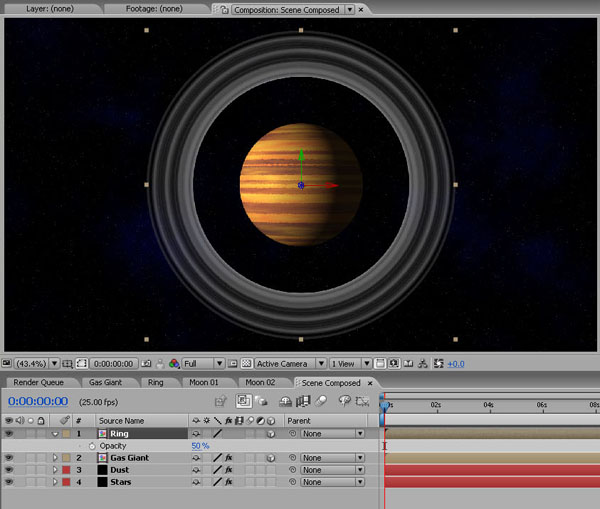
Drag in the ‘Ring’ composition and make this layer 3d also. Set its opacity to 50%.

Step 31

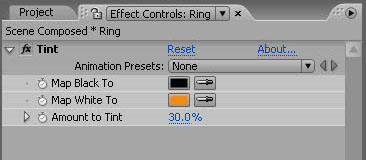
With the ‘Ring’ layer selected, choose Effect / Color Correction / Tint and ‘Map White to’ an orange/brown, knocking ‘Amount to Tint’ down to 30%.

Step 32

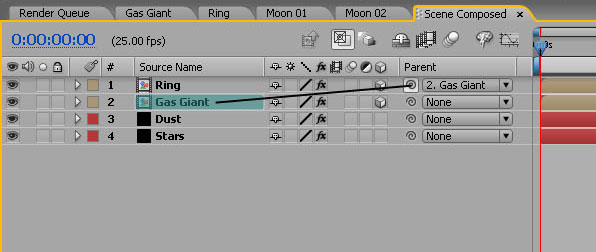
Then take the pick whip and parent the Rings layer to the Gas Giant Texture Map layer to lock them together.

Step 33

We now need to link the Scale, X-Rotation and Y-Rotation of the Ring to the properties of the Gas Giant.

Open the Effect Controls panel for the Gas Giant by clicking on its layer. Now click the little padlock icon in the top left of the Effect Controls panel to lock it open.

In the CC Sphere options, twirl down the Rotation properties.

Step 34

Drop down the Ring Layer’s transform properties on the timeline, and Alt-Click the Ring’s Scale stopwatch to open up the Expressions window.

Take the pickwhip from the Ring’s Scale properties and link it with the Gas Giant’s CC Sphere Radius. This makes the rings rather too big, so add ‘/2′ to the end of the expression to divide the size by 2.

Step 35

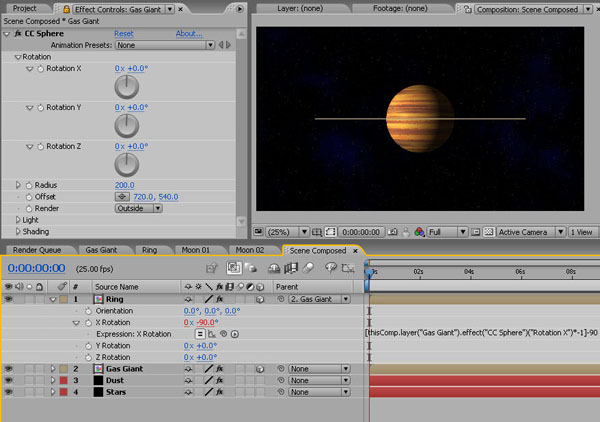
Alt-Click the Ring layer’s X-Rotation stopwatch, take the pickwhip and link it with the Gas Giant’s CC Sphere X-Rotation. This will link the rotation but you’ll notice the rings are still vertical and rotate in the opposite direction to the planet. We need to adjust the expression with a couple of variables.

At the start of the expression, add a square bracket ( [ ). At the end add ‘*-1’ – this will reverse the rotation of the rings. Close the expression with another square bracket ( ] ) and then add ‘-90′ to rotate the rings to the horizontal.

Step 36

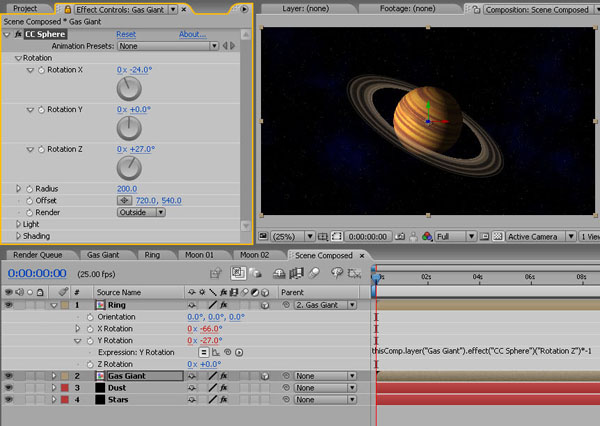
Now link the Ring’s Y-Rotation with the Gas Giant’s CC Sphere Z-Rotation and add ‘*-1′ at the end of this expression.

In the Gas Giant’s CC Sphere Effect Controls, play around with the X and Z rotation values and see how the Ring stays locked to the planet’s rotation.

Avoid rotating too much as we’ll see the back of the planet where the texture map joins, and the same goes for using the Y rotation.

Step 37

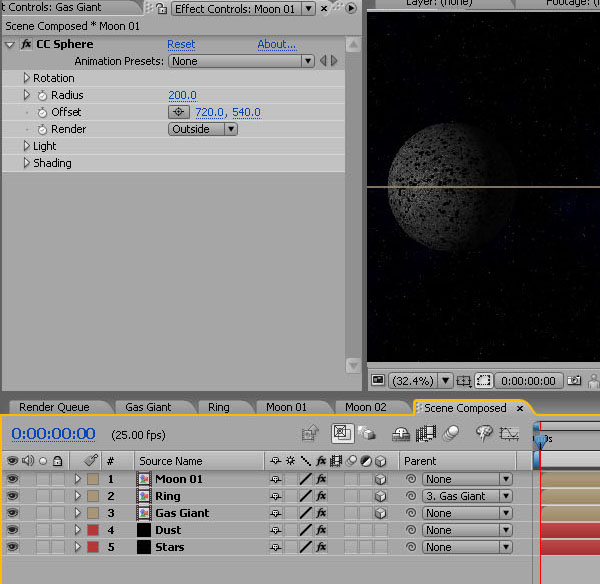
Now bring the ‘Moon 01′ composition onto the timeline. Make the layer 3d and add Effect / Perspective / CC Sphere. Again, drop down the Render options and set to ‘Outside’.

Step 38

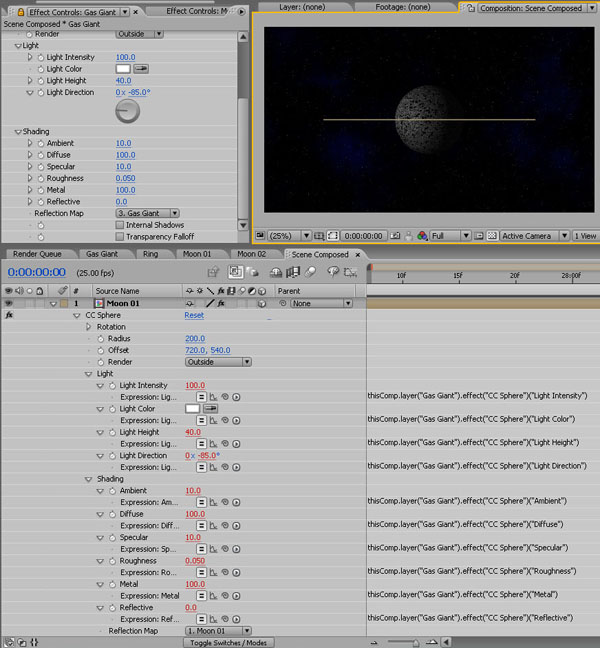
Now we will link the light properties of the Gas Giant and Moon 01 together so that we can change the lighting settings on the planet, and the moon’s will automatically update. This takes a little while and uses pickwhips, but it’s worth doing for the versatility it adds later.

Click the Gas Giant Effect Controls panel and make sure it is still locked open.

On the ‘Moon 01′ layer, drop down the CC Sphere Effect options. Now pickwhip the following properties to those of the Gas Giant’s: Light Intensity; Light Color; Light Height; Light Direction; and in the Shading options: Ambient; Diffuse; Specular; Roughness; Metal and Reflective.

We won’t be altering all of these variables in this tutorial, but it’s good to have the option built in.

Step 39

Now duplicate the Moon 01 layer. With the duplicate copy selected, hold down Alt and drag the ‘Moon 02′ composition from the project window onto the layer, replacing the Moon 01 map with the Moon 02 map, but keeping all of your expressions intact!
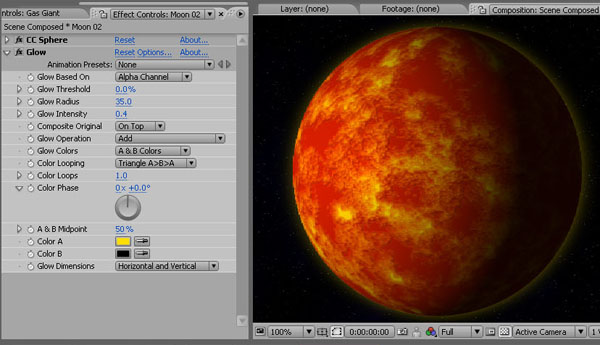
Step 40

Now add an Effect / Stylize / Glow to Moon 02 to create a sulphur-rich atmosphere. Set Glow Based On to Alpha Channel; the Glow Threshold to 0, Glow Radius to 35, Glow Intensity to 0.4, Composite Original to ‘On Top’, and choose and sulphur-yellow for Color A.

Step 41

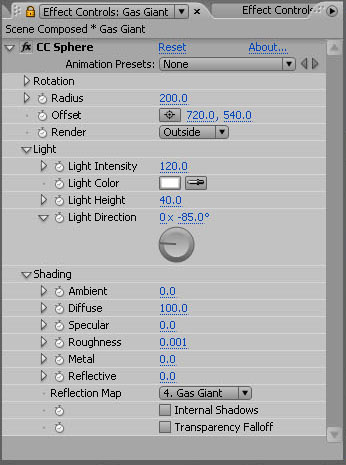
So now, any properties for lighting that you change in the Gas Giant CC Sphere options will change on the moons too. So go into the Effect Controls for the Gas Giant and in the ‘Shading ‘options, drop the ‘Ambient’ and the ‘Specular’ to 0, to really darken the ‘dark side’ of the planet and moons.

Then increase the ‘Light Intensity’ in the ‘Light’ options to 120.

Step 42

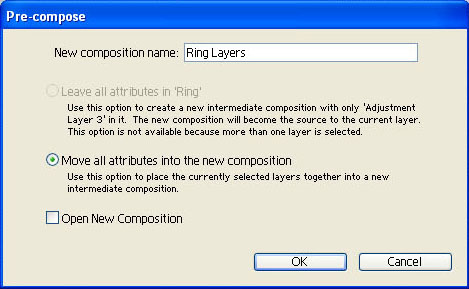
Now we need to create a shadow on the rings that is linked to the light direction, giving the impression of the Planet casting a shadow.

Pre-Compose the Ring layers by going into the Ring composition holding down CTRL and clicking on both layers. With both selected choose Layer / Pre-Compose, call the new composition ‘Ring Layers’, tick ‘Move all attributes into the new composition’ and click OK.

Step 43

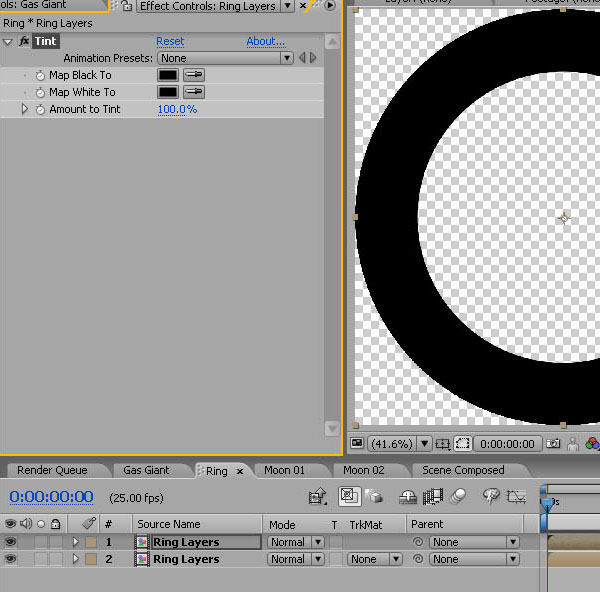
Duplicate the new Rings layer. On the top layer choose Effect / Color Correction / Tint and ‘Map White to’ black, turning the ring black.

Step 44

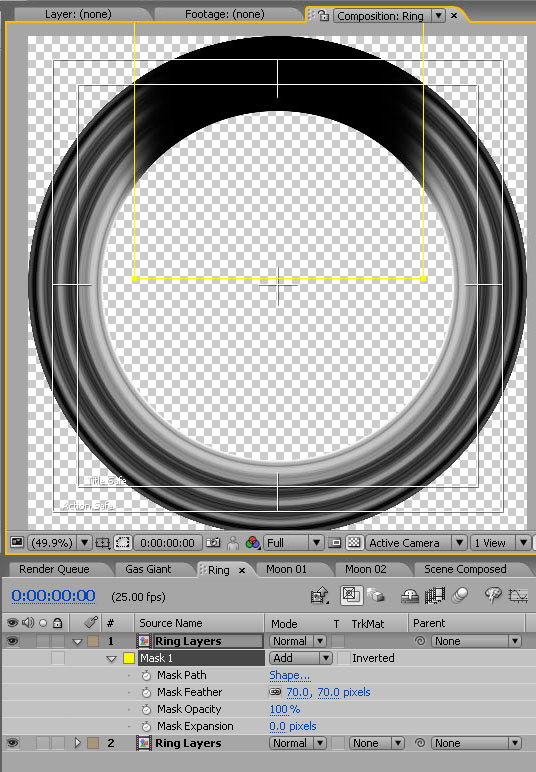
Now draw a rectangular mask so that just the top of the rings is black. Feather the mask by 70 pixels.

Step 45

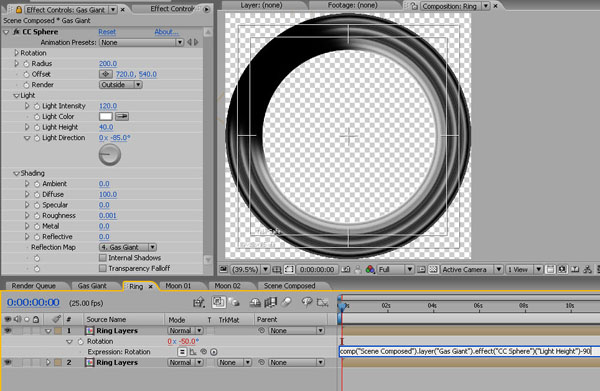
Alt-Click the rotation of this layer and pick whip it to the Light Height of the Gas Giant CC Sphere effect. Add a ‘-90′ to the end of the expression that is created.

Now we have a shadow cast onto the rings that is related to the light height.

Just as a note – this isn’t perfect as both Light Height and Light direction alter the way the light hits the sphere, as does the rotation of the sphere itself. But it gives pretty good results as long as you don’t go rotation crazy!

Step 46

Phew. Okay – let’s compose this into a scene.

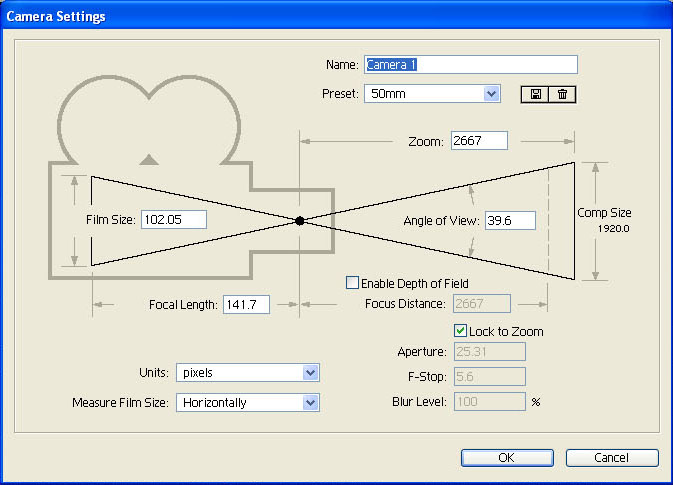
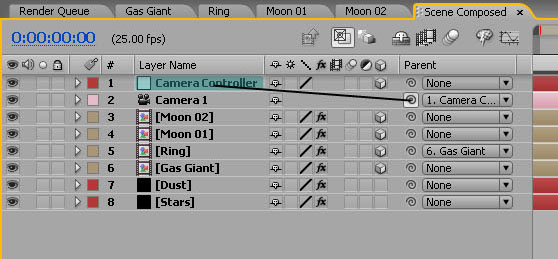
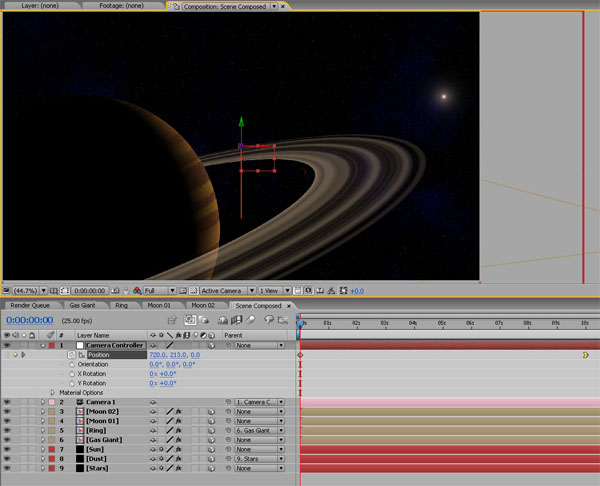
In the ‘Scene Composed’ composition, create a 50mm camera (Layer / New / Camera)

Step 47

Create a new Null (Layer / New / Null Object). Make the null 3d. Parent the camera to the null to give easier control of it, and rename the Null ‘Camera Controller’.

Step 48

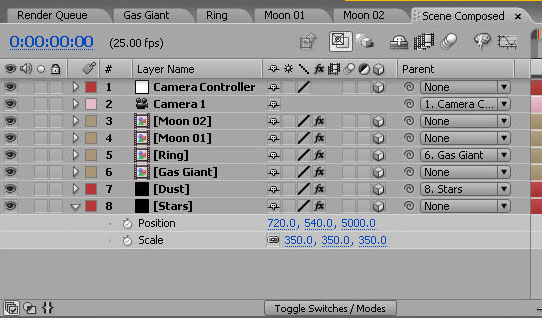
Now we need to get some Z-space between all of our elements.

Parent the Dust layer to the Stars, make both 3d, and set the Z position on the Stars layer to 5000. Then scale it up to where it’s just bigger than the composition window, about 350%.

Step 49

To keep the quality of the stars and the clouds which has been reduced due to the increase in scale, tick the ‘Collapse Transformations’ box for both the ‘Dust’ and ‘Stars’ layers.
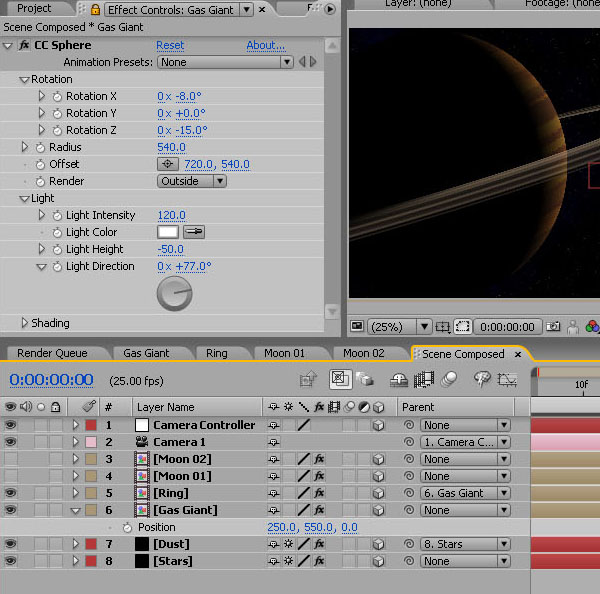
Step 50

In the Gas Giant CC Sphere controls, increase the radius to 540 (this is as big as the radius can get without the planet getting too big for the composition), set the Rotation X as -8, Rotation Z as -15, Light height as -50 and Light Direction as 77 (or just whatever you like – this is just how I have set it up for the final render).

Place the layer to the left side of the composition about 250, 550, 0.

Step 51

Position Moon 1 closer to the camera by changing its Z Position to -2000. Take its scale done to 20%.

Set position keyframes so that it comes in from the right, and drifts across the scene, going off the left. Give it about 10 secs of movement.

Step 52

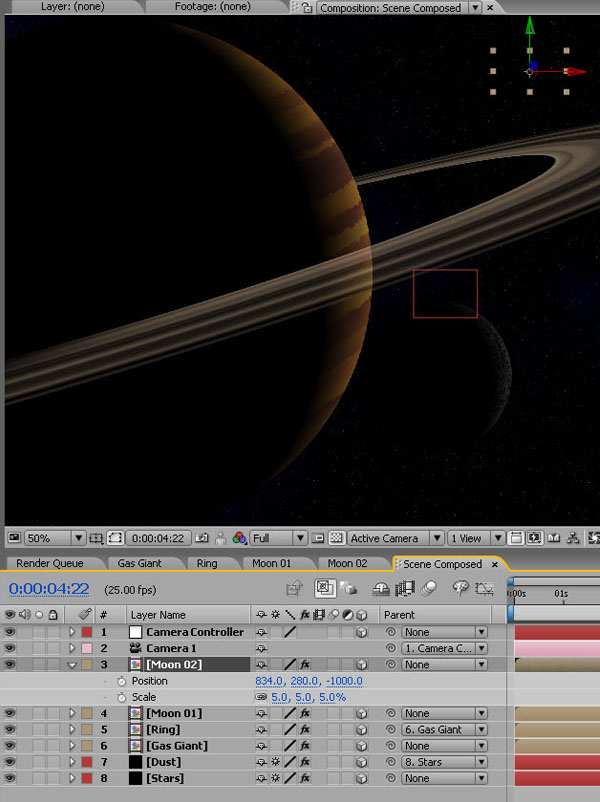
Position Moon 02 at -1000 in Z-space and reduce down to 5%. Place it above the rings, somewhere in front of the Gas Giant.

Step 53

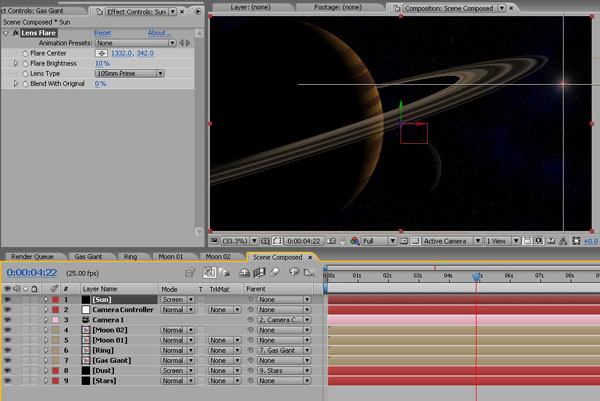
Lastly, create a new Black Solid and call it ‘Sun’. Make it 3d. Then add Effect / Generate / Lens Flare, and select a 105mm Prime Lens Type. Reduce the brightness to 10% and position the light in the top right of the frame to match the light direction on the Planet and Moons. Now set the blending mode to screen.

Step 54

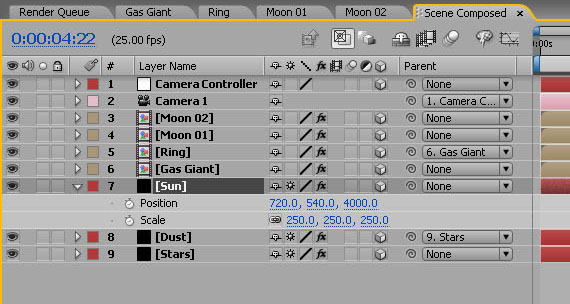
Set this layer’s Z position to 4000, scale it up to 250% and click the ‘Collapse Transformations’ box.

Drop the layer down in the stack to above the Dust layer.

Step 55

Set a position keyframe on the Camera Controller layer at 10 secs in. Go back to the start and set another keyframe, this time altering the Y position to move the camera up so that the Gas Giant sits towards the bottom of the frame. Go back to the second keyframe, make it an easy ease in keyframe (Right Click / Keyframe Assistant / Easy Ease In).

You may have to tweak the position or timing of Moon 01 now, just to get it to come into shot at the right time.

Step 56

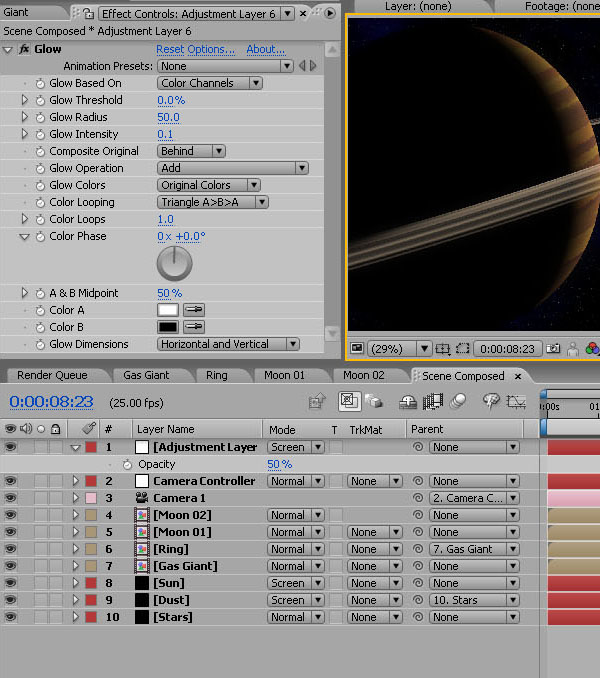
To brighten things up a little, add an Adjustment Layer with a Glow effect. Set the Glow Threshold to 0%, the Glow Radius to 50, and the Glow Intensity to 0.1.

Then change the Adjustment Layer’s blending mode to Screen and reduce the opacity to 50%.
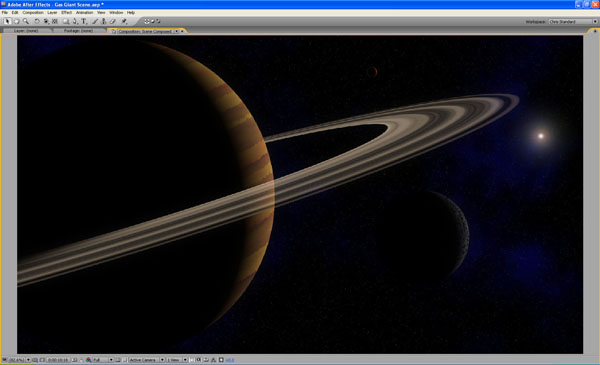
Step 57

And there you have it. You can alter the position of the Planet and moons as you like, and by adjusting the light height on the planet, you’ll automatically adjust it on the moons too.

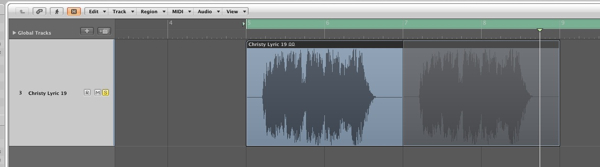
Now you can render it out and add some suitable spacey sound effects. I’ve just used some guitar feedback slowed down to create that classic ‘Alien’ drone sound.

Additional Resources


Quick Tip: Create a Damask Pattern Using the MadPattern Illustrator Template


Damask is a style of pattern that is easy to recognize, but not so easy to replicate. In this tutorial you will learn that with the right tools, anybody can make their own damask pattern that looks just as good as the ones you see on fancy hotel wallpaper, with the help of a template file.

Continue reading “Quick Tip: Create a Damask Pattern Using the MadPattern Illustrator Template”

Using Illustrator CS5 Tools to Create a Painted House – Vector Premium Tutorial


We have another great Vector Premium tutorial available exclusively for Premium members today. If you want to learn how to use a combination of the new Illustrator CS5 features – including the Perspective Grid and Natural Media Brushes – to create a 100% vector illustration with a painted finish, then we have an awesome tutorial for you.

Continue reading “Using Illustrator CS5 Tools to Create a Painted House – Vector Premium Tutorial”

How to Use Vocoders in Remixes

So maybe you’ve just been given a vocal part to remix and no matter how hard you try you just can’t get it to sit with your style of music. Maybe the progression is just too ‘light’ or perhaps you already have a piece you want to use. Whatever the reason, vocoding could really help you out in this situation.

I’ve used the vocoder thats bundled with Logic Pro 9 for this tutorial but as usual these techniques can easily be translated to other DAWs and essentially any other vocoder.


Step 1: The Original Vocal

Often when you a vocal part arrives as part of a remix project, it can be a challenge from the outset. If the timing, intonation or style clashes with your own then things have to be hammered into shape. Often this calls for some extreme processing.

A good few years ago I remixed Tears for fears for a major label and had this exact problem. My solution was to heavily vocode the vocal part. This meant it was still very much a part of my mix but the change in it’s musical progression meant that I was able to fit it around my work instead of me working around it.

Of course sometimes it’s easy to work around the vocal but this treatment can at least give you the option.

To avoid any messy copyright issues I’ve used a vocal phrase from Apple’s ‘Voices’ Jam pack. It’s maybe not the ideal example of a vocal remix part but it should work nicely for the purposes of demonstrating the technique.

The vocal part we’ll be using.

Download audio file (1.mp3)

The vocal part.


Step 2: The Remix Concept

Let’s assume that at this stage you have already constructed a basic loop to use for your remix, or at least have an idea in mind. I have thrown something basic together, rather than develop an entire song.

The basic remix concept.

Download audio file (2.mp3)

The drum and bass parts.

My idea currently consists of a drum loop and bass part. Even this simple combination has it’s own mood and musical progression. When the vocal part we have is added you can hear that it just doesn’t fit musically. The timing is correct but that’s where the good news ends.

The loop and vocal at this point are not playing nicely together.

Download audio file (2b.mp3)

The raw, out of tune vocal.

An option here would be to write some musical parts to work with the vocal but sometimes you will want to stick to your own style. This is where the vocoder comes in!


Step 3: Enter … the Vocoder

This is the point where you can load up your favourite vocoder plug-in. There are loads of them about and many DAWs bundle them as standard. I was actually planning to complete this tutorial in Cubase but it appears that they have ditched their vocoder in version 5 / 5.5… So Logic’s stock vocoder it is!

Logic’s vocoder.


Step 4: MIDI Routing

Most vocoders are treated by your DAW as instruments, as opposed to plug-ins. This means that you have to route MIDI and audio to them in order for them to produce sound. (These are traditionally known as the carrier and modulator.)

The audio we are feeding our vocoder with in this case is obviously the vocal. This is routed by using the instruments side chain input, in the top right. Once connected you are ready to start programming MIDI.

Routing the vocoders MIDI input is automatic.


Step 5: Recording a New Progression

MIDI routing is usually very straight forward and is often created when the instruments MIDI track is created. Ultimately this means you are good to go as soon as your vocoder is loaded and has audio being fed to it.

On a successful test of the connection I started to play a new progression. I picked something that worked well with my current loop but also allowed the vocal to be heard in full. In short match your chords placement to the vocal phrasing.

The new progression is recorded.


Step 6: Optimising the Vocoder’s Settings

If you are pretty new to vocoding it might be a good idea to start with a basic pre-set. Try to go for the most intelligible one you can find, this will ensure that as much of your vocal as possible is understood by the listener.

The vocoders settings get tweaked for clarity.

Download audio file (6.mp3)

The new vocal in isolation.

If you find that things need to be cleaned up further (as I did here) you can tweak things a little. I simply increased the amount of bands used, to produce a more refined, less grainy effect and also opened up the filters to ensure a nice bright sound was created. I also tightened up the vocoder envelopes a little.

Download audio file (6b.mp3)

The raw vocoded sequence with other parts.


Step 7: Adding Effects

Finally with my vocoder working satisfactorily and my musical elements in place I added a small amount of delay to the vocoded signal to open things up a touch and add some space. A compressor was also added to ensure that every part of the sequence was as up front as possible.

The final effect is obviously not a natural one but for electronic music it can be a really good way to include the vocal parts supplied but also stick to a specific style of production.

Compression and delay are added.

Download audio file (7.mp3)

The final result with some effects added.


Create a Fantasy Painting With Photoshop CS5?s Mixer Brush – Psdtuts Premium Tutorial


Today, we have another Psd Premium tutorial exclusively available to Premium members. If you want to take your digital painting skills to the next level, then we have an awesome tutorial for you. Learn more after the jump!


This Premium Tutorial is Filled with Creative Tips

Without a doubt, my favourite new feature in Photoshop CS5 is the Mixer brush. When you see the demos of people using it, it looks great, but when I first got to use it, I was a bit confused. Each brush has 5 different attribute settings and then another 4 canvas settings to get your head around. In this tutorial I will take you through some of the mixer brush settings and demonstrate how to use them to make a fantasy based image with 2 of the biggest rats ever to blight a city.

Today’s tutorial was written by David and Sarah Cousens who run Cool Surface from the South West England. They have provided illustrations for The BBC, Hachette, Adidas, Macmillan Publishing, Letraset, and have been featured in a number of leading design magazines such as Computer Arts, Advanced Photoshop, Digital Arts and Photoshop Creative. Log in or Join Now to get started!


Professional and Detailed Instructions Inside

Premium members can Log in and Download! Otherwise, Join Now! Below are some sample images from this tutorial.


Psd Premium Membership

As you know, we run a premium membership system here that costs $9 a month (or $22 for 3 months!) which gives members access to the Source files for tutorials as well as periodic extra tutorials, like this one! You’ll also get access to Net Premium and Vector Premium, too. If you’re a Premium member, you can log in and download the tutorial. If you’re not a member, you can of course join today!

5 Basic Ways To Populate Mass Groups Within After Effects – AE Basix

In this tutorial we look at 5 individual ways of duplicating crowds. These methods are:

  • Simple Masking (garbage matting)
  • Rotoscoping
  • Difference Matting
  • Chroma Keying
  • Camera Technique

The tutorial explains each of the methods, the pros and cons, and goes in depth to show how to create the final preview using the difference matting technique. The last part also contains some general compositing techniques that can be applied to each method.

Continue reading “5 Basic Ways To Populate Mass Groups Within After Effects – AE Basix”

Core Art Skills: Part 5, Traditional Media Techniques


If you’ve been following the course you’ve hopefully been using your sketchbooks more and have have tried your hand at clay. If so, you should now be happy to get your hands dirty and make some textures. In this Session Ben Mounsey will continue on with the core art skills and show you different methods for creating textures. You will learn how to add texture to your digital artwork, and the most striking ways to use it.

Continue reading “Core Art Skills: Part 5, Traditional Media Techniques”

Audiotuts+ Reader Survey

Our recent Tuts+ Survey showed that many of you have feedback on how we can make Audiotuts+ better for you. Now is your chance to let us know what you want from Audiotuts+. Please take a few minutes to complete our reader survey. All questions are optional. You only need to provide a response when you have something to say.

You’ll have the chance to tell us what you like, don’t like, and to make suggestions for the site. Every completed survey will be read, and your feedback will lead to real, tangible changes in the kinds of content we publish.

Thank you!

Take the Audiotuts+ Survey


Quick Tip: Spice Up Your Drum Patterns With Reverse Hits

Using reverse drum hits is a great way to enhance a drum pattern or mix things up in an arrangement because it reuses the existing sounds, creates tension, and easily adds interest.

Download audio file (afReverseDrumHits.mp3)


Step 1: Starting Pattern

First, here is the pattern we’ll be starting with. It uses four sounds from the free Mafz Vol 2 drum pack Mafz Volume 2 Drum Pack: Kick 30, Perc 3 (which is a tambourine), Clap 14, Hat 13. These four sounds are also available in the playpack for this tutorial.

Download audio file (aaReverseDrumHits.mp3)


Step 2: Make Space

I should also mention that I pitched the tambourine sample down two semitones. For our first adjustment, we’re going to use a reversed tambourine sound that leads into the second clap. To make room for it, we’re going to need to remove one of the hats. Let’s also clone the pattern so that we can use the original pattern later.

Download audio file (abReverseDrumHits.mp3)


Step 3: Place the Sound

Now that we’ve made space, let’s drag the tambourine sound file into the playlist and reverse it, placing it roughly just before the second clap. Be sure to turn off your host program’s snap setting so that you can adjust it freely.

Download audio file (acReverseDrumHits.mp3)


Step 4: Volume Envelope

Sounds cool, but we can make it fit better into the pattern by using a volume envelope. In most circumstances, it’s best to not use the attack of the reversed sound, because this can lead to a double hit which sounds unnatural with short sounds, and with longer sounds it can “spoil the surprise” for the listener. There are a few ways to do this in FL Studio, but the easiest way is to use the clip’s menu and navigate to Automate > Volume.

This gives us an envelope to adjust the volume.

Download audio file (adReverseDrumHits.mp3)

Reversing tambourines works quite well, because it results in a believable sound, fairly close to what a tambourine performer could achieve.


Step 5: Reverse Kick

Another common way to use this technique is to place a reversed kick at the end of a pattern. We can do this following the same steps listed above.

Download audio file (aeReverseDrumHits.mp3)


Step 6: Reverse Hat

We can also add interest to the pattern by including a reversed hat. A volume envelope is not necessary for this sound, but you can add interest by panning it.

Download audio file (afReverseDrumHits.mp3)


Step 7: Arrangement

Lastly, let’s create a more interesting arrangement by switching between our starting pattern and our “spiced-up” pattern.

Download audio file (agReverseDrumHits.mp3)


Step 8: Reversed Cymbal

For the sake of completeness, I want to show the infamously overused reversed cymbal sound. The sound file we’ll be using is labeled as Hat 4 and is from the Smashing Music Drum Kit available on the Audiotuts free page (the file is also available in the playpack). I want to note that this technique can also be used with FX sounds such as risers and fallers, and that when an FX sound is reversed, a riser can become a faller and vice-versa.

Download audio file (ahReverseDrumHits.mp3)

Download the Play Pack for this tutorial (831 KB)

Contents

  • Samples
  • FL Studio Project


Seven Steps To Writing Memorable Melodies – Part 2

Welcome to the second part of this mini-series. If you missed part one, I recommend reading that first to get a better understanding of what is going to be covered in the following steps in this tutorial. You can read Part 1 here.

So far we’ve worked out which notes we should use to get a ‘pleasant’ sound and avoid random or ‘clashing’ melody sounds. In the next two steps, we’ll learn techniques to add subtle interest to the melody by applying small ‘techniques’ to the order in which we play the selected notes.


Step 3: Jumping Over The ‘Desired’ Note By a Whole Tone

First of all I’m assuming you understand a whole tone? Basically, from C to D, D to E and so on. So what do I mean by jumping over the desired note? Well, lets look at the example audio and use this to better explain.

In step 2 of the previous example, we decided that the featured melody note in the second bar would be G. What we can do now, is plan ahead a little in bar 1. As we are playing the notes working up toward the G… we first jump over the G note by a whole tone, to play an A first, before finally landing on the desired G in bar 2.

Download audio file (audio-3-1.mp3)

In other words, we’re avoiding the natural instinct of simply to travelling up the scale from E to G, by jumping over the G note by a whole tone first to play a A, and then finally completing the sound by settling on the featured note of the G in bar 2. Remember, if we were playing a melody where the notes were travelling down the scale, we’d jump down over the desired note first before finally going back up to that note.

This technique involves you planning ahead a little, but, once mastered is a very effective way to add some interest to a melody line. The next step again utilises the ‘jumping’ technique between notes, but this time by 6 whole tones!


Step 4: Jumping Six Whole Tones

Another tip great tip for spicing up your melody is to jump six whole tones, either up or down the scale. This rather large jump between notes can be extremely effective when used at the right moment in a melodic phrase.

If we continue with the melody from the previous example, one place we could include a six note jump is after the G in the second bar. We jump from the G down the B (from G, we hop over F, E, D, C, and fall on B) before finally moving in bar three and playing the C note.

Download audio file (audio-4-1.mp3)

I hope you notice how this six note jump really adds something special to the melody, and indeed now, with these three bars alone, we have the start of a very beautiful and rather memorable melody line.

We can use the same technique to continue the melody with another six note jump, this time perhaps going up the scale, from the C note that we finished on in bar 4 to an A (at the start of bar 5). We know that this will sound good, because the A note we’re going to jump to is part of the F Major triad – which is the chord being played at the time we fall on the featured A note! Here’s how this would look and sound as I’ve then continued in to bars 5, 6, 7, and 8.

Download audio file (audio-4-2.mp3)


Step 5: Repeating Patterns

So why did bars 5, 6, and 7 work so well with the example melody in step 4? Well, firstly, because they make use of the previous steps in this tutorial. But also, they work specifically alongside the phrase in the first three bars, because they make use of the same ‘pattern’ of notes.

Repeating patterns of notes is a trick which great classical composers often used with great effect. You’re not necessarily repeating the same notes (although this is also an effective technique), but you’re using the same pattern of notes from a previous phrase, just shifted along the scale, either up or down. If you compare bars 1 and 2 in the score using our example, you can hopefully see that the notes in bars 5 and 6 follow the same pattern, only they’re using notes which are six whole tones higher.

Repeating patterns of notes like this makes the already pleasant melody become more memorable to the listener, and therefore a little more ‘catchy’ after only a few listens.

A great example of what I consider to be a fabulous melody line, which uses repeating phrases so effectively is the “Glasgow Love Theme” from the Love Actually sound track (below). Listen carefully to the melody, you’ll see how the composer has crafted an extremely moving melody line from only a few basic melodic phrases. Carefully repeated over various chord harmonies and different parts the scale, this is a wonderful example of how to use this ‘repeating patterns’ technique to great effect!


Review Stage

Using the steps in this (part two), of the tutorial series, alongside those in part one, you should now be able to see how the five techniques learned thus far offer you the basic ground tools for composing a wonderful melody line. By hopping over the ‘obvious’ note by a whole tone, creating new moods by jumping up or down 6 whole tones, and then cleverly repeating patterns of notes in musical phrases.

In the third part of this series we’ll look at the final two steps in this seven step guide, as well as a ‘bonus’ tip about creativity.


Add Depth of Field to a 3D Scene with Lens Blur


In today’s quick tip tutorial, we will demonstrate how to add depth of field to a scene that we will be creating with 3D objects to help improve a presentation to a client.


Step 1

First, create a new document (Cmd/Ctrl + N) and make it 600 pixels by 400 pixels. You could of course set the resolution up to 300 pixels per inch for any printed document, but we’ll keep it down to 72 for this tutorial.


Step 2

Then, we need to place the major part of this tutorial onto the scene, our business card. Choose File > Place and select your image.

Place it onto your canvas and make sure it’s big enough, we could still scale it down if it doesn’t fit well, but scaling up is something we don’t want to do because of the pixel loss.


Step 3

Now, in order to distort it in a certain perspective, you need to convert it to a 3D layer using the New 3D Postcard From Layer command. Select your layer and select 3D > New 3D Postcard From Layer. Once it’s done, take the 3D Rotate Tool in your tool palette and start playing around by simply dragging your card in any direction. A similar result can be achieved in earlier versions of Photoshop using the Distort tool or the Perspective tool, but the 3D Rotate Tool makes sure everything looks right.

Place your card as shown below. We don’t want too much inclination, only a subtle effect. You can now drag some guides on each corner of the layer to prepare the next step where we’ll need to create a reflection to this postcard.


Step 4

Use the Ruler Tool to create a straight line that joins the two corners on the left. This is going to help create a reflection that has the same height as your 3D layer.

Now, simply drag it down to the next corner and create a new guide at the new intersection. Do the exact same for the two remaining corners on the right.


Step 5

Place a second card onto a new layer and name it "reflection". An easy way to flip your image out is to simple add a "-" operator before the height dimension. Align the top left corner of the reflection to the bottom left corner of the card.


Step 6

Press Cmd/Ctrl + T, then right click, we’ll be able to bring up the transformation menu.

Select Distort and start dragging your anchor points to the appropriate intersections we just made with the Ruler Tool.


Step 7

The next step is how to make it fade to transparent. Select a big and soft brush about 200 pixels. We could also be using the Gradient Tool for this part, but I prefer the brush because it gives us a little bit of control we don’t get with the Gradient Tool.

Create a new layer mask to this layer by clicking the little mask icon at the bottom of your palette. Select this newly made mask and start brushing with a pure black the bottom area of the reflection. Bring down the Opacity value to about 20% the get a more subtle effect.


Step 8

We wouldn’t have so much depth in our scene if we didn’t have at least two elements in our 3D space, so repeat the process we just explained with another card. You should make it a little smaller since it’s farther into the Z space.


Step 9

Since our reflections are now transparent, there is a new problem which can be solved quite easily. What we need to do is to mask out the area of the front element’s reflection on the second one. To do this, Cmd/Ctrl – click the first element preview in the palette and Shift + Cmd/Ctrl – click on it’s reflection. What’s that does is it create a new selection from the selected layer and it adds the other selection to the actual selection.

Once your selection is ready, select the mask of the back element’s reflection and fill your selection with black.


Step 10

To simulate a nice laminated shine on your card, we need to create a new layer and name it "Shine". By pressing Cmd/Ctrl – click on the preview icon again, select your card and subtract a part of it using the Polygonal Lasso Tool. To do so, hold Alt and start clicking around to create your shape, once closed, it will subtract this shape to the current selection.

Fill your selection with white and mask it as we masked out the reflection using the Mask and the Brush. Bring the Opacity value down again so that it’s more subtle. Repeat the process for the second element but this time press Alt + Cmd/Ctrl – click on the front element’s preview icon to subtract it from the selection.


Step 11

It is now time to add depth of field to our scene. For those who don’t know much about depth maps, it’s a black and white map that represent the depth of each element with a value that goes from white to black, white being the focused elements. Create a new layer and fill it black because there is nothing to be focused on in the back of our scene. Using the selection method we discussed in step 9, fill the front element with white and the rear with gray. You don’t need to choose your gray well because we’ll be adjusting the blur settings in few moments, don’t worry if it’s too dark or too pale.


Step 12

Since the Lens Blur effect only affects one layer, we need to create a copy of our layers and make a single one out of them. Select all your layers (excluding the depth map we just created) and drag them onto the new layer icon at the bottom right of the layer palette. Press Cmd/Ctrl + E to merge them in a single layer or right click and select Merge Layers.

To apply the depth map on the flattened layer, hit Cmd/Ctrl + A with your depth map selected, this will select everything on the layer. Hit Cmd/Ctrl + C to copy it, we’ll need it in few seconds. The upcoming part is a great way to import black and white values to a layer mask, simply add a layer mask to the flattened image, be sure to hit Cmd/Ctrl + I to make it black and then press the Edit in Quick Mask Mode icon at the complete bottom of your tool palette.

Once the Quick Mask Mode is activated, hit Cmd/Ctrl + V to bring out the depth map we copied before, it should give you something like that. If it’s all right, press the Quick Mask Mode icon again to make a selection out of this. Click on the layer mask and fill the selection with white.


Step 13

Then, having the flattened layer selected, choose Filter > Blur > Lens Blur to bring up the effect settings.

Make sure when you adjust your settings that your source is set to "Layer Mask" in the drop down menu and that the "Invert" checkbox is checked (for some reason, Photoshop is using black as focus instead of white).


Step 14

To add dimension to the card, draw a simple dark gray line around the edge of the first card to create the impression of an extruded layer.


Step 15

Adding a floor is a great way to make it more realistic because the eye will understand more easily that the business cards aren’t floating in space but sitting on the ground. For this tutorial, I am using a texture you can easily get since it’s given in the Psdtuts+ freebies. I used "stonetexture5.jpg" that you can find in the Stone Texture Pack.


Step 16

Desaturate it by hitting Cmd/Ctrl + Shift + U, if it does not work, you might need to rasterize your layer. Choose Layer > Rasterize. Hit Cmd/Ctrl + T to bring the transformation tools and select perspective.

Scale it down about the third of your image and bring out the bottom left or bottom right anchor point to create a perspective.


Step 17

Mask out cards using the same selection method we’ve been using quite a lot before.


Step 18

Using a big soft brush, around 300px, mask out some areas we want to soften out.


Step 19

To add a quick shadow under those cards, create a new layer a paint a black spot using a soft brush.

Hit Cmd/Ctrl + T and start stretching it and rotating it so that it matches well with the card.


Step 20

Mask out the overlapping areas and repeat for the second card.


Final Image

You might want to play with these settings to get the desired effect, you could bring the opacity of the ground down a bit to make it less grungy.

Here is a similar attempt using the same exact method.

Test Your Observation Skills With an AS3 Difference Game – Active Premium

Today, we have another Active Premium tutorial exclusively available to Premium members. If you want to take your ActionScript skills to the next level, then we have an awesome tutorial for you, courtesy of Stephan Meesters.


Preview

Test your skills of observation with the demo below!


This Premium Tutorial is Filled with Creative Tips

During this tutorial we’ll create the core gameplay of a difference game. This includes all the main functionality and two levels to play around with. After this we will also add a main menu and an ending screen.

To summarize, we will be using two images: one with a clean background and one with all the differences. We create markers that determine the position and dimension of each difference and use BitmapData operations to copy this on the screen. Randomization will keep the gameplay interesting and increase replayability.


Professional and Detailed Instructions Inside

Premium members can Log in and Download! Otherwise, Join Now! Below are some sample images from this tutorial.


Active Premium Membership

We run a Premium membership system which costs $9 a month (or $22 for 3 months!) which periodically gives members access to extra tutorials, like this one! You’ll also get access to Psd Premium, Vector Premium, Audio Premium, Net Premium, Ae Premium and Cg Premium too. If you’re a Premium member, you can log in and download the tutorial. If you’re not a member, you can of course join today!

Also, don’t forget to follow @activetuts on twitter and grab the Activetuts+ RSS Feed to stay up to date with the latest tutorials and articles.

Manipulating Particle Motion with Stardust Particle Engine – Part 2

This is the second part of this tutorial. I’m going to show you how to manipulate particle motion with deflectors.

Prior knowledge of motion basics and vector fields is required. I highly recommend that you complete the first part of this tutorial before moving on.


Final Result Preview

Take a look at the final result we will be working towards. It’s an example of a floor effect, with particles bouncing off the floor.


Deflectors

Pretty much like gravity fields, a deflector takes a particle’s current motion data as input. Afterwards, the deflector overwrites the particle’s motion with its output, only that the output now contains velocity data in addition to position data. Thus, in 2D space, a deflector’s output is a 4D vector; the first two components of the 4D vector represent the x- and y-component of the position vector (denoted x and y), respectively, and the last two components represent the x- and y-component of the velocity vector (denoted vx and vy).


How To Use Deflectors

Remember the Field class and the Gravity action from the first part of this tutorial? Well, the procedure is similar. You create Deflector objects that manipulate particle motions, and then add them to the Deflect action, just like you would add Field objects to the Gravity action. Now let’s look at a quick example.


Floor Effect

In this example, we’re going to use the LineDeflector class to create a particle-bouncing-off-floor effect. A line deflector essentially simulates an infinitely long line in 2D space, with one side being open space, and the other side solid; particles are only allowed to be in the open space and not allowed in the solid space. When particles come from the open space side, hitting the line, they’ll bounce back. The Particle.collisionRadius property, representing the radius of a particle, is taken into account.

The line deflector uses a normal vector and a point the line passes through in 2D space to determine the line. Here’s an illustration to give you a better idea.


Step 1: Floor Effect Circle Symbol

Create a new Flash document, draw a circle of radius of 10, and then convert it to a symbol, exported for ActionScript with a class name Circle.


Step 2: Floor Effect The Document Class

Create an AS file for the document class. The class creates an emitter and a renderer. If you feel like needing a refresher on Stardust’s basic usage, you may check out this tutorial.

package {
	import flash.display.Sprite;
	import flash.events.Event;
	import idv.cjcat.stardust.common.emitters.Emitter;
	import idv.cjcat.stardust.common.renderers.Renderer;
	import idv.cjcat.stardust.twoD.renderers.DisplayObjectRenderer;

	public class FloorEffect extends Sprite {

		private var emitter:Emitter;
		private var renderer:Renderer;

		public function FloorEffect() {
			emitter = new CircleEmitter();
			renderer = new DisplayObjectRenderer(this);
			renderer.addEmitter(emitter);

			addEventListener(Event.ENTER_FRAME, mainLoop);
		}

		private function mainLoop(e:Event):void {
			emitter.step();
		}
	}
}

The emitter class is shown below. It basically shoots out circle particles and the particles are affected by a uniform gravity field, pointing downward.

package {
	import idv.cjcat.stardust.common.actions.Age;
	import idv.cjcat.stardust.common.actions.DeathLife;
	import idv.cjcat.stardust.common.actions.ScaleCurve;
	import idv.cjcat.stardust.common.clocks.SteadyClock;
	import idv.cjcat.stardust.common.initializers.Life;
	import idv.cjcat.stardust.common.initializers.Scale;
	import idv.cjcat.stardust.common.math.UniformRandom;
	import idv.cjcat.stardust.twoD.actions.Gravity;
	import idv.cjcat.stardust.twoD.actions.Move;
	import idv.cjcat.stardust.twoD.emitters.Emitter2D;
	import idv.cjcat.stardust.twoD.fields.Field;
	import idv.cjcat.stardust.twoD.fields.UniformField;
	import idv.cjcat.stardust.twoD.initializers.DisplayObjectClass;
	import idv.cjcat.stardust.twoD.initializers.Position;
	import idv.cjcat.stardust.twoD.initializers.Velocity;
	import idv.cjcat.stardust.twoD.zones.LazySectorZone;
	import idv.cjcat.stardust.twoD.zones.SinglePoint;

	public class CircleEmitter extends Emitter2D {

		public function CircleEmitter() {
			super(new SteadyClock(1));

			//initializers
			addInitializer(new DisplayObjectClass(Circle));
			addInitializer(new Life(new UniformRandom(60, 10)));
			addInitializer(new Position(new SinglePoint(320, 100)));
			addInitializer(new Velocity(new LazySectorZone(8, 4)));
			addInitializer(new Scale(new UniformRandom(1, 0.4)));
			addInitializer(new CollisionRadius(10));

			//actions
			addAction(new Age());
			addAction(new DeathLife());
			addAction(new Move());
			addAction(new ScaleCurve(0, 10));

			//gravity
			var field:Field = new UniformField(0, 0.5);
			var gravity:Gravity = new Gravity();
			gravity.addField(field);
			addAction(gravity);
		}
	}
}

Now you have created an effect with particles shooting out from the center of the stage, being pulled down by gravity. This is what it looks like:


Step 3: Floor Effect Add the Deflector

Add the folloing code in the emitter constructor. It creates a line deflector, adds it to the Deflector action, and then adds the action to the emitter, thus activating the deflector effect. The first two constructor paramters for the LineDeflector class is the coordinate of a point on the line, and the last two parameters are the x- and y-components of the line’s normal vector. The Deflector.bounce property determines the “bounciness” of the line, 1 causing complete rebound, and 0 meaning no rebound at all.

//create a line deflector passing through point (320, 320) and normal (0, -1)
var deflector:Deflector = new LineDeflector(320, 320, 0, -1);
deflector.bounce = 0.6;
var deflect:Deflect = new Deflect();
deflect.addDeflector(deflector);
addAction(deflect);

You may also draw a visual representation of the line on the stage to have a better look.

Alright, we’re done with this example. Now let’s take a look of our final outcome.


Bounding Box

In this example, we’re going to use the BoundingBox deflector to constrain particles inside a rectangular area.


Step 1: Bounding Box The Emitter Class

The document class remains the same as the previous example, but we are going to change the emitter class. This is the base emitter class of this example. Compared to the emitter class in the previous example, the SteadClock is changed to a ImpulseClock to instantly create 20 particles at the beginning, the position zone is changed from a single point to a rectangular zone that matches the stage size, the Velocity initializer is slowed down a bit, the Life initializer is removed because we want particles to stay permanently on the stage, the Age and DeathLife actions are in turn not required and removed, and the ScaleCurve is also removed. Some imports are also added and removed; you may just copy the code below for convenience.

package {
	import idv.cjcat.stardust.common.clocks.ImpulseClock;
	import idv.cjcat.stardust.common.initializers.CollisionRadius;
	import idv.cjcat.stardust.common.initializers.Scale;
	import idv.cjcat.stardust.common.math.UniformRandom;
	import idv.cjcat.stardust.twoD.actions.Deflect;
	import idv.cjcat.stardust.twoD.actions.Move;
	import idv.cjcat.stardust.twoD.deflectors.BoundingBox;
	import idv.cjcat.stardust.twoD.deflectors.Deflector;
	import idv.cjcat.stardust.twoD.emitters.Emitter2D;
	import idv.cjcat.stardust.twoD.initializers.DisplayObjectClass;
	import idv.cjcat.stardust.twoD.initializers.Position;
	import idv.cjcat.stardust.twoD.initializers.Velocity;
	import idv.cjcat.stardust.twoD.zones.LazySectorZone;
	import idv.cjcat.stardust.twoD.zones.RectZone;
	import idv.cjcat.stardust.twoD.zones.SinglePoint;

	public class CircleEmitter extends Emitter2D {

		private var impulseClock:ImpulseClock;

		public function CircleEmitter() {
			super(impulseClock = new ImpulseClock(20));
			impulseClock.impulse();

			//initializers
			addInitializer(new DisplayObjectClass(Circle));
			addInitializer(new Position(new RectZone(0, 0, 640, 400)));
			addInitializer(new Velocity(new LazySectorZone(3, 2)));
			addInitializer(new Scale(new UniformRandom(1, 0.4)));
			addInitializer(new CollisionRadius(10));

			//actions
			addAction(new Move());
		}
	}
}

Step 2: Bounding Box Add the Deflector

Pretty much like the previous example, we now add the following code in the emitter constructor to use the Deflect action, only that this time we use the BoundingBox deflector to constrain particles inside a rectangular region that matches the stage size.

//deflector
var deflector:Deflector = new BoundingBox(0, 0, 640, 400);
var deflect:Deflect = new Deflect();
deflect.addDeflector(deflector);
addAction(deflect);

Step 3: Bounding Box Test the Movie

That’s it. Nothing much is changed, and now we have constrained particles in a bounding box. Test the movie and you shall see the result.


Custom Deflectors

Now, we are going to create custom deflectors on our own. Let’s first understand the Deflector class we’re about to extend.

The Deflector class is the base class for all deflectors. In order to create custom deflectors, you should extend this class and override the calculateMotionData4D() method, and then return a MotionData4D object representing the 4D vector output of the deflector. The input at your disposal, just like the Field class, is included in the Particle2D object passed into the method as parameter. You may use this Particle2D object to determine your output. By the way, if this method returns a null value, the Deflect action would assume that you do not want to change the current particle’s motion, ignore the particle, and then go on to processing the next particle.

For instance, the following deflector would rotate each particle’s velocity vector by one degree clock-wise.

package {
	import idv.cjcat.stardust.twoD.geom.Vec2D;
	import idv.cjcat.stardust.twoD.particles.Particle2D;
	import idv.cjcat.stardust.twoD.deflectors.Deflector;
	import idv.cjcat.stardust.twoD.geom.MotionData4D;

	public class Rotator extends Deflector {

		override protected function calculateMotionData4D(particle:Particle2D):MotionData4D {
			var velocity:Vec2D = new Vec2D(particle.vx, particle.vy);
			velocity.rotateThis(1);
			return new MotionData4D(particle.x, particle.y, velocity.x, velocity.y);
		}
	}
}

Tube Deflector Effect

In this example, we are going to extend the Deflector class and create our own deflector, simulating a tube, which is essentially two line deflectors sandwiching a tube-shaped free space.


Step 1: Tube Deflector Effect The Emitter Class

Copy the Flash document, along with the Circle symbol, and the document from the first example. Here we are going to create another emitter class, still named CircleEmitter. This time the emitter emits particles from the center of the stage, and no gravity field is applied.

package {
	import idv.cjcat.stardust.common.actions.Age;
	import idv.cjcat.stardust.common.actions.DeathLife;
	import idv.cjcat.stardust.common.actions.ScaleCurve;
	import idv.cjcat.stardust.common.clocks.SteadyClock;
	import idv.cjcat.stardust.common.initializers.CollisionRadius;
	import idv.cjcat.stardust.common.initializers.Life;
	import idv.cjcat.stardust.common.initializers.Scale;
	import idv.cjcat.stardust.common.math.UniformRandom;
	import idv.cjcat.stardust.twoD.actions.Deflect;
	import idv.cjcat.stardust.twoD.actions.Move;
	import idv.cjcat.stardust.twoD.deflectors.Deflector;
	import idv.cjcat.stardust.twoD.emitters.Emitter2D;
	import idv.cjcat.stardust.twoD.initializers.DisplayObjectClass;
	import idv.cjcat.stardust.twoD.initializers.Position;
	import idv.cjcat.stardust.twoD.initializers.Velocity;
	import idv.cjcat.stardust.twoD.zones.LazySectorZone;
	import idv.cjcat.stardust.twoD.zones.SinglePoint;

	public class CircleEmitter extends Emitter2D {

		public function CircleEmitter() {
			super(new SteadyClock(1));

			//initializers
			addInitializer(new DisplayObjectClass(Circle));
			addInitializer(new Life(new UniformRandom(60, 10)));
			addInitializer(new Position(new SinglePoint(320, 200))); //stage center
			addInitializer(new Velocity(new LazySectorZone(8, 4)));
			addInitializer(new Scale(new UniformRandom(1, 0.4)));
			addInitializer(new CollisionRadius(10));

			//actions
			addAction(new Age());
			addAction(new DeathLife());
			addAction(new Move());
			addAction(new ScaleCurve(0, 10));
		}
	}
}

Step 2: Tube Deflector Effect The Tube Deflector

Now we are going to create our tube deflector class. Details are explained in comments.

package {
	import idv.cjcat.stardust.twoD.particles.Particle2D;
	import idv.cjcat.stardust.twoD.deflectors.Deflector;
	import idv.cjcat.stardust.twoD.geom.MotionData4D;

	public class TubeDeflector extends Deflector {

		private var y1:Number;
		private var y2:Number;

		public function TubeDeflector(y1:Number, y2:Number) {
			//y2 should be larger than y2
			if (y1 > y2) {
				//swap y1 and y2 if y1 is larger
				var temp:Number = y1;
				y1 = y2;
				y2 = temp;
			}

			this.y1 = y1;
			this.y2 = y2;
		}

		override protected function calculateMotionData4D(particle:Particle2D):MotionData4D {
			//output components, initialized to the particle's original motion data
			var x:Number = particle.x;
			var y:Number = particle.y;
			var vx:Number = particle.vx;
			var vy:Number = particle.vy;

			//caluculate actual collsion radius
			var radius:Number = particle.collisionRadius * particle.scale;

			//flag for whether the deflector takes effect
			var deflected:Boolean = false;

			if (particle.y < (y1 + radius)) {
				//particle y-coordinate is less than lower limit
				//set proper new y-coordinate
				y = y1 + radius;

				//set flag
				deflected = true;
			} else if (particle.y > (y2 - radius)) {
				//particle y-coordinate is greater than upper limit
				//set proper new y-coordinate
				y = y2 - radius;

				//set flag
				deflected = true;
			}

			if (deflected) {
				return new MotionData4D(x, y, vx, vy);
			} else {
				//ignore the particle and not update its motion data
				return null;
			}
		}
	}
}

Step 3: Tube Deflector Effect Add the Deflector

You should know what we’re going to do next very well by now. That’s right, we’re going to add the deflector to a Deflect action and then add the action to the emitter. Add the following code in the emitter constructor.

//create a tube deflector
var deflector:Deflector = new TubeDeflector(100, 300);
var deflect:Deflect = new Deflect();
deflect.addDeflector(deflector);
addAction(deflect);

Step 4: Tube Deflector Effect Test the Movie

You can now test the movie. Again, you may also draw some visual representation of the deflector on the stage for a better look.


Conclusion

This is the end of the entire tutorial. In the first part you have learned about gravitational fields. In the second part, you have learned the concept of deflectors and the actual usage of the Deflect action. Also, you’ve learned how to extend the Deflector class to create custom deflectors. Now you’re able to perform advanced particle motion manipulation in Stardust.

Thank you very much for reading!