This is the second part of this tutorial. I’m going to show you how to manipulate particle motion with deflectors.
Prior knowledge of motion basics and vector fields is required. I highly recommend that you complete the first part of this tutorial before moving on.
Final Result Preview
Take a look at the final result we will be working towards. It’s an example of a floor effect, with particles bouncing off the floor.
Deflectors
Pretty much like gravity fields, a deflector takes a particle’s current motion data as input. Afterwards, the deflector overwrites the particle’s motion with its output, only that the output now contains velocity data in addition to position data. Thus, in 2D space, a deflector’s output is a 4D vector; the first two components of the 4D vector represent the x- and y-component of the position vector (denoted x and y), respectively, and the last two components represent the x- and y-component of the velocity vector (denoted vx and vy).
How To Use Deflectors
Remember the Field class and the Gravity action from the first part of this tutorial? Well, the procedure is similar. You create Deflector objects that manipulate particle motions, and then add them to the Deflect action, just like you would add Field objects to the Gravity action. Now let’s look at a quick example.
Floor Effect
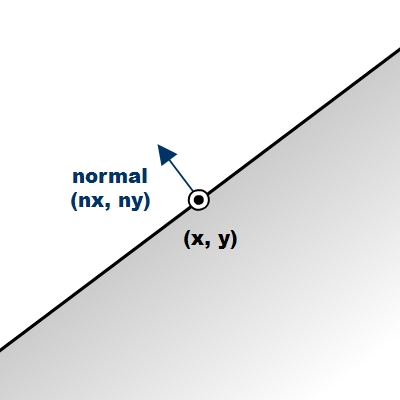
In this example, we’re going to use the LineDeflector class to create a particle-bouncing-off-floor effect. A line deflector essentially simulates an infinitely long line in 2D space, with one side being open space, and the other side solid; particles are only allowed to be in the open space and not allowed in the solid space. When particles come from the open space side, hitting the line, they’ll bounce back. The Particle.collisionRadius property, representing the radius of a particle, is taken into account.
The line deflector uses a normal vector and a point the line passes through in 2D space to determine the line. Here’s an illustration to give you a better idea.
Step 1: Floor Effect Circle Symbol
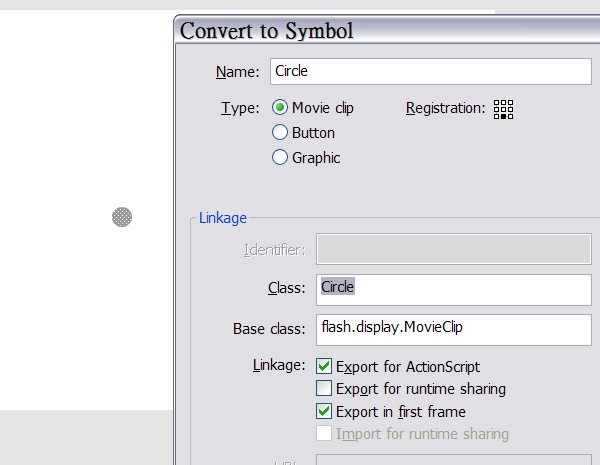
Create a new Flash document, draw a circle of radius of 10, and then convert it to a symbol, exported for ActionScript with a class name Circle.
Step 2: Floor Effect The Document Class
Create an AS file for the document class. The class creates an emitter and a renderer. If you feel like needing a refresher on Stardust’s basic usage, you may check out this tutorial.
package {
	import flash.display.Sprite;
	import flash.events.Event;
	import idv.cjcat.stardust.common.emitters.Emitter;
	import idv.cjcat.stardust.common.renderers.Renderer;
	import idv.cjcat.stardust.twoD.renderers.DisplayObjectRenderer;

	public class FloorEffect extends Sprite {

		private var emitter:Emitter;
		private var renderer:Renderer;

		public function FloorEffect() {
			emitter = new CircleEmitter();
			renderer = new DisplayObjectRenderer(this);
			renderer.addEmitter(emitter);

			addEventListener(Event.ENTER_FRAME, mainLoop);
		}

		private function mainLoop(e:Event):void {
			emitter.step();
		}
	}
}
The emitter class is shown below. It basically shoots out circle particles and the particles are affected by a uniform gravity field, pointing downward.
package {
	import idv.cjcat.stardust.common.actions.Age;
	import idv.cjcat.stardust.common.actions.DeathLife;
	import idv.cjcat.stardust.common.actions.ScaleCurve;
	import idv.cjcat.stardust.common.clocks.SteadyClock;
	import idv.cjcat.stardust.common.initializers.Life;
	import idv.cjcat.stardust.common.initializers.Scale;
	import idv.cjcat.stardust.common.math.UniformRandom;
	import idv.cjcat.stardust.twoD.actions.Gravity;
	import idv.cjcat.stardust.twoD.actions.Move;
	import idv.cjcat.stardust.twoD.emitters.Emitter2D;
	import idv.cjcat.stardust.twoD.fields.Field;
	import idv.cjcat.stardust.twoD.fields.UniformField;
	import idv.cjcat.stardust.twoD.initializers.DisplayObjectClass;
	import idv.cjcat.stardust.twoD.initializers.Position;
	import idv.cjcat.stardust.twoD.initializers.Velocity;
	import idv.cjcat.stardust.twoD.zones.LazySectorZone;
	import idv.cjcat.stardust.twoD.zones.SinglePoint;

	public class CircleEmitter extends Emitter2D {

		public function CircleEmitter() {
			super(new SteadyClock(1));

			//initializers
			addInitializer(new DisplayObjectClass(Circle));
			addInitializer(new Life(new UniformRandom(60, 10)));
			addInitializer(new Position(new SinglePoint(320, 100)));
			addInitializer(new Velocity(new LazySectorZone(8, 4)));
			addInitializer(new Scale(new UniformRandom(1, 0.4)));
			addInitializer(new CollisionRadius(10));

			//actions
			addAction(new Age());
			addAction(new DeathLife());
			addAction(new Move());
			addAction(new ScaleCurve(0, 10));

			//gravity
			var field:Field = new UniformField(0, 0.5);
			var gravity:Gravity = new Gravity();
			gravity.addField(field);
			addAction(gravity);
		}
	}
}
Now you have created an effect with particles shooting out from the center of the stage, being pulled down by gravity. This is what it looks like:
Step 3: Floor Effect Add the Deflector
Add the folloing code in the emitter constructor. It creates a line deflector, adds it to the Deflector action, and then adds the action to the emitter, thus activating the deflector effect. The first two constructor paramters for the LineDeflector class is the coordinate of a point on the line, and the last two parameters are the x- and y-components of the line’s normal vector. The Deflector.bounce property determines the “bounciness” of the line, 1 causing complete rebound, and 0 meaning no rebound at all.
//create a line deflector passing through point (320, 320) and normal (0, -1)
var deflector:Deflector = new LineDeflector(320, 320, 0, -1);
deflector.bounce = 0.6;
var deflect:Deflect = new Deflect();
deflect.addDeflector(deflector);
addAction(deflect);
You may also draw a visual representation of the line on the stage to have a better look.

Alright, we’re done with this example. Now let’s take a look of our final outcome.
Bounding Box
In this example, we’re going to use the BoundingBox deflector to constrain particles inside a rectangular area.
Step 1: Bounding Box The Emitter Class
The document class remains the same as the previous example, but we are going to change the emitter class. This is the base emitter class of this example. Compared to the emitter class in the previous example, the SteadClock is changed to a ImpulseClock to instantly create 20 particles at the beginning, the position zone is changed from a single point to a rectangular zone that matches the stage size, the Velocity initializer is slowed down a bit, the Life initializer is removed because we want particles to stay permanently on the stage, the Age and DeathLife actions are in turn not required and removed, and the ScaleCurve is also removed. Some imports are also added and removed; you may just copy the code below for convenience.
package {
	import idv.cjcat.stardust.common.clocks.ImpulseClock;
	import idv.cjcat.stardust.common.initializers.CollisionRadius;
	import idv.cjcat.stardust.common.initializers.Scale;
	import idv.cjcat.stardust.common.math.UniformRandom;
	import idv.cjcat.stardust.twoD.actions.Deflect;
	import idv.cjcat.stardust.twoD.actions.Move;
	import idv.cjcat.stardust.twoD.deflectors.BoundingBox;
	import idv.cjcat.stardust.twoD.deflectors.Deflector;
	import idv.cjcat.stardust.twoD.emitters.Emitter2D;
	import idv.cjcat.stardust.twoD.initializers.DisplayObjectClass;
	import idv.cjcat.stardust.twoD.initializers.Position;
	import idv.cjcat.stardust.twoD.initializers.Velocity;
	import idv.cjcat.stardust.twoD.zones.LazySectorZone;
	import idv.cjcat.stardust.twoD.zones.RectZone;
	import idv.cjcat.stardust.twoD.zones.SinglePoint;

	public class CircleEmitter extends Emitter2D {

		private var impulseClock:ImpulseClock;

		public function CircleEmitter() {
			super(impulseClock = new ImpulseClock(20));
			impulseClock.impulse();

			//initializers
			addInitializer(new DisplayObjectClass(Circle));
			addInitializer(new Position(new RectZone(0, 0, 640, 400)));
			addInitializer(new Velocity(new LazySectorZone(3, 2)));
			addInitializer(new Scale(new UniformRandom(1, 0.4)));
			addInitializer(new CollisionRadius(10));

			//actions
			addAction(new Move());
		}
	}
}
Step 2: Bounding Box Add the Deflector
Pretty much like the previous example, we now add the following code in the emitter constructor to use the Deflect action, only that this time we use the BoundingBox deflector to constrain particles inside a rectangular region that matches the stage size.
//deflector
var deflector:Deflector = new BoundingBox(0, 0, 640, 400);
var deflect:Deflect = new Deflect();
deflect.addDeflector(deflector);
addAction(deflect);
Step 3: Bounding Box Test the Movie
That’s it. Nothing much is changed, and now we have constrained particles in a bounding box. Test the movie and you shall see the result.
Custom Deflectors
Now, we are going to create custom deflectors on our own. Let’s first understand the Deflector class we’re about to extend.
The Deflector class is the base class for all deflectors. In order to create custom deflectors, you should extend this class and override the calculateMotionData4D() method, and then return a MotionData4D object representing the 4D vector output of the deflector. The input at your disposal, just like the Field class, is included in the Particle2D object passed into the method as parameter. You may use this Particle2D object to determine your output. By the way, if this method returns a null value, the Deflect action would assume that you do not want to change the current particle’s motion, ignore the particle, and then go on to processing the next particle.
For instance, the following deflector would rotate each particle’s velocity vector by one degree clock-wise.
package {
	import idv.cjcat.stardust.twoD.geom.Vec2D;
	import idv.cjcat.stardust.twoD.particles.Particle2D;
	import idv.cjcat.stardust.twoD.deflectors.Deflector;
	import idv.cjcat.stardust.twoD.geom.MotionData4D;

	public class Rotator extends Deflector {

		override protected function calculateMotionData4D(particle:Particle2D):MotionData4D {
			var velocity:Vec2D = new Vec2D(particle.vx, particle.vy);
			velocity.rotateThis(1);
			return new MotionData4D(particle.x, particle.y, velocity.x, velocity.y);
		}
	}
}
Tube Deflector Effect
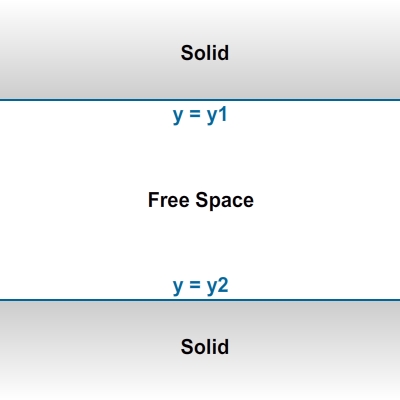
In this example, we are going to extend the Deflector class and create our own deflector, simulating a tube, which is essentially two line deflectors sandwiching a tube-shaped free space.
Step 1: Tube Deflector Effect The Emitter Class
Copy the Flash document, along with the Circle symbol, and the document from the first example. Here we are going to create another emitter class, still named CircleEmitter. This time the emitter emits particles from the center of the stage, and no gravity field is applied.
package {
	import idv.cjcat.stardust.common.actions.Age;
	import idv.cjcat.stardust.common.actions.DeathLife;
	import idv.cjcat.stardust.common.actions.ScaleCurve;
	import idv.cjcat.stardust.common.clocks.SteadyClock;
	import idv.cjcat.stardust.common.initializers.CollisionRadius;
	import idv.cjcat.stardust.common.initializers.Life;
	import idv.cjcat.stardust.common.initializers.Scale;
	import idv.cjcat.stardust.common.math.UniformRandom;
	import idv.cjcat.stardust.twoD.actions.Deflect;
	import idv.cjcat.stardust.twoD.actions.Move;
	import idv.cjcat.stardust.twoD.deflectors.Deflector;
	import idv.cjcat.stardust.twoD.emitters.Emitter2D;
	import idv.cjcat.stardust.twoD.initializers.DisplayObjectClass;
	import idv.cjcat.stardust.twoD.initializers.Position;
	import idv.cjcat.stardust.twoD.initializers.Velocity;
	import idv.cjcat.stardust.twoD.zones.LazySectorZone;
	import idv.cjcat.stardust.twoD.zones.SinglePoint;

	public class CircleEmitter extends Emitter2D {

		public function CircleEmitter() {
			super(new SteadyClock(1));

			//initializers
			addInitializer(new DisplayObjectClass(Circle));
			addInitializer(new Life(new UniformRandom(60, 10)));
			addInitializer(new Position(new SinglePoint(320, 200))); //stage center
			addInitializer(new Velocity(new LazySectorZone(8, 4)));
			addInitializer(new Scale(new UniformRandom(1, 0.4)));
			addInitializer(new CollisionRadius(10));

			//actions
			addAction(new Age());
			addAction(new DeathLife());
			addAction(new Move());
			addAction(new ScaleCurve(0, 10));
		}
	}
}
Step 2: Tube Deflector Effect The Tube Deflector
Now we are going to create our tube deflector class. Details are explained in comments.
package {
	import idv.cjcat.stardust.twoD.particles.Particle2D;
	import idv.cjcat.stardust.twoD.deflectors.Deflector;
	import idv.cjcat.stardust.twoD.geom.MotionData4D;

	public class TubeDeflector extends Deflector {

		private var y1:Number;
		private var y2:Number;

		public function TubeDeflector(y1:Number, y2:Number) {
			//y2 should be larger than y2
			if (y1 > y2) {
				//swap y1 and y2 if y1 is larger
				var temp:Number = y1;
				y1 = y2;
				y2 = temp;
			}

			this.y1 = y1;
			this.y2 = y2;
		}

		override protected function calculateMotionData4D(particle:Particle2D):MotionData4D {
			//output components, initialized to the particle's original motion data
			var x:Number = particle.x;
			var y:Number = particle.y;
			var vx:Number = particle.vx;
			var vy:Number = particle.vy;

			//caluculate actual collsion radius
			var radius:Number = particle.collisionRadius * particle.scale;

			//flag for whether the deflector takes effect
			var deflected:Boolean = false;

			if (particle.y < (y1 + radius)) {
				//particle y-coordinate is less than lower limit
				//set proper new y-coordinate
				y = y1 + radius;

				//set flag
				deflected = true;
			} else if (particle.y > (y2 - radius)) {
				//particle y-coordinate is greater than upper limit
				//set proper new y-coordinate
				y = y2 - radius;

				//set flag
				deflected = true;
			}

			if (deflected) {
				return new MotionData4D(x, y, vx, vy);
			} else {
				//ignore the particle and not update its motion data
				return null;
			}
		}
	}
}
Step 3: Tube Deflector Effect Add the Deflector
You should know what we’re going to do next very well by now. That’s right, we’re going to add the deflector to a Deflect action and then add the action to the emitter. Add the following code in the emitter constructor.
//create a tube deflector
var deflector:Deflector = new TubeDeflector(100, 300);
var deflect:Deflect = new Deflect();
deflect.addDeflector(deflector);
addAction(deflect);
Step 4: Tube Deflector Effect Test the Movie
You can now test the movie. Again, you may also draw some visual representation of the deflector on the stage for a better look.
Conclusion
This is the end of the entire tutorial. In the first part you have learned about gravitational fields. In the second part, you have learned the concept of deflectors and the actual usage of the Deflect action. Also, you’ve learned how to extend the Deflector class to create custom deflectors. Now you’re able to perform advanced particle motion manipulation in Stardust.
Thank you very much for reading!