Internet Etiquette for Vacationers

My boyfriend Shane and I recently went on vacation with my parents. It was a laid-back camping trip in Quebec, Canada.  We were 20 minutes outside of Quebec City, rife with campfires and Scrabble matches.

Incidentally, Shane doesn’t go anywhere without his MacBook and iPhone, and a family vacation was no exception to the rule–no matter what my parents thought.

Shane and I both work in the media and are constantly online. I use Twitter at weddings and business functions and Shane is forever updating his Facebook page and looking out for the coolest new app for his iPhone—be it a new game or barcode scanner.

My parents don’t get this. They don’t have Facebook pages and don’t understand the need (though my mother loves looking over the shoulder at mine). I usually go to bed before Shane does, and more than once I have woken up in the wee hours of the morning, turned towards Shane, and found him holding his iPhone inches from his face and furiously poking the screen with his finger playing a game.

While I am used to unplugging on vacations with my family, Shane is not. While my mother and I worked on knitting hats around the campfire and my dad set up for making s’mores, Shane was reading the news using the campground’s wifi. My father was stunned and, I think, a little put out. Instead of enjoying the picturesque surroundings, Shane was engrossed in something on his computer screen.

When we got home and I was alone with my dad he complained about Shane’s constant Internet use.

“He’s addicted,” my dad said. “Completely addicted.”

The more I listened to my dad the more I began to agree with him. Instead of enjoying the gorgeous countryside of Ile d’Orleans where we were staying, he was reading CNN on his iPhone. It was only when Shane was driving did he notice the world around him. And that’s no way to spend a glorious week on a quaint island on the St. John River.

Honestly, I had never thought about Internet etiquette before my dad complained about Shane’s behavior. But I saw his point. If my parents didn’t know him better, they could have taken Shane’s actions to mean that he wasn’t interested in spending time with them or that their company was boring. Luckily, they do know Shane well and didn’t feel disrespected.

Prompted by my dad’s comments I began to think about the “dos and don’ts” of Internet use while on vacation with others. Here is a list of my tips for vacationers who have a hard time unplugging around other people.

Mimic the actions of others.

Are the people you’re on vacation with playing a board game? Preparing dinner? Pitching horseshoes? Cross country skiing? Join in. If your friends and family are sitting around talking or taking part in some activity, you can instantly alienate yourself by opening up your laptop and tuning out. However, if other people are surfing the web, reading a book, or taking a nap, feel free to get online.

Check to make sure wifi access is free.

If someone else is footing the bill for your vacation (thanks Mom and Dad) and you’re using wifi—best to make sure there aren’t any hidden charges. And if it’s not free, and you use it, make sure you cover the costs.

Don’t hog your computer.

If you’re going to open Pandora’s Box, you should be willing to share it with others. It’s only fair – and makes you look like less of a schmuck.

Be aware of others.

Pay attention. If you sense that someone is offended or annoyed with your incessant Internet use, do the right thing and put your computer away—especially if you want to make a good impression.

Don’t make people wait.

If you’re reading ESPN and everyone is heading out the door for dinner, don’t make them wait for you.

Don’t forget—you ARE supposed to be on vacation.

If you expect to get a lot of emails while you are gone, put an away message on your email service to let people know who email you that you are away from the office. If you can’t go a whole day without reading the news, get on your computer first thing in the morning or right before you go to bed as those are probably the easiest times to avoid other people.

I could tell that Shane’s behavior was upsetting my parents. And since they were footing the bill for most of our vacation, it would have been nice if Shane had caught the signs and acted accordingly. But no one is perfect and not everyone can catch my father’s oozing subtleness. So pay attention to the people you’re with. Not everyone is as plugged in as you are. For some of them, a vacation means a break from the everyday—including the World Wide Web.

Quick Tip: Capturing Fast-Moving Kids!

What’s the one subject that seems to be constantly moving, jumping, talking and playing? Children may be cute, full of smiles, and incredibly photogenic, but they are also a tricky subject to capture. Today we’re offering a few tips for photographing kids!


Don’t Tell Them!

While this point may seem a little odd to many of us, it’s great advice to follow. The best way to shoot kids is to not letting them know that they are being photographed. Generally this evokes one of three emotions: fear, excitement, or fascination. Any of these will detract from a natural pose!


Always Focus In Advance

Shooting kids can be a nightmare if you don’t take the time to focus your camera before pressing the shutter. Start looking through the viewfinder, and hold the shutter halfway down to focus on the little nipper in question.

Now, it’s just a case of waiting for the perfect pose, glance, or giggle – when your kid pulls off a classic pose, press the shutter the rest of the way and you’ll catch the action with no delay.


To Shoot Kids, Become a Kid!

To shoot kids, you need to get down on their level! Kneel down to their level, hold them, look at them, play with them and make them feel comfortable. Being a kid will always leave you with far better shots than acting like a rigid photographer. Plus, it’s nice to be a kid again from time to time!


Have a Fast Shutter Speed

Children move fast! One second they’re in front of your lens, and the next they’re gone. There are various ways to combat this, but the most useful is to stick with a fast shutter speed. If your camera has a sports mode, try that.

If it’s dark, you may need to increase your ISO in order to maintain a shutter speed that is fast enough to stop your kids in the middle of the action. For a full explanation of how these relate to one another, check out our Ultimate Beginner’s Introduction to Exposure.


Don’t Expect Kids to Pose

Photo credits

Children are not models. Neither do they know what photography means, nor the importance of your camera gear. They are just kids, so don’t expect them to leave their favourite toy for a perfect pose!

Kids never care about what is going out around them, because they are always lost in their own sweet world. Make the most of this, and try to capture their wonder and fascination with what we consider to be the incredibly mundane.


Take a Lot of Photographs!

Make it a habit. If you are photographing your child, make sure you take a lot more photographs than you would in any other photo shoot. From personal experience, you will find only a fraction of the shots you took are the really memorable ones. Play the game of odds to snap photos you’ll really treasure.

Doodle Jump gets a Retina Display update

Doodle Jump has released a free update, available now, that not only brings out that underwater content that Igor Pusenjak promised us in that interview a little while back, but also updates the graphics on the app to take full advantage of the iPhone 4‘s Retina Display, so you can see the little doodle jumping up those platforms clearer and sharper than ever. Only three stages have been updated with Retina Display graphics so far, but Pusenjak says that “the rest of the Retina Display graphics is almost done and we’ll be releasing it soon!” The update is of course free for the game’s owners, or you can pick up the “Insanely Addictive” title for just 99 cents.

Pusenjak also told us
that after the water-related content was done and out, the iPad version of the app would be next up for development, so we’ll keep an eye out for news on that soon. Good to see that just because this little game is so popular, its developers aren’t taking success lying down.

TUAWDoodle Jump gets a Retina Display update originally appeared on The Unofficial Apple Weblog (TUAW) on Sat, 21 Aug 2010 09:00:00 EST. Please see our terms for use of feeds.

Read | Permalink | Email this | Comments

Prizmo is a pretty amazing iPhone app for OCR and more

There are a few apps that are great demos for the iPhone. Pulse News is a super RSS feed reader, iMovie always drops a few jaws, and Siri is a pretty amazing way to talk to your iPhone and get intelligent search results.

You can add Prizmo to the list of great demo apps, and it’s going to be a very useful app for a lot of people. Prizmo combines OCR (Optical Character Recognition), text to speech, and translation all in one place.

Prizmo, which sells for US $9.99, can scan business cards, books, white boards, or even receipts. It can output the text to the clipboard or email, and can even take a receipt and put it into a spreadsheet format.

If that isn’t enough, Prizmo can read the text to you with the addition of an optional text to speech module. There are 35 voices you can choose from, in ten languages. Each module is $2.99.

Gallery: Prizmo OCR app

TUAWPrizmo is a pretty amazing iPhone app for OCR and more originally appeared on The Unofficial Apple Weblog (TUAW) on Sat, 21 Aug 2010 11:00:00 EST. Please see our terms for use of feeds.

Read | Permalink | Email this | Comments

Steve Jobs: ‘Software update coming soon’ for iOS 4 on iPhone 3G

One of the many beleaguered iPhone 3G owners who’ve been suffering through poor performance after updating to iOS 4 e-mailed Steve Jobs to ask when Apple will offer a solution. Jobs’s response was brief enough for us to fit the whole thing in our headline: “Software update coming soon.”

The real question here is, how soon is “soon?” Apple has been “looking into” fixing iOS 4 for iPhone 3G owners for nearly a month now. While the issues are not universal, many iPhone 3G owners have reported extreme sluggishness and crashiness that renders an iPhone 3G almost unusable after updating to iOS 4 — and the problem’s widespread enough that parody videos have been making the rounds on YouTube for months. While there have been numerous solutions offered from troubleshooters (disabling Spotlight seems to be a popular choice), these solutions haven’t worked for everyone. Although there are methods to roll an iPhone 3G’s firmware back to OS 3, the fact that Apple doesn’t officially support these methods has kept many users from taking the plunge.
Speaking from personal experience, none of the 4.1 betas restored my iPhone 3G to a pre-iOS 4 level of performance. On the other hand, after giving my wife the iPhone 3G and setting it up as a new phone (rather than restoring from backup), she hasn’t seen nearly the same level of problems I suffered through.
At the very least, the fact that Apple’s CEO has acknowledged the problem at all should come as a good sign for iPhone 3G owners. Let’s just hope that “soon” really does mean soon.
TUAWSteve Jobs: ‘Software update coming soon’ for iOS 4 on iPhone 3G originally appeared on The Unofficial Apple Weblog (TUAW) on Sat, 21 Aug 2010 07:00:00 EST. Please see our terms for use of feeds.

Read | Permalink | Email this | Comments

18 Awesome Gadgets For A Video Production Specialist To Have

    We are always ever expanding our toolbox. Whether it be with camera equipment, VFX gear, or gadgets to make our post workflow more efficient and endurable, I have found some of my favorite pieces of equipment from my own arsenal, as well as from my wishlist that you should definitely check out and consider adding to your collection.


    • Fisheye, Macro, and Wide Angel Camera Phone Lenses

      If you are on location, you have probably noticed that if you want to take a picture of a sweet setting, some details on paper, or just really wanna screw around with taking pictures in between lighting setups, this might just be the set of camera lenses for you phone you were looking for.

      Visit Website

    • Tandem USB Connector

      You can connect so many different USB devices, it would be a shame to limit yourself to just the amount that you have available in your hubs and available slots. The USB Lineup lets you plug in a device, and then continue plug in devices behind that… indefinitely!

      Visit Website

    • Nvidia Quado FX Series Video Cards

      The Quadro FX series of cards have been specifically designed and calibrated to work in tune with the Adobe suite of products, including After Effects and Premiere Pro CS5. The boast a load of onboard video RAM, CUDA architecture and are just plain screaming cards.

      Visit Website

    • Alienware and NEC’s 42-Inch Wide Monitor Concepts

      Although these are still concepts and not available on the market yet… they are pretty amazing, and I gotta say, once they set a price, these things are going to be amazing for editing on.

      Visit Website

    • Griffin Powermate

      This is a pretty sweet little gadget. You can assign this little dial to do whatever you want, from being a plain old volume knob to being a shuttle for your NLE and anything in between… the possibilities are endless!

      Visit Website

    • Wacom Cintiq Tablet

      Wacom tablets have been around for a while, but not many people know about the Wacom Cintiq. I don’t use one regularly, but trying them out at NAB in April made me want to change my workflow. Things like roto, paint, photoshopping and general tasks seem so much easier, especially when with this one, you draw right on the screen!

      Visit Website Visit Youtube Demo

    • My Suite Stuff’s AE Pillow

      How could we not include My Suite Stuff in this roundup? Sadly, they are down for renovations, but never fear… they should be up soon enough for you to fill your snuggling needs with your favorite app icon pillow formations!

      Visit Website

    • Go Pro Camera

      The Go Pro is by far one of the most versatile sports cameras I have ever used, and been able to handle. Shockproof, waterproof, 1080p, mountable to just about anything… and its super cheap! Such a great little tool to have around just in case!

      Visit Website

    • TruePower U Socket Wall Outlet

      If I could, I would replace every outlet in my house with these. This is absolutely brilliant, and in ten years I think every outlet will have this in them. Imagine charging all your USB capable devices from anywhere in the house… without a computer!

      Visit Website

    • Camtrol

      This is a great product for anyone that has a video camera… handycams to DSLR filmmakers can benefit from this insanely customizable stabilization system. It has handle gribs, full gimbal positioning options, and if you have a handycam type of camera, there is a remote for start/stopping recording!

      Visit Website

    • Nasty Clamps

      This thing has saved my butt more times than I can imagine. I forget my tripod, or it won’t fit into the space where I want, all I do is attach my camera to the thread at the end of the Nasty Clamp, clamp it to an object and BAM! Shot assembled!

      Visit Website

    • CableDrop Cable Clips

      Such a simple idea, yet so effective! Being a video professional, it is inevitable that we are to have an incessant amount of cables around us at all times… and the most aggravating thing is when they fall behind the desk. What to do? Well, here is the answer.

      Visit Website

    • eSATA Drive Dock

      … or the toaster as I like to call mine, is an amazing tool, especially if you work on a lot of projects, where you end up just buying a hard drive for that specific client. You can keep all your drives organized by job and just pop them in when you need to work on that specific project! Works via USB.

      Visit Website

    • Tracking Markers

      These can almost be free, just make sure you have a good set of them on hand if you ever need them. You could be out on shoot, need to lay them on the ground, stick against a wall, or whatever, they will make your matchmoving, tracking or planar tracking worlds easier, especially if they are easy to roto out.

      Visit Website

    • A Nice, High Capacity Flash Drive

      Any flash drive will really do, but this one over at ThinkGeek.com is pretty tiny, and can go up to 32GB. Reason you want to always have this on hand, is if someone wants to hand you over some clips, transfer data from a laptop, or generally give you any kind of piece of the production at hand, you have a little piece of storage that will work on almost ANY computer.

      Visit Website

    • Some Kind of Slate App

      You are more than likely using a smartphone by now, and if you are… you should try to pick up a Slate app for a couple bucks. It will help immensely on shoots where you need to sync multiple cameras, audio, keep track of takes and audio files, settings on the camera an whatnot. Linked here is the DSLR Slate iPhone/iPad app, but there are many more for other platforms.

      Visit Website

    • Mountain Dew

      For those long editing nights where you have to go over revisions upon revisions… what’s the one thing you want by your side? A couple of liters of some of your favorite sugary soda beverage. Nothing gets me through a rigorous night like a good old fashioned sugar high.

      Visit Website

    • Sad Keanu Cutout

      Last, but definitely not least, you need to have yourself a Sad Keanu Reeves cutout to keep you company and sit upon your monitor like a throne. Just remember on those cold, lonely editing nights, there is someone always there with you.

      Visit Website

    • If you enjoyed this post, please give it a vote on Digg or a stumble to say thanks!


Imitate Guitar Techniques With MIDI Part 2 – Glissando (3-4 Semitones)

Sampling, virtual instruments and MIDI keyboards give a lot of sonic options to today’s music producer. But it’s not always easy to reproduce the important nuances of musical instruments. Reproducing a lead guitar sound can be especially problematic – especially when it comes to string bending and sliding. In this tutorial, Oleg Berg continues his series of the best techniques to achieve those sounds.

Last time in Part 1 we spoke about the smallest glissando range – two semitones. Today, in Part 2, let’s discuss another range of sliding – glissando for 3-4 semitones. We’ll talk about it separately because some steps in this process are significantly different to those of a smaller glissando range. While certain actions are similar, I’ll describe the differences in detail.

Here are the examples sounds we showed you last week. As you work through this series with me, you’ll learn to produce these sounds too.

Download audio file (example-1.mp3)
Download audio file (example-2.mp3)

Well, are you ready? Let’s start!

Note: This tutorial is good for any MIDI editor you use. I tried to make it as universal as possible, mentioning the commands, controllers, and window names of most programs – they may differ by name, but their functions are similar. I also explain the distinctions of programs with alternative system of numeric values. This makes the tutorial longer – but this way you can use it for your preferred MIDI editor. That is why you’ll sometimes find screenshots from several programs at one step. Enjoy!

Step 1

Let’s start by playing a separate note for every fret the guitarist’s finger reaches when sliding. Our glissando will be 3-4 semitones (4-5 notes). The sound we get is not quite realistic, and that’s what we’ll be correcting later. Don’t forget to save the the initial file – we’ll to refer to the copy later in order to know time of “Note On” events.

Download audio file (2-1.mp3)

Step 2

In the previous tutorial when we spoke about 2-semitone sliding, the main note had pitchbend = 0. Pitch margin (Pitch Wheel Range = 2) was enough for us to shift the pitch we hear up or down two semitones while the note sounds.

Now when we want to shift the pitch four semitones up (for example, G-G#-A-A#-B), we’ll have to use the entire range of the pitchbend parameter in the Piano Roll window, from -8192 to +8191.

In the beginning (when the parameter value is -8192, which is 2 semitones lower) the note’s sound corresponds the note G. Similarly in the end, when value is +8191, 2 semitones higher, the sound must correspond the note B. In this case the main note will be A – all other notes’ pitches will be changed to correspond the pitch of this one.

Therefore, change the pitch of all notes to correspond the main note pitch (in our example – A). By the way I would not recommend you to listen to the results of this in between process – the sound on this stage is far from what we want to hear.

Step 3

Now we’ll combine the notes whose pitch was changed with the main target note. We’ll use the Glue or Merge Tool for it – this way we avoid the sound effect of guitar string pluck – we need this effect for the first note only.

The pluck comes from the contact of finger and string, so we need it only at the beginning of our fragment. Other notes come from changing the length of string, so we combine the notes as if the sound was extracted only once in the very beginning.

Step 4

Make sure that on the VST instrument or sampler you use the value of Pitch Wheel Range = 2, which means that maximum shift of the pitch wheel will result in changing note pitch to 2 semitones. Most (but, unfortunately, not all) instruments allow to adjust Pitch Wheel Range (look at the images below). Many VST Instruments (samplers) make the value we need (2) a default setting.

I explained this process in Part 1, but I want to remind you again. If you for some reason couldn’t find a way to change the Pitch Wheel Range, you can try another method. Select your guitar track and open the List Editor window (Event List). At the beginning of the track, enter 3 lines as in the image below (other columns – event time and MIDI channel number – may be different, of course).

There should be three controllers (not simultaneous, but one by one in small period of time) with numbers accordingly 100 (value = 0), 101 (value = 0), and number 6. The value of the last controller manages Pitch Wheel Range, in our case it has to be 2.

If you are lucky enough and your instrument supports specification General MIDI, it will recognize this message, “read” it, and the result will be our Pitch Wheel Range = 2. Of course, these messages should come before the notes to appear on the track. All these actions are possible for any pitch wheel range, for instance equaling 12 (an octave). However, the smaller the scale – the more precision for every graph. So, I recommend to choose PW range = 2.

Step 5

We repeat the fifth step from Part 1. In the Piano Roll window, at the left part for graphic editing, select Pitchbend (Pitch Wheel) from the dropdown list. This is the controller we need to help us change the pitch of note. Here is how it looks in different MIDI editors.

This tool will allow us to “create” new notes when there are actually no new notes, while the previous note is playing. Changing its pitch bend value will lead to increasing or reducing the pitch, as if the finger is moving to a different fret.

Step 6

This is the most important part of our process. We need to the draw points in the graphics editing section to assign the needed pitch to every fragment.

Remember that, for the horizontal axis, the points must precisely match the beginning (“Note On”) of 4-5 notes taking part in glissando. The vertical axis shows the value of Pitchbend controller for every point (note). The main target note of the glissando fragment will have the Pitchbend Value = 0.

If we are sliding for four semitones, then we have five notes in our glissando – one at the beginning, and one for every glissando semitone. In this case, the main target note is the one lying in the middle of the range – the third one. Here the middle note is A – the one exactly in the middle between G and B.

The glissando range we want is three semitones. There are four notes in total – for example B-C-C#-D – like in the second glissando fragment in our example.

There are no strict rules here. You can choose either of two middle notes – C or C#. The difference between these two choices lies in pitch bend values we assign to points on the graph.

Step 7

Continue drawing points on the graph, corresponding to the notes in our glissando fragment. In the previous tutorial, when we spoke about a short 2-semitone glissando, we had just one middle note. Now we have two or three notes in the middle, depending on the sliding range we choose – three or four semitones respectively.

Remember, the horizontal x-axis coordinates of our points should correspond the beginning of the notes – here we can refer to a saved copy of our fragment we made in Step 1 to know the time values (“Note On”). Unlike Part 1, here the last note in the glissando will not have zero value, as the main note in this case will be in the middle of fragment.

If you want the correct numbers:

  • The pitchbend values for the fragment containing a glissando for four semitones (G-G#-A-A#-B) will be -8192, -4096, 0, +4096, +8191, with A as a main note with zero-value.
  • For a 3-semitone glissando (B-C-C#-D) values can differ according to the main note with zero-value we choose.
  • If we select second note as main one (C), pitchbend values for the fragment will be: -4096, 0, 4096, 8191.
  • If we choose the third note as main one (C#), the values for all 4 notes will be -8192, -4096, 0, 4096.

    Step 8

    While drawing the points in our last two steps, you may have had no difficulties in choosing maximum or minimum values (-8192 or +8191) and the zero controller value. However, when you draw points for semitone value (±4096), you may face some problems. I have already discussed this in the Part 1 of the tutorial.

    Don’t worry if you have trouble precisely positioning the points. In reality, when a guitarist slides, an additional increase or decrease in string tension is inevitable – the surface of a fret board isn’t perfect.

    But, if you are a perfectionist and you like everything precise, you still can assign the absolutely exact numeric value. Refer to the instructions and screenshots in Part 1, Step 9.

    Step 9

    Now we repeat this for the remaining fragments. The last example includes four such fragments – two up for 3 and 4 semitones, and two down for 3 and 4 semitones. For each of them make the similar graphic work using techniques described above. In cases when we need inverse glissando direction, simply change positive pitchbend values for negative, and vice versa.

    Step 10

    This step is for those who want an even more realistic result.

    When we imitate a slide longer than three semitones (as in the following example) the length of time the main note increases. The longer the glissando, the stronger the imitation of the natural fading of string vibration amplitude.

    When the guitarist moves his finger on the guitar neck pressing a string, the string receives small portions of energy whenever he reaches the next fret (especially when sliding up). The string rings longer than it normally would.

    In our case, the instrument does not care if its pitchbend value changes (or the value of any other controller, except those that alter volume). The sound fades naturally.

    Still we can imitate the energy portions on every new fret we just spoke about. With every increase in pitch we just add our sound a little volume. For this we need to choose the expression controller (Controller #11). Let’s set this controller as a second one in the list of main parameters in the bottom part of the Piano Roll window on the left. All MIDI editors allow to do this.

    Now we can draw the volume increments, considering that the points where the pitch and volume increase must match. You can also copy the graph of pitch change and paste it in a new “expression” window. However, the vertical values of these points are up to you – here you’ll need to experiment using your experience and preferences.

    Download audio file (2-2.mp3)

    However, your sound might act differently when it is a semitone higher – it may sound like it’s louder as well. (Some sounds become brighter with a pitch increase.)

    In this case we need to reduce the note volume every time we increase its pitch. In every particular case, depending on physical parameters of instrument you use, you need to decide if an adjustment of the expression parameter is necessary, and whether it needs to be increased or decreased. Your taste and ears will help you make the right choice.

    Conclusion

    Well, that is all for today! We learned how to imitate a realistic guitar sliding technique with MIDI keyboards in any MIDI editor for range of 3-4 semitones.

    Combining these techniques to imitate sliding, bending, whammy bar and plucking – combined with virtual adjustment tools – can give your virtual guitar track some unbelievable realism. When used wisely, it can sound just as realistic as live guitar playing, and the listener won’t hear the difference. I’ve used this method thousand times and always heard many compliments to my guitarist =).

    Next time we’ll discuss the widest range of sliding – an octave. I hope I gave you some useful tips and you’ve enjoyed it. Use it to create your own live guitar tracks with MIDI editor.


Workshop #110: Time Traveler by Lelio Padovani

At Audiotuts+ we regularly put up a reader track for workshopping and critique (find out how to submit a track). This is how it works: you upload your song, and every week or so we’ll publish one here and step away from the podium. The floor is yours to talk about the track and how the artist can fix problems in and improve upon the mix and the song.

This track has been submitted for your friendly, constructive criticism. They have put their track (and their heart and soul) in your hands to learn and get useful feedback.

  • Do you enjoy the song or track itself? Does it have potential?
  • Can the arrangement be improved?
  • How did you find the mix? What would you do differently?
  • What do you enjoy about the rhythm track? What can be done to improve it?
  • Is the choice of instruments relevant and effective for the style/song?
  • Are the lyrics (if any) effective? Does the style, arrangement and genre of the song suit them?
  • Can you suggest any specific techniques that might improve the track?
  • Do you have any other constructive feedback?

Time Traveler by Lelio Padovani

Artist’s website: myspace.com/leliopadovani1

Description of the track:

Opening instrumental song from soundtrack of thriller movie “Il Solitario”, done at home on a MacBook Pro and little else. Any tips and suggestions welcomed…

Download audio file (Lelio_Padovani_Time_Traveler.mp3)

Terms of Use: Users can stream the track for the purposes of giving feedback but cannot download or redistribute it.

Have a listen to the track and offer your constructive criticism for this Workshop in the comments section.


Submit Your Tracks for Workshopping

Need constructive criticism on your own tracks? Submit them using this form.


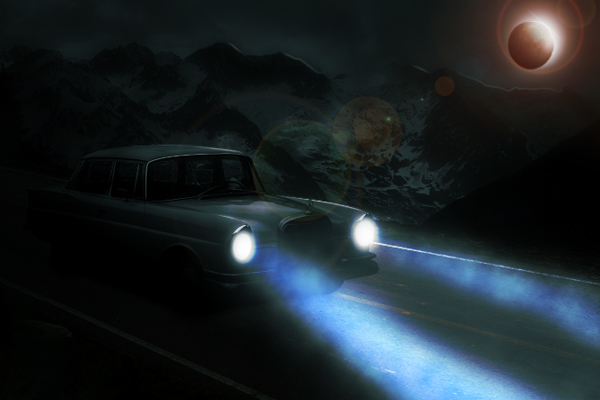
Create a Moonlit Night Scene in Photoshop


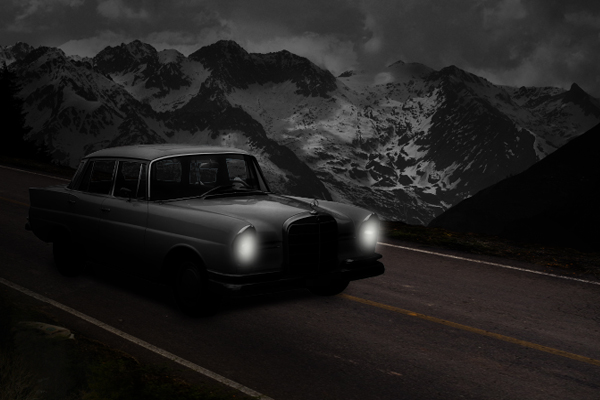
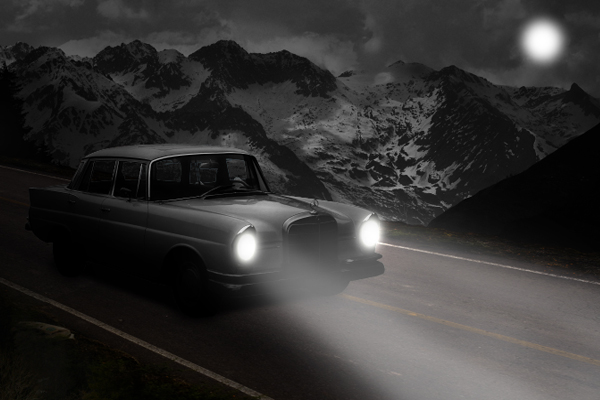
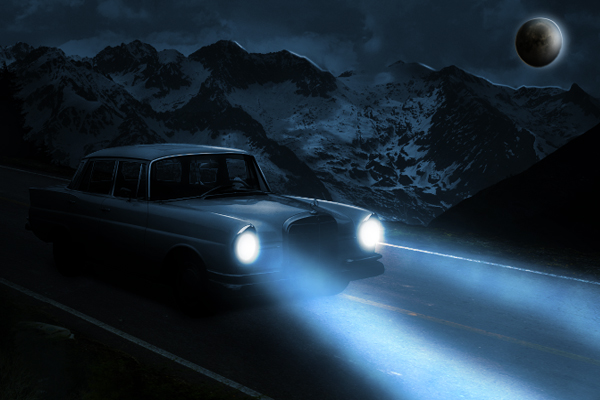
Photoshop is an excellent tool to combine several photos into one seamless image. In today’s tutorial we will use different tools and techniques to create an abandoned automobile in a moonlit night scene in Photoshop. Let’s get started!


Resources Used

You can download the following images from the links below. Just sign up for free to download the image.


Step 1

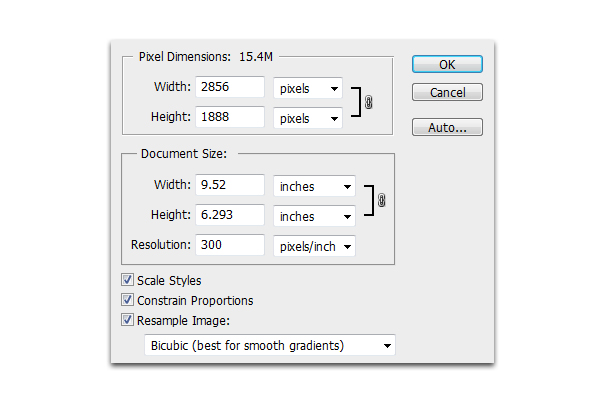
Create a new document 2856 x 1888 px in 300 dpi.


Step 2

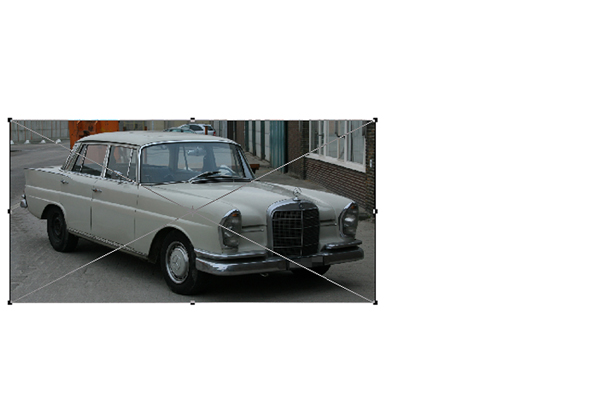
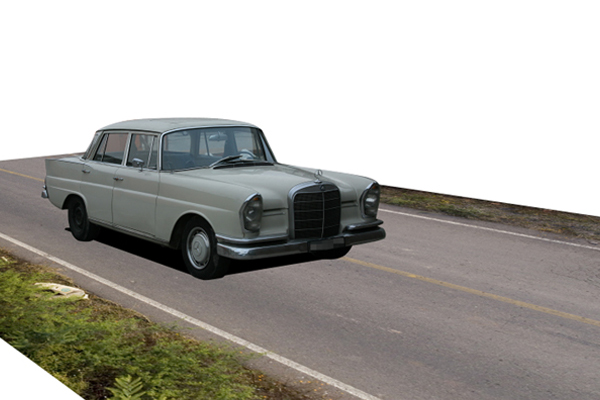
Next open Car.jpg and resize it by pressing Cmd/Ctrl + T. Place the car on the left portion of your canvass as shown.


Step 3

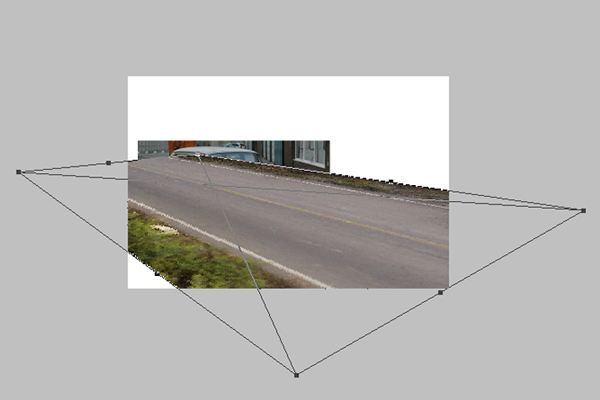
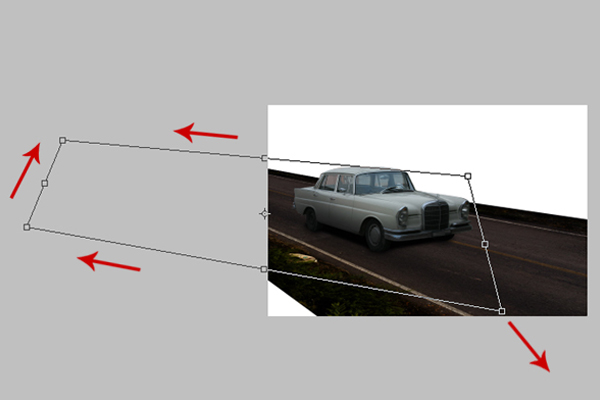
Open Road.jpg, then press Cmd/Ctrl + T. Once the resizing handles have been activated, right-click and choose Free Transform from the dropdown menu.


Step 4

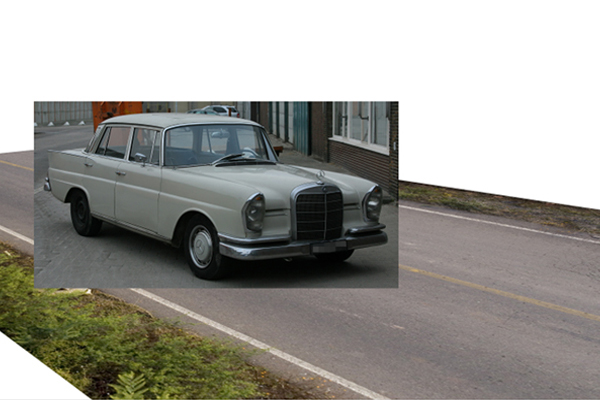
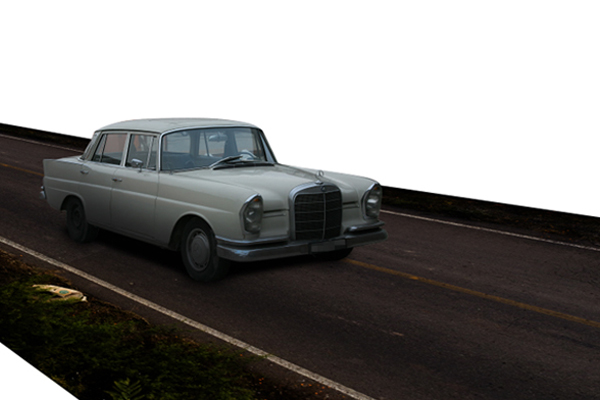
After that, make sure to place the Road.jpg’s layer below the Car.jpg as shown below. Make sure that the car’s perspective matches that of the road and vice-versa. Use the resizing handles, Cmd/Ctrl+T, just in case you still need to adjust the images.


Step 5

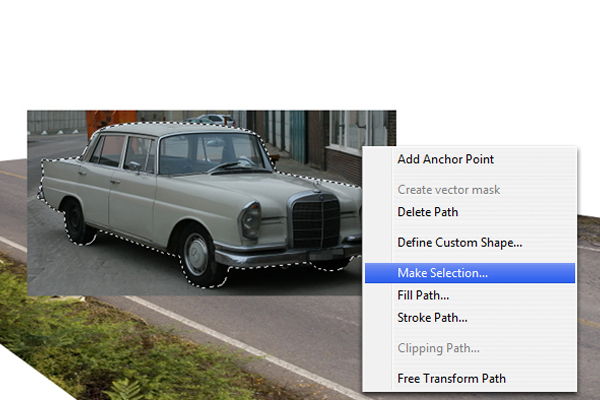
Next, use the Pen tool (P) to trace all the way around the car. Then, right-click and select Make Selection from the dropdown menu. Next, hold Cmd/Ctrl + Shift + I to inverse the selection, then hit delete.


Step 6

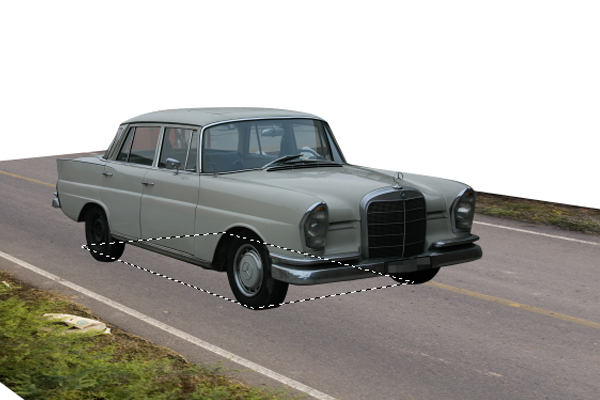
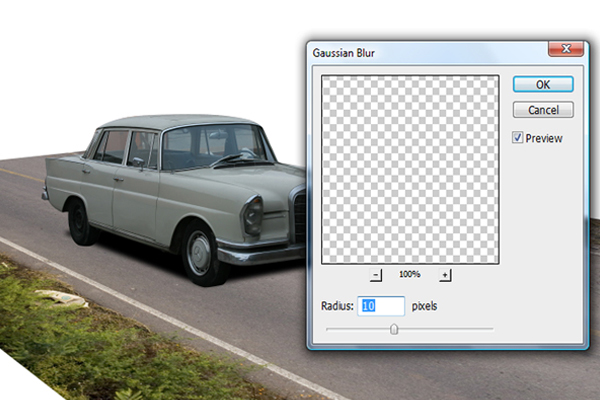
Next, create a new layer above Road.jpg layer and name it "Primary Shadow." Using the Pen tool (P), make a rectangular shape in line with the perspective of the road as shown. This will serve the primary shadow of the car.


Step 7

After that, go to Filter > Blur > Gaussian Blur and apply the settings as shown below for the "Primary Shadow."


Step 8

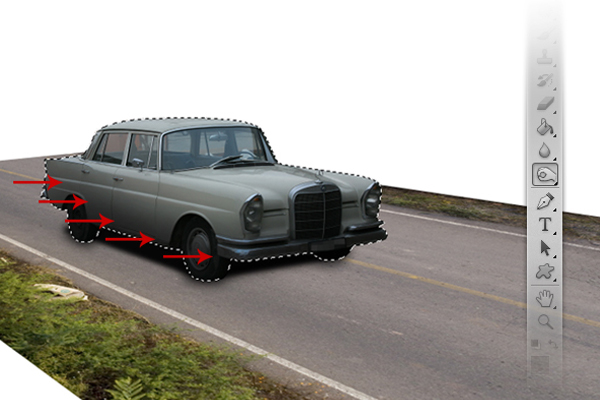
Next, select the Brush tool (B) with a size of 60 px, a Hardness of 20% and color #000000, brush the areas indicated below.


Step 9

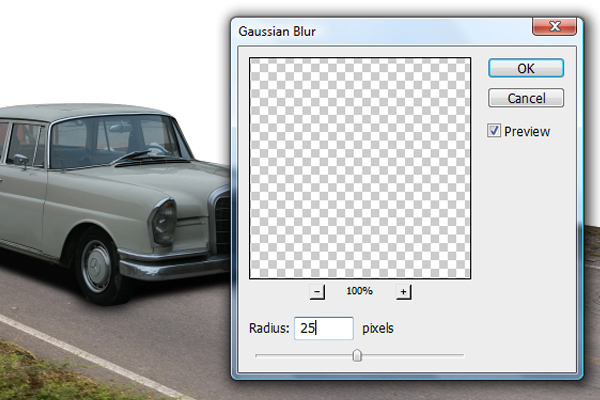
Next go to Filter > Blur > Gaussian Blur and change its radius setting to 25px.


Step 10

Use the Burn tool (O) to burn the indicated areas of the car using a mid-sized brush with a low level of hardness.


Step 11

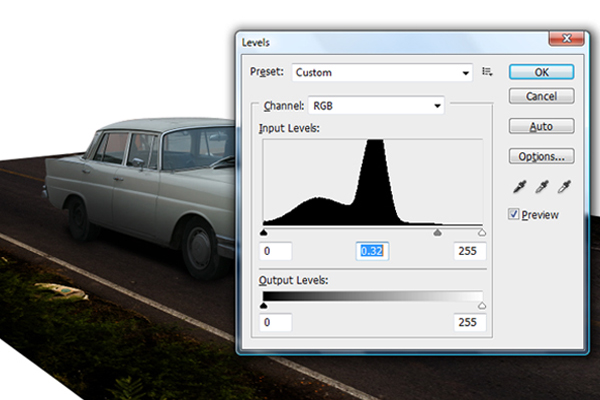
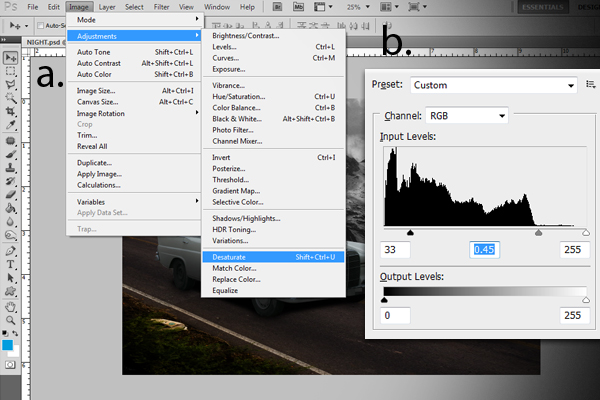
Next, let’s darken Road.jpg to match the darkness of the car . To do this, hold Cmd/Ctrl + L to activate the Levels window. In the Levels window, input the values indicated below.


Step 12

The next step would be to extend the road further backward. To do this, first duplicate Road.jpg by pressing Cmd/Ctrl + J in the Road.jpg’s layer. Next, press Cmd/Ctrl + T to activate the resizing handles. Once activated, right-click and select Free Transform from the dropdown menu. Adjust the road to fit to the perspective of the first road.


Step 13

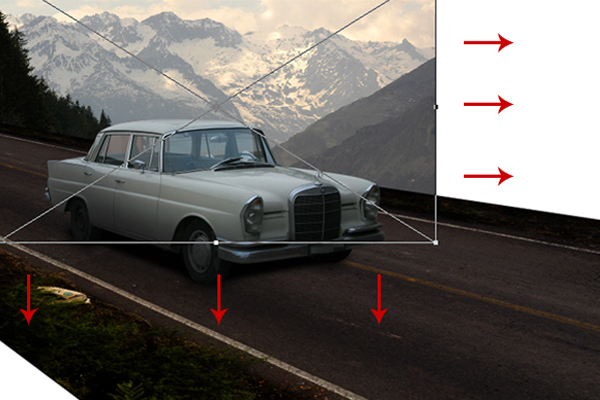
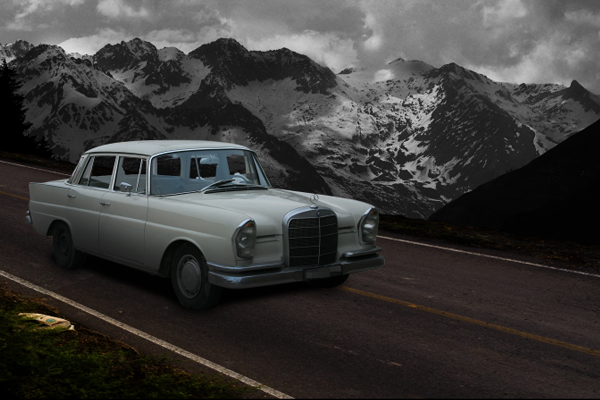
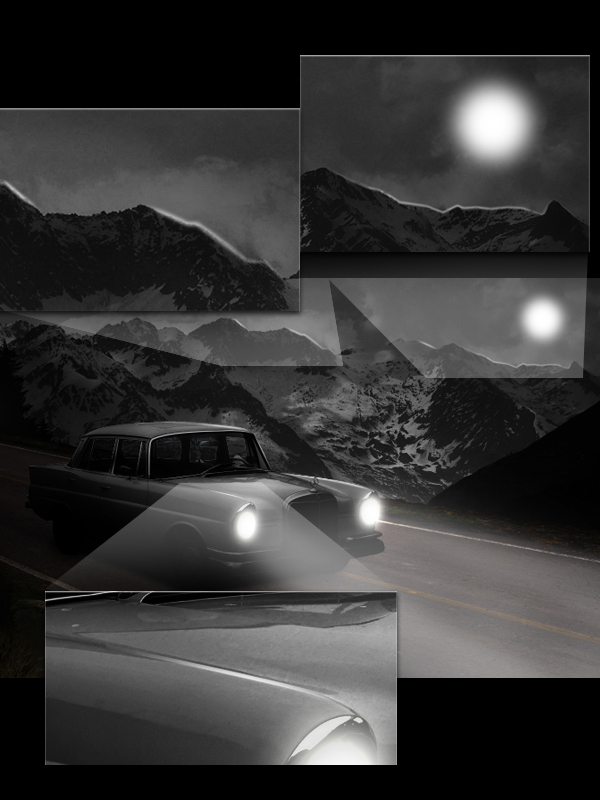
Now let’s add a background. First, open Mountain.jpg and place it below Road.jpg. Press Cmd/Ctrl + T to activate the resizing handles. Once activated, resize the image as shown below. After resizing, go to Image > Adjustments > Desaturate.


Step 14

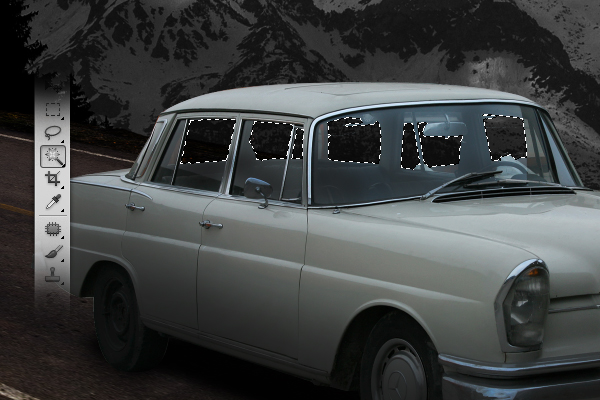
Use the Magic Wand tool (W) to select the areas shown below then hit delete.


Step 15

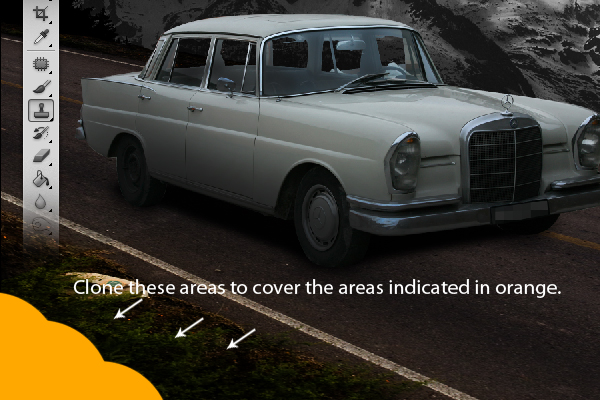
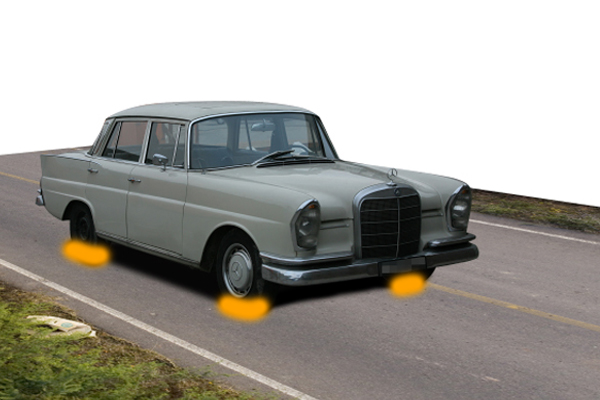
Next, use the Clone Stamp tool (S) to clone the areas indicated and transfer the cloned areas to the indicated areas in orange.


Step 16

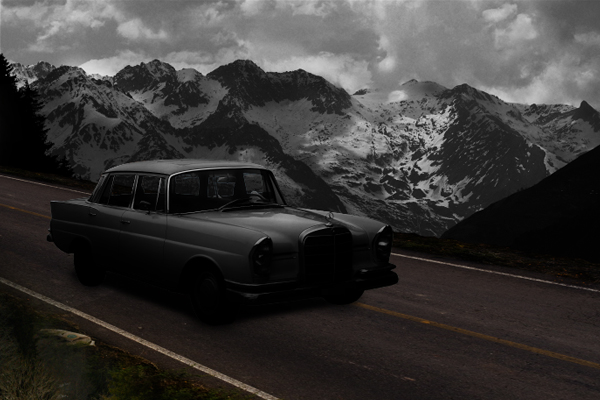
Next, go to "Car.jpg" layer, then go to Image > Adjustments > Desaturate, After desaturating, press Cmd/Ctrl + L to activate the Levels window. From the Levels window, change the values as indicated below.


Step 17

Create a new layer and name it "Black Shade." Using the Brush tool (B), set to 1400 px with 0% hardness and color #000000, brush the areas indicated below. After that, decrease its Opacity level to 62%.


Step 18

Now we’ll add the light effects for the car’s headlights. First add a new layer and name it "Base light", then using the Brush tool (B) set to a master diameter of 60 px, a hardness of 0% and color #ffffff, brush the inside parts of the headlights. After that, go to Filter > Blur > Gaussian Blur and change its radius value to 60 px.


Step 19

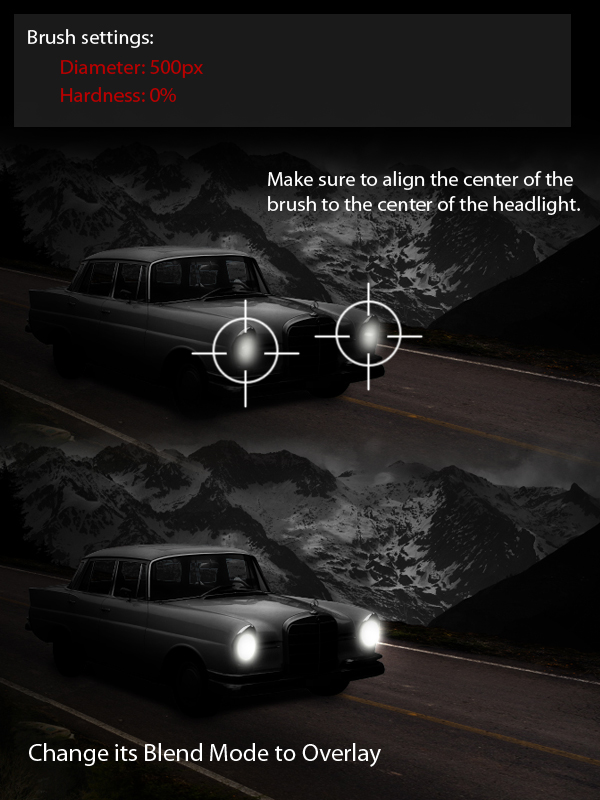
Next, add a new layer and name it "Secondary light", then using the Brush tool (B) set to a master diameter of 500px, a hardness of 0% and color #ffffff and paint as shown.


Step 20

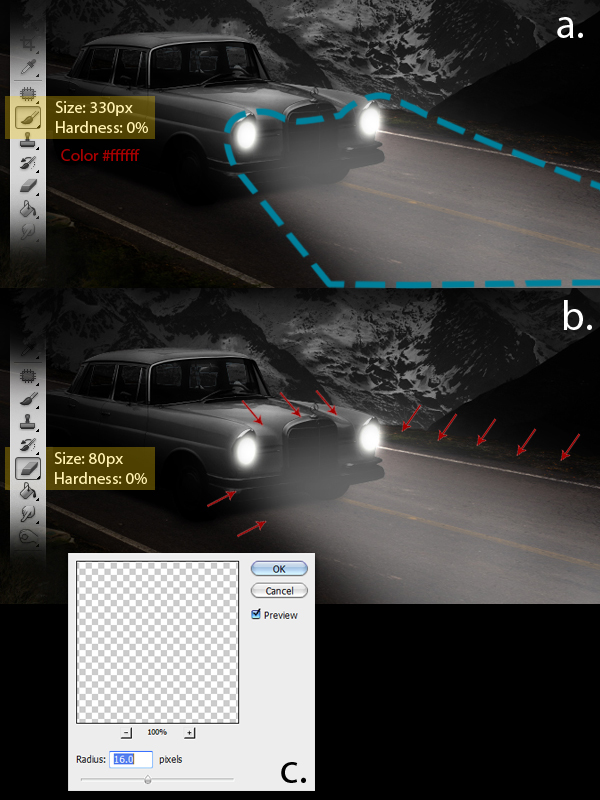
Add a new layer and name it "Extended light-1" then using the Brush tool (B), brush the indicated areas as shown below, Then, using the Eraser tool (E), erase the indicated areas. Lastly go to Filter > Blur > Gaussian Blur and apply the indicated value. Decrease its opacity level to 40%.


Step 21

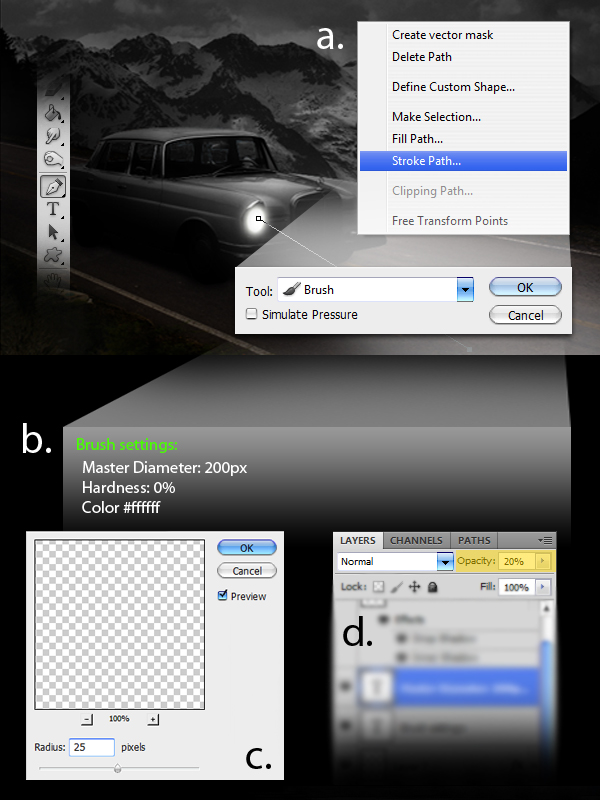
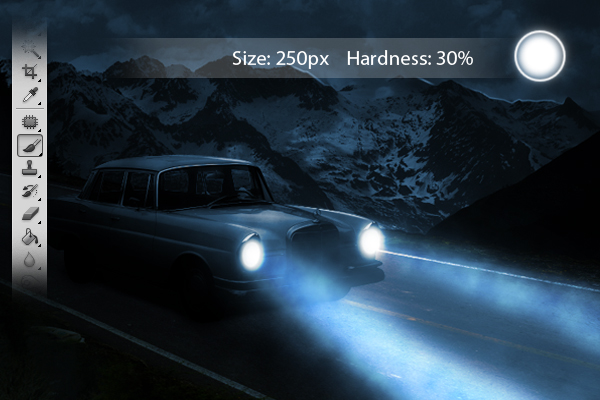
Now it is time to add more light coming from the headlights. First add a new a layer and name it "Extended light-2." Instead of using the Brush tool (B), we’ll be using the Pen tool (P). First, define a path from the headlight to the road. Next right-click and select Stroke Path from the dropdown menu. From the Stroke path window, select the Brush tool. Prior to doing this, make sure to change the brush settings with the values indicated. Next, go to Filter > Blur > Gaussian Blur and apply the values as indicated. Lastly, change the opacity level to 20%.


Step 22

The next step is to add the moon. First add a new layer and name it as "moon." Using the Brush tool (B), set to a size of 200px, a hardness of 0% and color #ffffff, brush a small area in the upper right corner of our image, just as shown. After that go to Filter > Blur > Gaussian Blur and change the value of the radius to 18px.


Step 23

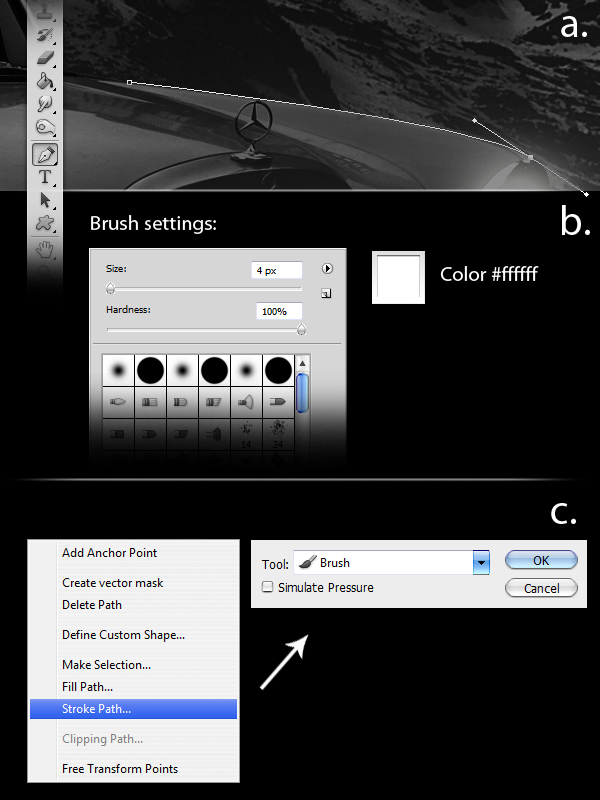
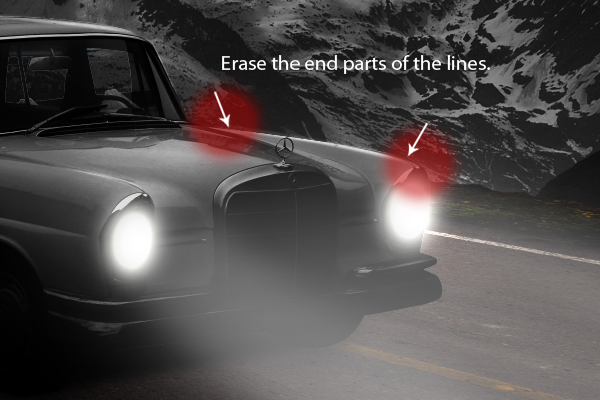
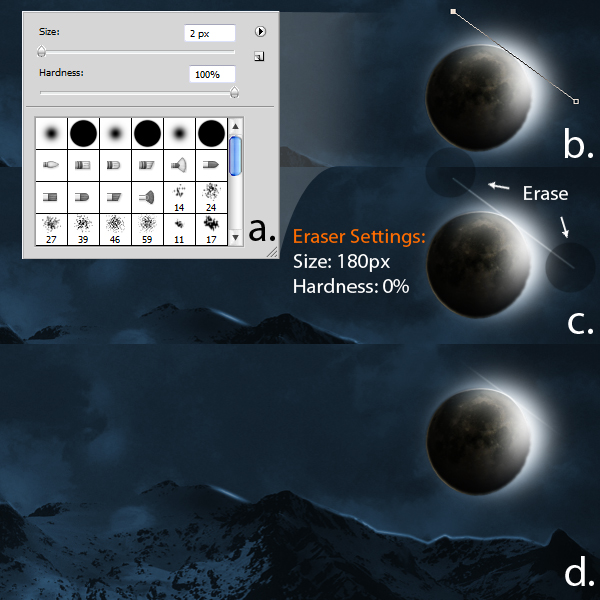
Next, add the surface reflection lights from the moon to the car’s body and also to the mountain ranges. To do this first add a new layer and name it as "Light lines." Using the Pen tool (P), define a path just like as shown in a. Make sure to change the brush settings with the values indicated in b prior to creating the path. After defining the path, right-click and choose Stroke Path from the dropdown menu. From the Stroke path window, select the Brush tool.

Finally, using the Eraser tool (E), erase the both ends of the lines.

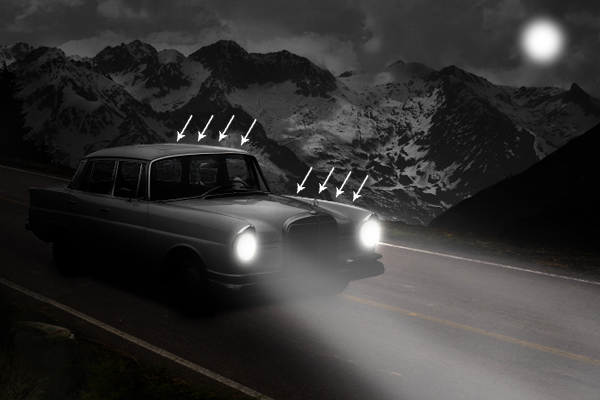
Apply light using the same technique to other parts of the car where light might hit. Change the layer blending mode to Overlay.

Do the same for the mountain ranges. Set blending mode to Normal.


Step 24

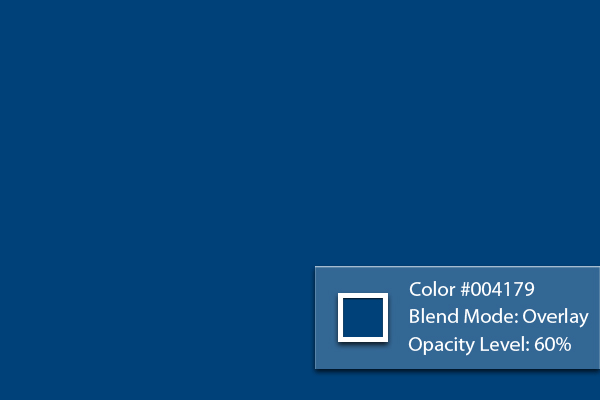
Next, add a new layer and name it "Blue tint." Using the Paint Bucket tool (G), fill the entire image with #004179. After that, set its Blending mode to Overlay and change its opacity level to 60%.


Step 25

Next, using the Brush tool (B) set the values as indicated below, brush a small spot over the moon.


Step 26

Next, duplicate "Extended light-2" and place it over the "Blue tint" layer. Increase its Opacity level back to 100% and change its Blending mode to Overlay.


Step 27

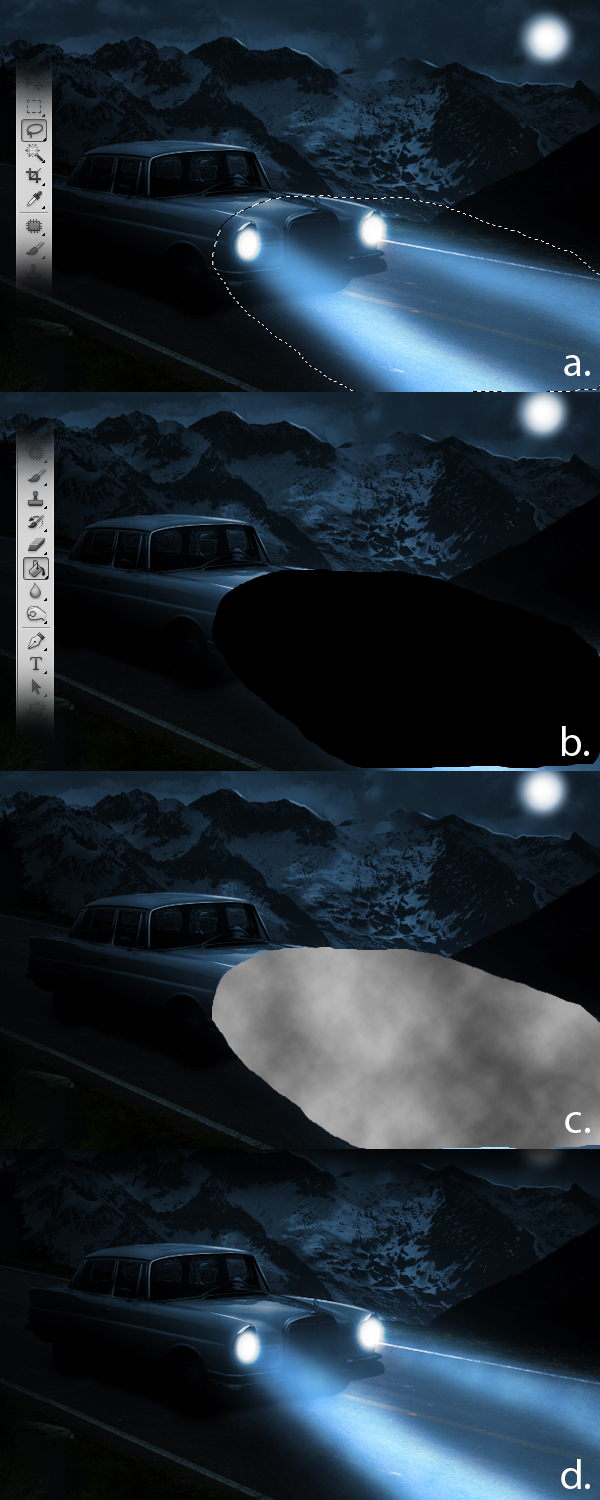
Next, add a subtle smoke effect in front of the car. To do this, first add a new layer and name it "Smoke." Next, using the Lasso tool (L), define an area as shown in below. Next, using the Paint Bucket tool (G), fill the entire selection with color #000000. Then go to Filter > Render > Clouds. Lastly, change the layer’s Blend mode to Overlay and decrease its Opacity level to 40% then use the Eraser tool (E) to erase some remaining hard edges.


Step 28

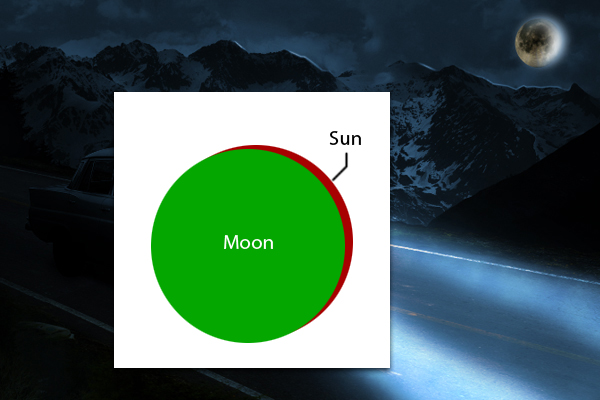
Next, Moon.jpg. Press Cmd/Ctrl + T to activate the resizing handles and resize the Moon as shown. After resizing, move the Moon slightly to the lower left corner.


Step 29

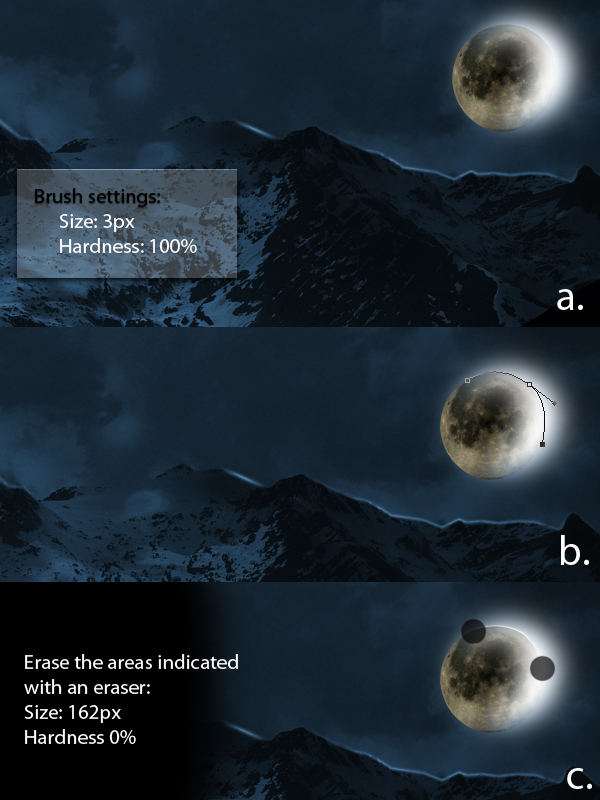
Next, select the Brush tool (B) and change its values as indicated below. Then, using the Pen tool (P), make a path on the upper right corner of the moon as shown. Finally, using the Eraser tool (E), erase the end parts of the path we’ve created.


Step 30

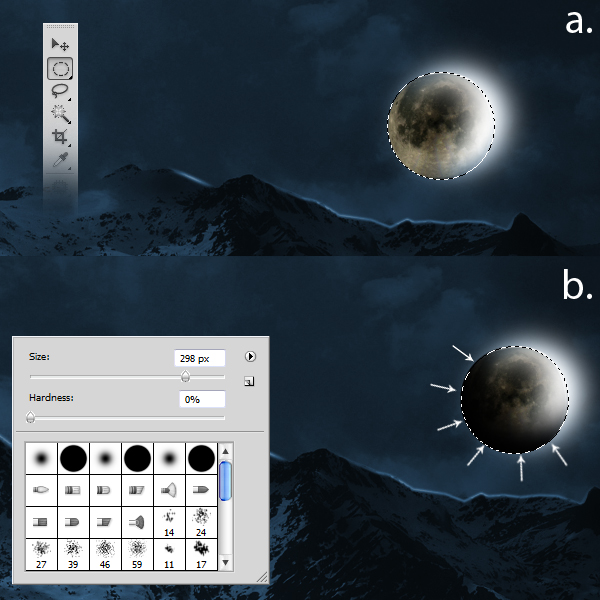
Using the Elliptical Marquee tool (M), make a circle just right with the size of the moon, a. You can hold down the Shift key to create perfect circles. Next, using the Brush tool (B) set to a size of 298 px, hardness of 0% and color #000000, brush the lower left corners of the selection we’ve made.


Step 31

Apply the following brush settings. After that, use the Pen tool (P) to draw a path as shown. After defining the path, right-click and choose Stroke Path from the drop down menu. From there, choose Brush as the tool of reference. Next, using the Eraser tool (E) with the indicated values, erase the areas as indicated.


Step 32

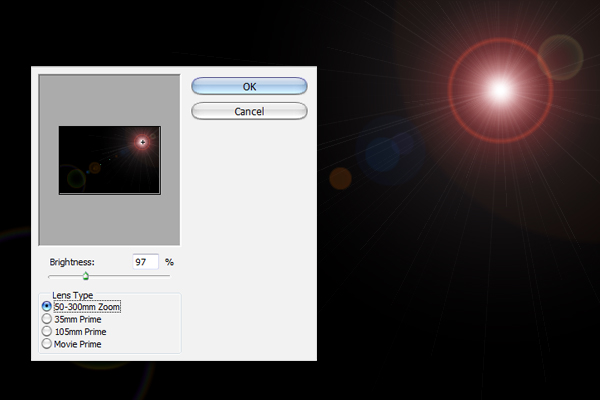
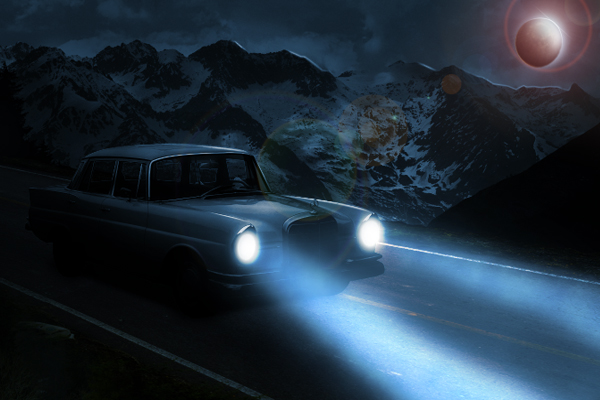
Next, add a new layer and name it "Lens Flare." Using the Paint Bucket tool (G), fill the entire image with color #000000. Next go to Filter > Render > Lens Flare and change the values indicated below. Finally, change its Blending mode to Screen and decrease its Opacity level to 70%.


Step 33

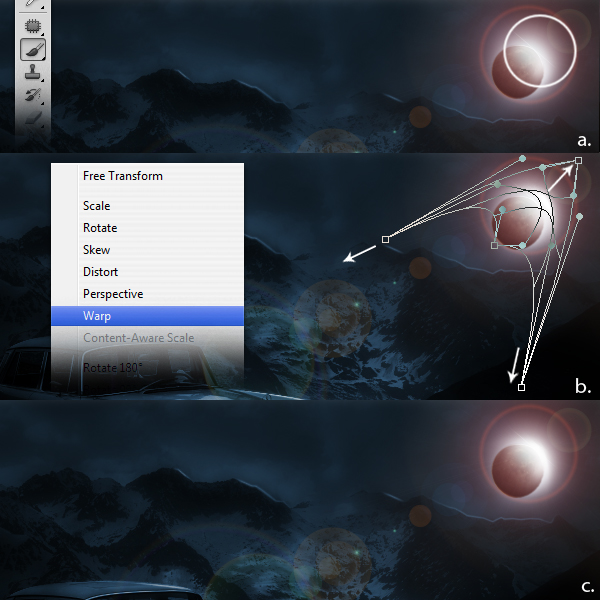
Create a new layer and name it "Additional Light." Using the Brush tool (B) set to a size of 250 px, a Hardness of 0% and color #fffffff, brush a small portion on the indicated area. Next, press Cmd/Ctrl + T to activate the resizing handles then right-click and select Warp from the dropdown menu. Warp the selection as shown.


Step 34

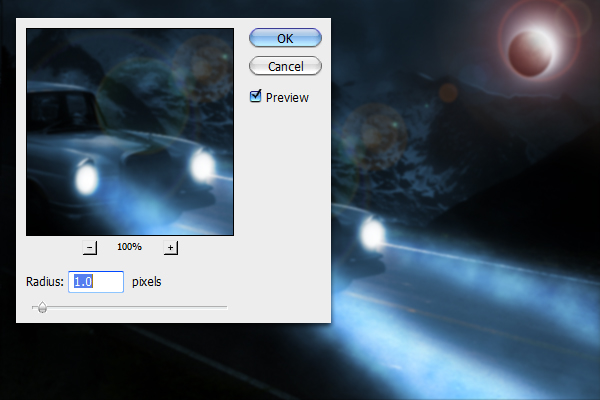
The next step is to duplicate all layers except the "Lens Flare" and "Additional Light" layers. Once duplicated, merge all these layers by right-clicking and selecting Merge layers from the dropdown menu. Next go to Filter > Blur > Gaussian Blur and change the value with the one indicated below. Finally, decrease its Opacity level to 51%.


Step 35

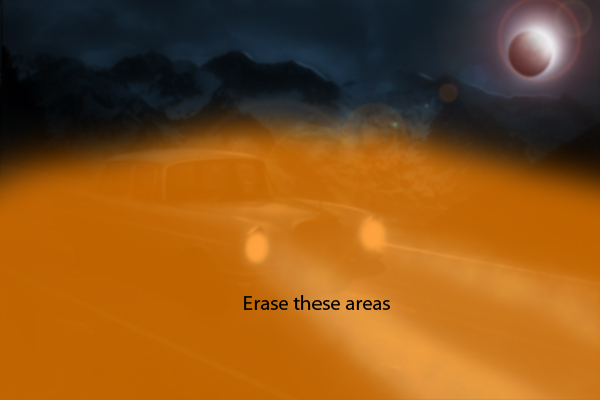
Erase the areas indicated below.


Step 36

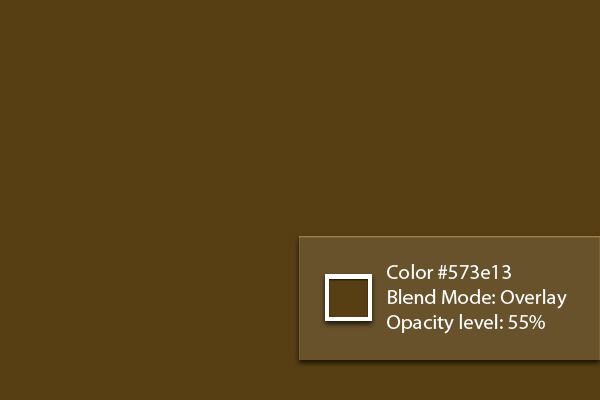
Finally, add a new layer and name it "Brown tint." Next, using the Paint Bucket tool (G), fill the entire image with color #573e13. Next change its Blend mode to Overlay and decrease its Opacity level to 55%.


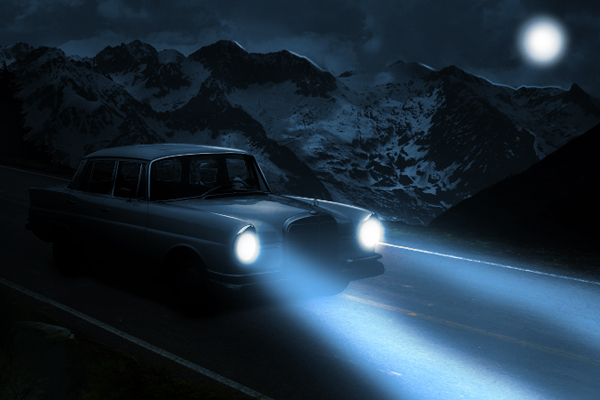
Final Image

20 High Rez Concrete Texture Sets – CG Premium Content Pack

Today we have 20 incredible high resolution concrete texture sets available exclusively to Premium members. Hand crafted from original photos by CGTuts+ author Clinton Jones, each of the 20 texture packs contains all of the different passes required to render stunning materials in all rendering engines. If you ever use realistic textures in your CG art, then this content pack is perfect for you! Learn more after the jump!

CG Tuts Content Pack 1

This new CG Premium content pack (415mb in total) was created by Clinton Jones and is available for CG Premium members to download immediately. Clinton Jones is a regular author at CGTuts+, and creates professional quality photo sourced textures on a regular basis. We are very excited to partner up with him on this release!


CG Premium Membership

The Tuts+ network runs a membership service called Premium. For $9 per month, you gain access to exclusive high quality screencast tutorials, extra project and source files, and awesome downloadable content packs like this one at CGtuts+, Psdtuts+, Vectortuts+, Audiotuts+, Nettuts+ and Aetuts+! For less than the price of a movie, you’ll learn from some of the best minds in the business all month long!!. Become a Premium member today!


Don’t miss more CG Premium tutorials and content packs, published weekly – subscribe to Cgtuts+ by RSS.

Flash for Android: Flixel Frogger on Nexus One and HTC Evo

In this screencast I show off how Frogger, which I built using Flixel, runs on a Nexus One with Android 2.2 and a HTC EVO running 2.1. Both play the same but the EVO feels more responsive due to the better touch response and larger screen.


Screencast: Frogger

Don’t like ads? Download the screencast, or subscribe to Activetuts+ screencasts via iTunes!

Don’t forget you can tart up your desktop and mobile devices with the Flash for Android Wallpaper!

Blogging Advice for More Prolific Writing

Like in any other trade, there are certain methods and tricks a blogger could follow to blog more productively and efficiently. Here are six quick nuggets of blogging advice to increase your writing output.

1. Writing tools

Since 70-80% of blogging is creating content, a blogger needs to know how he could write in less time without compromising on quality. Hence, making use of some power writing tools is suggested.

2. Control Email Usage

Most of the bloggers frankly confess to being addicted to email. We’ve covered managing email overload before and those tips should help.

3. Write Every Day

Write every day. No, you don’t need to publish every day – but write every day. That helps you stay in the flow and also, it ensures that you have an oversupply of articles. Check out this nice article by Daily Writing Tips on how to write everyday.

4. Delegate When Possible

Your blog is your baby but if it’s getting too overwhelming to manage it, it’s time you bring in other people. That’d be good for your blog as well.

5. Avoid Information Overload

Bloggers need to consume more information than the average internet surfer. It’s a part of what they do. And hence, they need to take extra care to avoid getting buried under information overload. Check these tips to avoid information overload.

6. Enjoy the Process

Lastly, blogging is fun only when you enjoy doing it. If you worry too much about things like traffic, reputation, competition and all, it won’t be fun anymore. And then, no matter what you try, it’d be really hard to execute tasks productively.

Friday Photo Critique #46

Friday Photo Critique is our weekly community project, where we publish a photograph submitted by one of our wonderful readers, then ask you all to offer constructive feedback on the image. It’s a great way to learn more about photography, express your viewpoint, and have your own image critiqued!


Quick Ground Rules

  1. Play nice! We’ve deliberately chosen photographs that aren’t perfect, so please be constructive with any criticism.
  2. Feel free to offer any type of advice – composition, lighting, post-processing etc.
  3. You can also link to photographs that you feel offer a great example of this type of image shot exceptionally well.

Without further ado, here is this week’s candidate for Friday Photo Critique!


The Photograph

Photo Critique

Photographer: Stefan de Graaf

Please let us know what you think in the comments – how would you have approached the scene or taken the photo differently? A massive thank you to everyone who commented last week.

The most constructive and helpful comments will be featured on the site. Interested in submitting your own photo? You can do so here!