Give a Yellow Lamborghini a Paint Job in Photoshop

With Photoshop, just about anything is possible. In today’s tutorial we will demonstrate how to give your yellow Lamborghini a quick paint job. Then, we will add some cool effects. Let’s get started!


Tutorial Assets


Step 1

Open the Lamborghini image in Photoshop. Since the image is pretty large, you’ll need to resize it to 1680px by 1050px. To do this, go to Image > Image size or press Cmd/Ctrl + Alt + I on your keyboard.


Step 2

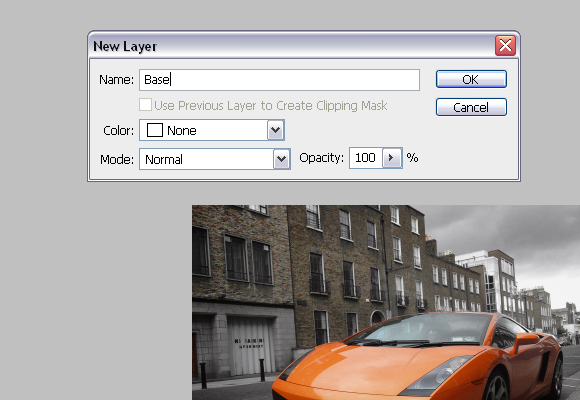
Now, in the Layers palette, you need to unlock the "Background" layer. To do this double click on the "Background" layer, and call it "Base".


Step 3

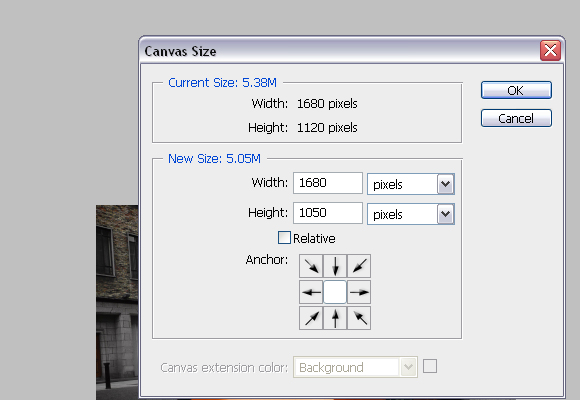
To finish with adjusting the image size, go to Image > Canvas Size or press Cmd/Ctrl + Alt + C on keyboard. In the Canvas Size windows, in the dropdown menu choose pixels for unit. For Height insert 1050 pixels. Click OK, and click Proceed on the new window, which alerts you that your image is larger than the canvas size.


Step 4

Using the Pen Tool (P), create a path around the car as shown below. Try to be as precise as possible.


Step 5

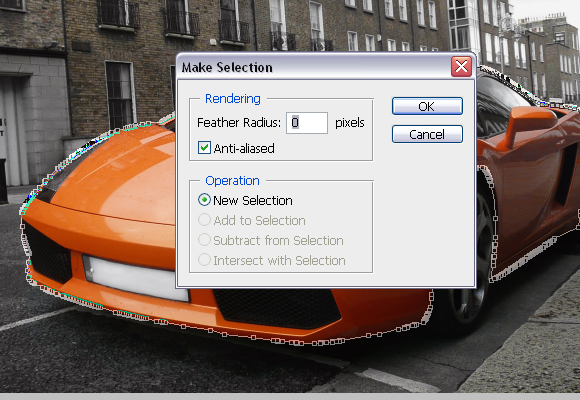
With Pen Tool (P) active right click and choose Make selection. For the Feather radius, set 0px.


Step 6

Usually, when you’re changing car’s colour, this step is not needed but since we are changing car’s colour to black it is. While, the car’s body is selected go to Image > Adjustments > Desaturate or press Cmd/Ctrl + Shift + U. DO NOT deselect yet.


Step 7

Using the Rectangular Marquee Tool (M), right click on the canvas and choose Layer via Copy, and rename the "Layer 1" to "Body".


Step 8

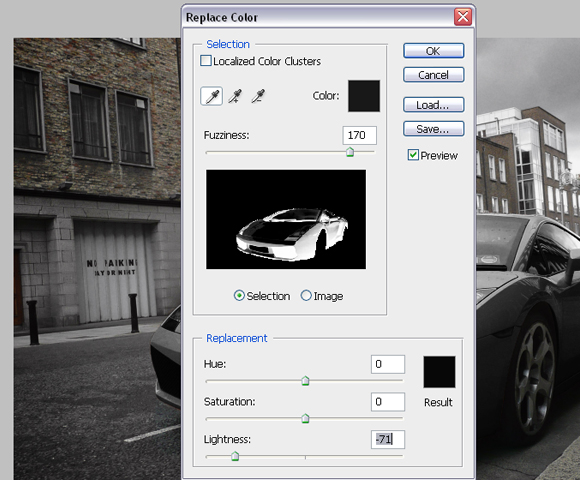
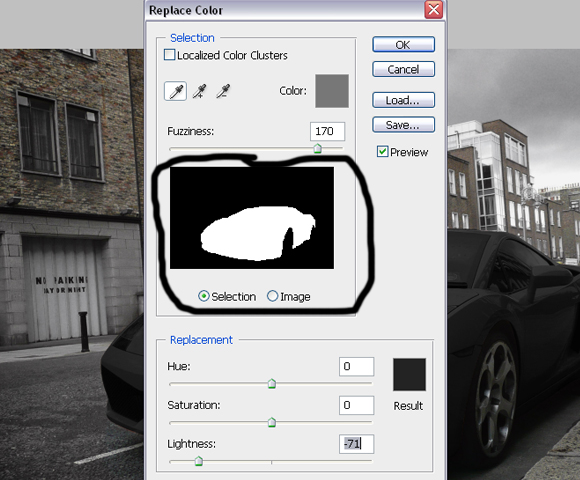
Make sure that you’re on the "Body" layer, and go to Image > Adjustments > Replace Color. In the new window set the parameters as shown below, but DO NOT click OK.


Step 9

Now, click somewhere on the hood to choose the colour to replace, and start adding colours which will be replaced by tones of black. You’ll do this by Shift-clicking on the car’s body (but DON’T click on the glass, lights etc). The selection in the Replace color window should look like below.


Step 10

Now create a Vector mask for the "Body" layer. Using Pen Tool (P) make paths, which will be used to select registration plates, lights, mirrors and grill.


Step 11

Right click with the Pen Tool on the canvas and choose Make Selection. For the feather radius insert 0px.


Step 12

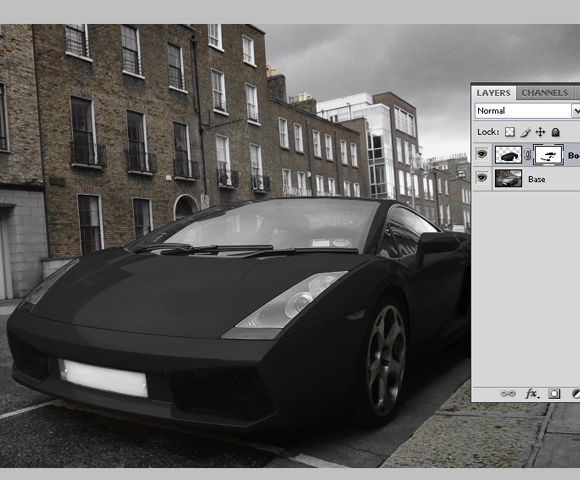
Using the Brush Tool (B), colour set to #000000, paint over selected areas on the mask of the "Body" layer. Image should look similar as shown below.


Step 13

Now click on the “Base” layer’s thumbnail, and using Pen Tool (P), same as before, create path around rims of the car, right click, go to Make Selection, Feather radius to 0px, and click OK.


Step 14

With Rectangular Marquee Tool (M) right click on the canvas and choose Layer via Copy. Rename created layer to “Rims”.


Step 15

Now, while you’re on the "Rims" layer, go to Image > Adjustments > Replace color and this time set the Lightness somewhere around -60. Shift-click on the different parts of the rims to add more sample colours which are going to be replaced. The result should look as shown below.


Step 16

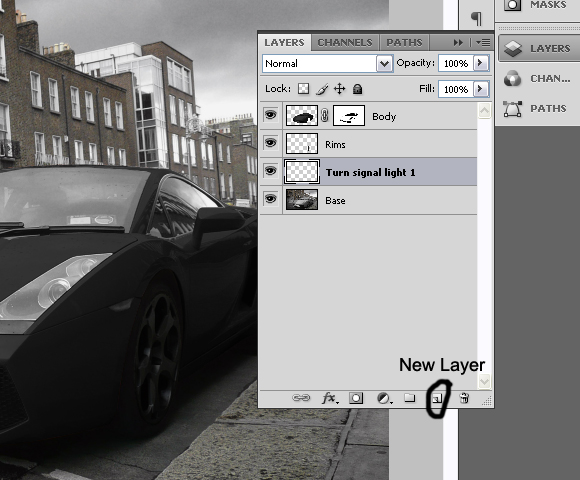
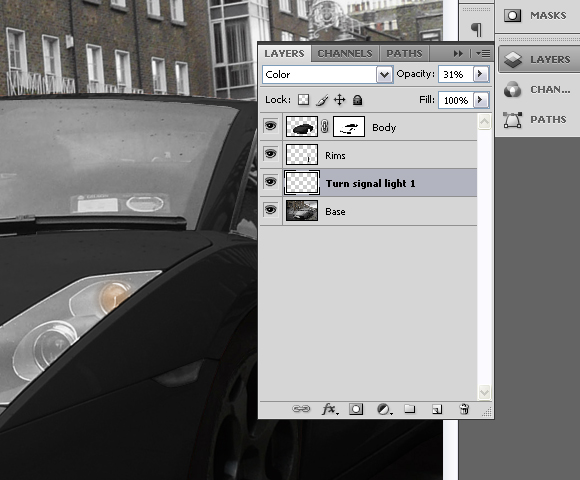
Create new layer, just above “Base” layer and call it “Turn signal light 1″.


Step 17

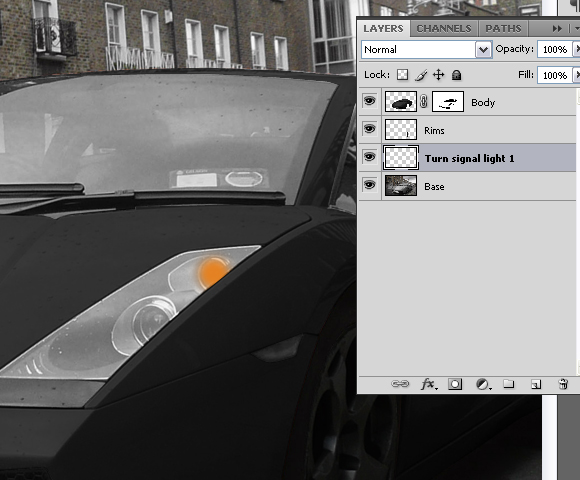
Using Brush Tool (B), with colour set to #e48223, Brush size 34px, Hardness 0%, paint on the turn signal light on front of the car as shown below.


Step 18

Now change the Blending mode for the layer “Turn signal light 1″ to Color and set the layer’s opacity to 31%.


Step 19

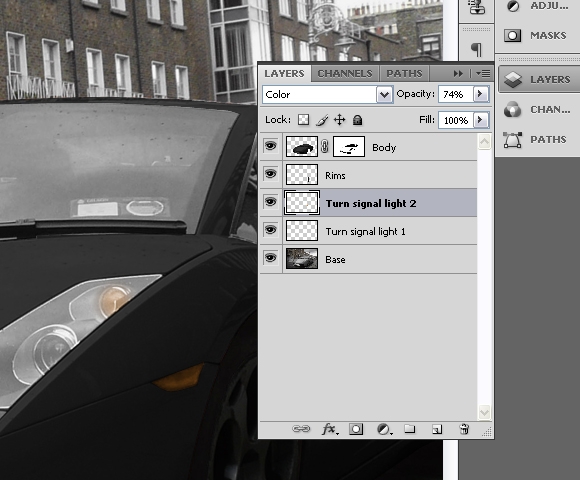
Create another layer above the “Turn signal light 1″, and call it “Turn signal light 2″.


Step 20

Again, using the Brush Tool (B), with colour set to #e48223, Brush size 34px, this time Hardness set to 100%, paint over the turn signal on the side of the car as shown below.


Step 21

Set the Blending mode for the “Turn signal light 2″ to Color and layer’s opacity to 74%.


Step 22

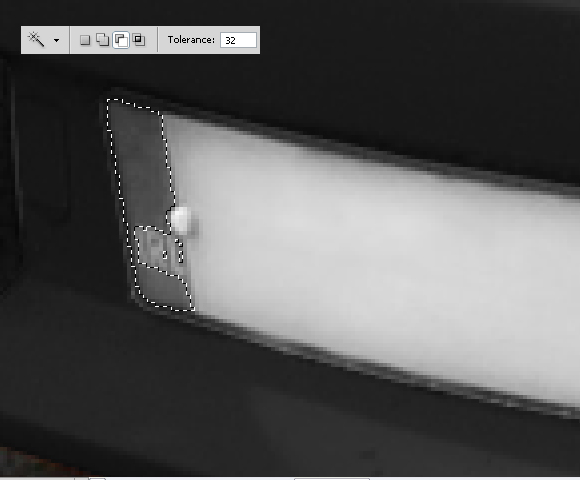
Set “Base” layer active (click on the layer’s thumbnail) and using Pen Tool (P) create path around the coloured part of the license plate. Right click, choose Make Selection and set Feather radius to 0px.


Step 23

With Magic Wand Tool (W), and Substract from selection set, click on the letters until you deselect them from the selection.


Step 24

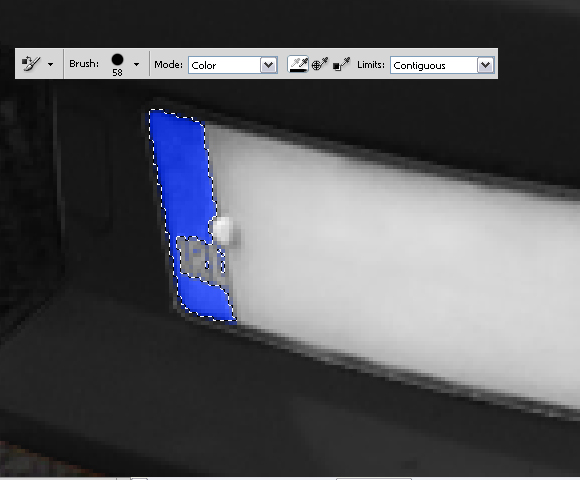
With Color Replacement Tool (B), with large brush, 100% Hardness, and colour set to #2343e4 paint over the selection until you finish with the following results.


Step 25

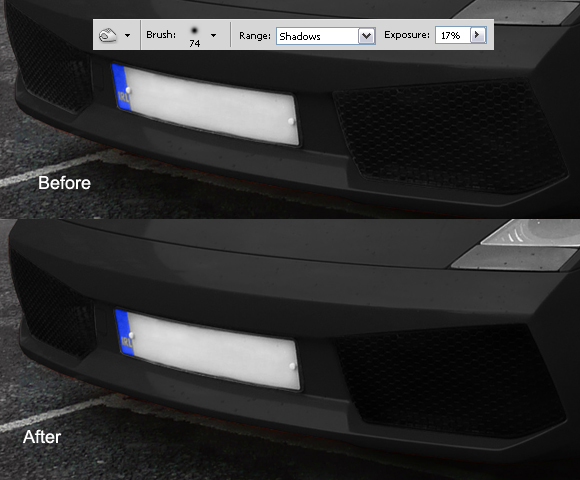
Now deselect by going to Select > Deselect or by pressing Cmd/Ctrl + D on keyboard. Using the Burn Tool (O), Range set to Shadows and Exposure to 17%; burn the grill on the front side of the car as shown below.


Step 26

While still on the "Base" layer Cmd/Ctrl-click on the "Body" layer’s mask thumbnail to select mask. Go to Select>Inverse or press Cmd/Ctrl + Shift + I. You can use the Polygonal Lasso Tool (L), with Subtract from selection set, subtract everything except the windows from selection.


Step 27

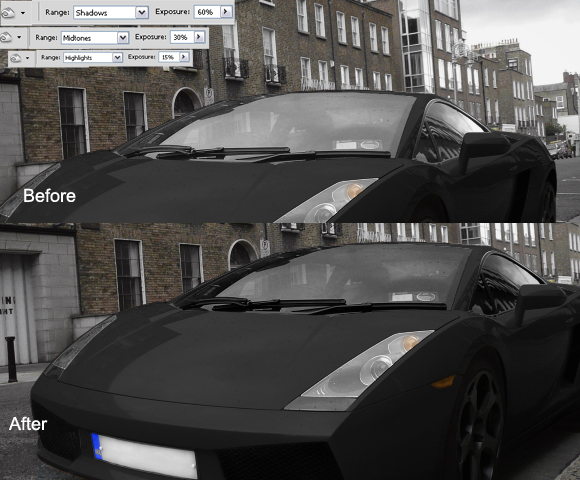
Using Burn Tool (O), Range set to Shadows and Exposure to 60% paint over the selection with big hard brush. Don’t deselect yet. Now, change the Range to Midtones and Exposure to 30%, and paint over the selection again. And finally, change Range to Highlights and Exposure to 15%, burn over the selection and deselect it by pressing Cmd/Ctrl + D or going to Select > Deselect.


Step 28

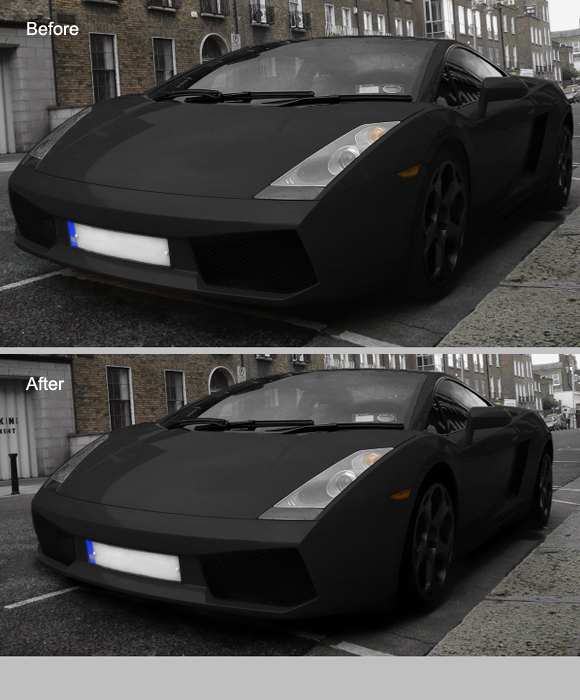
Again, using the Burn Tool (O), Range set to Shadows and Exposure to 60%, Brush size 60px and Hardness 15% burn the wheels, space between car and the wheels and shadows under the car.


Step 29

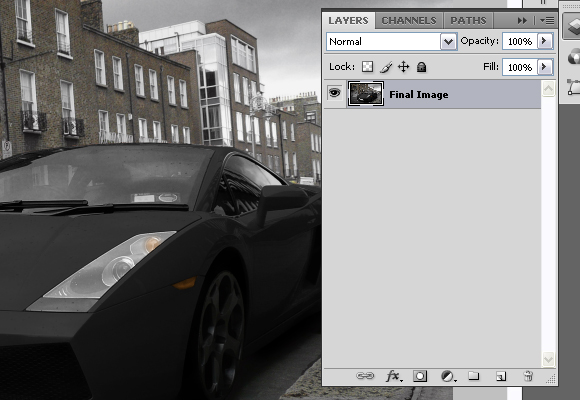
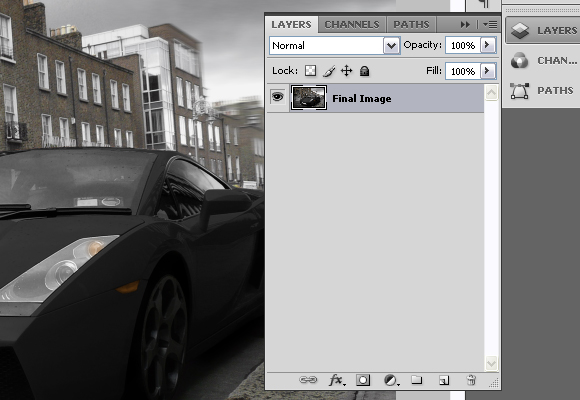
Select all layers, click the right click in the Layers pallet and go to Merge Layers. Rename the layer to the “Final Image”.


Step 30

Duplicate the layer by pressing the Cmd/Ctrl + J on the keyboard. Now, while on the copied layer go to Filter > Blur > Motion Blur and set the settings as shown below.


Step 31

Add a Vector mask for the copied layer, and using the Brush Tool (B), with pure black colour, diameter set to pretty high (around 130px) and Hardness to 0%, paint on the mask. The goal is to have blurred only the right part of the image, but not the Lamborghini as shown below.


Step 32

Again, select all the layers, right click in the Layers palette and choose merge visible. Rename the layer to "Final image" again.


Step 33

Now, using the Burn tool (O), Range set to Shadows, Exposure to 16%, Diameter 453px and 0% Hardness, burn entire image slightly.


Step 34

Now, let’s create the final effect and finish the tutorial. Go to Filter > Distort > Lens Correction. In the Vignette section, for the Amount set -100 and for the Midpoint + 28 and press OK.


Step 35

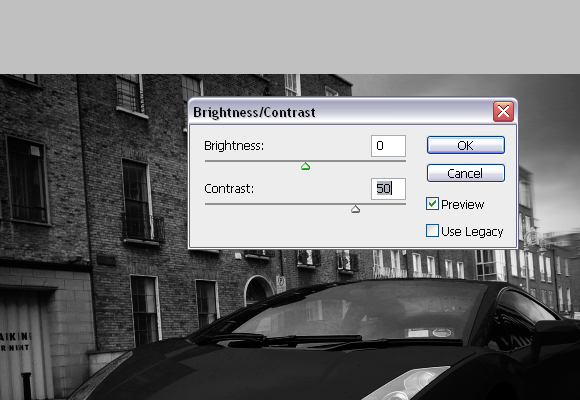
Go to Channels palette and choose "Red" channel or press Cmd/Ctrl + 3 on keyboard.


Step 36

Go to Image > Adjustments > Brightness/Contrast and for the Contrast set 50, and press OK.


Step 37

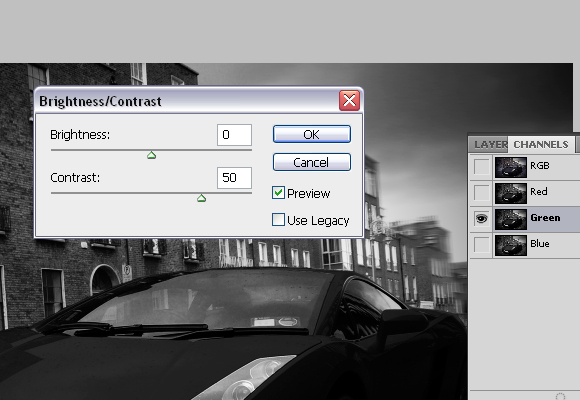
Select "Green" channel or press Cmd/Ctrl + 4, and go to Image > Adjustments > Brightness/Contrast and for the Contrast set 50 again and press OK.


Step 38

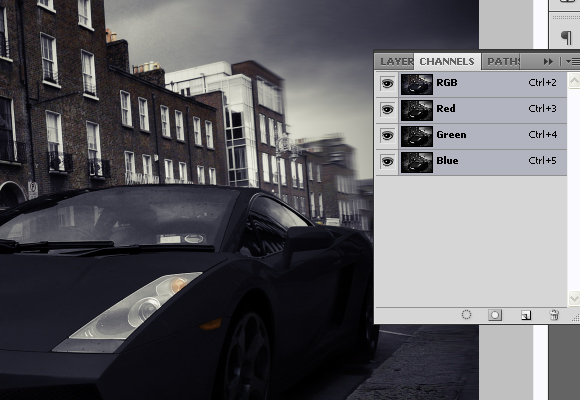
Now, go back to RGB mode or press Cmd/Ctrl + 2.


Step 39

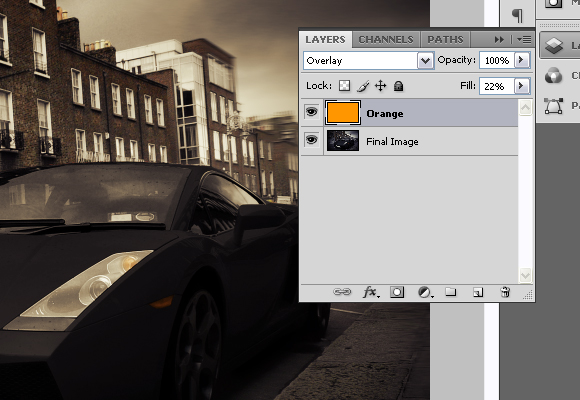
Create new layer, and rename it to “Orange”. Using Paint Bucket Tool (G), with colour set to #ff9600 fill the new layer. Set the Blending mode for the “Orange” layer to Overlay and Fill to 22%.


Step 40

Now using Type Tool (T), in the upper left corner type “Lamborghini”. Go to Character window and for font set “Champagne”, for size 100pt.


Step 41

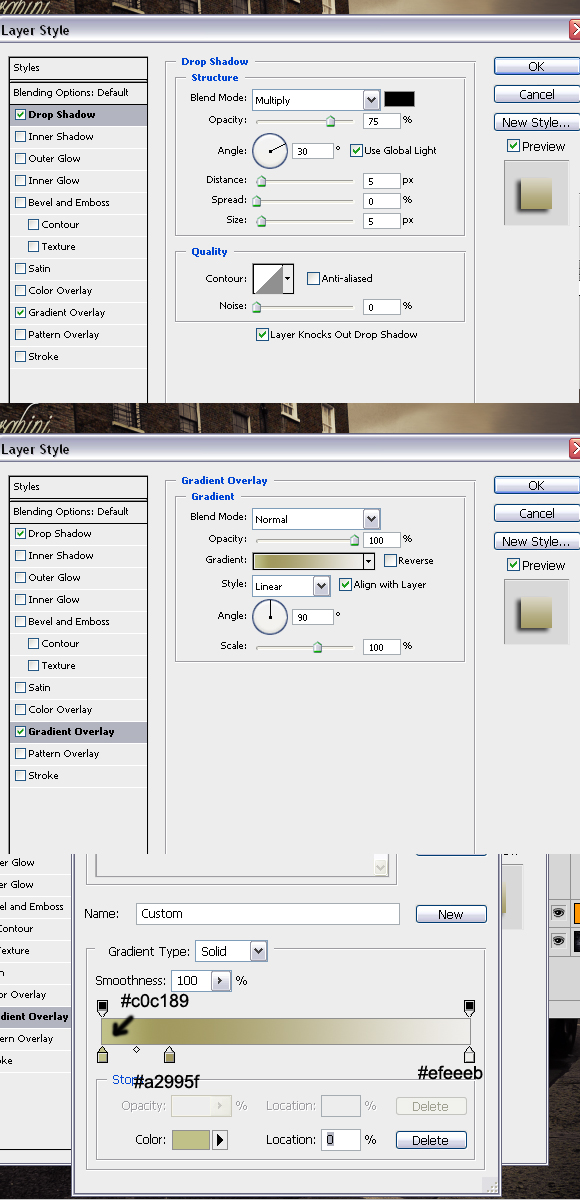
And finally, right click on the text layer and go to Blending options and set the following values.


Final Image

The final effect can be seen below. Thanks for reading the tutorial and I hope you liked it.

The Making of Rapture – Psd Premium Tutorial

Today, we have another Psd Premium tutorial exclusively available to Premium members. If you want to take your photo manipulation skills to the next level, then we have an awesome tutorial for you. Learn more after the jump!


This Premium Tutorial is Filled with Creative Tips

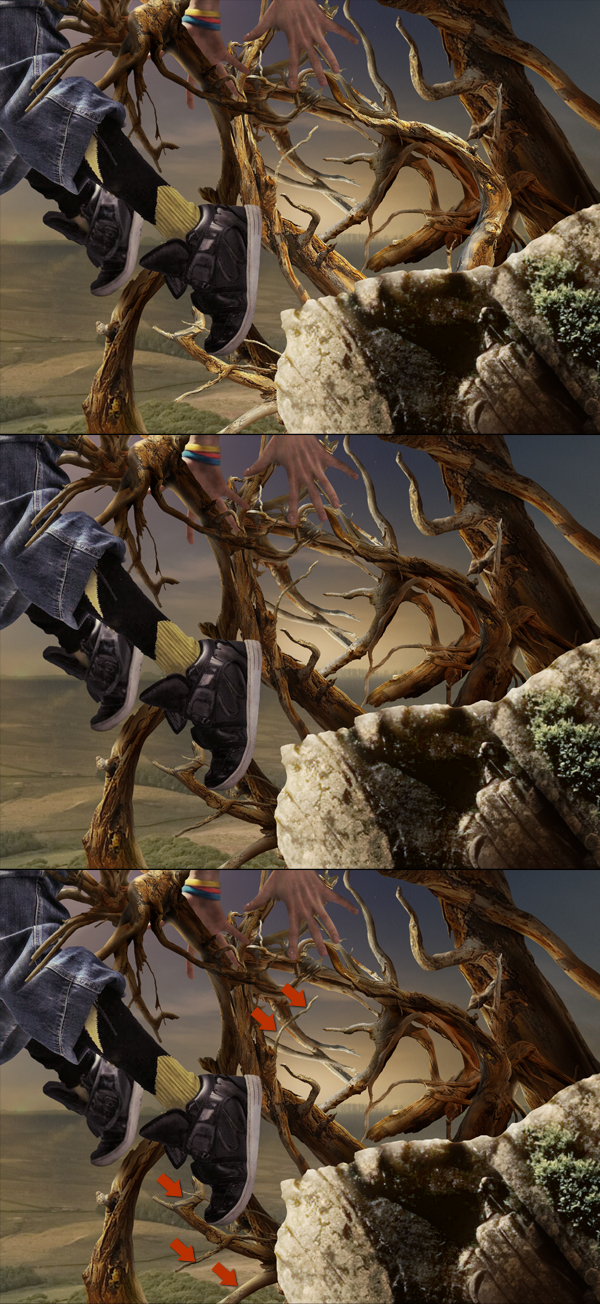
In today’s premium tutorial, we will demonstrate how to successfully create this epic scene in Photoshop. This piece involved the use of several stock images and is loaded with useful tips and tricks. It took several days to complete, so let’s stop fooling around and get started!


Professional and Detailed Instructions Inside

Premium members can Log in and Download! Otherwise, Join Now! Below are some sample images from this tutorial.


Psd Premium Membership

As you know, we run a premium membership system here that costs $9 a month (or $22 for 3 months!) which gives members access to the Source files for tutorials as well as periodic extra tutorials, like this one! You’ll also get access to Net Premium and Vector Premium, too. If you’re a Premium member, you can log in and download the tutorial. If you’re not a member, you can of course join today!

Quick Tip: Create a Seamless Wood Tile in Minutes

I use to do quite a bit of work with 3D models and texturing was something that I did on just about all my projects. The biggest problem most people have with creating seamless tiles in Photoshop is getting rid of the seam, especially with small file sizes. Today, I will demonstrate a technique that will get rid of the seam every time. Let’s get started!


Step 1

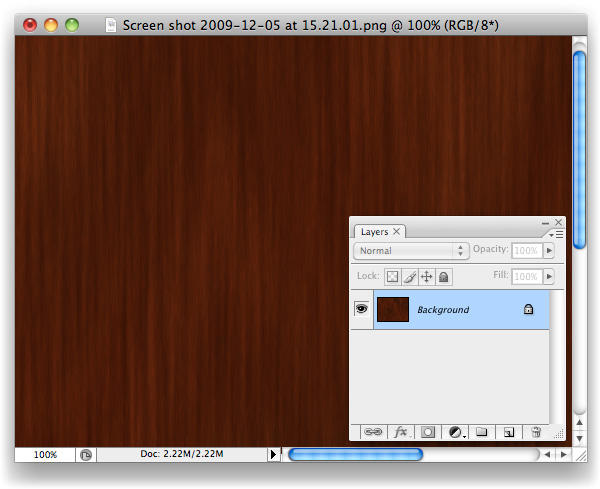
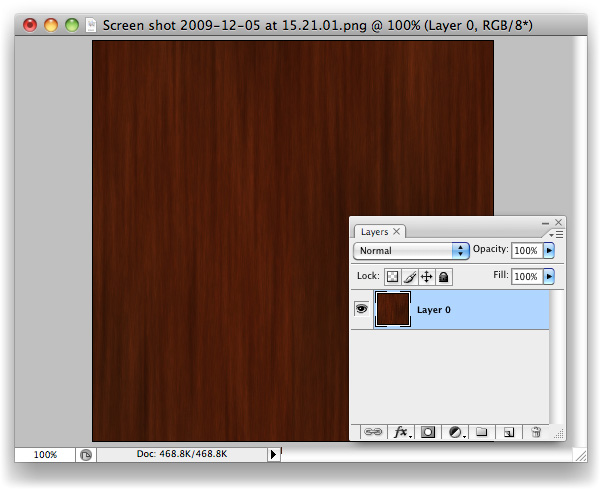
To begin, open up the texture you’d like to create a tile from. Any texture will do, for this example I chose a wooden background.


Step 2

Create a new document 400 x 400 pixels.


Step 3

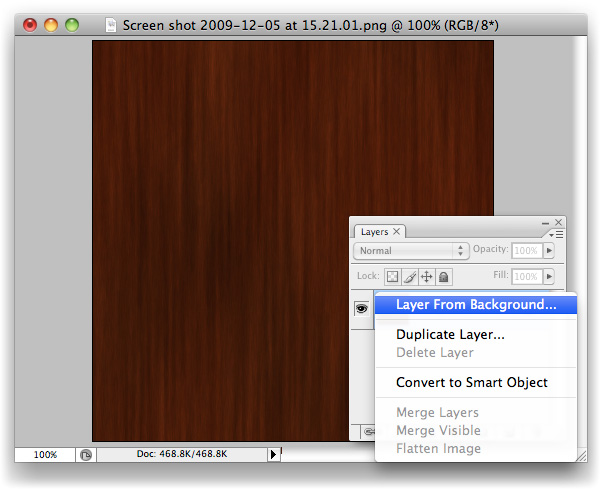
Crop the background layer down, if necessary and double click the background layer to unlock it and turn it into a regular layer.


Step 4

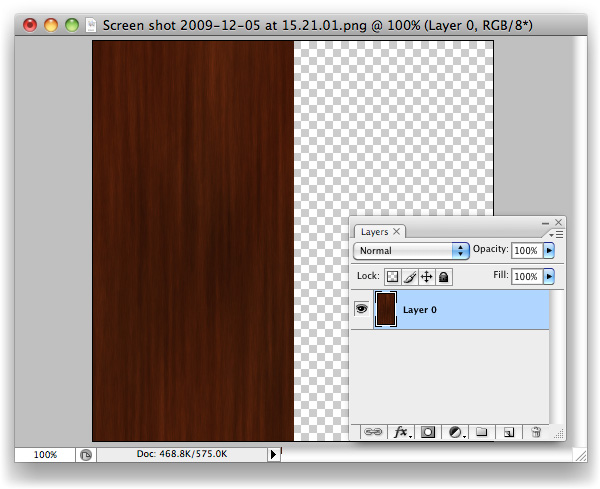
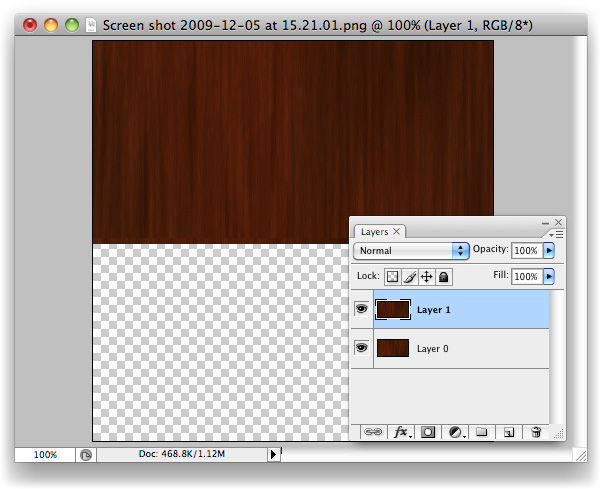
With the Marquee Tool, grab the entire right-hand side of the canvas.


Step 5

Cmd/Ctrl + X to Cut the selection away. You’ll be left with the left side of the image, on your "Layer 0".


Step 6

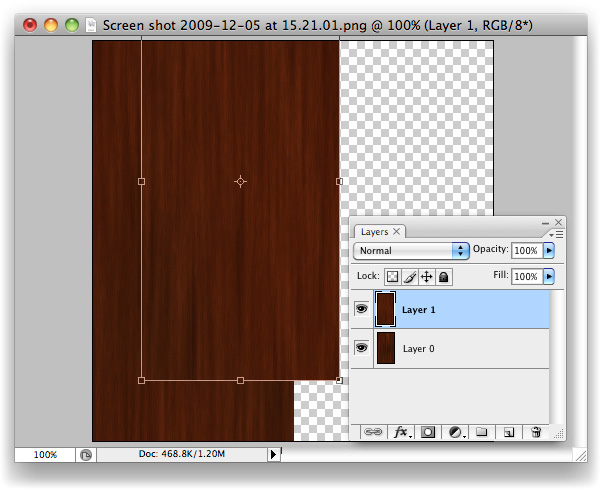
Cmd/Ctrl + V to Paste the selection that you just cut out back onto the canvas. It’ll be its own layer now, "Layer 1". You’ll want to drag it right over to where "Layer 0" is with the Move tool, snap it tight with the left-hand side of your canvas.


Step 7

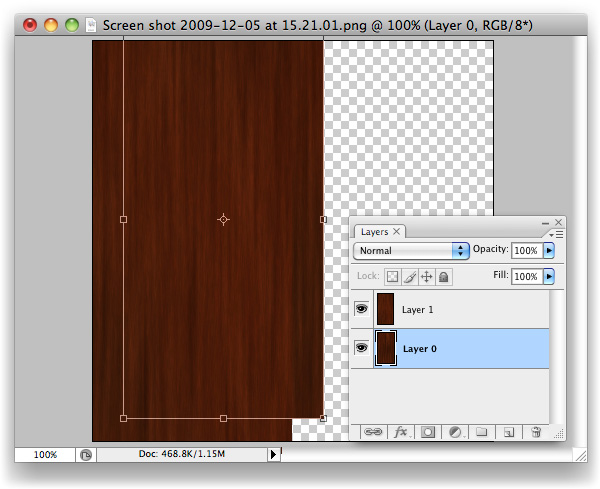
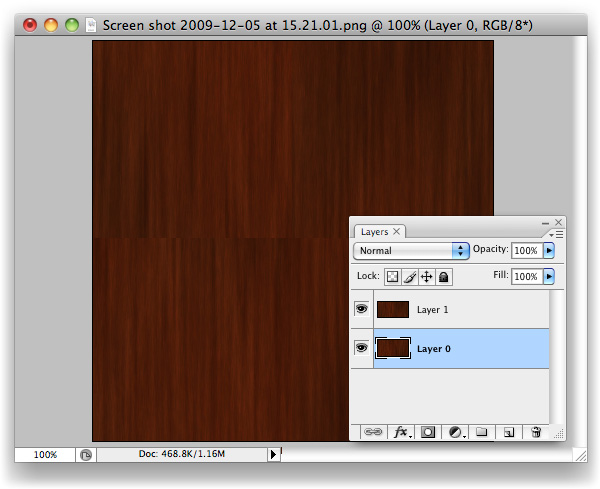
Now select "Layer 0", and Move its contents over to where the right-hand side used to be.


Step 8

What we have here now is the original image, sliced in half, with its pieces put in the wrong places. Amazingly, the background that I chose actually looks spot on after having done this, but you’ll likely see a seam of some sort along the centre.


Step 9

With "Layer 1" selected, hit Cmd/Ctrl + E to Merge Down the layers on top of one another.


Step 10

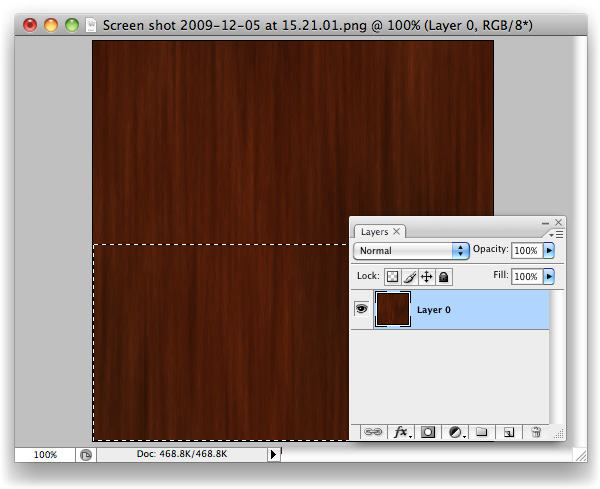
We’re going to repeat the process once more, but vertically rather than horizontally. Grab the bottom half of the image with the Marquee tool (M).


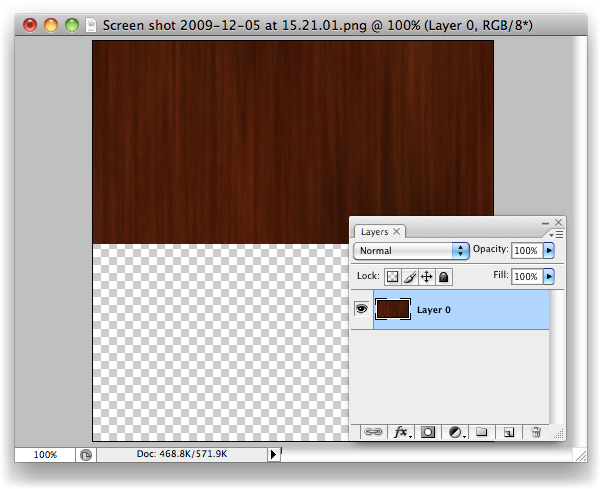
Step 11

Like last time, cut this selection out.


Step 12

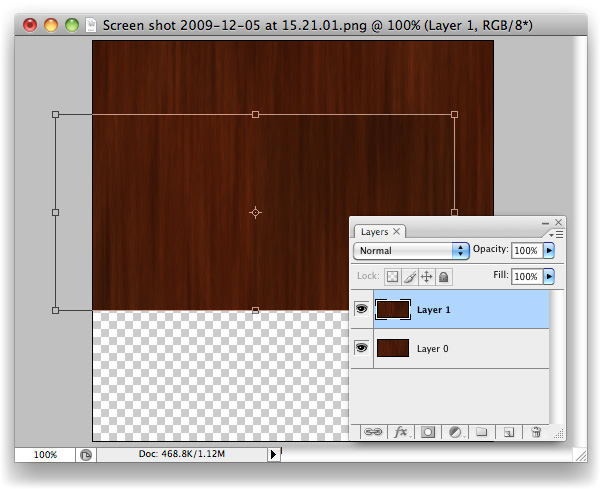
Paste the bottom back in as a new layer and Move (V) it up so that it snaps tight with the top of the canvas, on top of "Layer 0".


Step 13

You should be able to guess what’s coming next? If so, you’re getting it, and this trick will soon be baked onto your brain and will, hopefully, save you lots of time in the future.


Step 14

Move (V) the contents of "Layer 0" down and snap it tight with the bottom of the canvas, where "Layer 1"’s content used to be.


Step 15

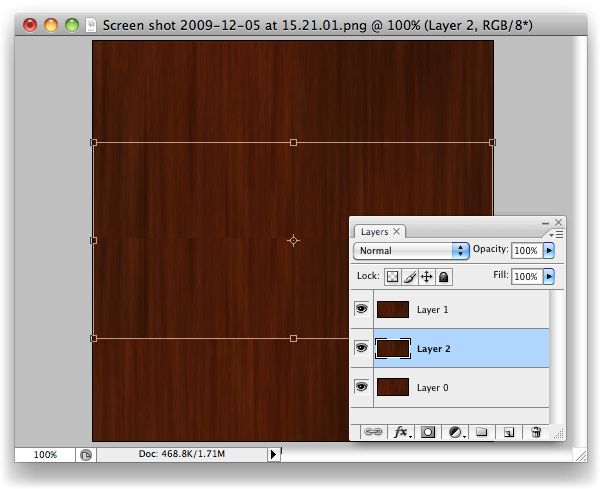
Here we go, check out that beauty of a seam. You’ll likely have two of them running through your image, whereas I’ve been fortunate enough to only have one (I still can’t believe the first cut was so clean!) What we’ve done is basically mimic the effect we would normally only see once we’ve applied a tiled image, and wonder how on earth to fix it. The edges of this image will tile perfectly, however, as we’ve moved the nice-and-tidy central area of the image over to the borders, and the original seams through into the centre of the canvas. Now we know that the problem areas are in plain sight, we can sort them out.


Step 16

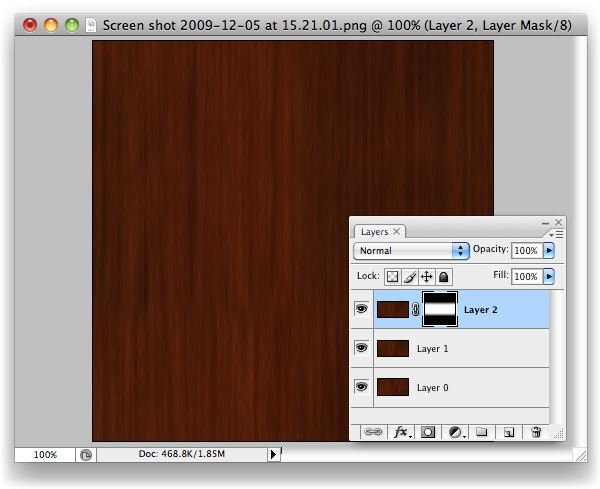
Paste again. You’ll have "Layer 1" twice now, this second instance named "Layer 2".


Step 17

Drag "Layer 2" up to the top of the layer stack (just grab it in the layers palette, move upward.


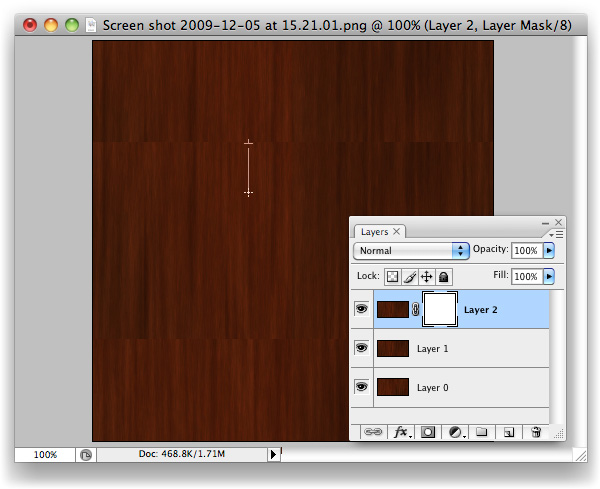
Step 18

Make a Mask on "Layer 2". It’s the third icon along at the bottom of the layers palette. Looks like a moon in a dark sky.


Step 19

With the Gradient Tool selected and Black > Transparent selected as the colour to be used with gradients, simply drag from the top of "Layer 2" down to about where I did in the screenshot.


Step 20

Same again with the bottom of "Layer 2", but upwards.


Step 21

Duplicate the new "Other Page" layer, and drag it underneath the original. Using the Levels panel (Command + L), drag the black Input Level over to the right and the white Input Level to the left slightly like in the image above to increase the intensity of the Gradient. Nudge this layer down slightly from the original "Other Page" layer, to reveal the second "Other Page". The increased intensity of this layer’s Gradient allows the effects of the gradient to be visible in this small space.


Step 22

At this stage, you’ve done all the legwork you should have to. If the gradients have left a sort of mushy, blurry edge, use a Brush and work into the mask a little to break the progressive line into a more choppy one. That should be all that’s needed to disguise the seam.


Final Image

You’ll now have your very own tiling image with seamless seams. More importantly, you should have a new trick up your sleeve that will hopefully save you lots of time in the future.

Envato Meetup Live Video Stream Tonight!

Tonight at 7pm CST we will be streaming a live video feed from our Envato Community Night here in Chicago. This will give you a chance to “hang out” with the Envato staff as we have an informal meet and greet with those who use the sites. Each site editor/manager, including myself, will make a point to come over and say hello. For those who can’t make it, we’ll record the stream for you to go back and watch later.


Update: Recordings Added

For those of you who couldn’t watch the video live, feel free to watch the recordings below.


Introduction: Part 1


Q & A Time: Part 2

Styling Silverlight UI Elements

The ability to apply style to user interface elements is something that we’re familiar with from HTML/CSS. Silverlight has some similar mechanisms for applying groups of common properties to parts (or the whole) of your user interface. In this video, we’re going to dive into styling in Silverlight.

We’ll take a brief look at how styles work in Silverlight, how we can apply them either individually or globally and how we often package them into resource collections for re-use and also so that we can swap them dynamically at run time to allow replaceable application “themes”.


What’s Covered?

Here’s a quick breakdown of what’s covered in this screencast:

  • Explicit and Implicit styles
  • Resource collections
  • Picking styles with Visual Studio
  • Defining styles with Expression Blend

View Screencast

Don’t like ads? Download the screencast, or subscribe to Activetuts+ screencasts via iTunes!


Useful Links

Mike Taulty Microsoft (UK): http://mtaulty.com: [email protected]: twitter.com/mtaulty

App Store Opens its Doors to Adobe Flash

Yesterday saw Apple announce removal of the infamous restrictions on 3rd party development tools for iOS devices. Twitter lit up, the blogosphere jumped into gear and speculation began in earnest. So what’s this all about and what does it mean for Flash?


What Happened?

Back in April 2010, Apple chose to tighten regulations for 3rd party development tools, effectively rendering Adobe’s iPhone compiler useless. In his blog post Thoughts on Flash, Steve Jobs defended his position, listing a number of concerns.

If developers grow dependent on third party development libraries and tools, they can only take advantage of platform enhancements if and when the third party chooses to adopt the new features.

Yesterday’s press release from Apple marks a significant change in attitude.

In particular, we are relaxing all restrictions on the development tools used to create iOS apps, as long as the resulting apps do not download any code. This should give developers the flexibility they want, while preserving the security we need.

What Changed?

It’s not immediately obvious why this 180° from Apple has come about. It could be argued that it’s a direct response to market performance of Smartphones; Android’s growing popularity may well have been a factor, but Steve Jobs denies this, saying that figures have been exaggerated.

Whatever the motives behind the decision, Adobe are understandably positive.

We are encouraged to see Apple lifting its restrictions on its licensing terms, giving developers the freedom to choose what tools they use to develop applications for Apple devices.

What Does this all Mean?

Those of you who purchased Adobe Flash CS5 will be able to use the iPhone packager to deliver apps for iOS devices (iPhone, iPod touch and iPad). Adobe have also made clear that they will resume development of the iPhone packager for future releases.


What About Browsing?

Removal of these restrictions does not mean that Flash Player will be brought on board as part of Safari on iOS devices. Neither does it mean that Adobe AIR will be natively supported.


Your Turn

So what do you think? What does this mean for you as a Flash developer? Do you embrace the change, or resent it? What do you think this means for Flash and Apple? We’d love to hear your thoughts!

Quick Tip: Lock Your SWF to a Specific Domain Name

Do you want to keep your SWF exclusive to your site? In this Quick Tip, we’ll look at how to use a “site lock” to stop people downloading your SWF and embedding it on a different website.


Final Result Preview

Here is the file running on an incorrect domain:

We’ll build an animated display to be activated when the SWF is on the wrong domain, as in the above example. Saying that, if you just want to learn about the site lock code, skip to Step 5.


Step 1: Tweener

Before you get started writing code and adding designs to the stage, you must first get Tweener. For this project I used open source, which can be used for open and commercial projects. Caurina tweener is available a code.google.com.

After you have downloaded Tweener, just copy and paste it to your project folder. Remember, the folder must be named caurina, inside the folder there must be a folder called transitions, and inside of that a load of Flash .as class files.

With the first step done, we can get on with coding and designing the file.


Step 2: File Size and Layers

The file size is irrelevant. Domain locker’s property is to lockdown your SWF, or component, in case someone has downloaded it from you without your permission.

For this example, I have used a stage size of 540 x 400, you can use whatever size you want.

After you’ve selected the file size, create 3 new layers as in the image below. Always keep your Actions Layer empty. Organised stages are much easier to work with and understand.


Step 3: The Censor System

After you have created the 3 layers, create 2 new simple movieclips. Place them wherever you want, whatever size you want. 40 pixel height by 10 pixel width let’s say, with no stroke. Positioning is not important, because we will be placing these movieclips by actionscript later on.

Now, comes the most important aspect of these movieclips, the registration point. Look at the pictures below, when converting your bitmaps to movieclips, remember to do the following else the file will not run at it’s full potential:

And of course, the instance names:


Congratulations! You’ve added the boxes that will shut the page down, in case the domain is wrong. Now, add a dynamic text box to the middle of the stage or anywhere you want it to be. This text box will inform the user who downloaded the file illegally that the file is protected by the script.. Give it an instance name of warning_txt


Step 4: Loading Necessary Classes

Now, once you’ve created the movieclips and the text box, you are ready to code. On the locked actions layer, press F9, and add the following code:

import flash.events.*;
import flash.display.LoaderInfo;
import flash.display.MovieClip;
import flash.net.navigateToURL;
import flash.net.URLRequest;
import flash.net.URLVariables;
import caurina.transitions.Tweener
  • flash.events.*; loads all the events we will probably need.
  • flash.display.LoaderInfo; brings up all information we need to load and that will load with the file.
  • flash.flash.display.MovieClip; loads all the events we will come across while using movieclips.
  • import caurina.transitions.Tweener; loads our tween engine, and the animation of the content blocking bars.

The rest of the events loaded are needed so that Flash gets access to the page URL in the bar.


Step 5: Checking for a Specific Page

var url:String = stage.loaderInfo.url;

Let’s suppose the SWF is loaded on the page http://www.domainName.com/siteFolder/sitePage.html. Line 9 retrieves this URL and assigns it to the string called url.


Step 6: Cause and Effect

Now that Flash knows where to get the URL from, it’s time to compare that with our web site’s URL, and take action if they match or don’t

function pageDomainCheckInit(event:Event):void {
	if (url != "http://www.domainName.com/siteFolder/sitePage.html") {

		warning_txt.text="This file is running on the wrong URL. Content Access Restricted!";
		closeBoxTop.x = 0
		closeBoxTop.visible = true;
		closeBoxTop.height= stage.stageHeight/2
		Tweener.addTween(closeBoxTop,{width:stage.stageWidth, alpha: 0.8, time:1, transition:"easeInOutExpo"});

		closeBoxBottom.x = stage.stageWidth
		closeBoxBottom.visible = true;
		closeBoxBottom.height= stage.stageHeight/2
		Tweener.addTween(closeBoxBottom,{width:stage.stageWidth, time:1, alpha: 0.8, transition:"easeInOutExpo"});
	} else {

		warning_txt.text=" ";
		closeBoxTop.visible = false;
		closeBoxBottom.visible = false;
	}
	stage.removeEventListener(Event.ENTER_FRAME, pageDomainCheckInit);
}

stage.addEventListener(Event.ENTER_FRAME, pageDomainCheckInit);

We’ve used an event listener to start the check-up of the previously detected URL string. What this basically does, is tell flash that if the string located in the navigation bar (or the URL where the page is hosted on) is not the correct one, then the page will execute the script of blocking out content and warn the user that the domain is incorrect. Otherwise, if the page is correctly placed, the boxes that close up the page will not be shown, neither will the warning text.

After this section is completed, we remove the event listener so the file does not eat up resources by checking and rechecking and rechecking over and over again. Once the string is successfully pulled, compared, and the script is successfully executed, the pageDomainCheckInit event is removed.

if (url != "http://www.domainName.com/siteFolder/sitePage.html") {

This section of the code, is basically an “IF NOT”, so if the page is not http://www.domainName.com/siteFolder/sitePage.html Flash will start executing functions below the IF, but otherwise – if the SWF is on the correct page – Flash will remove the blocks from stage, and keep everything neat and tidy. You’ll never know it’s there.

Now, let’s see what happens, when the file is not on the right domain.

warning_txt.text="This file is running on the wrong pageDomain. Content Access Restricted!";
closeBoxTop.x = 0
closeBoxTop.visible = true;
closeBoxTop.height= stage.stageHeight/2
Tweener.addTween(closeBoxTop,{width:stage.stageWidth, alpha: 0.8, time:1, transition:"easeInOutExpo"});

closeBoxBottom.x = stage.stageWidth
closeBoxBottom.visible = true;
closeBoxBottom.height= stage.stageHeight/2
Tweener.addTween(closeBoxBottom,{width:stage.stageWidth, time:1, alpha: 0.8, transition:"easeInOutExpo"});

The code you see here, positions the closeBoxes to stage start and stage end (closeBoxTop = 0 , closeBoxBotton = stage.stageWidth), and makes them invisible (closeBoxTop.visible = false, closeBoxBottom.visible = false) this hides them from the stage, keeps them away from view, and does not affect the site’s appearance. Nevertheless, they are there.

If the page, or the component is installed on a different site/domain name which it was not originally intended to be on, they become visible. They expand across the screen, covering it completely and alerting the user that the content is stolen or not where it’s supposed to be.

This measure not only informs the general user that the file is not where it’s supposed to be, but it also blocks out any content from being displayed.


Step 7: Checking for a Specific Domain

What if we only want to check whether the SWF is loaded on a specific domain?

So instead of checking if the SWF is at http://www.domainName.com/siteFolder/sitePage.html, we just check if it’s somewhere on the domainName.com website. So it could be at https://private.domainName.com/secure/secret.html and still work.

We can achieve this by editing the code that gets the URL, like so:

var url:String = stage.loaderInfo.url;		//this line was here before!
var urlBeginning:int = url.indexOf("://") + 3;
var urlTermination:int = url.indexOf("/", urlBeginning);
var pageDomain:String = url.substring(urlBeginning, urlTermination);
var lastDot:int = pageDomain.lastIndexOf(".") - 1;
var CharacterAfterDomain:int = pageDomain.lastIndexOf(".", lastDot) + 1;
pageDomain = pageDomain.substring(CharacterAfterDomain, pageDomain.length);

Code explained

Let’s suppose the SWF is loaded on the page http://www.domainName.com/siteFolder/sitePage.html. Line 9 retrieves this URL and assigns it to the String called url. That’s the same line we had before.

Line 10 of code retrieves the position within the URL of the ://

Line 11 of code retrieves the first / that appears in the URL after the ://. This is actually very important because between these your actual domain name can be found.

Line 12 of code, is just making the connection inside Flash of what’s in between the :// and the first / getting the domain name String ready for checking in the next step. At this point, with our example, pageDomain has been set to www.domainName.com.

The remaining code checks for the domain name string, what is before it (meaning “www” or “http://www.”) and what is after your domain name (meaning the “.”).

All of these are ignored, so that Flash can define the actual domain name. The domainName.com. Instead of checking:

if (url != "http://www.domainName.com/siteFolder/sitePage.html") {

…we check:

if (pageDomain != "domainName.com") {

The main problem with this technique is that it doesn’t work for domains that have three parts. For example, domainName.co.uk – this code will get “.co.uk” as the value of pageDomain. Still, it is my preferred method, as I will explain in the next step.


Step 8: Utility?

You may have several files on your server, on different domains, this method could have been done in such a manner that the file would be locked on one single and unique URL, as above. But if you were to run your file using deep linking for example, or subdomains, the file would stop working, due to the fact that the link would be invalid to the domain reader.

The fact that the code is if (pageDomain != "domainName.com") is very important. It will permit you to add this code to every file on your site, subdomain, deep link location; as long as your link is on that domain, the file will run, and the domain locker will not trigger!

Still, it can be useful to lock to something more specific than a domain name. Suppose you host your web site on a host like Amazon S3. Then your URL will be something like http://yoursitename.s3.amazonaws.com/folder/page.html. But someone else on Amazon S3 could have the URL http://someoneelse.s3.amazonaws.com/. They could upload the SWF to their site, and since the SWF would still be on amazonaws.com the domain locker would not lock.

Tip

Here’s a little tip you might really love. Let’s presume for a moment that you have the same content on several domain names and you don’t want to add a different code for each of your domains. You can make the file check for multiple domains at once really easily.

Meet the AND operator: && Using this command inside the first checker you can add as many domains as you wish. Let me show you how! :)

Single domain checker:

(pageDomain!="domainName.com")

Multiple domain checker:

( (pageDomain!="domainName.com") && (pageDomain != "mydomain.com") && (pageDomain != "hisdomain.com") ) really easy, isn’t it?


Conclusion

Well, this wraps it up. As you all know, full protection of flash files is never guaranteed 100%, but this is just another step, in making your site safer, better, and more secure against file theft. Don’t forget to encrypt your files before adding them to the server! Thanks for reading this tutorial, I hope it was useful to you, if you need any further help, don’t hesitate to leave your questions within the comment section.

Create an Epic War Game in Flash: Part 2 – Active Premium

Epic barely seems sufficient when describing this Premium tutorial! Premium members who like a Flash challenge will love following this series and will love the satisfying outcome. Here’s part two, so make yourself comfy and dig in!


This Premium Tutorial is Filled with Creative Tips

In the first part we created an engine to build the environment for our game; a camera that can follow active player objects; and one player object, the tank. But the game is still far from finished. The tank cannot shoot, it can drive through any obstacle, drive over water surface, and it doesn’t have any enemies to fight against.

During this tutorial we’ll fix all of these problems and turn it into an actual game.


Professional and Detailed Instructions Inside

Premium members can Log in and Download! Otherwise, Join Now! Below are some sample images from this tutorial.


Active Premium Membership

We run a Premium membership system which costs $9 a month (or $22 for 3 months!) which gives members access to extra tutorials, like this one! You’ll also get access to Psd Premium, Vector Premium, Audio Premium, Net Premium, Ae Premium and Cg Premium too. If you’re a Premium member, you can log in and download the tutorial. If you’re not a member, you can of course join today!

Also, don’t forget to follow @activetuts on twitter and grab the Activetuts+ RSS Feed to stay up to date with the latest tutorials and articles.

‘The Lantern’ – A 3Ds Max Project – Day 1

3Ds Max author Ben Tate is back once again with this exclusive 3-part tutorial series covering all of the processes involved in creating ‘The Lantern’. In this first part, Ben walks us through the modelling process, taking a look at not only traditional poly-modelling, but also how we can use splines to speed up your workflow when tackling more complex geometry. Let’s get started!

In this tutorial we’ll go through the entire process of modelling, uvmapping, texturing, lighting and rendering an old lantern in 3d Studio Max. We’ll use poly modelling techniques for the majority of the model, but we’ll also take a look at how to use splines to create the more complex pieces.

With the modelling completed, we’ll move on to the UV mapping – all of which will be done inside of 3ds Max using the many tools contained in the Unwrap UVW modifier, such as Flatten and Pelt Mapping. We’ll also discuss tips and tricks for UV mapping sub-divided geometry. With the mapping completed, we’ll scale the uv islands to the correct proportions and clean up our objects.

Finally we’ll pack and finalize our UV’s into a single layout, before moving into Photoshop to create the Diffuse, Bump and Specular Maps. We’ll also create procedural materials for the candle and flame inside Max, and finalize our scene lighting for the final render.


Video 1

Download

Note: click the ‘Monitor’ icon to view tutorial in full-screen HD.


Video 2

Download

Note: click the ‘Monitor’ icon to view tutorial in full-screen HD.


Video 3

Download

Note: click the ‘Monitor’ icon to view tutorial in full-screen HD.


Video 4

Download

Note: click the ‘Monitor’ icon to view tutorial in full-screen HD.


Video 5

Download

Note: click the ‘Monitor’ icon to view tutorial in full-screen HD.


Don’t miss more CG tutorials and guides, published daily – subscribe to Cgtuts+ by RSS.

Quick Tip: Vray Caustics & Illuminative AA

In today’s quick-tip tutorial, Edgar Mihailov presents two mini-tips covering how to create caustics using Vray for Maya, and how to get your Vray lights to anti-alias correctly in the final render! We know you’re going to find both tips extremely useful, so let’s get started…


Part 1 – Caustics


Step 1

First of all I will show what this scene looks like. 1 and 2 are Vray lights with default settings. 3 is a simple sphere, and the Background is just an inverted cube.

Step 1 Image

Step 2

Now we have to create a material for our sphere. For this we go to the Hypershade and create a new Vraymtl. I’ve set the Diffuse Color under Basic Parameters to black so that we get a more green looking sphere, but you can set it to whatever you like since the diffuse color doesn’t actually play a role in caustic generation. Finally in the Refraction tab, change the Refraction color to whatever color you want your caustics to be – in our case, green.

Step 2 Image

Step 3

Now we have to enable caustics. To do so go to Window > Rendering Editors > Render Settings. Once there, go to Indirect Illumination tab and find the Caustics submenu. Check On as shown to enable them.
Note: GI does not need to be on for caustics to generate.

Step 3 Image

Step 4

Now render. As you can see you now have green splotches on the ground. They are our caustics.

And I don’t like them! So we will go into our sphere material settings and change the Refraction IOR under the Refraction submenu to a lower value.

Note : IOR is a number that defines how much the passing light is bent when it enters the surface. You can use google to find IOR values of materials such as water and others.

Step 4 Image

Step 5

After rendering you can see that the caustics are now a lot more laid out, but they are still very rough looking. To fix that we go into Rendering Settings, head to the Indirect illumination section and change the Max density from 1 to 0.1. Feel free to experiment with this value to see it’s full effect.

Step 5 Image

Step 6

Ok, now things look much smoother. But I still don’t like how it’s so very green and very dense. To fix this we can reduce the amount of caustics. Return to the Rendering Settings menu and change the Multiplier from 1 to 0.5, this will reduce the amount of caustics by half.

Step 6 Image

Step 7

Now you can see that the caustics aren’t as solid and actually look really nice! Those are the basic steps you need to follow to enable, and tweak, caustics within your scene. Feel free to experiment with different colors and values to see what you can come up with.

Step 7 Image

Part 2 – AA Lights


Step 1

Here I have prepared a simple scene. 3 Vray rectangle lights, a simple cube mesh to embed these lights in, and a reflective sphere.

Step 1 Image

Step 2

When you render Vray lights, whether you have the AA filter enabled or not, the lights still turn out very aliased and jaggy. Both in the scene itself and in the object reflections as seen below :

Step 2 Image

Step 3

To fix this, you have to go back into the Render Settings.

Step 3 Image

Step 4

First, make sure you have Render Using set to V-Ray. Now click on the VRay tab and open the Color mapping dropdown menu. Here tick Subpixel mapping and Clamp output.

Step 4 Image

Step 5

Now when you re-render your image, the lights in both the main scene and the reflections have nice and smooth edges!

Step 5 Image

I hope you enjoyed these quick-tips, and that you can use them in your own scenes. If you have a questions feel free to leave them in the comments below!


Don’t miss more CG tutorials and guides, published daily – subscribe to Cgtuts+ by RSS.

Memorable Typos From Mass Email Mistakes

Mass emails are a highly efficient way to communicate information among your peers. Putting your whole group on the same page – literally – eliminates unnecessary back-and-forth emails, and it makes for increased productivity and an overall unified purpose among your group.

Emails sent out to entire departments or companies are thoroughly proofread and heavily scrutinized. But, inevitably a few mistakes make it through the error-checking process, and once in a great while, that error can turn a productive, purposeful message into a confusing (and sometimes comical) blunder.

A powerful storm recently wiped the power out for the entire office building at my workplace. All employees received the following message:

The power is currently out in our office building. The elevators are not working, access to the network is down and the phones are nonfunctional.

We are sorry for any incontinence and will send updates as they become available.

Please reply to this email if you have any questions.

Thank you.
Administration

(“Inconvenience” was the intended word, but the iPhone’s nifty predictive text feature felt that a slightly different word suited the purpose better. Perhaps “incompetence” would have also worked!)

Needless to say, there were quite a few followup questions, and confusion instead of clarity. We did, however, see the humor in it; a day off from work is certainly cause for excitement, but I doubt anyone got that excited.

Do you recall any memorable email mistakes? Have you ever mistakenly send a glaring error out to a large group of coworkers?

14 Helpful jQuery Tricks, Notes, and Best Practices


If there is one bad thing about jQuery, it’s that the entry level is so amazingly low, that it tends to attract those who haven’t an ounce of JavaScript knowledge. Now, on one hand, this is fantastic. However, on the flip side, it also results in a smattering of, quite frankly, disgustingly bad code (some of which I wrote myself!).

But that’s okay; frighteningly poor code that would even make your grandmother gasp is a rite of passage. The key is to climb over the hill, and that’s what we’ll discuss in today’s tutorial.


1. Methods Return the jQuery Object

It’s important to remember that most methods will return the jQuery object. This is extremely helpful, and allows for the chaining functionality that we use so often.

$someDiv
  .attr('class', 'someClass')
  .hide()
  .html('new stuff');

Knowing that the jQuery object is always returned, we can use this to remove superfluous code at times. For example, consider the following code:

var someDiv = $('#someDiv');
someDiv.hide();

The reason why we “cache” the location of the someDiv element is to limit the number of times that we have to traverse the DOM for this element to once.

The code above is perfectly fine; however, you could just as easily combine the two lines into one, while achieving the same outcome.

var someDiv = $('#someDiv').hide();

This way, we still hide the someDiv element, but the method also, as we learned, returns the jQuery object — which is then referenced via the someDiv variable.


2. The Find Selector

As long as your selectors aren’t ridiculously poor, jQuery does a fantastic job of optimizing them as best as possible, and you generally don’t need to worry too much about them. However, with that said, there are a handful of improvements you can make that will slightly improve your script’s performance.

One such solution is to use the find() method, when possible. The key is stray away from forcing jQuery to use its Sizzle engine, if it’s not necessary. Certainly, there will be times when this isn’t possible — and that’s okay; but, if you don’t require the extra overhead, don’t go looking for it.

// Fine in modern browsers, though Sizzle does begun "running"
$('#someDiv p.someClass').hide();

// Better for all browsers, and Sizzle never inits.
$('#someDiv').find('p.someClass').hide();

The latest modern browsers have support for QuerySelectorAll, which allows you to pass CSS-like selectors, without the need for jQuery. jQuery itself checks for this function as well.

However, older browsers, namely IE6/IE7, understandably don’t provide support. What this means is that these more complicated selectors trigger jQuery’s full Sizzle engine, which, though brilliant, does come along with a bit more overhead.

Sizzle is a brilliant mass of code that I may never understand. However, in a sentence, it first takes your selector and turns it into an “array” composed of each component of your selector.

// Rough idea of how it works
 ['#someDiv, 'p'];

It then, from right to left, begins deciphering each item with regular expressions. What this also means is that the right-most part of your selector should be as specific as possible — for instance, an id or tag name.

Bottom line, when possible:

  • Keep your selectors simple
  • Utilize the find() method. This way, rather than using Sizzle, we can continue using the browser’s native functions.
  • When using Sizzle, optimize the right-most part of your selector as much as possible.

Context Instead?

It’s also possible to add a context to your selectors, such as:

$('.someElements, '#someContainer').hide();

This code directs jQuery to wrap a collection of all the elements with a class of someElements — that are children of someContainer — within jQuery. Using a context is a helpful way to limit DOM traversal, though, behind the scenes, jQuery is using the find method instead.

$('#someContainer')
  .find('.someElements')
  .hide();

Proof

// HANDLE: $(expr, context)
// (which is just equivalent to: $(context).find(expr)
} else {
   return jQuery( context ).find( selector );
}

3. Don’t Abuse $(this)

Without knowing about the various DOM properties and functions, it can be easy to abuse the jQuery object needlessly. For instance:

$('#someAnchor').click(function() {
	// Bleh
	alert( $(this).attr('href') );
});

If our only need of the jQuery object is to access the anchor tag’s href attribute, this is wasteful. Better to stick with “raw” JavaScript.

$('#someAnchor').click(function() {
	alert( this.href );
});

Multiple jQuery Objects

Even worse is the process of repeatedly querying the DOM and creating multiple jQuery objects.

	$('#elem').hide();
	$('#elem').html('bla');
	$('#elem').otherStuff();

Hopefully, you’re already aware of how inefficient this code is. If not, that’s okay; we’re all learning. The answer is to either implement chaining, or to “cache” the location of #elem.

	// This works better
	$('#elem')
	  .hide()
	  .html('bla')
	  .otherStuff();

	// Or this, if you prefer for some reason.
	var elem = $('#elem');
	elem.hide();
	elem.html('bla');
	elem.otherStuff();

4. jQuery’s Shorthand Ready Method

Listening for when the document is ready to be manipulated is laughably simple with jQuery.

$(document).ready(function() {
	// let's get up in heeya
});

Though, it’s very possible that you might have come across a different, more confusing wrapping function.

$(function() {
	// let's get up in heeya
});

Though the latter is somewhat less readable, the two snippets above are identical. Don’t believe me? Just check the jQuery source.

// HANDLE: $(function)
// Shortcut for document ready
if ( jQuery.isFunction( selector ) ) {
	return rootjQuery.ready( selector );
}

rootjQuery is simply a reference to the root jQuery(document). When you pass a selector to the jQuery function, it’ll determine what type of selector you passed: string, tag, id, function, etc. If a function was passed, jQuery will then call its ready() method, and pass your anonymous function as the selector.


5. Keep your Code Safe

If developing code for distribution, it’s always important to compensate for any possible name clashing. What would happen if some script, imported after yours, also had a $ function? Bad stuff!

The answer is to either call jQuery’s noConflict(), or to store your code within a self-invoking anonymous function, and then pass jQuery to it.

Method 1: NoConflict

var j = jQuery.noConflict();
// Now, instead of $, we use j.
j('#someDiv').hide();

// The line below will reference some other library's $ function.
$('someDiv').style.display = 'none';

Method 2: Passing jQuery

(function($) {
	// Within this function, $ will always refer to jQuery
})(jQuery);

The final parens at the bottom call the function automatically – function(){}(). However, when we call the function, we also pass jQuery, which is then represented by $.

Method 3: Passing $ via the Ready Method

jQuery(document).ready(function($) {
 // $ refers to jQuery
});

// $ is either undefined, or refers to some other library's function.

6. Be Smart

Remember – jQuery is just JavaScript. Don’t assume that it has the capacity to compensate for your bad coding. :)

This means that, just as we must optimize things such as JavaScript for statements, the same is true for jQuery’s each method. And why wouldn’t we? It’s just a helper method, which then creates a for statement behind the scenes.

// jQuery's each method source
	each: function( object, callback, args ) {
		var name, i = 0,
			length = object.length,
			isObj = length === undefined || jQuery.isFunction(object);

		if ( args ) {
			if ( isObj ) {
				for ( name in object ) {
					if ( callback.apply( object[ name ], args ) === false ) {
						break;
					}
				}
			} else {
				for ( ; i < length; ) {
					if ( callback.apply( object[ i++ ], args ) === false ) {
						break;
					}
				}
			}

		// A special, fast, case for the most common use of each
		} else {
			if ( isObj ) {
				for ( name in object ) {
					if ( callback.call( object[ name ], name, object[ name ] ) === false ) {
						break;
					}
				}
			} else {
				for ( var value = object[0];
					i < length && callback.call( value, i, value ) !== false; value = object[++i] ) {}
			}
		}

		return object;
	}

Awful

someDivs.each(function() {
	$('#anotherDiv')[0].innerHTML += $(this).text();
});
  1. Searches for anotherDiv for each iteration
  2. Grabs the innerHTML property twice
  3. Creates a new jQuery object, all to access the text of the element.

Better

var someDivs = $('#container').find('.someDivs'),
      contents = [];

someDivs.each(function() {
	contents.push( this.innerHTML );
});
$('#anotherDiv').html( contents.join('') );

This way, within the each (for) method, the only task we’re performing is adding a new key to an array…as opposed to querying the DOM, grabbing the innerHTML property of the element twice, etc.

This tip is more JavaScript-based in general, rather than jQuery specific. The point is to remember that jQuery doesn’t compensate for poor coding.

Document Fragments

While we’re at it, another option for these sorts of situations is to use document fragments.

var someUls = $('#container').find('.someUls'),
	frag = document.createDocumentFragment(),
	li;

someUls.each(function() {
	li = document.createElement('li');
	li.appendChild( document.createTextNode(this.innerHTML) );
	frag.appendChild(li);
});

$('#anotherUl')[0].appendChild( frag );

The key here is that there are multiple ways to accomplish simple tasks like this, and each have their own performance benefits from browser to browser. The more you stick with jQuery and learn JavaScript, you also might find that you refer to JavaScript’s native properties and methods more often. And, if so, that’s fantastic!

jQuery provides an amazing level of abstraction that you should take advantage of, but this doesn’t mean that you’re forced into using its methods. For example, in the fragment example above, we use jQuery’s each method. If you prefer to use a for or while statement instead, that’s okay too!

Will all that said, keep in mind that the jQuery team have heavily optimized this library. The debates about jQuery’s each() vs. the native for statement are silly and trivial. If you are using jQuery in your project, save time and use their helper methods. That’s what they’re there for! :)


7. AJAX Methods

If you’re just now beginning to dig into jQuery, the various AJAX methods that it makes available to us might come across as a bit daunting; though they needn’t. In fact, most of them are simply helper methods, which route directly to $.ajax.

  • get
  • getJSON
  • post
  • ajax

As an example, let’s review getJSON, which allows us to fetch JSON.

$.getJSON('path/to/json', function(results) {
	// callback
	// results contains the returned data object
});

Behind the scenes, this method first calls $.get.

getJSON: function( url, data, callback ) {
	return jQuery.get(url, data, callback, "json");
}

$.get then compiles the passed data, and, again, calls the “master” (of sorts) $.ajax method.

get: function( url, data, callback, type ) {
	// shift arguments if data argument was omited
	if ( jQuery.isFunction( data ) ) {
		type = type || callback;
		callback = data;
		data = null;
	}

	return jQuery.ajax({
		type: "GET",
		url: url,
		data: data,
		success: callback,
		dataType: type
	});
}

Finally, $.ajax performs a massive amount of work to allow us the ability to successfully make asynchronous requests across all browsers!

What this means is that you can just as well use the $.ajax method directly and exclusively for all your AJAX requests. The other methods are simply helper methods that end up doing this anyway. So, if you want, cut out the middle man. It’s not a significant issue either way.

Just Dandy

$.getJSON('path/to/json', function(results) {
	// callback
	// results contains the returned data object
});

Microscopically More Efficient

$.ajax({
	type: 'GET',
	url : 'path/to/json',
	data : yourData,
	dataType : 'json',
	success : function( results ) {
		console.log('success');
	})
});

8. Accessing Native Properties and Methods

So you’ve learned a bit of JavaScript, and have learned that, for instance, on anchor tags, you can access attribute values directly:

var anchor = document.getElementById('someAnchor');
 //anchor.id
// anchor.href
// anchor.title
// .etc

The only problem is that this doesn’t seem to work when you reference the DOM elements with jQuery, right? Well of course not.

Won’t Work

	// Fails
	var href = $('#someAnchor').href;

So, should you need to access the href attribute (or any other native property or method for that matter), you have a handful of options.

// OPTION 1 - Use jQuery
var href = $('#someAnchor').attr('href');

// OPTION 2 - Access the DOM element
var href = $('#someAnchor')[0].href;

// OPTION 3 - Use jQuery's get method
var href = $('#someAnchor').get(0).href;

// OPTION 3b - Don't pass an index to get
anchorsArray = $('.someAnchors').get();
var thirdHref = anchorsArray[2].href;

The get method is particularly helpful, as it can translate your jQuery collection into an array.


9. Detect AJAX Requests with PHP

Certainly, for the huge majority of our projects, we can’t only rely on JavaScript for things like validation, or AJAX requests. What happens when JavaScript is turned off? For this very reason, a common technique is to detect whether an AJAX request has been made with your server-side language of choice.

jQuery makes this ridiculously simple, by setting a header from within the $.ajax method.

// Set header so the called script knows that it's an XMLHttpRequest
// Only send the header if it's not a remote XHR
if ( !remote ) {
	xhr.setRequestHeader("X-Requested-With", "XMLHttpRequest");
}

With this header set, we can now use PHP (or any other language) to check for this header, and proceed accordingly. For this, we check the value of $_SERVER['HTTP_X_REQUESTED_WITH'].

Wrapper

function isXhr() {
  return $_SERVER['HTTP_X_REQUESTED_WITH'] === 'XMLHttpRequest';
}

10. jQuery and $

Ever wonder why/how you can use jQuery and $ interchangeably? To find your answer, view the jQuery source, and scroll to the very bottom. There, you’ll see:

window.jQuery = window.$ = jQuery;

The entire jQuery script is, of course, wrapped within a self-executing function, which allows the script to limit the number of global variables as much as possible. What this also means, though, is that the jQuery object is not available outside of the wrapping anonymous function.

To fix this, jQuery is exposed to the global window object, and, in the process, an alias – $ – is also created.


11. Conditionally Loading jQuery

HTML5 Boilerplate offers a nifty one-liner that will load a local copy of jQuery if, for some odd reason, your chosen CDN is down.

<!-- Grab Google CDN jQuery. fall back to local if necessary -->
<script src="http://ajax.googleapis.com/ajax/libs/jquery/1.4.2/jquery.min.js"></script>
<script>!window.jQuery && document.write('<script src="js/jquery-1.4.2.min.js"><\/script>')</script>

To “phrase” the code above: if window.jQuery is undefined, there must have been a problem downloading the script from the CDN. In that case, proceed to the right side of the && operator, and insert a script linking to a local version of jQuery.


12. jQuery Filters

<script>
	$('p:first').data('info', 'value'); // populates $'s data object to have something to work with

	$.extend(
		jQuery.expr[":"], {
			block: function(elem) {
				return $(elem).css("display") === "block";
			},

			hasData : function(elem) {
				return !$.isEmptyObject( $(elem).data() );
			}
		}
	);

	$("p:hasData").text("has data"); // grabs paras that have data attached
	$("p:block").text("are block level"); // grabs only paragraphs that have a display of "block"
</script>

Note: jQuery.expr[':'] is simply an alias for jQuery.expr.filters.


13. A Single Hover Function

As of jQuery 1.4, we can now pass only a single function to the hover method. Before, both the in and out methods were required.

Before

$('#someElement').hover(function() {
  // mouseover
}, function() {
 // mouseout
});

Now

$('#someElement').hover(function() {
  // the toggle() method can be used here, if applicable
});

Note that this isn’t an old vs. new deal. Many times, you’ll still need to pass two functions to hover, and that’s perfectly acceptable. However, if you only need to toggle some element (or something like that), passing a single anonymous function will save a handful of characters or so!


14. Passing an Attribute Object

As of jQuery 1.4, we can now pass an object as the second parameter of the jQuery function. This is helpful when we need to insert new elements into the DOM. For example:

Before

$('<a />')
  .attr({
    id : 'someId',
    class : 'someClass'
    href : 'somePath.html'
  });

After

$('</a>', {
    id : 'someId',
    class : 'someClass'
    href : 'somePath.html'
});

Not only does this save a few characters, but it also makes for cleaner code. In addition to element attributes, we can even pass jQuery specific attributes and events, like click or text.


Thanks for reading!

Theme Tumblr Like a Pro: Upcoming Rockable Book


I’m pleased to announce the upcoming release of the book I’ve been sporadically referencing on Twitter for the last month or so: “Theme Tumblr Like a Pro.” There’s a reason why Tumblr’s popularity has sky-rocketed in the last few years: it’s amazingly intuitive, and allows you to rapidly build dynamic websites in a matter of hours.

As with my previous book, I’ve included companion screencasts with each chapter. This means that, whether you prefer the written word or screencasts, we have you covered.

Theme Tumblr Like a Pro: Upcoming Rockable Book

What’s in it for you?

Focusing on the fundamentals, this book takes you from front to back. You’ll learn about:

  • The fundamentals: template tags, basic structure
  • Blocks
  • The various post types and variables
  • Build a theme
  • Working with the Tumblr API
  • Passing Tumblr-specific values to your JavaScript
  • Adding enhanced functionality with JavaScript and the API
  • A plethora of miscellaneous recipes
  • Working with custom meta types to create an options panel, which then provides maximum flexibility for the user of the theme
  • And plenty more…
Promo

Save $9 and get a Free Book

The book won’t be out for one more week, however, as always, those who are on the Rockin’ List (takes five seconds to sign up) will receive a voucher for $9 dollars off the cost of the book.

“The Rockin’ List is our irregular mailout about new books and products, discounts and offers and Rockable news. Signing up to the mailing list will get you a free copy of the Rockstar Personal Branding minibook by Skellie.”


I’ll obnoxiously keep everyone posted on when the book officially comes out. Strangely, there simply aren’t many Tumblr resources and screencasts available around the web for those looking to switch over from a framework, like WordPress. Hopefully, this will help! Bye!

Understanding and Applying Polymorphism in PHP


In object oriented programming, polymorphism is a powerful and fundamental tool. It can be used to create a more organic flow in your application. This tutorial will describe the general concept of polymorphism, and how it can easily be deployed in PHP.


What is Polymorphism?

Polymorphism is a long word for a very simple concept.

Polymorphism describes a pattern in object oriented programming in which classes have different functionality while sharing a common interface.

The beauty of polymorphism is that the code working with the different classes does not need to know which class it is using since they’re all used the same way.

A real world analogy for polymorphism is a button. Everyone knows how to use a button: you simply apply pressure to it. What a button “does,” however, depends on what it is connected to and the context in which it is used — but the result does not affect how it is used. If your boss tells you to press a button, you already have all the information needed to perform the task.

In the programming world, polymorphism is used to make applications more modular and extensible. Instead of messy conditional statements describing different courses of action, you create interchangeable objects that you select based on your needs. That is the basic goal of polymorphism.


Interfaces

An integral part of polymorphism is the common interface. There are two ways to define an interface in PHP: interfaces and abstract classes. Both have their uses, and you can mix and match them as you see fit in your class hierarchy.

Using an Interface

An interface is similar to a class, except that it cannot contain code. It can define method names and arguments, but not the contents of the methods. Any classes implementing an interface must implement all methods defined by the interface. A class can implement multiple interfaces.

An interface is declared using the ‘interface‘ keyword:

interface MyInterface {
    // methods
}

and is attached to a class using the ‘implements‘ keyword:

class MyClass implements MyInterface {
    // methods
}

Methods can be defined in the interface just like in a class, except without the body (the part between the braces):

interface MyInterface {
    public function doThis();
    private function doThat();
    public function setName($name);
}

All methods defined here will need to be included in any implementing classes exactly as described. (Note the code comments below.)

// VALID
class MyClass implements MyInterface {
    protected $name;
    public function doThis() {
        // code that does this
    }
    private function doThat() {
        // code that does that
    }
    public function setName($name) {
        $this->name = $name;
    }
}

// INVALID
class MyClass implements MyInterface {
    // missing doThis()!
    public function doThat() {
        // this should be private!
    }
    public function setName() {
        // missing the name argument!
    }
}

Using an Abstract Class

An abstract class is a mix between an interface and a class. It can define functionality as well as interface (in the form of abstract methods). Classes extending an abstract class must implement all of the abstract methods defined in the abstract class.

An abstract class is declared the same way as classes with the addition of the ‘abstract‘ keyword:

abstract class MyAbstract {
    // methods
}

and is attached to a class using the ‘extends‘ keyword:

class MyClass extends MyAbstract {
    // class methods
}

Regular methods can be defined in an abstract class just like in a regular class, as well as any abstract methods (using the ‘abstract‘ keyword). Abstract methods behave just like methods defined in an interface, and must be implemented exactly as defined by extending classes.

abstract class MyAbstract {
    protected $name;
    public function doThis() {
        // do this
    }
    abstract private function doThat();
    abstract public function setName($name);
}

Step 1: Identify The Problem

Let’s imagine that you have an Article class that is responsible for managing articles on your website. It contains information about an article, including the title, author, date, and category. Here’s what it looks like:

class poly_base_Article {
    public $title;
    public $author;
    public $date;
    public $category;

    public function  __construct($title, $author, $date, $category = 0) {
        $this->title = $title;
        $this->author = $author;
        $this->date = $date;
        $this->category = $category;
    }
}

Note: The example classes in this tutorial use the naming convention of “package_component_Class.” This is a common way to separate classes into virtual namespaces to avoid name collisions.

Now you want to add a method to output the information into different formats, such as XML and JSON. You might be tempted to do something like this:

class poly_base_Article {
    //...
    public function write($type) {
        $ret = '';
        switch($type) {
            case 'XML':
                $ret = '<article>';
                $ret .= '<title>' . $obj->title . '</title>';
                $ret .= '<author>' . $obj->author . '</author>';
                $ret .= '<date>' . $obj->date . '</date>';
                $ret .= '<category>' . $obj->category . '</category>';
                $ret .= '</article>';
                break;
            case 'JSON':
                $array = array('article' => $obj);
                $ret = json_encode($array);
                break;
        }
        return $ret;
    }
}

This is kind of an ugly solution, but it works — for now. Ask yourself what happens in the future, though, when we want to add more formats? You can keep editing the class, adding more and more cases, but now you’re only diluting your class.

One important principle of OOP is that a class should do one thing, and it should do it well.

With this in mind, conditional statements should be a red flag indicating that your class is trying to do too many different things. This is where polymorphism comes in.

In our example, it is clear that there are two tasks presented: managing articles and formatting their data. In this tutorial, we will refactor our formatting code into a new set of classes and discover how easy it is use polymorphism.


Step 2: Define Your Interface

The first thing we should do is define the interface. It is important to think hard about your interface, because any changes to it may require changes to calling code. In our example, we’ll be using a simple interface to define our one method:

interface poly_writer_Writer {
    public function write(poly_base_Article $obj);
}

It’s that simple; we have defined a public write() method that accepts an Article object as an argument. Any classes implementing the Writer interface will be sure to have this method.

Tip: If you want to restrict the type of arguments that can be passed to your functions and methods, you can use type hints, as we’ve done in the write() method; it only accepts objects of type poly_base_Article. Unfortunately, return type hinting is not supported in current versions of PHP, so it is up to you to take care of return values.


Step 3: Create Your Implementation

With your interface defined, it is time to create the classes that actually do stuff. In our example, we have two formats that we want to output. Thus we have two Writer classes: XMLWriter and JSONWriter. It’s up to these to extract the data from the passed Article object and format the information.

Here’s what XMLWriter looks like:

class poly_writer_XMLWriter implements poly_writer_Writer {
    public function write(poly_base_Article $obj) {
        $ret = '<article>';
        $ret .= '<title>' . $obj->title . '</title>';
        $ret .= '<author>' . $obj->author . '</author>';
        $ret .= '<date>' . $obj->date . '</date>';
        $ret .= '<category>' . $obj->category . '</category>';
        $ret .= '</article>';
        return $ret;
    }
}

As you can see from the class declaration, we use the implements keyword to implement our interface. The write() method contains functionality specific to formatting XML.

Now here’s our JSONWriter class:

class poly_writer_JSONWriter implements poly_writer_Writer {
    public function write(poly_base_Article $obj) {
        $array = array('article' => $obj);
        return json_encode($array);
    }
}

All of our code specific to each format is now contained within individual classes. These classes each have the sole responsibility of handling a specific format, and nothing else. No other part of your application needs to care about how these work in order to use it, thanks to our interface.


Step 4: Use Your Implementation

With our new classes defined, it’s time to revisit our Article class. All the code that lived in the original write() method has been factored out into our new set of classes. All our method has to do now is to use the new classes, like this:

class poly_base_Article {
    //...
    public function write(poly_writer_Writer $writer) {
        return $writer->write($this);
    }
}

All this method does now is accept an object of the Writer class (that is any class implementing the Writer interface), call its write() method, passing itself ($this) as the argument, then forward its return value straight to the client code. It no longer needs to worry about the details of formatting data, and it can focus on its main task.

Obtaining A Writer

You may be wondering where you get a Writer object to begin with, since you need to pass one to this method. That’s up to you, and there are many strategies. For example, you might use a factory class to grab request data and create an object:

class poly_base_Factory {
    public static function getWriter() {
        // grab request variable
        $format = $_REQUEST['format'];
        // construct our class name and check its existence
        $class = 'poly_writer_' . $format . 'Writer';
        if(class_exists($class)) {
            // return a new Writer object
            return new $class();
        }
        // otherwise we fail
        throw new Exception('Unsupported format');
    }
}

Like I said, there are many other strategies to use depending on your requirements. In this example, a request variable chooses which format to use. It constructs a class name from the request variable, checks if it exists, then returns a new Writer object. If none exists under that name, an exception is thrown to let client code figure out what to do.


Step 5: Put It All Together

With everything in place, here is how our client code would put it all together:

$article = new poly_base_Article('Polymorphism', 'Steve', time(), 0);

try {
    $writer = poly_base_Factory::getWriter();
}
catch (Exception $e) {
    $writer = new poly_writer_XMLWriter();
}

echo $article->write($writer);

First we created an example Article object to work with. Then we try to get a Writer object from the Factory, falling back to a default (XMLWriter) if an exception is thrown. Finally, we pass the Writer object to our Article’s write() method, printing the result.


Conclusion

In this tutorial, I’ve provided you with an introduction to polymorphism and an explanation of interfaces in PHP. I hope you realize that I’ve only shown you one potential use case for polymorphism. There are many, many more applications. Polymorphism is an elegant way to escape from ugly conditional statements in your OOP code. It follows the principle of keeping your components separate, and is an integral part of many design patterns. If you have any questions, don’t hesitate to ask in the comments!

CodeIgniter from Scratch: Displaying & Sorting Tabular Data


In today’s video tutorial, we are going to use CodeIgniter to pull information from a database and display it in a sortable table structure. This is a quite common task, especially inside admin areas, for displaying database records. We’ll be utilizing a few different utilities, such as the active records library and pagination.


Catch Up


Day 16: Displaying & Sorting Tabular Data

Day 16: Displaying & Sorting Tabular Data

Thanks for watching! Any questions/thoughts?