How To Have An Actor Walk Through A Wall – Day 2

Ever wanted to have an object or actor walk through a solid object? In this tutorial we’re going to cover just that. From setting up the footage, keying it, and presenting the final effect with some flare. Yesterday we put up parts 1 and 2 so today we’ll finish with parts 3 and 4. Enjoy!


Tutorial Part 3

Download Tutorial .mp4

File size: 88.9 MB

Tutorial Part 4

Download Tutorial .mp4

File size: 52.4 MB


{excerpt}
Read More

Quick Tip: Creating Quick Grids and Using Live Distribute with InDesign CS5


Within this tut we are going to explore the Grid and Live Distribute features. The following information will help you create fast grids as well as explaining how to distribute frames quickly. Let’s begin!

Continue reading “Quick Tip: Creating Quick Grids and Using Live Distribute with InDesign CS5”

Create a Happy Illustration for a Magazine Article Design – Vector Premium Tutorial


Today, we have another Vector Premium tutorial, which is available exclusively for Premium members. Learn how to create an attractive woman in motion and mock it up for client review in a magazine style article design.

Continue reading “Create a Happy Illustration for a Magazine Article Design – Vector Premium Tutorial”

Quick Tip: Check Your Axis!

You just got a brand spanking new microphone and it is going to rock! You plug it in and the singer sings away and you go “Eww…” What happened?” Everyone had rave reviews about the mic but yet it just isn’t doing it for you. Further more you had to crank the gain to get any volume out of the thing and you can almost hear hiss now cause the gains so high. Did you ever think the mic was facing the wrong way?

Every now and again there are microphones that look like they should be facing one direction when in reality they should be facing another. The more technical term you might hear floating around for which way the microphone diaphragm is facing is the mic’s axis. Lets quickly look at general axis conventions and what mics defy convention.


Step 1: Understanding A Microphones Axis

Generally speaking there are two things you must keep in mind when dealing with mic axis. The axis of the microphone itself and the axis relative to the sound source.

If the microphone was pointing straight up and down and you talked into the top of the microphone (a handheld vocal mic for instance) then that microphone itself is considered “On Axis”; the microphone and the mic’s diaphragm are “on the same axis”. If however you have a microphone pointing up and down and you talk into the side of the microphone (most large diaphragm condensers) then you have an “Off Axis” microphone; this is because the diaphragm is a complete 90 degrees “off the microphone’s axis”.

The simple rule of thumb is if you talk into the top of the microphone then it is On Axis and if you talk into the side of it then the microphone is Off Axis.


Step 2: Understanding Axis Relative to a Sound Source

The best way to understand this type of axis is in context of an example; with that in mind envision a guitar cab. If you place an On Axis microphone facing straight into the cone of the cab then your microphone placement is On Axis relative to the cab and your microphone is an On Axis microphone. Now say you have a Off Axis microphone placed above your drum set as a over head microphone. The microphone is still considered Off Axis but is On Axis relative to the drum set.

A little trickier to understand at first but if you stop and think for a moment it isn’t all the bad. Just remember this, if your microphone’s diaphragm is directly facing the sound source then the placement is On Axis.


Step 3: Understanding Axis Conventions

Different manufacturers will use different schemes for identifying which direction is considered front and by relation which direction is back on the microphone. The most common method is for the company’s logo to be on the same side as the side you speak into. This scheme is most commonly seen with large diaphragm condensers.

Another form of axis identification is the location of a polar pattern switch. If your switch is on one side but not the other then you generally should be speaking into the side with a switch.

Another less noticeable clue is how the pictures are presented on packaging, online, etc. If a microphone is On Axis then they generally have the microphone pictures facing up and down or “aiming” sideways at something. Off Axis microphones however tend to be facing you like you would be talking into them.


Step 4: Defying Axis Conventions

While these conventions generally make a lot of sense, some microphones still do not adhere to these schemes. Here are some examples that I have seen frequently get confused.
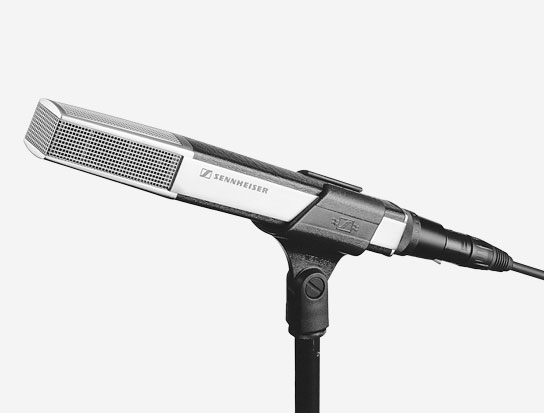
MD-421 and MD-441

While very common in the studio, I have seen younger engineers mistake how to place these microphones. While the pictures tell you it is a On Axis microphone, the actual shape of the grills look close to an Off Axis microphone; especially on the 421 with the plastic band going over the top.

Dragonfly

BLUE’s Dragonfly microphone is one of the more unique looking microphones you will find in a studio. A feature of this mic is the ability for it to turn the capsule around to help aim it at a sound source. While this feature is handy, you still need to know which direction is forward so you don’t have it backwards! While unarguably an Off Axis microphone, the only way to tell which direction is forward is by the little tab sticking out of the capsule housing. If the little tab is facing up then the front of the mic is facing away from where you mount the microphone to the stand. Have a look…
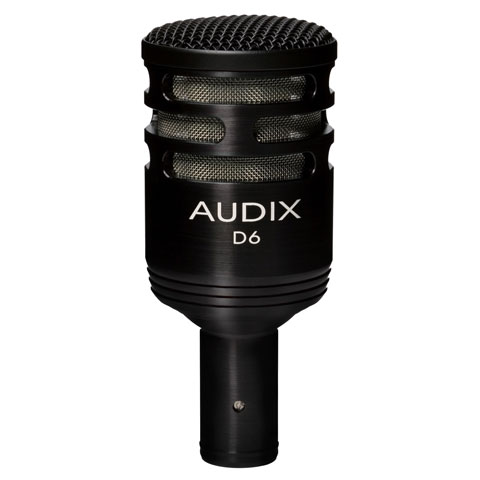
D6

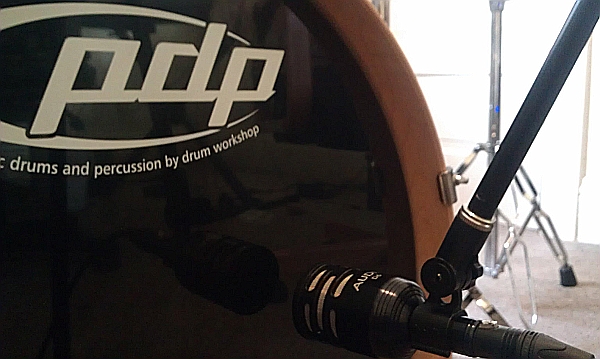
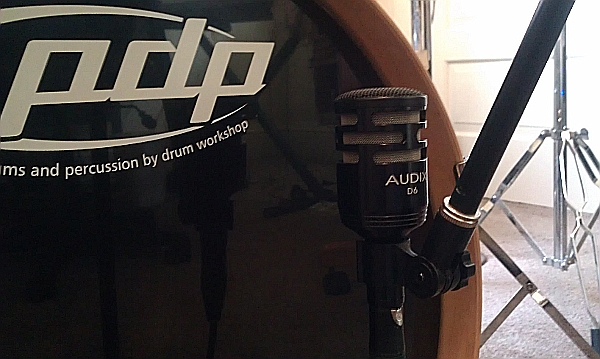
A very common kick drum microphone for inside kick placement, the D6 is a huge culprit of defying convention. Since most people understand and accept the “logo side is front” convention, they will instinctually aim the D6 logo side first. However, this microphone is in fact an On Axis microphone and should be aimed at a sound source from the top and not the side. If you look carefully at the top there is a grill on the top as well as the sides.


But Why Should I Care?

Because I told you to! Just kidding, but in all seriousness your sound will drastically change if you microphone is facing the wrong way. All the polar and frequency response charts you see are for when a microphone is aiming directly at a sound source. The more you are off of that the more change you will hear in your sound.

Some manufacturers include multiple graphs on the same chart so you can see how the mic reacts at different angles. If you need more convincing here is a D6 placed outside a kick first On Axis and then aimed 90 degrees Off Axis; the gain was never adjusted.

Download audio file (On_Axis.mp3)

Download audio file (Off_Axis.mp3)

The On Axis sound is much heavier and louder while the Off Axis is quieter and lost a lot of the boom; remember more gain to compensate will mean more hiss. The reason the Off Axis might sound clearer is because essentially we were micing the ceiling! (and the snare ring was more prominent) In addition, the D6 is really meant to be an inside kick mic but it I placed it outside for pictures sake.

I hope you have learned something in this quick tip and will always make sure to check your axis! Take care!


{excerpt}
Read More

Workshop #203: Choices by Spencer Newton

This track has been submitted for your friendly, constructive criticism. What useful feedback can you give the artist? The floor is yours to talk about the track and how they can fix problems in and improve upon the mix and the song.

Download audio file (ChoicesD1.mp3)

Description of the track:

A song I wrote about a year ago. It’s heavily acoustic based but I’m looking into adding some bass and some form of percussion, most likely a shaker, or some of my cajon, once I learn to properly record and produce it.

I’m looking for feedback on the mixing and levels mostly, but feedback about the music or lyrics are great too. Thanks!

Artist’s website: spencernewton.com

Terms of Use: Users can stream the track for the purposes of giving feedback but cannot download or redistribute it.

Have a listen to the track and offer your constructive criticism for this Workshop in the comments section.

  • Do you enjoy the song or track itself? Does it have potential?
  • Can the arrangement be improved?
  • How did you find the mix? What would you do differently?
  • What do you enjoy about the rhythm track? What can be done to improve it?
  • Is the choice of instruments relevant and effective for the style/song?
  • Are the lyrics (if any) effective? Does the style, arrangement and genre of the song suit them?
  • Can you suggest any specific techniques that might improve the track?
  • Do you have any other constructive feedback?

Need constructive criticism on your own tracks? Submit them for a workshop using this form. Most but not all submissions are published. There may be a wait of up to two months.


{excerpt}
Read More

Create a Cosmic Photo Manipulation in Photoshop – Psd Premium Tutorial

In this Psd Premium tutorial, author Mart Biemans will be demonstrating how to combine photos and effects to create a cosmic photo manipulation in Photoshop. This piece was originally created for Design Against Child Slavery (DACS), a group of designers working to fight against the child slavery epidemic. This tutorial is available exclusively to Premium Members. If you are looking to take your design skills to the next level then Log in or Join Now to get started!


Professional and Detailed Instructions Inside

Premium members can Log in and Download! Otherwise, Join Now! Below are some sample images from this tutorial.


Final Image


Psd Premium Membership

You can join Psd Premium for as little as $9/month. Premium membership gives you access to the source files for all our tutorials as well as access to premium tutorials like this one. This also includes the rest of the sites in our network including Vectortuts+, Webdesigntuts+, Phototuts+, Nettuts, and more! Premium Members can Log In and download this tutorial. Otherwise you can Join Today!


{excerpt}
Read More

Giveaway: 3 Accounts with $30 credit from DepositPhotos

Photoshop Star and DepositPhotos have partnered again to give away 3 free accounts, each with $30 credit to download photos or vector images.

Giveaway: 3 Accounts with $30 credit from DepositPhotos 1

About Depositphotos

DepositPhotos is a marketplace where you can buy and sell royalty-free stock photos, illustrations and vector images. Site is updated daily and offers a vast library of image stock with more than 2 million files to choose from.

DepositPhotos offers a free trial where you can download 5 images (JPEG) of any size or 5 vector files per day for 7 days which means 35 images free of charge. Creating an account is very simple and you can even use Facebook Connect to sign in.

Giveaway: 3 Accounts with $30 credit from DepositPhotos 3

Like many other stock photo sites online, you can buy credits or you can get a subscription plan which lowers price of images. When you buy a image at DepositPhotos using credits, you get another image free which is a great bonus and lowers price of images.

Giveaway: 3 Accounts with $30 credit from DepositPhotos 2

Prize

Each one of the three winners will receive one account with $30 credit so you can download royalty-free stock photos, illustrations and vector images.

How to Win

You need to leave a comment on this post telling us why you would like to win using a valid email address so we can contact you in case you´ve won.

Giveaway details

This giveaway ends on Wednesday, August 24th 2011 after which the comments section on this post will be closed.
Only comment once.
The 3 winners will be randomly selected as always.
Winners will be announced on a separate post so i advise you to subscribe to our RSS feed and follow us on Twitter or on our Facebook page. And they will be contacted via e-mail.

Comments are moderated on this site and your comment may not show up right away. If we find any comments that do not follow the instructions on how to participate (described above) may not be published, or may be removed later on.

Good luck to everyone!

Learn to Create Beautifull Lines of Different Shapes

The purpose of this tutorial is to show you how to create beautifull lines of different shapes that you can add to any image.

Final Image Preview

Learn to Create Beautifull Lines of Different Shapes

Resources


Step 1

Open Guitar Silhouette image on Photoshop. Go to Image > Image Size and change width to 1125px and height to 1500px.

Learn to Create Beautifull  Lines of Different Shapes 1

Step 2

Select Brush Tool and press F5. Choose a hard round brush with 10 pixels and set up following presets for current brush:

Learn to Create Beautifull  Lines of Different Shapes 2
Learn to Create Beautifull  Lines of Different Shapes 3
Learn to Create Beautifull  Lines of Different Shapes 4

Step 3

Create a new layer and make a straight line (white color) by pressing Shift.

Learn to Create Beautifull  Lines of Different Shapes 5

Step 4

Apply Filter > Blur > Motion Blur with these settings:

Learn to Create Beautifull  Lines of Different Shapes 6
Learn to Create Beautifull  Lines of Different Shapes 7

Step 5

Duplicate layer with Ctrl+J and merge copied layer with original one by selecting both layers and pressing Ctrl+E to increase effect.

Learn to Create Beautifull  Lines of Different Shapes 8

Repeat process several times till you have something similar to what i have below.

Learn to Create Beautifull  Lines of Different Shapes 9

Step 6

Go to Edit > Transform > Scale and transform line.

Learn to Create Beautifull  Lines of Different Shapes 10

Step 7

Duplicate layer a few times and move each copy right to get same effect as below.

Learn to Create Beautifull  Lines of Different Shapes 11

Step 8

Merge all the layers with lines into one layer and apply Filter > Transform > Scale to transform it.

Learn to Create Beautifull  Lines of Different Shapes 12

Step 9

Now make selection of current layer with Select > Load Selection.

Learn to Create Beautifull  Lines of Different Shapes 13

Apply Gradient Tool with Transparent Rainbow gradient (one of standard Photoshop gradients) for the left part of selection of layer.

Learn to Create Beautifull  Lines of Different Shapes 14

Repeat same process applying Gradient Tool to parts of selection but keeping some parts in between with white so line will look more fractional (It will create impression that the line consists of a set of lines).

Learn to Create Beautifull  Lines of Different Shapes 15

Remove selection with Ctrl+D.

Learn to Create Beautifull  Lines of Different Shapes 16

Step 10

Apply Edit > Transform > Scale to make line longer.

Learn to Create Beautifull  Lines of Different Shapes 17

Step 11

Now we go to Edit > Transform > Warp to transform line to similar position as you can see on my screenshot below.

Learn to Create Beautifull  Lines of Different Shapes 18

You can Transform the line in whatever way you want to decorate your image.

Learn to Create Beautifull  Lines of Different Shapes 19

You can also make different shapes with line as you can see on my example below:

Learn to Create Beautifull  Lines of Different Shapes 20

Final Image

Add more lines repeating all steps and position them on canvas and you have learned to created beautifull lines in a simple way.

Learn to Create Beautifull  Lines of Different Shapes

PhotoDune – Envato Photo Marketplace

It’s been almost five years since we launched Envato, the company behind this site and many others, and in that time we’ve built eight digital marketplaces for everything from WordPress Themes to Background Music. With our fifth birthday coming up this weekend, we’re excited to announce the beta launch of our ninth marketplace: PhotoDune for […]

{excerpt}
Read More

Delta testing iPad program for pilots

We’ve already posted about Delta setting up iPads for customers to use, but the company may be making different use of Apple’s tablet in the future. It’s testing Apple’s iPads out as “Electronic Flight Bags,” or EFBs, which as far as I can tell are the documents and folders that pilots need whenever they jump in a plane to fly it somewhere. Delta’s loading up iPads with GoodReader, as well as PDFs of the airplane manual, the flight itinerary and pertinent information, and anything else the pilots might need (BattleHeart, maybe?). And with the addition of in-flight Wi-Fi, pilots can even communicate while in the air with the company or even ground control.

It sounds like a good plan — Delta is rolling out a trial system now, and testing the viability of using iPads on all of its flights. The one issue I see, however, is what pilots will do if they need this information during takeoff or landing. I know it’s a complete pain whenever I’m on a plane and get asked to shut down all of my electronics. Presumably, pilots would have to do the same, right?

[via MacRumors]

Delta testing iPad program for pilots originally appeared on TUAW – The Unofficial Apple Weblog on Thu, 18 Aug 2011 07:00:00 EST. Please see our terms for use of feeds.

Source | Permalink | Email this | Comments

Apple gets magnetic coupling patent for possible use in iOS devices

Apple has been granted a patent that covers magnetic coupling connectors that could be used in future iOS devices like the iPhone and iPad. The patent, titled “Techniques for coupling interfaces parts using moveable magnetic elements,” describes a technology similar to the MagSafe connectors Apple introduced in 2006 to its MacBook lines that allows the power cord to separate from its host device if too much pressure is applied to it too quickly, as happens when one trips over a power cord attached to a laptop.

The patent application specifically shows a figure that looks like the first generation iPad with a MagSafe power connector. The patent does not, however, describe a MagSafe dock connector. Currently the 30-pin dock connector is how iOS devices receive power, but one can assume Apple could adapt the MagSafe technology to fit dock connectors, or of course, Apple could conceivably eventually eliminate the 30-pin connector and replace all iOS devices with a smaller MagSafe/Thunderbolt hybrid port that would allow for lighting-quick syncing complete with MagSafe’s “anti-trip” technology. Interestingly, this is the second patent granted to Apple that refers to a MagSafe-like connector on an iPad. The first was in October 2010.

[via Patently Apple]

Apple gets magnetic coupling patent for possible use in iOS devices originally appeared on TUAW – The Unofficial Apple Weblog on Thu, 18 Aug 2011 05:00:00 EST. Please see our terms for use of feeds.

Source | Permalink | Email this | Comments