Twitter has been thwarted in its six-year battle to offer greater transparency for US surveillance requests. District Judge Yvonne Gonalez Rogers has denied Twitter’s request for a summary judgment allowing it to reveal more details of the national s…
Category: Tutorials
Tutorials,freelance,projects,joomla,php,mysql,wordpress,blancer.com
Our readers think the Pixel 3a is a first-rate budget phone
Senior Editor Chris Velazco was skeptical when he got some time with Google’s Pixel 3a last May. The company’s high-end flagship for 2018, the Pixel 3, scored well on the basis of its brilliant display, impressive camera algorithms and solid software…
How to Create a Realistic Embroidery Text Effect in Adobe Photoshop
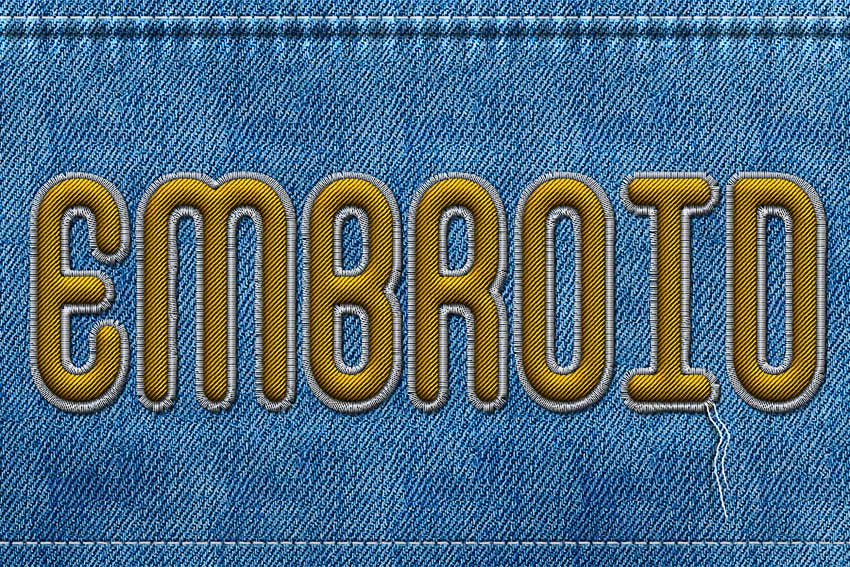
In this tutorial, I will show you how to create a realistic embroidery text effect in Photoshop using stitch brushes and layer styles. The end result will be a font that looks like embroidery!
Follow along with us over on our Envato Tuts+ YouTube channel:
This is part of my embroidery effect Photoshop action, which is part of the Embroidery and Stitching Photoshop Creation Kit from my portfolio on Envato Market.

Tutorial Assets
The following assets were used during the production of this tutorial:
- False Positive Font
- Jeans Texture by psddude
- Pixel-Pattern-Diagonal PAT File
1. Create the Jeans Background
Step 1
Create a new 1100 x 600 px document, and create a new layer called Jeans Background. Copy and Paste the Jeans Texture on this layer. Make sure you use the large texture (2000 x 1500 px).

Step 2
Create a new layer called Textured and Fill it with white. Make sure you have the Foreground Color set to white and the Background Color set to black. Go to Filter > Render > Clouds.

Step 3
Go to Filter > Brush Strokes > Crosshatch. Set the Stroke Length to 15, Sharpness to 16, and Strength to 2. You can, of course, change the settings to your liking.

Step 4
Set the blend mode of the Textured layer to Soft Light and around 50% Opacity. If you want, you can change the color of the jeans; add a Color Overlay style to the Textured layer with blend mode Color and simply pick a color that you like.

2. Create the Stitch Brushes
Step 1
In order to finish the jeans background and to start creating the stitched embroidery effect, we need some stitch brushes that we are going to make from scratch.
Create a new PSD file, size 27 x 5 px. Fill the canvas with color black. Go to Edit > Define Brush Preset. Set the brush name to “stitch” and click OK.

You can now close the new PSD file without saving and return to the initial PSD file (the one with the jeans background).
Step 2
Now we are going to modify the brush that we just made, to create a custom brush. Choose the Brush Tool and select the “stitch” brush from the Brush Preset Picker. Toggle the Brush Panel and make the following settings: Angle 90, Roundness 50%, Spacing 87%, and set the Angle Jitter to Direction.

Step 3
Click on the top right corner of the Brush Panel and choose New Brush Preset. Name the new brush “stitch1”.

Step 4
Now we’ll create the second brush. Again choose the Brush Tool and select the “stitch” brush from the Brush Preset Picker. Toggle the Brush Panel and make the following settings: Spacing 750% and set the Angle Jitter to Direction.

Step 5
Click on the top right corner of the Brush Panel and choose New Brush Preset. Name the new brush “stitch2”.

3. Add Sewing Details
Step 1
Use the Rectangle Tool and draw a shape as shown in the preview image. Make sure it exceeds the canvas on the top and left/right edges. Name this layer Jeans Border.

Step 2
Go to Filter > Distort > Wave and set the Wavelength, Amplitude and Scale to create a wavy border. Also go to Filter > Blur > Gaussian Blur and set the Radius to 0.7 pixels.

Step 3
Add this layer style to the Jeans Border layer: Drop Shadow (color #131e26), Inner Shadow (color #131e26), Inner Glow (color #ffffff), Bevel and Emboss (colors: #ffffff and #131e26).


Step 4
Create a new layer and call it Stitch. Pick the Brush Tool and choose the “stitch2” brush. Set the size to around 13 px and the color to #ffffff. Keep the Shift key pressed to draw a straight line. Add another line on the bottom of the jeans background in the same way.

Step 5
Add this layer style to the Stitch layer: Drop Shadow, Inner Glow, Bevel and Emboss, Stroke.


Step 6
Go to Filter > Distort > Ripple and set the Amount 30% and Size Small. Your result should now look like this.

Step 7
Create a new layer and call it Ripple Edge. Take the Brush Tool and pick the Soft Round Brush which is a default Adobe Photoshop brush that you should have in your list. Toggle the Brush panel to customize the brush and make these settings: Size 50 px, Angle 90, Roundness 45%, Spacing 150%.

Step 8
Draw two lines using this custom brush and color white. Set the blend mode of the Ripple Edge layer to Overlay, 40% opacity level. Also add a Drop Shadow layer style (color #0f1114).

4. How to Create an Embroidery Effect in Photoshop
Step 1
Create a new text layer and call it Embroidered Text. Type your text using the False Positive font. Click on the Toggle the Character and Paragraph Panels button and set the Font Size to around 230 px, Vertically/Horizontally Scale, etc., as shown in the preview.

You can of course use any font type you want or even combine text and vector shapes. In this last case you will have to convert the layers into a smart object.
Step 2
Add a Stroke layer style to the Embroidered Text layer. I am doing that to make the text a little thinner. Right click on the layer and Convert to Smart Object.

Step 3
Again, add this layer style to the Embroidered Text smart object: Drop Shadow (color #000000), Inner Shadow (color #000000), Bevel and Emboss (colors #ffffff and #000000, Bevel and Emboss – Texture (Pattern “pixel-pattern-diagonal”), Color Overlay (color #686565).


Step 4
Convert the layer into a smart object one more time to be able to add another layer style without rasterizing the effects. Press Control-T to transform the smart object and scale it to 130% on both the horizontal and vertical scales.

Step 5
Duplicate the Embroidered Text smart object and call it Shadow. Move this layer below the Embroidered Text smart object.
Step 6
Now we’ll add layer styles for each of these two layers. Let’s start with the Embroidered Text smart object. Add an Inner Shadow (color #000000), Bevel and Emboss (colors #ffffff and #000000), Color Overlay (color #ffc000) and Gradient Overlay (colors #ffffff and #ffffff). You can choose any Color Overlay you like, but just make sure to also adjust the Gradient Overlay opacity if you want a darker or lighter color tone.


Step 7
To make the effect more realistic, let’s add a Filter > Distort > Ripple and a Filter > Distort > Noise effect. These two effects are added as Smart Filters so you can edit them at any time by double clicking on the Filter name.

Step 8
Go to the Shadow Layer and set the Fill to 0%. Next, add a Bevel and Emboss (colors #ffffff and #000000) layer style. The embroidered text should now look like this.

Step 9
Create a new layer just below the Shadow layer and name it Stitched Border. Keep the Control key pressed and click on the Embroidered Text layer thumbnail to make a selection. Go to Select > Modify > Expand and expand by 5 pixels.

Step 10
Go to the Paths tab and choose Make Work Path.

Step 11
Select the Brush Tool, color #ffffff, and pick the “stitch1” brush. Again from the Paths tab, choose Stroke Path. Press Delete to remove the work path.

Step 12
Add a Drop Shadow (color #000000) layer style to the Stitched Border layer. Convert this layer to a smart object.

Step 13
Finally, let’s add a layer style to the Stitched Border smart object: Drop Shadow (color #161616), Inner Shadow (color #161616), Bevel and Emboss (color #ffffff and #161616), Color Overlay (color #f5f5f5—you can choose any color you want for the stitch).


Congratulations! You’re Done!
In this tutorial you learned how to create an embroidered text effect in Adobe Photoshop. I hope you’ve enjoyed this tutorial.
The Embroidered text effect is a part of Embroidery and Stitching Photoshop Creation Kit from my portfolio on Envato Market.

Want to learn more? Check out these awesome tutorials on how to create more text effects:
 Photoshop ActionsHow to Create a Cloud Effect in PhotoshopJohn Negoita
 Text EffectsHow to Create a Fun Felt Photoshop Text EffectJohn Negoita
 Photoshop ActionsHow to Create a Chalkboard Sign With Chalk Text in Adobe PhotoshopJohn Negoita
 Text EffectsHow to Create a ‘Stranger Things’ Inspired Text Effect in Adobe PhotoshopRose
 Adobe Photoshop100 Best Photoshop Text Effect TutorialsMelody Nieves
{excerpt}
Read More
The Morning After: Ray tracing makes ‘Minecraft’ look like a new game
Congratulations, you made it through another week. Beyond recapping some of the key stories from the last few days, make sure you don’t miss some of the new stories that hit on Friday, like our Chromebook Flip review or a look back at the Apollo 13 m…
Hitting the Books: How ‘universal’ stem cells might fix our brains
The impact that stem cell therapies could have on the worst diseases known to humanity is hard to overstate. From debilitating genetic disorders to currently incurable maladies like Parkinson’s and Alzheimer’s disease — even the ability to restore me…
‘Streets of Rage 4’ arrives with Battle Mode on April 30th
After sitting on the shelf for three decades, the Streets of Rage franchise is finally getting a new entry, and DotEmu has announced that its beat-em-up sequel has a release date. Streets of Rage 4 will be available on PC, Xbox One, PS4 and Switch be…
Karma’s first all-electric car is a souped-up Revero
After years of hybrids, Karma is finally ready to make the leap to pure EVs. The automaker has unveiled an all-electric Revero GTE sedan that will represent the “high-range” of its lineup. Karma didn’t reveal the motors, but the machine will be built…
Riot responds to concerns about ‘Valorant’s’ new anti-cheat driver
Over the past few days, some Valorant players have raised concerns about the fact that the game’s anti-cheat driver (vgk.sys) runs as soon as you turn on your computer. Now, Riot Games, the new first-person shooter’s developer, has published a post e…
‘Cyberpunk 2077’ Xbox One X will arrive ahead of the game in June
CD Projekt Red’s next game isn’t due until September 17th — and multiplayer will arrive well after that — but Microsoft has revealed a Cyberpunk 2077 Xbox One X that will go on sale in June. It’s odd timing, with the Xbox Series X (and accompanying f…
Extra-light, flexible solar cell could keep your smartwatch powered
Solar-powered smartwatches might become more practical in the years ahead. Researchers have developed a flexible solar cell that could be an ideal fit for future wearable tech. It’s 10 times thinner (0.3 micrometers) than human hair and, as you’ve li…
Beats president Luke Wood is stepping down
Beats president Luke Wood is leaving the company at the end of this month, with Apple Music and international content vice president Oliver Schusser set to take over. Wood's departure, which was first reported by CNET and confirmed to Engadget by Bea…
Chromebook Flip C436 review: ASUS missed the sweet spot
Somehow, I’ve become the guy at Engadget who loves Chromebooks. It’s a weird niche, but I believe that for a lot of people, the right Chromebook can be a great everyday computer. As such, I’ve kept my eye out for years now on what the best all-around…
Samsung’s latest smartwatch app reminds you to wash your hands
At this point, it's safe to say most people know hand washing is one the most effective ways to stop the spread of the coronavirus, but in case you need a reminder, and you happen to own a Tizen wearable like the Galaxy Watch Active 2, Samsung's late…
‘Minecraft’ looks like a whole new game with NVIDIA’s RTX ray tracing
When you think of Minecraft, you probably imagine blocky graphics and simplistic textures. But the recent beta launch of ray tracing support for NVIDIA's RTX graphics cards transforms it into an entirely new game. To put it simply, ray tracing enable…
Google is reportedly working on a smart debit card
Google’s push into banking could include a not-so-subtle parallel to the Apple Card. A TechCrunch leak suggests that Google is developing a smart debit card. While the payment format would clearly dictate changes compared to its Apple rival (you coul…